(Part 3) Best power rotary tools according to redditors
We found 326 Reddit comments discussing the best power rotary tools. We ranked the 77 resulting products by number of redditors who mentioned them. Here are the products ranked 41-60. You can also go back to the previous section.


Lots of others have mentioned great projects, so let me give you a general overview of what you should know, and then you can tackle just about anything.
For every project:
Electrical:
Plumbing:
General:
Tool List
Projects to avoid as a beginner
Projects I'd always recommend hiring out
Home improvement is very satisfying and not all that hard. Most people have a story of being lazy once or twice and having a near accident. I've been shocked by 120v (like in your wall)... twice. I've had saw blades break. Just be safe for that 5% of the time you're using something dangerous, and never get too lazy to grab the safety gear.
I really want to give Yoshi a hug.
My dude was really nervous about getting his nails clipped, hated every minute of it. He still doesn't like it but he doesn't freak out like he used to, here's what I did.
I hated the guillitine clippers, the potential for bleeding, I tried at first and immediately became convinced that filing was the way to go. So I bought high grit sandpaper, that didn't work either. Then I bought a little mini dremel like this one and it works perfectly. Just do it outside and I use a paper mask so I don't inhale nail dust.
Onto the squirming, it might help to have a friend at first but the trick with my guy was treats. Peanut butter may work well because it takes them a while to swallow so their attention will be had for longer, but I used to feed him cut up slim jim pieces during training so I used those. I take a pair of scissors and cut a long slim jim up in to tiny little pieces. Then give him a few to calm him down and take his mind off what he thinks (knows) is about to happen. Then turn on the dremel, let it run for a bit so he gets used to the noise, keep giving him treats and telling him he's doing great. Stay relaxed, if you are worried or tensed up he will be too, so you just have to remain as calm as you can. Remember dogs can be trained to sense seizures in humans, never underestimate how well your dog can sense whether you're tense or not. Then begin to file down his nails, the dremel files them down super fast but make sure to not hold it up against his nails for more than a few seconds at a time because it will create heat, not a lot but it's always nice to be on the safe side. The dremel is really gentle, I hit my skin with it on accident from time to time and it doesn't hurt.
Give him a treat anytime he starts to squirm, but more importantly try to give him a treat the minute he relaxes and is behaving the way you want. The ultimate goal is to help him understand grooming time is a time when he gets lots of delicious treats!
Hopefully that helps!
check pawn shops, or ask if any of your friends know someone who has one to borrow for a day.
They're not that expensive, and you don't need an official "Dremel" one either, just the cheapest one you can get since you might only ever use it once and that's as long as it really has to last. Think of the time you'll be spending doing other things to get it out. Your time is worth money.
​
Here's one from Canada: https://www.homedepot.ca/product/dremel-minimite-cordless-rotary-tool/1000100670
Here's one from Amazon US: https://www.amazon.com/Dremel-7000-N-6-Volt-Cordless-Two-Speed/dp/B003TU0XEQ/ref=sr_1_4?keywords=Dremel+Tool&qid=1556748354&s=gateway&sr=8-4
Here's a UK One: https://www.amazon.co.uk/Hi-Spec-Purpose-Engraver-Accessories-Compatible/dp/B013OYBMWI/ref=sr_1_3?keywords=Dremel+Tool&qid=1556748394&rnid=1642204031&s=diy&sr=1-3
don't know where you're from so I picked the most common places. Just look up Dremel Tool on your favorite online retailer, and sort price low to high. Pick up the first one that you see. It should come with the bare necessities to get the job done as far as attachments are concerned.
​
If you decide to do serious dremel work, do not use the paper cutters. Get one of the metal/composite whatever ones. They won't shatter in your face as readily and last a little longer. They're worth the money.
EDIT: If any of you would like to submit a design for a pick, please post a link! Draw it on a piece of paper, MS paint, or submit a picture! This is the 4th pick I've ever made, so hopefully I'll get better with time. If the design is particularly notable, I could mail you a copy of the pick for a small fee plus postage. I'll always post my work to this subreddit.
The design was submitted by /u/Nemo_Griff. Design link here.
He also has a massive archive (270 MB) of lock pick designs. Link here.
Materials:
Sorry for not uploading better quality photos or descriptions, but what you see is quite simple work. I used a few approximate measurements to determine where key features of the pick were and then did my best to outline an extremely crude (almost laudably crude) design with a sharpie.
Using a Dremel 200, a grinding bit, and a vise, I ground away at the sections marked with red sharpie. This gave me the rough design. Bust out the sanding sponges to take off any burrs before fine shaping.
Back to the dremel to cut the shaft of the pick into a thinner profile. This took the most time because I was trying to copy the design exactly. Unfortunately, I can't put powdered metal back onto the pick, so I decided to improvise a little bit after a few screw ups. Fine shaping took some time -around 20 minutes.
After the shape was more or less what I wanted, layered the three sheets of sandpaper like a Taco Bell gordita and shoved the pick into the middle. This went into the vise, and I tightened it so that the paper wouldn't slip as I moved the pick in and out of the sandpaper taco. I went from low-grit to high-grit.
To clean up the edges of the pick -arguably the most important part, I put 80 grit sandpaper around the corner on a wooden table and proceeded to sand the pick's edges.
I have yet to test the design, but so far, the pick feels very sturdy!
I've said it before... Why does everyone think USB is the only place power comes from these days?
My laptop is usually not on my soldering bench, for obvious reasons. A wall supply with swappable battery packs like power tools use would have been a much better idea. Especially if it used batteries compatible with existing products, like maybe portable dremel batteries.
Wall of text to follow :)
Thank you. I almost exclusively taught myself just by trying to make different things. I started first by making wooden stamps and slowly realized that I didn’t like how they were turning out so I just got my hands on lots of different wood and bits for my dremel and played around with what each bit could and couldn’t do to different types of wood. Initially this is what I tried finding tutorials for, and there is a surprising lack of videos that can provide straight answers to what bit is best for crafting various things. Almost all the videos focus on the home improvement side of the tool, or on how to make something specific, but not so much how to use the tool itself.
If you are looking to jump into it I would highly suggest the dremel stylo. It’s cheap for how versatile it is and with all the options for bits what you can do with it is almost limitless (unless you are hoping to make large sculptures then ignore everything I have just said).
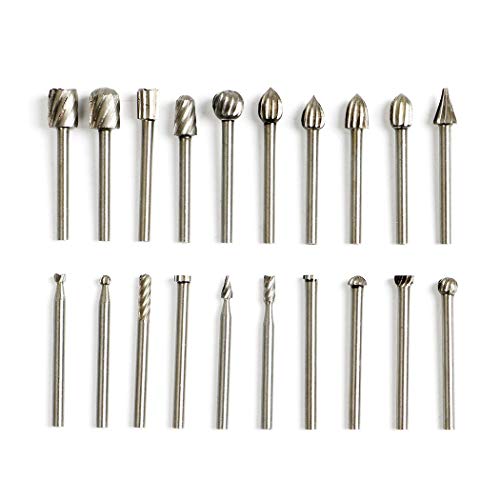
For carving things like this I use a combination of cutting bits available in nearly any large hardware store, and specialty diamond tip bits (don’t worry they are cheaper than they sound) for fine detail and smoothing. Both types are very easy to get on Amazon.
Most major craft stores stock a lot of the wood I use and a quick google can tell you if you have any specialty wood supply stores near you.
I’m not sure how your eyesight is but I found I absolutely cannot make these without the aid of a desktop magnifying glass/lamp combo. That is probably the most expensive thing, but in my case I NEED it.
All in all I say play around and see what you have the most fun creating. Just make absolutely sure you are very careful when you are starting to get a feel for the tools you choose to use. Thankfully this is pretty low risk compared to other types of woodworking, but it’s still wood working, and you are using a power tool so be carful.
I also found these links that might help for purchasing the bits I use. Dremel’s selection is massive and it can be very intimidating trying to figure out what the hell most of the bits are for.
Here is a good starter set of bits used mostly for material removal I use the ball shaped ones the most by far.
And here is a link to a good starter set of diamond tip ones for fine detail
You can figure out which of these you like and then buy those specific bits from dremel.
Also please feel free to send me a message if there is something you think I can help with. The learning curve can be pretty steep, but it’s probably the most enjoyable hobby I have ever found for myself.
I'd just stipple it. I can tell you what to buy and how to do it including the borders. You'll need the following:
https://www.amazon.com/Dremel-107-Engraving-Cutter-Shank/dp/B00008Z9ZV/ or https://www.amazon.com/Dremel-106-Engraving-Cutter-8-Inch/dp/B00008Z9ZU
https://www.amazon.com/Dremel-120-volt-Variable-Attachment-Accessories/dp/B075174NCV/ (you may have your own dremel, but definitely get a flex shaft for it)
https://www.amazon.com/HTS-401B3-Multi-Grit-Diamond-Medium/dp/B00U0E0KRE
https://www.amazon.com/AUSTOR-Grinding-Polishing-Accessories-Attachment/dp/B078Y5XGM8 (careful with these, light touch and keep it moving)
https://www.amazon.com/Flitz-Multi-Purpose-Fiberglass-Aluminum-Sterling/dp/B000MUSOW4
First use your engraving cutter to cut the borders that you've drawn on with a water-removable Stabilo marking pencil. Try to cut as smoothly as possible, with a steady hand. Don't try to cut it all at once, be patient (be patient for all of this, it took me a whole week doing a little at a time to complete the whole process, and turning my dremel off periodically because I have an older model flex shaft that gets hot after some use - solved this by wrapping the grip with bicycle inner tube)
The smoother you cut it the easier the rest will be. Some people just use the engraving cutter for borders, but I followed someone's guide and then used the diamond burs to smooth it out and polish it. Go from the lowest grit to the highest. You can either use the ball bits that are the same size as your cutter, or use the rounded cylinder bits. You can angle the cylinder bits in certain ways to get around curved surfaces, you'll kind of have to experiment with that. Once you get to the highest grit, I found that the only way to get it near-glass smooth was to apply a lot of pressure. It doesn't remove much material and you kind of want it to heat up the plastic to get it smooth. Then, still not satisfied with this, I got those felt wheels and cut the very tip off the smallest one, and used a bit of flitz paste, and then went over all the borders. That got it close enough for me. You can get more advice from the Weapons Stippling group on Facebook.
After you do the borders, I use the round tip on the walnut hollow wood burner on a medium heat setting. You don't want it too hot, not with the P80 plastic anyway. My technique was to press in, not too much but just enough, and drag downwards. A random totally pattern is best, I did a somewhat orderly snake pattern and then went over it again and smeared it out to give it a more organic texture. Then I went over it one more time, lightly and fastly rubbing all along the surface to blend the ridges that were created into the rest of the texture. You can do this several times to get it just right. The result is a texture that is grippy, yet not rough. That's how I like it, but you can experiment. The key is not to heat it up too much and don't stick any of the tips in too deep, and don't try to do it perfectly ordered unless you've gotten good at that with practice and are using an appropriate tip. You can make your own tips out of #8-32 brass screws or buy blanks from OT Defense, or some other place.
Sure. Here’s a basic one: https://www.amazon.com/Neiko-10649A-Air-powered-Grinder-Capacity/dp/B000K801NI
If you wanted to go flex shaft you could go with something like this: https://www.amazon.com/Electric-Flexible-Grinder-Rotary-Variable/dp/B06XJSK1K4
Like this ? link
Metabo tapping drill!
I would use a Dremel tool very carefully with a saw blade.
Here is a cheap knock off:
https://www.amazon.com/Rotary-Tool-Power-accessories-8000-30000rpm/dp/B07CYMDJS6/ref=sr_1_2_sspa?keywords=dremel+tool&qid=1571718008&sr=8-2-spons&psc=1&spLa=ZW5jcnlwdGVkUXVhbGlmaWVyPUFDOFZVTkxFMlRQQUkmZW5jcnlwdGVkSWQ9QTA3NTQ4NzkxOVhYR0MxWDZESEJLJmVuY3J5cHRlZEFkSWQ9QTA2NTA2NzAxMFdQUERBRUNFR0hRJndpZGdldE5hbWU9c3BfYXRmJmFjdGlvbj1jbGlja1JlZGlyZWN0JmRvTm90TG9nQ2xpY2s9dHJ1ZQ==
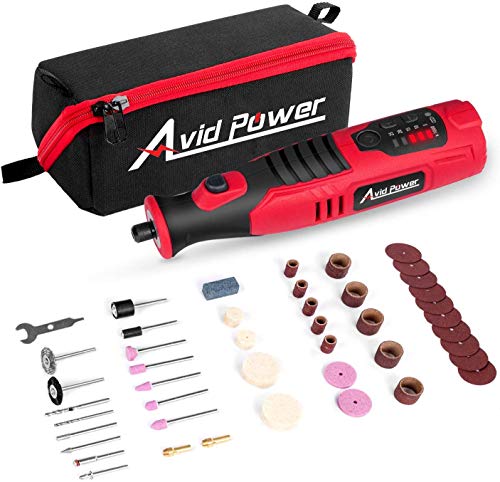
I love my Hypertough cordless dremel from Walmart! It has alot of different speed settings depending on what you need. 1st speed is very quiet but not too powerful so it's nice to get dogs used to the Dremel, the second speed is what I usually use. Amazon doesn't sell it but they do sell one that looks identical so it's probly the same rebranded (I can't guarantee that though). It's nice because if you get it from Walmart and there's an issue you can take it back. Plus it's only 28 dollars at both places, Here's the Amazon link though. This is the Dremel I use for all dogs when I groom because it's so adjustable.
https://www.amazon.com/dp/B07CQJG5H8/ref=cm_sw_r_cp_apa_i_zf4QCbF4W2Q0D
Let me tell you what else that I have learned. You can choose a #6 tap for the chambers but I wanted to go with the metric sizes because the threads were tighter and more of them. In metric I picked up a m4 but the hole it made was HUGE and the m3 was too small, so I had to find a 1/2 size and the m3.5 was just right! It threads the chambers quite easily and the thread count matched the m4 so I was able to use the m4 caps that I have. I just had to run the m4 tap part of the way down for the caps to fit, but leave enough of the 3.5 threads so that the cap wasn't loose.
Here are the taps with a T handle, this is the m3.5 tap, here are the grub screws and these are the burs that I picked up. Only two of the burs that are under 3mm fit inside of the core chambers. I am still trying to figure out how I can under cut the bible.
For recording yourself, you can use this gooseneck camera mount. It should be enough to hold up your phone and let you place it somewhere comfortable. I got a tripod and sorely regret it. The only way I can record is with the tripod between my arms and my face up to the camera. The first video I shot, I sounded like a stalker breathing down your neck, lol. I actually held my breath for the second one.
Like those:
https://www.amazon.ca/Longruner-Tungsten-Carbide-Grinder-LC01/dp/B01N0UIG4I/ref=sr_1_5?ie=UTF8&qid=1501877810&sr=8-5&keywords=grinder+bit+for+drill
Here is the tool I was thinking about, I don't know if you need course or something less aggressive since I have never ground concrete.
Haha, when it comes to building my own computers, I have raging OCD; so when it came to modding it and putting a dremel to the nice brushed aluminum case, it was extremely nerve racking. I used a pretty cheap single speed Dremel from Walmart with these metal cutting wheels.
The acrylic sheet that I used was precut and sold off the shelf at Home Depot, it's 8"x10" clear acrylic (.9mm thick)
If your budget allows, I'd go for the Foredom kit. You will need to buy some more aggressive bits, but they can be bought anywhere Dremel bits are sold.
Otherwise I'd go with the 3000 and a flex shaft. It will do plenty of carving on Basswood with smaller carvings.
I use both the Foredom and the Dremel (the Dremel for smaller carvings. I've burned out one Dremel, but my Foredom has been working for several years without a glitch.
I can order it on amazon, but it seems it's an import model, so no warranty.
My guess is that because bosch owns dremel, they don't want to compete with themselves.
I still might order one though, or I might get the dremel 8200, which is pretty much the same thing.
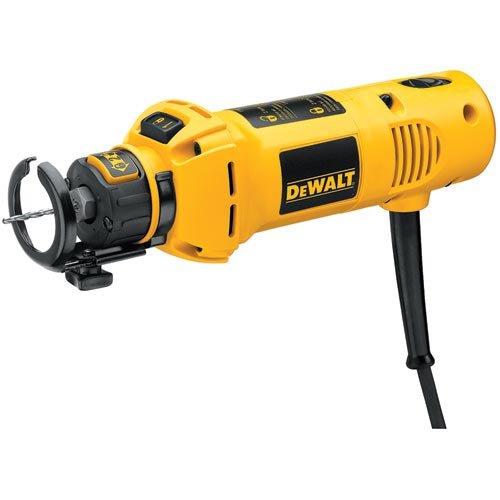
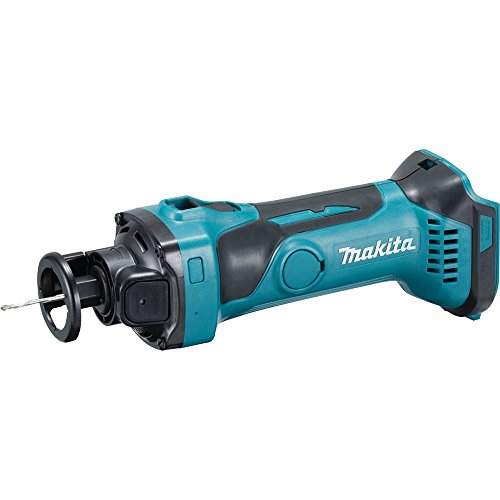
I think its the drywall cutout
What multitool are you referring to? When I hear "multitool" I'm typically thinking of like, a leatherman, haha. Do you mean something like this? That's what I use, personally.
This works great:
https://www.amazon.com/DEWALT-DW660-Cut-Out-Rotary-Collets/dp/B000051WQX?ref_=fsclp_pl_dp_2
You can run it along a straight edge ... anything. I have a 3' angle thing and a 6' level, booth work fine.
That's actually what I use. I thought highspeed rotary tool sounded better.
I use this model. 10 speeds, 35000 rpm. Usually set it on about 6-8 with a sanding attachment. Works great. Only real trick is to not stay on any spot for long, as it heats up fast.