(Part 2) Best automotive clips according to redditors
We found 132 Reddit comments discussing the best automotive clips. We ranked the 90 resulting products by number of redditors who mentioned them. Here are the products ranked 21-40. You can also go back to the previous section.


Unless you get the plastic pins that refuse to come out (not the kind with the center pin that pops out from the rest) where the heads fold in half when you try to pry on them.
Ninja edit: these fuckers
Get a full kit and you’ll have all the parts forever.
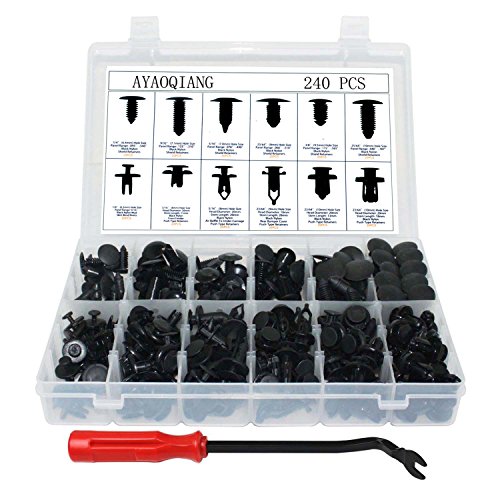
EZYKOO 435 Pcs Car Retainer Clips & Plastic Fasteners Kit - 19 Most Popular Sizes Auto Push Pin Rivets Set -Door Trim Panel Clips for GM Ford Toyota Honda Chrysler https://www.amazon.com/dp/B072KXQXL7
Looks like a Nylon Nut Clip
Edit: OEM parts website also has them sold separately but they're kinda pricey that way. It's either #13 or #17
I use these
10pcs Floor Mat Carpet Lock Clips... https://www.amazon.com/dp/B074P2L74V?ref=ppx_pop_mob_ap_share
This is what I got.
MATCC 350pcs Car Auto Push Pin Rivet Fit for many Brand Vehicles Panel Body Interior Assortment Set https://www.amazon.com/dp/B01LZ7TTW7?ref=yo_pop_ma_swf
If you don't have the tool, put a flat head screw driver under the brim of the circle between it and the ring. There's notches along the ring where it's easier to slip a flathead under. Pry the circle away from the ring (it's like a fat pin), when it pops out the whole unit can be pulled out of the hole.
To reinstall, while ensuring both parts of the panel/splash guard are aligned and together, push the clip in and secure by reinserting the 'pin'.
This is what it looks like: https://www.amazon.com/EZYKOO-Universal-Fastener-Retainer-Replacement/dp/B07HD1BZ3X/ref=mp_s_a_1_4?keywords=car+body+clip+honda&qid=1555095296&s=gateway&sr=8-4
I appreciate all the responses y'all. I realized I can just buy these https://www.amazon.com/dp/B07H89Q71Q/ref=cm_sw_r_cp_apa_i_PesYDbB01ZZ9S from one of the comments here and then just easily screw into those. Thanks y'all.
See my above reply to another comment for the headlight.
As for sanding and painting,
First thing was removing the body. That took forever. I had to figure out how to get every panel off and the tail was difficult. The most important thing is keeping track of where every screw, bolt and nut went. Write all of that down and take pictures as you go. Putting back together will be almost impossible without keeping track of where to screw things into. Taking it apart will make sense as you go.
Buy a bag of rivets tho so you don’t care when you break them like I did.
GZYF 100Pcs 8mm Push Type Nylon... https://www.amazon.com/dp/B07DYN4L1G?ref=ppx_pop_mob_ap_share
I did not remove the gas tank. I unscrewed the top 2 bolts near the dash so I could lift it up and put a large towel underneath it. I covered every part of the bike around the gas tank so I didn’t get paint on anything I didn’t want to. I used towels I didn’t care about so I could just throw them away when I was done.
Do not do this outside by the way. Dirt and bugs will get in your way when you end up painting. Also direct sunlight will be bad for the paint when it is drying.
So I bought a cheap plastic shower curtain to lay down in my back room of the house so I could put all of the pieces I took off the bike on a safe surface that could be thrown away when done and had room to walk around all the pieces. Use a room that can be ventilated or has windows at least.
Sanding is the first part. I don’t remember the exact grades I had but I had a course, a fine and a super fine grade.
Course is to get the paint off and help any deep scratches. I did 2 runs of course for every piece and the gas tank. Wipe down all the pieces with a microfiber cloth after every run through of sanding. I had a sander to help and hand sanded for hard to get angles.
Then I did 1 run on every piece with fine grade after words to smooth things out.
Buy a can or 2 of scratch filler. I don’t have a link since I bought it local but you should be able to find some at any auto store.
I did 2 runs of scratch filler for any bad scratches still left over for every piece and gas tank whiledoing 1 run of fine and then super fine after each run of scratch filler.
If you need to do more runs that’s fine. You just need to end up filling the scratches and having a smooth surface with most of the paint off. I have read that you don’t need to get all the way down to the metal which I didn’t.
Painting is the hard part because spray paint fucks up easy. I didn’t have a nice spray gun so I just made super to not start my sprays directly on my pieces. I either started below or above them and just did small strokes of sprays across until I had covered the whole piece or gas tank. Sand between each paint run with super fine to help prevent imperfections. You can do as many runs as you want But I used 2 cans of semi gloss black all together. There are YouTube’s videos on good spray painting techniques. I waited 3 hours after painting to sand but I don’t know if that is the recommended wait time.
After the painting is clearcoat. Get a good clearcoat that prevents sun damage and paint damage and rust if possible. I bought this local as well so no links. I did maybe 2 runs of clearcoat to finish and waited 2 hours between each clearcoat run.
Then it just needed to be put back together.
Let me know if all of that makes sense. I can try to go into more detail if need be.
Which part of the lower cowls specifically? The upper mounting points, or where they come together underneath the bike? My bike's not at my house right now so I can't post a picture of it, but the right side lower cowl (front brake lever side) has 3 allen screws, a plastic push-pin clip, and a giant phillips screw on the more visible section, then underneath it's either one or two of the push-pin clips, but I believe those are the type that take a screwdriver and a quarter turn to release them (so they don't come loose from road debris). The left side lower cowl is a similar setup, but without the big phillips screw. The reason for the big screw is because it has a big slot, it can be removed easily with a coin or something flat like that, and then you pull out the plastic clip, and you can get to the tool kit that's behind that fairing.
If you're missing more than one or two clips, I'd recommend getting something like this to replace them. Generally I replace stuff with OEM parts, but for plastics clips, as long as you get something the same size it'll be fine.
We just use a "heavy duty" zip tie pulled as tight as possible, sometimes looping the keyboard and mouse cable in through it to keep them from walking off in our problem labs.
Not sure how well it will work, but maybe some kind of retainer clip would do the trick? Would need to find the right size to put in there, but the size has looked the same since at least the GX100.
Google how to remove them on your specific vehicle. Follow a forum post or a YouTube video. Use non-marring panel tools for any prying that needs to be done. You can get them at auto parts stores, harbor freight, or Menards if you're in the US.
You can also buy replacement panel clips if you break any at your local auto parts store or from your dealerships parts counter.
I bought a box for my car and they come in handy so much.
https://www.amazon.com/gp/aw/d/B06XH2CQXF?psc=1&ref=ppx_pop_mob_b_asin_title
I got this kit, tool work pretty good and now I have enough to open a body shop.
You may have to remove/break additional retainers to fix it right.
I hate dealing with retainers!!!!!
https://www.amazon.com/Retainer-Plastic-Fasteners-Popular-Chrysler/dp/B0746Z8R52/ref=sr_1_4?rps=1&ie=UTF8&qid=1550724043&sr=8-4&keywords=bumper+retainers&refinements=p_85%3A2470955011
Push Rivet. Toyota ones are like $1.00 at the dealership. Any will work tho.
https://www.amazon.com/dp/B0797RHCN7/ref=cm_sw_r_cp_api_i_twGvDbRF2P1KT
Yep. Mine was sagging and with all the rain we were getting, my mechanic strongly suggested getting the clips needed for it. I ordered them off of Amazon. Not sure what year yours is or if these would still be the same ones that they're using -
https://www.amazon.com/dp/B07B73T6T9?ref=ppx_pop_mob_ap_share
These are used throughout the car's body too, so it's handy to have these around if needed.
Edit - just saw that these are supposed to be compatible for the 3 up until 2017
I went with the bigger one, generic one, I had no clue there was a Subaru specific one.
https://smile.amazon.com/gp/product/B06XVC5H3K/ref=ppx_yo_dt_b_asin_title_o08_s00?ie=UTF8&psc=1
Maybe these will work?
Auto parts store or Amazon, look up Nissan Murano Trim clip. May not come in orange as aftermarket part.
Rexka 30pcs Door Trim Panel Retainer Clip for Nissan Infiniti 01553-30001 Altima Armada Cube GT-R Maxima Murano Quest Rogue EX35 G25 G35 G37 Q40 Q50 Q60 QX30 QX80 https://www.amazon.com/dp/B07FW284RZ/ref=cm_sw_r_cp_taa_aocWDbCRW05J6
Amazon
I bought some of these since I kept breaking the ones that came with the car. Only the small size fits the crosstrek (as far as I've found) but the POM plastic is a lot stronger than the OEM Nylon - one of the spots on my bumper used to break an oem clip every month, so I quickly turned to these and I haven't replaced it since - it's been 8 months.