(Part 2) Best combination wrenches according to redditors
We found 132 Reddit comments discussing the best combination wrenches. We ranked the 88 resulting products by number of redditors who mentioned them. Here are the products ranked 21-40. You can also go back to the previous section.


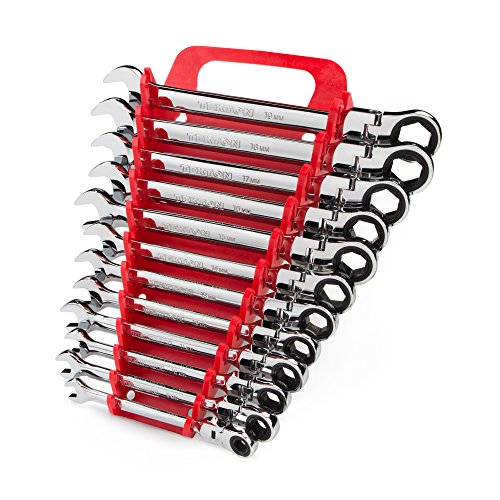


![TEKTON 2111 Flex Combination Ratcheting Wrench Set, Metric, 10-Piece [Older Model]](https://m.media-amazon.com/images/I/41bgkxO1+7L.jpg)


Oddly enough its the paint. The plug (and gasket) are installed before the pan is painted, meaning the tip sticking through the pan gets painted and won't back out.
Add a dumb lube tech using the wrong tool and voila.
Also this would absolutely never leave my dealership like this.
[edit] here's a pic to illustrate the point. the black stuff on the end of the threads is paint. (this is an older plug but the same idea exists.)
also, another thought - the hole in the undershield doesn't leave much space for getting onto the head of the bolt, and holds it at a bad angle if you're using a straight wrench. Our lube techs are all set up with one of these wrenches, that has a kink to the ends, and that helps. other techs use a flex head ratcheting wrench.
My Honda has the same covers. I bought this 17mm wrench and it works great. . Since it sits flat on all 6 sides of the head, it's way less likely to keep rounding it out.
I don't understand why ratchet wrenches (gearwrenches) are 12 point. My ratchet wrenches are Mac Edges and are 6 point. Love them.
The Mac Edges are not made anymore but I did find a set.
TEKTON WRN57170 Flex-Head Ratcheting Combination Wrench Set with Store and Go Keeper, Metric, 8 mm - 19 mm, 12-Piece https://www.amazon.com/dp/B01F5127RM/ref=cm_sw_r_cp_apa_i_M-4LDbVNZH52Y
I have a Tekton ratchet and it's pretty high quality. I would consider these if I was in the market for a set.
This, a six-point ring spanner is the tool for this. You don't need a ratcheting one, although the Britool 6-point (also called single-hex) i bought was kinda pricey (£25) but after rounding off a difficult to get to sump plug I figured that was the way forward.
I would also try squirting some Plusgas or other specialist bolt loosning penetrant around the thread before trying again. WD40 is NOT good enough for this. I've had a few occaisons when I've been called over to help a friend with stuck bolts on a car, sprayed plusgas as I walked past the car, made pleasantaries and demanded a cup of coffee for my services and then gone back outside and shifted the bolt with my daintiest ratchet.
Locking pliers may make even more of a mess.
When you do it back up, put engine oil on the threads and observe correct torque settings, it'sprobably stuck becasue last person to undo it did it up as tight as they could.
Is this your first bike?
You should really check out the beginner advice thread and the $200-600 thread in addition to this one. There's a lot of helpful advice in there including SIZING. KNOWING YOUR SIZE IS SUPER IMPORTANT SO KNOW THAT FIRST.
Also, if you're in this price bracket and you don't already have the essential bike accessories:
Note there are other options for all of these that could allow you to save money/space/whatever, but you won't go wrong with what I linked. I'd really suggest having these even if it means you go down a price bracket on the actual bike, they'll all come in handy.
New Bikes
Used Bikes
Another great thing about this price bracket is the used market. I daresay it is easy to find outstanding value bikes used in this price range if you know what you're doing. I helped a friend source this for $1100 and we were being choosey! Again, if you need help post in the questions thread or just PM me because I like helping people with this stuff.
Just get plain old combination wrenches, you don't need sockets for those.
Here are some suggestions of good brands but substitute with lesser brand as you see fitted:
power tool, cordless is preferred. Some brands to consider, makita, Dewalt, Milwaukee, Bosch:
[Combination Socket Wrench] (https://www.amazon.com/Flexible-Socket-Spanner-Combination-Wrench/dp/B00FC4X4CK)
You can get a Gearwrench 81920 (set of 18 wrenches from 7mm-24mm) for about $90, but they don't make a set of just the large sizes. Maybe you could sell the duplicate smaller sizes for $30?
You can also buy the 20-24mm Tekton wreches individually for just under $60 total.
Water set up:
The rest of my stuff (Wallet/tools/tubes/phone/kindle/lock/food/etc.) is either in this Timbuk2 Catapult on short rides (<30km) or in my jersey pockets on longer rides(>30km).
I've considered getting a duel bottle mount so I can keep one of those tool bottles with a tube, multi-tool, wrench, and levers.
https://www.amazon.com/TEKTON-21-Combination-Wrench-18292/dp/B00Q01OK9A
Comments say it’s 17/64ths thick.
You could get a ratcheting wrench that fits those. That would give you even more room - it's what I use in tight spaces.
Even better is a flex-head ratcheting wrench.
Something like this. Just make sure it's the right size.
Buongiorno,
devo prendere delle chiavi di qualità perchè mi son stufato di dover far manutenzione ai mezzi* con gli attrezzi di fortuna che ho.
Voglio spendere il giusto purchè sia roba di qualità.
Ero intenzionato a prendere questi due:
set
e
chiavi
Avete consigli da darmi o alternative? Grazie.
*decesplugiatori,tagliaerba,moto.
Combo Pack on amazon
How in the world did you get the filter to look like that? I've had filter stuck on due to no oil changes for 10k. A screw driver would work every time. Did you do it correctly? The screw driver is supposed to go in one side and come out the other, then apply steady light torque until it broke loose. You should have stopped if it wasnt working. You have entire pieces of the filter cover missing.
You should invest in a strap wrench for next time. http://www.amazon.com/Husky-8-in-Strap-Wrench/dp/B0090SR902
As for the gasket, check out the parts catalog. http://www.courtesyparts.com/240sx-parts-s13-1989-1994/genuine-nissan-parts/engine-mechanical/150-lubricating-system/-c-1418_1419_1420_1435.html
Item #15239
Buy
($6)Wires:For the MOFSET mod
($1o)MOFSET
($6)Wire spades:For the MOFSET mod
($8)Assorted M3 Bolts:You need some for a few mods and for the bolts you will inevitably strip on this
cheapwonderful machine($13)Longer assorted M3 Bolts:For a few mods
($9)M4 Bolts:For one of the mods
($9)Metric allen wrench set:Had to order one of these since metric tools aren’t common round these parts
(~$20) PLA of preferred choice- You’ll run out of the sample bit quick so go ahead and order a roll or two to be prepared. You will note some upgrades require ABS so a small spool of that to your order will also help.
($6)M3 Lock nuts:Critically needed for a simple mod
($10)Threaded rod and nuts:Please note that this item seemed difficult to find online. I recommend going to your local hardware store and getting two 5/16” rods of at least 16” in length. They should have an assortment of threaded rod in various lengths available. Also note that the pitch of the threading matches the nuts you buy. Further instructions regarding this can be seen in Azza’s Z-Axis braces below.)
($6)9mm Wrench for the nozzle: Don’t wait for your first clog, go ahead and have this on hand to remove/change the nozzle. Note to only tighten/loosen the nozzle when heated.
Below is the order of printable upgrades I recommend but I suggest you mix in a few other prints along the way because this is a hobby after all and you should be having fun. It helps to have your quality as tuned in as much as possible for some of these so be patient and keep trying if you need to.
Print
Spool holder- temporary : Until you can mount your spool on top of the enclosure or any other personal preference.
Belt tensioner- print x2
Z-brace
Shielded stop button
Cable relocator : It’s a pain, but if you spend the time to do this and turn your extruder motor 90 degrees then you can get the full Z height without ruining your cables. It does involve opening all the cables to the PSU and feeding a few extra inches back through the cable chains.
Cable shroud : Looks nice if you do the cable relocator.
The following need to be printed in ABS:
M3 Bed Nut retainer: 10/10 upgrade. I know they look worse than the nice metal stock ones, but these help keep your bed level longer.
CiiCooler
Glass bed Holder
Now that the first major round of printed upgrades is done it’s time to shift to a few more supplies to pick up to really fine tune the machine.
Buy
($5)Radial fan: For CiiCooler
($5)Glue sticksThis and a glass bed is magic
($25)Borosilicate glass 8” x 8”
($26)Y-Carriage plate upgrade: This has been a nice upgrade as I now only need to relevel the bed every couple weeks instead of every print. Check out this guide for a ‘how to’ as well as a free upgrade by shifting your Y pulley over.
($15)rechargeable dehumidifier: For keeping in the bin with your opened filaments
($9)Extruder gears: Might be able to hold off on these, but will need eventually. If for some reason you have a Maker Select with metal X-axis blocks (V1 and V2, but not V2.1) then this is a must. You can follow this guide for a how to.
($28)Metal extruder plate and lever: Not needed, but nice.
($14)Noctua 40mm fan: Not needed, but makes the printer a lot quitter. A LOT quieter.
($50)MicroSwiss All Metal Hot End: The destruction of my PTFE tube by this point pushed me to doing this upgrade. If needed you can follow this guide for replacement. Remember to tighten/loosen when the nozzle its hot.
($6)Ceramic cotton: Tore off the stock one when replacing for the all metal hot end by accident. At least its thicker than stock
Now that the printer is in its final form, its time for the enclosure which is a stacked Ikea Lack hack.
Print
Spool holder
Pi Case
120mm fan cover
Fan grill
120mm fan PSU modification: I edited this to fit upside down since my PSU is mounted on the underside. This was nice since I blew the 40mm fan anyways so it made everything a lot quieter than before.
IKEA Lack filament guide
Webcam holder: This is one I designed specifically for the webcam I happen to have lying around. The camera mount piece can be changed out no problem though for what ever webcam you have or buy. The SketchUp file is included on Thingiverse for such purpose.
Buy
($20)2x Ikea Lack: Luckily there is one right down the street from me. I am located in North America though, so we do not have the STUVA, if you live literally anywhere else you may check in to this as an alternative.
($80)Plexi glass for enclosure: Could be cheaper alternatives, but it looks cool
($9)Foam pads for feet
($42)Raspberry Pi3: For OctoPrint. I also suggest using a different USB cable than the stock one provided by Monoprice or you will have issues.
($9)2x 120mm fans: Used for the power supply cooling and enclosure
($6)Rocker Switches so that the enclosure fan can be on for PLA, but off for ABS
($15)Dimmable LED lights
($10)8mm LED light connectors
Total:
$250 printer + $452 upgrades/parts + ~$80 PLA/ABS to date
https://smile.amazon.com/TEKTON-WRN53118-Ratcheting-Combination-Wrench/dp/B01F511QKQ/ref=sr_1_5?ie=UTF8&amp;qid=1511033007&amp;sr=8-5&amp;keywords=tekton+ratcheting+combination+wrench
You can see the convex sides on the box end in their diagrams.
And in a 12 point combination wrench:
https://smile.amazon.com/TEKTON-16-Inch-Combination-Wrench-WCB23033/dp/B06XTY1KCR/ref=sr_1_1_sspa?ie=UTF8&amp;qid=1511033199&amp;sr=8-1-spons&amp;keywords=tekton+ratchet+combination+wrench&amp;psc=1
Also the harbor freight pittsburg and pittsburg pro ratcheting combination wrenches, but they don't have a diagram.
https://www.harborfreight.com/7-piece-sae-ratcheting-combo-wrench-set-96654.html
Craftsman example (No diagram)
https://www.craftsman.com/products/craftsman-professional-1-1-2-full-polish-long-pattern-wrench-12-pt-combination?taxon_id=1893
Not to hard, more time consuming than anything. This video helped me in what to feel for when tightening my ape cam chain tensioner https://www.youtube.com/watch?v=zB00JI5ZWFM
Course, I didn't start the motorcycle until I bolted the carbs back on as well as the air cleaner. I mainly used the 'feeling' by turning the motor by hand while tightening the bolt on the manual cam chain tensioner to achieve a good tension and then backed it off the necessary amount depending on the type of threading the manual cam chain tensioner has.
I have the same 'older' version so the threading might be different if you purchase one new now. One thing is to see if you have the proper tools. The SV650 Vtwin engine has 2 CCTs. The front one is pretty easy to get to but the rear one was a serious pain to get to. For me to tighten the nut on the manual cam chain tensioner, I had to purchase a folding racheting wrench. This allowed me to get into the tight space required to tighten the nut on the manual cam chain tensioner. If you were curious, I purchased this wrench set off of amazon:
https://www.amazon.com/gp/product/B00FFUPTWY/ref=oh_aui_search_detailpage?ie=UTF8&amp;psc=1
I found a set which is exactly what i want except its made in china.
https://www.amazon.com/Craftsman-5-piece-Polish-Combination-Wrench/dp/B01FTJJZDE/ref=sr_1_6?ie=UTF8&amp;qid=1523902500&amp;sr=8-6&amp;keywords=wrench+set+20-24mm
I'm not familiar with this bike at all, so this may be a stupid question, but can you install the rockers after you torque the head down?
How about something like a pivot head combo wrench like this and use your calibrated wrist for torque.