Best joinery router bits according to redditors
We found 26 Reddit comments discussing the best joinery router bits. We ranked the 9 resulting products by number of redditors who mentioned them. Here are the top 20.
We found 26 Reddit comments discussing the best joinery router bits. We ranked the 9 resulting products by number of redditors who mentioned them. Here are the top 20.


It really isn't. Just buy one of these things to open up the cart, pop the contacts off the old battery with a tiny screwdriver or something, slip on a new (obviously same-sized) one, then tape the contacts back on. I've done this for four different cartridges (Mario Land 2 and 3, and Pokemon Silver and Crystal) and I've never had a single problem. (As well, while you have the cartridges open you can (and probably should) also clean off the contact pins)
I LOVE the Bosch 1617 kit. Lowes occassionally has it on sale for $189. There are a few others in that price range that are also worth it I believe.
Some Router tips:
1- NEVER buy a cheap one. An underpowered router, or one that isn't made true will ruin your project. As tempting as a $30 HF router is, all it will do is trash your work.
2- Get one where the fixed base has an adjustment from below the router. This will more easily allow you to make it into a router table down the line.
3- Get something that does a 1/2" shank. 1/4" shank bits ARE available for a lot of things, but you'll break them (and thus whatever they shoot off into, such as projects, tools, body parts) way more often.
4- Get A LOT of clamps. Don't rout anything where you're taking off a lot of material (such as a dado/rabbet) without it being VERY well clamped down. Err on the side of caution, routers can kick back light things really easily
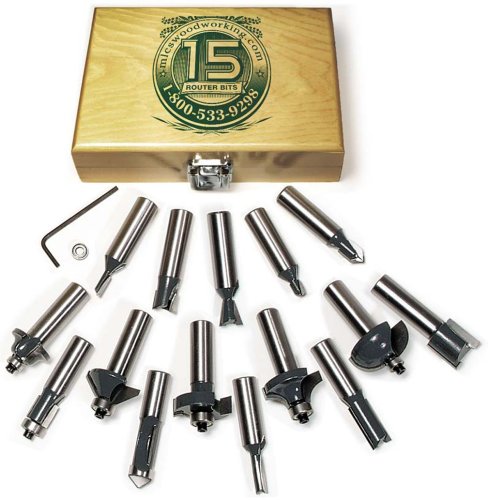
5- This set of bits here: https://www.amazon.com/MLCS-8377-15-Piece-Router-Carbide-Tipped/dp/B000FJRN8S is a good starting place. When you find yourself using one of those bits A LOT, invest in a Freud/Rockler/etc bit.
definitely not that. Bosch bits arent even that good, and that price is astronomical. I think that seller is offering it well over retail if I had to guess.
Get 1/2" shanks whenever possible.
I started with this set
http://www.amazon.com/MLCS-8377-15-Piece-Router-Carbide-Tipped/dp/B000FJRN8S/ref=sr_1_3?s=power-hand-tools&ie=UTF8&qid=1465239946&sr=1-3&keywords=router+bit+set
Its decent, it covers most of the bases without being wasteful with stuff you'll never use.
I have added to my collection with frued bits when I find that I use it alot, roundover, flush trim, straight bits mostly. And then some others that werent in the set.
What kind of router did you get? And what is the collett size?
I bought this set from amazon and love it. It's got the basics you will need for starting out. And, as /u/snuffvieh said, get specialty bits as you need them. But get the quality ones, then.
As for a router table, I had a cabinet I made and put a router table top, Number 6 plan on this list on top of it. I took the drawer out of the top of the cabinet and put in a tip out. Not the best of plans, because shavings get caught in there really fast.
Deep clean your games.
To do this I would recommend a deep clean. These games have 25+ years of dust build up and corrosion from people blowing in them. And simply dusting it out might not be enough.
To deep clean the games you will need to open them up this can be accomplished with a 3.8 security bit screwdriver. You can get those here from amazon for a few bucks. After it’s opened gently remove the chip and wipe out the inside of the cart with some isopropyl alcohol to remove any dust inside and set it aside. Then move to the game contacts these are the gold slips at the bottom of the game. Dip a q-tip in the isopropyl alcohol and firmly scrub the contacts until the q-tip stops getting a dark color. Use as many q-tips as you need.
After that there should still be some alcohol on the contacts. Use a pencil eraser on the contacts and firmly rub off any hunk that might have built up. I found the pink rectangular ones work best.
Next take a magic eraser and buff out the last of anything remaining on the contacts. Do this to both sides and then take a paper towel and some alcohol and gently rub off any dust or eraser markings left behind. Let everything dry for a minute or so and the put the game back together.
If doing that doesn’t solve the issue it’s a problem with the 72 pin connector. Turn the NES upside down and use a Phillips head screw driver to remove the 6 screws on the bottom so you can lift the top off. After that remove the silver heat shield there are 2 screws on the left 2 at the back and 3 or 4 on the right side. Once that’s off blast the insides with compressed air to get all the dust out that has built up. After a good dusting remove the tray and 72 pin connector there are 3 screws on either side with the middle screw being longer then all the other screws. Side the tray foreword and up to remove them pull the 72 pin connector off the back.
You can bend the pins back up or boil it to clean it if you don’t want to buy a new one or really care about having all Nintendo parts ( if so let me know and I’ll explain how to do that as well), but I personally usually just replace it at this point. If you don’t really plan on using your NES very often you can get a basic 72 pin connector on amazon for $10.00. If you play it often you might look into upgrading to a Blinking Light Win it’s more expensive but it’s designed so you don’t push down on the game and loosen the pins so it should last much longer and it will circumvent the region lock chip. Personally I love mine.
I think that’s everything. Let me know if you need to know anything else. Good luck with the repairs
http://www.amazon.com/dp/B0017Q0KZ6/ref=cm_sw_r_udp_awd_74Ejtb1DWMM48
This plus a router?
It's just a set of bits for a router, not particularly rare, fancy or expensive. New set would be 40-100 my guess http://www.amazon.com/gp/product/B000FJRN8S/ref=s9_top_hd_bw_bD4kJ_g469_i3?pf_rd_m=ATVPDKIKX0DER&pf_rd_s=merchandised-search-4&pf_rd_r=0854NJ7BABDQGVB3ZS0H&pf_rd_t=101&pf_rd_p=e3873ec3-2071-56f1-b304-96ab142fe7ba&pf_rd_i=3116511 put them on craigslist or ebay and I'm sure some woodworker will pick them up.
These keep popping up as recommended bits. I got a set, but haven't used them much. Seem fine and a decent price for a decent selection.
+router bit set:
https://www.amazon.com/MLCS-8377-15-Piece-Router-Carbide-Tipped/dp/B000FJRN8S
+honing jig:
https://www.amazon.com/WoodRiver-Honing-Guide/dp/B0035Y439C
Make the mallet.
Honing compound: https://www.amazon.com/dp/B01N20BY2T/ref=psdc_553346_t3_B00HT74364
Combo square:
http://www.harryepstein.com/index.php/12-4-pc-combination-square-metric-fractional-usa.html
Dust mask: https://www.amazon.com/3M-Facepiece-Respirator-6291-Particulate/dp/B000FTEDMM
Assuming you are starting from the ground up and need everything, it's going to be tight and you'll have to skimp in some places, but this is exactly what I would do. The grand total here is $5005.00 and that includes shipping on the big ticket items which is a few hundred dollars.
Table saw and related stuff:
[Grizzly G0715xp] (http://www.grizzly.com/products/10-Hybrid-Table-Saw-with-Riving-Knife-Polar-Bear-Series-/G0715P)
Freud Premier Fusion
[Freud SD208] (http://www.amazon.com/Freud-SD208-8-Inch-Professional-Dado/dp/B0000223O9/ref=sr_1_1?ie=UTF8&qid=1395407011&sr=8-1&keywords=freud+sd208)
Gr Ripper 3d advanced (awesome on the router table too
Make your own ZCI's
Table Saw Total - $1,142
Jointer
Grizzly G0654 6" jointer (sell this on craigslist when you can upgrade to the 8". They hold their value really well and sell fast)
Jointer total $534.00
Planer
Dewalt DW734 - $399.99 most places. The 735 is nice, but not that much nicer. If I were to upgrade beyond the 734, I'd go for a 15" stationary unit.
Miter saw
Definitely go craigslist on this one. These things are a dime a dozen there. You can get a sliding 12" Dewalt/Makita/Ridgid, etc for around 250.00 to 300.00 Also pick up a decent Irwin Marples or Diablo blade
SCMS total - ~320.00
Bandsaw:
Craftsman BAS350. I own this. It's the SAME EXACT saw as the Rikon 10-321, just 200.00 cheaper. 8" resaw capacity and no stupid riser blocks to fuck up the geometry of your saw and make tensioning a nightmare.
Bandsaw Total - 620.00 with the Rikon resaw fence (bolt on) and a few timberwolf blades
Harbor Freight 2hp Dust collector, a lot of hoses, blast gates, and material to mod it to a 2 stage cyclone - 400.00
Router(s)
Bosch 1617 with both plunge and fixed bases
MLCS 15 bit set. Not the best, but better than absolutely anything else in this price range. Replace bits with Whiteside or Amanna when you have the cash.
Router and bits total 200.00
Also make your own table and fence to fill the empty space in your table saw.
Sanding
{Milwaukee 6021-21 Random Orbit Sander. Best ROS on the market until you go Festool/Ceros
Some klingspor abrasives in different grits
Shop vac bucket max and a 5gal bucket - perfect for sanders
Ridgid oscilating spindle sander. This is a tool I could definitely not live without after owning.
Sanding total - $320.00
Drill Press
Porter cable floor press
Also get the Porter Cable Forstner bit set and some decent brad points/twists)
Drill Press/bits total - ~$420.00
Clamps
Jorgensen Cabinet Master 4pc Set and various other bar clamps. The Pittsburgh ones from HF are pretty good
Clamps total ~ $250.00
Misc stuff
Woodriver bench chisels.
A vintage stanley block plane, and a jack plane
some plywood/melamine, and cheap hardwood and hardware to make a cross cut sled, router table/fence. drill press table, a workable bench/outfeed table and a grizzly woodworking end vise
Misc total - ~400.00
Very carefully on a drill press with a tenon/plug cutter like this one.
new Drill press - Craftsman 12" $189
used table saw - Ridgid $250 http://denver.craigslist.org/tls/5299905704.html
new Dewalt miter saw 12" home depot $279
(2) new Sears plunge router 2.5 hp #27860 $130 each $260
used band saw http://denver.craigslist.org/tls/5306628654.html $150
new Milwaukee sawzall/drill kit http://www.homedepot.com/p/M12-12-Volt-Lithium-Ion-3-8-in-Cordless-Drill-Driver-Hackzall-Combo-Kit/206284103 $99
(2) Dewalt orbital sander http://www.sears.com/dewalt-5-in-random-orbit-sander-kit-with/p-00926349000P?prdNo=1&blockNo=1&blockType=G1 $50 each $100
new kreg pocket hole kit $99
used Delta jointer $225 http://denver.craigslist.org/tls/5262033510.html
(4) new pipe clamp fixtures $11 each plus $25 for the pipe $70
(2) new Irwin clamp sets $33 each $66 http://www.amazon.com/s/ref=nb_sb_noss?url=search-alias%3Daps&field-keywords=quick+clamp+12%22&rh=i%3Aaps%2Ck%3Aquick+clamp+12%22
new 15 piece router bit set $45 http://www.amazon.com/MLCS-8377-15-Piece-Router-Carbide-Tipped/dp/B000FJRN8S/ref=sr_1_4?s=power-hand-tools&ie=UTF8&qid=1448998111&sr=1-4&keywords=router+bit+set
new jig saw $60 http://www.sears.com/porter-cable-pce345-6.0-amp-orbital-jig-saw/p-SPM7634045028?prdNo=7&blockNo=7&blockType=G7
That should put me around $1800 - the rest would be spent on sandpaper, blades, screws, work bench etc.
Good starter bit sets: http://www.amazon.com/gp/product/B000FJRN8S?keywords=mlcs%20router%20bit%20set&qid=1449426804&ref_=sr_1_1&sr=8-1
I can't speak for others but I def use a round over bit the most. For that, I use the freud roundover quadra http://www.amazon.com/Radius-Rounding-Over-Bit-Quadra-Cut/dp/B00004T7FL/ref=sr_1_1?ie=UTF8&qid=1449426867&sr=8-1&keywords=freud+roundover+bit
I bought this MLCS set off Amazon as my starter set:
https://www.amazon.com/MLCS-8377-15-Piece-Router-Carbide-Tipped/dp/B000FJRN8S/
It's been fine - I'm now buying better quality bits when I know I need something and I've replaced a couple of these with nicer versions, but for a basic set this has been a good value for me.
Sorry it took so long to reply. Been busy in the shop.
Plywood. Love or hate it, right? There is nothing inherently wrong with using plywood. Plywood makes fantastic drawer bottoms. I have a big chunk of it in the middle of the top of the coffee table I'm building. I am even using it for door panels in the built-in closet I'm also working on. In each of these instances the edges of the plywood is completely concealed. Before the thought crosses your mind, slapping a 1/4" thick strip of hardwood does not conceal the edge. It looks like a piece of veneered plywood with a hardwood strip glued on. No finishing tricks will ever make it look good. I've tried. Oh how I have tried.
There are tricks to using plywood so nobody knows. For lower-grade furniture I have built for friends, I have used the hot-melt glue edgebanding. I only use it for painted pieces, because whatever they say the veneer is, it isn't and it will never match the walnut or cherry plywood. Unless you spend hours using tints and dyes to get it to match. Your time is money, so it would have been cheaper to just use solid wood. If you have a perfectly dialed in tablesaw, and have some serious balls, you can use a dado blade to hog out the plywood in-between the outer veneer layers. Modern ply uses 1/128th or maybe 1/64th" thick veneer, so you have very tight tolerances to work with. And they can't support any weight, so you have to MacGuyver some way of supporting the plywood while you do this. But then you glue in a strip of hardwood and it is nearly invisible. Or, you can do what I do and cheat.
I use plywood for building drawer boxes all the time. For the shop. I always use a dado to hold the plywood drawer bottom. This guy's use of a plywood drawer box with a luan bottom on what is portrayed as a piece of fine furniture detracts from the piece aesthetically so much that McIKEA crap looks like a Maloof original. I would have use solid maple sides 3/4" thick with a 1/2" thick front and back of maple, and maple ply in the bottom. All untreated. I'd route a 3/8" deep dado 1 1/2" wide on the drawer box front to back, and centered. On the inside of the drawer cavity I'd mount a 3/8" thick maple strip, just a smidge under 1 1/2" thick on each side. Wax both the groove in the drawer and the rail with a good wax like Renaissance Wax, and call it a day. That would look a million times better than the cheap Chinese drawer slide.
If you are starting woodworking, go to antique shops and ask permission to look at how older pieces of furniture were built. They didn't have plywood back in the 1800's and they had dressers, chests, tables, etc. as wide as could be. The name of that game is wood movement. Here is a 3m video by some dude on wood movement. Here is a calculator from Fine WoodWorking that you can use to figure out how much wood will move. I've built a Dining Table, and to accommodate the seasonal wood movement, I used breadboard ends (glued the middle 2", each end free to expand/contract) and attached it to the frame the same. (Screwed in the middle, and figure-8's on the corners.
Onto Dominoes. Full disclosure, I think 90%+ of Festool is overpriced plastic crap. Floating tennons are damn cool, and if I cannot jury-rig a horizontal mortiser, I might buy one. In this case, he has to use a floating tennon because the miter joint isn't working. So before you drop $1500+ on the latest plastic do-dad stop. Pull your head out of your butt and think. Maybe a miter is not the best joint for what I want to do... A 1/8" hardwood spline would have been a better choice than dominoes. Those floating tennon thingys are not cheap. A domino would be one of the last tools i'd buy. There are much better places to spend your money.
>A miter vs a dovetail should be mainly in aesthetics in the end right?
Nope. A miter has zero mechanical strength - the only thing holding it together is wood glue. With plywood only a half of the wood is a long grain to long grain joint, which is the strongest glue joint. Also, unless you have your tools dialed in perfectly, it is really hard to get two perfect 45^o joints. A miter does have the advantage of hiding all endgrain. A dovetail is self-squaring and provides a lot of glue surface. Also, because of how the dovetail is assembled, the grain on both pieces run in the same direction, so seasonal wood movement will not blow the joint apart.
Although it does show end-grain, the dovetail is almost universally seen as a hallmark of fine furniture. You can control where you see the end grain if you use half-blind dovetails. For this piece, I would attach the top (pins) to the sides (tails) with half-blind dovetails. this way, the top is unmarred by the tails' end-grain. I'd probably just use full dovetails to attach the bottom. The grain of all 4 sides would run left <-> right and up <-> down. This way, seasonal movement would only make the piece stick out from the wall 1/8" more or less depending on the season.
>Plus why is it better to use chisels? That to me sounds kinda snobby.
Chisels are not snobby. I am firmly in the middle of the Normite versus Neanderthal argument. I use power tools and hand tools alike. Some operations are best suited to one or the other, but there are no absolutes when you work with a once-living medium. Sometimes my random-orbital sander is the best way to get a piece ready to finish, and other times it just makes a mess of the delicate and wild grain of a burl. So I use a #80 scraper.
Every woodworker should have a decent set of chisels. I have a set of Marples, but it looks like they were bought out by Irwin. This looks like a good set for the money All 8 for $100 sounds like a good deal to me. I have the Narex mortise chisels and the cranked-neck paring chisels and they are more than adequate for what I use them for. Those paring chisels are just fucking awesome for cleaning out glue from the inside of joints.
Every woodworker should also have a #5 bench plane, and a low-angle block plane. I got my Stanley #5 for $5 at a flea market. Cleaning it up and sharpening the blade took ~45 minutes. I can cut a shaving that is too thin to measure with fractional calipers. Veritas planes are really nice, but $300 for only a marginal improvement over my $5 Stanley?
A set of scrapers will run you $20. If you don't have strong hands when you start using them, you bet your ass you will when you are done. A #80 is just a fancy holder for a larger scraper. Those are rare as hell at flea markets. I've only seen one, and I bought it for $20.
I hope this has helped you out. The things that have helped me the most are:
I have seen both shows up on youtube and are popular re-runs on cable tv. Especially on the DIY channels in the wee hours of the morning. Set your DVR.
Damn this got long. Send me a PM if you need advice. I cannot guarantee I'll respond right away, but I will respond.
edit: fixed some formatting
You can get a router bit that'll cut biscuit slots. This is possibly easier than routing the length of the plywood.
Something like this https://www.amazon.com/dp/B00KZM1Q1A/ref=cm_sw_em_r_mt_awdo_30e8CbVN815YX
This way you can keep the plywood flat and the router up the right way. Safer than routing 8' up in the air.
MLCS 8377 15-Piece Router Bit Set with Carbide-Tipped 1/2-Inch Shanks https://www.amazon.com/dp/B000FJRN8S/ref=cm_sw_r_cp_api_Wr2SybQJ8VEMY
I saw this set recommend in this sub. I have the same router as you and I've been happy with them.
If you buy ANY woodworking tools. I suggest a table saw (duh), a router and a router table. This is also the set I have that I bought to start with. Seems to be working great
http://www.amazon.com/gp/product/B000FJRN8S/ref=oh_aui_detailpage_o01_s00?ie=UTF8&amp;psc=1
It's not hard. I use a Makita RD1101 bought used, which I like because the grip allows me to keep pressure on top the the piece I'm cutting.
If it is his first router, I would recommend getting the DeWalt 611PK kit. It is a compact router, but it is pretty powerful for its size. I bought the Bosch recommended in another comment as my first router, and looking back, I wish I had purchased the DeWalt first. I find myself using the smaller router far more than the bigger one. Plus, the entire kit is around $160, so you have plenty of money to get a MCLS bit set and still be way under budget.
Just my 2 cents.
They are only $0.59 cheaper on woot than amazon. Probably not worth the "impulse".
Just last night I was deciding on a set of bits. I compared those, to these http://www.amazon.com/dp/B001S2RAWA/ref=pe_385040_127541850_TE_item
The MLCS set got much better reviews. I ended up ordering those, but I cannot speak to their quality either.
Update:
Thanks for the suggestion. Seems others have also made this suggestion so I went with this MLCS kit:
https://www.amazon.com/MLCS-6077-Woodworking-Carbide-tipped-15-Piece/dp/B001S2RAWA/ref=sr_1_5?ie=UTF8&amp;qid=1504242971&amp;sr=8-5&amp;keywords=mlcs
https://www.amazon.com/gp/product/B001S2RAWA/ref=oh_aui_search_detailpage?ie=UTF8&amp;psc=1
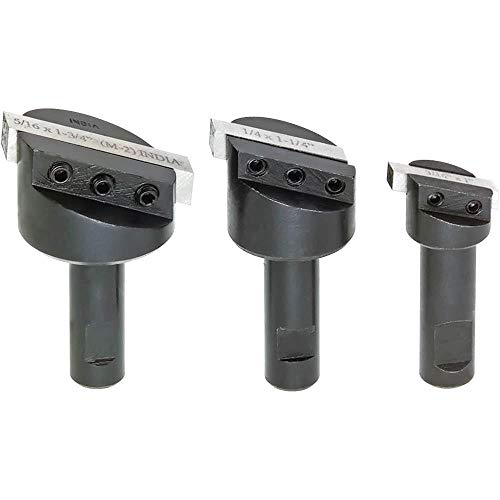
You can see the bits in the secondary images, the one I used was the first on the left in the second picture. If you zoom way in here you can sorta see how it came out: https://i.imgur.com/XNPFuOW.jpg
I think I have that same router, the key I've found is to just practice the hell out of whatever you're doing on scrap before you actually do anything. I'm sure the 1/4" is slower than a hypothetical 1/2" would be, but it's always given me good results.
You mentioned fly cutter ... Following on to your idea of shaping the cutter myself, maybe this would be a little easier to shape since they cutter can be taken out.