(Part 3) Top products from r/TeslaLounge
We found 31 product mentions on r/TeslaLounge. We ranked the 226 resulting products by number of redditors who mentioned them. Here are the products ranked 41-60. You can also go back to the previous section.
41. Sabrent 4-Port USB 2.0 Hub [90°/180° Degree Rotatable] (HB-UMN4)
Sentiment score: 0
Number of reviews: 1
Lightweight design enables the hub to be compact and portableUSB Connector Can be Rotated 90°/180° DegreesEasy Setup, Plug-n-Play, Hot Swappable, Hot PluggableCompatible With all Windows/Mac/Linux SystemsInstantly Add Four USB 2.0 Ports to Any Compatible Device
![Sabrent 4-Port USB 2.0 Hub [90°/180° Degree Rotatable] (HB-UMN4)](https://m.media-amazon.com/images/I/31jhDSiJ5RL.jpg) Show Reddit reviews
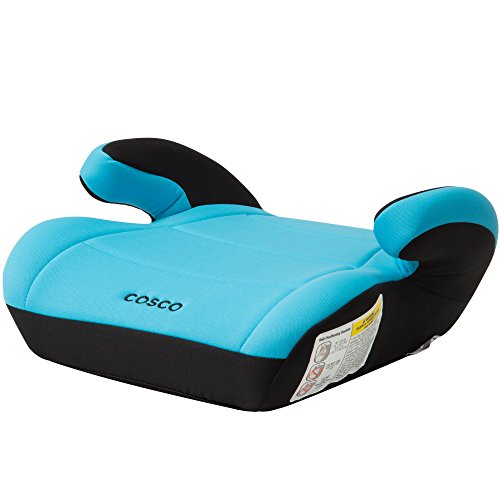
Show Reddit reviews42. Cosco Topside Booster Car Seat - Easy to Move, Lightweight Design (Turquoise)
Sentiment score: 2
Number of reviews: 1
Secure fit: The Cosco topside booster car seat gives your little one the extra height they need so that your car’s seat belt will fit safely and securely on themSuitable for 40 100 pounds: The seat is designed to hold children weighing between 40 and 100 pounds and from 43″ to 57″ in heightExt...
 Show Reddit reviews
43. Rain-X 600001 Windshield Repair Kit
Sentiment score: 1
Number of reviews: 1
Easy to use - takes only minutesRepairs all types of laminated windshieldsMinimizes the appearance of chips and cracks and stops them from spreadingCrack vanishes when examined at 45 degree angle, poor resin are achieved when repair resin is applied quickly, leaving air pockets or when repair is att...
 Show Reddit reviews
44. A&R Sports Ice Hockey Practice Puck, Black - 4 Pack
Sentiment score: 1
Number of reviews: 1
A&R Ice Hockey Puck, blackQuantity: one (1) hockey puckConstruction: vulcanized rubberWeight: 6 ozMade in the Czech Republic
 Show Reddit reviews
45. Leviton 8300-HW 20-Amp, 125-Volt, Heavy Duty Hospital Grade, Duplex Receptacle, Straight Blade, Self Grounding, White
Sentiment score: 0
Number of reviews: 1
Interlocking Thermoplastic Nylon Cover and BodyNickel- Plated Brass Strap with Integral Ground Contacts15-20 Amp Duplex & Single Configurations AvailablePermanent "Green Dot" Marked on Face. Total Outlet: 2Exclusive V-shaped, serrated back-wiring clamps for superior contact
 Show Reddit reviews
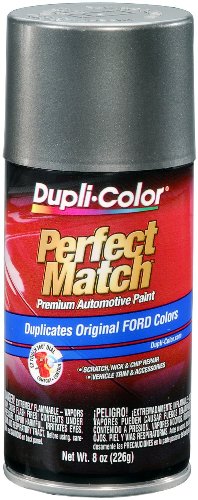
46. Dupli-Color BFM0360 Dark Shadow Gray Ford Exact-Match Automotive Paint - 8 oz. Aerosol
Sentiment score: 2
Number of reviews: 1
Dupli-Color Perfect Match Premium Automotive Paint is an easy-to-use, high-quality, fast-drying, acrylic lacquer aerosol paint specially formulated to exactly match the color of the original factory applied coatingFeatures an adjustable EZ Touch 360 degree nozzle and a wide spray pattern for smooth,...
 Show Reddit reviews
47. Tesla Model 3 Model Y Center Console Leather Wrap Kit Carbon Fiber Leather Sticker for Tesla Model 3 Model Y Console Protector Accessories
Sentiment score: 0
Number of reviews: 1
Custom-designed: Each leather wrap kit has been custom-cut specifically for the Tesla Model 3 Model Y center console. Fit all Tesla Model 3 Tesla Model Y.Leather Material: Revolutionary design. Made of premium leather material, which reduces fingerprints, protects against scratches. The Console Wrap...
 Show Reddit reviews
48. CCI IWCRD-15 15 Inch Clip On Stainless Steel Racing Disk Hubcaps - Pack of 4
Sentiment score: 1
Number of reviews: 1
Made from a spun finished stainless steelMetal Clip Retention SystemDurable finish resists extreme temperature and corrosionComplete set of four hubcapsDesigned for Quick and Easy Installation
 Show Reddit reviews
49. DEWALT Tough System Tool Box, Small (DWST08201)
Sentiment score: 0
Number of reviews: 1
Structural foam box for robust and durable structureRemovable 2 size cups for small parts organization and inner lid organizers for drills & bitsSide latches allow stacking modules one on top of the otherSide handles enable carrying or assembling products on ToughSystem metal CarrierIP65 Integrated ...
 Show Reddit reviews
50. FASTCAP Kaizen Foam 57 mm Black
Sentiment score: 1
Number of reviews: 1
57mm (2-1/4") thick x 24" x 48"Easy to peel away layersCuts easily
 Show Reddit reviews
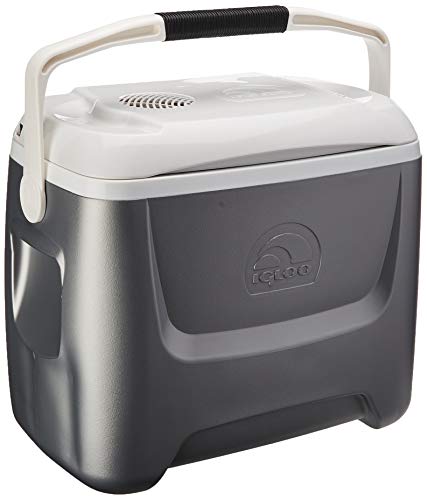
51. Igloo Iceless Thermoelectric Cooler (Silver/White, 26-Quart)
Sentiment score: 0
Number of reviews: 1
Molded-in side handles for two handed carrying or lifting8' long power cord plugs into any 12V DC receptacle (e.g. cigarette lighter) for portable use - good universal fit in 12V outletsSilver/white
 Show Reddit reviews
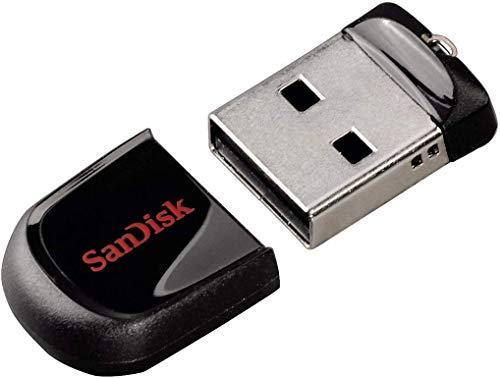
52. SanDisk Cruzer Fit CZ33 32GB USB 2.0 Low-Profile Flash Drive- SDCZ33-032G-B35
Sentiment score: 1
Number of reviews: 1
Low-profile drive for notebooks, tablets, TV's and car audio systems32GB of Capacity in a tiny portable USB DriveGuard your data with SanDisk Secure Access softwareBuilt-in LED light to monitor drive's activityUSB Specification: USB 2.0,Backed by a 2-year limited warranty
 Show Reddit reviews
53. Celebrity Machines Back to The Future | Outatime + 2015 | Metal License Plates
Sentiment score: 0
Number of reviews: 1
Screen accurate platesSticker kit included (California ’86 & AUG)Metal stamped / embossed aluminumShrink-wrappedStandard USA plate dimensions (12" x 6")
 Show Reddit reviews
54. Bar Keepers Friend Powdered Cleanser 21-Ounces (2-Pack)
Sentiment score: 1
Number of reviews: 1
NEW LOOK, SAME FORMULA. Cleans and Polish. As a bleach-free product, this cleanser is an ideal stainless steel cleaner and can easily remove rust, tarnish, mineral deposits, and tough stains from most surfaces.SURFACES: Stainless Steel, Porcelain, Ceramic, Copper Alloys, Fiberglass, Corian, Brass, B...
 Show Reddit reviews
55. 3M 2080 S12 SATIN BLACK 5ft x 1ft (5 sq/ft) Car Wrap Vinyl Film
Sentiment score: 1
Number of reviews: 1
Removable, Air Release, Dry Install, RepositionableExtreme Conformability for curved surfacesEasy Installation, Slideable, Pressure Activated with Air ReleaseNo Printing. No Overlaminate. Open the box and Start Wrapping60" Wide Rolls Meaning You Can Cover Entire Sections of the Vehicle
 Show Reddit reviews
56. Adam's Detail Spray - Quick Waterless Detailer Spray for Car Detailing | Polisher Clay Bar & Car Wax Boosting Tech | Add Shine Gloss Depth Paint | Car Wash Kit & Dust Remover (Gallon)
Sentiment score: 2
Number of reviews: 1
✅ WHY CHOOSE ADAM’S DETAIL SPRAY? - Adam’s Detail Spray is our most Iconic and versatile product. With so many uses, its an auto detailer’s swiss army knife. It can be used with a clay bar as a clay luber, pad primer, quick polishing booster, gloss enhancer, wax booster, waterless wash dust ...
 Show Reddit reviews
57. Prepworks by Progressive Adjust-A-Slice Mandoline
Sentiment score: 2
Number of reviews: 1
Get perfect, even slices of carrots, onions, zucchini, tomatoes, kiwi and applesSliding button adjusts between 3 thicknesses: thin, medium and thickAngled blade provides more efficient slicingNon-skid base and ridges keep mandoline slicer stable on cutting surface and allow for use over a bowlDishwa...
 Show Reddit reviews
58. Monkey Hooks Picture Hangers Home and Office Pack, Gorilla Hook, Drywall Hooks for Hanging Pictures, Wall Hooks, Picture Hangers, Picture Hanging Kit, 30 Pc Set
Sentiment score: 1
Number of reviews: 1
MONKEY HOOK PICTURE HANGER VARIETY PACK: 3 Varieties Included: 10 Original Monkey Hook, 10 Gorilla Grade (made of thicker steel so it holds up to 40% more weight than Original) and 10 Flush mount (hanging small items that MUST mount FLUSH to the wall.)The Amazing Monkey Hook one of the most innovati...
 Show Reddit reviews
59. CRC 05089 BRAKLEEN Brake Parts Cleaner - Non-Flammable -19 Wt Oz
Sentiment score: 1
Number of reviews: 1
The original brake parts cleanerFormulated to quickly & effectively remove grease, brake dust, brake fluids, oils, & other contaminants from brake parts, lining, padsCannot be sold for use in ca or njNon-flammableThis item is not for sale in catalina island
 Show Reddit reviews
60. DEWALT 18/20V Max Vacuum, Wet/Dry (DCV581H)
Sentiment score: 0
Number of reviews: 1
Can operate corded with an AC outlet, or cordless by an 18v or 20v MAX batteryHEPA Rated filter traps up to 99.97 percent efficiencyWashable/reusable filter;2 Gallon tank capacity. 31 CFMCrush resistant 5ft hose.Heavy duty, crush resistant, fully integrated 5' (by 1 1/4" diameter) hose provides dura...
 Show Reddit reviews
Thank you!! Absolutely, here's the video that we watched and followed very closely: https://youtu.be/H9xn066qfKo
Some notes:
CRC 05089 BRAKLEEN Brake Parts Cleaner - Non-Flammable -19 Wt Oz https://www.amazon.com/dp/B000LDR9HI/ref=cm_sw_r_cp_apa_i_fbdvDbZNSKSJG
120 Grit Dry Wet Sandpaper Sheets by LotFancy, 9 x 3.6", Silicon Carbide, Pack of 45 https://www.amazon.com/dp/B075WV8PN9/ref=cm_sw_r_cp_apa_i_NfdvDbPYQJ1VG
A. Good for the holes in the caliper and very tight spots (I painted almost all the way to the back of the caliper to make sure it looked red at every possible angle).
Check out this item at Target https://www.target.com/p/e-l-f-blending-eye-brush/-/A-14653397
B. A stiffer brush for the verrrrry tight spots where the caliper meets the brake pad and you do NOT want to have Shakey hands and get anything near those pads.
Check out this item at Target https://www.target.com/p/e-l-f-concealer-brush/-/A-13958833
C. For extra measure when you are doing touch up in those tight spots (this one is $3):
Check out this item at Target https://www.target.com/p/e-l-f-angled-eyeliner-brush/-/A-13586153
https://www.ebay.com/itm/TESLA-HI-TEMP-PREMIUM-BRAKE-CALIPER-DECALS-STICKERS-CAST-VINYL-/362070373338
https://teslamotorsclub.com/tmc/threads/want-painted-calipers-dont-want-to-spend-600-on-them.140873/#post-3346753
My husband didn't want to do this method because prep looked much more intense and he'd figure I wouldn't mind a painting project on a cloudy Saturday afternoon.
If you are in my state, I'd be happy to help. I'm new to reddit so not sure how to do the direct messages but let me know! Hope this helps! Please don't hesitate to ask questions when you start this. 150% worth the effort. It's beautiful and the Tesla service man honestly thought our SR+ was a P3. Even after pulling up the computer to look at the specs, he kept saying,"You're so lucky to have a performance!". I didn't have the heart to tell him it wasn't. Best of luck!!!
Here's what I sent to the couple of PMs I got asking similar questions...
I ordered these from Amazon:
Dupli-Color BFM0360 Dark Shadow Gray Ford Exact-Match Automotive Paint - 8 oz. Aerosol https://www.amazon.com/dp/B00407TU5U/ref=cm_sw_r_cp_api_i_4DxwDbP62JVFE
Sandpaper, Premium Wet Dry Waterproof Sand Paper, 45PCS 120 to 5000 Assorted Grit Sanding Paper for Wood Furniture Finishing, Metal Sanding and Automotive Polishing, 9 x 3.6 Inches. https://www.amazon.com/dp/B07KV3VX97/ref=cm_sw_r_cp_api_i_NHxwDb65VSTCX
From there I started off using a 1/4 piece of one of the 240 grit pieces of sandpaper and spent about 5 minutes sanding off all the jagged edges of the curb rash. (Side note for your question: Pressure was about what you'd use with a scrubby sponge to get some stuck on food off a plate for all the sandpaper sheets, regardless of grit.)
Next I tore off a similar sized piece of 400 grit sandpaper and spent another 5 minutes sanding it down further to smooth out some of the larger damaged area into smaller issues.
Repeat another 5 minutes with 600 grit. Then 5 minutes with 1000, and finally 5 minutes with 1500.
Once you are done the damaged area should be shiny bare metal that should feel smooth to a light touch with your finger. (And leveling out the area is not really a problem. As bad as curb rash looks, it's mostly just jagged metal sticking up that gets sanded off. It's really not that deep that you end up with valleys and craters once you are done sanding. Technically, yes, the rim is "thinner" where you sanded, but it's a fraction of a millimeter so, and not really visible to the eye unless you get down real close and look for it.)
Next I cleaned it all off using nothing more than some Windex and a soft rag.
I then used a new small piece of 600 grit and lightly went over the whole area to make some tiny rough areas to help the paint stick to the metal better, and wiped clean the dust.
I then taped the tire and undamaged area of the rim to keep the paint off those parts, and sprayed on the paint using the instructions on the can. (Three light coats 10 minutes apart)
That's pretty much it. Someone else mentioned clear coat but I didn't use it. I though the result I got was pretty dead-on and didn't want to risk a clear coat make it look off or too shiny, then have to do the rest of the wheel to make it uniform - which would have made me then have to do the other three tires in clear coat to make them match as well. But if I down the road I change my mind, adding clear coat is as easy as the painting.
Anyway, it's time and labor intensive, but it's easy. Good luck!
Don’t buy the pucks, make ‘em, real easy. Takes about 10mins, only needs a screws/screwdriver. They fit perfectly.
(4 Pack) Rubber Screw On Bumpers - Shed Doors, Sliding Door & Cabinets
https://www.amazon.com/dp/B07GBFD3SH/ref=cm_sw_r_cp_tai_cd1mDb54F70ZV
A&R Sports Ice Hockey Practice Puck, Black - 4 Pack
https://www.amazon.com/dp/B008875XYU/ref=cm_sw_r_cp_tai_Kd1mDb7DYT2CB
Costco rotation and winter tire exchanges are super cheap, and they have the right lift gear, used to Tesla’s etc.
Try out something like meguiar's clay bar or some such. Also, for lubricant, their quick detailer or something like Adam's detail spray I have noted below while claying works best for me. Also, when claying, I have found that after making a couple passes, if the clay has dirt in it, is discolored, or something similar, I use a hand slicer like below to remove the contaminants quickly.
​
https://smile.amazon.com/dp/B001QVGUMO/ref=sspa_dk_detail_0?psc=1
https://smile.amazon.com/dp/B001QGPHXM/ref=psdc_289783_t2_B0090JINY2
I was in the same boat. Here were my considerations...
and what i ended up deciding...
Based on the feedback so far, I'm leaning toward the Sandisk Ultra Fit.
In order of importance, my decision factors...
at least 1 day of videoat least 2000 miles of driving (over a month of driving) and reduce the number of re-writes.Thanks for helping me think it out.
discussion here
edit, changed recording time to distance driven, as it records while moving, not 24/7
I'm not sure why Safelite wouldn't repair but I have had great success with chips in my wife's car using this kit. The chip won't be noticable after. The kit also claims it'll be stronger than before the chip (sounds dubious though).
Rain-X 600001 Windshield Repair Kit https://www.amazon.com/dp/B00IPS4APU/ref=cm_sw_r_other_apa_i_h0rHDbDSJYYZM
My kid is finally big enough for a backless booster! We got this one on Amazon and it’s been great. Color really pops on the white seats too!
Cosco Topside Booster Car Seat - Easy to Move, Lightweight Design (Turquoise) https://www.amazon.com/dp/B00IP8AEXC/ref=cm_sw_r_cp_tai_hGwjDbD2VCXYF
Ah dude nice. I’m subscribed. I work at UPS loading trailers, and your autopilot videos are easy to listen to with my headphones in while working.
I have no Tesla, so I’d have to try on my leaf lol. I’ve also seen full moon hubcaps . These as well most people would think are ugly, but could possibly give just a bit more efficiency to the aerodynamics of the car
Try Bar Keepers Friend, and see if you can improve things.
https://www.amazon.com/Bar-Keepers-Friend-Powdered-21-Ounces/dp/B008EN9XUI/
All of these: https://shop.tesla.com/product/gen-2-nema-adapters
And this: https://shop.tesla.com/product/corded-mobile-connector
In this repurposed Dewalt toolbox: https://www.amazon.com/dp/B01M3SP97Z/ref=cm_sw_r_cp_api_i_R3B0DbVARKYQT
Using scraps of this Fastcap Kaizen Foam 57mm (2-1/4") Black from another project: https://www.amazon.com/dp/B007J2JJYK/ref=cm_sw_r_cp_api_i_TaC0Db2YE2QW8
Hope this helps. You could use other foam. This is just what I had on hand from another project.
Do you care about the mirrors? The chrome delete is actually not that hard to do yourself, if you skip the mirrors.
I did a chrome delete with the kit from Amazon and bought carbon fiber mirror caps from RPMTesla and called it a day. <$200
2x [3M Satin Black 5ftx1ft] (https://www.amazon.com/gp/product/B008OIQEG4/ref=oh_aui_search_asin_title?ie=UTF8&amp;psc=1) $30
1x [Model 3 Gen 2 Carbon Fiber Mirror caps] (https://www.rpmtesla.com/products/model-3-gen-2-carbon-fiber-mirror-caps-129-w-20-off) $139
I have mine hung on the wall https://cl.ly/433ae036f4dd
Using these hooks. Easy to install and when you want to remove leaves a small hole https://www.amazon.com/Monkey-Hook-Picture-Hanger-Office/dp/B001KVMNPI/ref=sr_1_1_sspa
Is this the box? Want to make sure I get the dimensions right.
DEWALT Tough System Tool Box, Small (DWST08201) https://www.amazon.com/dp/B005HNJPHO/ref=cm_sw_r_cp_api_i_KFF0DbMFQZFQA
You can get these on Amazon for $20.
I think what you want to look for is an electric cooler. I think there should be one the right size.
https://www.amazon.com/Igloo-40369-Iceless-Thermoelectric-28-Quart/dp/B007ZYIFQ0/
They are readily for sale: https://www.amazon.com/Celebrity-Machines-Delorean-OUTATIME-License/dp/B00EDX2NN2
Check your breaker box and see if it's a 20A or 15A breaker. If it's a 20A, you can replace these outlets with the 5-20 outlet and get ~1mph extra charge if you also get the 5-20 adapter from Tesla for your UMC (it all adds up when trickle charging).
If your HOA don't let you do this, you can get an adapter (ONLY USE THIS IF YOUR BREAKER IS ACTUALLY 20A!).
Most don't require a power source.
https://www.amazon.com/Sabrent-4-Port-Degree-Rotatable-HB-UMN4/dp/B00LRYUJQS