 Reddit reviews Hakko FX888D,T18-B,BL,I,D24,D32,C05,S7,599-029 Soldering Station with T18-B/BL/I/D24/D32/C05/S7/599-029
We found 8 Reddit comments about Hakko FX888D,T18-B,BL,I,D24,D32,C05,S7,599-029 Soldering Station with T18-B/BL/I/D24/D32/C05/S7/599-029. Here are the top ones, ranked by their Reddit score.
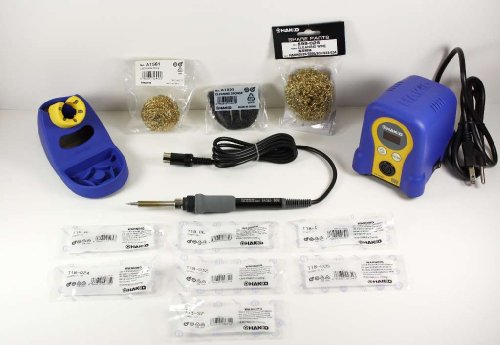
Digital Soldering Station ESD Safe version with 7 extra tips - T18-B/BL/I/D24/D32/C05/S7/599-029 tipsFX-888D KIT version with 7 extra tips - T18-B/BL/I/D24/D32/C05/S7/599-029 tips ( 8 total with the iron )Adjustable temperature controlTemperature range 120° - 899° f (50° - 480° c)Digital display shows °ree; f or °ree; c
I would only suggest doing this mod if you are extremely comfortable with a soldering iron. I'm not responsible if you mess up your Joy-Con. With that being said below are the things I used to make this possible:
Parts
Steps
More pictures
I would stay away from the cheap no-name all in one solutions. They tend to be pretty crappy. Look at some of the nicer options from Hakko or Weller. You really only need a 100$ish soldering iron to do incredible work (obviously nicer IS better, but the returns are diminishing). Check out this one from Hakko: Hakko FX888D,T18-B,BL,I,D24,D32,C05,S7,599-029 Soldering Station with T18-B/BL/I/D24/D32/C05/S7/599-029 https://www.amazon.com/dp/B00C2BHTBI/ref=cm_sw_r_cp_apa_i_ohkZDb6WW5TJY
That set meets all of your needs and more. That, plus a cheap air station like this: BACOENG 110V Digital 858D SMD Hot Air Rework Station Solder Blower Heat Gun https://www.amazon.com/dp/B07BRQX15Z/ref=cm_sw_r_cp_apa_i_ojkZDbTDPH5PN
and a cheap extractor, and you are more then set.
I have this one. Haven't run into any issues. Granted this is NOT a rework station. But it's the same model they are issuing in Fed labs. $135 gets you great soldering iron which wide range adjustable temps, set of various tips, though if you are doing ISP you'll want the very fine tips...I'll have to find the number for the ones I use...The only other thing you would want for ISP is decent magnification to work under.
https://www.amazon.com/Hakko-FX888D-T18-B-D24-599-029/dp/B00C2BHTBI/ref=sr_1_1_sspa?s=hi&ie=UTF8&qid=1525274929&sr=1-1-spons&keywords=hakko+soldering+station&psc=1
Alright, so you basically have 3 options depending on how much soldering you plan to do. If you're just gonna build one or two keyboards and and will never try to do SMD, I recommend this:
If you think you're gonna do this a lot, OR you've already had the cheap iron and want something better, you have two choices:
The Hakko is recommended by basically everyone here, and is widely used in the hobbyist world. I've used the Hakko a few times at TechShop, and it's a good station. However, I've never seen anything but a weller used commercially. I picked up a weller for my own station, I couldn't be happier with it.
No matter which of these 3 you end up you'll be happy.
Here's my suggestion:
How to use it and getting your soldering technique right:
This was my first iron, though under a different branding. It's only $16, and it has a knob you can spin that at least loosely correlates w/ the iron's temperature.
I wouldn't recommend it, though. I splurged for a Hakko FX-888D a couple of months later and haven't regretted it once. It truly is a night-and-day difference. Working with my old iron was like pulling teeth. Working with the Hakko is effortless.
I'd definitely recommend an upgrade. If you're un(willing|able) to spend $100+ on a soldering iron, I'd recommend still getting the first one I linked, along with some Hakko tips. Hakko tips are about 10-20x as expensive as their no-name counterparts, and you absolutely get what you pay for.
Easily the most frustrating part of using my first iron was how quickly the tips would oxidize, even though I kept them tinned religiously. Hakko tips, when cared for, will last indefinitely. I wouldn't be surprised if nice tips + cheap (but temperature controlled) iron got you 70% of the performance of the all-Hakko kit.
Is it necessary to clean up flux? Almost never. Is it a good idea to do it anyway? I'd say so. Here's a good article about all things solder and flux to bring you up to speed.
Flux is SUPER carcinogenic, or so I've been lead to believe, and it also causes serious gastrointestinal issues if ingested, in even relatively small amounts. I generally try to leave all the circuit boards I work on clean of big globs of flux, but I'm no perfectionist. Flux is non-conductive, so don't worry if you leave a bunch behind or it looks like the flux might be bridging a connection. I oftentimes leave smaller flux contamination spots on the board, unless it's in a spot where I'd be likely to touch next time I'm handling the board.
Here's a pretty good soldering iron, the Hakko FX-888. It's more than enough iron to last you through all your projects in the foreseeable future, and it comes with extra tips and a tip cleaning canister. To be honest, though, it's pretty expensive, and I totally understand if it's out of your price range. Personally, I use a Chinese clone, which works extremely well, for what I paid for it.
I'd also recommend anyone working on anything with a soldering iron to get a set of helping hands. Finding one which isn't broken or of shit quality is a real crapshoot, but, once you have one that works, you'll wonder how you ever got by without one. Personally, I recommend spending the cash to get one with some sort of LED built in, but here's a link to a cheap and functional set of helping hands.
If you're going to be desoldering things often (or trying to make beautiful solder joints), you definitely want to get yourself some desoldering braid, which is just stranded copper wire filled with flux paste. When you put heat to the top of the braid and put the bottom of the braid on the component, the braid will wick excess solder from the component. Once you master using this stuff, it's a real boon for disassembly (or cleanup of solder blobs). You might also want to look into a desoldering pump, which is okay for some things, but not nearly as versatile as desoldering braid.
Last, but certainly not least, is having the right solder for the job. Personally, I use silver bearing solder, because I've been told it is more resistant to cold joints, and slightly more conductive. Here's a link to a spool of silver bearing solder, which I'd buy, were I in the market for a new spool.
One more link for you... When I was looking for a link to that Chinese clone soldering station, I stumbled on this DIY SMD soldering practice kit. Might be worth your time to invest in one and try your luck. For $2, it's a great way to go from soldering zero to soldering hero in a day or two. Also, check this page for more DIY kit ideas.
Let me know if you have any more questions! My inbox is always available, if you'd feel more comfortable PM'ing me questions, too. (That goes for anyone who needs a hand, not just /u/websurferathome)
You guys are making it sound easier than it is.
SOLDERING is easy. Anyone can do that. Just heat the work and the solder drips right in the hole.
It's DESOLDERING which is hard. And without proper desoldering equipmenet (like an Aoyue or a Hakko), it can be even HARDER and if you do it wrong, you could damage the PCB. You need more than just a soldering iron to desolder. You also need a desoldering pump (vacuum tool pump (NOT recommended unless you have no other choice) or a proper desoldering iron which is $$$).
The key is probably damaged and those are not easy to fix without making the problem worse. If the metal tab is damaged or bent out of shape there's no fixing that. With a switch top remover (from MK.com) you can remove the switch top and the cherry stem, after desoldering the switch (ONLY PCB mount switches can be popped open without desoldering), but if you don't have spare switches, I would just RMA the thing.
A good desoldering pump is https://www.amazon.com/Aoyue-Contained-Desoldering-Internal-Carrying/dp/B00PGFAJWS
But as you can see it's expensive. But it does come with some extra tip tops.
An even better one but more expensive is https://www.amazon.com/Hakko-FR300-05-P-Desoldering-Tool/dp/B00KWM69C4/ref=sr_1_1?ie=UTF8&qid=1490577663&sr=8-1&keywords=Hakko+FR300-05+desoldering+tool
Yes that's $$. And a lot.
A good starter kit, which includes solder and a vacuum pump is https://www.amazon.com/gp/product/B01E1ISGH0/ref=oh_aui_detailpage_o01_s00?ie=UTF8&psc=1 ; not too expensive for what you get.
Once you're ready to move up to higher quality you can buy this:
https://www.amazon.com/Hakko-FX888D-23BY-Soldering-Station-599-029/dp/B00C2BHTBI/ref=sr_1_3?ie=UTF8&qid=1489522270&sr=8-3&keywords=Hakko+FX888D