(Part 2) Best arcade & table games according to redditors
We found 150 Reddit comments discussing the best arcade & table games. We ranked the 80 resulting products by number of redditors who mentioned them. Here are the products ranked 21-40. You can also go back to the previous section.


Sharper Image Virtual Ping Pong “paddle”
https://www.amazon.com/Sharper-Image-Features-Integrated-Children/dp/B07BRH8VPT
I'm 37 and have wanted one of these since I was 10 as well. Also work in IT, but as a programmer, but I have done a lot of PC building and repairing on the side for decades. Never owned or worked on an arcade cabinet before, or worked with Raspberry Pi before. The Arcade1Up MK was also my first (and only so far) cab. As a tinkerer, I modded mine immediately (as in, within 3 days of ownership), and I'll give you some tips for if/when you mod yours that will save you a lot of time and money, because I made a lot of mistakes with mine buying wrong or insufficient parts, and general things that I would have done better/differently if I got to do it over again.
Modding is NOT hard. It's as easy as building the thing out of the box was (requires moderate effort and very little skill).
Hardware:
Software:
Go into a game, and hit Select/Coin + X. This will bring up a special Retroarch menu. Go to
Settings -> Onscreen Display -> Onscreen Notifications -> Display Frame Count -> OFF. Hit B to go back to the Settings menu, then go toConfigurationand make sureSave Configuration on ExitisON. You may have to do this for every system you're emulating, because it seems to only apply to whichever emulator you have running when you change the setting.None of this is nearly as complicated as it might sound. I was just trying to be thorough and save you a ton of time and money. Hope this helps!
Here's a video of my modded cab:
https://www.youtube.com/watch?v=J8lNARvbiKA
No problem, I just wish they'd actually list the price for the thing. For anyone else reading this, it goes for about $3,400 on Amazon and it does have slots for cup holders.
Stickers
Bat Top. Price on this seems to have gone up by a dollar for some reason but I'd still recommend it at this price. The rest of the parts list is inside of the guide if you need anything else.
Maybe this is a cheaper option and comes with controller and fool proof design :)
Edit: apparently this is a terrible port of the game, but there are similar plug and play controllers that supply a proper version.
I really want to buy a pinball machine for my place one day.
You can get the Deadpool one on Amazon.
https://www.amazon.com/Stern-Pinball-Deadpool-Arcade-Machine/dp/B07JZWMN9R
They sell tiny arcade machines that play these games. I have a few, they work great and make cool desk ornaments.
https://www.amazon.com/COLLECTIBLE-RETRO-DIG-MICRO-PLAYE/dp/B07CRRP4F4
For someone who plays "seriously", as in willing to join a club, take lessons, enter competitions, etc. you really need a custom setup and will cost at least about $50 per racket + rubbers. For someone who just wants to play casually with friends or in the office something like this and this is totally fine. I saw some rackets that were even cheaper but they weren't inverted rubbers, which is probably the kind you want. You can tell it's inverted because the outside of the rubber is smooth and you can press into it a little bit because of the sponge separating the rubber and the wood.
WMYCONGCONG 10 PCS Push Button with Microswitch for Jamma Mame Arcade Video Games DIY https://www.amazon.com/dp/B072R1H185/ref=cm_sw_r_cp_apa_i_BN70CbNX2TMJ8
Has it ever worked? Can you open the back? Check to ensure there is a wire connected to the microswitch on the down position of the joystick. If you're lucky, there's a wire dangling and it just needs reconnected (uncommon).
More likely is you have a dead microswitch. It's almost certainly one of these : https://www.amazon.com/WGCD-Micro-Switch-Arcade-Button/dp/B06XWFY2S3/
You'd just need to pop the switch out of the joystick, check to make sure it's a similar style as the one in the link, then buy a replacement. If you have a shop locally you can probably just buy one switch for a dollar or two.
That is correct: https://www.youtube.com/watch?v=Vl-1n95hJRc
Pretty poor resolution (480p-720p, limited by the small transmitters?) and FOV on these small racing drones compared to something like an oculus rift, but people have hooked up those kinda headsets to the larger quads, like this P3.
I can't find the forum where I read it, but the goggles haven't been progressing nearly as quickly as the rest of the drone tech, think I read somewhere that no one is actually manufacturing the screens anymore(?) They'll all surplus from other obsolete tech(?), and now they're finally running out of those surplus screens(?) Hence, why there are only a couple goggle manufacturers/why they are relatively expensive right now.
No need to look into it, got $50-$75? (well, about $100-125 with extras) No goggles, but you wont want them right away. Buy extra props, a DECENT multicharger (don't skimp here), and at least 4 or so extra batteries.
That's already a thing.
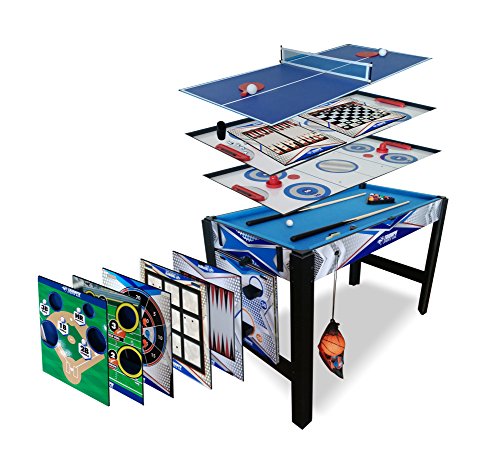
Triumph 13-in-1 Combo Game Table https://www.amazon.com/dp/B01MQD7TSR/ref=cm_sw_r_cp_api_VpsKzbE9H6VJM
I hate when someone invents something before I invent it!!! I intended a table that has a stake rather than legs so I could put it anywhere in the yard next to my hammock to hold my drink. Some asshole invented it before me!!!!
http://www.amazon.com/Imports-Floating-Beer-Pong-Set/dp/B001NPQ6E0
I have buttons very similar to this. Mine only came with the red and black wires. I had to order these: https://www.amazon.com/gp/product/B075VYG9GT/ref=oh_aui_detailpage_o02_s00?ie=UTF8&psc=1 and this power supply https://www.amazon.com/gp/product/B0745BZV6T/ref=oh_aui_detailpage_o03_s00?ie=UTF8&psc=1 and hook them up to my buttons. Worked out good though. here is a pic: https://imgur.com/H2s5KFe
There's a couple pics ( 6 and 7) in this listing that show the pinout that might show what you need - https://www.amazon.com/Pandoras-Classic-Vintage-Harness-support/dp/B07CM9BW7X
I'm not the one who's confused. Here is another picture of that style trackball. https://www.amazon.com/Happ-Trackball-Diameter-White-56-5500-11/dp/B07D6W4JRQ/ The wire harness on it looks like this. https://www.amazon.com/d/Grown-Up-Toys/Jamma-Replacement-Wiring-Harness-Trackball/B00F1YQHMK The optic sensor boards are what the wire harness is plugged into on the trackball (you can see the wires going into a connector and another bundle of wires going to the other end of the trackball.)
You can also use a wire harness that looks like this. https://www.amazon.com/Atomic-Market-Trackball-Interface-Compatible/dp/B07HQ693PP/ Although I'm pretty sure the pinout on that specific one would be wrong for an I-PAC, it looks like it'd be easy to fix. If I was the OP, I'd email Andy and ask what he needs to make what he has work.
This is the one that one suggested to me. I'll tell you about the project, but it doesn't really change anything. That valve needs to be opened and closed in increments under household water pressure (~55PSI). Also, if the control isn't fine enough, I can always restrict flow to the valve down to 1/8".
Okay, so the project is a water massage table. There will be a pump, pulling water from a reservoir tank and providing pressure to a showerhead. The valve in question will be between the pump and showerhead, and opening or closing it will increase or decrease the pressure on the showerhead. Any water that bypasses the showerhead via the valve will return to the reservoir tank. The tank will be filled with distilled water, treated with waterbed conditioner. It will spray onto the bottom of the sealed water-handling area (essentially a hollow box with a waterbed mattress for a bottom) from the inside. The water handling 'box' will be hinged like a tanning bed. You open it up, lie on the table, close it, and then you have a layer of waterbed material draped over you, with a pulsating massaging showerhead mounted on rails and moved by a stepper motor, pointed at your bac, and it gives you a water massage without you getting wet. You press an up or down button , and it adjusts the bypass valve, increasing or decreasing the pressure slightly. Or if the valve is already turned as far as it goes in either direction, the light will flash on the button when you press it. Possibly something audible, too, since you'll be relaxing and likely have your eyes closed.
There will be an immersion heater and DS18B20 temperature sensor in the reservoir tank so it keeps the water nice and warm, with up and down buttons to adjust the temperature the same as the pressure. The tank will, of course, be insulated as well.
A 16x2 RGB LCD screen will display information telling you what the system is doing--starting up, ready, running, heating up, cooling down--and if there's an error, etc.
It will have a start/stop button to begin/pause/resume the cycle, and another pair of up/down buttons to manually adjust the sprayer position while the cycle is paused.
The main power will all come from a 120V/20A solid state relay that gets its 12V to activate through an E-stop switch, so if you hit the E-stop, it kills power to everything. (Safety first!)
There will be a low-voltage box that contains the Arduino Mega 2560, with all the control buttons and LCD mounted on the cover, sitting right between where your hands rest while you're using the table.
Any component that carries 120VAC will be inside a liquid-tight high-voltage box--bus bars, relays, 120VAC adaptors, fuses, etc.
And the water handling area will have a plexiglass front with RGB color-cycling LEDs illuminating the interior and the spray mechanism and water spray and slowly fading in and out.
And it will cost me around $800 to build, and it will probably take me a year or 2, but I'll be learning, it will be exactly how I want it to be, and I'll save 5 figures. Pretty sure if will be worth more than what I have in it when I'm done, too.
I started working at a new office in December, right before Christmas. The corporation is internationally huge and my office has hundreds of employees, but my team has about 15-20 people. We did a yankee swap with the entire office and everyone went wild for the mini game sets, like mini basketball hoop, mini football, mini pool table, mini air hockey, etc. Those were the gifts everyone (especially my team) battled for. Definitely cemented the idea in my head forever more, I know what I’m doing next year.
Along the lines of this and this
Floating beer pong racks, for when you want to party in the pool!
http://www.amazon.com/Go-Pong-Floating-Includes-Rafts/dp/B001NPQ6E0/ref=sr_1_12?ie=UTF8&qid=1371663848&sr=8-12&keywords=beer+pong