Best craft shears according to redditors
We found 13 Reddit comments discussing the best craft shears. We ranked the 8 resulting products by number of redditors who mentioned them. Here are the top 20.
We found 13 Reddit comments discussing the best craft shears. We ranked the 8 resulting products by number of redditors who mentioned them. Here are the top 20.


Edit 2: The guide is available here
-----------
I made these token mini's as an alternative to buying miniatures. They're significantly cheaper and can be made in 0.5", 1", 2", 3" sizes and cost very little (1" and 2" shown).
If enough people are interested, I'd be happy to create a DIY post or video.
Edit: I created a MS Word template (link) for 1", 2", 3", and 4" tokens for anyone that doesn't want to wait until I post my guide.
I use wooden circles as the base - they're available on Amazon in 1", 2" and 3" sizes; /u/ScoutManDan suggested MDF discs.
The tops are epoxy stickers - they're also available on Amazon in various sizes.
When it comes to assembly, this is the order I use:
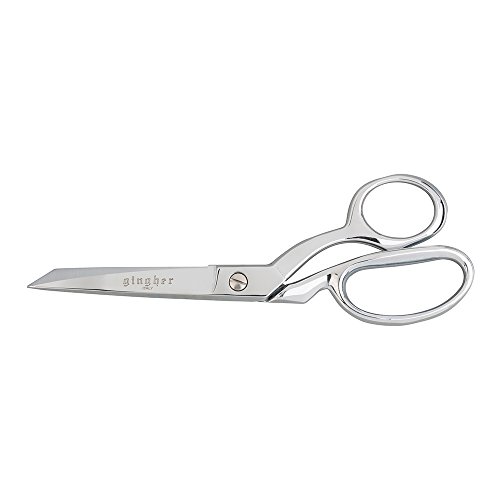
Seconding the good scissors. Be willing to spend a bit more on these. I love my Gingher shears. Do not cut anything other than fabric with these!! Seriously, there is nothing worse than dull blades that are full of nicks and don't close properly. Hubby knows I will murder him in his sleep without a second thought if I ever catch him using them, period. I bought these years ago and have only had to sharpen them once. Make sure whomever sharpens them knows what they area doing -- I had a "professional" sharpener screw up three pair of embroiders scissors. Luckily, I was able to send them to Gingher and have them fix them. I also have another less expensive pair that I keep on hand for cutting things that may ruin my good shears (sequined fabric comes to mind). The minute these start dragging they get sharpened.
I also have a rotary cutter and ruler that I LOVE. Great for straight edges. and cutting through multiple layers at once. I know people who can sut pattern pieces out with these. How they do it, I'll never know - my control is just not that good. Try searching for quilter's garage sales on Craigslist to grab them cheap. CL is a great way to find garage sales that have sewing stuff. Search "sewing" and "quilting" separately. Chances are if they mention that they have sewing stuff there is usually more than a handfull of stuff and you can get it cheap. I just got what I think is this set at a garage sale for $10 this weekend. I don;t even have my embroidery machine yet >_< but I"ll be ready when I do get it! Seriously though, haunt garage sales. (I'm still kicking myself for passing up two Singer Featherweights this weekend for $100 each)
Another idea: ask older family members. Someone might have a bunch of unused stuff laying around they might be willing to give you.
I know it seems like a cool idea, I've been down this route, too. But unless you're really doing 2-3 weddings a week or something like that, these cases are such overkill and inconvenient. They're heavy as fuck, and just have tons of wasted space. You could fit everything you have there in a moderately sized bag and still have more than adequate protection.
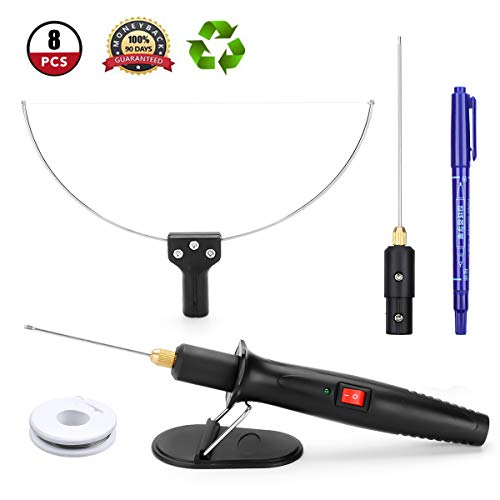
But, if you ARE doing a shitload of work and constantly are traveling with your gear, or fuckit just wanna have a roadcase for your gear, then look into the electric heated wire and tool that's used to cut this stuff. you'll get super clean cuts with almost no dust. Best way I've found is to print a template/stencil of what you want it to look like, and tape to the front and back, and then use it as a guide for the heated wand.
You can also find plans online to make homemade versions of these using large batteries.
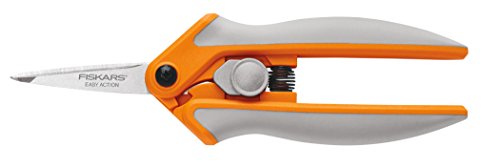
Hmmmmm. If you have enough of the purple, I think you might want to do it again, but this time with a pair of super sharp "nippers." I have a pair of Fiskars https://smile.amazon.com/Fiskars-190500-RazorEdge-Micro-Tip-Action/dp/B00UY11IFG/ref=sr_1_17?ie=UTF8&qid=1541026478&sr=8-17&keywords=fiskars+scissors and I absolutely love them. The spring action means your hands don't get tired because they open themselves up. They are really sharp and pointy and let you get right in there on all the little fussy parts.
Looking at your crown area again, you might not have to start all over; just get the nippers and clean everything up and see what you think. However, the fray check might still be super visible (and it usually stays pretty stiff) so you might want to practice using the nippers on this piece and then make another one?
You could use layers of styrofoam, which you can cut to shape with a hot wire cutter, like [this.] (https://www.amazon.com/Hercules-Hot-Knife-Styrofoam-Cutter/dp/B06Y2H64P7/)
When you have the basic shape, you can cover it with something that will take paint, like DAS modeling clay or drywall grout. Anything that dries out will likely crack as it does, because it shrinks. You can fill the cracks with more of the same.
You can paint it with acrylics and add various forms of model railroad scenery (shredded foam for bushes, various grades of sand or ballast for the scattered gravel, etc.).
There are a million tutorials out there for building scenery. Look for model railroad scenery, wargames terrain, or scale model diorama tutorials.
This is the closest thing I have made to what you're describing. I did it with styrofoam and modeling clay.
Below are tools/materials I use all the time. I keep them super handy on my work station.
Stamps/Stamping Platform/Blocks: Clear cling stamps are going to be the most space efficient for you. I buy lots of clear stamps and metal dies on ebay to save money but the quality is not nearly as good as US-made brands. If you have wood mounted stamps you can unmount them for use with the stamp platform and for easier storage. There are tutorials online. I second and third other people's recommendations of the Tim Holtz stamp platform. I use it ALL the time. You can get placement perfect for stamps but I also love it because you can reink and stamp a couple times to get a more even and inked impression. Like /u/erwtje-be said, you can put a piece of craft foam on the platform and sometimes that helps get better impressions. I get the thinner craft foam at dollar tree and also use it to raise larger sections of the card up for some dimension. For the thicker craft foam go to Michael's or another craft store. I do use acrylic blocks from time to time too. I find the round/scalloped edge type are the ones I grab most often.
Inks: My two most used inks are VersaMark and VersaFine. I use VersaMark for most of my embossing but there are awesome other techniques you can use it with too. VersaFine gets the best edges and details IMO for all regular stamping. I highly recommend the full size. Don't bother with the itty bitty baby cubes. The great thing about both of these is they can be reinked.
Embossing Powder Tool: You use this to remove static from your paper before stamping embossing ink and applying powder so the powder only sticks to your sentiment and not to finger prints or other parts of the paper. You can make your own (tutorial) buy one like this or this. I have all three but use my home made one (6 years ago) the most often. I second /u/sm9406's powder list and point that it elevates the look and feel of your cards exponentially. You can do everything with black, white, clear, silver, and gold. Use the antistatic tool on the paper that catches your embossing powder to get as much of it back in the container as possible.
Scissors/Tape/Glue: I use my Tim Holtz non-stick serrated scissors everyday. They are for cutting adhesive tapes/double stick foam. They are great if you buy tape on rolls, not necessary if you use the plastic applicator double stick stuff. I find that much less versatile than buying rolls of double stick tape and foam tape. I personally buy mine from DAISO but you may not have that store where you are. They have all different widths and I find the quality cannot be beat for $1.50 a roll. Scor Tape is also excellent though it is much more expensive. My favorite glue is the ZIG two way glue pen. When it's blue and wet it is permanent or if you let it dry clear it can be used to temporarily bond things.
Tweezers: I never bothered to get tiny craft tweezers for a looong time and now I realize how much time and headache could been avoided if I'd only known how much I would use them. To remove double stick tape backing, to position small glued elements, to pick up and place tiny embellishments, etc. These are by far the best tweezers I've bought. I tried some knock off alternatives but they honestly don't even come close. If you're going to get tweezers, I highly suggest these by EK Tools.
Ruler/Layer Tool: I'm absolutely obsessed with this tool. If you like the clean look of layered/matted paper on your cards it is a must. It will look perfect every time. You use this with an Xacto or other craft knife. You will want a self healing mat or a tempered glass cutting surface. I prefer the glass mat over the self healing because you can glue on it and ink on it and then scrape or wash it off. That link is to the one I have, it is a bit large. I know they make smaller ones though. My favorite ruler is by Tim Holtz It has the metal edge so you can run your craft knife against it. I cut things by hand with the ruler and layer tools much more often than with the paper cutter.
ScorBuddy: Like /u/Mystery_Substance suggested, the ScorPal is awesome. They make a mini version called the ScorBuddy and I use that 99% of the time over my larger one. The big one is mostly useful if you're going to make your own envelopes which I don't really do.
For snips, I have a pair of Coilmaster's and a pair of Harbor Freight $3 specials, which work really well. Scissors, I use a pair of Fiskars micro tip shears,and they have been the best I have tried so far. Fiskars 190500 RazorEdge Micro-Tip Easy Action Shears, 5 Inch, Orange and Gray https://www.amazon.com/dp/B00UY11IFG/ref=cm_sw_r_cp_taa_ufXWDbGNSXMJQ
This book by Susan Khalje has been recommended in the past. Maybe you could borrow it from the library.
I'm not sure which view is B, and I've never sewn anything like that, so I don't have much to say. I know that people keep the sewing room extra clean with paper or sheets, wash their hands every hour, and sometimes use a special marker that can be seen only under ultraviolet light.
If you are cutting slippery fabric like satin, I recommend buying a pair of Gingher microserrated shears. They grip the fabric.
Hot Wire Foam Cutter, Genround Styrofoam Cutter, 572°F Electric Cutting Tools Hot Knife Foam Cutter - 2 x 4 inch Foam Cutting Pen Foam Cutting Tools for Polyethylene EVA Foam Carving, DIY Crafts https://www.amazon.com/dp/B01MZ3VE4J/ref=cm_sw_r_cp_api_i_VGgaCb81SVSWW
Save yourself the time next time.
Pretty much this! Also, if you're really getting into it the next best purchase would be a hot wire cutter similar to this. https://www.amazon.com/Cutter-Genround-Styrofoam-Electric-Cutting/dp/B01MZ3VE4J/ref=sr_1_1_sspa?ie=UTF8&qid=1549932564&sr=8-1-spons&keywords=foam+cutter&psc=1
&#x200B;
I can't think of what else you'd need to start making great pieces. You can pickup various acrylic paints at your local hobby store for pretty cheap too.
I used a soldering iron with a piece of stiff wire in place of the tip. Ideally you could use a hot wire foam cutter