Best paper trimmer blades according to redditors
We found 25 Reddit comments discussing the best paper trimmer blades. We ranked the 11 resulting products by number of redditors who mentioned them. Here are the top 20.
We found 25 Reddit comments discussing the best paper trimmer blades. We ranked the 11 resulting products by number of redditors who mentioned them. Here are the top 20.


Hello all, in a previous post made yesterday, I had replied with a picture of a drawer of my Alex 9 unit and received a few of inquiries about how I made my drawer organizers. So, I decided to try my best to tell you how I did it. I apologize I wasn't able to make a complete step by step with a ton of photos, but this process was done over a year ago, and I wasn't really planning on doing it again since I finished!
Materials Needed:
Ruler
X-acto Knife
-I would recommend some extra blades as well-
--Foam Board (the more the merrier)--
Flathead Pins
--Contact Paper--
-The blades become dull fairly quickly, I think I used about four during the process-
--I was able to get a piece for $.99 at Michael’s on sale
---I decided to wrap each piece with contact paper because it makes it very easy to clean. In my actual vanity, I used fabric and it has gotten dirty and damaged and I 100% don't recommend it--
Template Materials:
Copy Paper or Grid Paper
Ruler
Actual makeup products
Steps:
Some other things to note:
In my palette drawer, I created L shaped panels to allow for the palette to be better seen
I also purchased from byAlegory a liquid lipstick and lipstick organizers to build around
In my lipstick drawer, I purchased little glass beads to allow for the products to stand up better
My paper towel drawer has a holder which I created using a wooden dowel and clay
Also, I grabbed plastic liquid dispensers to easily get to my various liquids
Managed to slice my finger open making little lids of acrylic to hold all my disposable paper products
*Most of my other acrylic pieces have been purchased from MUJI
I hope you enjoyed my
~teal battlestation~, if you have any other questions about it feel free to ask. And I'm sorry if it was unclear at all. And, I'm 100% aware I have a stupid amount of makeup that I've gotten over the years as a makeup artist, Sephora employee, and a true Make Up Addict.---
Section 1: Tools
---
Note: Just because it is more expensive doesn't mean it is better. You could get by just fine with the "cheaper" options.
---
| Tool | Required vs. Optional | Use | Notes | Price & Link |
|:---|:---:|:---|:---|:---:|:---:|
| Tandy Wholesale Membership | O | Allows you to get better pricing at Tandy. | This is definitely optional. Items will cost slightly more without it OR if you have a tax ID you can get the membership with better pricing for free. | $35 / Free|
| Awl Haft | R | The handle which will hold your blade. | This particular haft allows for different blades to be added or removed with ease. | $16 / $35|
| Diamond Awl Blade| R | This is the blade used for piercing the holes in your projects.| This goes in the awl haft.| $4.80 / $28
| Channel Groover | R | Used to measure and gouge channels where your thread will lay. | Some say gouging a channel is optional however I find it to be required. It further protects your thread from damage. | $16 / $80 |
| Overstitch Wheel | R | Marks where you will punch your holes. | This particular overstitch wheel is a few dollars more than the versions that only offer one wheel. | $24 / $225 |
| Edge Beveler | R | Used to bevel and round off the edges of your project prior to burnishing. | Sizes vary. The smaller the number, the smaller the round edge. | $12 / $55 |
| Adhesive Glue | O | Used to hold your pieces of leather together prior to piercing the holes. | Some people prefer binder clips instead of glue. I've found that the clips end up making marks on my projects so I've always stuck with glue. | $6 / $30 |
| Gum Tragacanth | R | Used as a burnishing agent for your edges.| Some people use saddle soap. I prefer gum trag.| $6.40 / $21|
| Harness Needles | R | Used in combination with the thread for your projects. | Avoid the stitching needles. They break very easily.| $5.99 / $7.50 |
| Xacto Blade | R | Used for cutting projects. | You may have one of these at home already. Be ready to have replacement blades handy ($21.95) | $2.49 / $50 |
| Self-Healing Cutting Mat | R | Used for cutting your leather projects.| You may have one of these at home already. If so, you can obviously use that.| $14.73 / $50.80 |
| Cork-backed Ruler| R | Used for cutting straight lines.| I highly recommend the cork-backed version. It will save from accidental cuts/slips.| $4.80 / $14 |
| Burnishing Tool | R | Used in combination with the gum tragacanth to get a good burnish.| A good piece of canvas can be used as well. | $8.99 / $80 + $99|
| Sanding Tool| O | Used to sand down the edges prior to burnishing.| You might have sandpaper at home. Feel free to use that too.| $7.30 / $0 with dremel|
| Steel Square | O | Used for creating nice, even squares/rectangles for projects. | Learn to use this correctly!| $8 / $14|
| Thread Cutters | O | Use these for cutting your thread in the hard to reach places without running the risk of damaging your project. | Scissors work for cutting thread and the xacto blade can work for cutting thread inside your projects -- just be careful! | $3.95 / $39 |
| Maul | O | Used for end punches, rivets, snaps, chisels, or irons. | You really only need one of these if you are planning on doing any of the activities mentioned previously. | $20 / $55 |
| Pricking Iron/Chisel | O | Use these to mark or punch your holes instead of an overstitch wheel and awl. I prefer using the overstitch wheel and awl but others like the irons/chisels. | There is a big difference between irons vs. chisels, diamond vs. lacing. They all produce different results. Definitely ask before purchasing! The ones I linked are very different.| $12 / $259|
| Creaser | O | Used for decorative creases on things like card slots. | Definitely optional and definitely personal preference. | $14.40 / $72 |
| Wax | O | Used for burnishing. Gives the edges a nice seal. | The $10 is my top secret wax I use. I bought a bunch on sale for $5 and it is fantastic. | $4 / $10|
---
The Logan Foamwerks Straight Cutter has been a godsend for me for making inserts. It cuts straight and square in a single pass, and the blades last exponentially longer than normal XActo blades. It's fantastic.
If you're picking one up tomorrow, I strongly suggest also grabbing an Adapt-A-Rule along with it. The Adapt-A-Rule has a channel that the Logan cutters fit into that guides them, ensuring a perfectly straight cut.
I consider those two tools an absolute necessity.
EasyCut Replacement Blades, Standard, 81pc, 09703 https://www.amazon.com/dp/B07NXVV4DH/ref=cm_sw_r_cp_api_i_rCNWCbPHQ37NF
Link to blades on amazon!
Would [this] (https://amazon.com/dp/B075NYWF5P/ref=cm_sw_r_cp_apa_i_OV4TCbJYYH80Q) help?
I'm also into Gundam models and I went through the same thing a while back.. I probably tried a dozen types of side cutters until I found ones that work. The problem is many of the jewelers cutters don't have a straight edge, since they are designed to cut metal. So even if the edge of the blade is flush with the piece you cut, you still get end up with some plastic attached.
These are by FAR the best ones I've found: https://www.amazon.ca/dp/B002SZVE8M/
The blades are very sharp, and they're small enough to get into tight spaces. I would suggest you order a couple pairs. These even blow away the Tamiya cutters you posted (I bought those too and they sit in a drawer unused).
Note that regardless of how close you get the cut, you will still need to cut / file away the extra plastic bit on the piece. I use an x-acto knife with the following blades: https://www.amazon.ca/dp/B00006ICJV
Then use a series of finer files to get the piece smooth.
I use a Jielisi 12 inch scrapbooking cutter for my bolts of sealing material. Scrapbook paper cutter
Since I buy 50 foot rolls of 11" and 8" vac sealer bag material, I put an adjustable paper towel holder on 1 end, feeding the material into the cutting area. 3 years now, no problems making clean, straight cuts. Hope this helps!!
Ten bucks:
https://www.amazon.com/ELMERS-X-Acto-Retract--Blade-Blue-X3204/dp/B007XZTC90
I like having absolute control over my grind. I find different grinders grind herb to dust or leave it quite chunky. The space case is a chunky grind, and my easyleaf mashes anything but wet bud into powder. Those plastic grinders with the pyramid teeth just mash the herb and gum up first session.
Another reason is the scissors are much easier to clean. Grinders get filled with gunk unless you keep them good and clean - just like scissors. The scissors just require a whip over with a blade. With a grinder you have to pick around the teeth, it's nowhere near as bad if you only grind properly dried bud. However, I've also had problems with properly cured resinous trees.
The only thing I don't like is how long it takes to chop with the scissors, and the dreaded knuckle ache.
I'm thinking of getting a Russell Hobbs mini chopper as a decent halfway house - quick, easy to clean, and controllable. I have one in the kitchen, but if I were caught experimenting there would be some very harsh words in my direction.
E: Vis scissors I'm a believer in a very short blade (oh that's what they're called) and a long handle, more leverage means less stress on your finger and thumb. A nice pointed blade like the ones you're using helps with gunk buildup too.
Instead of scissors you could use those tiny trimming shears, or a bigger bowl and a pair of pruning shears. You could go for hours with a pair of those.
Some will point you towards getting the tamiya knife, and here's a similar style olfa art knife. Note the replacement blades for the olfa. I also happen to use snap off blades, in addition to xacto and the tamiya knife. I have an olfa one. I happen to not use exacto knives for gundam anymore though. The tamiya model knife and olfa snap off meet my needs just fine due to the angles of cuts I tend to make and angle of the cutting edges of the knives.
And some sand paper, since you included putty.
And lastly, some cheap ass brushes to go along with good paint brushes; decent tooth pics (if you snap it off, the thin layers of wood can be a cheap fine detail brush)... etc.
Yes it does dull over time. It is rather significant. However, even with a slightly dulled blade, it cuts the flash off just fine. The parts you want to remove are almost always weaker/thinner than the actual detail on the miniature, so you can casually remove the excess with ease.
Plus, much of the 'cutting' power of the knife doesn't rely on it being super-sharp, it requires a simple blade and pressure. I find I cut myself much less often when using slaightly dulled blades.
Sharpening isn't necessary. Replacement blades are really cheap, and you don't have to get X-Acto brand blades.
http://www.amazon.com/X-Acto-X611-Blades-Knives-Bulk/dp/B00006ICJV/ref=sr_1_3?ie=UTF8&qid=1367812873&sr=8-3&keywords=xacto+blades
http://www.amazon.com/Techni-Edge-11-Hobby-Blades/dp/B0006GBSXG/ref=sr_1_1?ie=UTF8&qid=1367812873&sr=8-1&keywords=xacto+blades
http://www.amazon.com/Fiskars-96017197-Craft-Knife-Blades/dp/B0033PORF8/ref=sr_1_1?ie=UTF8&qid=1367813009&sr=8-1&keywords=craft+knife+blades
The sidebar has some great info on tools and what to do. Get an exacto knife and plenty of blades, get a self healing cutting mat, get some cardstock to print onto for a sturdy model, get some Aleenes tacky glue. Print the model onto the cardstock and then carefully and slowly cut it out. Fold the tabs, glue with the tacky glue (only takes 30 seconds to a minute to attach firmly) and continue! Take your time and cut as accurately as possible in order to get the best result..
I use these:
Elmer's self-adhesive foam board
I have a channel rail and cutter to make it fit.
I have an Xacto circle cutter.... https://www.amazon.com/X-ACTO-X2020-Designer-Circle-Cutter/dp/B004DNX71E
http://www.amazon.ca/X-Acto-X611-Blades-Knives-Bulk/dp/B00006ICJV
these are what i use (blue) i ordered them from S&T office products, havnt seen them anywhere else really i ordered a 100 pack probably a year ago and still have 60 or so id say they last 5x longer then the normal colored ones
the black blades i havnt seen in xacto form, only in the flat razors ...opp did a search http://www.artistsupplysource.com/product/20549/cutting-tools/art-knives-and-blades/x-acto-no-11-carbon-steel-blade-blister-carded-pack-of-5/ CARBON STEEL :OOOOO
These would be super easy to make especially if you have the right machine - https://www.amazon.com/Binding-Machine-Manual-Operation-BUYOR/dp/B07GDXK1HB/ref=sr_1_2_sspa?ie=UTF8&qid=1541711463&sr=8-2-spons&keywords=binding+machine&psc=1 (Push down to create the hole punch and push back to open up the binding and slide on the paper.)
Based on your dimensions it looks like the previous person may have just been printing out 2 per page then cutting them in half. (8.5/11 page). Hole punching then sliding them on the binders.
​
Now for the covers, they just look like clear binding covers: https://www.amazon.com/Fellowes-Binding-Presentation-Covers-52089/dp/B0015ZVXIW/ref=sr_1_3?ie=UTF8&qid=1541711751&sr=8-3&keywords=clear+binding+cover
​
And then if you want to be exact I recommend a steady hand or just a standard paper cutter. https://www.amazon.com/Firbon-Scrapbooking-Automatic-Safeguard-Cardstock/dp/B075NYWF5P/ref=sr_1_5?s=office-products&ie=UTF8&qid=1541711789&sr=1-5&keywords=paper+cutter
​
You may have to recreate the file itself, but overall easy to do!
​
Hopefully that helps!
​
Edit: And binding combs, which could also just be cut in half with scissors
2nd Edit: The paper, I would personally use a cardstock for the covers, but that would generally be personal preference. The inside you could just use regular paper
​
​
I use a combination of techniques. 3D printed dungeon tiles, dry erase flip mat and tiles. If there is a nice pre-existing gridded map I want to use then I will print it at home.
I use a relatively cheap Ink Jet printer and I added a "continuous ink supply" system (CISS) purchased off eBay. It has paid for itself many times over.
I print the maps full size on many letter sized sheets. Trim the edges as necessary using a ruler and utility knife or something like This.
Next I will use small pieces of Post-It tape to hold the pieces together from the front side.
Finally, I flip the whole thing over and use packing tape along the seams on the back of the map. Then the Post-it tape can be easily removed without tearing up the map or messing with the images at all. You can follow-up by running a glue pen inside the overlap from the top of the map if you wish.
It sounds like a lot of work, but I can generally do a map that spans 8 pages in about 30 min from PC to finished paper map. It's much cheaper then printing at a print shop. After 2 or 3 maps the CISS and supplies pay for themselves. I try to reserve this for larger areas or maps that might be reusable.
Many map makers on Patreon also make modular systems, like forests, cities, etc. I print these out and glue them to 8" x 8" pieces of chipboard or cereal box. They can go together any way you want.
I would invest in the paper cutter. They really are not very expensive--i have what I imagine is probably the smallest size and it works for my everyday crafting needs.
You can also try folding, licking the edge, and tearing paper. I do that and actually really like the soft edge you get. Just practice a bit and as long as you fold straight, you'll get straight pieces from it.
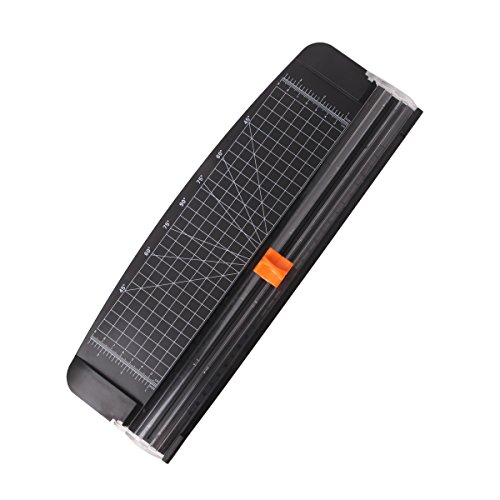
P.S. Here's a 12 inch cutter from Amazon, I have the same size but different brand. This one is under $11: https://www.amazon.com/dp/B075NYWF5P/ref=cm_sw_r_cp_api_i_tFiYDbC67CWHZ
Does anyone know if #11 blades will fit in the Tamiya Design Knife (74020)?
I lost my replacement blades for the Tamiya, so was wondering if these will work
I used Oracal vinyl and a paper cutter for the angles/straight-edge cuts.
I watched this video and it really helped me out + gave me direction with applying the vinyl, even though it was my first time messing with it on a bike.
Before cutting the pieces out of the vinyl roll, I used paper to help create a template. I didn't take many photos of the process, but I did create a "highlight" on my Instagram account (same username), showing a few pics/vids that I took during the process.
Get a paper cutter
https://www.amazon.com/Jielisi-Trimmer-Automatic-Security-Safeguard/dp/B00LX398CY/ref=mp_s_a_1_9?ie=UTF8&qid=1542076641&sr=8-9&pi=AC_SX236_SY340_QL65&keywords=paper+cutter&dpPl=1&dpID=41LrZ7zBMqL&ref=plSrch