(Part 2) Best pipe fittings according to redditors
We found 380 Reddit comments discussing the best pipe fittings. We ranked the 259 resulting products by number of redditors who mentioned them. Here are the products ranked 21-40. You can also go back to the previous section.


26. Automatic Shut-Off Valve with Quick-Connect Fittings For RO Reverse Osmosis
2 mentions

QC fittings


Four inch fittings are usually made to fit inside a hose -- not to mate with other fittings. So use a short length of hose, or a Fernco plumbing flexible coupling sleeve, to connect them.
For shop-vac hoses, the fittings come in male and female. For example, you can get a F-F coupler (just a short length of plastic pipe) to connect two male 2.5-in fittings.
For reference, the shop-vac male 2.5 fittings have an outer-diameter (OD) of about 2.28-in but are usually slightly tapered. The female fittings have an ID of about 2.30-in.
I also find this coupler useful, which is male shop-vac on one side, and male 4-in hose on the other:
https://www.amazon.com/gp/product/B00M3J60O6
Non-mobile: http://www.amazon.com/dp/B00FB56SAU/ref=redir_mdp_mobile/179-3844062-9825103
^That's ^why ^I'm ^here, ^I ^don't ^judge ^you. ^PM ^/u/xl0 ^if ^I'm ^causing ^any ^trouble. ^WUT?
Water hammer possibly. Look into a water hammer arrester.
This worked for me when I had the same issue.
Sioux Chief Mfg 660-TK Female Swivel Ballcock Nut by Male Ballcock Thread Mini Rester https://www.amazon.com/dp/B000JRGAMQ/ref=cm_sw_r_cp_api_-t9Izb3WE1SE3
GX16-2
http://www.amazon.com/gp/aw/d/B00FB56SAU/ref=redir_mdp_mobile/179-3844062-9825103
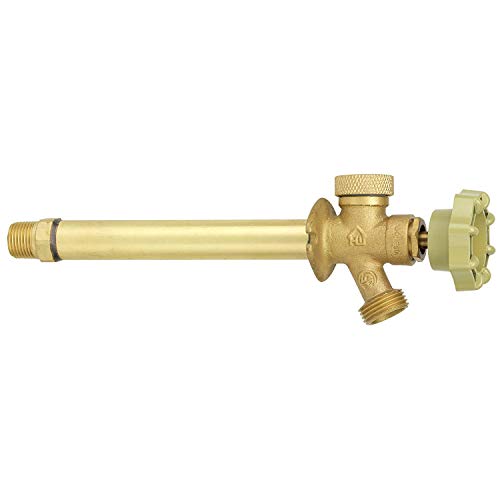
Looks like this. The valve part is set back so the water cuts off inside your house. So there is less chance it will freeze.
Homewerks VFF-ASP-C19PA Anti-Siphon Frost Free Sillcock, 1/2-Inch Male Thread or 1/2-Inch Solder, 1/2-Inch inlet by ¾ inch garden hose thread outlet by 12-Inch in length https://www.amazon.com/dp/B00D4VE1MA/ref=cm_sw_r_cp_apa_i_hwqiDb9VY8SBX
Yep, you need one of these: http://www.amazon.com/gp/product/B00BC057UK/ref=as_li_tl?ie=UTF8&camp=1789&creative=9325&creativeASIN=B00BC057UK&linkCode=as2&tag=aquarnetwo-20&linkId=P7JMPQCUL77BXB44
so you don't waste water.
You can message me if you need any help installing it
The white line? That's coming from the dishwasher. I think, I can use these two items where the dishwasher connects.
https://www.amazon.com/dp/B001TIZI68/ref=cm_sw_r_cp_apa_WnvhAb5R5TFDK
And
https://www.amazon.com/dp/B009XDMEK4/ref=cm_sw_r_cp_apa_sqvhAb4MS86DC
I don't see why you would need 2 coolers. Also those cylindrical coolers are more expensive than the rectangular ones by quite a bit. The stir plate is overkill even though it's "free".
Make your own mash tun! This is all stainless unlike the one you linked. Brass sucks.
52 quart cooler $39
Stainless spigot with bulkhead and bushing $29
6" stainless screen $10
1/2" stainless barb adapter $7
And some 1/2" foodsafe silicone tubing, maybe 3 feet
Assembly is super easy, just remove the plastic spigot and put on the stainless one.
Yeah, you can get them at places like Home Depot and amazon for around $25.
https://smile.amazon.com/PlumBest-M25127R3-2-Inch-27-Inch-Water/dp/B0069QU7Z2
I just redid my kitchen as well so I bought one of these and one of these to clean up the ends, to make sure I got a clean cut every time. If you think you might do more pex work in future, probably worth dropping $20 to get them.
But if this is a one time thing, pex is pretty soft - you could use a hacksaw, or even a utility knife, and just clean up the cut with the knife afterward. Key is to make sure your cut is perpendicular to the pipe, and that there are NO stray bits of plastic around the rim at the cut end Put a little bevel on the end with a knife for best results. And make a little mark 1" from the end of the pipe, so you can make sure it is inserted all the way into the fitting.
These are GREAT connetors. They come in multiple diameter sizes too.
Here is the proper tubing too. Again they come in different diameters.
You need something similar to this that’s fits yours sink. I would double check your measurements first, but this one will work on most US sinks.
JG Speedfit ASVPP1LF 3/8-Inch by 3/8-Inch by 1/4-Inch Angle Stop Adapter Valve https://www.amazon.com/dp/B003YKF2JC/ref=cm_sw_r_cp_api_cW20AbQK14V7M
Fyi. Just did this project. I used
Superior Tool 35034 3/4-Inch... https://www.amazon.com/dp/B004Q0QOVE?ref=ppx_pop_mob_ap_share
And
SharkBite Deburring Pipe and... https://www.amazon.com/dp/B000K6QFSU?ref=ppx_pop_mob_ap_share
Make sure your cutting tool is the right size though. It was a breeze for me.
Thanks! I ended up ordering these:
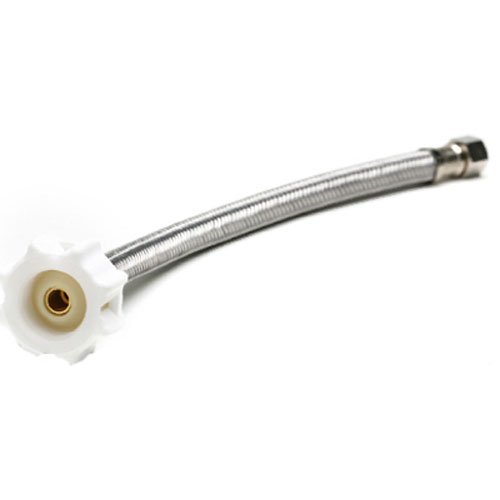
Decor Star VSF38-27 3/8" OD 6 mm ID Vessel Sink Faucet Stainless Steel Flexible Water Supply Hoses 27" Long, UPC, cUPC x 2 (1 Pair) https://smile.amazon.com/dp/B00EA15BJK/ref=cm_sw_r_other_apa_i_mCHyCbD90B1TG
You may not need a frost free in FL, but you should install one with an integral vacuum breaker (anti-siphon). This prevents water from the hose being siphoned back into your potable water system. Anymore, hose bibbs with a vacuum breaker are required by code, and most of them just happen to also be frost free (meaning the actual valve is housed at the back of the fixture, which would place it inside the conditioned space of the house instead of outside at the point of use).
This is what you want. If you scroll down and look at "People also bought..." you'll see a SharkBite FIP. Get that, as well. Cut your pipe back inside the house to where it needs to be using a tubing cutter (NOT a hacksaw... you need a clean cut), pop the SharkBite FIP on, and screw the new sillcock into it (with a couple wraps of tape). The SharkBite can rotate on the pipe, so the orientation of your new hose bibb is whatever you want it to be; just screw it onto the house when it's pointing the right way.
this to this to this
of course you could just buy this
Like others have said, one of these is probably more along the line of what you want.
And no, you generally should not move the drain to one of the higher openings. Its at the bottom because that's where you want your condensate draining from. Ideally, you would install one of these in the higher openings to shut the system down if your drain clogs and water rises to that level.
you're missing a little piece in your RODI, some come with them, some dont.
Its this little doodad
Don't use a drain saddle, use a DLA-D drain adapter. It hooks to the dishwasher drain at the garbage disposal and allows you to tee in the RO drain. It's completely reversible and less likely to leak in the future. https://www.amazon.com/Watts-Premier-164020-Plumbing-Adapter/dp/B009XDMEK4
If you don't want to use the DLA-D then drill the black elbow coming off the disposal
Grab one of these to use as your Hot Lauter Tun and you're good to go. Just drain your sparge water from your keggle in (I typically aim 5ish degrees high to accommodate heat loss on the transfer). Then vorlauf your mashtun and drain the first runnings into the now empty kettle. Start heating the kettle. Dump the sparge water from your cooler HLT into your mashtun (don't forget to close the spigot first!). Aim for 168 F final temperature (I use 180 F sparge water). Stir in, wait 5 minutes, then vorlauf and finally drain into your boil kettle.
If you want, you can modify your cooler HLT with a spigot so you can drain from it instead of having to dump (or pump out if you get into that).
I have the dual fuel smoker. Get a needle valve, it works. It takes very minor adjustments to slow the fuel. You'll need tape, and extra propane gas line as well. You will have to keep an eye on it to make sure it doesn't blow out, but it hasn't done it on me yet. I got exactly this:
http://www.amazon.com/LASCO-17-1631-8-Inch-Straight-Needle/dp/B008E5C7NG
http://www.amazon.com/Camco-59913-Propane-Hose-Assembly/dp/B007HG7Y7M
http://www.amazon.com/44094-Slic-Tite-Thread-Premium-Length/dp/B004MYFPAK
This pipe is fine. Haters are going to hate on anything that isn't glass, when there are a great many cheaper materials that work perfectly for pipe making. I have been using brass and brass pipe screens for years, and have had no problems with it. Brass fittings are lead free, and that's the only legitimate concern. Otherwise, the pipe may get a little hot, but it has never got too hot for me to not be able to touch the pipe. I do have one recommendation, though. Get one of these off of Amazon. It's a brass bowl that will screw into that pipe and then you'll have a real bowl. You will probably need some Brass Pipe Screens for it too, but none of this is expensive, and the brass bowl comes in a set of 2, so you can have two pipes. I've had the same pipe for over a year, and it still works perfectly. And the major advantage that brass has over glass: you can drop it without it shattering.
Is there any particular reason you're using that glass? It looks like its already fractured, and may be jagged around the edges. From the looks of it, you may be better off using a brass bowlpiece, it wouldn't look too bad either. You can usually get them at headshops. That way you would just bore a hole slightly smaller then the bowl and screw it in, no adhesive required. Something like this is what im think of: https://www.amazon.com/TWO-Standard-Pipe-Bowls-BRASS/dp/B005MGU5TI
Anywho, good luck!
If this is the case, you can use a air admittance valve under the sink. https://www.amazon.ca/Oatey-39017-Sure-Vent-Admittance-Adapter/dp/B0069KCZO4/ref=asc_df_B0069KCZO4/?tag=googleshopc0c-20&linkCode=df0&hvadid=292930174785&hvpos=1o1&hvnetw=g&hvrand=4194651304515183041&hvpone=&hvptwo=&hvqmt=&hvdev=c&hvdvcmdl=&hvlocint=&hvlocphy=1001849&hvtargid=pla-311232934043&psc=1
​
They are well within the capability of most DIYers. Put in a Y downstream from the trap, then run pipe to put the valve as close to the top of the undersink space as you can. Not sure why these aren't used more often rather than running stacks.
You might already have air chamber shock absorbers, in which case you could recharge them: shut off the main, open all fixtures to drain the pipes, let it sit awhile, close the fixtures, turn on the main. See if that reduces the hammer, and then see how long it lasts.
Otherwise just install the screw-on hammer arresters at the washing machine and any other fixture that's causing water hammer:
https://www.amazon.com/Sioux-Chief-Mfg-660-H-4-Inch/dp/B000H5MQNM
https://www.amazon.com/dp/B000JRGAMQ/ref=asc_df_B000JRGAMQ4949869
https://www.amazon.com/dp/B008RI63BW/ref=psdc_3226897011_t2_B000JRGAMQ
Also, instead of all that nonsense, you could just get the adapter that's literally made for that...
https://www.amazon.com/dp/B00M3J60O6/
and they are available on amazon prime. https://www.amazon.com/Speedfit-ASVPP1LF-8-Inch-4-Inch-Adapter/dp/B003YKF2JC/ref=sr_1_1?ie=UTF8&qid=1485804435&sr=8-1&keywords=ASVPP1LF
Sorry I'm late to respond, but if you want to reply to someone, you need to click the "reply" link under their comment. Then add your comment as a reply to them, it will notify them you replied, and they'll know the reply is for them.
This reply is probably a bit long, lol. But I'm bored, so I go into some detail, and give some suggestions on tools n' such you can use for various things. You don't have to use them, obviously.
===
====
I do my mashing in a 5gal stainless steel pot, and I do my fermenting in these 5gal buckets (foodsafe from Home Depot). I use these lids, as it has an extendable spout which is the perfect diameter for a No. 7 size drilled rubber stopper, which I stick the airlock in.
For the actual mashing process. I do the following. So, not far off from what you do, except the starting temperature, since going above 161F can damage some of your enzymes and slow things down. These steps haven't failed me yet.
I mix up the yeast culture as soon as I hit the 150F temp of the mash, by pouring the yeast (1tbsp) into 2cups of warm water with a pinch of sugar, a pinch of DAP (aka diammonium phosphate), and a pinch of Magnesium sulfate (aka epsom salt, I bought at walmart in a large jug). Then I just let it sit while the yeast rehydrates and starts doing it's thing. When the mash is down to around 80F, I pour that mash into a sanitized 5gal bucket, then when it hits between 75F to 70F, I pour the yeast mix into the mash in the bucket, close the lid, put in the stopper+airlock, and leave it alone for about 3 days, before I check on it.
When I check on it, if it has slowed down significantly, or is stuck. I do the following:
That usually accounts for all the stuck fermentation issues.
===
===
Hope this helps!
That was my fallback plan, but I actually found, after much searching, a replacement for the proprietary supply lines on Amazon. For anyone else with this problem: https://www.amazon.com/gp/product/B00EA15BJK/ref=oh_aui_detailpage_o01_s00?ie=UTF8&psc=1.
This is the hose https://www.amazon.com/dp/B005SPLBWS/ref=cm_sw_r_cp_awdb_t1_1y8XBbF9F2V80
And I'd also like to add that I've had this for 3 months and no issues so far but I wouldn't mind preventing a burst from happening
They used a very similar trap as the one you linked. In the 16 years I've been here, I've only had one clog in the trap, everything else was much farther down the drain line after it enters the walls/floor. I'd love to go and replace it with a slightly larger diameter pipe, but to do that I'd need to cut up my downstairs neighbor's ceilings, and I'm just not wanting to do that.
​
While yeah, I'd be upset if the trap fell out and poured water everywhere, the old one was unglued from June '03 (when I bought, probably earlier) to Nov '18 when the system was replaced. Never had an issue with it coming undone.
​
I'll probably end up picking up some unions and calling it a day
​
Edit: Pretty sure this is the trap I've got. I'd upload a pic of my setup but can't hit image hosting from work :/
I've never seen the part you're describing all in one piece.
But you might be able to go from this to this to this, to accomplish what I think you are trying to accomplish.
No. Even if you do need to shut off the hot, the cold will not need shutting plus DO NOT DRAIN THE TANK. Shut off the supply to tank and open a few hot taps. But.... Check local codes tho I haven't see any against [this] (https://www.amazon.com/gp/aw/d/B003B6JC4A/ref=mp_s_a_1_1?ie=UTF8&qid=1479603482&sr=8-1&pi=SY200_QL40&keywords=Add+an+tee&dpPl=1&dpID=41NYFZBMQoL&ref=plSrch) . Assuming it's a 3/8 compression stop, this goes onto the hot valve for the kitchen faucet then the new line for the d/w comes off the side. Also don't forget that any solenoid (electric) valve must have a [water hammer arrester] (https://www.amazon.com/gp/aw/d/B00D73MFCI/ref=pd_aw_fbt_60_img_2?ie=UTF8&psc=1&refRID=2DQC7YW7K7DW2D8P069E), in my area anyway. That's dishwasher, washing machine, fridge icemaker / filters.
You are correct. You could also mount a studor valve (air admittance valve) on it:
https://www.amazon.com/Oatey-39017-Sure-Vent-Admittance-Adapter/dp/B0069KCZO4
Check the secondary after you correct/change the primary, and see if it, too, is leaking cold air.
Ya, thinking about it a bit more I will probably skip the floor heating for the garage. More effort than it's worth. Might do a couple loops in the house though. Maybe something like https://www.amazon.com/Ft-Aluminum-Transfer-Radiant-Heating/dp/B009KT7PO6 since I have a partially finished basement that give me access to the most of the floors on the main level.
Regular old heat transfer plates should be cheaper if you're willing to build around them.
Eg
https://www.amazon.com/Ft-Aluminum-Transfer-Radiant-Heating/dp/B009KT7PO6
I bought one of these and shut my own valve off at the street. It's easy if you know where it is. Nobody will ever know...
https://www.amazon.com/dp/B0069QU7Z2/ref=cm_sw_r_sms_apa_i_-WFTDbF7MASXY
Tubbing: http://www.amazon.com/dp/B000BVS1YK/
Connector: http://www.amazon.com/dp/B003WJRG30/
Cutters: http://www.amazon.com/dp/B000HSAPR8/
You are correct and this is the one I have.
https://www.amazon.com/LASCO-17-1631-8-Inch-Straight-Needle/dp/B008E5C7NG/ref=mp_s_a_1_4?keywords=lasco+3%2F8+needle+valve&qid=1563645759&s=gateway&sr=8-4
Hope you're using a stainless steel flex supply line.. this if you are there is no problem bending it ,it was made for that.