(Part 2) Top products from r/Reprap
We found 21 product mentions on r/Reprap. We ranked the 95 resulting products by number of redditors who mentioned them. Here are the products ranked 21-40. You can also go back to the previous section.
21. eTopxizu Dc 24v 15a 360w Switching Power Supply Transformer Regulated
Sentiment score: 1
Number of reviews: 1
Input: 110V/220V AC; Output: DC 24V 15A max. Output voltage is adjustable 15%. Three sets of output Channel.Safety features: Automatic overload cut-off, over Voltage cut-off, automatic thermal cut-off, short circuit protection.Voltage consistency: There is no voltage fluctuations to speak of at powe...
 Show Reddit reviews
22. Symtec Black Handlebar Warmer Kit with Round Rocker Switch for ATV Snowmobile
Sentiment score: 1
Number of reviews: 1
 Show Reddit reviews
23. Elenco Practical Soldering Project Kit
Sentiment score: 0
Number of reviews: 1
Build a fun two tone European sirenLearn about multivibrator circuitsGain valuable experience working with printed circuit boardsMade in the United StatesFor 30 years Elenco has been using their strong engineering and design skills to develop reliable, affordable electronic test equipment, tools, an...
 Show Reddit reviews
24. W S Deans Company Connector: Micro 4R 4 Pin, Black, WSD1241
Sentiment score: 0
Number of reviews: 1
Deans 1241 - Micro 4B PlugFeatures:Part number(s) included (in factory packaging): 1241Includes: (1) Micro 4B Plug with Mating Plug (8) Sections of Shrink TubingSpecs: Micro Plug; Mating Plug, Length: .47" (12mm) Including Pins .69" (17.5mm) Including Pins, Width: .43" (11mm) .43" (11mm), Thickness:...
 Show Reddit reviews
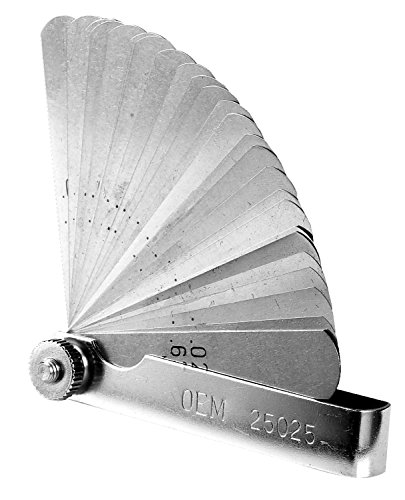
25. OEMTOOLS 25025 26 Blade Master Feeler Gauge
Sentiment score: 0
Number of reviews: 1
26 Hardened, Tempered Steel BladesMeasures: 0.0015 Inch (0.038 mm) to 0.025 Inch (0.635 mm)Chrome Plated Main Shaft for Easy Clean Up and Professional LookEach Blade is Laser Etched with Inches and MillimetersBlade Protector has Thumb Notch to Aid in Removal of Blades
 Show Reddit reviews
26. Weller SP40LK 40 Watt Soldering Iron Kit
Sentiment score: 0
Number of reviews: 1
Lightweight pencil iron develops 900 degrees FStainless steel barrel and heat and impact resistant handleIndicator light allows you to instantly see that the iron is on
 Show Reddit reviews
27. Silverline Tools - Metric Dial Indicator - 0 - 10mm
Sentiment score: 1
Number of reviews: 1
High precision 50 mm dial indicator Rotating bezel with lock for zero setting Range 0 - 10 mm, graduation 0.01 mm
 Show Reddit reviews
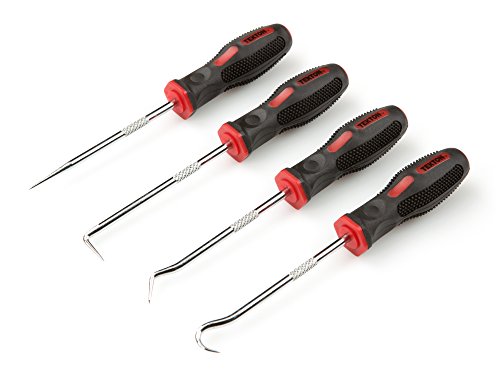
28. TEKTON 6943 Precision Pick and Hook Set, 4-Piece
Sentiment score: 1
Number of reviews: 1
Heat treated, chrome vanadium steel shaftsCushioned, non-slip grips for extra controlKnurled shaft grip area for precise workIdeal for assembly, repair, or removal of small partsSet Includes: 1-pc. Full Hook, 1-pc. 45-degree, 1-pc. 90-degree, 1-pc. Straight PickHeat treated, chrome vanadium steel sh...
 Show Reddit reviews
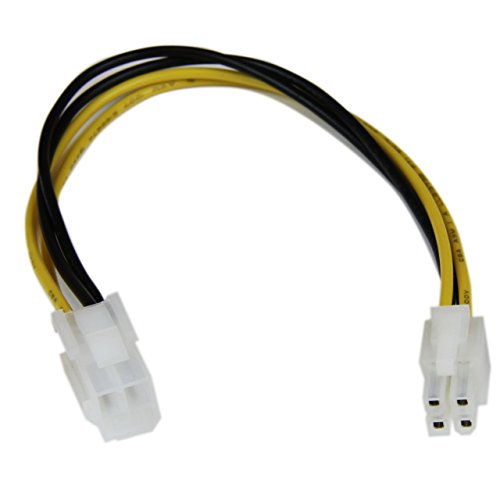
29. StarTech.com 8in ATX12V 4 Pin P4 CPU Power Extension Cable - M/F - Power extension cable - 4 pin ATX12V (M) to 4 pin ATX12V (F) - 7.9 in - ATXP4EXT
Sentiment score: 0
Number of reviews: 1
Extend the reach of your ATX12V power supply CPU power connector by 8inATX12V 4 Pin P4 CPU Power Extension CableM/FATX12V 4 Pin P4 CPU Power Extension CableEasy to use and install
 Show Reddit reviews
30. Catskill Craftsmen 12-Inch Tempered Glass Cutting Board with Padded Feet
Sentiment score: -1
Number of reviews: 1
Dimensions: 12-Inches Wide by 8-Inches Deep by 1/4-Inches ThickDishwasher SafeMicrowave SafeNon-Slip Rubber FeetNon-absorbent, non-porous
 Show Reddit reviews
31. Neiko 01902 Adjustable Helping Hand With Magnifying Glass | Dual Alligator Clips
Sentiment score: 1
Number of reviews: 1
Heavy duty cast iron base keeps unit upright and provides stability and keeps objects secure while workingEquipped with a 2x magnifying glass on adjustable arm for precision work without eyestrainDual alligator spring clamps on adjustable arms securely hold components, work pieces, small electronics...
 Show Reddit reviews
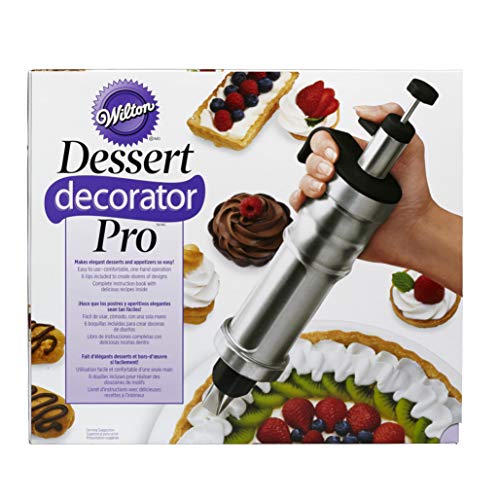
32. Wilton Dessert Decorator Pro Stainless Steel Cake Decorating Tool, Decorating Your Cakes, Cupcakes, Cookies and Treats, Simple and Fun, Stainless-Steel
Sentiment score: 0
Number of reviews: 1
DECORATING MADE EASY: Easier than ever to create stars, flowers, rosettes, dots, leaves and other icing designs. An ergonomic design makes it easy to hold with a comfortable one-handed operation.SMOOTH OPERATION: The pull-out plunger smoothly pushes icing or filling through the cylinder for superior...
 Show Reddit reviews
33. PlayStation Eye
Sentiment score: 1
Number of reviews: 1
Free EyeCreate download editing software, which allows users to save, edit and add cool visual effects to photos, video and audio clipsCamera and audio reception making it an integral part of the PlayStation Move motion control systemA sophisticated microphone with the ability to reduce background n...
 Show Reddit reviews
34. Quartet Cork Tiles, Cork Board, 12" x 12", Corkboard, Wall Bulletin Boards, Natural, 4 Pack (102)
Sentiment score: 0
Number of reviews: 1
Design your own bulletin board, any size or any shape, or cover a whole wall with self stick cork panelsUse push pins or tacks to secure documents and photos in the cork; Each tile is 12”w x 12”hProvides the added benefit of noise absorption in loud areas3/16" thick cork surface is self healing ...
 Show Reddit reviews
35. Engineers Precision Crimping Pliers Pa-09
Sentiment score: 1
Number of reviews: 1
Brand New Product
 Show Reddit reviews
36. LEDwholesalers 16.4 Feet (5 Meter) Flexible LED Light Strip with 300xSMD3528 and Adhesive Back, 12 Volt, Warm White 3100K, 2026WW-31K
Sentiment score: 1
Number of reviews: 1
Efficient LED strip with 300xSMD3528 LEDsCuttable every 3 LEDs, approx. every 2", at designated cut marksCut sections may be linked via optional quick conectors or directly soldering wiresDimmable with optional compatible dimmable transformer and wall dimmer switch or PWM dimmersEco-friendly - uses ...
 Show Reddit reviews
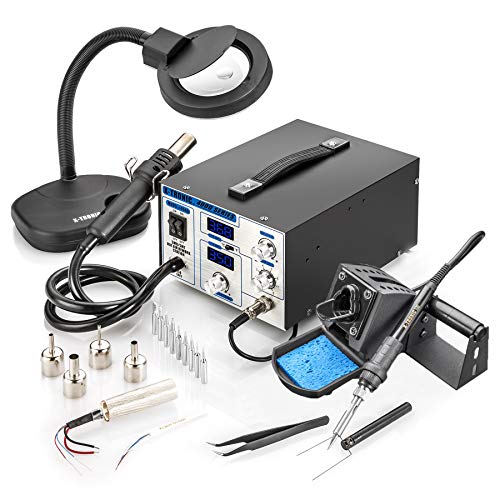
37. X-TRONIC XTR-4040-XTS Digital Hot Air Rework & Soldering Iron Station Bundle (5 Items)
Sentiment score: 0
Number of reviews: 1
Celcius/Fahrenheit Toggle Switch - Includes 5X Gooseneck Magnifying Lamp700 Watts Total Power Consumption - 500 Watt Hot Air Gun - 60 Watt Soldering IronHot Air Gun: 212°F ~ 896°F/100°C ~ 480°C - Soldering Iron: 392°F ~ 896°F/200°C ~ 480°C4 Air Nozzles - 10 Asst. Solder Tips - 1 Extra Hot Ai...
 Show Reddit reviews
38. Aokin 3D Printer Parts and Accessories, 1pcs 3D Printer Stepper Motor Parallel Module with 100mm Cables for Double Z Axis Dual Z Stepping Motors Reprap Prusa Lerdge 3D Printer Board
Sentiment score: 1
Number of reviews: 1
Module Size: 27mm/1.06in x 15mm/0.59in; Cable Length: 100mm/3.94in; Weight: 5gPackage Included: 1pcs stepper motor parallel modules with 1pcs 100mm cables, easy to connect.Application: special design for stepper motor-side parallel, a driver drives two motors, put them in-line (series) with the moto...
 Show Reddit reviews

I highly recommend Nophead's kit. It's fantastic--the quality of printed parts is excellent, the power supply and j-head are quality, and the Dibond helps to prevent resonances, making the printer quieter than ones built from plywood.
Don't over-tighten the nyloc nuts--it's very easy to do, and doing so will bend the Dibond slightly or crack the plastic parts.
Follow the directions very carefully. Everything is explicit in the instructions, but there aren't as many pictures/videos as I needed, and I ended up doing 2 steps incorrectly as a result. Nophead sells individual replacement parts, though, and everything he sells is quality and has a low profit margin. If you're not in the UK, though, shipping can get expensive.
You're going to need to strip very small gauge wire (for the ribbon cable, among others). Here's a great tip I learned to strip small gauge wire without breaking the wire:
https://www.youtube.com/watch?v=yM4JsxirXPg
As others have stated, get a caliper. Also I find that a dial gauge is useful in leveling the bed--one like this:
http://www.amazon.co.uk/Silverline-196521-Metric-Dial-Indicator/dp/B000LFYK0A/ref=sr_1_1?ie=UTF8&qid=1396249675&sr=8-1&keywords=dial+gauge
Basically, after you get your first print, print up something like this:
http://www.thingiverse.com/thing:92852
Change a setting in your firmware to allow the z-axis to go below '0', and attach the dial holder to your x-carriage instead of your extruder. This will allow you to get a very level bed. Bed leveling is everything--it will help adhesion and make your prints much more reliable.
After you've got your bed level, print replacement parts from ABS for your extruder, especially the gears and extruder block. I had problems at one point with a jammed extruder, and the resulting stresses cracked my extruder block. I had a PLA extruder block replacement, but the way the extruder mounts to the block on the Mendel90 (directly with screws, rather than using an aluminum mounting plate on the j-head's groove mount) meant that it got soft when the extruder got up to temperature, causing the tip of the extruder to wobble and the prints to go badly. Printing an ABS extruder block solved my problems. It's nice to have a backup so you don't need to rely on /r/reprappif or on friends.
You won't go wrong with Nophead's kit. I've seen many kits, and helped many friends build their printers at my local hackspace. Nophead's kit is the nicest I've found. The only other printer in the same league is the Ultimaker, and it's quite a bit more expensive, especially if you want the one with the heated bed.
Once you've got some experience under your belt, order an extra Nema17 motor, and get an extra D-Sub connector and custom PCB from Nophead, and purchase an E3D hot end. Build a 2nd extruder--the Mendel90 allows you to replace the extruder by unscrewing only 2 wingnuts (no tools necessary!). The E3D hot end can print nylon and other hot materials. It's a bit longer than the J-head, so you'll lose some space on the z-axis. But it's a fantastic all-metal hot end.
An easy option is to go to amazon.com and get this:
http://www.amazon.com/gp/product/B000TYHZ0A/ref=oh_details_o05_s00_i00
It's 30 bucks, has 2 heat pads, is all pre-wired, pre-stripped, glue backed, and has free shipping if you've got prime. I use it on EasyMaker( my own 3d printer design ) with a 1 foot square 1/8" thick piece of Aluminum from onlinemetals. It heats to 60C no problem. Something smaller -- say the size of a Prusa bed -- should easily heat to 110. Mark Gantor's lab ( aka the UW Seattle 3d printer lab/research group ) has used it to heat a prusa-sized bed to 110. EasyMaker uses a square foot sized bed, which is HUGE compared to other designs -- so don't let my 60C scare you. With 1 square foot of surface area, no existing heater can get to 110C.
you get 2 heat pads -- if you've got a really small bed -- say a makerbot cupcake or other mini-sized device, you could use just one. You can also use the switch if you like -- but I just wired directly to the RAMPS board. Super-easy. Done in 5 minutes.
Also -- I've found printing ABS on 60C Aluminum that has blue tape on top works great -- no curl, and safe to touch. I even printed a large, thin, flat thing using ABS -- no problem, everything stuck great, and nothing curled. Though, I normally print with PLA, and designed the machine around PLA, 60C is fine for ABS if you use blue tape instead of kapton( from my experience ).
Hope that helps!
The safest thing is a properly-sized resistor on the 5V rail. If you don't do that, the PSU may appear to run fine without it initially and then randomly shut down, reset, etc., potentially ruining prints. You need to keep drawing 1-2 amps at 5V to keep things happy. If you really want ideas for things to put on 5V that are actually useful:
Source: Have repurposed several AT and ATX PSUs for bench supplies and reprap power supplies.
Great. I'll confirm with ryan turner what comes out of the box and go for a 24v. I really like your lighting, did you use something like this
Measure the center-to-center spacing of the wire housings. If they are 2.54mm (.1") they are the JST XHP series as the other commenters pointed out out. Usually though, stepper connectors are the JST PH series and spaced 2mm center-to-center. These definitely look different though... is that a NEMA 17 or a NEMA14? Anyways if it's the more standard connection, it's a JST PHR-6 connector. These are the crimp pins that mate to the PHR-6. There are other ones for thinner wires, but you will want these for steppers. If it is instead what the other commenters have pointed out, you will want these connectors with these crimp pins. If you don't already have a crimp tool for thinner wires, I recommend these from experience.
EDIT- just want to add that if you don't feel you have a reliable way to measure the center-to-center spacing (like using calipers), you can always hold up a connector for an Arduino or similar, or an Arduino itself, and eyeball the pin spacing.
In addition to flush cutters, I've found a few different types of picks help to clear out hard to reach support areas, and fastener holes. Just don't punture your finger!
https://www.amazon.com/TEKTON-6943-Precision-Pick-4-Piece/dp/B000NPPBQK
This helps me so much when soldering. I'm not sure how much it would help your specific weld you have to do but it will help in the future
http://www.amazon.com/TEKTON-Helping-Hand-with-Magnifier/dp/B000P42O3C/ref=sr_1_1?ie=UTF8&qid=1421774456&sr=8-1&keywords=helping+hand+soldering
So, if I use this power supply with a 131W heatbed, would I have enough voltage/amplitude for the rest of the printer (dual extruders, small fan, 6 stepper motors) and would I still need the solid state DC relay?
> y machine has two motors. Would I just splice them t
Stepper Motor Parallel Module
https://www.amazon.com/Aokin-Printer-Accessories-Parallel-Stepping/dp/B07Y42B87X/
You'll save $2-3 by ordering from Aliexpress if you choose free shipping, but you wont get it until January.
About Calibrating a Delta, I'm using this wizard to calibrate mine and I've got to a point where I can't seem to get better than [-0.1:0.1] offset on all 7 probe points. I'm using 6 factor and [a gauge like this](uxcell Metric Thickness Feeler Gage Gauge (0.02-1.00mm) https://www.amazon.com/dp/B0052IRYVS/ref=cm_sw_r_cp_apip_WJL7ivK8ztXUi) using the 0.1 mm sheet to measure the height between the nozzle and the bed.
How do I know when to stop?
How is that different/better than something like this?
Micro Deans are what I use on my hotend. I have two 4pin connector running my heater cartridge , thermistor, fan, and LED ring.
http://www.amazon.com/Deans-Micro-Pin-Connector-Black/dp/B000BOXMDW
> a quarter inch wide on an SMT pad.
http://www.amazon.com/Weller-SP40LK-Watt-Soldering-Iron/dp/B000HE5BZS
I think it was pretty close. Whatever the case, it seems that I choose poorly. Hopefully I can still return it as defective or something.
I was warned via youtube tutorials to avoid the fixed-wattage irons, and I think I now understand why - lesson well learned.
Amazon has techflex flexo tubing in different colors.
I like to use a rework station, to reheat plastic parts for touch ups... You could probably connect the two halves and then heat the seam up to get it to hold. Then if you're really worried about the seam, you can heat it up and smooth it out.
I use these
I zero my extruder and move it to the corners. At each corner, I manually adjust the bed until the correct feeler gauge barely fits. Takes less than 5 minutes about once a month.
http://www.harborfreight.com/32-piece-sae-metric-feeler-gauge-32214.html
http://www.amazon.com/25025-26-Blade-Master-Feeler-Gauge/dp/B000BYGIR4/ref=sr_1_1?ie=UTF8&qid=1409135061&sr=8-1&keywords=feeler+gauge
If after reading these comments, you decide to learn to solder, here's a simple $8.59 kit that I recommend. Iron not included.
I used one of these instead of cutting up the cables in case I ever wanted to re-use the ATX supply with a computer in the future: http://www.amazon.com/StarTech-com-8-Inch-ATX12V-Extension-ATXP4EXT/dp/B000O7WFHA/ref=sr_1_2?s=electronics&ie=UTF8&qid=1426279478&sr=1-2&keywords=atx+4+pin
Check this out: http://www.walmart.com/ip/Pyrex-11-x-14-Glass-Cutting-Board/17479051
Too bad it's a few inches too big.
Edit: http://www.amazon.com/gp/product/B000OUXBKM/sr=1-4/qid=1319141064/ref=pop?ie=UTF8&s=home-garden&qid=1319141064&sr=1-4 That might fit a little awkwardly, but it's closer.