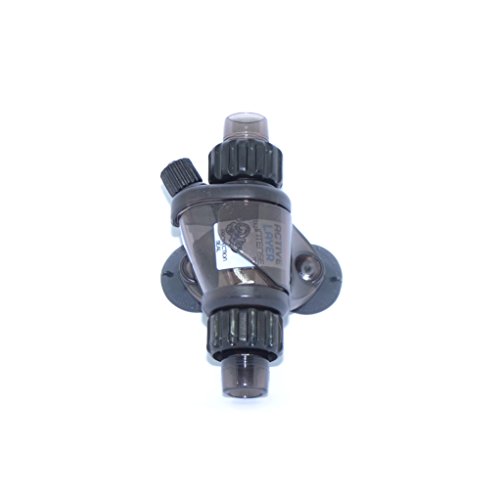
(Part 2) Best aquarium air pump accessories according to redditors
We found 1,053 Reddit comments discussing the best aquarium air pump accessories. We ranked the 235 resulting products by number of redditors who mentioned them. Here are the products ranked 21-40. You can also go back to the previous section.


Hey guys,
​
I saw this awesome video by Derek Gilman about an automated curing system he had built: https://www.youtube.com/watch?v=Jho0qeTUZnA
​
His rig is with 5 gallon gamma lid buckets, and he loads about 2 pounds in each one. The way the system works is you put your dried bud in the buckets, and you hook up an air pump to the buckets, on a timer. The timer I have set is for 15 mins every 24 hours. (The timer kicks on the pump, pushing air through the buckets, and auto shuts off after 15 mins). You install little valve outlets on the container and they exhaust out the old the air when the pump comes on, and then seal back up when it shuts off.
Being a micro grower who grows autos that yield ~100g, at about 179 grams a gallon I would be nowhere close to filling a 5 gallon gamma lid bucket, and even at 2 gallons I'm still a bit short.
So, I went to the store and found 1 gallon airtight food containers and it works! I was able to fit a Seedsman Zkittlez Auto I just got finished drying/trimming and ready for cure.
The system I built is:
- Aquarium Air pump, ideally with a built in manifold so you can hook up multiple containers: (NON AFFILIATE LINKS!) https://www.amazon.com/gp/product/B008ILGHAU/ref=ppx_yo_dt_b_asin_title_o00_s00?ie=UTF8&psc=1
- Air line https://www.amazon.com/gp/product/B000255NYQ/ref=ppx_yo_dt_b_asin_title_o00_s00?ie=UTF8&psc=1
- Check Valves: https://www.amazon.com/gp/product/B07FKJXZ78/ref=ppx_yo_dt_b_asin_title_o00_s00?ie=UTF8&psc=1
- 3/16" Drill bit
- 1 Gallon airtight food storage container https://www.walmart.com/ip/Better-Homes-Gardens-Flip-Tite-Square-Food-Container-16-Cups/370961661
- Timer with 15 min increments: https://www.amazon.com/gp/product/B00MVFF59S/ref=ppx_yo_dt_b_asin_title_o00_s01?ie=UTF8&psc=1
​
I noticed that the pressure was a little too high when I had only one check valve as the outlet and it was causing the lid to pop up, so I added two more. If you are growing photos, you're most likely yielding more than I do with my auto plants, so you'd prolly be able to just use the 2 gallon gamma buckets, which should hold about 1/2-3/4 pound. https://www.amazon.com/Gallon-Black-Bucket-Screw-threaded/dp/B018BFY2KY/ref=sr_1_5?keywords=2+gallon+gamma&qid=1574473805&sr=8-5
I think he does. High flow pump, low flow pump, quiet pump, crazy high flow pump.
Depends on what your use is I suppose, any of these can be controlled with a combination of transistors and/or relays. Can you give us any more detail?
Buy this water bed water changer or this python replacement connector. Buy this hose. Buy this brass adapter.
​
Congratulations. You have a 50 foot python for less than $25. You can build a part out of PVC that hangs on the side of your tank for less than $5 and it'll let you control the flow of the water into or out of your tank. Not having to stand at your tank during water changes is nice.
Go for the 5gal, and add a nice sponge filter! It's cheap and works like a charm.
Here's a good sponge filter, it'll need to be powered by a air pump (like this one). You'll also need some airline tubing, and something to regulate airflow (this is a 10-pack, but you get the idea).
Thanks!
Inside this grow-tent, I'm using 2x VIPARSPECTRA 300w LEDs for the lighting. I have a 4 LPM air pump with tubes running into each container (plugged to air stones). This setup is running on a timer from 6AM to 10PM.
The containers are ~10L (a bit more than 2gal) plastic trash bins from Walmart. I found it was the most efficient containers as they are more high than wide (unlike most standard storage containers), which allows me to fit more in the tent. This also enables the roots of the plants to reach deeper which I think is good (but don't quote me on this).
As for the nutrients I use standard General Hydroponics Flora series. I started with small concentration first, then followed the general indications on the bottles (aggressive vegetative growth until they start to flower, then transition to bloom, and then bloom and ripening).
I topped them all at the beginning when they had about 4 or 5 sets of leaves. I also pruned them a few times, cutting big leaves preventing light from reaching the middle of the plant.
Temperature was kept at between 22°C and 28°C most of the time (71F - 82F). Humidity varied between 35% and 55%.
I also have a Raspberry Pi in there to which I connected (and soldered) a humidity and temperature sensor. I then wrote a little app to send the data to a database and wrote another app to display real-time temperature stats and charts. I did this mostly for fun but it was useful.
-3 packages jello + 2 cups of sugar into a 2L. Let harden.
-mix 1 cup warm water, 1/2 cup sugar and 1tsbp yeast (any kind). Pour into 2L.
-drill hole in 2L cap, insert tubing. Seal around tubing (hot glue or something)
-Attach to diffuser inside tank. In 1-2 hours you'll have Co2
In 2-3 weeks bubbles will slow. Pour out crap on top, add another cup of water/sugar/yeast. When Jello all gone, start again.
Anything over 20-30g, you'll want to buy a proper setup.
First grow.
This took 2-3 months. Seems like I ran into a number of first-timer pitfalls along the way. Good learning experience though.
Can't wait. So god damn tired of shady, undependable hook ups.
Edit 2:
Photos of my setup.
Edit 1:
Some have asked about my setup. This is about everything. This is my first grow so take my suggestions with a cup of salt but this stuff has worked well for me.
Tent:
Zero complains. Very happy with this. It just fits perfectly into a closet (had to remove the hanger bar though).
http://www.amazon.com/gp/product/B004U6WCMY
Air
Carbon filter:
The inside of my tent stinks. I smell absolutely nothing outside. Don't get caught. Get a good carbon filter. Maybe not this one, but something.
http://www.amazon.com/gp/product/B004FVJK60
Inline fan:
I hand this outside the tent. No need to take up any space or add any heat inside the tent.
http://www.amazon.com/gp/product/B002JQ14F8
Variable xformer for fan control:
This allows me to control the noise and airflow. Every other fan controller made the fan buzz. This thing is quality built. I keep it around 50v.
http://www.amazon.com/gp/product/B006NGI8VS
Circulation fans:
http://www.amazon.com/gp/product/B004RTMD8C
DWC
Bucket top net pots:
http://www.amazon.com/gp/product/B0049XIIGC
Air pump:
http://www.amazon.com/gp/product/B002JPEVMC
Airline:
The black just prevents light from getting into my res.
http://www.amazon.com/gp/product/B001D4XTUU
Air stones:
http://www.amazon.com/gp/product/B0050HJ7Q6
Check valves:
You NEED these. Many airlines are thin enough that if the power goes out or a hose becomes disconnected, capillary action might permit water to back-flow into your electrical air pump and/or just flood your room. Don't take chances when a .50 cent valve will protect you. There are some horror stories in the aquarium hobby about this. Note, even if the air pump is higher than your res, capillary action can pull the water up through the air hose. This is the same principle that allows 100ft trees carry water from the roots to the canopy.
http://www.amazon.com/gp/product/B00977J508
Lighting
Lights:
Word of warning. Start off a good distance between the lights and your canopy. These product more light than you think and I have burned and cooked plants from keeping these too close. They don't product a ton of heat or anything. I think it's just too much light if they aren't a good foot or so away from the canopy. I assumed I could practically lay LEDs on top of my canopy. Not so.
http://www.amazon.com/gp/product/B00FGFLCXS
Adjustable ropes for lights:
Chains work, these are just faster/easier to adjust.
http://www.amazon.com/gp/product/B0098R0600
Tools
Temp/humidity sensors:
http://www.amazon.com/gp/product/B0013BKDO8
pH pen:
I used to do chemical reagent tests (I have tons of aquariums so I had it laying around). Never again. A pen is fucking awesome for dialing in pH every morning. Get one!
http://www.amazon.com/gp/product/B00EQISYQO
Pruning snips:
These are great. Sharp as fuck and solid.
http://www.amazon.com/gp/product/B00004SD76
Training wire:
What I use for my scrog screen and early training before the screen goes in. Also good for random shit that's temporary enough I don't want to waste a zip tie.
http://www.amazon.com/gp/product/B001EXJ652
Nutes/Water changes
Pond pump:
This is another must have! I've been using these for a while now to handle water changes in my aquariums. It's also awesome for mixing nutes before they go into your DWC. I drop one in a bucket without a hose attached and then just dump all my nutes and such in. The pump does all the mixing. Then I adjust the pH a little. Give the pump about 10-20 seconds to mix my pH up or down in and test again. I don't have to worry my pH adjustment isn't probably mixed yet. I makes the mixing process so easy and fast. I also use these to pump out my res once the scrog screen is in place.
http://www.amazon.com/gp/product/B006M6MSL0
Root protectant:
One of my early problems was with brown algae. This cleared it right up after a week.
http://www.amazon.com/gp/product/B00IGFH3FG
Syringes:
No guess work. I know exactly how many ml I'm adding.
http://www.amazon.com/gp/product/B000RB3CV6
Cal-mag:
http://www.amazon.com/gp/product/B000J2CUPW
pH control:
http://www.amazon.com/gp/product/B000BNKWZY
Nutes:
http://www.amazon.com/gp/product/B000COBT54
http://www.amazon.com/gp/product/B000CO7U02
Here's the air pump that I bought
Tetra 77851 Whisper Air Pump, 10-Gallon https://www.amazon.com/dp/B0009YJ4N6/ref=cm_sw_r_cp_apa_lSQxybNT7AE1N
And the filter
Bio Fish Aquarium Mini Cylinder Soft Sponge Water Filter, Black by XINYOU https://www.amazon.com/dp/B009V3KUOS/ref=cm_sw_r_cp_apa_tTQxybTDESDSD
I think I accidentally ordered the filter a size up. Mine takes up a bit of room but it should have the same effect as this one that won't take up as much. I think it's more about the air flow than the size of the sponge.
I also got some check valves to protect the pump in the case of a power outage. They're super cheap, and I got mine at a petco nearby. If you want a little bit more control over the air flow, I got an air control valve there too.
Like these
Plastic Aquarium 2 Way Air Line Tubing Flow Control Valve 3mm Dia 5pcs https://www.amazon.com/dp/B00WW6LSWY/ref=cm_sw_r_cp_apa_p5Qxyb33GC6V2
Uniclife Aquarium Air pump Accessories Set for Fish Tank, 2 Air Stones, 2 Check Valves, 4 Connectors and 6 Suction Cups https://www.amazon.com/dp/B01K4AZKNW/ref=cm_sw_r_cp_apa_M7Qxyb9GZRACN
And some airline tubing.
Many of these things were actually cheaper at a petco than on Amazon besides the filter and air pump
The fluval kit doesn't function like the typical co2 setup most people run.
The way it works is you turn the knob on to let the co2 fill up the chamber and then turn it off and let the co2 diffuse into the water throughout the day.
TBH this is really a lot of hassle for a system that you have to turn it on and off manually.
If I were to buy a co2 system all over again I would likely go with these items:
Co2 regulator
Diffuser
Drop checker
Check valve
Tubing
I would consider this to be a good bare bones starting system that would get you started in co2 once you pick up a tank from your local welding supply shop.
This video has some great advice. I used it when I got my DIY system set up. I purchased a kit from amazon for around $15. Totally worth it so far. Citric acid and baking soda lasts two weeks (when I'm doing it correctly) and I've had great growth so far. Be sure to also pick up a bubble counter and diffuser. Baking soda is easily found at any store with groceries, I had to order citric acid online because my Cub foods didn't have any. Overall the system is totally worth it for around $25.
I am currently using the Fluval 45 gram CO2 cartridges. It is a lot of work to manually adjust the CO2 regulator every day. I don't really recommend it.
Here is a link to my light: https://www.amazon.com/Aquarium-Asta-20-Dimmable-Freshwater/dp/B07236CXBQ/ref=sr_1_3?crid=K9MI0MA1VWCI&keywords=lominie+led+aquarium+light&qid=1562990688&s=gateway&sprefix=lominie+%2Caps%2C183&sr=8-3
​
Here is the link to the diffuser: https://www.amazon.com/gp/product/B074MLT716/ref=ppx_yo_dt_b_asin_title_o09_s00?ie=UTF8&psc=1
​
This light gets really hot so try to be careful if you are doing water changes if the light has been on for a while.
I have not used an ISTA inline heater, I have the Hydor inline heater. I can't say enough good things about the Hydor. It's incredibly precise and keeps the tank temp on my 90g spot-on at the set temperature, much more accurate than any in-tank heater I've used.
For the EHEIM Classic filter, swap out the blue disc and the black carbon disc and replace them with filter floss. I never keep carbon in my filter.
I would suggest getting a plastic inline CO2 diffuser instead of glass. Glass is just too fragile IMO. I have this one by NilocG: https://www.amazon.com/NilocG-Aquatics-Atomizer-Diffuser-Aquariums/dp/B07594GKGJ He does have these in different sizes so make sure to get the one that is sized for the tubing you want to use.
Also if you're going to get a refillable CO2 canister you are going to need to invest in a quality solenoid valve. Do not get a no-name brand on Amazon. I also like NilocG's solenoid valves, this one comes with a 5 year warranty: http://nilocg.com/na-mini-regulator-na-mini-regulator-with-solenoid/
I bought this one because I have a bigger tank, and it has a 10 year warranty: http://nilocg.com/dual-stage-regulator-na-ss-pro-dual-stage-stainless-steel-regulator/
Get the add-ons, especially the bubble counter and stainless steel check valve.
I have not played with this yet but it is an interesting idea and should be fairly easy to accomplish.
In the link you posted they mention this pump at Adafruit. That appears that it would possibly work but they mention using a Peristaltic pump which would be my preference as well. They can be a bit more expensive like this one at Adafruit but you can find them a bit cheaper other places like this one on Amazon. With this type of pump you run less risk of the internals getting fouled since the liquid never comes in contact with any moving parts. In addition you can just weight one end of the tubing and drop it into your detergent bottle. No reservoirs or modifications required.
Next part is driving and controlling the motor. The common method is to use motor driver board containing an H-Bridge. A dual H-Bridge DC motor controller/stepper motor controller is what you will mostly find right now and can be pretty inexpensive. You can go the (sort of) easy route and get something like this shield for the Arduino but it is a little more expensive and has way more than you need for this project. Or just search on Amazon (or elsewhere)for "Dual H Bridge" and you will find many at well under half the price that will work perfectly fine for this. Some are even made for use with the Arduino.
As far has how to wire and program for this project, you will find plenty of tutorials and how-tos on Adafruit, YouTube, and many others.
Had someone ask for an inventory list and thought I'd post it up here for visibility.
Coralife Biocube 14 - $199
Lighting System - $141
Filtration System - $122
Arline System - $32
Decor - $140
Flora - $114
Fauna - $46
Tools - $12
You're welcome!
And thank you :D I use the same paint I used for the back of the tank for the trimming. You can't even tell it's there until someone points it out to you. The trim height fits perfectly on the lip.
I use Lee's Sleek Airline Tubing so the airlines blend in with the black background.
I left an opening at the back of the glass top for the HOB filter and wires/hoses. Like this. I used a piece of plastic to cover the edge of the glass, but it's not really necessary. I sanded the edges of the glass when I got it home from the store.
Man, don't let it get ya down! I run a 46g with a DIY kit and my plants look sexy af, get that and some citric acid + baking soda. I bought a cheap diffuser from china, a cheap drop checker (you'll need this, it measures how much co2 so you know if you need more or less) and quality checker fluid.
​
Edit: With enough stuff to make co2 for a long time, and shipping, was prob $50 total for everything, if that
Get one of these.
Make sure none of your tanks make bubbling sounds by using internal sponge filters with small power heads.
Get two of these.
Put babyproof locks on the cabinet doors for when you are away and you are set.
If the filter is not adjustable, there is a good chance it is stressing them out. Bettas are generally very resilient. Don't give up on Bettas yet, it sounds like you are doing everything quite well.
Here are some options:
Again, don't give up! Bettas are awesome. You will dial everything in soon enough and be back to feeling great.
20ppm nitrates is just fine btw.
something like this:
pump
sponge
air tube
Don't forget the airline tubing! Also very cheap.
It's such a drag that this stuff doesn't all come together.
Looks fine to me, but if you Betta appears stressed you can always reduce it by getting a valve to control the air flow. I use this: Pawfly 2-Way Aquarium Air Flow... https://www.amazon.com/dp/B06XFSSTZB?ref=ppx_pop_mob_ap_share
Seafoam probably won't fix it. A shop will ream you. Some people claim they can get carbs rebuilt cheap, but in my experience a full rebuild has always been really high labor wise...
This is a CMX450C correct? Should be any easy job... You can do it yourself and don't let anyone lead you to believe otherwise.
Basic process that applies to most biles:
Lazy method. I usually do this to test if a bike runs before I perform a complete rebuild. More often than not you end up with some leaky o-rings that have never been changed:
Non Lazy method:
It sounds like a lot, but it really isn't. The first time should take you a few hours. Once you get the hang of it you can perform a basic clean on many bikes in 30-60 minutes and a full rebuild in just a few hours.
For a twin the cost should be approximately as follows:
A shop might want $500-$800 for a complete rebuild.
There are some more things you can look at on your specific bike (carb air cutoff valve rebuild, accelerator pump rebuild which should cost about $30 together so you might want to purchase those kits and perform those as well while you have the carbs off and access to everything.
Youtube videos for your specific bike. Surely there is a website that can provide more info too. AND BUY A SHOP MANUAL.
Good luck :)
Absolutely; Uploaded a 6 week progression
Light: NICREW 11-19" LED Fixture.
Substrate: Basic Coarse Sand from Petco (using root tabs for ferts)
CO2: Modified the Fluval 20 kit; instead of the gaudy diffuser/bubble counter it came with I'm using the fluval 88 bubble counter and this diffuser
Lights are on from 8am to 8pm daily.
Plant list is:
TOM Aquarium Aqua Lifter Pump 3.5gph
I have the same one.
https://smile.amazon.com/gp/product/B01LZDXECV/ref=ppx_yo_dt_b_asin_title_o03_s03?ie=UTF8&psc=1
I have a DoubleSun regulator, which works, but isn't the greatest. It does what it's supposed to do, but it's really touchy, so you have to fiddle with it for a bit to get to the exact setting that you want. It has a solenoid, so I have it set up on a timer to come on 2 hours before the lights go on, and 2 hours before they turn off. It runs about 9 hours per day.
The CO2 itself was tricky to find, because I live in the middle of nowhere. After a few weeks of looking around, I found out that my local NAPA auto parts store has a partnership with a company that supplies CO2. I got a 10 year lease on a tank (and tank swaps when they need refilled). It's a 20 pound tank, which will last me a ridiculously long time, and the 10 year lease was $90.
When you take the plunge, one really important thing to keep in mind: get CO2 specific hoses. I was using a rubbery generic one that was meant for regular air pumps, but it turns out those leak CO2 like crazy. I switched to a hose that's specifically designed for CO2, and the difference is pretty dramatic.
When you get a diffuser/atomizer, do yourself a favor and pick up 2 of them. That way, when one needs cleaned, you can just hook up the 2nd one while the 1st is soaking in a weak bleach solution. I have 2 of these, and the key to keeping them in good condition is not touching the ceramic tops. Just soak them when they need it. I only have to clean mine every 2 months or so, but it varies from tank to tank.
Wall of text incoming for anybody looking for an introduction to CO2.
Try one of (https://www.amazon.com/gp/aw/d/B01F3FLHIK/ref=mp_s_a_1_3?ie=UTF8&qid=1502328542&sr=8-3&keywords=diy+aquarium+co2+system&dpPl=1&dpID=41wVzLINnML&ref=plSrch)[these systems] if you're doing DIY - trust me. Best €20 I've spent in the hobby by far.
I use this on a 100l (25g-ish) and have set them up for multiple other tanks of different sizes. They work absolutely brilliantly once you get used to priming them correctly and I have never once had an issue with the health or even behaviour of livestock, apart from a single shrimp's deathly dear of bubbles, ha!
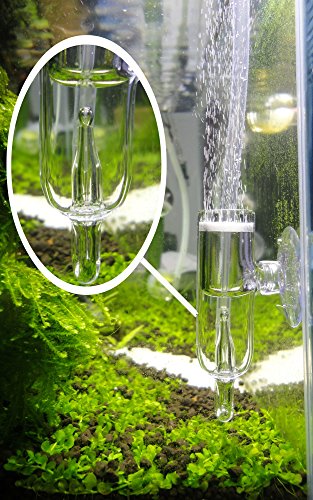
The system includes a pressure guage, and a pin valve to regulate flow. You out citric acid in one bottle, and sodium bicarbonate (baking soda) in another. Add water to both, screw he bottles in, squeeze some acid through to start the reaction, et voilà. You're ready to open the valve once required pressure has developed.
The citric acid bottle is drawn from the primary bottle via a magnetic header on the pickup hose which can be lifted from the mixture using the included magnet in order to prevent further mixture.
As the acid enters the secondary bottle, CO2 is created, which then leaves. As this is pushed into the tank, you're creating lower pressure in the secondary bottle, so it will draw only as much acid as is required to continue at that rate. On top of that, the acid can travel down right into the base of the soda mix, but CO2 will only leave the bottle via an elevated Y-joint, meaning that liquid basically can not enter the tank, or at least not in any meaningful quantity.
Do it. I can't praise them enough!
Edit: I see you've mentioned looking at the older version of the product I've linked - go for this one if you can as it has a much more sturdy pin valve; the old version had a tendancy to fail after a few months.
Also, you can get it via Amazon or eBay, and they will mostly ship from China.
We all started this way :)
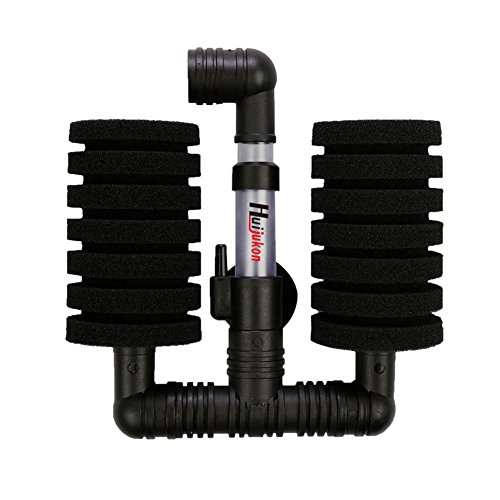
I have similar sponge filter, it stays in the tank without floating, weighted base. But if yours floats, you can attach it to something. Or superglue it to some 2" ceramic tile. Let it cure outside that tank and rinse well before adding to the tank.
Gang air valve, double or triple, plastic is OK too, is used to regulate air flow. The third one 9extra) could be used for bleeding extra pressure outside, if needed. Or available almost anywhere single plastic valves could be connected by pieces of flexible air tubing.
Sponge filter (one that I really like the looks/features): https://www.amazon.co.uk/Hygger-Biochemical-Aquarium-Container-Increasing/dp/B07RFKNF3G/ <-- small one should fit in your tank, dual sponges + double chambers with additional ceramic ball media = great space for your beneficial bacteria to grow = healthy nitrogen cycle = better water quality for your betta
&#x200B;
Cheaper alternative, but I still like the other one better: https://www.amazon.co.uk/Huijukon-Biochemical-Aquarium-Tank,Tank-Gallons/dp/B01LZDXECV/
&#x200B;
Air pump to run the sponge filter (it relies on bubbles to move the water out of it, and pull water through the sponges): https://www.amazon.co.uk/Uniclife-Quiet-Aquarium-MA-60-Accessories/dp/B0749KW5YK/
DO NOT use the freebie airline tubes, but the check-valve they include will be nice for you to use.
Better airline tubing - I use this one on my sponge filter: https://www.amazon.co.uk/Elite-A1123-Hagen-Silcon-Airline/dp/B0002AQI9A/
Don't want to repeat useless information, so I'll add my contribution:
Filtration: I use a sponge filter along with a small air pump, here's my particular filter on amazon. The pump I use is from a Whisper 3i filter, though you can reduce the flow using any simple air hose system supplies stuff. (I use it but don't know what it's called.... these things, I guess, are a good example.) Just pick them up at your local wal-mart along with a small pump and aquarium tubing. You will need a utility knife/scissors to cut the tubing with.
My tank running that filter supports a betta and a nerite snail with no noticeable problems.
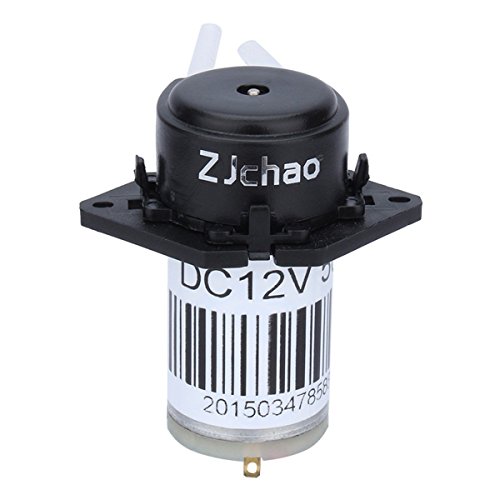
They're sold as aquarium pumps. Its the exact same pump sold by adafruit, but 40% cheaper.
http://www.amazon.com/Dosing-Peristaltic-dosing-Aquarium-Analytic/dp/B00F9MXFFQ/ref=sr_1_1?s=pet-supplies&amp;ie=UTF8&amp;qid=1394981750&amp;sr=1-1&amp;keywords=peristaltic+pump
Get a fish aquarium pump and some hose.
If you have a hydroponics store nearby, a lot of them do CO2 tank rentals. It works like propane rentals, you put a deposit on an initial (full) tank and you pay to switch them out when you are empty. If you ever drop CO2 or need your money back, you just return the tank for your deposit.
For a regulator, I recommend going with a full regulator. Even if you ultimately go with a paintball sized canister, you can use an adapter to go down. While you can get an adapter to go the other way (paintball regulator on a full tank), it's much more limiting on the future. The Aquatek regulators are hit or miss (some people love them, some hate them), but I haven't had a problem with mine, and it was by far the cheapest option. GLA regulators are a work of art but much harder on the budget.
Aquatek regulators come with an integrated bubble counter and check valve, but you can use any check valves including the dollar ones at any pet store. Bubble counters are relatively cheap, but if you end up using a ceramic diffuser most have a bubble counter built in. You can get cheap ceramic diffusers on Amazon.
If you run a canister, I'd recommend just getting an Ista reactor. It's not much more money, it's less maintenance than cleaning diffusers, there's less CO2 lost, and less clutter in your tank. If have a canister you want to go something more sleek, you can get an in-line atomizer but I believe these require occasional maintenance compared to a reactor.
Pollen Glass CO2 Diffuser with U-Shape Connecting Tube for Aquarium Planted Tank (20 - 50 US gallons) https://www.amazon.com/dp/B01N2LZOCE/ref=cm_sw_r_cp_api_i_5texDbN5TF54E
This is the one I got. This is my first time using CO2 so I don’t know if there are better diffusers out there, I just liked the way this one looked.
most expensive stuff was actually the stupid aquasoil.. no one locally was carrying the fluval stratum anymore, so i got stuck dropping 20 bucks per 4 lb bag. I refuse to use eco complete ever again. Most expensive stuff will be the light and the regulator, going LED and larger tank is more expensive at first, but you save money in the long run
not convinced at these being accurate at all https://www.amazon.com/Aquarium-Dioxide-Monitor-Solution-Indicator/dp/B01C9DGXV0/ref=sr_1_6?s=pet-supplies&amp;ie=UTF8&amp;qid=1473971368&amp;sr=1-6&amp;keywords=co2+drop+checker
not going to go into the various other crap i bought so totaling it all up ... (preparing to wince)
---
About $575 after tax/shipping/lube.
with the stuff i got that is now in a bin for being crap... tack on about another 150-200 bucks (aquatek regulator/ paintball sytem)
Sure thing
https://www.amazon.com/dp/B074MLT716?ref=ppx_pop_mob_ap_share
It says it's unavailable but the other one they sell is very similar
Simple Deep Water Culture System:
Tent = anything like this
Bucket = anything like this
Air Pump = something like this
Air Stones = some of these
Air Line = sure, this
Nutrients = General Hydroponics Flora Nova Grow & Flora Nova Bloom (available at any hydroponics supply store - expensive to buy online)
Lighting = so many options, this is a great starter light MEIZHI
Lemme know if you wanna consider Ebb and Flow - not much different overall but a cool system.
Why not go for an inline reactor like this? I think it's a lot less obtrusive and you don't need to worry about placement or anything like that.
It's just a lil 5 gallon! :) The CO2 is the basic Fluval mini co2 kit, but I replaced their diffuser with this bad boy. I usually have it at about 1 bps (bubble per sec).
Also, here's a fun tip! You can get significantly cheaper CO2 cartridges on Amazon! As long as the cartridges have the threading you're good. 6 cartridges for $20, vs 3 for $16. For me, one cartridge usually lasts between 3-4 weeks.
sounds like you just had an inefficient system tbh
i never empty out my dwc, i let the water get low enough that it forces me to fill it back up with nutes, no issues whatso ever.
constantly ph checking= once every couple days? even then it is stable enough to not do anything with it except maybe once a week. get a decent sized container and it isn't an issue. it's an issue when people are growing 4ft plants in 2g pails
i don't use a chiller, and haven't had high temps ever, AC for the house and the tent is in the basement, so cooler air is pumped in always
if I'm lazy i just fill my vegging plants with plain tap water and no nutes, deficiencies aren't the end of a plants life instantly, it takes weeks and weeks of no nutes
the price of my dwc was cheap as hell...all prices cdn
13$ containerx2 - https://www.homedepot.ca/en/home/p.102-l-strong-box-tote-with-locking-in-blackyellow.1000706729.html
45$ air pump (does my entire tent and veg area without issues)- https://www.amazon.ca/gp/product/B002JLJC0W/ref=ppx_yo_dt_b_asin_title_o01__o00_s00?ie=UTF8&amp;psc=1
12$ air stones - https://www.amazon.ca/gp/product/B01MT45VCM/ref=ppx_yo_dt_b_asin_title_o01__o00_s00?ie=UTF8&amp;psc=1
7$ air splitter - https://www.amazon.ca/Uxcell-Jardin-Control-Aquarium-Diameter/dp/B00A8X1XI2/ref=zg_bs_6292472011_39?_encoding=UTF8&amp;psc=1&amp;refRID=KC92XXTPW3FJSTWA4C12
7$ air tube - https://www.amazon.ca/gp/product/B000255NYQ/ref=ppx_yo_dt_b_asin_title_o00__o00_s00?ie=UTF8&amp;psc=1
15$ netcup - https://www.amazon.ca/gp/product/B073WJ78MM/ref=ppx_yo_dt_b_asin_title_o01__o00_s02?ie=UTF8&amp;psc=1
24$ digi ph pen - https://www.amazon.ca/gp/product/B07C9WR156/ref=ppx_yo_dt_b_asin_title_o00__o00_s00?ie=UTF8&amp;psc=1
So complete setup, without having to buy anything else again for a 4x4 tent is a grand total of 136$
i have left it for 12 days without touching it after a fresh top up due to work requiring me to be away
now, a RDWC could be a bit more advanced, overwhelming and costly to a newer person, but for sure throwing an airstone in a bucket isn't complicated for newer people
Might as well get these net pots that you can just place on top of your bucket so you dont have to worry about making one and risking light leaks.
Might need tubing for the air pump, not sure if it comes with the pump or you didn't include it in the post, but I'd go with black instead of clear.
Also, get yourself some cal-mag with those nutrients. I just started my first DWC grow too but I also bought Canna Rhizotonic and liquid silicon to go with the nutrients at the suggestion of a few on this sub.
If you want to get reallllllly in depth on full spectrum LED's, this site has a lot of information on it and their list of best panels to go with, even though I didn't go with any of them and just got the Mars 300 anyway.
And don't forget your trichome scope!
Python Aquarium Pump
Hook one end up to a regular garden hose, the other end to syphon head, and you now have the easiest, most convenient way to filter you water. No buckets, no smelly tank water inside the house getting on your floor, done.
I have one for when my tanks decide to bloom algae. The pump is extremely weak because it has to run through the components before it actually pumps out water. You can get some cheap thing like this and drill a hole in the bottom to put the co2 line in or just have your diffuser right under it
Tank: Fluval Spec V
Filter: Stock
Lighting: Current USA Satellite Freshwater LED Plus
CO2: Paintball system with AQUATEK CO2 Regulator Mini
Substrate: Eco-Complete
Heater: Hydor 50W
Flora: Dwarf Hairgrass, Staurogyne Repens, Anubias, Christmas (java?) moss (on driftwood)
Fauna: The hardiest apple snail ever
According to their website the satellite LED Plus should give my tank 36+ PAR, so a solid medium light. Tank is fully cycled and I keep it around 78-82 degrees.
Onto my questions. I'm looking for suggestions for a good background plant that has good height, will work well for the red cherry shrimp I have coming in, and do well with my tank parameters.
I'm also having an issue with my CO2 system. I did not use it for a while and now it seems something is wrong. I bought a new ceramic diffuser thinking the older one just had an issue with the ceramic but that still doesn't seem to be the case. My issue is that I cannot get any bubbles to come out of the diffuser unless I have a ton of CO2 going through-way more than my 5 gal needs and will probably kill the shrimp. I use CO2 proof tubing from aquatek and I checked and there are no leaks on the line. I use this aquatek bubble counter that also doubles as a check valve. For good measure I added another check valve to my line but that did not make any difference. I really don't know what the issue is and could use some help, thanks in advance!
NilocG Aquatics | Intense Atomic Inline Co2 Atomizer Diffuser for Planted Aquariums Tanks (16/22mm(5/8") Tubing) https://www.amazon.com/dp/B07594GKGJ/ref=cm_sw_r_cp_api_i_cyKRDbT38HFE5
TBH I’ve been doing aquascaping for several years. This is the first time I’ve managed to successfully get the carpet and hair grass.
Here are a few pointers and pitfalls:
Pointer:
Use a soft, nutrient dense substrate. I use aquasolum black humate (a Seachem product).
Pitfall: Avoid using course gravel like Flourite. It’s too think and heavy which prevents the roots of a carpeting plant like hair grass from being able to spread runners and creating new growth sprouts. This was the single biggest reason all my other carpeting attempts failed. Black sand would work as well. Whatever it is, it needs to be soft enough for roots to be able to spread easily.
Pointer: Use quality lights. I use 2 x Kessill Tuna Sun lights. Those are crazy expensive and may be over your budget. I’m sure there are cheaper options.
Pitfall: Don’t use cheap lights which fail to produce adequate FULL SPECTRUM lighting.
Pointer: Use a filter that moves a lot of water like a canister filter. I use a Fluval 207.
Pointer: Use quality filtration media. The absolute best of the best is this Aquarium Filter Pad - Premium... https://www.amazon.com/dp/B01AHIOM8A?ref=ppx_pop_mob_ap_share
Coupled with this
Polishing Filter Pad 100 Micron -... https://www.amazon.com/dp/B014G7WTRY?ref=ppx_pop_mob_ap_share
Pointer: Use CO2 injection. I use DIY CO2 and it works fantastically well. I use this
Estink DIY CO2 Generator Aquarium Plant System Kit D201 Tube Valve Guage Bottle Cap for Aquarium Moss Plant https://www.amazon.com/dp/B01NCXOPKP/ref=cm_sw_r_cp_api_i_jHTPDbPFZBQHC
With this
ISTA Intense Flow CO2 Bubble Counter suction cup hanging - aquarium Solenoid diffuser https://www.amazon.com/dp/B00RZZROHA/ref=cm_sw_r_cp_api_i_dKTPDbN38ASP5
With this
JARDLI Pollen Glass CO2 Diffuser with Bubble Counter for Aquarium Planted Tank https://www.amazon.com/dp/B01N36MAO4/ref=cm_sw_r_cp_api_i_1HTPDbHP2BECM
With this
Milliard Citric Acid 5 Pound - 100% Pure Food Grade NON-GMO Project VERIFIED (5 Pound) https://www.amazon.com/dp/B00EYFKNL8/ref=cm_sw_r_cp_api_i_uITPDbXA0Q9JE
With this
Arm & Hammer Baking Soda Unscented Box, Boxed 1 Lb. https://www.amazon.com/dp/B002YCILXK/ref=cm_sw_r_cp_api_i_BJTPDb4VRBT2Z
Pointer: Use filtered water preferably from a reverse osmosis water dispenser. I own 4 x 5 gallon jugs which I fill up to use for any and all water changes.
Pointer: keep your water immaculately clean. Like 2 water changes per week which includes cleaning your filter media.
Pointer: don’t let any algae start to build up. I use a toothbrush to brush off algae growth from rocks and plant leaves.
Hope this helps. Happy to answer any other questions!
Why are you using an air pump instead of a small water pump like https://www.amazon.com/Aquarium-Lifter-3-5gph-inches-height/dp/B001BOD9JI ?
I was going to say, it sounds a lot like a sump filter (and then I saw your pic that says "sump"). How would you control the rate that water flows back into and from each tank? I think the hardest part of your design is getting the flow to be the same to all of the jars. Why not just go with a drip system to refill tanks and a drip siphon from each jar to the sump? It sounds like you're already going the route of a drip system since you're using an air pump and possibly airline tubing.
That is all correct. Just not sure about airline tubing, I believe you need special tubing for CO2. Also, UP Aqua also makes an inline diffuser but not sure about how the quality compares.
http://www.amazon.com/Super-Aqua-Power-Head-158GPH/dp/B00CJNGKO6/ref=sr_1_3?s=pet-supplies&amp;ie=UTF8&amp;qid=1453140351&amp;sr=1-3&amp;keywords=powerhead
This + this+ this. I use this setup and it works perfect for me.
Yeah co2 can cost up to 200 or so for a proper setup, depending on size and quality. I just got co2 running on my 30gallon for incredibly cheap though. Look up the citric acid and baking soda co2 method. It’s incredibly cheap, pretty easy, and it’s just as reliable. I’ll send you an amazon link to the equipment I’m using, gimme a sec to update this comment
Edit: https://www.amazon.com/dp/B01NCXOPKP?ref=ppx_pop_mob_ap_share
Here’s the main part of the setup. All you need are powdered citric acid and baking soda(I bought it at Walmart, but there are much better deals on amazon) and two bottles(I used 1L coke bottles). Then you just need the usual diffuser and check valve. I bought the tropica 3-in-1 diffuser which works pretty well, but it’s not great. Certainly worth the cheap price though.
Over all, I paid around $30 for the whole setup
I actually watched the video again and although there were a lot of larger bubbles, you actually had plenty of small bubbles so diffusion shouldn’t be a problem.
You’re right about it being a bad sign. Too much co2 lowers oxygen levels in the aquarium so fish try to get oxygen any way they can. Good on you for taking it out for the sake of your fish.
If you don’t have one yet, a drop checker would also be helpful to have. Maybe consider getting a device that regulates the flow.
This is a good example. Maybe not this exact one but something similar if you’re using two large bottles.
Sorry for the long response but I’ve been through this before and I thought I’d offer some advice based on past experience.
You'd need:
A diffuser and bubble counter (this has both in one and is one I use. Work VERY well in my 10g.
Tubing
A check valve. I do not recommend skimping out here There's also this bubble counter/check valve combo.
And a drop checker
The drop checker is essential for noobs like us. Purists will say you don't need it but I don't want to risk gassing my fish.
Also, I think the regular you linked has a bubble counter and check valve! I just read it's description
Ask away of you have more questions! I have two tank with co2. On my 10g, both my light and regulator are plugged into the same timer and it works fine.
Are you using a sponge filter like this one? ‘Cause I had a similar problem with them creating too much current. I found that if you remove the little right angled piece on the outlet so it just bubbles upwards then it solved the problem for me. I have one in a really tiny 20x20x20cm tank and it doesn’t cause enough current to disturb them
Adjustable Air Pump: https://www.amazon.com/dp/B0018CDR68/ref=cm_sw_r_cp_apa_i_PeybBbG3WZGVG
Tubing: https://www.amazon.com/dp/B0002563MM/ref=cm_sw_r_cp_apa_i_RbybBb2N07DFH
Also, a portable mini air pump (batteries required): https://www.amazon.com/dp/B000EYULIS?ref=yo_pop_ma_swf
I was recommended this Beamswork light on here awhile ago and it has been great for me for the last year or so. If you are looking for a budget light this one has been great for me so far.
As far as co2 goes it is super easy to do honestly. It only cost me about $100 to set mine up and it is great knowing I can put almost any plant in and it has a chance. I am currently starting a carpet in my tank since I've had the co2 setup for awhile. Here is my setup:
But here is a copy pasted comment explaining my setup and links to all the parts I used that I gave to someone else:
Ok. I'll try to type out my whole setup.
The biggest parts of the setup are the tank and regulator. I use an Empire/Tippman co2 tank with a Double Sun Hydroponics Regulator.
Now, aquarium regulators aren't made with paintball tanks in mind, but most sporting goods stores won't refill tanks above 24oz due to safety reasons. So instead of buying a 5lb tank that no one can refill, I just use a simple Aquatek Paintball co2 adapter to attach the regulator to the tank I have. So for that part of the setup you just attach the adapter to the regulator and then after you fill your Co2 tank attach the tank to the adapter, done (make sure the regulator is plugged in and everything is tightened if you have already filled the co2 tank). Do not attach the adapter to the Co2 tank first, the adapter opens the tank so you'll just empty your Co2 into the air. So attach everything to the Co2 tank last lol.
I also use teflon tape on the tank threads and adapter threads just to help prevent any loss of co2 through the adapter. It probably wouldn't leak without it but I would rather be sure so I just wrapped up both pieces before the install.
Now that you have your regulator/tank setup we just need to get the co2 into the aquarium. I attach Aquatek co2 tubing to the bubble counter that comes attached to the regulator and attach it to a Rhinox check valve, this prevents any water from getting to the regulator, then run co2 tubing from the check valve to a Rhinox co2 diffuser, this condenses the co2 into tiny bubbles so it absorbs into the water.
Boom, almost done. We have co2, we are getting it into the tank, but now how do we know how much? We need a NilocG co2 drop checker and some Drop Checker Solution to put in it. This will come with a card that says the proper colors. I would suggest starting with low co2, check the next day, if the drop checker is still blue, increase the co2 a tiny bit and check again the next day, repeat until it turns green, yellow is bad and you might gas your fish so don't increase co2 too much at a time to protect the fish.
I'll do a full write-up later as my design and parts keep changing. For now, I'm using a model B, a SainSmart 8-channel relay, a Pi Cobbler and these pumps. The pumps are powered individually with a 12v power supply.
Regulator, bubble counter, dual gauge, needle valve built in one. - $57.99 - I've read the more expensive the better, but this one has worked great for me.
Inline Diffuser - $39.99 - I use this to attach to my tubing on the canister filter. Much cheaper if you go with a regular diffuser that goes inside the aquarium.
C02 Tubing - $9.99.
I bought a 5 gallon filled C02 tank from a local welding store for about $60.
&#x200B;
Did you know Amazon will donate a portion of every purchase if you shop by going to smile.amazon.com instead? Over $50,000,000 has been raised for charity - all you need to do is change the URL!
Here are your smile-ified links:
https://smile.amazon.com/gp/aw/d/B01F3FLHIK/ref=mp_s_a_1_3
---
^^i'm ^^a ^^friendly&nbsp;bot
I have this DIY system and it works great (for what it is).
https://www.amazon.com/Generator-Aquarium-Plant-System-Bottle/dp/B01NCXOPKP/ref=sr_1_2?ie=UTF8&amp;qid=1518152996&amp;sr=8-2&amp;keywords=diy+co2
CO2 levels are definitely not as stable as a pressurized system, so you have to give yourself some headroom so you don't gas your fish.
My pressurized system is a cheap 5lb co2 tank (co2 place exchanges it when I need a refill). My regulator is by Azoo and it works great. The needle valve isn't as precise as some higher end systems, but this is about half the price as a UNS or GLA.
https://www.amazon.com/aquarium-Pressure-Regulator-Magnetic-Valve/dp/B018QQ5SI8/ref=sr_1_1?ie=UTF8&amp;qid=1518153313&amp;sr=8-1&amp;keywords=azoo+regulator
I have the same one I think.
I'm pretty sure this is the same as the one I have
http://www.amazon.com/ZJchao-TM-Peristaltic-Aquarium-Analytic/dp/B00F9MXFFQ
You can buy a replacement python adapter on amazon
Sounds like your regulator may have crapped out. I'd recommend a regulator like this one https://www.amazon.com/dp/B077XVFQ46/ref=cm_sw_r_cp_apa_i_tc9rDb4998G4Q
For 10 to 20 gallons do this except instead of a power reactor use another bottle to make this
I've done diffusers, ladders, bells, flourish excel and I'm currently running co2 through an inline diffuser on my 75 gallon. For small tanks a co2 bell fed from some wine yeast will go for months, and produce more co2 than you can really use for less than the price of a co2 cylinder, let alone the regulator and diffuser and timer.
Pressurized is the only option once you hit 40 to 50 gallons. At that point, don't skimp on the regulator, the Milwaukee is worth every penny. It's kind of like going salt water, go big or go home. Every dime you save, ends up being more frustration, and often costing you more in the end.
If you do decide to go pressurized, this has been the best diffuser I've tried. Some people have had problems with them, it's been a champ for me for 3 years now.
If you decide to go the DIY route, remember, you don't have to use plain sugar and bread yeast. You can use honey and wine yeast, so when it's time to change out the bottle, you get mead or apple wine, or beer. Whatever floats your boat.
https://www.amazon.com/Python-13B-Aquarium-Replacement-Pump/dp/B000255NVE/ref=pd_sim_199_4/138-8997213-9091558?_encoding=UTF8&pd_rd_i=B000255NVE&pd_rd_r=3c0178fd-341d-48c0-a546-42ec345bba94&pd_rd_w=5sNDE&pd_rd_wg=yC2Ka&pf_rd_p=5c130f77-a5ef-4ffd-9db1-c29a354f52f9&pf_rd_r=AJWMGK8F8W3STDJKSEQG&psc=1&refRID=AJWMGK8F8W3STDJKSEQG
So this is the piece I bought. I don't have a faucet adapter but that's not really an issue. The problem is that I thought I could just stick my tubing into the hose end of this pump. However, water would not flow down the tubing and into the bucket and instead overflowed in the pump. I was looking at the python water maintenance system, which is what this pump is supposed to be for
https://www.amazon.com/25-Foot-Python-Aquarium-Maintenance/dp/B000255NXC/ref=pd_bxgy_199_img_3/138-8997213-9091558?_encoding=UTF8&pd_rd_i=B000255NXC&pd_rd_r=b39db634-f205-4686-bb9f-04e1b11fc6ff&pd_rd_w=xIXTj&pd_rd_wg=uu2Na&pf_rd_p=a2006322-0bc0-4db9-a08e-d168c18ce6f0&pf_rd_r=7TNQW6ZGBF3YF5JCYMVX&psc=1&refRID=7TNQW6ZGBF3YF5JCYMVX
And I noticed that there is a little component at the end of the tubing (opposite end of the vacuum) that supposedly screws onto the hose end of the pump and brings water to the tubing. I believe that it's called a tubing adapter? Not sure.
Ok will this valve be adjustable Pawfly 2-Way Aquarium Air Flow Control Lever Valve Distributor Splitter Accessories Set with 1 Check Valve, T & Straight Connector and 4 Suction Cups for Fish Tank https://www.amazon.com/dp/B06XFSSTZB/ref=cm_sw_r_cp_api_i_ioijDb6M7KXFX and as fort he loud air pumps can I roll up a towel and put it under the pump so it takes up the sound?
I actually ordered everything individually from Amazon. I’m sure you could probably find everything locally as well but it was easier for a newbie like me to get it all from the same place.
Aluminum CO2 Paintball Tank https://www.amazon.com/dp/B0008G2WAW/ref=cm_sw_r_cp_api_i_J3vBDbY97P8E0 - $22 ( + $5 to fill with CO2)
Aquarium CO2 Regulator with... https://www.amazon.com/dp/B07F7P8TL3?ref=ppx_pop_mob_ap_share - $53
AQUATEK CO2 Paintball Tank CGA... https://www.amazon.com/dp/B004M49QDC?ref=ppx_pop_mob_ap_share - $12
aFe Power Magnum FORCE 54-11473... https://www.amazon.com/dp/B01N36MAO4?ref=ppx_pop_mob_ap_share - $18
AQUATEK CO2-Proof Tubing 16 Feet https://www.amazon.com/dp/B008UCOFJW/ref=cm_sw_r_cp_api_i_z6vBDbMW07193 - $8
Century 24 Hour Plug-in... https://www.amazon.com/dp/B00MVFF59S?ref=ppx_pop_mob_ap_share - $9
Aquarium Carbon Dioxide CO2... https://www.amazon.com/dp/B01C9DGXV0?ref=ppx_pop_mob_ap_share - $11
Total: $148
Again, total newbie and this is the bare minimum of quality and price I was comfortable with. I plan on upgrading to a bigger tank and a better regulator in a few months. Do your own research too.
You've already gotten some answers but here's a little more info:
I would recommend supplementing your diy setup with this https://smile.amazon.com/dp/B01NCXOPKP/?coliid=I28RJL0SHQHUER&colid=JX62JSDG7Z5Y&psc=0&ref_=lv_ov_lig_dp_it or another product like it. I have a double gatorade bottle setup on my 20g tall and it worked fairly well, alternating refilling a bottle each week. Used 1tsp yeast to 2 cups sugar. However, getting the diy caps (drilling a whole for tubing) to not leak co2 was a pain and now I've got a leak again. I'm not setting it back up until I buy a little rig like this.
&#x200B;
&#x200B;
Minimum Setup is only 3 items
Tank
regulator
Diffuser
Surface agitation is what oxygenates the water, so you have to have surface water movement and you need more movement the higher the temperature. So, if you'll have tropical fish in the top tank you'd need more movement than what I'm seeing in the goldfish tank. But, if the bubbles you have are too big, you can buy an air flow control valve at your LFS for a dollar or two to reduce the number of bubbles. Then there are also diffusers that make tons of little bubbles like what you have on the bottom left.
I have no experience with these...but look: Just read the reviews before you buy.
https://www.amazon.com/dp/B07F7P8TL3
https://www.amazon.com/dp/B077XVFQ46
https://www.amazon.com/dp/B07KK7YLRK
https://www.amazon.com/dp/B07D5S617H
https://www.amazon.com/dp/B002P39I8U
I think what i'm actually going to do is get one of these inline atmomizers/diffusers so that I don't have to put more stuff "in" the tank. Not as much worried about the cost.
&#x200B;
https://www.amazon.com/dp/B07594GKGJ/?coliid=IYI0EPF2LVEAG&colid=24C3I1E8TPJ1B&psc=0&ref_=lv_ov_lig_dp_it
That's exactly how it works.
This is the exact diffuser I have. I know the ceramic needs cleaned now and then but the tank hasn't had water in it for a week yet.
I pulled the pump out to check for blockage but it all looked good. I plan to take the diffuser apart Sunday just in case.
I also have a new pump coming that's going to triple my flow just in case the stock pump is just too weak for the diffuser.
I use an inline diffuser on my 90 gallon tank with an eheim classic filter. The inline diffuser I got works well with the plastic tubing that came with the eheim, but I don't think it would work on the ribbed fluval lines. So, if you go that route, be sure to find reviews on the specific model you are getting that say it will work with the fluval lines.
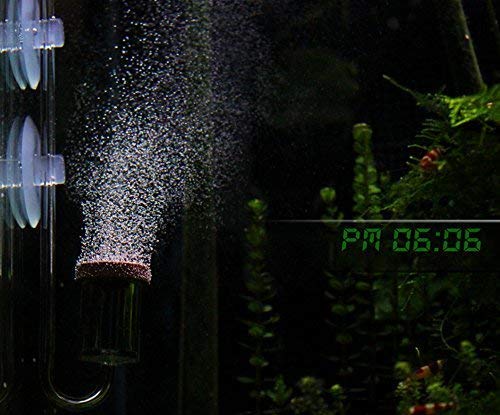
The dispersion is great, and most bubbles are disolved before making it to the surface. If you look closely at my tank, you can see that the spray bar is shooting micro bubbles across the entire aquarium.
This is the one I bought (maybe a different size):
http://www.amazon.com/U-P-Aqua-Inline-Atomizer-System/dp/B006HKMO06
http://www.amazon.com/Tetra-77848-Whisper-Pump-40-Gallon/dp/B004PB8SMM/ref=sr_1_2?ie=UTF8&amp;qid=1418973697&amp;sr=8-2&amp;keywords=aquarium+air+pump
http://www.amazon.com/Sleek-Airline-Tubing-25-Foot-Black/dp/B001D4XTUU/ref=sr_1_2?ie=UTF8&amp;qid=1418973746&amp;sr=8-2&amp;keywords=air+tubing
http://www.amazon.com/Jardin-Aquarium-Distributor-Splitter-Diameter/dp/B00A0GOL6I/ref=sr_1_1?ie=UTF8&amp;qid=1418973765&amp;sr=8-1&amp;keywords=air+tubing+splitter
http://www.amazon.com/1-inch-Mineral-Release-Aquarium-Airstone/dp/B00CQGXBJ8/ref=sr_1_1?ie=UTF8&amp;qid=1418973776&amp;sr=8-1&amp;keywords=air+stone&amp;pebp=1418973778694
All of those would combine to make one rig that could support up to 5 air stones.
The Pump pushes air through some of the tubing to the splitter, then the valves that are open (in this case 2) have air go through them and into more tubing. Then at the end of the tubing is the air stone that is in the tank and bubbles to provide oxygen for the fish.
Here's another option with a cheaper (smaller) tank, different regulator, better diffuser, and a less expensive bubble counter.
That's exactly what I do on my overflow. It works like a champ. TOM Aquarium makes an awesome dosing pump that I use just for this. I recommend having a long lead on your output that you can securely mount low into your aquarium, otherwise, you get some pretty loud bubble popping if it's near the surface of the water (from personal experience).
I would automate:
By having a cleanup crew (amano shrimp, nerite snails, siamese algae eaters) in my 75 I've managed to automate algae management and cleanliness.
I've been thinking about the last one ... there are pumps you can buy on Amazon that do that like the Jebao Pump, and even considering DIY solutions like this with a Raspberry Pi.
> There is no check or restrictor in the hose, its just straight hose so you have to look at peaks.
That is part of the problem, you don't want to look at the peaks. The spec is given with the intent that the mechanic is going to be using some form of a manual vacuum gauge and restrictors in the line. Those restrictors help create a average to look at VS a instant on and off peak.
Those restrictors help create a regulated pocket of vacuum eliminating/smoothing those high and low spikes. Motion pro has a set of restrictors with a preset hole size or you can use a aquarium type valve for regulating air flow. You don't want the ones with a check valve and you do want the ones that will totally close off the air flow. Easily found at most any pet shop.
Start with putting the valve as close to the carb/throttle body port as is convenient(within a couple of inches). Start the bike and begin with a closed valve and open it only enough to get a reading and let it build. Open the valve too much and you will be back to very spiky readings(in a gauge it would show as needle flutter, we don't want needle flutter). Too little and the regulated air pocket behind the valve/restrictor will take a looooooong time to adjust to any changes.
I am curious of the result, but my bet is 1, 2, 3 are the farthest off on the low side with 4 being the closest overall.
Do you have links for exactly all of the connections? I'm getting really tired of all this algae and really want to start a carpet, so C02 here I come.
EDIT: Once again, google has proven very useful lol
DIY kit
Diffuser
Bubble counter
https://www.amazon.com/ZJchao-Dosing-Peristaltic-Aquarium-Analytic/dp/B00F9MXFFQ
Haha, I'm so glad it helped. I took a look at that after I wrote it last night, and I was like "man, apparently I have opinions about sponge filters." Don't know if you've bought that four pack yet, but I found a cheaper one for you. There's a couple that are Prime too, if you look.
Don't forget to get some air control valves so you can control the amount of fizziness.
I really should make my user flair "needlessly verbose" or something. 😅
Amazon, it's the python replacement part only $5
https://www.amazon.com/Python-13B-Aquarium-Replacement-Pump/dp/B000255NVE/ref=sr_1_3?ie=UTF8&amp;qid=1506518004&amp;sr=8-3&amp;keywords=python+water+changer
I'm very happy with my sponge filter! Here's my set-up:
Here's the basic parts list to build a bucket like this:
Lots of this stuff can be had cheaper at a home improvement or pet store. Check around. You'll need a soldering iron (I like my adjustable 40w), a drill and drill bits up to 3/4" (I like step bits for work on plastic), a heatgun or lighter to shrink that heatshrink tubing. An infrared thermometer is nice to have and can tell you the temp of your nutrients, the plant itself, your lights, etc...Just make sure to calibrate it first, all the cheap ones are inaccurate by at least a few degrees.
THis is what use i have a short garden hose going from my bathroom to link 1 being in my commode then ihave this on the other end and never have an issue
https://www.amazon.com/Python-13B-Aquarium-Replacement-Pump/dp/B000255NVE/ref=pd_sim_199_6?_encoding=UTF8&amp;pd_rd_i=B000255NVE&amp;pd_rd_r=WNXK5PRH55C2W9TGA6J0&amp;pd_rd_w=MII6T&amp;pd_rd_wg=vJEVx&amp;psc=1&amp;refRID=WNXK5PRH55C2W9TGA6J0
https://www.amazon.com/25-Foot-Python-Aquarium-Maintenance/dp/B000255NXC/ref=pd_sim_199_5?_encoding=UTF8&amp;pd_rd_i=B000255NXC&amp;pd_rd_r=28H3RTT8BS8AWF8TP0AJ&amp;pd_rd_w=LitCh&amp;pd_rd_wg=mUiY3&amp;psc=1&amp;refRID=28H3RTT8BS8AWF8TP0AJ
This is crazy, cause I had this list put together, let me know what you think of this stuff? May go with your diffuser tho as it seems cheaper, is it also a c
Drop checker or do I need to get one of those too? Also, should I be dosing stuff on top of this CO2 setup? Like should I use Excel and other stuff still?
Ohhh ok, wasn't sure if you tried cutting the top off of it or not.
JT CO2 Tank 12oz w/repeater https://www.amazon.com/dp/B0008G2WAM/ref=cm_sw_r_cp_apa_i_-t03AbGZWQRJ7
Interstate Pneumatics WRCO2-5A4 CO2 Paintball Tank CGA 320 Adapter https://www.amazon.com/dp/B00I2UMZ2Q/ref=cm_sw_r_cp_apa_i_iu03AbTZCMEKR
CO2 Regulator Aquarium Mini Stainless Steel Dual Gauge Display Bubble Counter and Check Valve w/ Solenoid 110V Fits Standard US Tanks - LP150 PSI - HP2000 PSI Accurate &amp; Easy to Adjust Comes w/ Tools https://www.amazon.com/dp/B07C6HKTN6/ref=cm_sw_r_cp_apa_i_Fu03AbFC8ZJ3S
Rhinox Glass Drop Checker Kit - 3 Seconds to Read CO2 levels - 3 Minutes to Setup - Fastest way to ensure sufficient Co2 in Planted Aquarium - Includes pH Reagent indicator solution &amp; Color chart https://www.amazon.com/dp/B005C74ZCA/ref=cm_sw_r_cp_apa_i_Xu03AbX7A0N5G
Pollen Glass CO2 Diffuser with U-Shape Connecting Tube for Aquarium Planted Tank (20 - 50 US gallons) https://www.amazon.com/dp/B01N2LZOCE/ref=cm_sw_r_cp_apa_i_dv03Ab406ZNJT
AQUANEAT 25 FT Airline Tubing Suction Cups Control Valves Tee's Check valves Aquarium Air Pump Accessories https://www.amazon.com/dp/B076Z8ZR9H/ref=cm_sw_r_cp_apa_i_sv03Ab2DJ19BC
Rhinox Brass Check Valve for Aquariums - Sturdy, Reliable, Anti-Leak, Anti-Backflow, Non-Return CO2 Air Valve That Ensures One Directional Water Flow, Perfect for Sensitive Fish https://www.amazon.com/dp/B00IHXW5SC/ref=cm_sw_r_cp_apa_i_Gv03Ab2QEHCZQ
Whoops, forgot to mention that they are JARDLI
Here's Diffuser
Bubble Counter
https://www.amazon.com/gp/aw/d/B00WW6LSWY/ref=mp_s_a_1_1?ie=UTF8&amp;qid=1466685944&amp;sr=8-1&amp;pi=SY200_QL40&amp;keywords=aquarium+air+line+valve&amp;dpPl=1&amp;dpID=31y5WeHq4VL&amp;ref=plSrch
Using this kit from amazon:
https://www.amazon.com/gp/product/B01NCXOPKP/ref=oh_aui_detailpage_o00_s00?ie=UTF8&psc=1
The recipe it comes with uses citric acid and baking soda. Has been working like a charm since I got it in June
Yep, those diffuser can be really variable. If made poorly, the CO2 will come out the sides of the disc. I was much happier with this one: https://www.amazon.com/gp/aw/d/B074MLT716/ref=mp_s_a_1_3?ie=UTF8&amp;qid=1542688186&amp;sr=8-3&amp;keywords=co2+diffuser&amp;dpPl=1&amp;dpID=51hFQalXvWL&amp;ref=plSrch
https://www.amazon.com/gp/product/B01NCXOPKP/ref=oh_aui_detailpage_o03_s03?ie=UTF8&amp;psc=1
Buy some citric acid, baking soda, and the appropriate tubing, catch valve, drop checker, and gas diffuser, and you have a solution for $30. The down side is you have to manually manage the CO2 flow if you want to have it turn off in the evening or for pH (CO2 saturation) control.
These are just personal experiences so take from them what you will.
I have an Aquatek mini that I have had good luck with. It has been running without problems since spring 2015 on my 15 gallon tank. The adjustment for the needle valve is pretty sensitive and it can be hard to find the perfect spot but it does seem to hold it's positioning pretty well. I have it hooked up to an atomizer from GLA and it works very well.
On my smaller puffer tank I bought this regulator:
https://www.amazon.com/gp/product/B077XVFQ46/ref=oh_aui_detailpage_o02_s00?ie=UTF8&amp;psc=1
It was quite a bit cheaper than the Aquatek mini price wise but the quality seems to be there. It's a hefty unit, has a built in bubble counter and adjusts fairly easily. I have it hooked up to a paintball canister with an adaptor from Aquatek and it hooked up easily and without any issues. It is pushing the CO2 through this glass diffuser and it has been working well. With the regulator, diffuser, some tubing and the paintball adapter I think it was all under $100. Keep in mind I have only had this running for about 5 days, so no idea how it will perform long term but so far I am impressed for the price.
Sorry for late-ish reply. I bough this one: https://www.amazon.com/gp/aw/d/B00CJNGKO6/ref=mp_s_a_1_8?ie=UTF8&amp;qid=1501861923&amp;sr=8-8&amp;keywords=sunsun%2Bpowerhead&amp;th=1&amp;psc=1
It's not by any means the best option; just a cheap one. I fitted some plastic to help direct the flow and diffuse it a bit but it is more than enough for my 40 breeder!
i'm currently using a pollen diffuser , it works wonders, the pollen honestly can serve as a bubble counter as well, as I observed the bps rate is the exact same as my bubble counter.
Stay the hell away from "sprial" glass CO2 diffusers, I have gone thru three, they're so inefficient and CO2 only gushes out of one side. This is consistent on all three I've had, tho they're all from the same manufacturer.
For anyone wondering about the CO2 Setup, here is a quick writeup that includes all of the Amazon links and prices:
I am using a TV stand for my aquarium that looks like this and the entire CO2 setup fits in one of the smaller cubby holes. I am using a 24OZ Empire paintball tank that has this adapter hooked up to this regulator.
Those three items will makeup the majority of the cost of pressurized CO2. The other things I bought were a drop checker, a CO2 diffuser and CO2 airline tubing.
Finally, I bought an outlet timer since the regulator I previously mentioned has a solenoid valve.
The core components are the tank, adapter, regulator, tubing, and diffuser. The total of those came to $130. Adding on the dropchecker and timer brings the total to $160. Filling up the paintball tank at my local sporting good store cost 5$, but that should last this tank anywhere from 3-6 months.
You may be able to assemble the entire setup for cheaper if you can find a cheap paintball tank and a smaller diffuser, or already have some of the items needed.
Diffuser
https://www.amazon.com/gp/product/B01N36MAO4/ref=oh_aui_detailpage_o02_s00?ie=UTF8&amp;psc=1
Citric Acid
https://www.amazon.com/gp/product/B00EYFKNL8/ref=oh_aui_detailpage_o04_s00?ie=UTF8&amp;psc=1
Co2 kit. Includes instructions on how to mix baking soda with the citric acid. You provide your own bottles. These are just typical 2l soda bottles.
https://www.amazon.com/gp/product/B074MC7PK5/ref=oh_aui_detailpage_o06_s00?ie=UTF8&amp;psc=1
I have yet to install the kit as I am waiting for the defuser/bubble counter but from all the research I have done, it seems to be a good working solution that requires minimal fuss.
Cool, thanks! This Aqua lifter Pump?
Sorry to burst your bubble but you should have done more market research. You can pick this up on amazon for $25 right now and this includes a safety valve. Adding on a check valve, bubble counter and solenoid will cost a bit less than you’re current target pricing, and they get to pick their own style of diffusing. Most people consider DIY CO2 for the low initial investment costs, either because they’re on a budget or they’re reluctant to invest a chunk of money for pressurized systems and want to try out CO2.