(Part 2) Best electrical outlet boxes according to redditors
We found 133 Reddit comments discussing the best electrical outlet boxes. We ranked the 80 resulting products by number of redditors who mentioned them. Here are the products ranked 21-40. You can also go back to the previous section.


They are covers for either power outlets or data ports. Like this one: https://www.amazon.com/dp/B00Q56HG8M
I doubt it. I would upgrade to a double gang box - These remodel boxes make the process pretty painless:
https://www.amazon.com/gp/product/B00H8NUVRO/ref=oh_aui_search_detailpage?ie=UTF8&psc=1
Seriously doubt it is structural but I am sure someone is going to tell you to hire a engineer.
Most likely it was put there to hold the thermostat or doorbell.
What you should of done is
https://www.amazon.com/iMBAPrice-LV1-2PK-Voltage-Mounting-Bracket/dp/B00HEVAPNA/ref=sr_1_7?crid=1N7F2O0MPDHI8&keywords=low%2Bvoltage%2Bcarlon%2Bsc100rr&qid=1564065358&s=gateway&sprefix=low%2Bvoltage%2Bcarl%2Caps%2C202&sr=8-7&th=1
Buy this cut the screws and ears off. Then screw it to the wood with long screws.
Get it flush and put a face plate over it.
​
I would put the Voltage box in and the mount the face plate. Then sit down and drink a nice cold beer. Home Ownership is a war and this is just one of many skirmish before you get to a battle.
​
​
We have all been where you are now.
Second this, imagine spilling liquids on your counter or run off from a cutting board. You might be able to get away with something like this: http://www.build.com/hafele-822-99-320/s1136222?uid=2726289&gclid=CjwKEAjwgbG5BRDp3oW3qdPiuCwSJAAQmoSD4A5SVAcU5qT9EdFFsdonCmZ4l8HaqGLXGMjUcehFnxoCR9Dw_wcB&source=gg-gba-pla_2726289____50002411159&s_kwcid=AL!4215!3!50002411159!!!g!80403657919!
or a less expensive version of this:
http://www.amazon.com/Lew-Electric-PUFP-CT-SS-Countertop-Receptacle/dp/B00JV3D7C0/ref=sr_1_8?ie=UTF8&qid=1462559192&sr=8-8&keywords=counter+outlet
I've been building my own kitchen cabinets and had to cut some drawers short because of an outlet being behind them, it sucks, but code is code =\
Also make sure you use the metal boxes with armored conduit when you run the wire, this is also code I believe.
One last thing I learned through my own project. If the island is attached to the floor/non mobile its required to have at least one outlet in it somewhere. If you have something like a range or a sink that has a narrow gap behind it, its required to have an outlet on each side (you're fine with one outlet in yours, its just an fyi :) ).
Assuming you know how the electrical parts work (if you don't, call an electrician),
That style of floor box consists of 3 parts:
It looks as though you have exactly this type of photocell. You need to open the whole light to access it from inside the post.
Hi, I did something similar where I replaced a fluorescent 1 tube fixture that had been installed as undercabinet lighting using a piece of romex run out the wall right under the cabinets. I was able to use that "always hot" romex wire as the feed for a 1 gang receptacle I installed where the wire had previously just ran out the wall. I used a horizontal "old work" box that mounts to the studs as that's not really visible directly under the cabinets installed at the height they are (these boxes were only $2.50 each when i ordered them). It's as simple as using a jab saw/close-quarter hacksaw and installing an outlet.
My LED undercabinet fixtures were made by lightkiwi (also on Amazon) and they included a little on/off/dimming control wired in-line. I was able to use some tiny screws to mount the control out of sight, behind the trim lip of the upper cabinet. I used a rubber bump stop attached on top of the on/off button as an "index mark" and still have a piece of blue painter's tape visible on the front to point me where to reach (although the goal is to find something more attractive as a mark).
I've had the opposite experience. I needed box extenders and they were way more expensive on amazon. I guess your mileage will vary.
https://www.amazon.com/Electrical-Receptacle-Extender-Single-Gang/dp/B00J7KO9K6/ref=sr_1_15?ie=UTF8&qid=1541594743&sr=8-15&keywords=electrical+box+extender
https://www.homedepot.com/p/ReceptXtenders-1-Gang-1-2-in-Electrical-Receptacle-Box-Extension-Ring-00004/100159668
like this?
https://www.amazon.ca/Orbit-Industries-Flip-Type-Receptacle-Adjustable/dp/B01HSPJ37K/ref=sr_1_3?s=hi&ie=UTF8&qid=1526670771&sr=1-3&keywords=floor+box
You can't get more cyberpunk than a clear project box so you can see the internal electronics.
http://www.amazon.com/Hammond-1591ATCL-Translucent-Polycarbonate-Project/dp/B00CS2YP22/
They are available in a variety of sizes.
Hi, I'm finally working on fixing this. Can you tell me what you meant by a "shim"? Can you point me to the right product?
Right now I'm trying to fix it with tube shaped spacers, but they don't seem to provide enough resistance--especially with the tamper-proof safety feature of the GFCI outlet, which increases the amount of force required to plug something in. Thanks!
This is precisely what makes a quick 10-minute project to swap a switch turn into 45-minutes, or longer, of hell.
Get some gang box extenders. That's a 2-pack; they snap apart ... and together as long as you need. You can also get 2-gang, 3-gang, and probably 4-gang varieties without the divider between each outlet.
Check your local codes^, but from what I read here, National Electrical Code in the US says you must extend the front of the box if there is more than 1/4" between the front of the box and the surface of walls made with non-combustible materials, and the box must be flush with walls made with combustible materials.
Surprisingly, on my tile backsplash, the builder did not; they were recessed almost a full inch. This made getting the outlets straight nearly impossible ... until I added those extenders I linked above (but purchased locally, as they were much cheaper). Those provided a firm anchor point for the switches.
You can also look into these spacers (or just use washers), or these shims, where suitable (video shows both spacers and shims).
Finally, a trick some use is to wrap unused electrical wire around the screw to build a spacer to the exact size needed (note slideshow in the middle of the article has all the steps).
^ ^I ^am ^not ^an ^electrician.
If I were you I would get a heavy duty extension cord that reached just beyond the hole from an outlet in the garage, and attach the wire after putting it through after being cut to this, which would be secured to the outside of the garage at the hole, or 3 feet above it after putting the wire first through 3 feet of pipe made to be secured with that kind of outlet against a wall. Unplug the extension cord inside the garage when not in use.
https://www.amazon.com/Hubbell-Bell-MK1250S-Weatherproof-Horizontal-Receptacle/dp/B00JTQX6DE/ref=sr_1_5?ie=UTF8&qid=1474336808&sr=8-5&keywords=Outdoor+electrical+box
SO I think this is the box (not sure as it was nto installed by me, and I forgot to look closely at part number on box when working on it yesterday.
https://www.amazon.com/Hubbell-Bell-DB350Z-2-Inch-Weatherproof-Outlets/dp/B00JTQWW2K/ref=sr_1_18?ie=UTF8&qid=1500905056&sr=8-18&keywords=Hubbell-Bell%2B2%2Bgang%2Bweatherproof&th=1
Rough size is 2.2 x 4.6 x 4.6 inches . I think is is 35cu inches, but that is a guess based upon part number.
Box is mounted to a 6x6 deck post. Wire from breaker comes into the top of the box, and service goes out of the bottom (down side) of the box. No wires go into the deck post.
So I basically have a single 12-2 gauge wire coming into the box, and a single 12-2 gauge leaving.
Internally, I have 3 groups for the 2 conductors and ground to make their way, so 3 wire nuts in the box. Before anyone says anything, I am, aware of Line/Load and how to wire GFCIs properly.
I am just looking for a slightly deeper box.
Alrighty then. I'll get this enclosure with this rail and these cable lock nuts.
Let me give you a tip. Helped me when someone showed them to me. If you are replacing 2 or 3 gang boxes that are already mounted, these work great. The first spot can get tight, but deep for the other two. Just passing along something that was passed to me.
https://www.amazon.com/Madison-Electric-Products-MSB3G-Adjustable/dp/B00H8NUVQA/ref=sr_1_55?ie=UTF8&qid=1473946089&sr=8-55&keywords=3+gang+screw+mount+box
http://www.amazon.com/Madison-Electric-Products-MSB4G-Adjustable/dp/B00H8NUVO2/ref=sr_1_2?ie=UTF8&qid=1465078456&sr=8-2&keywords=4+gang+plastic+electrical+box
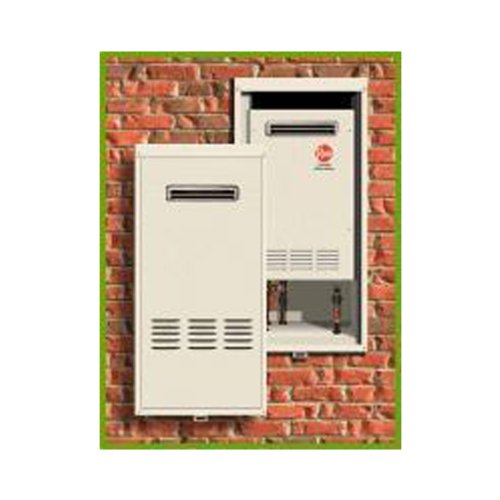
This was for my motorhome so it went all over (It was actually overkill. Delicious endless hot water overkill). Do whatever it is you do for wherever you live. They make enclosures for them that recess into an exterior wall which can help as well and make them much more aesthetically pleasing.
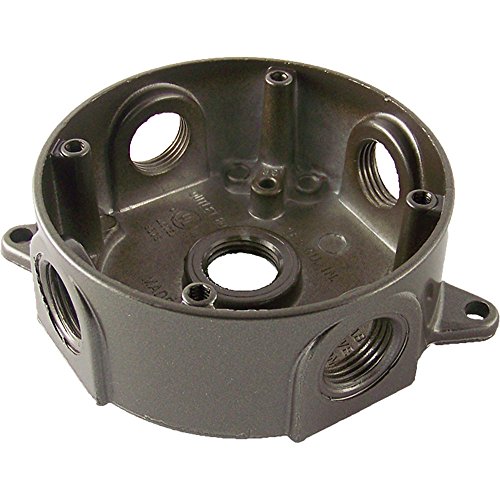
I found round PVC boxes on Amazon like this. Too bad they all come with 4 holes instead of 6.