Best industrial process filter bags according to redditors
We found 11 Reddit comments discussing the best industrial process filter bags. We ranked the 8 resulting products by number of redditors who mentioned them. Here are the top 20.
We found 11 Reddit comments discussing the best industrial process filter bags. We ranked the 8 resulting products by number of redditors who mentioned them. Here are the top 20.


personally i would go with something like this with one of these I believe that still also comes with tubing, clamps and a hookup to your faucet but i may be wrong. In which case those are easily ordered from amazon or ebay. This setup would be pretty close to the ease of the t500 due to the electric element, its also safe to run indoors (provided you leave a window open for ventilation) and the 2" triclamp leaves your options open for upgrades like a reflux column should you wish to produce neutral or vodka. I also want to add, a nice hdpe bucket like this and a airlock such as this are great to have. A filter like this comes in handy for filtering yeast and sediment out of mash. As far as extras you dont need much other than a mash bucket, airlock, and way to cool your still head. I personally run a 32gal trash can filled with water and a pond pump to to recirculate my water without any wasting any, but for a small apt i would just use the kitchen faucet and screw on a adaptor
I had to break this into another comment due to per comment character limits.
The following previously belonged to the above comment, but was moved here due to the above mentioned limts.
> Something you can do now: Build a filament drybox. Seriously, some filaments such as certain Nylons can go bad in just a few hours, depending on ambient humidity levels. All filaments are susceptible to moisture absorption, and ideally should be kept in something like a Spannerhands holder, even while printing, but at worst you should store them in a big plastic tub with silica gel beads to keep them dry.
> If I had to give one last tip, don't stock up on too much filament yet! Seriously! I thought I would be printing mostly in PLA but now that I've had a few weeks to work with it, I've learned I prefer PETG more, and now I have so much extra PLA! I'm sure I'll find something to do with it, but for my final tip I would add "And get a good variety!". Services like MakerBox (referral) let you try a bunch of different filaments on the cheap. It's not a ton of each filament (about 50g), but I love the variety of materials and colors.
Original second level comment begins:
Final Tips: Bonus Round!
There are tons of other accessories you can get ahead of time. None of these are necessary, but are small things you might end up using (or wanting to try :P), and should help get you started getting a wishlist together. Besides the ones mentioned in this comment (and the one that precedes it) already:
Edit: Upon rereading my comment I realized I have a problem.. I own every product I just listed..
^^Except ^^for ^^the ^^nozzles ^^kit ^^so ^^it's ^^not ^^that ^^big ^^of ^^a ^^problem, ^^right?... ^^Right?!
Hello! This looks incredible! I'm just now a high school senior and have been looking into aeroponics after having done hydroponics for at the past three years. I was apprehensive to spend my petty fast food job money on one of those $80 8800 pumps that aeroponic supply companies sell, and those outrageously priced $5 a piece 50 micron plastic nozzles. I'm glad I finally found a source of information that doesn't try to up the price a ridiculous amount. Also great work on using the Arduino as a timer as that was my plan too! I just never got around to it and decided to learn Python instead of C++ :P You're quite right that finding a timer for this kind of application is both a pain and expensive otherwise.
I have a few questions about your build.
How many nozzles/sprayers can this system support?
Is the above question dependent on the size of the accumulators?
Are those brass nozzles able to produce 5-50 micron droplets?
Are there any problems you have run into using this system?
Final note: check these filter bags out, as they might be a little easier to use straight away than a sponge and could fit into a larger water reservoir.
I’m not going to lie, this post may scare some people off... it’s really simple I just explain in specific details... here look at My Tula results I have replicated multiple times with this process...
Buy this too:
———————
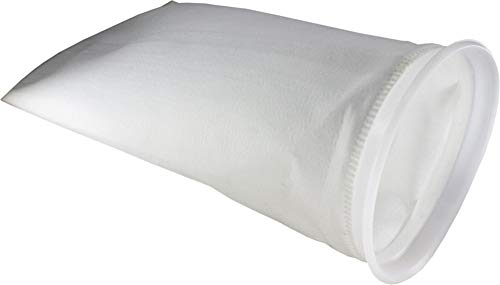
5 Micron Polypropylene Filter Bag - overkill/makes paint slick
Read all this if you want good results, I go into detail, maybe too much but it is what it is.
Buy filter too, cut out circle from filter large enough to fold into a cone that you stick in your small funnel you use when pouring paint into your gun. If it won’t stay folded, paperclip/staple, the folded piece.
Make sure you have clean gloves on, and good ones... when the paint is almost done straining, squeeze the filter pushing the last bit through. To reuse filter run cheap lac thinner through filter media.
Prep Notes:
——————
If you are this far, I am assuming you followed my recommendations for 120-180 alum ox to prep with, you just sprayed the gun down with lac thinner or acetone and it’s hanging...
Mixing:
————
This whole process will make the paint a little runny, but silky smooth - mix it at 2 parts paint, 1 part thinner, basically 70% paint, 30% thinner.
***If you get cob webs which look like spider man spraying webs from your clean gun put a little more ethanol in until it sprays smooth. Think “50:50 is max dilution, I’m at 70:30” and eyeball a 60:40 mix.
Spraying:
—————
Turn the pressure down on your gun to 25psi, that is set when you depress the trigger half way.
You want it to go on glossy/shiny/wet looking and even. Let first coat dry by air, don’t use a heat gun. Put subsequent coats on nice and wet enough to shine but not enough to run and you will have dead nuts the Tula look, take your time.
IF you get a run with this paint it is OK, let it dry... it will take a bit to dry dry, Go right back over run area next few passes. With a little bit of glossy misting, then a wet coat.
Do not over do the first coat, make sure your 10 inches back... the ethanol will retard dry time a lot. Be patient.
Do NOT put this project in the over, near heat, near a fast blowing fan once it’s wet. It is going to dry slow slow and that helps process smooth out the paint. If you do get it near heat, fans, whatever just repeat until it is black and shiny.
Once dry over night you can bake it/heat with heat gun.
A few recommendations:
Something like this filter will take it to the next level, until you get a plate filter...
https://www.amazon.com/Duda-Energy-PESP1PW-01um-Polyester-Industrial/dp/B00KE83O7Y/ref=sr_1_6?keywords=1+micron+filter+sock&qid=1568692488&s=gateway&sr=8-6
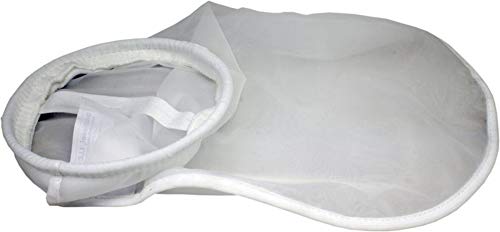
Yeah for Kief or real smushy material you need to order some of these bad boys https://www.amazon.com/Nylon-Rosin-Press-Filter-micron/dp/B06X6KG5T9/ref=sr_1_1?s=home-garden&ie=UTF8&qid=1527560275&sr=1-1&keywords=Squish+Strong
But me personally i go for much smaller presses so i think the bags i use are from that same company but they are 1.5inch x 4inc a smaller bag. edit just for reference, i only press buds and rarely have to use the bags. Sometimes ill get some fresher material than i expected and ill have to use the bag before if not the shit will just keep pancaking out too far
It's entirely possible to use a hair straightener if you're careful.
Hash doesn't need a whole lot of pressure. But the temperature you have to watch. It should only have the slightest sizzle when you touch it with your wet finger. When I used one of those back in the day, I would toggle the power until I found the sweet spot.
And you definitely have to use some kind of bag to hold back the plant matter. You can grab them on the cheap from Amazon.
>rozninc bags
>
> https://www.amazon.com/ROZN-inc-Rosin-Bags/dp/B07RHHVV4B?th=1
>
>These?