(Part 2) Top products from r/prusa3d
We found 36 product mentions on r/prusa3d. We ranked the 221 resulting products by number of redditors who mentioned them. Here are the products ranked 21-40. You can also go back to the previous section.
21. Super Lube Synthetic Multi-Purpose Grease, 3 Oz.
Sentiment score: 2
Number of reviews: 2
Patented synthetic NLGI grade 2 heavy-duty, multipurpose lubricantDielectric, Food Grade, CleanNSF Rating H-1, safe for incidental food contactWill not drip, run or evaporate
 Show Reddit reviews
22. FYSETC Prusa i3 MK3 Cool Blower Fan 4010 40x40x10mm DC 5V 0.2A Hotend Cooler Radiator for 3D Printer DIY Parts Accessories, 2Pcs
Sentiment score: 0
Number of reviews: 2
Brushless DC Blower Fan, best DIY replacement extruder hotend parts for Prusa i3 MK3.Size: About 40x40x10mm/ 1.7x1.7x0.39 inch; Cable Length: about 750mm/ 29.5 inchRated Voltage: 5V, 0.35APlease Note: the fan has two sides,but the side with sticker must be always facing the hotend (not visible when ...
 Show Reddit reviews
23. Bondhus 10687 Set of 7 Balldriver Screwdrivers, ProGuard Finish, sizes 1.27-5mm
Sentiment score: 3
Number of reviews: 2
Angle entry up to 25 degrees on sizes 1.27, 1.5, 2, 2.5, 3, 4, and 5mmComfortGrip handles are designed for maximum torque with ultimate comfort and gripTools are Made in the USA with Bondhus proprietary Protanium steel and are up to 20% stronger than competitor toolsProGuard Finish is 5 times more e...
 Show Reddit reviews
24. HICTOP Cartridge Heater 24V 40W for Creality Ender 3 3 Pro Ender 5 CR-10S Pro 3D Printer Prusa Mendel (Pack of 3)
Sentiment score: 2
Number of reviews: 2
[Material]: Stainless steel (304)[Voltage]: 24V. Power: 40W.[Application]:Creality Ender 3 3 Pro Ender 5 CR-10S Pro 3D Printer Prusa Mendel[Diameter]: 6mm. Length: 20mm,Wire Length:1M[SERVICE COMMITMENTS]: We offer 90 Days Money Back Warranty. If you unsatisfied with the quality of our product, you ...
 Show Reddit reviews
25. FYSETC Prusa i3 MK3 Cooling Fan 5015 50x50x15mm 5V DC 0.35A Hotend Cooler Blow Radiator Sleeve Bearing for 3D Printer Parts Accessories, 2Pcs
Sentiment score: 1
Number of reviews: 2
Brushless DC Blower Fan, best DIY replacement extruder hotend parts for Prusa i3 MK3.Size: About 50x50x15mm/ 1.9x1.9x0.59 inch; Cable Length: about 750mm/ 29.5 inchRated Voltage: 5V, 0.35APlease Note: the fan has two sides,but the side with sticker must be always facing the hotend (not visible when ...
 Show Reddit reviews
26. MOONS' NEMA17 Stepper Motor 3D printer 0.2Nm(28oz-in) 1A 2Phase 1.8 degree Prusa Extruder Stepping Motor Bipolar 25.3mm(1in.) Smooth Silent Step Motor (model MS17HD5P4100)
Sentiment score: 1
Number of reviews: 2
High Torque: MOONS’ high torque stepper motors provide 15% to 25% more torque across the entire speed than conventional motors.Long Life Time: In typical Industrial application, Mean Time Between Failures of MOONS' motor was up to 406,500 hours and Failure Rate was 3.44 hours /1000,000 hours, ...
 Show Reddit reviews
27. casa pura Anti-Vibration Pad - Rubber Vibration Isolator Mat | Matting for Washing Machines, Washers, Dryers and Appliances | Multiple Thicknesses & Sizes | 1/4" Thick - 24" x 24"
Sentiment score: 0
Number of reviews: 2
STRONG RUBBER: This anti-vibration pad is made with 100% recycled rubber particles, compressed for maximum sound dampeningMINIMIZE VIBRATION: Most washing machines are prone to vibrate and cause excessive noise during the spin cycle and potentially damaging the floor. casa pura rubber mats absorb vi...
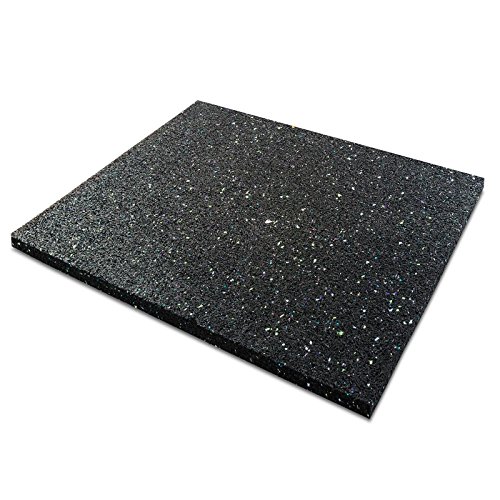 Show Reddit reviews
28. uxcell Nylon Flat Washers M3 6mm OD 3mm ID 0.5mm Thickness Sealing Gasket for Faucet Pipe Water Hose, Clear, Pack of 200
Sentiment score: 1
Number of reviews: 2
[Size] - 6mm(0.24 Inch) OD 3mm(0.12 Inch) ID 0.5mm(0.02 Inch) Thickness[Application] - Used for faucet pipe, hose bolt, valve, or other gardening maintenance or retrofit[Function] - It can prevent the pipe from leaking and provide positive shut off, stop leaks to save energy[Advantage] - Durable nyl...
 Show Reddit reviews
29. Wera 05118066001 2054 Screwdriver for Hexagon Socket Screws for Electronic Applications, Hex-Plus, 1.5 mm x 60 mm
Sentiment score: -1
Number of reviews: 1
Kraftform Micro screwdriver for hexagon socket screwsMulti-component Kraftform Micro handle with anti-roll feature and swivel capThe Wera Black Point tip offers an exact fit and optimum corrosion protectionHex-Plus allows socket head screws to live longerE.g. for electricians, opticians, precision m...
 Show Reddit reviews
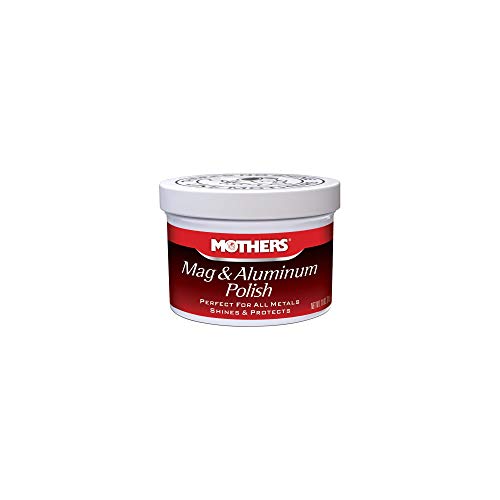
30. Mothers 05101 Mag & Aluminum Polish - 10 oz
Sentiment score: 1
Number of reviews: 1
Apply with a clean cloth and a little elbow grease for a shineGentle enough to use on a regular basisRegular use provides a long lasting benefit to your vehicleEasy to apply
 Show Reddit reviews
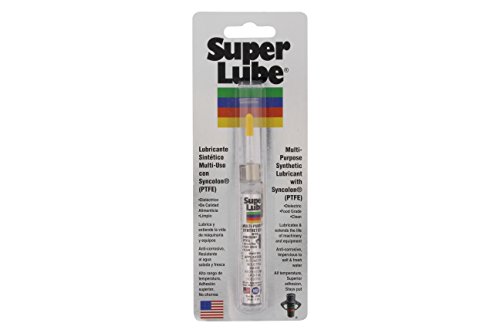
31. Super Lube 51010 Oil Super Lube,Translucent white
Sentiment score: 1
Number of reviews: 1
Synthetic oil with suspended Syncolon (PTFE) particlesWaterproofUSDA/NSF Rated H-1Reduces friction and wearExtends machinery and equipment life
 Show Reddit reviews
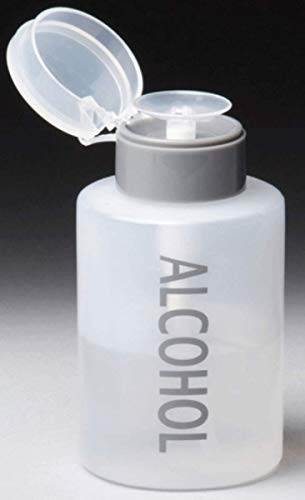
32. Liquid Push Down Alcohol Dispenser- Clear Bottle- Labeled - 9 Oz Bottle by Tech-Med
Sentiment score: 2
Number of reviews: 1
Liquid Push Down Alcohol Dispenser- Clear Bottle- Labeled - 9 Oz Bottle
 Show Reddit reviews
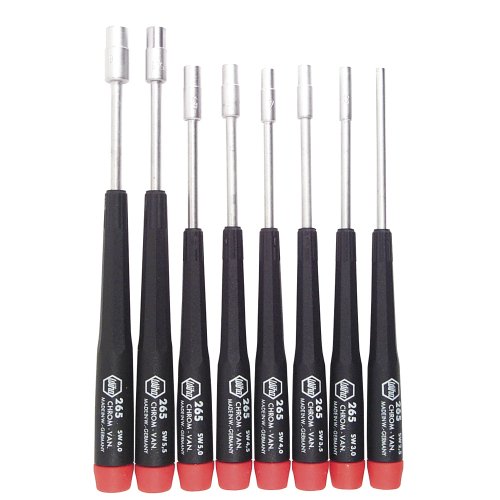
33. Wiha 26491 5-Piece Ball Metric End Hex Driver Set
Sentiment score: 0
Number of reviews: 1
High quality chrome-vanadium-molybdenum steel, through hardened, chrome-plated. Wiha ChromTop finish on tip for a perfect fit every time.Wiha PicoFinish handle for rapid rotation.Ideal for high-precision work with electro-technical and precision components.Practical plastic rack with hanging holes. ...
 Show Reddit reviews
34. Wiha 26590 Nut Driver Set with Precision Handle, 2.5 to 6mm, 8 Piece Set
Sentiment score: 0
Number of reviews: 1
Wiha tools are made to ISO quality standards.Wiha has been making Premium Tools For Over 60 YearsHigh quality chrome-vanadium-molybdenum steel, through hardened, chrome-plated. Wiha ChromTop finish on tip for a perfect fit every time.Narrow diameter for easy access in tight locationsuaranteed qualit...
 Show Reddit reviews
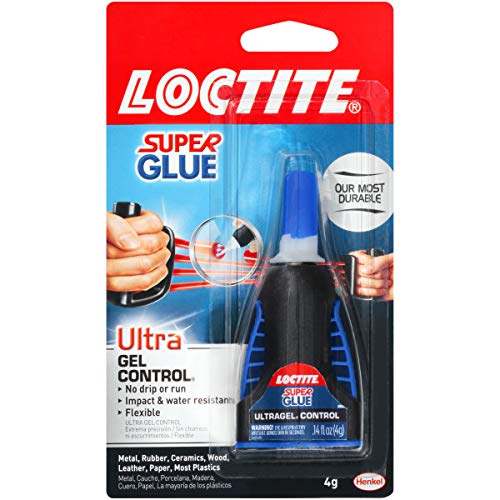
35. Loctite Ultra Gel Control Super Glue
Sentiment score: 1
Number of reviews: 1
Rubber-toughened, instant adhesive resists impact, shock, vibration and temperature extremesIdeal for metal, rubber, ceramics, wood, leather, paper and plasticsComes in a patented, side-squeeze design for maximum control and airtight storageGlue dries Clear and sets without clamping0.14 fl oz.; 1 Ea...
 Show Reddit reviews
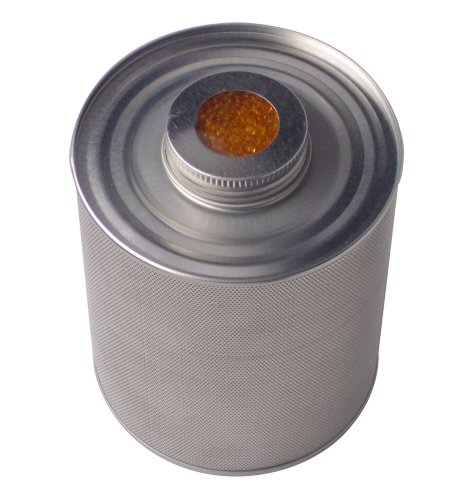
36. Dry-Packs 750 Gram Silica Gel Canister Dehumidifier - Moisture Indicating
Sentiment score: 1
Number of reviews: 1
750gm dehumidifier - no electric needed and Indicating silica gel - cobalt chloride freeLid Contains Orange Moisture Indicating Silica Gel For A Visual Indication Of When Unit Needs ReactivatedProtect guns, ammo, sporting goods, electronics, safes, rvs, camping, coins, collectionsTool boxes, safes, ...
 Show Reddit reviews
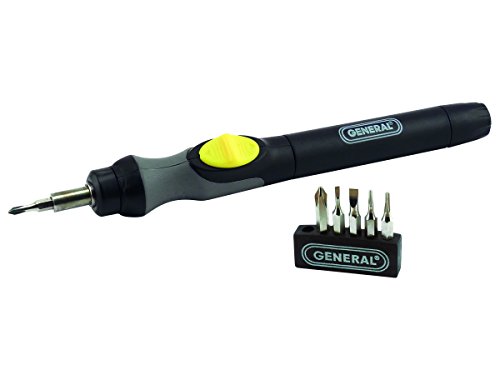
37. General Tools 500 Precision Cordless Electric Screwdriver with Six Bits and Quick Change Chuck, Handles Difficult, Repetitive Screw-Fastening Jobs, Multi
Sentiment score: -1
Number of reviews: 1
CORDLESS- fast action super-torque drive applies more than 100 rpm that is powered by 2 AAA alkaline batteries (included)QUICK CHANGE CHUCK- makes changing bits easy on this power screwdriver plus the chuck is compatible with all micro (4mm) bits6 PRECISION BITS- comes with six popular bits: Phillip...
 Show Reddit reviews
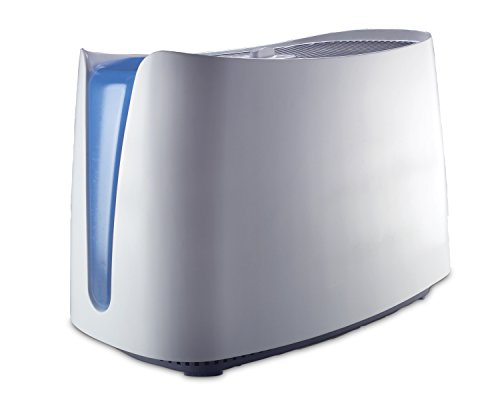
38. Honeywell HCM350W Germ Free Cool Mist Humidifier White
Sentiment score: 0
Number of reviews: 1
Cool mist humidifier: Add cool moisture to dry air with this quiet humidifier. The 1 gallon tank runs up to 24 hours on low, making this humidifier great for bedrooms & medium sized rooms in your home. Uv technology kills 99.9% of bacteria in the water.Filtered Cool Moisture:Evaporative Technology b...
 Show Reddit reviews
39. 2 Spools Silk Metallic Shiny Red Copper Bronze PLA 3D Printer Filament Bundle, 3D Printing Material 1Kg Each Spool Total 2Kg Pack in One Box, with Extra Gift 3D Print Nozzle Cleaner Tool by TTYT3D
Sentiment score: 0
Number of reviews: 1
Include Most Popular Real Metal Shiny Colors: Copper, Bronze,The Finished 3D Printed Item with Silk Glossy Smooth Appearance, Perfect for Arts, Crafts, DIY, Many Different 3D Print ProjectsPremium Quality, Easy to Print: Widely Compatibility for FDM 3D Printers, 1.75mm High Diameter Tolerance, No Ed...
 Show Reddit reviews
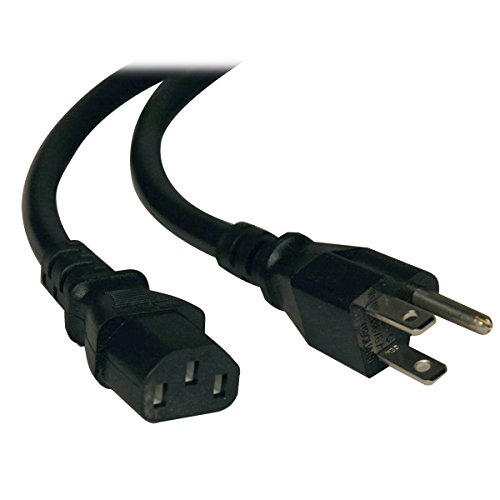
40. Tripp Lite Heavy Duty Computer Power Cord, 15A, 14AWG (NEMA 5-15P to IEC-320-C13), 6-ft. (P007-006)
Sentiment score: 0
Number of reviews: 1
Heavy duty 14awg: plug computers and peripherals into a standard outlet; this power cord is the ideal solution for powering a pc or peripheral device in applications that require higher rated, heavier gauge cablingHigh quality connectors: c13 to 5 15p connectors, 3 x 14 awg conductors, 15a / 125v r...
 Show Reddit reviews
I believe that grease is actually ideal for bearings over oil in terms of longevity of the application and I was recommended some superlube synthetic PTFE grease. It’s pretty cheap on amazon and there are printable bearing packers on thingiverse you can use to get it all the way in the races. (Just noticed you said you didn’t have access to it!)
I actually didn’t have grease when I built it so I used some synthetic PTFE oil on the rods and that has seemed to be fine. From the good article below, the important thing is that you don’t apply different (synthetic vs. non-synthetic) lubricants at the same time. Hence ideally you degrease the oil they are shipped in with isopropanol before applying more oil/grease. However, I read that the shipping oil is synthetic so I just applied the synthetic PTFE oil to the rods without de-greasing. I am just about to tear down and revise the bearings with grease the proper way myself actually.
So bottom line is that if your oil with PTFE is synthetic you can just apply it directly, but the ideal would be to de-grease and then apply grease of your choice.
Here’s a great resource (though the link is borked with the new prusa site—google “set your bearings straight” and it’s the first one that comes up): https://prusacommunity.com/set-your-bearing-straight/
And the superlube: Super Lube 21030 Synthetic Grease (NLGI 2), 3 oz Tube https://www.amazon.com/dp/B000XBH9HI/ref=cm_sw_r_cp_api_i_7yCWCb21H21WM
Thingiverse link: https://www.thingiverse.com/thing:3328377
I had the same issue.
It's actually really easy to take apart and get to the extruder if you want to check everything.
Unscrew the fans and let them dangle to the side, then you unscrew the parts that are holding the extruder in there. After that you should be able to wiggle the whole thing out.
But honestly, just by looking at your picture, it doesn't look like you have heat creep, or plastic issues. So I doubt it's going to be an issue with the heat break, block, or anything like that. So probably just the heater cartridge.
I was just in your shoes, and successfully spliced a new heater cartridge onto my old wires.
Basically snip off the old wire about 6-8 inches down, strip the wire coating, and splice on a new heater cartridge.
This is the bundle of heater cartridges I got from Amazon. They work perfectly with my MK3. The cartridge itself is slightly longer than the base, but still works without issues.
Also to make splicing easier and faster I got these and they have been working really great.
It won't do much for a couple reasons. First, none of those cabinets are "air tight", so a lot of the drier air is just leaking back out. It will help a little bit but you'll never drop the humidity very low (depending on how dry your air normally is, looks to be 33% rH on the accurite - toss that up in the top for a bit and see how much it drops, but I'd be really surprised if you're even at 25%). Second and more importantly, the ratings on those things is ridiculous. I looked up the "Eva-Dry" on Amazon and I see similar models to the one you have are rated at 333 sq. ft, which is just insane. Get something like this canister which can actually keep an area that size dry for a while. You'll see the Eva-Dry is probably spent within a few days if you actually use a humidity monitor up there. A little harder to recharge, but you can always use something like this to refill it, then it will last you forever, and you'll have as close to dry filament as you can without gaskets to seal the upper compartment. Optimally you would add a latch to the top door, put gaskets around the seams so the door is close to air tight when closed, and place a small fan in the upper compartment to keep the air circulating. This would get your air very very dry, which would be great for Nylon and PETG and other moisture sensitive filaments.
Alternatively, pick up a food dehydrator and modify it so you can just dry your filaments before printing. That's a lot easier and is fine for most filaments, but can take a few hours to actually dry the filament out to a reasonable level, depending on how much moisture is absorbed (Nylon and PETG tend to be the worst offenders, but all filaments will absorb SOME moisture).
Skip the ruby nozzle, it's only necessary if you are printing a lot of abrasive filaments like wood, magnetic, carbon fiber, etc. Get it when (if) you need it. The stock nozzle will print PLA and PETG for ages before requiring replacement.
Same goes for the smaller nozzle, again, unless you are planning on using it right away. Smaller nozzles are great for finer details, but will typically greatly reduce your print speed, especially on really low layer heights like 0.05mm. They also really require you to have your settings, extruder and Z-height dialed in, something you're not going to be ready for right away if you're new to 3D printing.
As for tools, what comes in the box will get you by (assuming you purchased a kit, not assembled). A pair of fine-tipped tweezers is also useful. Side-cutting pliers. Also, highly recommend a proper set of ball-end hex screwdrivers instead of those God-awful hex keys.
I'd also
I can dig up the Amazon link for the ones I bought. By popular demand, I used these: https://www.amazon.com/gp/product/B013G5XSB8The nylock mod is amazing and when combined with the 7x7 mesh bed leveling you can safely use the entire surface of your heated bed without having to worry about prints coming loose due to bed level variance.
I use loctite super glue on pla and it works great too. Loctite Ultra Gel Control Super Glue 4-Gram (1363589) https://www.amazon.com/dp/B003Y49R7G/ref=cm_sw_r_cp_apa_i_GY-UCbGDJ010B
When I started, I was looking for 91% or 99% wipes and didn't have much luck. Today on Amazon I see 91% wipes: Box of 50 for $18. Ridiculous. Spray would work well, but I also like to feel the bed in case there are small bumps that need to be cleaned off.
I've settled on using: 91% iso alcohol (ultra cheap, from Walgreens or WalMart, probably), a push-down alcohol dispenser https://www.amazon.com/gp/product/B000MI85FC ($5, singe purchase), and Kimtech Wipes (also great for glasses, etc.) https://www.amazon.com/gp/product/B008UB6IKC (280 wipes per box, 3 boxes for $8.40). Using this method, I actually use the Alcohol+wipes on lots of things.
I need to find a local source for 99% iso. The stuff online all feels expensive.
Ok, I was having a TON of problems with adhesion with PLA, and a fair deal of issues with PETG on the textured sheet. I tried it all: Lower Z, 99% alcohol, dish soap, increased bed temp. Everything was coming loose after a few layers, or warping (or warping worse with the higher bed temp). It would still warp with a 2cm brim.
I was seriously considering tossing the textured sheet because it was completely useless for me, so I tried a more drastic approach. I figured that acetone was risking chemically changing the surface (which is why they warn against it), so I decided instead to physically change the surface.
I got some "Mothers Mag & Aluminum Polish" and softly polished one side of the textured sheet. This stuff has an extremely fine grit in it (aluminum oxide), and it scuffed/polished the top layer of the powder coat. I didn't polish too hard, I didn't want to change the look or texture of the sheet. After that, I washed the surface thoroughly with dish soap, dried it with towels, did a pass with the 99% alcohol, then heated the bet to 80c for a few min.
The difference was night and day. PLA sticks incredibly well (nozzle 200c, bed 50c), but still easily pops off with a light bend of the sheet. It didn't change the surface texture of the sheet at all, you still get that nice textured finish. I haven't tested PETG on it yet, but considering how well the PLA sticks, I'll only want to only do small test parts first until I have confidence that the bigger parts will actually pop off (I still have the reverse side of the sheet for PETG in case this polished side works too well). I've accumulated about 50h of printing on the polished textured sheet now without issue.
WARNING: Mothers contains petroleum distillates. I'm not a chemist, but I may have in the end actually chemically changed my textured sheet anyways (similar to what using acetone would have done). I don't know if there will be long term issues with this method, but in my case, I at least turned a useless textured sheet into something I can actually use for a bit.
This is the stuff I used: https://www.amazon.com/Mothers-05100-Mag-Aluminum-Polish/dp/B0009H519Y
Ooh it's four dollars! Ordered. Super Lube 51010 Oil Super Lube https://www.amazon.com/dp/B000BXOGHY/ref=cm_sw_r_cp_apa_i_EdI0DbKX6MN0W
The bondtech motor is an LDO motor but yeah I replaced it with https://www.amazon.com/gp/aw/d/B07G3XCYGH?psc=1&ref=ppx_pop_mob_b_asin_title
There may be better options though.
Okay,
Would this cartridge be okay for my prusa mk2s?
HICTOP Cartridge Heater 24V 40W for 3D Printer Prusa Mendel (Pack Of 3) https://www.amazon.ca/dp/B01HGIMI2G/ref=cm_sw_r_cp_api_i_EGG0CbER0SBFZ
Thanks for the help, I got worried that I would have to disassemble the whole extruder part or have to do some sketchy welding^^
I've got my notes on recommended tools & first-aid kit here. Proper tools for swapping nozzles are important to avoid inadvertent damage (although it's not a scary process).
Which sock & which nozzles? The TriangleLab nozzles are good. The others are OK in a pinch, but I've seen reports of them shearing off at high temps.
Read up on clearing jams. The 1st one can be scary, but they're no big deal if you're prepared.
Have fun with it!
Hey another commentor made me look into it again. It seems like Super Lube (synthetic grease with PTFE/Teflon) (Amazon link) is what is recommended these days.
The other two I mentioned before have been used by a lot of people over the years and I haven't heard anything bad about them, but the folks at Prusa seem to be recommending Super Lube these days (links here and here).
FWIW, I use machine oil and I'm going to keep using machine oil. As the second link mentions, mixing lubricants can cause reactions between the old and the new stuff which can wreck your shit.
Hope this helped.
Yes metric hex and nut drivers. Nut drivers Hex Drivers
Something like this
As recommended, these are the one's I bought. Here's a picture as they have arrived.
you should get this https://www.amazon.com/FYSETC-Cooling-50x50x15mm-Radiator-Accessories/dp/B07NTKG9K4/ref=sr_1_2?keywords=prusa+print+fan&qid=1573783857&sr=8-2, it is a drop in replacement. I got this when I broke my print fan, and it works exactly the same.
This should do well enough, but you should be able to find an equivalent cable at any electronics store if you ask for an IEC cable. https://www.amazon.com/Tripp-Lite-Computer-IEC-320-C13-P007-006/dp/B0027JRMD0/
This: https://media.bahag.com/assets/resp_product/58/86/90588655_21550839.jpg
You can get those usually in hardware stores or where washing machines / dryers and so on are sold. A general "anti vibration mat".
Or something like this: https://www.amazon.com/casa-pura-Anti-Vibration-Vibration-Appliances/dp/B071DVFWTW
Bondtech: https://www.bondtech.se/en/product/prusa-i3-mk2-5-mk3-extruder-upgrade/
Moons: https://www.amazon.com/gp/product/B07G3XCYGH/ref=ppx_yo_dt_b_asin_title_o03__o00_s00?ie=UTF8&psc=1
Firmware: https://github.com/codiac2600/Compiled-Firmware?fbclid=IwAR1xkPOhhiXDCRT4I9EtA_6y60BV7dPV7VDNLpfN6BZoudjZxE3_bbvEhZg
And the slic3r profile can be found on the prusa community facebook page
TTY3D Silk Metallic PLA. I bought 2kg spools for ~$40 total so not bad. link
I use two of these humidifiers, no monitors though. During this project, I saw that my sensors were reading around 50% before putting them inside the boxes.
I got the parts in but in the process of swapping the heatbreak melted the collet in the heatsink, so I had to wait for a couple of those (and matching clips to avoid future PTFE tube shifting problems) to come in. I could have printed some on my FLSun QQ-S but didn't want to risk in the future thinking, "Well, it's still a problem, is it the printed collet that's bad?" and have to order one anyways.
I just wrapped up the install process and I'm trying the same print now, I'll update when it jams again or if in ~2 days if it completes without issue (in my mind if it can't do a 43+ hour print it's not fixed).
In the mean time, here is the complete list of what I just installed:
It depends...Due to a medical issue my hands shake a fair bit so I used one of these: https://amazon.com/General-Tools-500-Precision-Screwdriver/dp/B002XZLTQO and drove the screws all the way but stopped just short of tightening then did the final tightening by hand with a hex key or the hand driver in the kit linked below. It beat dropping the allen key on the floor every 4 minutes! Now this power driver uses 4mm shank "micro bits" and the German tool makers Wiha and Wera, which are seriously pro grade and expensive as all hell, market these bits but this kit I linked to will supply you with all the bits you need and then some.
https://amazon.com/Syntus-Precision-Screwdriver-Electronics-Cellphone/dp/B071PB4RPV
Oh, and use lithium AAA batteries in your driver as it'll kill regular batteries in just a few hours.
Full disclosure I have zero, nill, null, nadda financial interest in the above linked items.