 Reddit reviews Aven 17010 Adjustable Circuit Board Holder
We found 20 Reddit comments about Aven 17010 Adjustable Circuit Board Holder. Here are the top ones, ranked by their Reddit score.
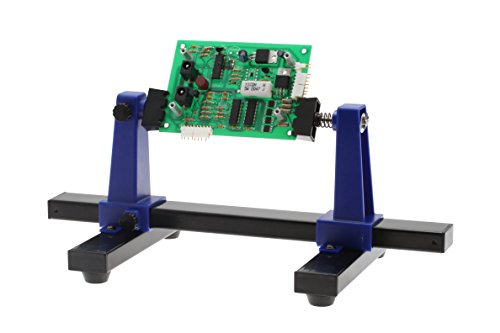
Ideal for clamping PCB, for soldering/desoldering or reworkRetractable to accommodate various board sizes up to 198mm wide and up to 4mm thickClamps allow PCB to rotate 360 degreesRigid metal structureRubber feet of the base ensure stability
Aven 17010 Adjustable Circuit Board Holder https://www.amazon.com/dp/B00Q2TTQEE/ref=cm_sw_r_cp_apa_mFZ-BbDJWGWJ4
I did a BYOC kit over a year ago.
It can be difficult if you don't have the right tools. I got a board holder that made my life so much easier.
I also suggest getting a very fine/narrow solder tip. The one I used was a little big for the job.
The most difficult part was soldering the switch. Pisses me off just looking at it.
In the end the pedal had a huge volume drop, so I fucked something up along the way.
I bought this a while ago, which has been fantastic for filling boards and soldering components. It gets tough if you have components really close to the edges, but that's why I also use a regular old helping hand tool.
I've been using this: https://www.amazon.com/dp/B00Q2TTQEE/ref=cm_sw_r_other_awd_K3x8wb1ZQJWX1
It works great. You can easily flip your project over and see both sides of the board. I'm not sure how much smaller it is that the one you're looking at though.
I'm still pretty new to this myself, but like you I have some electronics experience in the past. I just got this Weller 40w iron station with a desolder braid/sucker and a solder tip cleaner. Oh and a more precise tip for the solder iron
I'm really happy with it all so far, and couln't imagine needing more for a while. A heat gun would be nice for de-soldering and reflowing premade boards (like modding Boss pedals), but that can also be done with a regular solder iron as far as I know. You can get the above for about $60 total, so it's a nice way to get your feet wet without a huge investment. Then you gotta add on components/enclosures/pots/switches etc. Maybe get a helping hands and/or circuit holder if you need
Oh and get a good multimeter. I went a step up from the $20 ones and got this one which I'm also really happy with.
I havent built that model but to answer your second question...Be cautious of build guides (or lack thereof). The one you linked has a really good guide. Step by step, clear pictures, and in color. So far, I've found Befaco, AI Synthesis, and Trogotronic to have really good guides.
Also, take your time. Its better to go slow and be sure of your work than rush. Tape! Tape helps me a lot by holding small pieces in place. If you can, get this circuit board holder. I got this magnifying headband for free (that style, not that specific one) and its been really helpful as well.
Here are my go to recommendations for beginners.
Trogotronic VCA
Trogotronic Power System
AI Synthesis
The nicest one I have ever used was [this one by Otto Frei.](
http://www.ottofrei.com/Store/Soldering-Stations-Third-Hands/GRS-004-570-Double-Soldering-Station-With-2-Third-Hands.html) I really liked it when I borrowed it to do some wire harness and cable modifications, so much so that I looked it up afterward, but I couldn't handle the sticker shock.
For pedal making/modifying, I would recommend a circuit board holder and a typical helping hand (with or without magnifying glass) so that you have both hands available to use the iron and feed solder.
Seconded, also consider this kind of thing: https://www.amazon.com/Aven-17010-Adjustable-Circuit-Holder/dp/B00Q2TTQEE/ - it's invaluable for PCBs. Just populate from one side, add something to hold stuff in place (like gaffa tape, or bend one lead, or clip on a sheet of paper, etc), turn over the PCB and start soldering away. I wouldn't want to miss mine.
Any soldering iron 40+W where you can regulate the temperature should do, I own a nice station but when I don't feel like breaking it out because it'd take longer to set it up than to do the job I use something like this: https://www.amazon.com/ANBES-Soldering-Iron-Kit-Electronics/dp/B06XZ31W3M/ set to 350°C. Just make sure to clean and tin your tip regularly and it will do the trick just fine Oh, but ditch the solder and get a few spools of good rosin core solder of different gauges, it's not expensive but worth it. In my experience, the solder that comes with kits like that mostly works as a deterrent.
If you're not planning on buying all-included kits also get a few spools of stranded core wire of different colors. You could use solid core wires but those tend to break if they're getting bended from movement without showing it. With stranded core some strands may break but as others don't they'll continue to work. Invisibly broken wires (i.e.) inside the isolation) are a *beeeeep* to debug.
Also, a set of tweezers are great to have, especially the kind that holds stuff together per default, like this one: https://www.amazon.com/Curved-Tweezers-Cross-Jewelers-Soldering/dp/B000OVPG9A/ (only an example, I'd get a tweezers set that contains one like that).
In my experience a tool set like this one is great to have: https://www.amazon.com/Haobase-6Pieces-Double-sided-Soldering-Assist/dp/B01DLX6V3C/ - especially the bending tool is great to have, as it allows eg to bend the leads of a LED without running the risk of breaking the LED itself. It's also great in order to clean up mistakes, helps with desoldering and such
Speaking of desoldering: desoldering braid is a must. A desoldering pump can be useful, too. And yes, practice soldering and desoldering until you can do both without destroying anything.
If you're not going to buy pre-drilled enclosures then you very likely want a) a center punch and b) stepping drill bits. Those let you drill holes in all kinds of sizes without having to buy lots of drills.
Last but not least a wire cutter is a must
this little thing has worked great for me.
Very nice work! Here's a link to the one I got:
https://www.amazon.com/gp/aw/d/B00Q2TTQEE/ref=mp_s_a_1_3?ie=UTF8&qid=1501995047&sr=8-3&pi=AC_SX236_SY340_QL65&keywords=pcb+holder&dpPl=1&dpID=41nBaU-cqqL&ref=plSrch
I got it after starting my Ergodox, and it made it so much easier.
Sorry if the format is off, I'm on mobile.
Thanks for the tips re: clips and Electrodroid.
Can't picture how using the vice would work... Usually what i do is put the components through, smoosh on the Blu-tack, then use this circuit board holder to spin it upside down for the soldering:
https://smile.amazon.com/gp/product/B00Q2TTQEE/ref=oh_aui_search_detailpage?ie=UTF8&psc=1
Yes - that Ebay link is probably the same thing. Here's exactly what I bought.
The base rods are steel, so these magnetic arms also work well as helping hands.
The blue uprights of the PCB holder are plastic, and one side is spring loaded. It allows for several different mounting positions. It also allows you to spin the board back-and-forth, which is good for this kind of work. Note that it barely fits the length of the Planck, and if I were doing anything longer I would need to hold it sideways instead, which would mean the flipping wouldn't work.
It's not heavy duty like something from PanaVise, but for this kind of thing and smaller boards it works fine.
This is a good list.
For a soldering iron, a good one like a Hakko FX888D is invaluable. It may seem expensive, but if you buy one you'll never know the annoyance of having to deal with a crappy soldering iron.
If you're going to be soldering breakout boards (or just soldering in general) an Adjustable Circuit Board Holder is very handy.
https://www.amazon.com/Aven-17010-Adjustable-Circuit-Holder/dp/B00Q2TTQEE/
Given that this is your first build, I'm wondering whether maybe you're still getting the right tools?
I use this soldering iron from BYOC. It's cheaper than an equivalent Weller, but still works well for me. I previously had a Radio Shack one with a less finely-pointed tip, which was frustrating to use. I also use a circuit board holder from Amazon that makes it easy to put a component in on one side, bend the leads a little to hold it in place, then rotate the board to the other side so I can solder it. I place, solder, and clip the leads for one component at a time. I've tried following some YouTube videos that put in a bunch, tape them down, and then solder through the forest of exposed leads, but that ended up messier than I would have liked.
I'm not sure what you mean about soldering from both sides. Looking at the project doc, it seems to me like all the components (other than the switch and pots) go on the same side. Is it about placing components on one side and soldering on the other?
For an IC socket, I follow these steps:
Given that the Helios has board-mounted pots, you might also find the instructions below (from BYOC) helpful: https://imgur.com/a/6FLzV
Thanks. Here's a link in case helps anyone else. Currently $12.95 and it looks like a gadget that could be used for other one-handed activities. (Now there's a phrase normally used for other activities on Reddit)
Aven 17010 Adjustable Circuit Board Holder https://www.amazon.com/dp/B00Q2TTQEE/ref=cm_sw_r_other_awd_-VVGwbCQ5C8GA
I got this a while ago and it's pretty good.
> eBay
Thanks. Never heard of that brand before but it looks legit! I have two cheap soldering sets, a gun kind and pen type. They work alright but I imagine they wouldnt compare at all to the Hakko. I will keep my eye out for good deals on them. Wouldnt it be too late if I already purchased it after emailing Hakko the SN? Or would I be doing this prior to buying it via messaging the seller ?
Right now the solder im using is "rosin core 40/60" .
Im not sure if you meant this ratio or the one you said. Im pretty sure this isnt the fine gauge rosin because I have another roll of solder that is like 1 tenth the thickness of this one.
Do you have a link to the best all purpose solder for small electronics or your go to brand? The only reason I got into soldering is because I always end up breaking things and soldering fixes a lot of the things I break lol
Heres the items I have for soldering:
I meant like the one in the video, but I just realized it's probably not your video :/
I'm a bit slow XD
EDIT: Looks to be custom made, this is the base.