Best straight, spiral & trim bits according to redditors
We found 137 Reddit comments discussing the best straight, spiral & trim bits. We ranked the 80 resulting products by number of redditors who mentioned them. Here are the top 20.
We found 137 Reddit comments discussing the best straight, spiral & trim bits. We ranked the 80 resulting products by number of redditors who mentioned them. Here are the top 20.


Take a piece of MDF, cut a circle in it with a hole-saw or a jig-saw. Use this type of bit in the router. The bearing follows your template.
Made using a keyhole router bit.
Router sled.
Mine is very similar to this one, though you should probably start smaller to fit the sizes you would commonly work on.
You'll need a full size router and a wide flat bottom bit (I have this one). Wider bits for larger pieces to save time.
Keyhole router bit
https://www.amazon.ca/Bosch-85078-8-Inch-Carbide-Keyhole/dp/B000WA6ZRU/ref=asc_df_B000WA6ZRU/?tag=googlemobshop-20&linkCode=df0&hvadid=292995173425&hvpos=1o1&hvnetw=g&hvrand=5517177481664767233&hvpone=&hvptwo=&hvqmt=&hvdev=m&hvdvcmdl=&hvlocint=&hvlocphy=9000774&hvtargid=pla-382407673099&psc=1
http://www.amazon.com/Trademark-Stalwart-Multi-Purpose-24-Piece-Router/dp/B000X47YDE
Most recommended reviews say they are cheap and possibly dangerous.
I like your method for trimming the veneer from the speaker holes, maybe kind of overkill though.
In the past, I've used this bit:
https://www.amazon.com/gp/product/B000K2G69M
It only needs 1/8" clearance. https://i.imgur.com/BqDFW4i.jpg
As long as you let the router do the work and don't force it against the wood, it works like a charm.
Probably will be fine, keep in mind that it really isn't designed to do that task, so the lateral stress against the bit might break it if it is very small. I am pretty sure they make tiny router bits for things like the dremel that have cutting edges designed for that task.
https://www.amazon.com/Dremel-692-6-Piece-Router-Bit/dp/B00005LEXR
...is an example.
I got this cheap set first (on sale for $30 now).
I'll purchase the more expensive Whiteside ones once I'm comfortable with routing.
Buy a cheap multi-bit set, like this one to get you started. As you work on projects over time, you'll discover which bits you use and which you don't. As you break/dull bits from use, you'll know which are the important bits and can replace them with better quality individual bits. Also, you'll discover that bits come in 1/4 and 1/2 shanks, so you'll need/want to purchase (if you don't already have one) a collet for the correct size bits.
Yes, that's what that description means. I wouldn't get that router bit though. What you want is a top-bearing pattern bit. [Something like this, though it doesn't have to be this exact one.] (http://www.amazon.com/Dia-Top-Bearing-Flush-Trim/dp/B0000225XQ/ref=sr_1_1?ie=UTF8&qid=1457217370&sr=8-1&keywords=router+pattern+bit+top+bearing) As far a brands, I like Whiteside, Amana, or Freud. It's fine to go with something cheaper, you'll just get less life out of the cutters.
You need to make yourself a template the exact size of your mortise and plunge in with the router. The template will look roughly like this. The cleat on the bottom of the template in that image is not strictly necessary; it's fine to just clamp your template to your work piece. Any scrap piece of plywood is fine for a template. MDF works well too, but is softer, so I wouldn't recommend it if you want to use this template a whole bunch of times. It can also be a good idea to make two templates - that way if you mess up and run your router into the edge (which can be pretty easy to do), you have a back up.
I've been trying to find a video of someone doing this, but all i'm seeing are people doing things that are way over-complicated. If you're interested in proceeding like this and you want more help feel free to message me with questions. Good luck!
The challenge for buying something for someone that likes woodworking is that you don't know what kind of tools they want/need. Not to mention tools tend to be quite a bit more expensive than the price point you mentioned.
You could consider purchasing them something that will come in handy, if not immediately so. Router bits, saw blades, drill bits, or wood project packs are all something that would see mileage.
Here's a couple ideas from browsing Amazon.
Rosewood Cutting Guage
[Crown Marking Knife] (http://www.amazon.com/dp/B001V9KOTQ/ref=wl_it_dp_o_pC_nS_ttl?_encoding=UTF8&colid=1XH9ERR8QY3ND&coliid=ILFECPNG7H6C1)
[Router Radi Guide] (http://www.amazon.com/dp/B0040BNLRO/ref=wl_it_dp_o_pC_nS_ttl?_encoding=UTF8&colid=1XH9ERR8QY3ND&coliid=I1EHDP8Y8SGNEO)
[A Flush Trim Bit for Patterns] (http://www.amazon.com/dp/B0000225XQ/ref=wl_it_dp_o_pd_nS_ttl?_encoding=UTF8&colid=1XH9ERR8QY3ND&coliid=I1TEA98C23FQ2D&psc=1)
Edit: I should point out that not everyone may agree with this list. This is just stuff that, in my experience, is either a Quality of Life type item or something that people have to buy as bits tend to wear out, etc.
I would go with a 1/4" cutting diameter, 1/2" shank. For example, the Whiteside RU4700.
It depends on the router bit you have, and where the bearing is: top or bottom, there are also some that have a bearing in both places. Beyond that, it depends on the direction of the grain on what you're cutting. A lot of times, you'll want to cut it one way on one side, then flip it over on the other, to reduce tear out.
Another point of reference -- I'm assuming you're using the standard 1.5kw/2.2kw spindle. I've been doing 0.9mm DOC, 1000mm/min at 12000rpm using single-flute 12mm CEL cutters in 6061. The shorter flute length is key -- I went through a pack of 17mm CEL cutters on one part, but then cut almost 10 pieces with slightly more aggressive settings using the shorter tools.
Another very important thing is to evacuate the chips in deep slots. I was mostly doing 1/4" aluminum, and I ended up using an air compressor pointed at the cut to blow out the chips reliably at the bottom. I had to use a ton of WD40 to flush out the chips, which is not economical. Standard isopropanol (rubbing alcohol) actually worked just as well, if not better since the evaporation carries away more heat.
Another thing I've been meaning to try is trochoidal milling for cutting out aluminum plates like that. Should save a lot on tool life.
One last hint I forgot -- you need a VERY STIFF machine to go this aggressively! On my little X-carve clone, the best settings I got was 0.25mm DOC, 800mm/min, 20krpm. The "chips" were basically just aluminum dust. The new machine I'm using is an old retrofitted CNC router with linear rails and servos, and actually cuts nice solid chips at these settings.
THESE are my most used bits...I use them to cut aluminum and MDF all day long. They're cheap, but stay sharp for longer than you'd expect
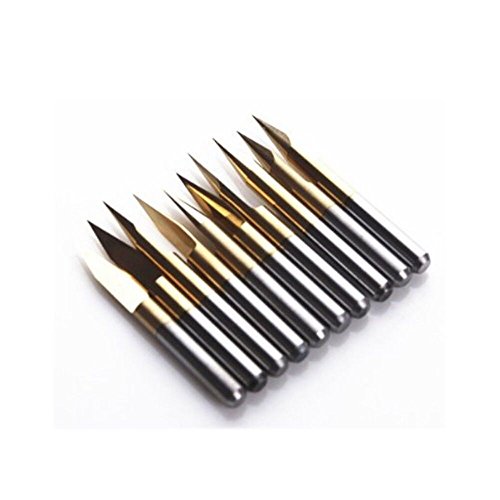
I use THESE for engraving...and yes, I use them in aluminum as well
For Vcarving, I use THIS I've probably ordered 3 of these in a 1 year time span but cut A LOT of MDF with it
​
In the beginning, don't buy expensive bits....it's a waste of $$$ until you get your feedrate and DOC figured out. I also highly recommend you download the millrightCNC app for your phone or tablet to figure out your feedrate / RPM / Depth of Cut / Chiploads.
I used a 1 3/4 flat bit and took off between 1/8 and 1/4 per pass, sometimes more in particularly high spots. The slab started out very wavy!
Next time I would use longer rails, both for the sled to ride on and for the sled itself, I kept having to move the slab and rails around to get at different areas and it was a pain.
Yeah, I second this advice. I used this bit with good results the last time I used a router sled. With a 1-3/4" cut, it's about 7-8 passes per foot depending on how much overlap each pass.
Sure!
A planer is essentially just a really big two flute router bit with removable blades that can also be adjusted.
Get yourself a two flute straight edge plunger bit, (something like this), and put it in your router. Make sure your bed is setup properly to mimick a jointer setup, then hold the board flat to the table, and push into the router wall a little bit, and you'll get a clean edge suitable for jointing.
It's effectively a planer on its side. I really like it because I prefer the motion of pushing compared to a planer but that's just me.
Sadly, using this method, you're bits will wear uneven over time and you'll start to notice that your joints aren't perfectly 90, so you'll have to replace the bit. But in all honesty, planer blades wear too (people just don't notice as easily since you can't pick up the blade and compare it to a straight edge compared to a bit) and they're probably the same cost as a new bit to get sharpened professionally or replace.
There are router jigs that are really cool you should google. I don't use them but i really want to try them out. They help remove a lot of the pressures and help give you a straight edge to work with.
Youtube is your friend!
I bought these ones, hopefully they are good? This is my first router.
Gladly. I bought 1"x4"x8' clear-heart redwood boards. I also borrowed a router and router bench and bought a [tongue and groove set] (https://www.amazon.com/gp/product/B00KZM2AIS/ref=oh_aui_search_detailpage?ie=UTF8&psc=1) and ran all of my boards through the router. You can definitely buy wood already tongue and grooved which is a lot easier, but I was really specific about the wood I wanted to use so I had to do it myself. If you're going to do it yourself and haven't done it before, definitely test it out on some throwaway wood to practice before you start cutting into your stock.
Once they were all t&g'd I started mounting them against the plywood walls and they just stack on top of each other. I cleaned off all the wood sticking out past the walls with a router template bit. I used Lexel to seal the edges between the redwood siding and the plywood, then cut some 1/8" plywood as trim to cover the gap, you can see me clamping the trim on here. I also had to cut out my doors/windows, etc.
For the outer roof and hatch, I used 1/8in Marine grade plywood. It's super durable, and bent easily over the frame. For the inner roof I used 1/8in maple plywood, and in-between both those layers I filled it with insulation. You can kinda see the process here.
I finished the siding and redwood with Waterlox Sealer & Finish. It's a tung oil sealer, and the finish is marine spar varnish that protects against water, UV...etc. The best part is if it ever needs a new coat you don't need to sand, you just add on a new layer and it kinda 'burns' in.
As for cost....I'm not sure, I stopped keeping track :P - Redwood can get expensive, but I really liked it so I splurged. You can get just as beautiful a finish with pine, which is much easier to find already tongue and grooved. Pine is great as long as you seal it.
Here's some photos of the process and the finish. Please let me know what other questions you have!
Step 1. Download MillrightCNC app on your phone / tablet
Step 2. Purchase these bits on Amazon for dirt cheap : https://www.amazon.com/gp/product/B010NI39WO/ref=oh_aui_search_asin_title?ie=UTF8&psc=1
Step 3. Make sure you use T6061 aluminum (it is easier to mill)
Step 4. Use lubricant while it's cutting so the aluminum doesn't melt to the bit! (I use WD40)
Here are the settings I used in the vid:
Feedrate: 770mm/min
Depth of Cut: .6mm
Spindle RPM: 17k
​
Here is a pic of the final result of what I was cutting:
https://imgur.com/kLv9LfZ
You can use a larger bit and just take off less with each pass. Personallyy with flattening a workbench I'd rather be on the side of larger bit, less depth at one time. Here's a decent 1 3/4" flat bottom
http://www.amazon.com/gp/product/B00004T7CZ
Are you looking for just one bit? It might be hard to pick just one. If I were building bookcases and shoe racks I'd probably want a straight bit, a rabbeting bit, and possibly a flush trim bit.
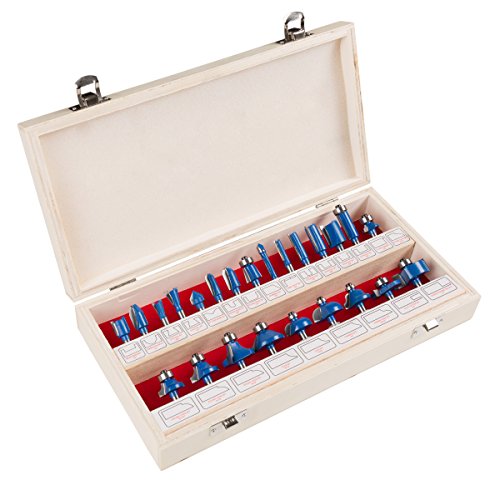
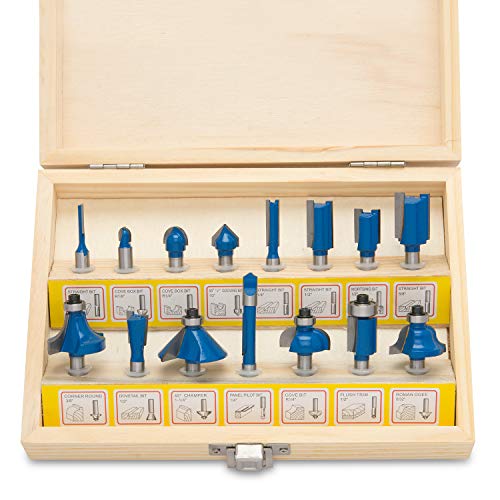
I'm not sure what your budget is, but you can usually find small starter sets which have the basics covered such as this one from rockler or this one from whiteside. There are plenty of others as well.
If your router allows for it, I would strongly recommend getting 1/2" shank bits. These will be more sturdy, dissipate heat better (less burning), have less vibration, and result in a cleaner cut.
Or:
http://www.amazon.com/Roman-Carbide-DC1261-2-Inch-Cleaning/dp/B005W18EIW
I use two bits: a 2” from Infinity and 1.75” made by Freud:
Freud 1-3/4" (Dia.) Double Flute Straight Bit with 1/2" Shank (12-194) https://www.amazon.com/dp/B00004T7CZ/ref=cm_sw_r_cp_api_o753BbSQZB01S
This is the one I use https://smile.amazon.com/Freud-Double-Flute-Straight-12-194/dp/B00004T7CZ/ref=sr_1_1?ie=UTF8&qid=1542225656&sr=8-1&keywords=freud+straight+router+bit+1+3%2F4
I use the crap out of these:
https://www.amazon.com/gp/product/B010NI39WO/ref=oh_aui_search_detailpage?ie=UTF8&psc=1
this one for V-carving:
https://www.amazon.com/gp/product/B000ALY4E2/ref=oh_aui_search_detailpage?ie=UTF8&psc=1
For engraving
https://www.amazon.com/Autek-Titanium-Carbide-Engraving-J3-3001Tix10/dp/B00HC98K2C/ref=sr_1_8?s=industrial&ie=UTF8&qid=1542727514&sr=1-8&keywords=cnc+engraving+bit
Also, get a 1/8 and 1/4 compression bit
Cuttable area
Btw I am using the dual endstops I think that is critical for what I am doing
It makes it much easier to split up jobs or change a bit etc
HQMaster CNC Router Bits, 10 Pack... https://www.amazon.com/dp/B07F35WQYG?ref=ppx_pop_mob_ap_share
These are the bits I used so far
They measure 3mm with my calipers
Just got stuck in the workpiece—I cut waaay too deep. This is the set, if you're interested: https://www.amazon.com/dp/B000KSOOLI/ref=cm_sw_r_cp_apa_UMYhzbHH2WF4G
There seems to be a bigger set on Amazon for $30 now, though.
The problem that i see with forstner bits is that they have a point in the center, which will create a little hole below each spot where you plunge the forstner. That's why I suggested using a flat-bottomed router bit in your drill.
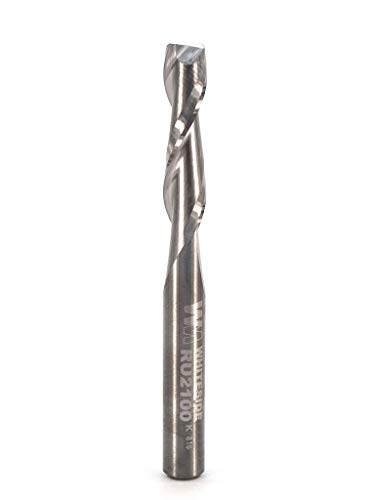
Something like this maybe: https://www.amazon.com/Whiteside-Router-Bits-RU2100-Standard/dp/B000K2BGNS
I've discovered that for carbide spirals, Whiteside are now as inexpensive as MLCS.
If I were doing it, I'd make a pattern from a 1/4 piece of MDF by:
it involves some specialty tools, but they are inexpensive and it provides a way to make a perfectly routed circle of very precise dimensions.
here's a video that shows how pattern cutting works with a router
The Dremel has (router bits)[http://www.amazon.com/Dremel-692-6-Piece-Router-Bit/dp/B00005LEXR] that should work well. My Dremel came with an attachment that allows you to set the depth and keeps the tool at a 90 or 45 degree angle. I also bought the router base attachment for it (about $30) which does the same thing but better.
Another option is using a block plane to take off the corner, or using your sander, which can round corners if your patient and willing to take the time.
You can also Google "how to chamfer wood" and see what comes up.
edit: I typed this on mobile originally, and I didn't proof-read it because I believe in living fast and dangerous.
Not too sure why you've ruled out a router. Here's a quick example of a straight bit that will go to 2.5" deep. While the flutes may not be 2.5" long, as long as the total bit length is around 3" or more it should be able to reach the full depth with 1/2 an inch being held in the collet. It is still a good idea to hog out the waste with a drill, and take light cuts with the router. The bit that I linked to has an overall length of 4 1/8", which would provide a comfortable amount of shank in the collet.
No you stick the laminant to the wood first then cut it to size and cut out the sink.
You will need a flush cut bit This allows you to cut the counter a little oversized, stick it to the wood then trim with the router bit.
I just did my first counter like this and it turned out great. I put oak trim on the side with a half inch round edge.
Here is the counter I did last year in my tiny house
And another
It has held up very well and I really like the look. Both countertops and with the wood, glue and the bit was about $120 CDN. Cheaper and way nicer than you can buy IMO.
If you need more detailed steps just let me know.
I think so too. I got a router bit kit and they seem to be cheaply made. I bought spiral cut up bit from Amazon. Hopefully that'll fix the problem. how should I dial my speed for this bit?
knife and then sanding could work, or something like this if your recess is 1/8" deep or more.
Which design is that looks like RS drivers?
Needing quick advice on carbide bits, buying today
Which one(s) would you buy and a very brief explanation to why?
This is what I'm looking at:
Amazon:
Hiltex 10100 Tungsten Carbide Router Bits
CARBIDE ROUTER BIT SET - 35 piece 1/4 shank NEW BITS by EDMBG
Router Bit Set- 24 Piece Kit with ¼” Shank and Wood Storage Case By Stalwart (Woodworking Tools for Home Improvement and DIY)
Sears:
Craftsman 30 pc. Router Bit Set
Harbor Freight:
Carbide Tip Router Bit Set 12 Pc
Carbide Tip Woodworking Router Bit Set Pc
Note: I'm intentionally NOT wanting a $120+ starter kit, that's by design. I'm also having to budget for carving tips which are gonna cost about $25 each, if you have a favorite brand you use, let me know - I'm willing to go ahead and splurge a bit more on these bits as I tend on using them far more.
I got the 15 piece Hitex set for less than $20. They seem to be working fairly well - haven't sent more than 100 feet of wood through any of them yet though.
I assume I'll mess them up sooner or later as I'm starting out too, but it's a pretty cheap set, so no real loss. I literally had bits come loose and fly off the router before I realized that I needed to really tighten up the collet too ...
https://www.amazon.com/gp/product/B000KSOOLI/ref=s9_top_hd_bw_bD4kJ_g469_i1?pf_rd_m=ATVPDKIKX0DER&pf_rd_s=merchandised-search-4&pf_rd_r=DXPDQ1W2HBGTWW78PK73&pf_rd_t=101&pf_rd_p=7771a85c-b1fb-5864-a037-c5d8ffd938b4&pf_rd_i=3116511
I cut a rectangular template out of mdf and used a trim router with a top bearing bit.
Similar to this.
https://www.amazon.com/NXGEN-Diameter-Pattern-Template-Router/dp/B07QJX1XLB/ref=sr_1_1_sspa?crid=2HDCDDRPL8H36&keywords=top+bearing+flush+trim+bit+1%2F4&qid=1563380239&s=hi&sprefix=top+bearing+flush+trime+b%2Ctools%2C163&sr=1-1-spons&psc=1
hmmm, can't find any in a quick and dirty search, but using a 1/16th end mill in a press should suffice re: http://www.amazon.com/E700-1-Flute-Single-End-Carbide/dp/B000I6I5N0
followed by a 1/8th extractor; http://www.grainger.com/product/WESTWARD-Screw-Extractor-Spiral-Flute-2RUL8
keeping in mind the extractor goes in counter clockwise, and you'll need a tap handle or similar to twist it.
let me know if i need to do some more googling when i get off work.
look around if you want, using the above as a reference, read reviews, don't automagically get the cheapest thing out there, or the 2nd.
I ordered these straight bits lastnight as they were cheap and the reviews are decent. At $20 I'm not going to be too upset if they end up being garbage, but at least I'll have something to practice on and get familiar with the router. I have this bit in my cart for order later today- this is the bit I'll actually need for the project I posted about. Is this one decent for the price? Mind you, as of now I won't be using these a bunch so I don't think I really need contractor quality bits that would see daily wear as it's not really in the budget currently.
http://www.amazon.com/Dia-Top-Bearing-Flush-Trim/dp/B0000225XQ?ie=UTF8&psc=1&redirect=true&ref_=ox_sc_act_title_1&smid=ATVPDKIKX0DER
MDF doesn't have a lot of grain pattern, but it will soak up a bit more finish on the cut ends than on the faces.
The steps I follow to finish MDF seamlessly has always been to flush-trim the edges with a bearing flush trim bit, followed by sanding to 220 and primer before final finish. The trim bit (if you have a router) saves a lot of time sanding.
This is the flush trim bit I use: https://www.amazon.com/Dia-Bearing-Flush-Trim-Bit/dp/B0000225YC/ref=sr_1_2?ie=UTF8&qid=1464796548&sr=8-2
I used a 1 3/4" Freud straight cut bit. Something like a Whiteside WS1101 would provide 2” of cutting and be slightly more time efficient I suppose. On this slab the result was pretty good, although given the width of the sled and me leaning over it with too much weight at times, some routes were slightly different. Not much though, but I did give it a 60/100/150 grit belt sand before random orbiting. I used the same process on the maple bench you see in some of the photos. With a smaller sled and not having to lean over the work on the garage floor, the maple top came out damn near perfect and required only finish sanding (there were visible lines on the maple but you couldn't really feel them brushing around with your hand).
You could use a flush trim bit with a bottom bearing, like this one.
I'm struggling with setting up a jib for cutting dados with a router.
I'm using 3/4" ply and want to cut a 3/8" deep dado. I followed this guide and bought this router bit, but it seems way too deep. What bit should I buy to make this work?
make 5 identical plywood boxes.
you'll probably need additional tools to construct this.
if you can afford it, the makita 1-1/4hp router and a whiteside 1/4" upspiral bit are the only two additional tools necessary to construct both the boxes and drawers. use a straight edge for the guide.
if you want to go with hand tools only, you'll need a rabbet plane.
I've been trying to find a good way to do it myself, preferably without it looking like crap.
Would look the best doing it with a vertical mill, but not just everyone has access to one, if you could find a small end mill bit, you could likely do it with a Dremel type tool, as long as you have a collet the right size, the slot (on mine) is about 1/16" I drilled all the holes out to that.
If you have a steady hand I would give that a shot.
First hit on google http://www.amazon.com/E700-1-Flute-Single-End-Carbide/dp/B000I6I5N0
I'm sure you could find one for less, or find one at Lowes/Home Depot, with it being so small, as with small drill bits, it will likely break easily.
Good idea for the spacer. I actually had to make my router sled two sided. One side had rails that were one layer thick, the other had two for the thicker stock. So if the boards were too thick for the side with one layer, i could take it down to that size first.
The sides were supposed to be about .065 to about .080 inches thick i was closer to about .055 to .060 in thick. Thin enough to bow out a bit eventually, even though bending adds structure. This was the first thing I did so I didnt quite have the technique down. I found the key was to take small even measurements, as well as to measure often and since i hot glued the pieces down, i had to remember to take into account the dofference that makes, as well as having to sand/scrape away the striations left by the router. I also found that running the router in line with the plunge handles and in very shallow passes helped minimize this.
The back of mine is about 3mm, and I was shooting for about 2.5 final. The front should have been about 2mm, and that ended up about 2.5 the last I measured, but while finishing i actually stripped all the finish off and scraping a bunch to remove gouge marks so I think i emded up closer to my goal anyway.
Forgive the mixture of units, but my calipers went between the two easily and different sources said different things.
This is the bit I used. I boughr it for this project and I have been more that happy with it. If you do make the uke, be sure to practice on scraps for everything you havent tried before. Using the router, you will want to get a card scrapper, it takes care of the srriations in no time.
I've used a similar setup to finish end grain slices and gotten best results from a 1 3/4” Freud straight bit. Shallow passes with the bit's big cutting area leaves a pretty smooth finish. Minimal sanding (think 15 mins with ROS) to get rid of faint lines.
Also, make sure the wood itself isn't moving at all. That can produce gouges.
Freud 1-3/4 In. Diameter by ¾ In. Double Flute Straight Router Bit with ½" Shank (12-194) https://www.amazon.com/dp/B00004T7CZ/ref=cm_sw_r_cp_apa_rtZHzbA2T2QG2
The roundover bit is the 1/4" one from this set.
The flush trim bit I used is this one.
The flush trimming was hard because it attacked the grain where it was weak. I ended up doing a lot of careful climb cutting to get around the issues, which is no fun. If I were going to produce lots of these, I might give something like this a try. In theory, the shear angle should be a lot friendlier to the wood.
I didn't make the dowel. I usually make my own, but my doweling plate only goes up to 5/8" and since the dowels aren't glued in, getting "close enough" wasn't going to work. I'm sure someday I'll talk myself into a doweling jig like this, but that's a lot to spend on a tool I would basically only use for odd jobs like this.
As it turns out, the commercial dowels I bought aren't that good. The walnut ones are perfect, but the cherry/maple are loose. I have cherry/maple dowel on order from Lee Valley that are supposed to be to tighter tolerances.
I wouldn't have even tried using a ball end mill. They do give really interesting machining artifacts though. Have you tried something like this?
https://www.amazon.com/Autek-Titanium-Carbide-Engraving-J3-3001Tix10/dp/B00HC98K2C
That's the style of engraving bit I usually use, though it's not often.