(Part 2) Best car battery accessories according to redditors
We found 342 Reddit comments discussing the best car battery accessories. We ranked the 145 resulting products by number of redditors who mentioned them. Here are the products ranked 21-40. You can also go back to the previous section.


It's a key from a battery disconnect switch.
Like this:
https://www.amazon.com/HELLA-002843011-Rating-Battery-Master/dp/B0000AYAFE
Clean it up good then you can use anti-corrosion washers or [anti-corrosion spray](https://www.amazon.com/Permatex-80370-Battery-Protector-Aerosol/dp/B000BOKML2/ref=sr_1_2? s=automotive&ie=UTF8&qid=1496404545&sr=1-2&keywords=anti+corrosion+spray) or just coat them in a heavy grease after you retighten.
The corrosion is caused by the dissimilar metals and perhaps a bit by the hydrogen gas generated when charging the battery.
Battery terminal protector instead. I've had the same can for about 8 years. It has lasted many a car.
Clean the terminals and clamps with a wire brush, spray a coat of the protector on everything and add some fiber washers. I've never had terminal corrosion issues.
It’ll probably work. Just know that you won’t be able to do much else with the cig lighters while the fridge compressor is on (Phone charging is probably ok, but that’s about it). 10A max per Toyota; both sockets are on the same fuse, and the fridge pulls about 6A when it’s running.
Also if you keep the fridge quite full you could probably turn the car off for an hour every now and then while it’s cool out if needed. The other option is to keep the car in ready mode and lock the car with the physical key from the outside, though it’s still not very secure. Someone could literally break a window and drive away when the car is in that condition.
You could also wire it directly to the battery, which if you’re fulltiming I’d recommend doing. Something like this oughta do the trick. Then you wouldn’t have to keep the car on all the time (including when you’re away from the vehicle). The stock battery can safely keep the fridge running for 12 hours or so (wintertime, overnights) before it needs a recharge. I haven’t been through a summer yet with this config though, so I don’t know what the numbers would look like then.
As echoed elsewhere... No.
To fix this, get the correct ring terminals, and crimp them on. If you don't have the crimper, use crimp/solder terminals and solder them using a torch.
Then replace that positive battery terminal with an aftermarket that will accept all of the wires appropriately, or use a military style terminal and appropriate size ring terminals.
You can get everything you need to fix this at NAPA.
If anything I've said here has confused you, please enlist the help of someone more familiar with automotive electronics.
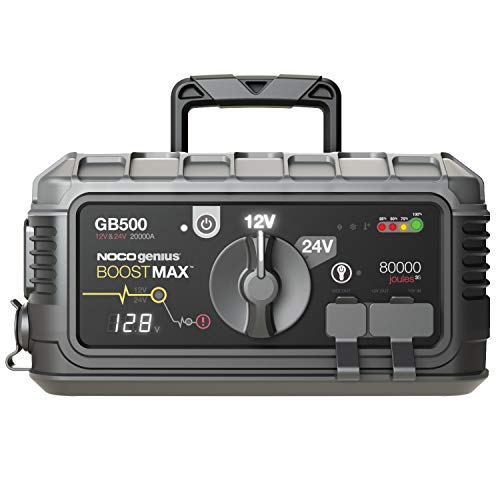
NOCO Genius Boost Max GB500 20000 Amp 12V/24V UltraSafe Lithium Jump Starter
https://www.amazon.com/dp/B07C2WS1XH/ref=cm_sw_r_cp_apa_nP27BbM2WQNSH
High-end ones can jump farming equipment.
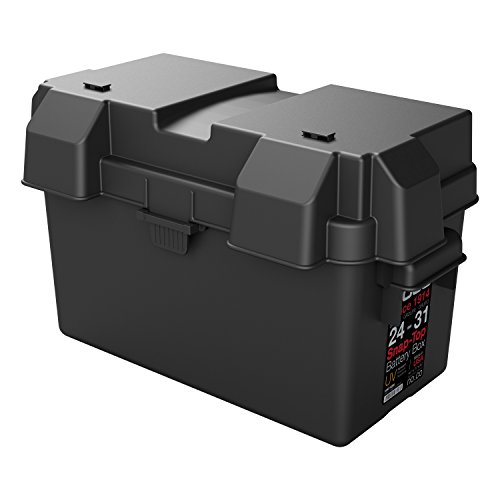
maybe im missing something here but my whole setup was like $250 at most. I got my deep cycle battery on offerup for $40, used this $15 isolator (bigger ones arent much more expensive), and this $20 box. Then i also added this voltage meter/usb port/ power socket to the box for $10. Then all the wiring and fuses were maybe $100 total.
The red post? https://www.amazon.com/Fastronix-Stainless-Single-Ground-Junction/dp/B01LLZF7DW
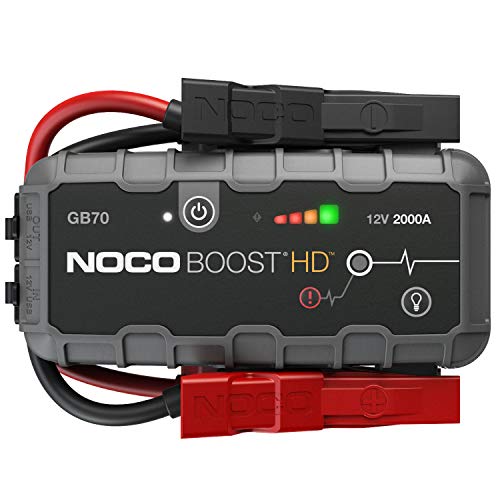
I have a genius boost HD.
https://www.amazon.com/NOCO-GB70-UltraSafe-Lithium-Starter/dp/B016UG6PWE
Yes, the jumper cables. I have cursed myself so many times not having them... Cartman cables sounds like... Cartman. http://www.amazon.com/Cartman-Booster-Cable-Gauge-Listed/dp/B00F9RNIPI/ref=as_li_ss_tl?s=automotive&ie=UTF8&qid=1459123126&sr=1-1&keywords=jumper+cables&refinements=p_72:1248861011&linkCode=ll1&tag=addourscom-20&linkId=58c5a476325586749eeb05523e3cebca
Either take the battery with you or put one of those 12v kill switches on it that boaters use. The battery will still slowly go flat, though at a slower rate than before with no parasitic load on it.
You might want something like this for safety.
http://www.amazon.com/NOCO-HM318BKS-Snap-Top-Automotive-Batteries/dp/B004W5SGBO/ref=sr_1_1?ie=UTF8&qid=1457794361&sr=8-1&keywords=boat+battery+cover
I use one of these that I use to disconnect my 12V Deep Cycle RV/Marine battery from my starter battery:
http://www.amazon.com/HELLA-002843011-Series-Rating-Battery/dp/B0000AYAFE/
I have it in a location where it is easy to see it so that I remember to turn it, but an automatic one like the Battery Buddy would be nice in case I forgot.
I also just have one fuse, right on the output of the battery, an automotive 58V 70A MAXI fuse from Littelfuse in an inline fuse holder. There's also a 100A manual power switch from Hella and a small precharge button.
Everything will need to be grounded or it will not operate. The easiest way to do this is to use a fusebox as you mentioned. The number of items you'll want to power should determine the number of terminals you'll need. Connect your Anderson Powerpole terminals to their corresponding spots on the Blue Sea Systems fuse box (12 terminals with negative because you can always not use some, but you can't add any on the 6 terminal model).
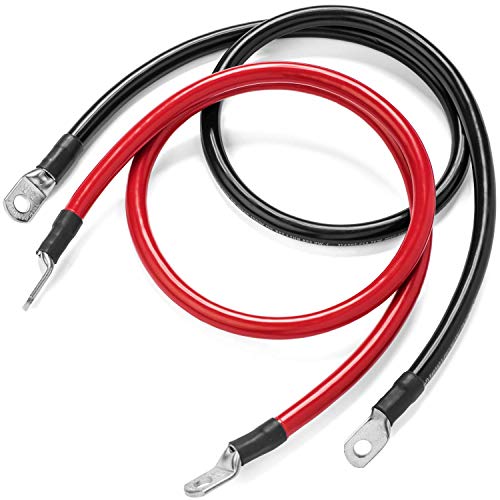
https://www.amazon.com/Goal-Zero-Terminal-Connector-Cable/dp/B00URTHQTC/ref=sr_1_1?s=lawn-garden&ie=UTF8&qid=1496442293&sr=1-1&keywords=yeti+1250+terminal+ring
https://www.amazon.com/Blue-Sea-Systems-Blade-Block/dp/B001P6FTHC/ref=sr_1_1?ie=UTF8&qid=1496442487&sr=8-1&keywords=blue+sea+fuse+box+12
Use a disconnect switch below and a ring connector cable to make sure you don't draw any power when not intended. It will go between your positive leads.
https://www.amazon.com/gp/product/B011EYWMDS/ref=oh_aui_detailpage_o02_s00?ie=UTF8&psc=1
https://www.amazon.com/Camco-47453-4-Gauge-Battery-Assembly/dp/B00JGJGCV2/ref=sr_1_9?ie=UTF8&qid=1496442659&sr=8-9&keywords=4+awg+cable
For the wiring to indidual 12v sources I use copper-clad aluminum because I'm cheap and use 12 gauge (non-awg because it's cheaper and only slightly smaller in gauge diameter) and it hasn't given me any problems because for the price I go a bit bigger than I might need.
https://www.amazon.com/PRIMARY-POWER-GROUND-100FT-ROLLS/dp/B00OU0IIFU/ref=sr_1_6?s=automotive&ie=UTF8&qid=1496442827&sr=1-6&keywords=12+gauge+wire
For the fridge though you may want to go to 10 gauge.
https://www.amazon.com/GAUGE-GROUND-PRIMARY-STRANDED-COPPER/dp/B01C7O8166/ref=sr_1_6?s=automotive&ie=UTF8&qid=1496442902&sr=1-6&keywords=10+gauge+wire.
Look at the 12v chart below and make sure you're within the range for the length of wire you want to run which I can't imagine you wont be since everything you're describing is super low amp.
https://s-media-cache-ak0.pinimg.com/originals/57/22/80/57228076ef240ed796b328a7d6387eac.jpg
Then to connect the equipment to power you can either solder the wires together or use these below to crimp them (crimping video below that). You're wire stripping pliers should have a crimping portion on them already. if not buy the ones in the 4th link.
https://www.amazon.com/Hilitchi-Insulated-Terminals-Electrical-Connectors/dp/B01D8HIQ2K/ref=sr_1_4?s=automotive&ie=UTF8&qid=1496443951&sr=1-4&keywords=12-10+gauge+wire+connectors
https://www.amazon.com/Glarks-Electrical-Insulated-Terminals-Connectors/dp/B01E7SY49I/ref=sr_1_11?s=automotive&ie=UTF8&qid=1496444024&sr=1-11&keywords=12-10+gauge+wire+connectors
https://www.youtube.com/watch?v=Svja8zEcKNQ&t=9s
https://www.amazon.com/VISE-GRIP-Multi-Tool-Stripper-Crimper-2078309/dp/B000JNNWQ2/ref=sr_1_cc_2?s=aps&ie=UTF8&qid=1496443370&sr=1-2-catcorr&keywords=wire+stripping+pliers+irwin
You'll then use the terminal rings from the link above (pretty sure that's the correct size ring) to connect the end of those wires to the fuse box on the negative and positive sides. Fuse based on the amps you'll be drawing. Since I think someone somewhere will complain that this is expensive and there are cheaper ways to do it, I set you up on the "new everything" route since I don't think you'll have any of these things and if you're getting a goal zero I don't think price is a limiting factor. Unless you already have a lot of experience with wiring this is the basic version with everything you'll need pre-made as much as possible.
I have some property in a similar area. I understand 100% and doubly recommend making your van as unenticing as possible. Don't make your dad carry the battery. Something like this properly but discreetly installed, combined with a lack of anything of value.
On one of my old trucks, I kept one of the windows broken with "you're too late" written on the cardboard that covered the hole.
If you're willing to pop the hood every night, something like this would make it relatively painless: https://www.amazon.com/dp/B071D55VM3
Have you wired... anything before? You'll need to be able to terminate wire to do it, but that's not too big a deal. There's also a bunch of different ways to go about it, depending on who you talk to. My preferred method goes something like this:
Acquire parts:
If you can't work out another good way to crimp the ends on, just pick up a crimp tool along with it.
Plan:
You need to create a circuit from the alternator to the house battery. Circuits are loops; in a DC circuit (as most are on a vehicle), the magic power fairies have to come from the power source via the positive terminal, through the thing they're powering, then return back to the negative terminal of the thing they came from. Most vehicles use the body and frame as the return path for the fairies. The devices' negative sides all connect to the body or frame, and so does the battery or batteries, so once they get to a device, they can always get back to where they came from, whether they came from the alternator (grounded through the engine block/bracket), starter battery, or house battery.
Next, you need to consider where each component will live. You need to connect positive to positive from starter to house battery, with all the other doo-dads in between. The fuse holders should be very close to their respective batteries. Like, less than a foot. I lay my starter battery's fuse right on top of the battery, so anyone working on the van later can't miss it, and should know to consider the rest of that circuit when appropriate. My starter battery's fuse is mounted right next to the battery. The placement of the isolator depends on what kind it is. If it's a manual type, you'll need to access it from within the cabin; I like to put my house battery and a manual isolator pretty close behind the driver's seat, so I can operate the switch from there or from within the cabin. If you go with an automatic jobber like the VSR I linked, that doesn't need accessed again except for troubleshooting, so it's common for it to be mounted near the starter battery in the engine bay. Either way, the wire will go from starter battery positive, through a fuse, through the isolator or VSR, through the house battery's fuse, to the house battery positive.
There's two types of connections to make with the linked items: "set screw" and "lug". The fuse holders I linked all use set screws, and everything else will use lugs. To make a lug connection, you strip back the wire jacket from the end of the wire just enough so the remaining copper strands fit into the sleeve (and only the sleeve) on the lug, then crimp it down. The lug then gets a bolt through it to make its connection. There is typically already a bolt on the starter battery terminal somewhere, and this is where it will go, though both batteries' terminals will vary in their format. You may need an extra doo-dad to make it right. For a set screw type connection, you strip back the wire jacket as before, back out the set screw, put the wire in its hole, then tighten it into place with the set screw.
Installation:
Snip off a foot of 4 Gauge wire, remove the fuse from the inline fuse holder, then set-screw the wire into one end. The other end of the wire gets a lug, and goes on the starter battery positive. From the other end of the fuse holder, route it to a VSR (if applicable; install its additional ground wire to one of its mounting screws, into the body), then on to the house battery location. Here, it will go through a manual isolator switch (if you don't choose the VSR), then through a fuse, and on to the house battery positive terminal. The negative terminal of the house battery gets connected to the van body or frame with a couple lugs on as short a wire as possible; a seat or seat belt hole is typically a good ground lug - just remove the bolt, add your lug with wire already crimped on, and reinstall the bolt.
Once all connections are made, you can go back and insert your fuses. If you chose the dual-battery switch, it has 3 lugs on it: a "common" lug, battery A, and battery B. The wire coming from the starter battery goes to battery A, the wire going to your house battery goes to battery B lug, and the common lug is for your load (aka, your devices). The switch has 4 positions: "A","B","Both", and "off". You can set it up other ways, but in this configuration, the first two select which battery power is drawn from for the devices connected to the "common" lug, the "both" setting literally chooses both, which means it also is the setting for charging your house battery, and "off" ensures the devices get no power from either battery, and that the batteries aren't connected to one another.
Manual isolator operation:
With the engine running, turn the simple isolator "on", or the dual-battery switch to "both". This connects the batteries, which connects the alternator to the house battery. If the alternator can charge it, it will (see "Caveats" below). When you stop running the engine, and want to run devices without draining the starter battery, turn the simple isolator "off", or set the dual-battery switch to "B". If you go with a VSR, this happens automagically for you, and you can forget I typed this paragraph.
Caveats:
The house battery isn't as close to the alternator as the starter battery. This introduces resistance to it, which comes with voltage drop. The alternator has a voltage regulator in/on/near it that senses the voltage of the battery (or batteries) it's connected to, and if that voltage is lower than its setting, it will kick on, and start charging, typically at or above 13.8V, maybe 14.1. An idle, full battery will read closer to 13V. A 12V battery is actually dead if it gets down to 12V; anything running on 12V accepts all these voltages, and so these systems are considered to run on "12V nominal", which is a range including all these. Anyways, from the perspective of the alternator or house battery, there is less voltage present on the far end than from the near end, due to the voltage drop over distance in the wire. So, the house battery never sees full charging voltage from the alternator, and therefor may never fill all the way up. Measure voltage at the starter battery while the engine's on and alternator's charging, then measure it again at the house battery. The difference between these two is your voltage drop, which should be in the 1-3% range. More or less, this is how short of full you can get your house battery only charging from the alternator.
If you choose a manual isolator, you will get the most charging output possible from your alternator, and you can throw the switch to "jump start" yourself if your starter battery should die, but you might forget to turn the switch one day, and accidentally drain your starter battery. I simply make checking the state of the switch part of my van start-up and shut-down routine, and have only had a problem once. If you instead go with an automatic isolator or VSR, you won't have to worry about this, but your charging rate will be limited by the rating of the device chosen, if its rating is below the alternator's rating.
Your power distribution to your loads still needs additional fusing. If you use the dual-battery switch, most loads should come off the common lug, through a fuse, and on to the devices. If not, then connect them from the starter battery, through a fuse, and on to the devices. Many people install a fuse block with multiple fused circuits to go to various devices; it needs a fuse in its feed that is as large as all the other fuses combined.
Wondering why I linked a triple-fuse holder? It's a neat sort of junction for the house battery's positive terminal, where everything connecting needs fused anyway, and these particular fuses can need to be quite large, though different sizes. 100A alternator charge, 50A+ load distribution, 30A+ solar charge, or the big ol' honkin inverter I tend to install on my builds.
For camping, a small led light bar should be able to run during your waking-but-after-dark hours without needing an additional battery, assuming you occasionally start the car if it's an extended multi-night camping trip. However, a nice coleman lantern may be a better option given the cost of a dual battery setup.
If you are serious about dual batteries, I would strongly suggest an AGM type battery (oddysey pc1500 or similar, as mentioned elsewhere in this thread) and I personally prefer an automatic disconnect, over a hardwired or "manually switched" dual battery setup. I've had good success in the past with this one: https://amzn.com/B00LMGPHW2
Also, there are kits on the market now for jk/jku's that have the same smart isolator in them. genesis offroad has one. The kit is nice, but really, it's the isolator that does all the magis. they just sell you a nice mounting kit that is prewired for easy setup.
This particular smart isoloator also has a momentary switch option where.. if your cranking battery is low and can't start your vehicle, you can press a button and connect both batteries for 60 seconds, effectively jumpstarting yourself.
Manual selecter switches.. I've found I always forget to change the setting, and either.. never disconnect the two batteries when I should, or I forget to reconnect them for charging later meaning one battery is always really low. so I've personally given up on manual switches.
(Since this reads a lot like an ad now, let me just say.. I have no affiliation with cole hersee, other than having a great deal of success with that product I linked. I've run dual battery setups in several vehicles, and this is my personal preference. but like all opinions.. everyone has one, and none of them are "wrong" as long as it works for that person)
A deep cycle battery and a battery isolator. Makes it so both batteries charge straight off the alternator, but keeps them seperate so that you can hook all your accessories up to your secondary battery and not have to worry about draining your main. The nicer ones(such as this) will charge the main battery before the secondary, and with the press of a button will temporarily join them in case your main battery is dead so that the starter can pull from both batteries. You could supplement it with a solar charger as well for longer endurance.
On any vehicle I buy I replace those immediately. Get some 6 gauge ring terminals off amazon (negative is 5/16 and positive is 3/8 ring diameter), a pair of military terminals and some 3/4” heat shrink (harbor freight is dirt cheap). Cut the old ones, peel back the insulation and crimp the lugs. Amazing how much better they run without the corrosion and a solid connection.
I think they have a 25 pack of ring terminals for $10ish bucks. Can use a 3/8” ring on both of you want to. Out the door for $20 and have room for accessories to be added later.
Links:
Ring Terminal
Military Terminal
Sure.
Should be about $750 for lots of runtime, and compatible with any pump that uses 120VAC. The only open question I have is whether the eyeletts on the battery terminals are 3/8" or 5/16" so I know which wiring set to buy. I emailed the company and waiting for a response.
I used this guide to figure out what I wanted to do - https://www.tripplite.com/support/how-to-select-and-install-inverter-charger-for-sump-pump
EDIT: wow thanks for the gold, kind Internet stranger!
I know this was posted over a month ago, but if you haven't moved forward here are my thoughts and experience. I will agree with most of what @jgpatty says, but I have had less problems
Install/DIY - As long as you have basic diy skills these are easy to install and the instructions are very straight forward. You will need a good drill and bits, square/measuring tools, and marking devices that is about it.
My Experience - I have installed 3 of the Mighty Mule Gate openers over the years, and was very happy with them. I find them to be very reliable. I have installed two of the m500 models at my own house. 6 years ago I installed the first M500 after after about 5 years something broke on it, BUT that is completely my fault. I neglected my gate (not the opener) it was having a bunch of problems. The hinges I installed were not very good and the post I put in was just a 4x4 which caused the gate to sag and drag on the ground. I tried adding a wheel to the gate, but in the cold weather (north east ohio) the wheel would freeze up and drag on the ground as well. Anyways after about 3 or 4 years of that the opener gave out. I am honestly surprised it lasted that long the gate was putting a ton of strain on it.
So Anyways this summer I removed my old wooden gate/post threw it all out and built a custom 5 x 5 metal post and metal gate with some good hinges and decided just to install a new opener instead of fixing the old one. Every works great
Solar Powered - The other one I installed at my parents farm. Due to the location and distance from 110v power I decided to go solar. We are in North East Ohio which has some of the most cloud coverage in the USA, and the worst rate for solar panels. I put in just one solar panel like they suggested, but in the winter they had problems with low battery, so I added a 2nd solar panel which is easy. You just splice/wire it up to the other panel and you have more charging capacity
Competition - The 2nd time around at my house I considered going with a Liftmaster/Chamberlain option because I have 3 of their garage door openers at my commercial building and they are great. For like $40 you can add an internet gateway that controls up to 16 openers, switches, lights, etc and they connect to home automation hubs as well. They mobile app/website tells you if they are opened or closed and for how long, you can get notifications, etc. BUT in the end the price was more than doubled so I passed on that. I looked into and read a ton of reviews on Aleko and Ghost controls who seem to be knocking off Mighty Mule, and the prices are a little better. But the reviews were not as consistent as mighty mule and since I had good experiences I decided to stay with them. I will say Aleko accessories are good and I have used a bunch of those
Tips & Tricks
Hinges - BUY A GOOD GATE HINGE. Your opener will last so much longer. And a gate hinge is only worth while if it has a grease fitting on the bottom. There are some great weldable ones on amazon for like $15 or $20 for a set. If you don't want to weld them on then you can get these aleko ones for like $11 a piece (they don't come as a set). I welded those ones on, but you can bolt them on as well
Solar Panels - If your gonna go solar install two panels unless you rarely use it or live in the south in a very sunny area. Also it is cheaper to buy the standard opener and just get the solar panels separate and hook them up. There is no difference between the standard opener and the solar opener it is just a bundle. For panels it is cheaper to go with Alekos panels. On Amazon you can get Aleko panels that are twice as powerful for half the cost. Might mule 10w is $99, and Aleko 20w is $45
Extra Batteries For Solar - If your not running solar the standard backup battery might mules sells for $25 is perfect, but It isn't necessarily cheaper but you do get a lot more bang for your buck if you go to home depot and get a deep cycle marine battery as an extended battery. You can then put the next to the post in the ground using one of these on amazon for like $10 - Waterproof Battery Box . That is what I did for my solar install. You wire the Solar panels to the large battery and then hook the large battery up to the main mighty mule battery or the extra battery hookups if your model has that. Make sure to use fuses :)
Mighty Mule Gate Lock - For $120 I was not impressed from a security perspective. If your gate is solid (wind can't penetrate it) then this serves a nice purpose of taking stress off the hinges, gate opener, post, brackets etc. Because a solid gate is pretty much a sail, But from a security stand point it is just too easy to bypass. The latch is just spring loaded when locked. You can stick a screw driver in there and release it. Also the retaining pin the bolt that the latch attaches to can be removed without tools and then the lock is attached to nothing. If you really want security use an aftermarket outdoor magnetic lock. They are about $60 to $80 on amazon and can be used on a mighty mule using the gate lock wiring. There is a little more DIY here. You have to put a separate circuit board in the enclosure for the magnetic lock
Keypad & Post - Don't bother hard wiring the gate keypad. It makes it a less secure system and then you have a run a wire. Using it wirelessly the batteries last more than a year with regular use. And when I say it make sit less secure all someone has to do it rip the wire out of the back of the keypad and push the two wires together to open the gate. Buy the Aleko keypad Post on Amazon. It is $35 vs the mighty mule $85
Inside or Fixed Location Opener Button - You can hardwire a garage opener style button that allows you to open the gate from inside the house, garage etc. It is cheaper and so much faster to just take a regular mighty mule clicker ($20), remove the clip from the back, and run a screw through the keychain hole to mount it to the wall of your house. it looks nice and mine worked for 5 years on the same battery with daily use.
This is a cool little website that helps to design solar systems and battery banks. Since you have 12V batteries and a 12V inverter, you'll need to wire the batteries in parallel, this will add their capacities and keep the voltage the same. When wiring these together it is important to keep the wire length between batteries the same, this is because there is resistance in the wire, so if one battery wire has more resistance than another, then it will draw a bit more power to equal the other battery and over time this can cause issues. This website explains the wiring issues and shows a little diagram of how you should wire your four batteries for your specific case.
So you can use the first website to show how the battery bank should be wired, and use the second website to see how to correctly wire it. Buying wires like this will mean they're already at the same length, but you may only need 8awg or 6awg wire for your purposes (look at wire gage sizing charts). For my two-battery bank I'll be crimping my own connectors onto wire from the hardware store that I cut into equal lengths, usually a cheaper option is to just make your own sets. A forum about a guy asking about battery wiring.
Fusing is also important, you don't want an accidental short happening in your inverter and your 6Kwh battery bank dumping hundreds of amps into it. Again there are many websites offering advice, this one is what I based my fusing off from, I'm only using one solar panel though so I'm only needing one fuse for that. Smaller ones for the solar panels and bigger ones for the batteries and to the inverter I believe the best way is to fuse each battery and then fuse the entire bank as well 5 fuses total). Slow-burn fuses are recommended.
Basically I would say use www.Google.com as a strong resource and post further questions you might have that you can't find the answers to (or can't find simple answers to).
I have posted 2 links below. The first is "dual sense" and it turns on if either battery is charging at more than 13.3 volts. The second is "single sense" and only turns on if the one side is charging over 13.3 volts. It sounds like you want dual.
https://www.amazon.com/Voltage-Sensitive-Relay-Battery-Isolator/dp/B0741Y7YCZ/ref=mp_s_a_1_fkmr1_1?ie=UTF8&qid=1536727246&sr=8-1-fkmr1&pi=AC_SX236_SY340_FMwebp_QL65&keywords=vsr+voltage+sensor+relay.
https://www.amazon.com/Voltage-Sensitive-Single-Battery-Isolator/dp/B073XF46GM/ref=mp_s_a_1_fkmr1_2?ie=UTF8&qid=1536727246&sr=8-2-fkmr1&pi=AC_SX236_SY340_FMwebp_QL65&keywords=vsr+voltage+sensor+relay.
I have a couple of these installed in line on positive side — between PV and MPPT and between battery and positive bus bar. (Just be sure to never have current flowing into solar charge controller without the battery being connected). Battery Switch, 6V 12V 24V 48V... https://www.amazon.com/dp/B07HT19T5V?ref=ppx_pop_mob_ap_share
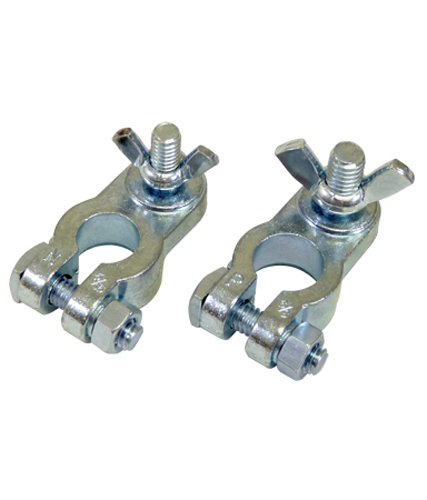
Those connections are made of lead and look to be cast on to battery post, which is also lead, at the battery factory. If this is true you would have to buy the battery with them.
I bought a pair of battery posts with wing nuts on Amazon about six months ago ...
https://www.amazon.com/gp/product/B0060YHLJS/ref=oh_aui_detailpage_o05_s00?ie=UTF8&psc=1
I also bought a set from McMaster-Carr that look better, but it would be a bit silly to open an account with them just for one set of battery terminals.
I would have a concern about that bare shielded cable touching one of the battery posts, if it touches somewhere else, kapow!
Get something like this from your local auto parts store, or even Wal-Mart. I had a car that had corrosion issues on the battery terminals and after cleaning with a wire brush, baking soda and water (as others have stated) I put these on and they never corroded again. Cheap investment, worked perfectly.
No, they haven't. I don't think. Not the original owner. Don't get me wrong, there is space, but not a whole lot. I might be able to pull it off. What posts would you say? I was looking at these https://www.amazon.com/gp/product/B001QRTZR0/ref=ox_sc_sfl_title_2?ie=UTF8&psc=1&smid=A3SY7P2NFH5KUX
Normally the cable that goes from the battery to the tender is called a 'pigtail,' in my experience.
I doubt that this is one because of the fact that I've never personally seen a tender where it was possible to mix up the positive and negative leads; normally each end has one female and one male prong to ensure that it is plugged in correctly. I guess that the proper orientation is forced by the small clip on top in this case, but I've still never seen one like that.
My guess is that it is an accessory or lighting lead, but as someone else said you'd have to ask the PO to know for sure, or trace it back and try to figure it out.
If on some off-chance this IS a battery tender pigtail, I would recommend replacing it with one that uses the standard prongs either way so that you can choose from a wider variety of tenders.
https://www.amazon.com/dp/B003WDDLTO
Does anyone have recommendations for a trickle charger? I already have a connector like this one hooked up.
I'm looking for something to keep my battery charged overnight (kept in the garage but not heated, and it gets cold in WI overnight) and then to keep the battery fresh over winter.
This is what I bought for my setup. The costs have gone up, but that one panel can fill a couple of batteries without any problems.
https://www.amazon.com/gp/product/B00FPSCET2/ref=ox_sc_act_title_1?ie=UTF8&psc=1&smid=A2D22KZJD14Y8Y
https://www.amazon.com/gp/product/B00JH1PABW/ref=ox_sc_act_title_2?ie=UTF8&psc=1&smid=A2D22KZJD14Y8Y
https://www.amazon.com/gp/product/B0060YHLJS/ref=ox_sc_act_title_3?ie=UTF8&psc=1&smid=ATVPDKIKX0DER
https://www.amazon.com/gp/product/B003RCJB62/ref=ox_sc_act_title_4?ie=UTF8&psc=1&smid=ATVPDKIKX0DER
https://www.amazon.com/gp/product/B00UFERZKO/ref=ox_sc_act_title_5?ie=UTF8&psc=1&smid=AWZ3LXPHZK09
https://www.amazon.com/gp/product/B00DDZE33E/ref=ox_sc_act_title_6?ie=UTF8&psc=1&smid=A24WV2YRRJEBAG
https://www.amazon.com/gp/product/B00B8L6EFA/ref=ox_sc_act_title_7?ie=UTF8&psc=1&smid=A05654602L3XUQ70M87BV
It depends on the gauge wire you are talking about for I assume your inverter. I type locally run 2/0, so some of these blocks are not designed for that size cable.
Here is a example of a single post that you can crimp lugs to the cable. Put the three wires from the coach on the lug and the new wire from the battery to the post. When you put that many cables on the post you may run into spacing issues so you may need a washer or bolt to evenly stack the lugs.
Here is a example of a four post block. Simple and easy to install.
Finally if you don’t have lugs and want something easy a compact distribution block may help you.
I am not in your area so I can recommend anyone local. Most chain auto parts and home improvement stores don’t carry these types of items in-stock if at all. I send some Amazon links which may help you.
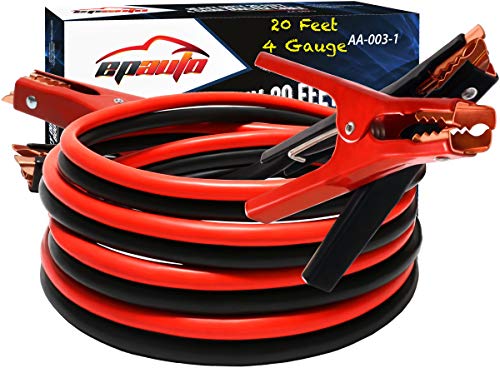
I might even spring for the 16' cables, I know my 20' have saved me loads of headaches. But definitely 4 guage, the only thing more expensive than a nice pair of jumper cables, is a broken shitty pair of cables, then having to buy a nice pair to replace them. Here's a link to a cheap good pair from amazon that I use.
https://www.amazon.com/Cartman-Booster-Cable-Gauge-UL-Listed/dp/B00F9RNIPI/ref=sr_1_3?ie=UTF8&qid=1478242256&sr=8-3&keywords=4+gauge+jumper+cables
Normal, in my experience it happens. Try using these https://www.amazon.com/Battery-Anti-Corrosion-Washers-Black/dp/B01155YKF4. Make sure you dont just use water to clean it. They make battery cleaner that neutralizes the acid and helps seal the post. Or I just make a paste with baking soda and scrub it down and put one washer when I buy a car.
Well the battery is brand new now so it doesn't have any corrosion on it yet! I do need to do a better job on the terminal though. Do those little anti corrosion washers actually do anything?
I like that jumper unit! I’ve been looking at this myself
I honestly hadn’t thought of TP - I have some regular old tissues in a box but didn’t consider TP, so I might just add it in! Costs nothing and is pretty light, so why not. Ditto for the coolant - thought of the oil, because Subaru - hadn’t thought of the coolant. Gonna get some and keep!
On the extinguisher, I’m seriously considering one because even if it might not be useful to save my own butt at some point, it could be useful to save someone else’s and that kinda makes it worth carrying. I’m intrigued by your spare mount setup and how you’ve attached the axe and shovel on the hatch - do you have any pictures to share how that looks like?
Basically everyone I know has some version of this in their car for the winter. The bristles are for sweeping snow off your car, and the flat, plastic blade on the other end is for scraping ice off your windshield and windows. Sometimes the blade and bristles are on the same end, and that's fine too. A tool like this is 100% crucial, and if you don't have one handy a credit card/debit card will work in its place although you'll likely ruin the card.
Also the jumper cables are no joke too. If your car battery is old, you might find you have some trouble starting your car in the morning. The engine will be sluggish, especially if the weather is below zero. If it doesn't turn over at all, or if you forget a light on (for some reason this always happens to me in winter), you'll need a set of jumper cables to get your car going again. I'm 100% sure everyone who's lived in MN their whole life has had to get their car jumped before, and I've personally helped 8 or 9 people jump start their car in my 30+ years of living here. The key is the lower the gauge number the better (lower numbered gauge = thicker wire and try to get at least a 6 gauge but preferably a 4 gauge), and the longer the cables the better. You might think 4 gauge and 20 ft is too much. It isn't.
For the consumer level its basically find the thickest setup you can. I think I have an old set from walmart I got, heavy duty and something like 30 bucks years ago. IDK what I did with them. Cables I always have in my truck are professional ones you would use with a tow truck that are easily 1" thick cables. Those ones can jumpstart some serious stuff.
When buying cables the number is the gauge size of the wire, smaller number is thicker cable. Thicker the cable the more current it can carry and less resistance.
Something along these liens would work well in most cases: https://www.amazon.com/EPAuto-Booster-Jumper-Cables-Travel/dp/B01AXBB2VG/ref=sr_1_12?ie=UTF8&qid=1480741653&sr=8-12&keywords=jumper+cables+2+gauge
Yep, quick google search will show you where they are, Ive had alot of people cause problems by jumping it there. Here is a link to the charger I use on my M cars, I just bought 3 battery leads so I can keep one charger at home and charge any of them. Heres the lead
https://smile.amazon.com/Schumacher-WM-12-Connector-Battery-Maintainer/dp/B003WDDLTO/ref=sr_1_18?keywords=trickle+charger+lead&qid=1557669815&s=gateway&sr=8-18
https://smile.amazon.com/dp/B004LX14Z2/ref=sspa_dk_detail_0?pd_rd_i=B004LX3AXQ&pd_rd_w=VsD2p&pf_rd_p=46cdcfa7-b302-4268-b799-8f7d8cb5008b&pd_rd_wg=Edh2V&pf_rd_r=QSZC2Q9P4WH3TEHVZ4J0&pd_rd_r=d60460a4-74be-11e9-a9da-2171f603c15c&th=1
Requires 4 screws be tightened over the wires.
You could get one of these:
https://www.amazon.com/Universal-Disconnect-Terminal-Isolator-Vehicles/dp/B074HW532B
Holy shit I didn't understand half of what your talking about I have a transit connect as well with no solar.
No solar for me either.
I use a 12v male to male connector. Schumacher 12v male to male(It's on amazon) straight into the 12v next to me while I'm driving and I have a fused voltmeter 12v splitter so I can monitor the charge of my rig and house battery so nothing gets over/undercharged. I also have a 6 in 1 Schumacher jumpstarter/power station however I will also have a larger deep cycle in a battery box with a 12v to battery fused connector. See all below.
I think your over complicating your build a little there, this whole sticking a isolator blah blah you guys do and than wonder why all your batteries are shit over a couple months and your alternator needs replacing and you starter ect. Jeez Edison and Tesla are screaming from there grave K-I-S-S.
https://www.amazon.com/gp/aw/d/B000H92L4W/ref=mp_s_a_1_5?ie=UTF8&qid=1520088726&sr=8-5&pi=AC_SX236_SY340_FMwebp_QL65&keywords=12v+male+to+male
https://www.amazon.com/dp/B01N2O153Z/ref=sspa_mw_detail_4?psc=1
https://www.amazon.com/gp/aw/d/B076M8Y1M6/ref=mp_s_a_1_3?ie=UTF8&qid=1520088890&sr=8-3&pi=AC_SX236_SY340_FMwebp_QL65&keywords=chgeek&dpPl=1&dpID=41-yQO-uUqL&ref=plSrch
Battery Switch, 6V 12V 24V 48V 60V Battery Disconnect Master Cutoff Switch for Marine Boat RV ATV UTV Vehicles, Waterproof Heavy Duty Battery Isolator Switch, 275/1250 Amps, On Off Position https://www.amazon.com/dp/B07HT19T5V/ref=cm_sw_r_cp_apa_i_iiMlDbNXDRHQB
There are switches rated for all sorts of current and voltages. Are you sure you know what you are talking about?
That is not why we have solenoids.