Best countersink drill bits according to redditors
We found 52 Reddit comments discussing the best countersink drill bits. We ranked the 26 resulting products by number of redditors who mentioned them. Here are the top 20.
We found 52 Reddit comments discussing the best countersink drill bits. We ranked the 26 resulting products by number of redditors who mentioned them. Here are the top 20.
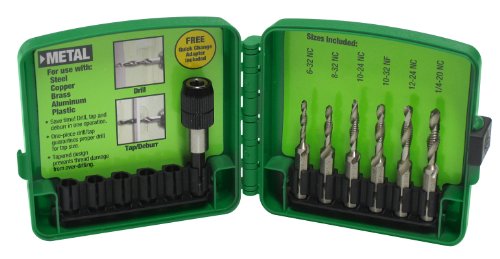


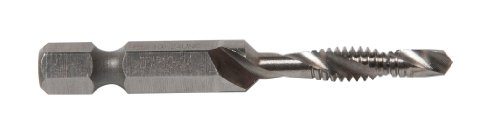


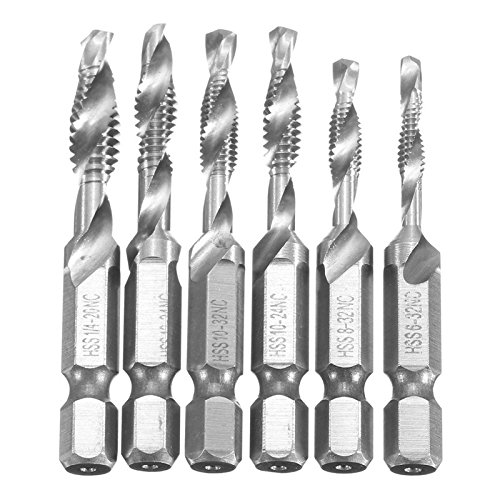


Greenlee DTAPKIT 6-32 to 1/4-20 6-Piece Combination Drill and Tap Set https://www.amazon.com/dp/B0041FIR1E/ref=cm_sw_r_cp_apa_KAXHAbSZCPCY3
Do you mean the deck screws? If so, just get a countersink bit (available at any hardware store), unscrew and discard your current screws, use the countersink bit in the wholes you have already made and screw in new screws.
If you mean the other screws (the pan head sheet metal screws), unscrew them and use the other type of screws.
TL;DR Unscrew screws, countersink, screw new screws.
Edit: Linked to correct product. I had the wrong type.
Get a giant carabiner with a cushioned grip. All plastic bags slide into the carabiner. Close clasp. One trip with 10 plastic bags accomplished.
Pic of what I mean
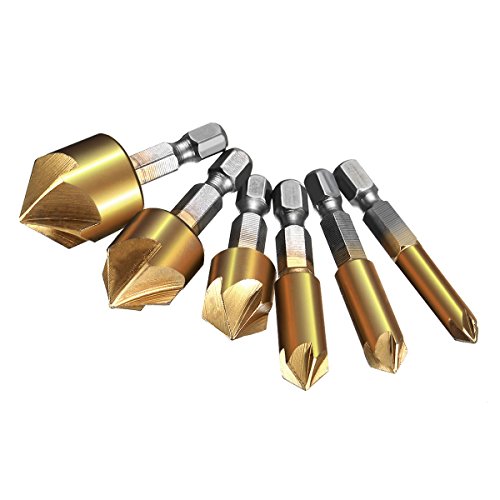
Use THIS kind of bits, they are self centering and smooth.
(this other kind doesn't work well on wood) .
​
Set a stop on your drill press for consistent results, if you are countersinking many holes to the same depth, or just take shallow passes checking often, small depth differences result in big countersink outer diameter differences.
edit: fixed links
I use these on the end of the X rods. I have zero faith in the setscrews keeping the X axis rod from shifting under belt tension plus the herky jerky forces of the printhead.
Of course, if you really want to buy a whole new printer just to get good screw threads in your prints more power to you, but you do have other options:
you really need this in your life.... countersink bits
cool build though!
This is kind of an oddball solution but it might work. Drill a hole into the saddle with a jewelers bit. Take a needle, pin, or toothpick and superglue it into the hole you just made. After it dries pull the saddle out. If you want to reuse the saddle you can dissolve the superglue with acetone and pack a superglue/baking soda mix into the hole you just made and it will be useable again.
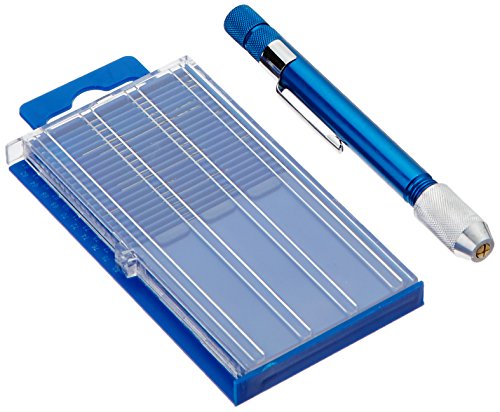
They sell these little jewlers drill kits with a pen drill in hobby stores but here's a link to one in case you don't know what to look for:
http://www.amazon.com/gp/aw/d/B000VNPRNQ
A countersink is an angle. A flat bottom is a counterbore.
You can buy a cutter the size of your outer diameter, and a pilot the size of the inside.
Frankly, I would suggest simply trying to do it with plain old twist drills. Once you put the screw in you wont be able to tell the difference.
This has come in handy more than a few times...
http://www.amazon.com/gp/aw/d/B0041FIR1E/ref=mp_s_a_1_2?qid=1416195164&sr=8-2&pi=AC_SX200_QL40
And my everyday carry Kershaw knife.......http://www.amazon.com/gp/aw/d/B00AU6NWP4/ref=mp_s_a_1_3?qid=1416195515&sr=8-3&pi=AC_SY200_QL40
Off the job...... http://www.amazon.com/Klein-Tools-98002BT-Bottle-Opener/dp/B00093GENU
If all you've got is $200 and NO tools, I'd say buy a nice cordless drill. It will give you the most bang for your buck starting out, then you can pick up tools as you need them. Even buying an inexpensive hand saw from the hardware store combined with a cordless drill will help you build a workbench.
Cordless Drill
Same Drill, bigger batteries
Handsaw
Save the rest for drill bits, bit drivers and countersinks. I've found the Home Depot Ridgid drill bits to be some of the best. Fuller makes the best countersinks.
use a countersink bit to make room for the screw head to sit flush before you drive it in. It works best with a pilot hole, but you can drill it with the countersink then drive the screw in if you want.
>use a countersink bit
I always used a larger drill bit as wide as the screw head.
Słownik czasem nie nadąża za technologią. Chociaż akurat wiertła gwintujące są znane co najmniej od połowy ubiegłego wieku. Niemniej jednak nawet one służą do wiercenia (a gwintowanie jest ich dodatkową funkcją).
I bought a set of these. Makes carrying multiple bags a breeze.
https://smile.amazon.com/gp/product/B01FU7BZ1K/ref=oh_aui_detailpage_o03_s00?ie=UTF8&psc=1
Here ya go. This took care of it for me.
Just ordered a set.
I didn't even know these existed and I've been a hobby CNC wannabe for a few years now.
These are what I'm used to.
http://www.amazon.com/gp/aw/d/B0000225OU/ref=mp_s_a_1_1?qid=1407665594&sr=1-1
I don't think metric/imperial is much of an issue of you're working with wood. You can always look up a conversion chart to make sure.
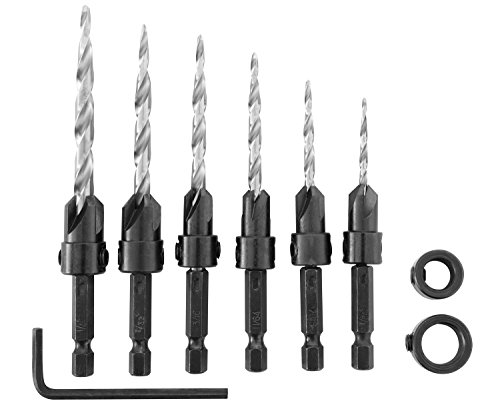
Good countersink bits
Splitting the wood -- other than pilot holes being too small, you might also try to countersink the wood to suit the screw heads, too.
Something like this:
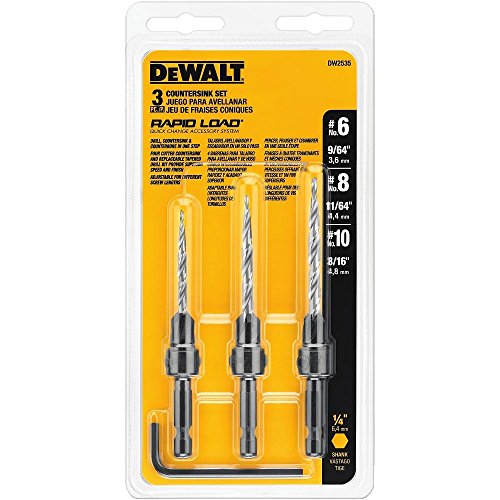
https://www.amazon.com/DEWALT-DW2535-Piece-Countersink-Assortment/dp/B0000225OU/
You can always get a counterbore drill bit, then cover over the screwhead with a dowel plug. Not quite as clean-looking as some of the other joinery, but for some wood types, you can make the plugs almost invisible... and it's a super-simple method of doing things with limited tools.
I personally like this type of bitsince it's good for countersinking the head of the screw, as well as doing a full counterbore so that the hole can be plugged (and generally a dowel works fine for plugs, and is much cheaper than buying premade plugs).
Like the other guys said, its a pilot bit+drill bit+countersink.
I have the modern, replaceable bit, version set from Dewalt for prepping decking for screws. I love them
Narex Chisels
Porter Cable Forstner Bit Set
Eclipse Coping Saw
Countersink Wood Drill Bits
Narex Marking Knife
Bessey F-Clamps from Home Depot. 4 pack for like $20.
Bessey 3/4" pipe clamps from Home Depot. $12-ish. Black pipe is about $1 a foot.
I have never bought any really expensive multi-flute countersinks, but all the cheap ones I've tried didn't work that well. They simply didn't seem to cut very well, even when brand-new.
What I use is the single-flute type like this: https://www.amazon.com/Degree-Single-Flute-Countersink-Shank/dp/B00OTX3IEE
Not that particular brand however. I am only posting that link to show the picture. It's like a stubby drill bit, but with only one flute cut, not two flutes.
There is another single-flute type that has a hole made through the front if the bit, and the edge of the hole is the cutting edge. I have never tried these.
They won't do all you're asking for.
Like this
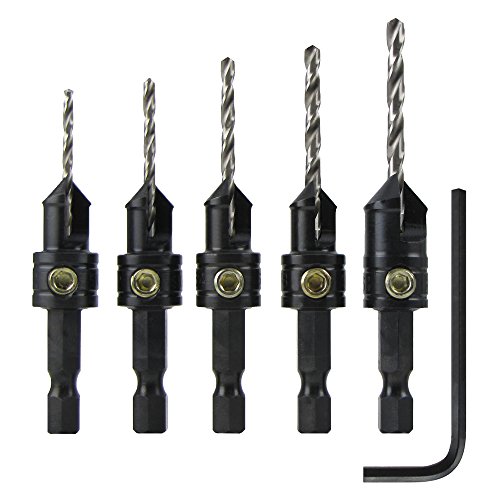
Pre-drilling isn't the only thing, though. Those screws have a tapered head. You'll need to countersink the hole or else once the head enters the wood, it'll always split. Grab a set of these or something like them.
if the houses around yours are multistory, then there's no privacy anyway.
regardless, yes, you'd have to pull and reset the planks, or get a lot of 1"x2"x5' strips and fill the gaps.
consider purchasing a quick-change bit for your drill so you can swap out a countersink bit with a phillips driver quickly as you go along. something like this: https://www.amazon.com/Makita-Quad-Driver-Pre-Drill-Countersink-13-Piece/dp/B0000224F5
I Love This Greenlee Drill/Tap set!
And of course my Wera Screwdriver Set. Makes dealing with terminals a breeze.
Everyone here seems to like Milwaukee power tools, but I have a Milwaukee drill/driver, but seriously, I prefer the 12V Bosch drill and impact driver. I was trying to use the brand new Milwaukee to drive a 1/4" lag bolt into my dock, and it stalled about 4 threads in. Grabbed the 8 year old Bosch, and drove it all 3 inches down without a sweat.
ETA: Something I only pull out once in a blue moon, but when I do need it, a good Fox and Hound is an absolute bloody necessity! I have that one for general wires, and my Fluke network test kit one for Coax/Copper Ethernet. I wish there was some way for someone to make one for fiber, but oh well, that's next generation physics.
I guess I should also say, the GreenLee Slug-Buster knockout set is amazing. No time spent trying to pop out slugs from the punches.
Oh, lord, I could go on...
Okay, one last one, sitting on my desk: a Brady printer. I can use that to print wire labels FAST (Real Fast), directly importing from a wire run list in a CSV format, but it also does legend plates, and pushbutton/switch plates. Godly.
Okay, I'm done.
No wait.. .One more, for instrumentation guys: Fluke 4-20mA Clamp on... LOVE IT
Okay, I'm really, REALLY Done
Here is the non-mobile link from the comment above
***
This bot is supported by the referral link above. If you wish to not use a referral link, you may use this link instead.
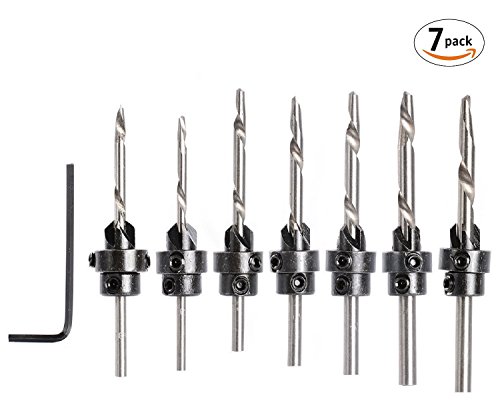
If you plan on woodworking at all have a set of these handy.
https://www.amazon.com/gp/aw/d/B000XXZME8/ref=mh_s9_acsd_top_b2Jhc_c_x_4_w?pf_rd_m=ATVPDKIKX0DER&pf_rd_s=mobile-hybrid-3&pf_rd_r=9XWMC82QZQCCS2ZHM5Q3&pf_rd_r=9XWMC82QZQCCS2ZHM5Q3&pf_rd_t=30901&pf_rd_p=6aa1ddc2-586f-575d-b83c-52d8d3588213&pf_rd_p=6aa1ddc2-586f-575d-b83c-52d8d3588213&pf_rd_i=552396
These work good too. The pilot bit keeps the countersink centered on the hole.
https://www.amazon.com/Snappy-Brand-Quick-Change-Countersink-Proudly/dp/B000XXZME8/ref=sr_1_13?keywords=countersink&qid=1564342089&s=gateway&sr=8-13
I got mine from Amazon, for 10 dollars. Already had wire and crazy glue at home.
http://www.amazon.com/gp/aw/d/B000VNPRNQ/ref=mp_s_a_1_5?qid=1426545901&sr=8-5&pi=AC_SX110_SY165_QL70&keywords=pin+vice
Those are really petty complaints
you can buy a bag of ground screws with pig tails already attached to them. bag of 50 is about 20$.https://www.amazon.com/Grounding-Pigtails-Ground-Screws-Pack/dp/B00CDVJA0A/ref=sr_1_2?ie=UTF8&qid=1495112568&sr=8-2&keywords=ground+wire+pigtail
put those in the metal boxes. Most metal boxes already have screw holes in the back of them for a 10-24 screw but some do not. If yours do not buy one of the drill and tap bits made by Greenlee https://www.amazon.com/Greenlee-DTAP10-24-Combination-Drill-10-24NC/dp/B000FCGRWI/ref=sr_1_7?ie=UTF8&qid=1495112488&sr=8-7&keywords=drill+and+tap+bit
you will need a bit holder for the drill to extend it deep enough into the box. https://www.amazon.com/Tonsiki-Screwdriver-Holder-Extension-Handheld/dp/B018702HQ4/ref=sr_1_6?ie=UTF8&qid=1495112723&sr=8-6&keywords=bit+extension
something like that, you will want a locking one so you can pull the bit back out.
the drill bit/tap can be a bit finicky; you go from high speed drilling to tapping in a second and if you push to hard or don't slow down, you can break the tap in half. Go slow and be prepared for it to change. Hopefully the bit wont go all the way through the back of wall. most of the time it wont because metal boxes are mostly shallow and have room inside the wall for the bit.
GFCI's do not work well without a ground and neutral. without seeing the actual wiring in person, I cannot tell you how to fix that. Do all the receptacles read as having a continuous ground? Maybe use a gfci breaker instead of receptacle?
I used this tapping bit and this cutting oil and they worked marvelously.
And to re-state the re-stated: Take your time.
You did a good job with fit and finish. One thing I like to do when using screws is to countersink... I think it really improves the project. Take a look at this link below. You can drill a pilot hole and countersink in one swoop:
https://www.amazon.com/gp/aw/d/B0000225OU/ref=mp_s_a_1_2?ie=UTF8&qid=1525891819&sr=1-2&pi=AC_SX236_SY340_QL65&dpPl=1&dpID=51QMLOynRSL&ref=plSrch
These ones?
What about the bits with the counter sink built into the top?
Use a counter sink and tapered head screws, like drywall screws to install the tub.
counter sink will make the screw heads flush with the surface on the tiling flange.
Counter sink example
http://www.amazon.com/DEWALT-DW2535-Piece-Countersink-Assortment/dp/B0000225OU/ref=sr_1_1?ie=UTF8&qid=1408325845&sr=8-1&keywords=drill+bit+with+countersink
Careful tightening the screws, if you use a drill to drive them in set the clutch so you don't over tighten and crack the flange, might be best to do the final tighten by hand.
You can shim gaps under the screws with cedar shims. ( flange does not touch the stud ) then cut the shims off.
http://www.hardwarestore.com/36-count-16-red-cedar-shims-656434.aspx?utm_source=pla&utm_medium=cpc&utm_term=brand=nelson%20wood%20shims%20and%20adwords_labels=hardware&utm_campaign=rkg&device=c&network=g&matchtype=&creative=20650488858&adpos=1o4