Best feeler gauges according to redditors
We found 23 Reddit comments discussing the best feeler gauges. We ranked the 12 resulting products by number of redditors who mentioned them. Here are the top 20.
We found 23 Reddit comments discussing the best feeler gauges. We ranked the 12 resulting products by number of redditors who mentioned them. Here are the top 20.


Congrats, just got mine 2 months ago.
SeeMeCNC forums are awesome. Start reading every new post.
Best upgrade I've done: PEI Bed
http://www.amazon.com/gp/product/B0013HKZTA
http://www.amazon.com/gp/product/B007Y7D5NQ
~$30 in upgrades; all my prints stick and pop off with ease. Also, the underside of every part is glassy and smooth. So good.
Buy "feeler gages" to assist with leveling the bed.
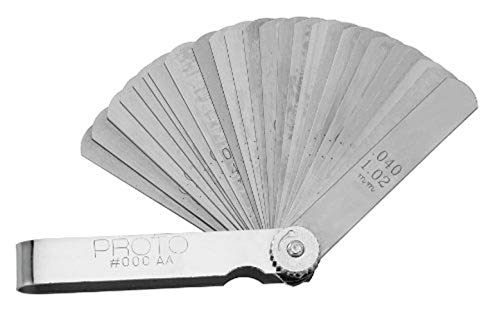
http://www.amazon.com/Stanley-Proto-J000AA-Master-Feeler/dp/B001HWDOK8/
My bed leveling process is kinda like this:
Let's see, what else. If you can spare the cash, I moved to Simplify3d for all my slicing needs ($100~$150 for the license). Love it. If you can't afford it, maybe you'll find a way.
Also, get ready to do a bajillion calibration runs. I mean it, don't be in a rush.
Find a nice 20mm box off thingiverse or whatever, and you're gonna want to print that repeatedly while you dial in your settings. Once that's set, move on to the hollow pyramid, or the 5mm stairs.
I seriously printed at least 20 of each of these while I dialed in my settings:
ASAP, move over to PLA. Prints so much nicer for me than ABS.
Oh, before you go to PLA, make sure you print 3x of the layer fans housings (not just 1x) and order up 2 more of the "squirrel cage" fans (centrifugal fans) from SeeMeCNC. edit: I spliced the single pair of layer-fan wires into three right at the connectors, I didn't bother running extra wire for them.
Oh, and one other big improvement I made was putting connectors in-line with the hot-end and for all the fans. This way, if I have to replace a fan or upgrade the hot-end I don't have to cut and splice wires, I can just pop it off and connectorize another new one. Here are the connectors I used:
That was probably too much info -- just take your time and try not to get frustrated while you get things all set up. It is not a plug-'n-play object, it requires care and feeding.
... oh, and have fun! Whatcha gonna print?
Good advice. I bought my bike and did them at 6k and I'm betting they were never done and the bike ran noticeably better afterwards with that and syncing up the carbs. I adjusted them all to the outer most clearance since in theory it should be longer before they need to get adjusted again.
Also if you've never done a valve adjustment before this is the perfect bike to do it on your first time. Much easier with tappet and locknuts rather than valve shims.
Also Amazon sells nice long feeler gauges which make this much easier. Do not try to do it with short ones or you'll probably end up dropping them into the engine. I was able to do it without removing the radiator as well.
http://www.amazon.com/gp/product/B006Z58ZQK/ref=wms_ohs_product?ie=UTF8&psc=1
You just need something like this. The metal thing with the two notches is for bending the top (ground) electrode. The wire feelers are exact thicknesses and you just pull it through the gap to measure the distance.
You'll see feeler guages that have flat blades like this. Those are for measuring/setting valve lash and you can't be accurate on a plug with those.
Precision Brand 19425 Steel Thickness Feeler Gage, 0.012" Thickness, 1/2" Width, 12" Length (Pack of 12) https://www.amazon.com/dp/B00065UXCY/ref=cm_sw_r_cp_awd_IYd7wbYF2CQS8
Just take some of this and cut/grind it down. You'll have a lot you can make.
Pick up a cheap feeler gauge on Amazon. .2mm works for me most of the time, and it's really easy to feel when you've got the spot. Link
>Where's the best place to source a single piece of spring steel to get this knob working good?
I can't tell how long that's supposed to be. Harbor Freight sells feeler gauge sets for really cheap, and you'll definitely find the thickness that you need. Each blade is 3.5"x0.5"
Another option would be discarded windshield wipers at your auto parts store. About 25% of the ones I've pulled out of the trash have steel that might work. They're 0.028" x 0.148" x longerthanyouneed. Others are about the same thickness but narrower. Probably too weak for that application.
You could also look for "Precision Brand feeler gauge stock"
​
Edit: How about this? You can get 0.0315" for less than $7. You can bump it up to 0.033" for under $20 https://www.amazon.com/Precision-Brand-Thickness-Feeler-0-15mm/dp/B002UXRFHQ/
Discussed here and here, and shown in some more detail here. In short, set a shim around the square base of the LED and slide a razor blade across it. I've had very good results with a 0.9mm feeler gauge, unscrewing the binding post and using the attachment hole to surround the LED. A fresh utility knife or single-edged scraper razor blade works well to actually make the cut (I tried a double-edge razor blade meant for shaving, and it was too flexible).
It drops the total output by about 20% but makes it more focused, less green, and a bit warmer. You can do something similar on most flip-chip LEDs (anything where you can't see the bond wires), but something with the way they're assembled makes the Samsungs particularly easy to do.
[Precision Brand makes some pretty decent feeler gages and you can buy a set for 20 bucks of all different sizes.] (https://www.amazon.com/Precision-Brand-19740-Thickness-Assortment/dp/B00065UXZQ/ref=asc_df_B00065UXZQ/?tag=hyprod-20&linkCode=df0&hvadid=312154631245&hvpos=1o2&hvnetw=g&hvrand=15556309047547191615&hvpone=&hvptwo=&hvqmt=&hvdev=m&hvdvcmdl=&hvlocint=&hvlocphy=9011814&hvtargid=aud-801657747996:pla-567795975014&psc=1ne) I machine stuff at work so I have alot lying around. If you don't need a bunch of sizes you can get individual peices on ebay for pretty cheap. If you can find a 12" peice of Starrett feeler gage, that's the nicest route to go.
It's light enough to cut with heavy scissors and do the fine work with a sanding drum on a dremel.
I just 3d printed a handle but you could always sandwich and epoxy it between two peices of wood. I made sure to make grooves on the steel that went in to the handle so epoxy would lock it in.
No, more like this:
https://www.amazon.com/Precision-Brand-Thickness-Feeler-Length/dp/B00065UXXI/ref=sr_1_6?keywords=precision%2Bfeeler%2Bgauge%2Bstock&qid=1570001386&s=gateway&sr=8-6&th=1
I am not sure whether this particular one is made of good enough steel but this is the type of product I was referring to.
Replying to myself immediately after hitting reply seems silly, but these are separate thoughts so whatever...
If you don't currently use Octoprint/Octopi, you can get the readings from the bed level command on a computer plugged into the printer. Passing just G28 commands should do it. There are a number of pieces of software that'll pass gcode directly and return the results. I've been an Octoprint convert for some time so the only time I plug in my printer to a computer is when updating the firmware (the one thing I don't quite trust Octoprint to do).
Also, sometime I found helped was ensuring the PINDA probe was aligned properly. This is supposed to only effect the gap between the probe and the nozzle, and the live adjust Z is really just account for that to my understanding, but I think part of the problem is Prusa Research's lack of specificity in this regard. The manual for the Prusa MK3/MK3S kit (and I think other models) suggests using a zip tie to get the PINDA probe aligned to the nozzle end. I'm not a fan of this. I kept having problems related to this, mostly in that it's really hard screw the probe in place while keeping it steady resting on the zip tie, probably because I sadly only have two hands. Instead, I picked up a set of feeler gauges (these in particular) to do this instead. I do the whole "manually lower the z axis by hand, move the nozzle to just barely touching on the left, repeat on the right" thing, but stop there. I move it back and forth a couple times to make sure it's not touching in the center, move the bed back and the extruder to the right, then use the 0.85mm gauge to slide under the PINDA probe while I lock in the screw to hold it in place. I've found it far more consistent at least. The magnets near the edge of the bed hold the gauge in place, so I can use one hand to balance the probe on it and the other to screw it into place.
Edit: and yet another thought while I'm changing filament to print another couple things for work...
The spring steel sheets themselves could be a problem for some. I got one of the non-powder coated PEI sheets with my printer, bought another a few months later because my first had gotten scratched up (and I just wanted a second), then when the powder coated ones became a thing I picked up one of those. Besides the powder coated sheet being much thinner, requiring a much "higher" live adjust Z value (in quotes because technically you're lowering the value, but it's hard not to think of it as a positive number), I've also found it to be really inconsistent in stickiness. I love the texture, but I've had a lot of models suffering lift on the corners. It's been so bad I switched back to my sticker PEI sheets and the problem magically disappeared. I didn't see it often, but occasionally during the first layer it did happen in a few spots which could look like a similar problem. It doesn't look like you have one, OP, but pointing it out for others that may stumbled on this thread.
Related, only bending you sheeting in one direction to get things off can introduce warping of the sheet. I always try to bend an equal amount "in" and "out", as well as from the sides and top and bottom. While we don't think we're applying much force to bend the sheets it is enough to cause it deform, so try to apply even and opposite bending forcing to reduce the changes of developing warps in the sheet itself.
It looks like this set of feeler gauges has the .009 and the .011.
However, they are referred to as "Overhead Valve" gauges.
Do you think they would work for the S2000?
http://www.amazon.ca/Stanley-Proto-J000R-Overhead-Feeler/dp/B001HWAD6Q/ref=sr_1_4?ie=UTF8&qid=1451354280&sr=8-4&keywords=proto+feeler+gauge
Thanks
James
you look close, use more brake clean and a rag and more elbow grease to try and get that residual gasket off. a razor blade will help some. hopefully you have a machinist straight edge and feeler gauges for piece of mind, if not it is a worthy investment for what you are doing.
https://www.amazon.com/Starrett-380-24-24-Inch-Steel-Straight/dp/B0006J4GKK
and
https://www.amazon.com/Stanley-Proto-J000AA-Master-Feeler/dp/B001HWDOK8/ref=sr_1_1?s=industrial&ie=UTF8&qid=1465746330&sr=1-1&keywords=feeler+gauge
No, make sure they are exact.
Sometimes you need to combine two smaller feelers to make the size you need. However you should buy a metric one. They cost about $5.
https://www.amazon.com/OEMTOOLS-25345-Metric-Feeler-25-Blade/dp/B000BYEQ3C/ref=sr_1_5?ie=UTF8&qid=1542597599&sr=8-5&keywords=metric+feeler+gauge
I use a Stainless Steel .005" feeler gauge. I have an incredibly low failure rate.
http://www.amazon.com/dp/B00065UXZQ/ref=biss_dp_t_asn
A credit card is too thick and not flat enough.
Feeler gauges also work nicely.
Pick up one, like here, get the scope set in the rings, find the right point in the gauges where any thicker and it won't freely slide between the scope and the mount, then tighten. After you have your rings torqued down, you should need to remove the gauges using some force, but your scope will be mounted perfectly level with your mount.
To add to /u/ntoff's idea, feeler gauges make great shims. Find a metric set like this and cut the 0.5mm shim with some tin snips and then wrap it around the stepper shaft.
About Calibrating a Delta, I'm using this wizard to calibrate mine and I've got to a point where I can't seem to get better than [-0.1:0.1] offset on all 7 probe points. I'm using 6 factor and [a gauge like this](uxcell Metric Thickness Feeler Gage Gauge (0.02-1.00mm) https://www.amazon.com/dp/B0052IRYVS/ref=cm_sw_r_cp_apip_WJL7ivK8ztXUi) using the 0.1 mm sheet to measure the height between the nozzle and the bed.
How do I know when to stop?
Ok. I now have an understanding of your problem. To restate for those that were as confused as I was:
The bed is NEITHER level or trammed. Instead OP is relying on the "auto bed leveling" wherein an end stop or the nozzle is probed at several XY positions on the bed and then this information is used to offset the build accordingly.
Honestly I've been opposed to this method since people started doing it on RepRaps a few years ago. I believe I've seen discussions of doing what you would like to do previously in the reprap forums but I could not find anything with a quick search (http://forums.reprap.org/). As stated elsewhere you'd only really need 2 adjustments, but that's still 2 more motors you need to control and they only need to be controlled at the start of a print.
It seems like a huge increase in complexity when the same effect can be achieved with 3 screw knobs once a month. That doesn't make it any less interesting and I encourage you to try it out. An added complexity here is that Josef's Mendel moves the table in the Y-direction, so now you have to move those motors too.
Just in case this helps you, here is my tramming method:
This whole process takes at most 10 minutes. Once it's done I can print confidently for at least 100 hrs of print time (about 2 weeks for us).
If you need to substantially change temperature settings, retram. I don't typically switch materials all too often though. Cheers.
Feeler gauges: http://www.amazon.com/Metric-Thickness-Feeler-Gauge-0-02-1-00mm/dp/B0052IRYVS/ref=sr_1_1?ie=UTF8&qid=1427385860&sr=8-1&keywords=.1mm+feeler+gauge
WHPthomas tramming prints: http://www.thingiverse.com/thing:39430
Glad I could help. (Maybe? ;)
Good turning down the accelerations and jerk I had to do the same thing and it does help.
So for the glass bed, I bought [this one] (https://www.amazon.com/gp/product/B00QQ5Q3BI/ref=oh_aui_detailpage_o09_s00?ie=UTF8&psc=1) which has been excellent for me despite some of the bad reviews. I also bought this thermal pad. It has to come from china which is kinda a pain but it delivered pretty quickly and is HUGE compared to some of the other ones on amazon. That means I can use it for other projects and have replacement pads, which is nice.
Here's a great guide for this and for most things related to this printer
I also went ahead and upgraded to a Micro Swiss nozzle which has been a really nice upgrade for me. I also upgraded the filament feed lever because I like fancy aluminium replacement parts and the plastic one didn't seem like it was going to make it in the long run.
A note about shipping: They are FAST. I hit order and within fifteen minutes my order was out their door and on it's way.
The final thing I did was purchase a shim set. At my work, we do a LOT with 3D printing. We've found that using shims to set the nozzle exactly .2mm off the bed is the best way to get the printer to excel on the first layer. If you are confused on how to use the shims to achieve this, I can take a picture.
EDIT: When using the glass bed you're going to have use Elmers Disapearing Purple School Glue to get prints to stick. It's cheap and has been giving me excellent results. I may switch to Elmers Glue-All which we were using at work for Nylon prints and Gahddamn is that stuff great for nylon prints.
EDIT: RECALIBRATE YOUR ESTEP. This fixed a lot of my infill and layer problems because now my extruder is laying down the correct amount of filament.
I got a set that has 32 blades. The blade I use for the printer is 0.1mm. That is the same thickness as a sheet of paper is supposed to be. Since this is metal there is a much more solid "touching or not touching" that I never got with the paper.
Here is a link to the 2 pack of guages I purchased. You can find the same thing on amazon for a single guage for under $7 though. Also any Auto parts store like autozone would carry these for under $10.
https://www.amazon.com/dp/B077GLSXWS/ref=cm_sw_em_r_mt_dp_U_AKg3CbG05EVD0
Nice Abloy Protec!!!! (Amateur lock picker)
Suggestion. Keep the garage door opener in the car. and buy a feeler gauge for the keys you only use rarely but always need one you. (Just take the gauges out and put your keys in. Also a Chicago bolt works.
EDIT Also look into the bladekey