Best hydraulic equipment according to redditors
We found 102 Reddit comments discussing the best hydraulic equipment. We ranked the 37 resulting products by number of redditors who mentioned them. Here are the top 20.
We found 102 Reddit comments discussing the best hydraulic equipment. We ranked the 37 resulting products by number of redditors who mentioned them. Here are the top 20.


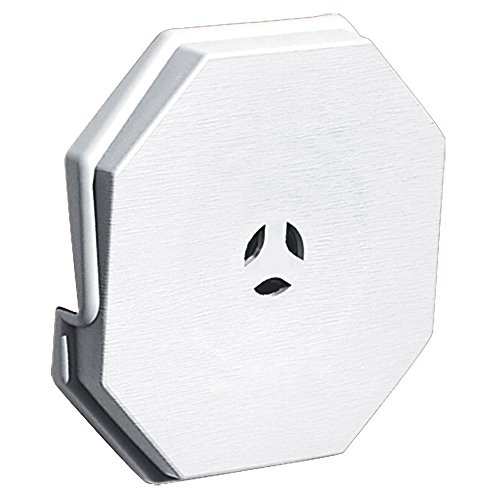


Hi. They make lamp mounting kits for vinyl siding.
Builders Edge 130110006001 Surface Block 001, White https://www.amazon.com/dp/B0041NT7D8/ref=cm_sw_r_cp_api_AV9RAbVRZCPWS
There are different colors. Find one that has the right amount of steps for your type of siding.
Use a outdoor silicon to seal around the edges and there are foam pads you can use between the junction box to the siding cover plate. Hopefully they put a junction box in there, the lamp mount attaches onto the box. If they didn’t, install an outdoor box in there too.
Here is another
Arlington 8141-1 Vertical Siding Lamp Mounting Kit with Built-in Box for 1/2 Inch Vertical Siding LAP https://www.amazon.com/dp/B002W6ZOCO/ref=cm_sw_r_cp_api_4V9RAbFQ3P1Z4
Hope that helps. Turn off the breaker before wiring.
This is prolly cheaper https://www.amazon.com/dp/B0113UJOOS/ref=cm_sw_r_cp_apa_i_tAm0DbPTPC7F8
I'm assuming you already have a kettle, burner, brew paddle, and thermometer. Also assuming you have good water. You will have to buy crushed grain until you get your own grain mill. The ball valve can be upgraded with a cam lock quick disconnect and tube. I like to mash on my kitchen counter, so I have to move the kettle outside for the boil and a platform dolly is a big help with that.
Below is a copy paste of a comment I made the other day on the cause of this problem.
the shaft of the z motor is 3mm and the threaded rod is 4mm the coupler they use is 4mm on both sides so the z motor shaft is pushed to the side inside the coupler so the center axis of the motor is off .5mm from the center axis of the threaded rod. Imagine putting a drill bit in a drill off-center of the chuck, the bit would wobble around in a circle. The is what the threaded rod does and pushes on the gantry every revolution. You should have horizontal stripes in the sides of your prints that coincide with the threads of the threaded rod. Since this is my first printer, I thought those were layer lines. upon closer inspection I realized the layers are much thinner and they were shifting back and fourth. I replace the coupler with one of these and it fixed the issue. https://www.amazon.com/gp/product/B018VE5YAW What you need to look for in a coupler is that it is 3mm on one side and 4mm on the other. Now that I have fixed that , I can now see the vertical lines in my prints that were masked by the horizontal lines. It is probably due to the smooth side of the y belt running on the plastic toothed pulleys.
3x4mm coupler https://www.amazon.com/dp/B018VE5YAW/ref=cm_sw_r_cp_apa_i_JdakDb3YWS9Z6
Note to self, get Amazon affiliate link.
It's $230. Not the cheapest IoT device but it's built rock solid.
There are cheaper ones that try to spin the valve externally but I did't feel confident in them.
Here's the link for Leak Gopher:
https://www.amazon.com/Leak-Intel-Certified-LIFETIME-WARRANTY/dp/B01LE9OD3A/ref=sr_1_2?ie=UTF8&qid=1504743267&sr=8-2&keywords=leak+gopher+z-wave+valve+control
2pcs 3x4mm CNC Motor Jaw Shaft Coupler 3mm To 4mm Flexible Coupling OD 19x25mm (3x4mm) https://www.amazon.com/dp/B018VE5YAW/ref=cm_sw_r_cp_api_i_53-RCbJ1NFFRV
Takes out z-wobble.
Depending on the size of your landscape and given your climate, you might be needing something more like this:
https://www.amazon.com/RomoTech-Horizontal-Polyethylene-Reservoir-Gallon/dp/B01BFC5Q9Q/
I always encourage folks before going down this road to do a proper analysis of their watering needs. Resources on line are abundant and you can start with your local ag extension and the Irrigation Association for information about how to do the math. Water requirements vary by season, by soil type, and by plant. For example, a mature fruit tree can require as much as 35 gallons of water per day, or more in severe weather conditions (hotter, drier, windier).
my kit was 130 on amazon has a hookup for keurig hookup https://www.amazon.com/PureSec-Plastic-Fitting-Adjustable-Refrigerator/dp/B01MU6YQGA/ref=sr_1_55?crid=27MN1TVZRKKIK&keywords=float+valve&qid=1573017139&sprefix=float%2Caps%2C265&sr=8-55
fridge water with a float
https://www.amazon.com/AquaLutio-Premium-Filtration-Drinking-Designer/dp/B01HFH2UHG/ref=sr_1_2_sspa?crid=2JU6U38SMSNZ8&keywords=ro+water+filter+system&qid=1573016804&sprefix=ro+%2Caps%2C331&sr=8-2-spons&psc=1&spLa=ZW5jcnlwdGVkUXVhbGlmaWVyPUEzRFFYVVJYQTJQNTgyJmVuY3J5cHRlZElkPUEwODU3NjU3M0xPWVBRSUJIQUxLWCZlbmNyeXB0ZWRBZElkPUEwNDgyMjg4MzY2TlAxUkhERkozTSZ3aWRnZXROYW1lPXNwX2F0ZiZhY3Rpb249Y2xpY2tSZWRpcmVjdCZkb05vdExvZ0NsaWNrPXRydWU=
The silver sleeve is an anti-siphon device --- so hose water doean't go back into your drinking water supply:
https://www.amazon.com/Orbit-Pack-Faucet-Anti-Siphon-Valve/dp/B07B86K88Z
Printed couplings are prone to slipping which means the Z axis doesn't rise(or lower) the correct amount. You're better off buying a real coupling for a few dollars.
Sure thing! Here's a list of the main equipment:
Lighting - Finnex FugeRay Planted+ Aquarium LED Light Plus Moonlights
Light Risers - OEM FINNEX LIGHT RISERS FITS PLANTED+, RAY2, FUGERAY, ETC.
Filter - EHEIM Classic 250
Co2 - Tank / Diffuser / Drop Checker
Heater - EHEIM Jager Aquarium Thermostat Heater
Addon - Finnex Breeder Box with Light
Have you ever seen a wedge block for vinyl siding?:
https://www.amazon.com/Builders-Edge-130110006001-Surface-Block/dp/B0041NT7D8
This is what I ended up using and seems to be working well:
2pcs 3x4mm CNC Motor Jaw Shaft Coupler 3mm To 4mm Flexible Coupling OD 19x25mm https://www.amazon.com/dp/B018VE5YAW/ref=cm_sw_r_cp_apa_m4N2AbMH6HZM7
Mash tun cooler (this is probably cheaper at your local hardware store or wal mart) Also, this isn't the only cooler that works. Pretty much any plastic cooler works. But you'll need a different false bottom if you use a chest cooler, which may allow you to mash bigger batches.
Weldless Ball Valve Just take the plastic valve off the cooler and screw this one on. Will work on most any cooler you choose.
False bottom Put this at the bottom, connecting the silicon hose to the ball valve and the top of the false bottom.
3/8" barb You'll need to screw this onto the ball valve on the inside of the mash tun to connect the silicon hose to.
Honestly, if you've already got a kettle that can boil 6 gallons, you're good to go there, and just add this to the mix. Otherwise, pick up a Stainless Steel Brew Kettle.
This whole setup comes in just under $200 but you'll need some hoses and some hose clamps as well. But I'm sure that if you shop around (even on amazon) you might find better deals than I linked. But that's the gist of it. And there's no need to stick with the specific brands I linked. But just make sure to stick with stainless steel for the kettle, ball valve, and connecting accessories and food-grade plastic for the cooler. And any hoses need to be high temp hoses. Silicon is ideal.
This is by no means the "only" way to do it, but a great start down the road. You may also choose to use a pump. It has advantages and disadvantages. You can make great beer with and without one.
Just make sure you get the one with the DI. The replacement cartridges are pretty reasonable as well, and my lps sells them as well as amazon. I have heard nothing bad about that system. My TDS from the tap is 144, and is zero after that system.
Here is the TDS monitor for cheap:
https://www.amazon.com/gp/product/B001EHAZGW/ref=ppx_yo_dt_b_asin_title_o00_s01?ie=UTF8&psc=1
And a float valve if you need one:
https://www.amazon.com/gp/product/B0113UJOOS/ref=ppx_yo_dt_b_asin_title_o00_s00?ie=UTF8&psc=1
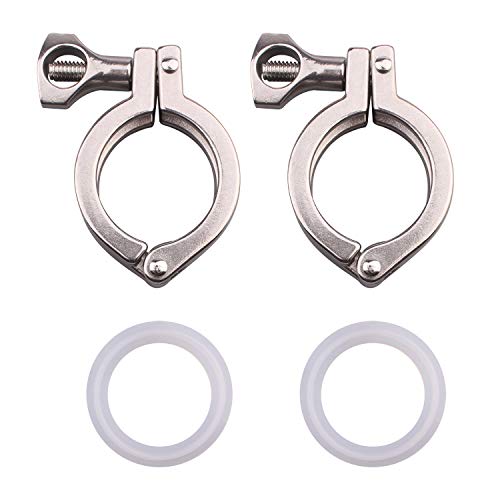
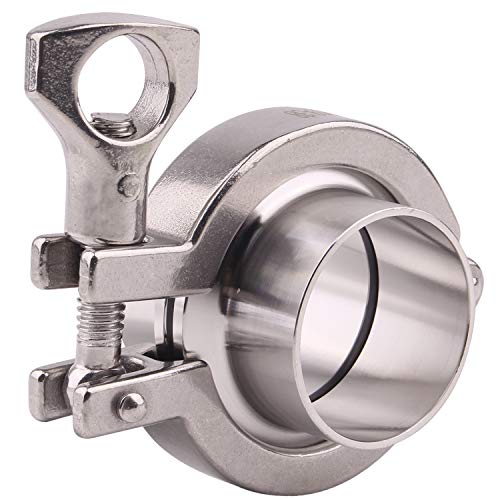
Can confirm. Commonly used for sanitary fluid pipe work as a joiner.
https://www.amazon.com/Dernord-Stainless-Tri-clamp-Tri-Clover-Sanitary/dp/B06ZZQP6C6
Usually stainless steel they are used in pharmaceutical plants, breweries etc...
If you look at the product you will see it is commonly bought with [this ball valve] (http://www.amazon.com/Weldless-Bulkhead-Stainless-Steel-valve/dp/B00420WMUU/ref=pd_bxgy_k_img_z). Just remove the old valve (it is nylon) and put this in its place. Then connect the screen inside.
Upgrade. You can drill an AL kettle using dish soap as lubricant like a hot knife through butter. Step bit was like $6 at my local hardware store -- not the best ever tool but I only need one use out of it. And then this serviceable bulkhead+ball valve+barb is less than $21: link. It goes on sale for cheaper from time to time if you watch homebrewfinds.com. Even if you upgrade, it's worth doing this one and using it as an HLT or something.
Buy a cheap HDMI switch if you want to switch between HDMI sources. It is entirely standalone and doesn't require a RPi or anything else.
You'll need something like this Hauppauge box plugged into your PC and just have a HDMI switch before it. They claim Linux drivers exist for it but you'll have to investigate how easy it is to get it running on a RPi.
There are cheap standalone HDMI encoders available such as this HDMI over IP transmitter or this Android settop box but they all require some work to get running properly. You're going to have to write significant amounts of code to get it all hooked up properly.
If you do want to capture a HDMI stream then you'll need to strip off HDCP first and then split the connection so one goes to your TV and one goes to the HDMI encoder box. You don't want to do encode then decode because it is lossy encoding and the latency will drive you nuts if trying to play on your PS4. The Hauppauge box claims it has a zero latency passthrough connection so you don't need to split it for that.
Honestly, your title needs to be more specific. If you're asking how to get the footage from the PS3 onto a computer, most people use (and I myself do the same) a PVR of some kind.
Most people I know use some form of a Hauppauge HD PVR, the one linked is a "specific" gaming one.
The PS3 has a cable to the PVR and from there it has 2 cables. One to the TV and one to the computer. Think of it as a crossroads which splits the image and sounds into 2 directions.
Then the inbuilt software records it onto your computer and you can chuck it into some video editing software and you're done.
Having a hard time getting a perfect seal with my new 5 gallon Rubbermaid cooler. I've tried numerous o-rings and washers that always result in a drip every few seconds. This usually stops after I dump in the grain, but it's just really annoying. Using this ball valve setup
Any help with this one? Cheers!
Basically, you need a tank, a regulator some airline, a bubble checker would be good to have and a diffuser. Also, you'd like a timer of some sort as you really do not need to have co2 running 24/7 nor would you probably want to.
My setup:
$23 dollars on Amazon - though I would have still needed to get it filled at paintball shop for $5 which brings it $28. $2 more - i think it's better at that to support the local shop and plus I didn't want to wait for the tank to come to my house as that would have arrived later than anything else.
Price for this setup: $109
If you need a timer, there's plenty of options. I already had one, but you can find them on Amazon.
Though in the end, you would need a timer and if you already have one then you won't have to buy one. Or if you have extra smart switches either that you can set a schedule on.
Other tanks:
Instead of the paintball tank you can get a regular co2 tank:
Of course, that's just buying the stuff to build the system.
You can watch videos about it on Youtube like Aquarium Co-Op's Co2 guide but I can still try to break it down.
Get tank and properly secure it to the regulator.(I'd recommend watching a video on that as the regulator does need to be open for this part apparently). If using the paintball tank, secure the adapter to regulator first. DO NOT secure it on the paintball tank first. If you do it with the way the adapter is built, I'm guessing you'd be losing a bit of co2. Though, I haven't tried it, I'm logically thinking that it ain't good. If you use a 5lb tank or larger, there's something about some disc or gasket or something that is supposed to help keep it from leaking. I'm going to refer you to youtube on that one. I didn't use any on my paintball setup except for the gasket already on the tank. I did use some plumbers tape on the adapter to regulator though. I'm just hoping I don't have a leak and I'd be pretty confident to assume that I don't as I still have CO2 in my tank after a couple of weeks.
All you need to do now is to attach the airline hose(some people will say to use co2-proof hose to prevent co2 loss, but I decided to skip that and you can decide what you wish to do as I might be right or wrong on that part along with other people who claim airline tube is sufficient) to the regulator. So after you attach the hose to the regulator, attach the bubble counter somewhere along the line before the aquarium(I think I did that right). Of course, if you use the 5lb or larger tank, you should be able to use the bubble counter that came with the regulator as it would stand vertical. The line eventually gets connected to a co2 diffuser which will break up the co2 into smaller bubbles to easily be dissolved better into your water. Of course, there are other ways to get the co2 into your tank, but this is the way I do it. Youtube can show you other ways, or other redditors for that matter. One thing to note is that you should also have a check valve to prevent water from going from the aquarium to your system. It should most likely be closer to the water than the co2 system. The bubble counter I use, also has a check valve for whatever that one is worth. Some diffusers come with bubble counters and check valves as well. Speaking of diffusers, i forgot to add that to my price. but that can run anywhere from $5 on up. Also the diffuser might have to be cleaned due to algae once and awhile.
The system should be ran using a timer to coincide with your light cycle and should run basically when the lights are on. I turn my co2 on 1 hour before the lights turn on and turn it off 2 hours before the light turn off. Hypothetically, you can run it 24/7 however it's better not to as the risks are a bit too much for putting something in your tank that is not being used as the plants typically don't use co2 with the lights out and you can risk running into a situation where you deplete the oxygen in your fish.
Overall, I think it's worth it at least for me. But also be cautious that adding too much co2 might be detrimental to your fish. If you are running it and your fish are all gasping for air, you definitely are putting too much in but you should never get it that far which some way to check it would be a good purchase for this. I just use the method of figuring out the ppm of CO2 based on pH and KH. I'm not sure how accurate it might be but it has been stable and my fish are doing fine as well as my plants and the algae is at bay. There's also what's called a CO2 drop checker that you can purchase to measure this.
If you really want to get into this, I'd recommend researching it further yourself and maybe wait on some other more "experienced" redditors to answer as I might and could be wrong on some things. I know I've read some people don't think the ph/kh calculation method is good and to buy a drop checker, but I'm pretty confident in using it for my tank but I might be undosing the co2 for all I know. Though on the flipside, I could be overdosing, though my fish are not showing any signs of symptoms of said overdosing. But I could be wrong on that. If I am, please let me know. :) Definitely do your own research, like you should on anything. :) At least, get a good footing and confirmation from other sources.
Prefer silicone tubing over vinyl (aka PVC). A lot of the vinyl tubing found in hardware stores contains lead and isn't food-grade.
I bought this tubing for a gravity feed system with my Sawyer Squeeze, and am quite happy with it: Amazon Link
Be sure you get the correct inner diameter, the fittings for my Sawyer are 1/4 inch, but I know some hydration systems use 3/8.
Yes, cooler as a mash tun. My setup is:
Ball valve (https://www.amazon.com/dp/B00420WMUU/ref=cm_sw_r_cp_apa_i_oFpqDb0236QSQ)
Coleman 48qt cooler
https://www.homedepot.com/p/Coleman-48-Qt-Performance-Marine-Cooler-3000003702/206851499
Silicon tubing for transfer
https://www.amazon.com/dp/B079X3SCFV/ref=cm_sw_r_cp_apa_i_UGpqDb43MYVWT
Custom Wilser Brew Bag
https://biabbags.webs.com/
I did not bother with insulating the lid of the cooler. I simply place a long piece of aluminum foil down onto the mash. Works perfectly.
Great. I was going to add a no weld ball valve to it as well.
edit: this one actually: http://www.amazon.com/Weldless-Bulkhead-Stainless-Steel-valve/dp/B00420WMUU/ref=wl_it_dp_o_pC_nS_nC?ie=UTF8&colid=22WSWWQDSQRRM&coliid=I193MJG09G8FHZ
Here is the Amazon link I used.
The support page for the Mini has all the links to mods. To get nice prints, I had to:
You may not have to do all these things, but my printer was a train wreck.
I also put in an E3D v6 hot end for $15 off Amazon and designed a double fan to cool it. You may not need that, but the extra cooling certainly helps with small parts.
I’ll upload some pics of print quality later. I have to head to work now.
This is the one: https://www.amazon.com/Builders-Edge-130110006001-Octagon-Mounting/dp/B0041NT7D8/ref=asc_df_B0041NT7D8/?tag=hyprod-20&linkCode=df0&hvadid=198097951144&hvpos=1o1&hvnetw=g&hvrand=17773540549136269974&hvpone=&hvptwo=&hvqmt=&hvdev=c&hvdvcmdl=&hvlocint=&hvlocphy=9002254&hvtargid=pla-403882341727&psc=1
https://www.amazon.com/Home-Brew-Stuff-SS-WV2-Stainless/dp/B00420WMUU
the shank might not be long enough for a cooler. measure before you buy
Found these couplers on Amazon. Two for $4. Need to test but sofar it looks good.
https://www.amazon.com/gp/product/B018VE5YAW/ref=oh_aui_detailpage_o01_s00?ie=UTF8&psc=1
Edit: This is a better solution than the 3dprint couplers available on thingsverse that I've tried. The reason is that the printed couplers clamp on the stepper motor shaft transferring the entire load of the X axis assembly to the bottom stepper motor bearing. This new coupler, like the Malyan original, retains the two nylon washers and transfers the load to the top bearing surface which is fixed to the motor case and printer chassis.
I built one and it was pretty easy and not very expensive considering. Warning: The following instructions are probably dangerous. This is what I did, and it's to demonstrate how simple it was to make.
It's maybe two hundred bucks and when combined with an inkbird it makes biab a breeze.
I started with a 20 gallon Winware Aluminium kettle, a custom bag , ball valve, a clip on thermometer, and a couple of Aquatainers for no chill. I miss the simplicity of that setup.
Stand by:
Ball Valve
False Bottom
10 gallon cooler
False Bottom - Valve adapter
Please shop around. I have no doubt you could get some of this stuff for cheaper. I was restricted in that my only form of currency was Amazon gift cards. Especially the adapter could be built / constructed for much cheaper than I paid.
Additionally, instead of the false bottom / adapter, one could simply employ a Bazooka Screen instead of a false bottom, I have just read that false bottoms are more effective and less prone to problems.
DISCLAIMER - Always do your own research and make sure the parts that you are buying are all compatible and properly sized, etc. etc.
Having said that, the parts I listed above are exactly what I ordered and all fit together perfectly, I just needed to go out and buy a female coupler (to attach the valve to the hose from the false bottom) and a washer (per the included instructions with the valve, which had a additional washer for my configuration).
these have a 0.15 minimum :P
unforetunetely the cheapest item with free shiping is this
ASSASSIN
I ordered this one about a year ago and have used it probably about 20 times since then. I love this pot and plan on installing a weld-less ball valve on it this weekend. Like what kds1398 said, the main downside is the size if you don't have a valve because once you get 7.5 gallons of wort in it she can get heavy. The only other really minor negative I can think of is that a lot of gunk and stuff gets caught and hidden under the little lip near the top, you just have to be careful when cleaning it but it's really no big deal. I would definitely buy this pot again.
Maybe this is cheap enough wfor you?
Oh, and with free shipping included, this one
https://www.amazon.com/gp/product/B00420WMUU/ref=od_aui_detailpages00?ie=UTF8&psc=1
http://www.homedepot.com/p/Rubbermaid-10-Gal-Orange-Water-Cooler-FG1610HDORAN/202260809
http://www.northernbrewer.com/universal-false-bottom
exactly what I have, works perfectly
[This is the cheapest I can find (prime shipping)] (http://www.amazon.com/exec/obidos/ASIN/B007A5XM3K/ref=nosim/krisssoccersi-20/), I would like [this] (https://www.amazon.com/gp/product/BT00DC6QU4/gcrnsts?ie=UTF8&ref_=reg_hu-rd_add_1_dp).
So I finally put my mash tun together last weekend. I hit a few small snags that I should have seen ahead of time based on reviews of the spigot I bought!
Items
Total Cost: $76
Time to assemble: 15 minutes +- 5 minutes for testing the seal
Main suggestion - get either a false bottom or one of the short bazooka screens. The long bazooka screen is a pain to work with -- it barely fits in the cooler. I also heard there are spigots you can buy that come with a female connector so you wouldn't have to buy the coupling.
Take a close look at the instructions for the spigot - it spells out how to put it together correctly but the diagram was super confusing to me for some reason.
My primary frustration was that none of my local hardware stores had the coupling so I had to get and wait for it from Amazon. Lame!
My plumbing in the cooler sits pretty flush with the inner wall. Basically the only thing exposed on the inner wall is the nut.
We used a weldless valve for the boil kettle: 1/2" Stainless Steel Valve Weldless Buldhead and we used this video to make the counter flow chiller.
I did ice baths for a full year prior to making all this equipment. While I made great beer, I was tired of adding those extra hours to my brew day so I built this chiller. It's seriously amazing. I was able to empty 6 gallons of beer into my carboy and have it cooled to pitching temperature in about 10-15 minutes.
(And sorry for some of the potato quality or motion blur photos. I'm not a professional!)
Look in craigslist, Hit yard sales for the water cooler or Chest Cooler and a Stainless Steel Valve
I've done a bunch of 1 gallon all-grain batches (and a few 5 gallon extract batches) and want to try my luck with 2.5 gallon all-grain. I bought a 5 gal cooler and a ball valve kit, but would kind of like to swap out the barb on the ball valve for cam lock fittings to make it easier to clean.
What cam lock fittings are best for this type of setup? I'm guessing the "D Style" from looking here but it's a complete guess.
Heres an item for 18 cents (including free prime shipping)
Cheap!
18 Cents with Amazon Prime shipping. This is an interesting contest :D
If I win I'd prefer a gift card as I'm saving for some video games, but if you'd rather buy a physical item, I do have some blu rays on my lists less than $5 :)
$.18 with Prime that is if Prime is allowed.
Yes.. that is eighteen cents. Should I win.. might I nudge you twards my MP3 list? I'm trying to go legit
You can look into stainless. Can't go wrong with 304 stainless. Also since this is all pre-boil sanitation is that big of a concern. Mine was stainless. Paid a little more but for the piece of mind it is nice.
I believe this is the one I got.
HomeBrewStuff 1/2" Stainless Steel Valve Weldless Bulkhead For Home Brew Kettle https://www.amazon.com/dp/B00420WMUU/ref=cm_sw_r_cp_awd_7yz6wbRPCZK53
It is possible to capture video from an iPhone or Android using a video capture device, and something like an MHL to HDMI adapter.
The exact versions you use will depend on what you want to spend, the devices you want to use them on (especially considering the compatibility of your mobile device). Obviously this means some hardware cost, but it might be worth considering in the future if you wanted to branch into mobile games.
The $40 is worth it to get a good silicone o-ring, washer, and SS parts, in my opinion. I got this one and I'm happy with it. I just don't think you'll save enough to make up for having inferior stuff.
Apache 97438148 EPDM Pin Lug Gasket, 2" (Pack of 4) https://www.amazon.ca/dp/B01C7AKBO0/ref=cm_sw_r_cp_apa_i_13yADb5JFQX7T
Can I use these as well?
I would advise that you look into getting Premiere Pro for your video editing (it's my personal favourite), or maybe just something as simple as Windows Movie Maker if you are unsure about getting a bigger program.
As for your recording, check out FRAPS or Bandicam for PC recordings.
For console, check out any capture card or HDPVR (High Definition Personal Video Recorder).
My friend has one of these which he uses to record from his and the result is a good quality video.
For your voice recordings, take a look at Audacity which is a good free program for microphone recordings, although you will need a microphone for your computer.
Hit me up if you'll like any more help!
I have the pot you referenced in the post and KAB4 burner that another poster recommended.
Pot is decent, but you can get better one. I've used it for a year so far, got a bit of a ding on a bottom, but it's ok. It's not super thick, but I guess it makes it lighter. What I would want in a pot is the markings for how much water is there. Another thing is having a valve there to drain the wort, built-in thermometer is nice too, i do BIAB though, so thermometer sticking out can potentially damage the brew bag. The valve you can buy yourself and drill a hole/install it - something like this:
https://www.amazon.com/Home-Brew-Stuff-SS-WV2-Stainless/dp/B00420WMUU/
The burner is good, I converted it to natural gas so I don't need to buy propane and worry about it running out in the middle of brewday.
Something like this https://www.amazon.com/Saim-Stroke-Single-Pneumatic-Cylinder/dp/B06WGVLRB1/ref=pd_sbs_504_2?_encoding=UTF8&pd_rd_i=B06WGVLRB1&pd_rd_r=VS6G6H6DPZ061T4F8K7S&pd_rd_w=KWtde&pd_rd_wg=jcsqU&psc=1&refRID=VS6G6H6DPZ061T4F8K7S ?
I'm just used to pneumatic springs that require a compressor, not sure how to differentiate.
Yeah, there's a need for a more cost effective solution to this issue. I sprung for 1 cask widge just so I could ferment and dry hop loose in kegs. I would love to have a few more, but not for $40/each. Seems like the necessary pieces would be...
I think #2 may be the hardest to come up with as an off-the-shelf DIY solution.
Maybe this thing can be rigged up into something workable?
That's actually a Bayou Classic, pretty cheap, nothing special.
Ball valve:
http://www.amazon.com/Weldless-Bulkhead-Stainless-Steel-valve/dp/B00420WMUU/ref=sr_1_1?ie=UTF8&qid=1330884675&sr=8-1
Themometer:
http://www.midwestsupplies.com/weld-b-gone-thermothingy-2.html
with:
http://www.midwestsupplies.com/1-4-npt-brewmometer-bi-metal-thermometer-w-adjustable-face-weldless.html
sight:
http://www.brewhardware.com/wlsightglass/49-weldless-sight-glass-kit
The key was 3-in-1 oil with a stepped drill bit.
Just an x machine shop foreman messing around on my hobby time. If you want a custom machine and don’t want to pay upwards of $1000 contact me and we’ll talk. This unit runs $300-$550 and can handle 3”x3” -4”x6”. This can be used with a harbor freight 8 ton bottle jack or can be simply swapped for a cylinder and hydraulic hand pump. This unit your looking at is a 2.75”x3” platen setup for a 8 ton bottle. And is $300 + shipping to US states only. This is the smallest platen design I have.
Here’s a link of the $75 pid build
https://m.youtube.com/watch?v=Ra6Dn9tq7ks
Here’s a link to the 8ton
https://www.harborfreight.com/8-ton-hydraulic-bottle-jack-96648.html
Here’s a cylinder
https://www.amazon.com/stroke-Hydraulic-Cylinder-Lifting-YG-1050/dp/B00XKCXPOI/ref=rtpb_3/133-1641262-1548304?_encoding=UTF8&pd_rd_i=B00XKCXPOI&pd_rd_r=b41c9e31-aa9c-49cf-9d11-cdea7c031998&pd_rd_w=iPupi&pd_rd_wg=XIOHJ&pf_rd_p=1bcffe98-d472-4d3e-9788-8a286d2f9d88&pf_rd_r=3M22QDFM9GDNP0X8YXEN&psc=1&refRID=3M22QDFM9GDNP0X8YXEN
Here’s a gauged hand pump from dabpress
https://www.dabpress.com/products/dabpress-dp-cp390-hydraulic-hand-pump-well-paired-with-dp-hr10t35-mini-rosin-press?variant=12395302912073
Here’s a built pid from dabpress
https://www.dabpress.com/collections/rosin-accessories/products/dp-tc04r165?variant=12086243754057
There are many options and all of my presses are designed to be enjoyable to operate and maximize yields without overworking your hydraulics.
Or you could do all the work and build this press ground up with a few dimensions. I will give dimensions if you need. Just dm as it’s easier to keep track of builds.
Not sure if that would help or not. Given the price, I'm assuming plastic gears inside so that could just nuke the thing. The only one I'd trust is something like this:
https://www.amazon.com/Z-Wave-Valve-Control-Gopher-Certified/dp/B01LE84USO/ref=sr_1_4?ie=UTF8&qid=1491575025&sr=8-4&keywords=zwave%2Bvalve&th=1
Now the downside of course is its no longer DIY, but if the goal is flooding protection, spend the ~100 or so to have it properly installed.
This one only opens if it receives power. You can hook it up to a z-wave controller and trigger it that way:"...Simple two wire connection, valve largely de-energizes after opening; Returns to fully closed if power is removed..." Motorized Ball Valve- 3/4"
... or you can get one with the z-wave controller: Z-Wave 3/4" Valve Water Control
I wouldn't get used hardware. I'm just too "safe" I guess.
I did just find out that there are other capture devices that don't use HDMI-input. I don't have time to have a proper look now, but this appears to connect to a PC through USB. Any idea on the performance for this sort of device in comparison?
http://www.amazon.co.uk/Hauppauge-PVR-Gaming-Edition-Passthrough/dp/B0092P47GW/ref=sr_1_6?ie=UTF8&qid=1383085398&sr=8-6&keywords=capture+card
Minimum Setup is only 3 items
Tank
regulator
Diffuser
https://www.amazon.ca/Dernord-Teflon-Tri-Clamp-Gasket-ring/dp/B07CH6TGWV/ref=mp_s_a_1_2?ie=UTF8&qid=1541952135&sr=8-2-spons&pi=AC_SX236_SY340_FMwebp_QL65&keywords=2"+ptfe+tri+clamp&psc=1
I think you're on the right track. I've been searching for mounting block covers for siding and came across this.
I'm not 100% sure it will work simply bc of the position of the existing box and the way that cover is designed to fit over the siding. Seems like the current junction box wouldn't be centered under the cover. But at least I feel like I'm on the right track.
Thanks for the suggestion.
I've tried everything to get rid of this ridge pattern, every 4.3mm or so. It happens along the X-axis (both sides) of a lithophane box, but not the Y-axis. I tried both .1325 and .175mm height. The litho is 115x115mm. The belts appear tight. I replaced the base coupling with this flexible coupling: https://www.amazon.com/dp/B018VE5YAW/ref=cm_sw_r_cp_apa_i_w5j2CbQ95ZEE4. I replaced the heat break and nozzle. The hot end temperature looks stable at 200C, and same for bed temperature at 65C. The extruder is stock, but I dont see how it would create a cyclical pattern on one axis only. The repetitive pattern suggests a mechanical problem. Also, it appears the grooves are facing one direction in that what is a groove on one side of the wall is a protrusion on the other.
I have a second MPSM, where the lithophane prints without ridges with the same Cura profile.
I have no idea what is happening. Help.
That might be tough, but look into something like these; https://www.amazon.com/Dosing-Pump12V-Peristaltic-Aquarium-Analytical/dp/B01HRPKBAE/ref=sr_1_1?ie=UTF8&qid=1492120227&sr=8-1-spons&keywords=peristaltic+pump&psc=1
I picked up a WinWare aluminum boiling pot for $40 last year, drilled a hole in it (I think that the bit was $20) and installed a $20 valve. Since purchasing it, I've used the bit for two valves, a thermometer, and two sightglass installs.
Edit: The pot
The Bit
The valve
Holiday Deal Valve Alternative
You might be able to find better deals on Cyber Monday, though.
All you need is a drill gun and dish soap (the soap is a nice lubricant so you don't wear the bit down quickly)
I had the same problem. This fixed mine.
2pcs 3x4mm CNC Motor Jaw Shaft Coupler 3mm To 4mm Flexible Coupling OD 19x25mm (3x4mm) https://www.amazon.com/dp/B018VE5YAW/ref=cm_sw_r_cp_api_i_x2IPDb932DYNE
Nothing fancy. Inkbird PID controller off Amazon came with a type K thermocouple and SSR. I chose this heater because at some point I'll build a bigger still and the same company has 240V heaters with the same electrical connection, so it'll be a drop in replacement since the PID controller is powered by 100-240VAC. Also got the triclamps on Amazon
Hey - here is the hardware that I use to record my consoles (including Wii U) HERE
It will record anything that outputs video via a HDMI cable (or composite), and records on your PC via a USB cable and software that comes on the disc included with the hardware.
For recording your son (video/audio), he will need a camera and a microphone that can have its files eventually saved onto a PC for editing. I don't record any video of myself, but I use a Dictaphone (I paid around £80 for a decent one) to record myself talking and can connect it via USB to my PC where I join up the video (and game audio) taken from the games console and the audio (from my dictaphone) in video editing software (you can use any software that you can combine a separate audio file to a pre-existing video file).
I choose to record my Audio on a separate device, opposed to buying a microphone to record audio directly on my PC, as my PC is quite slow and does struggle to record both the game video and audio at the same time. Might be something to take into consideration if your PC is quite old.
I hope that helps :) however, as someone else has stated here, Nintendo get really funny about people uploading their games to Youtube. Technically Youtube stipulates that you can upload game footage as long as someone is talking over it and the commentary adds educational or instructional value to the game - a lot of people would argue comedic commentary also fits into this legally.
I would stay away from that starter kit. Not because its bad per se but its not worth 180 bucks. And I prefer plastic buckets over glass carboys. If you want you can convert a cooler to a mash tun but I would start with BIAB and you then can increase the complexity of your system as you see fit.
Here is my recommendation of equipment. I am function over form driven when selecting my gear. I find that these items serve their purpose at a reasonable price and are of good quality and unless you want to start doing 15 gallon batches they should serve you well.
Starter Kit
KAB4 Burner
44qt Pot with basket
Ball Valve for Kettle
Thermometer
Bag for BIAB