Best technical drawing supplies according to redditors
We found 84 Reddit comments discussing the best technical drawing supplies. We ranked the 51 resulting products by number of redditors who mentioned them. Here are the top 20.
We found 84 Reddit comments discussing the best technical drawing supplies. We ranked the 51 resulting products by number of redditors who mentioned them. Here are the top 20.


pretty sure that's a General Tools compass. I have one too.
https://www.amazon.com/General-Tools-842-Precision-Compass/dp/B00004T7R7/ref=sr_1_8?ie=UTF8&qid=1503879391&sr=8-8&keywords=compass+pencil
Yeah they do
https://www.amazon.com/General-Tools-842-Precision-Compass/dp/B00004T7R7/ref=sr_1_8?ie=UTF8&qid=1503879391&sr=8-8&keywords=compass+pencil
Draftsman and students use entirely different compasses.
Students use this:
https://www.amazon.com/Westcott-Bearing-Compass-Pencil-Nickel/dp/B00DUXMN0E/ref=mp_s_a_1_2?keywords=wescott+compass&qid=1567393559&s=gateway&sprefix=wescott+c&sr=8-2
Draftsman use this:
https://www.amazon.com/Mr-Professional-Diameter-Geometry-Precision/dp/B07MJVSB7D/ref=mp_s_a_1_3?keywords=drawing+compass&qid=1567393713&s=gateway&sprefix=drawing+&sr=8-3
Hey, I was checking pictures of the components and I noticed it was just a regular wooden compass, so why don't you get a normal compass?
Like this
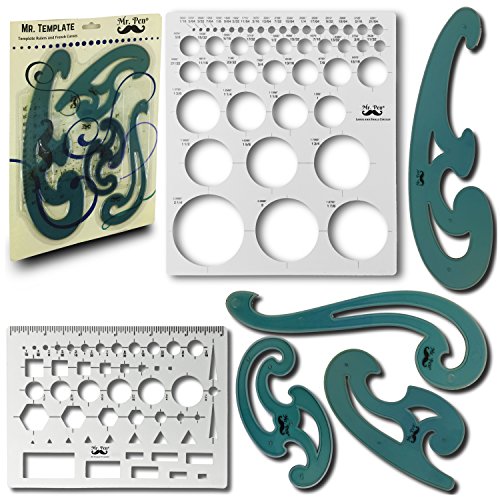
I don't know anything about tapestry weaving, but would you be able to use a French curve ruler to help pack in the weft? I know I've seen similar things (Not sure what to call them) for floor looms used to give a similar result, so perhaps they'd help. I'm talking about the green rulers in a package like this - https://www.amazon.com/Mr-Template-Stencils-Templates-Journaling/dp/B073RR8LFY/ref=sr_1_4?s=arts-crafts&ie=UTF8&qid=1549420374&sr=1-4&keywords=french+curve
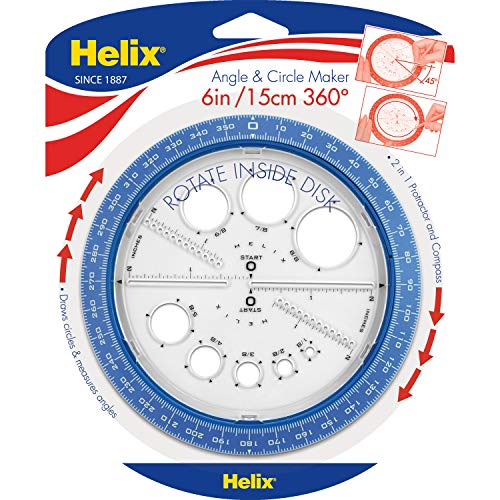
It’s this! Helix Angle and Circle Maker (36002) https://www.amazon.com/dp/B0044S5CZM/ref=cm_sw_r_cp_api_q1.ZAbTACXDBX
Looks like you got a nice smooth finish on there-- not bad for an airbrush noob. 8)
One piece of advice for wheels with rubber tyres is to paint them in reverse order, and separately from the hull. You can paint the edges a dark rubber grey color and then use a circle template (like this: http://www.amazon.com/Staedtler-Combo-Circle-Template-977/dp/B000KIBQ46/ ) to mask off the dark tyres and just airbrush the wheels one at a time and save yourself some fiddly brush painting. It's not perfect and you might have to tidy up a little afterwards with a fine brush, but it saves a load of time, especially if you're kind of a shaky brushpainter like I am... It gives you something like this:
http://i.imgur.com/K7D6gQg.jpg
Isn't airbrushing great, though? Post more progress pics as you go, if you get a chance.
It's great that you've been practicing these for a couple months already and overall I'd say the main area to focus on should be getting that consistent ellipse form with a smooth round end and a subtle curve on the sides. Some of your ellipses are flattened on the ends and some others lose that curve and become straight on the sides instead of subtly curved. This is all expected when starting out and to really get good at ellipses it'll take months upon months of regular practice.
The upper 3 columns are your strongest for sure so what I'm saying about shape mostly pertains to the lower 3. Also in some areas watch for the minor axis moving off course - if you aren't rotating the page slightly as you move down this will naturally happen.
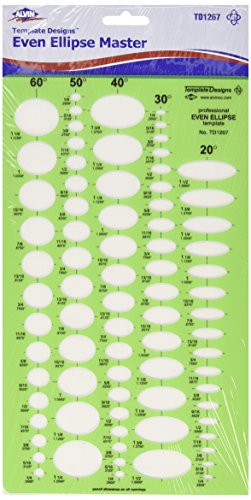
To nail down the the shape just keep practicing but also I think buying an ellipse guide like this https://www.amazon.com/Alvin-TD1267-Ellipse-Master-Template/dp/B000KNPX2M/ref=sr_1_2?keywords=ellipse+template&qid=1566888566&s=office-products&sr=1-2 or even printing off your own the use as a reference will really help. When doing the rows of ellipses exercise for example I'd pick a degree that I struggle with (your small degrees look better so try going larger like 30-70 degrees) draw one of the template ellipses (or just trace from a printed sheet) as your first ellipse at the start of each row. When you're working then you can compare your ellipses to the example and see what's off.
Lastly, thinking of drawing ellipses as a set of distinct yet interdependent skills helps assessing the quality objectively so I'd suggest breaking it down into these skills when setting goals and doing specific exercises:
Skill 1) Drawing a true ellipse shape: i.e. looks like what you'd see from an ellipse template - not too flat ontop/bottom, ends are round not a sharp point, no symmetry issues). Smaller degrees tend to be easier to do wellI find but the closer you get to a circle the harder it is to do well, especially when larger than an inch or two.
Skill 2) Placement pt1: aligning the minor axis. If you're drawing a correct ellipse shape (1) then you can easily tellif your ellipses are aligned by finding the major axis (end to end) and see if the perpendicular is lining up.
Skill 3) Placement pt2: getting the degree right. This take experience placing ellipses inside of squares andknowledge of perspective grids which I won't get into here but to actually use them this final step along with (1)and (2) will make your ellipses usable in perspective drawings. Your exercise here doesn't cover it but others can.
Skill 4) Line quality: I put this last since it's something you always will want but it takes tons of repetition and timeto do clean ellipses again especially true for larger ellipses with a larger degree. For the most part just keep this in mind and gradually work to improve over time w/o letting this get in the way for everything else
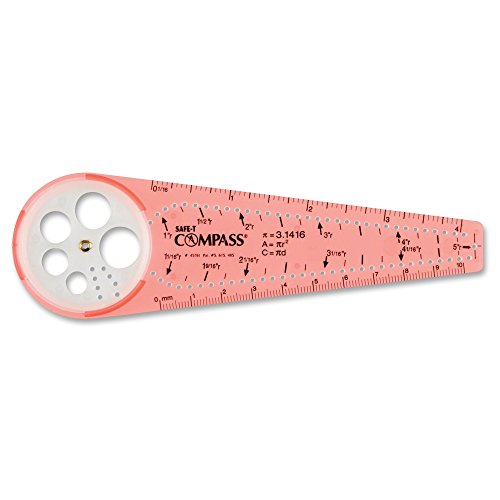
Just use a safety compass.
A notebook and a pen. Dotted will make your life easier, because if you choose to draw lines, you won’t have to measure.
The ruler for me is overkill, because I use whatever is at hand to make straight edges if I don’t freehand it— a visiting card (ha, they still exist), the edge of an envelope or a post it stack. But I do like the circle maker, and you may want to invest in one eventually, if you make my kind of a bujo.
What is essential though, is to go in with some rules. What are you going to do for the first month? When it doesn’t work, the rules can change, of course, but the bullet journal inspirational sources can be overwhelming and intimidating and a lot of not sinking is not doing everything at once.
Like /u/lilin_unite42 I have a limiting rule that makes my life easy: no spread of mine must require more than one pen, and must not require any tools to fill. I use more than one pen, and I use other stuff, but I didn’t want to be forced to carrying paraphernalia everywhere (because if I decide that this must be filled in red and that in black, then I’ll get antsy if I don’t have both on hand for when I need them).
Edit: inserted link
here's one, but for the price they're asking you might as well just learn to draw basic geometric figures.
I've been self teaching myself up until this coming January, when I'll be taking on a graphic design minor. A few things that I use that I happen to really enjoy are:
I hope this helps you!!! Good luck in your studies.
https://www.amazon.com/MYLIFEUNIT-Stainless-Drawing-Compass-Geometry/dp/B00ZFAYAVA/ref=sr_1_8?ie=UTF8&qid=1478978397&sr=8-8&keywords=compass
Makes perfect circles w/out effort.
You can practice with USGS 1:24,000 scale UTM maps (also known as 7.5 minute scale), but you will need a protractor in that scale: https://www.amazon.com/dp/B003NAOERO
UTM is the same as MGRS except for the 100,000 grid square identifier. UTM just uses numbers instead of two letters.
https://ngmdb.usgs.gov/topoview/ is a good source of historical maps, once you figure out the map name for the location you want, you can search for a more up to date PDF version on data.gov or buy a paper copy on the USGS website.
Another good site is https://www.topoquest.com
​
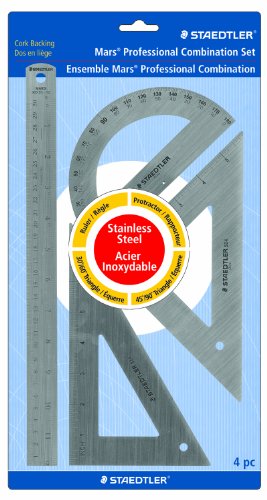
Look for drafting supplies. Just do a quick search on Amazon.com and find some kits. Mechanical pencils get a thin and a thick for different line weights, or pens if he prefers but I make to many mistakes to go with ink. Triangle scale rulers are awesome and in my mind a must.
https://smile.amazon.com/Alvin-BDK-1E-Beginners-Drafting-Engineers/dp/B000JM47FS/ref=sr_1_3?ie=UTF8&qid=1481911877&sr=8-3&keywords=drafting
https://smile.amazon.com/Staedtler-Combo-Circle-Template-977/dp/B000KIBQ46/ref=pd_sim_229_2?_encoding=UTF8&psc=1&refRID=HDZAG4H645K0RBS0WTGD
https://smile.amazon.com/Staedtler-Drafting-Mechanical-Pencils-925WP3/dp/B000GR7SUM/ref=pd_sim_229_1?_encoding=UTF8&psc=1&refRID=HDZAG4H645K0RBS0WTGD
Found it. $36
https://www.amazon.com/Coates-Giant-Willow-Charcoal-Stick/dp/B06Y68H6YD
Another thing, don't buy a rotary hand punch, they're junk. Just order a 3/16" drive punch, way easier to line up as well as easier to get through the leather. 3/16 will fit chicago screws and the belt prong holes.
http://springfieldleather.com/16280/Punch%2CDrive%2CRound%2C1.8mm/
Also, make a template before punching leather... layout your hole pattern on a piece of paper or thin cardboard first using rulers and maybe a circle template like this
http://www.amazon.com/Staedtler-Combo-Circle-Template-977/dp/B000KIBQ46
After that, I punch the template, then affix it to my leather and punch lightly enough to transfer the outline of the holes to my belts, remove the template and punch the rest of the way through each one. This way, no trying and hoping you are centered on your lines, no lines on the leather to worry about, and you now have a template for future belt making.
This is the template I use, printed at 100% scale:
https://docs.google.com/file/d/0B-1sola8GX95ZHk5Sm5SM29fSmc/edit?usp=docslist_api
One half is the buckle end, the other half is my 9 hole pattern for the other end.
Makes this on the buckle end: http://imgur.com/egDhtVm
Honestly, if I have to draw an actual perfect circle, I use a circle template like this one. I've got three or four of these lying around of different sizes leftover from when I was taking drafting class back in high school. If I didn't still have them I'd just shell out for a compass. Same thing when I have to draw a straight line that's actually, perfectly straight: I use a ruler.
It's not really that often I have to draw perfect circles or lines, though, so when close enough is good enough the principle is the same: practice doing it in a single, quick stroke, and draw from as high up your arm as you can.
Oh I'm a shameless cheat. I use this thing. Thanks so much for the advice and feedback! I forget that vowels can act alone even if they don't start off a word.
Helix 360 Degree Angle and Circle... https://www.amazon.com/dp/B0044S5CZM?ref=ppx_pop_mob_ap_share
Oh ok, I gotcha now. Pick up one of these bad boys. You can get them for cheaper at a place like Staples or OfficeMax, around $3 at those stores versus Amazon's for $6. The outer ring spins, once you find the angle of line you want draw the line using the spaces on the inner solid part. I use this when plotting on a map and for other stuff.
https://www.amazon.com/Helix-Angle-Circle-Maker-36002/dp/B0044S5CZM/ref=pd_lpo_vtph_229_bs_t_1?_encoding=UTF8&psc=1&refRID=VFMM9CEQY9T7NY0YRMRC
Yeah! Basically any size circle you want within 6 inches/15.2 cm :) The smaller ones are a bit trickier since you can't use the rotating part, there's just different-size stencils in the plate instead. Link to the helix
www.amazon.com/dp/B003OBFECG/ref=wl_it_dp_o_pd_S_ttl?_encoding=UTF8&colid=CPH0TQ7V8C2E&coliid=I3HOF054KYY8CN&psc=1
Comment auto-removed by Reddit. Try like this: http://www.amazon.com/dp/B003OBFECG/
This isn't the cheapest, but the dubbed "toilet template" is always a fun one to show.
I'm enjoying seeing everyone's stuff.
A set of french curves might be useful for drawing machined items that have long, gradually curving lines.
You can see the point in the center where a compass was most likely used in conjunction with a protractor:
buy a set for yourself
Scott Robertson: How to Draw? Great book if so :)
Yeah, the ellipse templates are very expensive, $110 US for a set of small for me, almost $200 for large. Same with the equal space divider I saw him use in one of his videos. I found one for $300 lol (didn't buy it).
Sweeps are quite pricey for what they are too imo. The only place I know is a UK site here, but they're called 'curves' or 'french curves' rather than sweeps. Maybe searching for those terms instead would help.
Like I say though, the ellipses are helpful, but not necessary. You can do the grid plotting with ellipses exercises digitally and save yourself a good $100 - $200. Most grid building in the book doesn't use them, and once you learn what a cube looks like, you can do it without anyway. I used them for maybe 1 week out of the 6 months I spent with the book.
The oval template you're looking at is only for 45 degree ellipses. It might get you in to a habit of drawing the same grid over and over again, which sort of defeats the objective of the book. Its philosophy is lots of different types of grids where you have full control over what they're made up of.
Alternatively, what about something like this, or maybe this.
If you got both, you wouldn't need your ovals anymore (they're 45 degrees), and you'd have 60, 45, 50, 40, 35, 30, 25, 20. Not a full set of 15 but pretty darn close for about $15. They'd be quite small on the page though, but probably enough to learn with.
Edit - $15 for this one. Even more selection. I think that's about as close as it'll get to a full set. These are small compared to the ones linked above though. I think I'd prefer the ones above even though you lose the 55, and 15.
I accidentally posted the plastic triangles. The stainless steel ones are only $5 more.
Get these instead.
http://www.amazon.com/Staedtler-Combination-Stainless-Steel-56632BK/dp/B00279H3ZW/ref=pd_sim_229_5?ie=UTF8&dpID=51e7haXeHlL&dpSrc=sims&preST=_AC_UL160_SR85%2C160_&refRID=03P1BAXT9N2ZYVHE678V
The official stencil is 75 with free shipping on Amazon
Not sure what you're exactly looking to use it for lol
I've gotten by just fine on a Helix and pocket engineering scale.
You could probably cut this up and match it what you need https://www.amazon.com/Pickett-Circle-Radius-Template-1202I/dp/B002JVI1IQ
or here's some paper you can print
http://tablepadshop.com/how-to-measure/
they've got these things you could print out on paper and cut out if you want http://tablepadshop.com/wp-content/uploads/CornerRadiusChart1.jpg
Something cute to look at.
Here are a couple things from my <$8.00 (default) list that would be helpful.
Item 1 and Item 2. Both would be super useful for my current projects.
A set of dividers. Starrett are the best but not sure about your budget.
These would probably be good: https://www.amazon.com/gp/aw/d/B0779R5FCJ/ref=sspa_mw_detail_1?ie=UTF8&amp;psc=1
You can never have enough of these because you can “save” measurements.
Gotcha. Does it stretch or move a lot when you cut it?
Yeah that’s not the best way to mark stitching lines so I recommend a wing divider. This will be cost effective and will help tremendously with your stitching.
I bought these two when I started and still use them.
https://www.amazon.com/dp/B0779R5FCJ/ref=cm_sw_r_sms_c_api_i_A727AbF4N33A3
https://www.amazon.com/dp/B014549SNG/ref=cm_sw_r_sms_c_api_i_a827AbKEF359B
They work great for me and will eventually upgrade to some quality tools like KS.
Looks neat, something I'd really be interested in. The one review on amazon is kind of poor though, have any comment on the accuracy/fragility as noted in the review? I know it's only $4, but it'd be nice if I didn't have to buy a new one every six months. ;-)
http://www.amazon.com/Helix-Angle-Circle-Maker-36002/dp/B0044S5CZM/ref=sr_1_1?ie=UTF8&amp;qid=1342221109&amp;sr=8-1&amp;keywords=HELIX%C2%AE+Angle+and+Circle+Maker
This is the type of protractor I'm talking about:
http://www.amazon.com/Improved-Military-Reader-Protractor-Super/dp/B003NAOERO In case you assumed it was a heavier metal protractor. I've used it a few time to mark and return to campsites, hard to find trails since with a good topo map you can pinpoint a 10m^2 area.
I tore the core out of the 550 cord a while ago, should have mentioned that.
The calamine lotion is in a 3oz bottle
The iodine is because some infections can develop in hours, not nearly enough time to return to civilization. If I could get broad spectrum antibiotics I would carry a 3 day supply with me as well. I will look into something that can function as a antiseptic and back up water purification.
The tourniquet can be applied with one hand, and you can apply the tension in increments so that you can apply the ITB(which is a pressure dressing) over the wound and maintain a distal pulse, or if needed you can eliminate the distal pulse entirely. When I say 3 packs of gauze, I mean 3 rolls, 3" wide with a 1" diameter.
Yeah, I imagine sticks or a rock would work for digging waste holes and I'll look at my actual usage of clothes and compare it with what I carry, I suspect you're right and I'm carrying too many.
I bought a nice Staedtler set from Amazon including a ruler, protractor, and triangles with the cork bottom. So far they've worked pretty well with my dryer fountain pens, particularly the Lamy 2K.
First step is to figure out the scale of the map - How big is the place?
Second step is to choose the style you want to go in.
Third step is to practice on a separate bit of paper the artwork you are going to create, random mountains, forests, etc.
Note that in a perspective map the items in front can partially hide items behind them. If you have a very large map, then the symbols can be very small and still convey what is happening with the terrain.
Example: http://i.imgur.com/9aQF8YL.png
And of course there is the Classic Tolkien map
So start at the bottom and work you way up so that you do not have to paint over or draw over things.
Have small grid lines in a light distinctive color so you can keep things lined up and straight. (or else use a ruler) One of the reasons graph paper is blue is because the light blue can be filtered out, leaving only the black lines of the artwork.
Drawing by hand, an old school French Curve is great for drawing smooth curved line. for example
https://www.amazon.com/PARTH-IMPEX-Plastic-Drafting-Template/dp/B06WP8J9JL/
Do not just do tho obvious things, also mark locations of legendary events that can be used to drive players nuts "Rumored site of XXXX"
Buy a stencil! They sell them on Amazon.
Here is one.
I even use a circle maker for my power sources.
https://www.amazon.com/dp/B0044S5CZM/ref=asc_df_B0044S5CZM5443197/?tag=hyprod-20&amp;amp;creative=394997&amp;amp;creativeASIN=B0044S5CZM&amp;amp;linkCode=df0&amp;amp;hvadid=167136703436&amp;amp;hvpos=1o4&amp;amp;hvnetw=g&amp;amp;hvrand=5585320991790148940&amp;amp;hvpone=&amp;amp;hvptwo=&amp;amp;hvqmt=&amp;amp;hvdev=m&amp;amp;hvdvcmdl=&amp;amp;hvlocint=&amp;amp;hvlocphy=9052790&amp;amp;hvtargid=pla-311251556309
They are to hold the leads. (There's one in the jar bottom right)
Edit: look at this higher end one- point on one side, flip it around to the lead holder to draw.
Super cool, I might order some of these made. Right now I'm using something similar to one of these, which is a bit cheaper and has more sizes, but it'd be nice to have something heavier duty for my commonly used sizes.
found a similar one on amazon
Did you know Amazon will donate a portion of every purchase if you shop by going to smile.amazon.com instead? Over $50,000,000 has been raised for charity - all you need to do is change the URL!
Here are your smile-ified links:
If you want to go really hardcore...
---
^^i'm ^^a ^^friendly&nbsp;bot