Best wood filler according to redditors
We found 95 Reddit comments discussing the best wood filler. We ranked the 44 resulting products by number of redditors who mentioned them. Here are the top 20.
We found 95 Reddit comments discussing the best wood filler. We ranked the 44 resulting products by number of redditors who mentioned them. Here are the top 20.


I've actually used these before with pretty good results in a similar situation (rental home).
https://www.amazon.com/Guardsman-Wood-Repair-Filler-Sticks/dp/B0057IV5PY
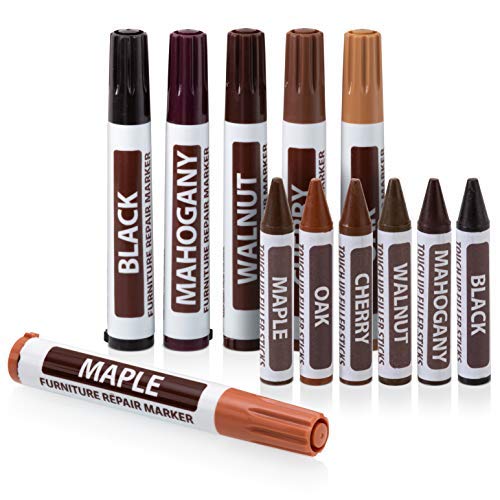
Guardsman Wood Touch-Up Markers - 3 Colors - Touch-Up and Repair Scratches - 465000 https://www.amazon.com/dp/B007WC0X38/ref=cm_sw_r_cp_apa_WIxYAbJ2Z00SY
Use the lightest color first, then blend the next darkest shade in until you can't notice it. Then just hope no one notices it.
Model by youngs66 on thingiverse: https://www.thingiverse.com/thing:1753445
Printed with Hatchbox PLA at 0.16 layer height on my Ender 3. Whole project took about 3 weeks, but I couldn't be happier with the resultsModel by youngs66 on thingiverse: https://www.thingiverse.com/thing:1753445
Printed with Hatchbox PLA at 0.16 layer height on my Ender 3. Whole project took about 3 weeks, but I couldn't be happier with the results
Edit: thought I'd give a more complete outline of the process since people seem to be interested:
Printing
As stated above, this model was printed on my Ender 3. I actually have two Ender 3's, but I stuck mostly to using one due to a lack of filament. The whole thing took about 1 and 1/4 rolls of filament (in my case about 1.25kg). I printed in black Hatchbox PLA using Cura 4.3's new creawesome settings with variable layer height. Most of the files were printed with supports, which I actually found difficult to deal with (as always) and I ended up having to use a brim on every print to make sure some of the larger support towers didn't fall over. My first step was calibrating my printers. I made an iron Man helmet a couple months back and it didn't fit together quite right, so I wanted to make sure that I had my printers properly prepared this time. The model itself was scaled to 94.4% of its original size although in hindsight I should have given more clearance for my big head because Its almost impossible to put on and take off. I don't have an exact figure for the total print time, but it was probably close to 120 hours, most of which were overnight. The hardest part was keeping my bed leveled throughout the whole project. I got to a point where I leveled it before every print, which I know is a good practice, but it's still annoying to have to do without any sort of ABL.
Sanding/Assembly
I started sanding the individual parts as bare plastic with 80 grit sandpaper, then moved up to 100 grit, and then got bored and jumped to 400 grit. All in all I could have used to do a little more sanding because the layer lines are still visible in some places, but it is what it is. After sanding to this point, I assembled the whole thing except the eye pieces using cyanoacrylate. This didn't actually take that long because cyanoacrylate sets pretty quick, but it was still quite a process making sure everything lined up correctly. After it was assembled, I filled in any unwanted seams with wood filler and sanded them down with the same process I used on the rest of the model. After I was happy, I wet sanded the whole thing with 1000 grit sandpaper to give it a super smooth finish. I then applied a few coats of filler primer and wet sanded again with the same grit sandpaper as before. The lenses of the helmet were cut from a piece of transparent red cast acrylic I found on Amazon. It came with a paper backing on both sides to protect it, so I used that to draw the circles I wanted to cut as well as to draw the grid pattern with pencil before I made anything final. I probably could have made the grid better by using geometry or something but I didn't feel like it so I used a ruler and eyeballed the rest. I drew it on the paper in pencil first, and then went back (still using the ruler) and went over my lines with a hobby knife.
Painting
I started painting with a coat of the base gray color. Once I was happy with the finish, I masked basically the whole helmet to paint the gold parts, which was a pain, but I think it would have been more difficult to mask the recessed areas had I chosen to do the gold first. I still had the eyepieces separate and hadn't yet installed the lenses. The bright silver color was done by hand because I figure that would be easier than more masking, especially with the details and tubing. After I was happy with my base paint job, I went back with the silver and did some dry brushing on edges and corners to make it look a little worn.
Electronics
The electronics were by far the easiest part of this project, although there are thing I would change if I were to do this project again. The whole thing is really as simple as a red LED strip hooked up to a 9v battery. The LED strips I used are linked below, although I would recommend not using them for this purpose. They've got a water proof coating across the LED side of the strip that covers all of the contact points so it's pretty much impossible to connect to a strip you've cut. I had to use the LED strip from the inside out and make it one continuous strip across both eyes. The battery holder I got had a switch on it, so that's convenient. After I had it all hooked up, I installed the lenses into the eyepieces, the eyepieces into the helmet and then stuck the electronics in with some cyanoacrylate just to be sure it wouldn't fall out, the battery is held in the front of the mask by some masking tape (I know, not the most glorious solution)
Links
Model: https://www.thingiverse.com/thing:1753445
Sandpaper: https://www.amazon.com/dp/B07MXB5M5K?ref=ppx_pop_mob_ap_share
Metallic Gray Paint: https://www.amazon.com/dp/B00681T1UU/ref=cm_sw_r_other_apa_i_dDNTDb3JRFXTB
Gold Paint: https://www.amazon.com/dp/B0006N6RA8/ref=cm_sw_r_other_apa_i_3DNTDbKYMM9VC
Silver Paint: https://www.amazon.com/dp/B004GJDUN0/ref=cm_sw_r_other_apa_i_YHNTDbWPQ9P83
Wood Filler: https://www.amazon.com/dp/B001733MIG?ref=ppx_pop_mob_ap_share
Red Acrylic: https://www.amazon.com/dp/B006FLYIYM?ref=ppx_pop_mob_ap_share
Red LED strip (again, I recommend a different option): https://www.amazon.com/dp/B01HRMPBQQ?ref=ppx_pop_mob_ap_share
Battery Holder: https://www.amazon.com/dp/B07HQ5RT7Z?ref=ppx_pop_mob_ap_share
Hope this helps!
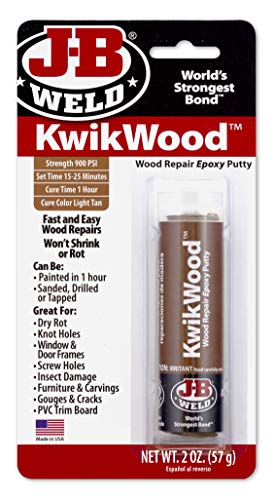
Fill the entire hole and area with some kwik wood epoxy (not wood filler) and let it set up per the directions (I want to say an hour?). Re-drill the hole for the strike plate and screw into it.
Push pin holes are easy to fix and hardly noticable. I doubt you would even need to paint, and if so, it would a tiny dot of paint. Unless you're looking directly at it, you wouldn't know that there used to be a hole there.
Lemme find the product:
https://www.lowes.com/pd/3M-Nail-Hole-and-Small-Hole-Repair/50199661
I don't like that product as much as a previous product that had a nice angled tip. I can't find the angled tip product any more. Lemme check Amazon.
Oh, this is close. Get this stuff instead: https://www.amazon.com/Amazing-GOOP-310010-Filler-Adhesive/dp/B000PI7TVK/ref=sr_1_6?ie=UTF8&qid=1484318989&sr=8-6&keywords=nail+hole+filler
What happens is you squeeze a bit into the hole through the center of that large tip, and then you pull down, effectively wiping off the surface but leaving the filler in the little hole. Works great.
It works really well. I would recommend using like a 220 grit with it though. I usually do a 120 grit sand on a .2 layer model before I do any fill.
It does dry kinda fast though, so I would do a pass or two and leave it alone.
If you keep messing with it as it dries, you will start pulling it up and causing it to clump. Kinda like bondo does when it starts to cure.
Then I use the plastic wood for seams and any imperfections ect.
Sand the whole thing down with 220.
Then do a coat of filler primer sand with 220 repeat till you are happy, then paint.
epoxy putty like milliput or green stuff or even JB Weld. First use a bit to make an imprint of the pattern of the plastic (use some plastic wrap so it doesn't stick to the car, or if you're a pro, use a mold release agent, or vaseline on the car part, press the putty on the plastic and let it harden) then fill the hole with some of the putty and use the pattern mold you made to press it flat.
Should come out pretty close. You may need to remove the part to put tape behind it to help keep the putty from squishing through the holes too much.
I guess I could provide a guide for my palm rest
Supplies needed:
 
Instructions:
Okay so It's a pretty labor-intensive process, so be forewarned
I didn't want to just draw the parts by hand because I wanted the shield to be game accurate, so I took this picture and had it printed on a poster at my local staples, I used the largest poster size, so this was about $20. I then cut out the entire shield from the poster to draw the base, and cut out each of the detail pieces to trace.
I cut and sanded everything with a multi-use dremel. The wood that I used was 1/4 inch birch, which is easy to cut and sand. I got a big sheet at home depot, and I ended up only using half. (I might use the other half to make the Master Sword Scabbard later this year) I would recommend using 3/4 inch wood or layering more pieces than I did, because my shield doesn't have anywhere near as much depth as I would like.
So I cut out the smaller shield pieces for layering by tracing the large shield piece, then taking a 2-3 inch block of wood and running it around the inside edge of the first trace. I made sure the three pieces were centered on top of each other before supergluing them together.
I filled spaces on the layered shield with wood bondo, sanded that down as smooth as possible, then filled all the little holes with wood filler, of course you have to sand this too. Then I painted it with this, but you can use a lighter shade if you want a different look. Finally, I covered the whole thing in newspaper except for the little parts where the border shows through (the silver triangles) and I painted those silver.
For the border I cut the border out of the poster and traced it on the birch, cut it out with a dremel, then cut it into sections and sanded it down. I laid it down on top of shield base (after I had filled it in with the bondo) and filled the gaps between the border parts with bondo. What this does is reconnect the border pieces in a curved manner that perfectly fits on the base. When the bondo dries, add more bondo on the reverse side of the border to strengthen the connection. Then you can sand it down smooth. Spray paint that shit silver and you're good.
For the triforce, pointy decals, and bolts for the border, I cut them out of the poster, traced them onto particle board, cut them out and sanded them to look 3-dimensional. I painted them, and that's that.
Attach all the pieces together using wood caulk. The last step is adding Hylia's Crest, which was frustrating to figure out at first. What I ended up doing was cutting out the details from the poster, tracing them onto this and cutting them out. These decals were a little too pink for me, so I painted them with this glossy red paint. Finally I peeled off the backing and stuck them on the shield.
To hang it up, I pounded some small nails into the back and hung a metal wire between them.
Thanks for your interest. I'd be happy to answer any other questions you have!
Look in the wood working supplies and get a hard wax filler stick. Here is an example at Amazon. You can warm up the wax with your fingertips and get it pliable.
Fill in the holes and polish off any excess with a soft cloth.
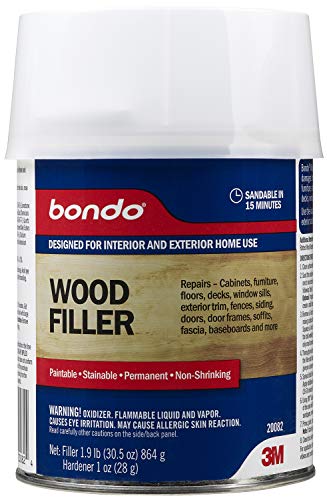
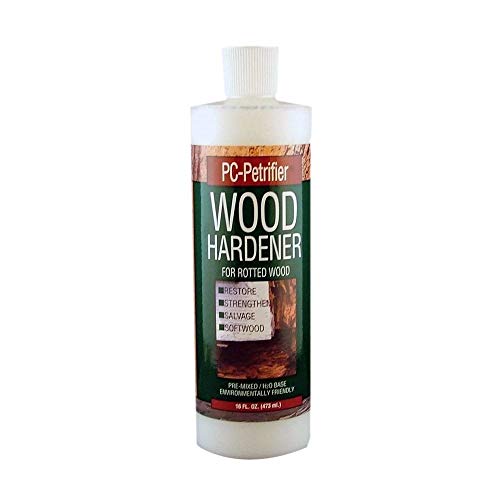
Before you tear anything out, buy some PC Petrifier Wood Hardener and PC Woody epoxy wood filler. Remove the paint, drill some holes in the rotted sections and let them dry thoroughly. Apply the hardener with a paint brush making sure to soak it in as much as possible. Once it dries, the wood will be solid. Fill the holes and missing wood with the wood filler, then repaint. Good as new!
https://www.amazon.com/Products-164440-PC-Petrifier-Water-Based-Hardener/dp/B00081FW1I/ref=sr_1_1?keywords=pc+petrifier&qid=1567970132&s=gateway&sr=8-1
https://www.amazon.com/Protective-Coating-083338-Woody-Epoxy/dp/B00CAG4GGG/ref=sr_1_2?keywords=pc+woody&qid=1567970161&s=gateway&sr=8-2
I remember buying some clay-like stuff, for the woods scratches etc, and there was a pen that followed with it. Now, I am not the most artistic, but I somehow matched the shade and the color, and after a few weeks of just staying there, it blended in eventually. It is still visible, but not eye-popping, you have to literally squat down and see it. I’ll try to find that thing. And because it’s a little scratch, it’s not worth to change the planks because of it.
EDIT: This is the closest thing I could find. Obviously not ideal, but if you have that artistic side or can work with colors, I believe you’ll make wonders with it! ;)
Glue+sawdust and get some of these; https://www.amazon.com/Ram-Pro-Total-Furniture-Repair-System/dp/B075ZZXB8K/ref=sr_1_1?ie=UTF8&qid=1523812019&sr=8-1&keywords=wood+crayon
It's just a material that I thought would not stick to a wood based putty, and allow for the putty to be shaped like the wood on either side of the repair, when rubbing it back and forth. No heat. Or the rubbing is the heat, if you insist.
I would try the teflon with this product. https://www.amazon.com/FamoWood-40022126-Latex-Wood-Filler/dp/B001733MIG Let the putty sit, after pressing it in the repair, a minute or two, then run the teflon back and forth across it. If you get good at it, your repairs may require only a little sanding.
Because the wood putty has wood flour in it, the Teflon sheet might work better with the putty if you sprinkled some household flour on it, oddly enough. Both are plant based products.
I generally achieve this by using "green stuff/kneadtite" (or more typically for weaponry...) milliput and sculpting the weapons.
I feel like actual wood might not be as durable as I'd prefer for regular tabletop use, especially if you have players that haven't been taught to be gentle with the miniatures or if you don't have a case for transport purposes. It should hold paint alright tho...but to be fair I've only ever used it for an actual basing material.
Came here to congratulate you as the proud owner of a homemade spoon! /j
By the way, how do you feel about burning a drawing of sorts into your pipe?
Wood engravers (or fancy pants pyrography pens) are pretty cheap, for example, this is the [Weller HK1] (http://www.amazon.co.uk/Weller-Woodburning-and-Hobbyists-Kit/dp/B000X8I86C/ref=sr_1_1?s=diy&ie=UTF8&qid=1412626603&sr=1-1&keywords=woodburning) I use.
Hit it, Price Zombie!
http://www.amazon.co.uk/Weller-Woodburning-and-Hobbyists-Kit/dp/B000X8I86C/ref=sr_1_1?s=diy&ie=UTF8&qid=1412626603&sr=1-1&keywords=woodburning
> Timbermate wood filler is the shit and blends really well if you get the right kind.
This stuff looks better than the Elmer's Probond Stainable Wood Filler that I've been using.
It seems like the Timbermate color that is the closest match to my window trim is the Mahogany Hardwood color. Do you recommend that I still stain the Timbermate filler, so that it blends in better with the surrounding wood?
I've had success with https://www.amazon.com/21506-Plastic-Wood-Filler-16-Ounce/dp/B000BQYI24/ref=sr_1_7?ie=UTF8&qid=1485477785&sr=8-7&keywords=wood+filler
The Lack coffee table won't stand up to much abuse. Coasters are imperative ... getting it wet at all more than a quick wipe-down will ruin it if you have any scratches or nicks in the surface. It is solid and will stay together, but the finish is laminate over particle. If you get a scratch or a nick, use the wax crayon type of thing to fill/color it in immediately, like these: http://www.amazon.com/Guardsman-500300-Filler-Sticks-Shelf-Tray/dp/B0057IV5PY
Don't use sharpie or the markers they make to cover scratches. Those don't keep out moisture. My Lack coffee table would have lasted a lot longer if I'd figured this out sooner. I recycled it into a window bench/cat bed by covering the ruined top with an upholstered cushion.
Oak grain filler for cabinets. People use this but there are others available too. The best thing to do is test your process on one or two doors first and see if your system works. Cabinets are all about the prep work. Good luck!
Not OP, but Bondo is pretty common. However, you should wear gloves and a respirator when working with it.
I personally prefer wood filler. It's cheaper, and safe to work with your hands.
This should help.
https://www.amazon.com/Mohawk-Fil-Stik-Furniture-Cabinet-M230-1250/dp/B00WQ47N1M#customerReviews
^^ check the above product out.
if you glue to the substrate you're fine. you are essentially just making plywood. i do recommend that you add another layer, could be anything, on the bottom. plywood works best with odd number plies. even with stuff like these pics it's considered veneering - but i know what you mean. thicker stock can be used as veneer a lot easier than the thin sheets if you don't have a vacuum press.
if you build like your pics (with that recommended bottom layer added) i'd also recommend a good grain filler. timbermate is great for this. this will buy you a ton of forgiveness on your lines in case your cuts didn't come out perfect (almost a given for this type of pattern honestly) and will give you a nice slick finish surface. just make sure you are only sanding after you grain fill - timbermate is silica (think sand) based and will wreck a blade with a quickness. it doesn't shrink back the way other fillers do, which was a big factor in my suggesting it
That is not going to be strong enough. THIS is what you need - it's a two part polyvinyl product. If you are trying at Lowes, THIS or THIS would work.
I have the same desk and have a spot or two where I ruined the veneer as well. I’m thinking this might help and I’m ordering some for myself soon
https://www.amazon.com/dp/B075ZZXB8K/ref=cm_sw_r_sms_c_api_i_kb.4Ab9BEPFT1
Depending on the depth of the scratches you can use wood-filler to fill up the holes. If the scratches are mostly superficial, try sanding it out.
Is the door painted or natural? In the former case full restoration will be easier. And yes, /r/woodworking or /r/DIY would probably be better for a question like this.
Any thoughts if this will work? The guy at Lowes told me it was my best option
This is rated for exterior use:
https://www.amazon.com/21506-Plastic-Wood-Filler-16-Ounce/dp/B000BQYI24
It will do the job for you.
I’ve had luck with this product for filling gaps and nail holes on wood that has already had finish applied. You rub it back and forth over the gap and it fits in there. Then rub off the excess with a cloth. Not a great choice for colors that might get cleaned with hot water, as the wax softens with heat. But a good choice for a job like this.
Once you have removed everything bad, I would use a wood hardener like this:
https://www.amazon.com/Products-164440-PC-Petrifier-Water-Based-Hardener/dp/B00081FW1I/ref=sr_1_12?keywords=Rot+fix&qid=1566419161&s=gateway&sr=8-12
And I typically use Bondo because it is cheaper, but an expoxy is better (this is just really expensive)
https://www.amazon.com/Products-PC-Woody-Repair-Epoxy-Two-Part/dp/B000H5O7Y8/ref=sr_1_6?keywords=Rot+fix&qid=1566419309&s=gateway&sr=8-6
Then you can paint it. More here:
http://www.woodweb.com/knowledge_base/Polyester_Versus_Epoxy_Wood_Fillers.html
I don't know if they'll replace the case piece. If you've got accidental damage protection on it it's possible they'll replace it.
You could use something like Milliput to fill the hole - https://www.amazon.co.uk/Milliput-MPP-5-Epoxy-Putty-Black/dp/B002CSX7Z8/ref=sr_1_1?ie=UTF8&qid=1481221976&sr=8-1
Epoxy putty if you don't particularly care what it looks like and just want an easy strong fix, or you could do a scarf joint or something with the leg to replace the broken section but it's hard to say exactly what might work without a picture.
Timbermate, it doesn't shrink. If it dries out in the container you can just add water, you can thin it with water and use it as a grain filler, it can be cut, drilled and threaded, the dust can be reused, just add water. It can be dyed with normal both water and oil based dyes. It's my all around go to filler.
Maybe I should just buy one of these and have a go myself - http://www.amazon.co.uk/Weller-Woodburning-and-Hobbyists-Kit/dp/B000X8I86C/ref=sr_1_2?ie=UTF8&qid=1426512957&sr=8-2&keywords=wood+engraving+tool
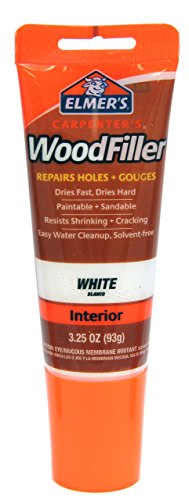
Are we just talking about something like this?
https://smile.amazon.com/Elmers-E855-Carpenters-Filler-3-25-Ounce/dp/B000BQM72C/ref=sr_1_4?ie=UTF8&qid=1527460029&sr=8-4&keywords=wood+filler
I have no idea about any of this stuff, lol.
Would something like this work as well?
I need to fill in door hinges and a door latch on the door frame from where I removed a door. Would this product work to fill the space? After which I would sand it down and then paint? Or do I need to cut a thin sliver to fit? The hinge is shallow.
https://www.amazon.com/Bondo-Home-Solutions-Wood-Filler/dp/B0007ZG9T4
I have used JB Weld kwickwood with good success for a number of repairs.
The epoxy plus wood shaving is also a great idea. I have done similar things to fill cracks on a smaller scale with superglue
They make Hardwood pens that work ok. Look around for a color that matches your hardwood.
was wondering if a simple sanding and application of elmer's carpenter's wood filler in white would do the trick
https://www.amazon.com/Elmers-E855-Carpenters-Filler-3-25-Ounce/dp/B000BQM72C
obviously you have never heard of this amazing product. https://www.amazon.com/Bondo-Home-Solutions-Wood-Filler/dp/B0007ZG9T4/ref=zg_bs_383886011_3
Is this what you mean by the millIput?
Probably will be tough to fill it without it being obvious. Here's something close to the product /u/ZXWoodworker mentioned:
http://www.amazon.com/Timbermate-Mahogany-Hardwood-Wood-Filler/dp/B001NV16LM/ref=pd_sim_469_3?ie=UTF8&dpID=51K%2Bc7yf9aL&dpSrc=sims&preST=_AC_UL160_SR160%2C160_&refRID=0HZEB54RA7Y4FGYABH71
They make a ton of different colors. So far it's dried, sanded, and taken stain very well for me.
You could also rip, rejoint, and reglue that seem if you wanted to get rid of it.
I don't really mind as long as its smooth on top. I like the "old" look of the chest anyway so a crack is fine
Should I add another brace further along the crack also, or only brace the "crossbeam"?
And when you say epoxy, just fill it in with something like this?
Thanks
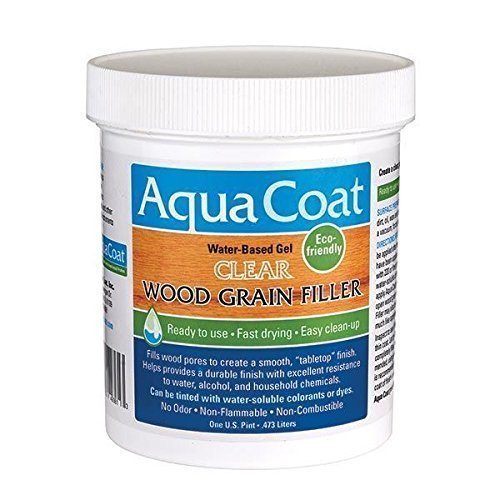
Aqua Coat Clear Wood Grain Filler
Fill the edges in good with kwik wood epoxy, let it set up good, then re-screw it. Make sure you really push it down and up into the gaps behind where you'll be screwing.
If you aren't looking to replace it you might be able to get away with covering it up with something. Like a corner protector.
You could use wood filler to rebuild the corner, then use these to try and paint back the wood grain, then top it off with something like varnish or nail polish to match the gloss.
As /u/always_down_voted says, get some wood filler, spread it on, let it dry, sand it flat and paint over it. Something like this should work: http://www.amazon.com/Elmers-Products-E847-Carpenters-Interior/dp/B000H5OQIU/ref=sr_1_5?ie=UTF8&qid=1397232472&sr=8-5&keywords=wood+putty
Here are some links for the product in the above comment for different countries:
Link: http://www.amazon.com/Elmers-Products-E847-Carpenters-Interior/dp/B000H5OQIU/ref=sr_1_5?ie=UTF8&qid=1397232472&sr=8-5&keywords=wood+putty
|Country|Link|
|:-----------|:------------|
|UK|amazon.co.uk|
|France|amazon.fr|
|Canada|amazon.ca|
This bot is currently in testing so let me know what you think by voting (or commenting).
I would try sanding it down, if there are gouges you can get some Durham's to fill them, it is cheap and hard to screw up. Once that cures sand it all again and paint it. If the grain is raised from the paint sand it again and paint/seal. It is possible to paint a faux wood grain to match the existing but it would be difficult for me to describe the technique. There are probably some youtube videos about it though. For that one I'd start with a base of the lighter brown and then grain with the darker brown, latex paint is easiest for the user...
You might also consider sanding it and spray painting the whole thing a solid color then gluing/decoupaging a coordinating fabric or paper print to the top in a pattern you like.