(Part 2) Best router its according to redditors
We found 317 Reddit comments discussing the best router its. We ranked the 195 resulting products by number of redditors who mentioned them. Here are the products ranked 21-40. You can also go back to the previous section.


It really isn't. Just buy one of these things to open up the cart, pop the contacts off the old battery with a tiny screwdriver or something, slip on a new (obviously same-sized) one, then tape the contacts back on. I've done this for four different cartridges (Mario Land 2 and 3, and Pokemon Silver and Crystal) and I've never had a single problem. (As well, while you have the cartridges open you can (and probably should) also clean off the contact pins)
Just happened to come across the body pillow of the character
she'she's cosplaying as for no particular reason.This is a pretty good deal. but don't let Amazons "MSRP" bullshit fool you into thinking it's the deal of a lifetime .
Hopefully price zombie will back me up here but no store has ever actually sold one of these for $358.00
Not on sale It's a 175.00 router table.
As I said it's an OK deal if you need a tiny router table, but you could build a larger table for about the same price, even if you include a halfway decent router plate
Made using a keyhole router bit.
Keyhole router bit
https://www.amazon.ca/Bosch-85078-8-Inch-Carbide-Keyhole/dp/B000WA6ZRU/ref=asc_df_B000WA6ZRU/?tag=googlemobshop-20&linkCode=df0&hvadid=292995173425&hvpos=1o1&hvnetw=g&hvrand=5517177481664767233&hvpone=&hvptwo=&hvqmt=&hvdev=m&hvdvcmdl=&hvlocint=&hvlocphy=9000774&hvtargid=pla-382407673099&psc=1
Well, normally it would be a roundover bit in a router. Dremel does make a roundover bit, but I'm not sure that it's something that could be done well (or safely) freehand without the router base, which you didn't mention having.
http://amzn.com/B00004UDIJ
That being said, if you're not too concerned about precision you could definitely round over the edge with your sander. Will just take some time.
Probably will be fine, keep in mind that it really isn't designed to do that task, so the lateral stress against the bit might break it if it is very small. I am pretty sure they make tiny router bits for things like the dremel that have cutting edges designed for that task.
https://www.amazon.com/Dremel-692-6-Piece-Router-Bit/dp/B00005LEXR
...is an example.
A lot less scary. I used this on a project i posted recently.
I like your method for trimming the veneer from the speaker holes, maybe kind of overkill though.
In the past, I've used this bit:
https://www.amazon.com/gp/product/B000K2G69M
It only needs 1/8" clearance. https://i.imgur.com/BqDFW4i.jpg
As long as you let the router do the work and don't force it against the wood, it works like a charm.
Maybe a cove molding bit
Deep clean your games.
To do this I would recommend a deep clean. These games have 25+ years of dust build up and corrosion from people blowing in them. And simply dusting it out might not be enough.
To deep clean the games you will need to open them up this can be accomplished with a 3.8 security bit screwdriver. You can get those here from amazon for a few bucks. After it’s opened gently remove the chip and wipe out the inside of the cart with some isopropyl alcohol to remove any dust inside and set it aside. Then move to the game contacts these are the gold slips at the bottom of the game. Dip a q-tip in the isopropyl alcohol and firmly scrub the contacts until the q-tip stops getting a dark color. Use as many q-tips as you need.
After that there should still be some alcohol on the contacts. Use a pencil eraser on the contacts and firmly rub off any hunk that might have built up. I found the pink rectangular ones work best.
Next take a magic eraser and buff out the last of anything remaining on the contacts. Do this to both sides and then take a paper towel and some alcohol and gently rub off any dust or eraser markings left behind. Let everything dry for a minute or so and the put the game back together.
If doing that doesn’t solve the issue it’s a problem with the 72 pin connector. Turn the NES upside down and use a Phillips head screw driver to remove the 6 screws on the bottom so you can lift the top off. After that remove the silver heat shield there are 2 screws on the left 2 at the back and 3 or 4 on the right side. Once that’s off blast the insides with compressed air to get all the dust out that has built up. After a good dusting remove the tray and 72 pin connector there are 3 screws on either side with the middle screw being longer then all the other screws. Side the tray foreword and up to remove them pull the 72 pin connector off the back.
You can bend the pins back up or boil it to clean it if you don’t want to buy a new one or really care about having all Nintendo parts ( if so let me know and I’ll explain how to do that as well), but I personally usually just replace it at this point. If you don’t really plan on using your NES very often you can get a basic 72 pin connector on amazon for $10.00. If you play it often you might look into upgrading to a Blinking Light Win it’s more expensive but it’s designed so you don’t push down on the game and loosen the pins so it should last much longer and it will circumvent the region lock chip. Personally I love mine.
I think that’s everything. Let me know if you need to know anything else. Good luck with the repairs
I don't remember the exact set of bits but this set seems fairly similar.
I would go with a 1/4" cutting diameter, 1/2" shank. For example, the Whiteside RU4700.
You could use a Round Nose Router Bit in a plunge router.
THESE are my most used bits...I use them to cut aluminum and MDF all day long. They're cheap, but stay sharp for longer than you'd expect
I use THESE for engraving...and yes, I use them in aluminum as well
For Vcarving, I use THIS I've probably ordered 3 of these in a 1 year time span but cut A LOT of MDF with it
​
In the beginning, don't buy expensive bits....it's a waste of $$$ until you get your feedrate and DOC figured out. I also highly recommend you download the millrightCNC app for your phone or tablet to figure out your feedrate / RPM / Depth of Cut / Chiploads.
I use the crap out of these:
https://www.amazon.com/gp/product/B010NI39WO/ref=oh_aui_search_detailpage?ie=UTF8&psc=1
this one for V-carving:
https://www.amazon.com/gp/product/B000ALY4E2/ref=oh_aui_search_detailpage?ie=UTF8&psc=1
For engraving
https://www.amazon.com/Autek-Titanium-Carbide-Engraving-J3-3001Tix10/dp/B00HC98K2C/ref=sr_1_8?s=industrial&ie=UTF8&qid=1542727514&sr=1-8&keywords=cnc+engraving+bit
Also, get a 1/8 and 1/4 compression bit
Biscuits attaching the side panels to legs. Dove tails for drawers to faces...and if you notice I used a dovetail in the little piece that separates the two drawers. The panels were made using a pair of matched rail and stile bits, with a round over cove. Like this:
Yonico 12335 Raised Panel Cabinet Door Router Bit Set with 3 Bit Ogee 1/2-Inch Shank https://www.amazon.com/dp/B00KZM0M1K/ref=cm_sw_r_cp_api_bJHnzbC5H9SZQ
Gladly. I bought 1"x4"x8' clear-heart redwood boards. I also borrowed a router and router bench and bought a [tongue and groove set] (https://www.amazon.com/gp/product/B00KZM2AIS/ref=oh_aui_search_detailpage?ie=UTF8&psc=1) and ran all of my boards through the router. You can definitely buy wood already tongue and grooved which is a lot easier, but I was really specific about the wood I wanted to use so I had to do it myself. If you're going to do it yourself and haven't done it before, definitely test it out on some throwaway wood to practice before you start cutting into your stock.
Once they were all t&g'd I started mounting them against the plywood walls and they just stack on top of each other. I cleaned off all the wood sticking out past the walls with a router template bit. I used Lexel to seal the edges between the redwood siding and the plywood, then cut some 1/8" plywood as trim to cover the gap, you can see me clamping the trim on here. I also had to cut out my doors/windows, etc.
For the outer roof and hatch, I used 1/8in Marine grade plywood. It's super durable, and bent easily over the frame. For the inner roof I used 1/8in maple plywood, and in-between both those layers I filled it with insulation. You can kinda see the process here.
I finished the siding and redwood with Waterlox Sealer & Finish. It's a tung oil sealer, and the finish is marine spar varnish that protects against water, UV...etc. The best part is if it ever needs a new coat you don't need to sand, you just add on a new layer and it kinda 'burns' in.
As for cost....I'm not sure, I stopped keeping track :P - Redwood can get expensive, but I really liked it so I splurged. You can get just as beautiful a finish with pine, which is much easier to find already tongue and grooved. Pine is great as long as you seal it.
Here's some photos of the process and the finish. Please let me know what other questions you have!
If I were doing it, I'd make a pattern from a 1/4 piece of MDF by:
it involves some specialty tools, but they are inexpensive and it provides a way to make a perfectly routed circle of very precise dimensions.
here's a video that shows how pattern cutting works with a router
I just bought these plans from Gregory Paolini and built the jig. Here's a video (poor audio) of a guy using it.
Here's my build: http://imgur.com/a/5G8TT, which I just completed last week. I bought a Whiteside spiral up cut bit which has been amazing so far on my test cuts. I bought some 36" and 24" of this t-track, this set of Incra knobs since I didn't have any and didn't want to make from scratch on the band saw, and a couple of these toggles.
I don't have a good way to mount my dust collection cart yet, but I'm still tweaking it. So far, I'm really happy with the jig.
I would agree with the previous replies - good value router bits will be inherently good quality. Poor router bits will be a nightmare to work with and not last nearly as long as the higher quality ones.
My personal favorite is Whiteside and if you're looking for a set you might start with this. I've also heard good things about Freud and CMT. If you're on a tight budget you may consider something like Woodriver or Grizzly.
As others have said, you probably want to buy bits as you need them instead of a full set you may or may not use. I'm not sure what specific bits you're looking for in terms of radius etc - you'll have to see if it's more cost effective to purchase individually or as a starter set.
One final comment - I would strongly recommend getting 1/2" shank bits instead of 1/4" shank bits if possible. They'll last longer and provide smoother cuts through improved heat capacity and reduced vibration.
Edit: If you're willing to do some reading, check out this article. It's a torture test of the most popular brands and discusses their performance in several different woods and cutting scenarios.
The Dremel has (router bits)[http://www.amazon.com/Dremel-692-6-Piece-Router-Bit/dp/B00005LEXR] that should work well. My Dremel came with an attachment that allows you to set the depth and keeps the tool at a 90 or 45 degree angle. I also bought the router base attachment for it (about $30) which does the same thing but better.
Another option is using a block plane to take off the corner, or using your sander, which can round corners if your patient and willing to take the time.
You can also Google "how to chamfer wood" and see what comes up.
edit: I typed this on mobile originally, and I didn't proof-read it because I believe in living fast and dangerous.
Ooh, probably not unless you find one that has the little stem instead of a roller bearing. Maybe the kind meant for a dremel tool in a routing base. Does it have to be round, or just not a sharp corner? If you just want to break the edge a hand plane would do it. Lee Valley used to sell a tiny chamfering plane, but I don't see it on their site any more.
Edit to add I found the bit I was thinking of.
I make signs (including nameplates), and stuff for a small etsy shop I have on the side. I've found that typically, harder woods machine better. I make nameplates for people out of Walnut or Maple usually. Also, I find that using a 60 degree bit for smaller lettering looks really nice.
The nameplates I make are 9in x 3in, and 3/8in thick. I also make a stand for them out of a contrasting wood (if I use maple for the nameplate, I make the stand out of walnut). The stand allows me to set the nameplate at an angle if it will be displayed on a desk.
Here's the bit I use: Amazon Link
Let me know if you have any questions!
Try this link
CMT 858.001.11 60 degree Laser Point Bit, 1/4-Inch Shank, 1/2-Inch Diameter, Carbide-Tipped by CMT http://www.amazon.com/dp/B000P4NSYG/ref=cm_sw_r_udp_awd_0Emktb12XDFND
This one is what I used. A lot cheaper than those Amana cutters with inserts.
https://www.amazon.com/Whiteside-Spoilboard-Surfacing-Router-Shank/dp/B071748JQN
https://www.amazon.com/dp/B01J7IGLV2/ref=cm_sw_r_cp_apa_i_Hk53AbKP7AVKG
https://www.amazon.com/dp/B071V4DB6K/ref=cm_sw_r_cp_apa_i_Hm53AbGA6WHGV
And unfortunately I can't find my rem one.
I primarily use 1/4 & 1/2" roundover bits to smooth over the edges of our cutting boards. I also have:
https://www.amazon.com/gp/product/B00004T7M5/ref=oh_aui_detailpage_o04_s00?ie=UTF8&psc=1 (for putting handles on the bottom of the board)
https://www.amazon.com/gp/product/B00004T7DM/ref=oh_aui_detailpage_o04_s01?ie=UTF8&psc=1 (for juice trays)
And this bit for mortises based on the Wood Whisperer's method of creating them:
https://www.amazon.com/gp/product/B00004T7K1/ref=oh_aui_detailpage_o08_s00?ie=UTF8&psc=1
For the top face, you need one of these - https://www.amazon.com/Whiteside-Spoilboard-Surfacing-Router-Shank/dp/B071748JQN
​
And then you need to get your spindle pointing nice and accurately straight down, and you're good.
I just never used a router before, I don’t know how flexible I can be with it. Looks like I will get a router and learn it the hard way.
The closest bit I found is this, but it still doesn’t match the bead width: https://www.amazon.com/dp/B00KZM2SSK/
I'm certain this goes without saying, but be certain to get carbide-tipped bits. A teflon coating is probably a good idea too since you'll be running a lot of stock through. Found these:
http://www.amazon.com/Yonico-15227-Matched-Tongue-V-Notch/dp/B00KZM2AIS
Be sure that your router table is well set up with the safety gear in place as well as sufficient infeed/outfeed tables. Spend some time getting your workplace set up so you have an easy and safe workflow (pull stock from here, run it through here while keeping hands in these spots, store the finished pieces there) -- I expect you'll need to do a lot of material, so make it easy on yourself.
Beyond that, this shouldn't be too difficult (just time consuming). Install the floor, sand it in place, finish and you should be good. Post pics when you're done, I'll be interested to see it.
I've been trying to find a good way to do it myself, preferably without it looking like crap.
Would look the best doing it with a vertical mill, but not just everyone has access to one, if you could find a small end mill bit, you could likely do it with a Dremel type tool, as long as you have a collet the right size, the slot (on mine) is about 1/16" I drilled all the holes out to that.
If you have a steady hand I would give that a shot.
First hit on google http://www.amazon.com/E700-1-Flute-Single-End-Carbide/dp/B000I6I5N0
I'm sure you could find one for less, or find one at Lowes/Home Depot, with it being so small, as with small drill bits, it will likely break easily.
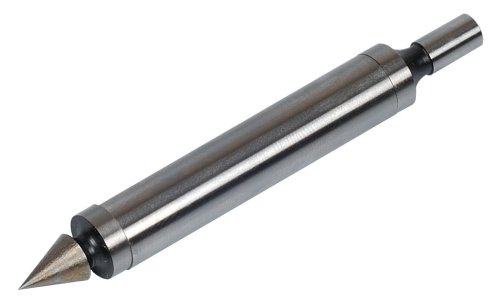
Uh, pretty sure the pointed end is a "center finder". That's what I use it for anyway.
http://youtu.be/06IGyn84lmE?t=1m23s
That's what Mitutoyo says it is.
You have a good idea too there though, but I don't think that situation comes up enough to warrant slapping one on the back of your edge finder.
I own a Craftex CX-601, which is a very similar machine to the one you've decided on.
On the vice, I would recommend either buying a vice that someone else owns and can confirm is good...or only buy one you can see in person. I bought a 5 inch Taiwanese vice, and I'm pretty disappointed with the quality of it. It was on-sale, and I figured it would "do fine" while I looked for a Kurt or other super nice unit on Craigslist. Turns out it does "do fine", but the moveable jaw was shimmed instead of machined square. Not good. On my table a 5in vice is a good size, but I probably could have gone with a six. Consider upsizing yours to a 5in vice.
It's worth looking to see if you have any tool shops nearby that carry milling machines, even ones of a different brand. Armed with your machine's measurements you can find a "similar" sized bed on a floor model and see what a 4, 5 and 6in vice will look like. That's what I did before ordering both my mill and my vice size.
All the clamping kits are basically the exact same in the box, probably from the same company. Shop around, you can save even more money:
http://www.amazon.com/Anytime-Tools-Slot-CLAMP-CLAMPING/dp/B007DMLBRE?ie=UTF8&keywords=clamping%20kit%201%2F2%20t-slot&qid=1458758346&ref_=sr_1_6&sr=8-6
http://www.harborfreight.com/58-piece-combination-step-block-and-clamp-set-3-8-eighth-inch-16-nc-studs-1-2-half-inch-clamps-5952.html
I own that end-mill set, very happy with it.
You have two edge finders listed, a Mitutoyo edge finder and a Fowler edge and centre finder. You only need the one combo unit, and this Mitutoyo is cheaper: http://www.amazon.com/Mitutoyo-050103-Center-Finder-Diameter/dp/B002SG7PPM/ref=sr_1_1?ie=UTF8&qid=1458758586&sr=8-1&keywords=edge+and+center+finder
You are missing a holder for your horizontal dial indicator, which I'm presuming you're ordering for squaring up your head to the table, and your vice to the table. The magnetic base you have is great for checking run out of the spindle, and movement of the work, but not ideal for squaring up the head. I started with a clamp like this:
http://www.amazon.com/HHIP-4401-0401-Universal-Indicator-Holder/dp/B01BHHY92E?ie=UTF8&keywords=universal%20indicator%20holder&qid=1458759060&ref_=sr_1_21&sr=8-21
Which I wasn't too happy with. It works, but it's pretty easy to upset the clamp alignment and you have to start over. I have since ordered this unit: https://www.accusizetools.com/egaa-z986-zero-set/ but haven't had a need to re-square my head or vice yet. Doesn't look like it's available on Amazon though.
I notice the mill you're looking at has the option to add the X-axis power feed for $299. If you can stretch the budget, definitely go for it. I figured I would "add one later" and even though I still plan on doing so, man am I cranking away on that handle a whole lot.
It's not cheap, but I find this set of drill bits to be quite handy: http://www.amazon.com/Woodtek-928828-Boring-Machinist-Titanium/dp/B008RE2CSY/ref=sr_1_6?ie=UTF8&qid=1458759539&sr=8-6&keywords=115pc+drill+bit+set
If you're going to be building a bench like the one in your picture, you don't need a router table at all. All you need is the router table insert like this. The benchtop acts as the "table" part.
It's difficult to route out a shape freehand, and keep nice, straight lines. You can either stay inside the lines, and clean it up with a chisel, or make a template and use a pattern bit. With a bit like this, you make the template the exact size of the cut you want to make.
hmmm, can't find any in a quick and dirty search, but using a 1/16th end mill in a press should suffice re: http://www.amazon.com/E700-1-Flute-Single-End-Carbide/dp/B000I6I5N0
followed by a 1/8th extractor; http://www.grainger.com/product/WESTWARD-Screw-Extractor-Spiral-Flute-2RUL8
keeping in mind the extractor goes in counter clockwise, and you'll need a tap handle or similar to twist it.
let me know if i need to do some more googling when i get off work.
look around if you want, using the above as a reference, read reviews, don't automagically get the cheapest thing out there, or the 2nd.
knife and then sanding could work, or something like this if your recess is 1/8" deep or more.
Which design is that looks like RS drivers?