(Part 2) Best 3d printer accessories according to redditors
We found 1,395 Reddit comments discussing the best 3d printer accessories. We ranked the 401 resulting products by number of redditors who mentioned them. Here are the products ranked 21-40. You can also go back to the previous section.
![[Gulfcoast Robotics] Thermistor Upgrade for Maker Select Plus and Wanhao Duplicator i3 Plus 3D Printers.](https://m.media-amazon.com/images/I/31OXL-XQ-8L.jpg)


![[Gulfcoast Robotics] M3 Stud Screw-in thermistor 100K NTC 3950 - Drop in Replacement, Works for Any China 3D Printer extruders - Anet, Wanhao, Maker Select etc.](https://m.media-amazon.com/images/I/41Q2Tq1vh2L.jpg)
![[Gulfcoast Robotics] Borosilicate Glass for Wanhao Duplicator i3 Anet A8 MP Maker Select 3D Printers, 4mm Thick.](https://m.media-amazon.com/images/I/51RX52S+XIL.jpg)


Outside of the things others have mentioned (springs, tubing, couplers, SKR, BMG, etc.) - if you don't already have some good tools/spare parts you can use this time to invest in some.
I have this one, works great. A quick wipe of iso alcohol on the bed before a print does WONDERS. :)
https://www.amazon.com/Gulfcoast-Robotics-Borosilicate-Duplicator-Printers/dp/B07B2YLWF9/ref=sr_1_3?crid=3R1DVT6ST84HS&keywords=duplicator+i3+glass+bed&qid=1555892960&s=gateway&sprefix=duplicator+i3+glass%2Caps%2C145&sr=8-3
I got really tired of those all plastic ones and picked up these off of Amazon.
https://www.amazon.com/gp/aw/d/B01IB81IHG/ref=yo_ii_img?ie=UTF8&psc=1
They are spring loaded too, so no need for clips or anything to keep the bowden nice and tight in there.
It’s crazy to replace this nonstandard fitting when you could replace the entire extruder with a better, all-metal version - including a new Bowden fitting - for a couple bucks less: https://www.amazon.com/gp/product/B07QHBNYD9
There are quite a few vendors that sell what appears to be this exact kit at various prices, but I’m skeptical that there’s really much difference between the various options.
I had the PTFE inside the heat throat go bad and couldn't find the 3.5mm OD replacement tube anywhere so I replaced mine with this, $16:
https://www.amazon.com/gp/product/B074NX68MP/ref=oh_aui_detailpage_o05_s00?ie=UTF8&psc=1
Comes with 1x full metal heat throat and 3x replacements that use partial PTFE like the stock piece.
It's a little shorter than the stock piece so you'll need to raise your bed up a bit. I use a glass bed on top of the stock bed so that added some height, but I had to get some longer (4x M3 x 20mm I think) screws to replace the stock screws on the bed and now it lines up great. Full thread from when I needed help getting the bed to the proper height:
https://www.reddit.com/r/MPSelectMiniOwners/comments/8a9z0i/new_hot_end_too_short/
I'll 2nd the guide, but even on top of that, a cheap/quick upgrade is an aluminum extruder assbly - highly recommend doing that as my plastic one wore severely in the first few weeks.
​
Like this guy:
https://www.amazon.com/Gwisdom-Extruder-Upgraded-Replacement-Extruders/dp/B07FKD4FZD
I went this way...
Zeelo Ender 3 Extrude, CR-10 Extruder Upgraded Replacement, Aluminum MK8 Drive Feed 3D Printer Extruders for Creality ENDER3, CR-10, CR-10S, CR-10 S4, CR-10 S5 https://www.amazon.com/dp/B07QHBNYD9/ref=cm_sw_r_cp_api_i_A7qkDbVCZFJEH
I just ordered this. https://www.amazon.com/dp/B00F2IQNX8/ref=cm_sw_r_cp_apa_BJD-zb9PSY2AZ
It comes today and I will try to leave an update if it works. I know it's 5 meters but it's cheap.
Sorry for bad formatting I'm on mobile
Thanks so much for the detailed reply!
Getting a hold of an aluminum carriage would fix my most major concern with the overall design. I've already found, collected and downloaded all the brackets, replacement motor mounts, belt tensioners, fan ducts, and redesigned x carriage. Once I get the chance to pull the trigger on it, I'd get to work with my MP Mini printing all of those while it's shipping.
You bring up a good point with the MOSFET. I've read a bunch about it with the Maker Select and Wanhou and Anet and whatnot, but I've read that (with the standard bed anyway) the Tevo is pretty good. But with the expanded bed presumably drawing a fair bit more power, a $10 MOSFET might still be a good idea.
And thanks for the insights on the other upgrades. You more or less confirmed what I was already thinking. The standard extruder looks like an all-metal version of what's on my MP Mini and that's doing me just fine. And I've gotten pretty good at manual leveling and have no problem with it so long as it's stable and isn't going to unlevel itself after every print.
One last question though: making the blind assumption that you're in the US, where did you order your Tevo from?
As for the bowden tube coming loose, I had that problem with the V6 clone on my Mini. Just buying a new PTFE tube with some new fittings did the trick. It seems like after a while, the fittings just lose their bite on the tube.
One of the biggest upgrades I have to recommend is flashing new firmware. The default firmware doesn't support thermal runaway protection and it's fairly straightforward to upgrade. Here's a video guide for the process.
Second is to upgrade the thermistor. It's not necessary, but the one I have can survive up to temperatures as high as 600C and is easy to remove during cleaning.
The third upgrade is the most tedious and not necessary, but it's what I did after my first heated bed connectors melted to the Melzi board. I upgraded all of the wiring with 12+14 gauge copper wire. It might be an over kill, but it keeps me sane.
What you absolutely MUSTTTTTTT!!!! order? Nothing. The printer works as is. But if you want to do yourself a favour, here's a list of what I consider essentials:
- New springs, both bed and extruder. I don't have a link for an extruder one as I upgraded my entire extruder drive frame and that came with a better spring
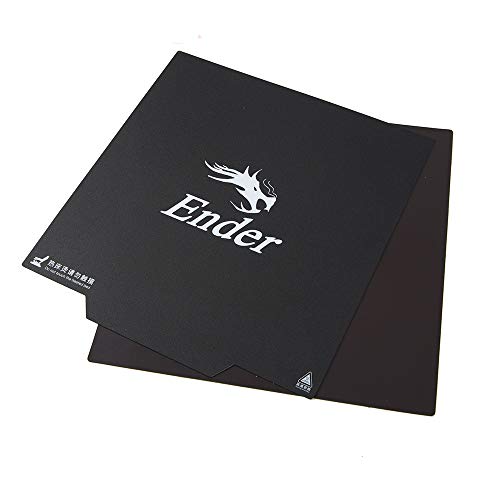
- A new removable bed. Creality glass bed or glass with a PEI sheet is my bed of choice
- Thermal pad to avoid the annoying bed clamps. Cut squares out of it, lay them in a checkered pattern alternating between thermal pad and nothing and place your bed on top. They will hold the bed in place and help with heating
- Stepper dampers if your printer is anywhere near where you spend your time, it sounds like a bloody jackhammer right out of the box
- New tube fittings, the stock ones are terrible and will give out in a matter of weeks at best. They also barely hold onto the tube
There are a ton of other great upgrades, but I think a good idea is to get a feel for it yourself.
What you can do, however, is check out some printable upgrades. I have this thread where people contributed with their choice of printable upgrades. It's a great list you can refer to later. Essentials on that are the fan guard and LCD back cover simply because the Ender 3 as is has the fan and back of the LCD exposed and that makes it crazy vulnerable to dust and gook damage
Hey I got you... Trust me I've fucked up more hotends than you'll ever think possible... Thermisistor is the wire on your left and it may be broke but seems to be intact. Now your thermocouple/heater cartridge is not intact(its the cylinder with 2 wires sticking out of it. Still inside ths heater block)
Here are a few things you can do to remedy the situation.
Here is a link to my hot end troubles it might be useful.
FYI I'm a firm believer in be able to fix everything yourself. I believe that this philosophy is very applicable in 3d printing. Otherwise you'll just be throwing money at problems witjout every getting to the source of the problem. Hope this helps. Let me know if you have more questions.
This is so true! If you can summarize your issue succinctly without ranting, people will be more than willing to help you. (Parts of) the internet are nicer than you might imagine!
I think you're also reading a bit too much into the issues. The inner tube in the Maker Select v2 is supposed to be plastic - it's made of PTFE. This is a very common design in cheaper printers. There is absolutely no problem with this! PTFE has a reported melting/charring point ~240 C, though I've heard it may begin degrading as low as ~230 C. You should be okay to print in PLA temperature ranges and even ABS if you're careful.
I'd say that on the grand scale of things, the MonoPrice printers are some of the lowest maintenance printers you can get at that price range. Unless you're willing to go up above the thousand-dollar range, they're probably the most reliable you can get. They WILL print very well with a little tuning and basically no hardware modifications. The v2/Plus are both excellent choices for a beginner.
Here you go, comes with both the bed magnetic sheet and magnetic build surface (a spare is always good)...
https://www.amazon.com/Creality-Ultra-Flexible-Removable-3D-235X235MM/dp/B07HNWSMXY/
Any advice/help on this issue would be appreciated. I had been in the process lately of attempting to install a new nozzle on my Monoprice Maker Select v2., and ran into a wall when the nozzles I ordered did not fit the hot end. Next, I got the correct ones, installed the .3 instead of the .4 as I had intended, got it going, and got the 'def' temperature error. I looked online and troubleshooted some, in the process of some testing/troubleshooting, this happened. I've ordered what I think to be the correct replacement piece, but I'm not sure. https://www.amazon.com/Signstek-Reprap-Ceramic-Cartridge-Printer/dp/B00Q9Z1JUU/ref=pd_bxgy_328_img_2?_encoding=UTF8&psc=1&refRID=YX7HDJM85KX98CNGTZW4
Any help/advice would be appreciated. I don't know how to install it when it arrives, or even if it's the correct thing I need.
ANTCLABS BLTouch : Auto Bed... https://www.amazon.com/dp/B07FR2LLZP
Both of the sellers are authorized U.S. resellers per ANTCLABS website. If you aren't in the U.S., they have a list for other countries. I received a V3.1 from 3D Printer Universe.
Hope that helps!
Use this as an opportunity to stock up on a few different spare parts. I recommend always having those tubes, nozzels, heaters, thermistors, and possibly even one set of spare cooling fans. I did one purchase a little over a year ago, was like $40, has saved me from having downtime on several occasions.
Use a silicone mat it will hold the glass in place without clips plus transfers the heat more evenly and efficiently.
That was my experience too. This worked well for me https://smile.amazon.com/gp/product/B07FKD4FZD/ref=ppx_yo_dt_b_search_asin_title?ie=UTF8&psc=1
Here’s the one I’m trying....
Zeelo Ender 3 Extrude, CR-10 Extruder Upgraded Replacement, Aluminum MK8 Drive Feed 3D Printer Extruders for Creality ENDER3, CR-10, CR-10S, CR-10 S4, CR-10 S5 https://www.amazon.com/dp/B07QHBNYD9/ref=cm_sw_r_cp_api_i_zkByDb5G37GNJ
Hello there. This is a rebrand of the Wanhao i3 Plus, so if you need some help, googling information about that printer, or its popular rebrand, the Monoprice Maker Select Plus, may give some answers. I have the MPMS+, so I may be able to help you out. Your old heater block had two holes because it is able to take two different sized thermistor screws. Your new heater block can only take one. It looks like an M3 screw hole maybe? It is hard to tell. But yes, you should be able to put your thermistor cable into the hole with the right screw just fine. As for where to put the heater cartridge plugs in, your daughter board should look like this, right? You would plug it into the one labeled heater. Also, I upgraded my thermistor to a screw based thermistor, which I would recommend. I think it would be compatible with the block you have there if you're interested.
Not really, no. The point of the PTFE tubing is to be an ultra low friction material, not just to be flexible. Luckily, PTFE tubing isn't expensive at all, though, two meters of it is like $5.
However, I'm honestly curious as to why you think a Bowden system would be an "upgrade" for your printer. A Prusa clone isn't going to run very fast, and removing mass from the X carriage isn't going to change that very much, but at least with a direct drive you can work with flexible filament a bit better, among other perks.
Depends on the one you get... some have long leads and the right connector so you just fish the wire through the mesh and replace it.... others have a shorter lead on them so you just cut the wires to the old one and splice it in... the thermistor isn't polarized so doesnt matter which is which......in any case the ender uses a 100k ohm NTC type thermistor.... the connector on the end is a JST-XH.....
I switched to this type for easier install and no worry about shorting to the heater block and damaging the board.
https://smile.amazon.com/Gulfcoast-Robotics-Stud-Screw-thermistor/dp/B07B3W8XQ4
Or here are the original style and heaters
https://smile.amazon.com/Sunhokey-Cartridge-Thermistor-Printer-Creality/dp/B07KXR4LZ3
They are seperate things you buy, upgrades for the printer
Here is an example of borosilicate: https://www.amazon.com/Printer-Heated-Borosilicate-310x310x3mm-Perfectly/dp/B079HZWDZJ/ref=sr_1_3?s=industrial&ie=UTF8&qid=1550613578&sr=1-3&keywords=borosilicate+glass+cr-10
​
Here is the Antclabs BLTouch (Get the 2m extension): https://www.amazon.com/BLTouch-Leveling-Sensor-Premium-Printer/dp/B07FR2LLZP/ref=sr_1_1?s=industrial&ie=UTF8&qid=1550613674&sr=1-1&keywords=BLTouch&th=1
​
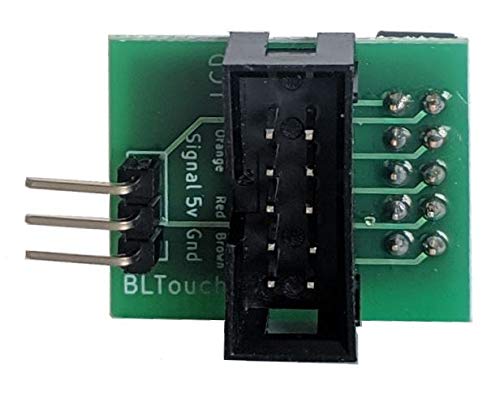
You also need a PIN27 Board to attach it: https://www.amazon.com/Creality-Ender3-BLTouch-Filament-Sensor/dp/B07L2Q2SSD/ref=sr_1_3?s=industrial&ie=UTF8&qid=1550613674&sr=1-3&keywords=BLTouch
​
Here is a teaching tech guide on the BLTouch (It is for the Ender 3 but watch it, it will show you more about the BLTouch): https://www.youtube.com/watch?v=sUlqrSq6LeY
$4.84 - 1x Flexible Magnetic Sheet w/ Adhesive Backing
$27.76 - 1x Spring Steel Wear Resistant Sheet
$15.99 - 1x Pack of Athorbot 3d Printing Build Surface Sheets
For CR-10, this was a quality of life improvement and setup took minutes.
Install:
Yes magnets lose polarity with heat but 6 months and no change for me. You could get the heat protected magnet sheet but I heard it's not very sturdy.
Prints never move during printing and removal is as easy as peel metal build sheet away from magnet and flex it so the part pops off.
Did you replace the crappy OEM coupling that holds the Bowden tube flush to the nozzle on the hot end? The OEM coupling lets the tube slip which creates a gap where your filament can clog up. I think this is the replacement.
take that spring out, get a couple of pliers on each end and pull it to stretch it out, then put the spring back. you will have added more tension to this and allowed it to compress the filament as it moves through. quick and easy fix but getting a better spring and/or replacing the cheap extruder parts is recommended: https://www.amazon.com/Gwisdom-Extruder-Upgraded-Replacement-Extruders/dp/B07FKD4FZD
Never heard a fan make that noise. Time for a new one.
https://www.amazon.com/Creality-Original-40x40x10MM-Cooling-3D/dp/B07FTNCC9B/ref=asc_df_B07FTNCC9B/
I imagine u could find the 4010 by itself for cheaper on aliexpress or ebay
These are what I’m using on my Pro.
Try this. It screws directly into the hole.
https://www.amazon.com/Gulfcoast-Robotics-Stud-Screw-thermistor/dp/B07B3W8XQ4?keywords=gulfcoast+thermistor&qid=1535912538&sr=8-5&ref=mp_s_a_1_5
I've done that and it's seated. This is the replacement I put in. [Gulfcoast Robotics] Thermistor Upgrade for Maker Select Plus and Wanhao Duplicator i3 Plus 3D Printers. https://www.amazon.com/dp/B07B3ZYBTM/ref=cm_sw_r_cp_apa_fTvLBb3Z93P59
Yeah, that totally blows. Do you have the glass bed?
I do. Here's what works for me and I've never damaged a print in the process.
https://www.amazon.com/dp/B075SLTY8B
It's actually a set of two tools. The longer tool will rock your world! Ok, perhaps I'm overselling it a bit, but it's amazing. Unfortunately, the shorter tool sucks rocks.
Good luck and happy printing!
Do you think this belt would work? I'd prefer to use amazon for the prime shipping.
Also if you’re going to be doing major hotend changes I highly recommend this thermistor. It screws into heatblock where the screw now holds the fragile wires for glass thermistor that just hangs inside a hole. This one comes with a new cable and can be unplugged and is also much more rugged. It requires just one change in the firmware and instructions are listed on their website, and firmware changes will probably need to be done anyways to be able to set higher max temps. [Gulfcoast Robotics] M3 Stud Screw-In thermistor 100K NTC 3950 - drop in replacement, works for any China 3D Printer extruders - Anet, Wanhao, Maker Select etc. https://www.amazon.com/dp/B07B3W8XQ4/ref=cm_sw_r_cp_api_i_ep.2DbEYPC4VW
unfortunately the RepRap Champion clones aren't available anymore so I can't vouch for the quality of this particular clone, but just buy the whole thing, comes with replacment parts too
https://www.amazon.com/EAONE-All-Metal-Extruder-Stainless-Makerbot/dp/B074NX68MP/ref=sr_1_4?s=industrial&ie=UTF8&qid=1520361651&sr=1-4&keywords=e3d+v6
Oh wow, that looks perfect for my intended use and budget. On another note, I found that 3D printer cartridges are dirt cheap and can have around 60 watt density, so that's another option.
Here is a good kit
https://www.amazon.com/dp/B07PS3NH82/ref=cm_sw_r_oth_api_i_dK00DbAK3612M
I'll just put them right here. I think these are essential upgrades for the ender 3
[Metal extruder feeder] (https://www.amazon.com/dp/B07TWQFT7J/ref=cm_sw_r_cp_apa_i_gq8SDbCHX88J8)
[TL smoothers] (https://www.amazon.com/dp/B071WG3SZQ/ref=cm_sw_r_cp_apa_i_ms8SDbA5EWY3W)
[PTFE tube and fittings] (https://www.amazon.com/dp/B07PS3NH82/ref=cm_sw_r_cp_apa_i_Ls8SDb794MJ3Q)
Yea the Ender 5 boards have Thermal Run off protection but the old Firmware that is shipped with all Ender 5's dont have it, so in order to get it enabled you have to update the firmware which means gettinig a kit like
https://www.th3dstudio.com/product/arduino-uno-bootloader-flashing-kit/ which is cheap and set the pinning correctly for the isp and Flash a bootloader on to it and then get the updated 1.1.x/2.x.x firmware. and Yep can add a ABL to any of the boards but with some difficulty, easiest one to attach is Th3D EZABL EZ Connect, uses just the Z probe endstop but firmware can be a pain in the arse as you have to use their Unified firmware. Next is BLTouch and for creality 3d boards require https://www.amazon.com/Creality-Ender3-BLTouch-Filament-Sensor/dp/B07L2Q2SSD to do it easily else i think it requires Splicing the LCD Display Ribbon cable that belongs to Servo Pin 27 which kills the speaker buzzer and then connecting a 5v and ground wire to the ISP connectors of the board, Easier to just get a https://www.amazon.com/Creality-Ender3-BLTouch-Filament-Sensor/dp/B07L2Q2SSD and pop it right in with no destructive modding.
What I did was I got a nice thick borosilicate glass plate from amazon, the one with the corners cut off so it fits the bed perfectly without the heated bed bolts interfering. Then I got a sheet of PEI with 3M adhesive on the back. I cleaned the glass with alcohol and then carefully applied the PEI so there weren't any air bubbles.
​
This is the glass:
https://smile.amazon.com/Gulfcoast-Robotics-Borosilicate-Duplicator-Printers/dp/B07B2YLWF9/ref=sr_1_5?crid=2640M0KDOPOV&keywords=borosilicate+glass+plate&qid=1555903635&s=gateway&sprefix=borosilicate+glass+pl%2Caps%2C153&sr=8-5
​
And this is the kind of PEI:
https://smile.amazon.com/Gizmo-Dorks-Preapplied-Laminated-Adhesive/dp/B07GSJSDWR/ref=sr_1_4?keywords=PEI+sheet&qid=1555903728&s=gateway&sr=8-4
​
I have gone through a handful of these borosilicate sheets, and have had one or two that were warped. All of them were thinner than the Gulf Coast Robotics one. Theirs is bang on flat and way tougher, hands down the best. When you apply the PEI, make sure you do it very carefully as to not create any bubbles underneath. I started on the center of one edge and slowly applied from one side to the other, peeling the backing off as I went. Press it down from the center out as you lay it down and you shouldn't get any bubbles. Lots of very tiny bubbles are to be expected and work their way out after a while (Im talking really tiny). As for attaching the glass to the bed, a set of four binder clips are perfect. Don't bother with the thermal pads some people suggest, they make it a pain to remove the glass in between prints and don't really do anything.
​
This is a great way to have a removable build surface that everything sticks to. I have since moved up to a Prusa MK3, so I get to enjoy the luxury of the magnetic PEI build plate. You could get a similar thing going, BuildTak sells a magnetic build surface that you apply to the heated bed. The drawback of this is that if your bed is warped at all, the magnetic sheet does nothing to correct it. The thick glass on the other hand makes everything nice and flat.
​
I should add that to put the glass sheet on, you will have to move your z endstop switch down. There are several mounting holes on the printer to do this already so its really not that hard, you just have to experiment. The glass is about 4mm thick so you have to adjust for it.
Yep! I just sneak the scraper under one corner and listen to the "crackle" sound and go slow. I almost never have to re-level my bed, it's not a wrestling match.
I have the TH3D EZMAT on my Ender 3 and the Athorbot surface on my CR-10S at home and work.
I get great results and would never go back to glass.
Buy some [3D printer surfaces](https://www.amazon.com/gp/product/B073TW738G/ref=ppx_yo_dt_b_asin_title_o04_s01?ie=UTF8&psc=1) off of Amazon, cut it to shape and use it to replace the PEI. I've had much success also sticking one on the spring steel sheet and using the steel side for super sticky PETG and the other side for everything else.
I am using a build surface called Athorbot. It sells in a package of 3 and was only $16 on Amazon. In the past I've printed with BuildTak and PEI on my other printers. I prefer BuildTak to PEI, because with PEI I'm always adding chemicals to it (IPA to clean, Gluestick to reduce adhesion with Flex, Windex to Reduce adhesion with PETG, etc.). I have no idea how good the Arthorbot sheet is, but I've seen people on this sub with it and they seem to like it, so I thought I'd give it a try. It's cheap as chips- so if it doesn't work out, no problem!
The filament I prefer for my flex parts is Sainsmart TPU. I would definitely recommend using some gluestick as /u/PuterPro mentions, because otherwise you'll never get it off, or damage your sheet. I've actually managed to tear up my PEI before because of over adhesion. To be honest, I've also ruined a BuildTak sheet with it, but that was because I was printing too close. (Fortunately, BuildTak is super easy to replace compared to PEI). To clean off the gluestick residue after the print, use a wet (water) paper towel. Don't just rub it with IPA, as it will make an even bigger mess.
Hope this helps and best of luck!
I bought this
https://www.amazon.com/gp/product/B07PS3NH82/ref=ppx_yo_dt_b_search_asin_title?ie=UTF8&psc=1
Sorry, I have buckets of them so I didn't think to mention. Standard BSP PC4-M10, same as the Voron belted extruders (so you can just re-use those if you have them).
https://www.amazon.com/gp/aw/d/B01IB81IHG
For me, i got the pin 27 board. I have the 1.1.4 motherboard as well from stock. While all the videos said to switch the cables, if i did that, it would short the machine. I switched them back and I've been good ever since. The only annoyance is that I had to cut and solder the for the stopper. I didnt feel like putting hotglue inside the machine.
​
What version of Marlin are you using, I used vanilla and followed the TT instructions. The only thing that I had an issue with is their numbers for offset, with his i was missing a massive area on the left.
​
The link to the pin 27 is here
I did that too...
I started with the masking tape under the glass. I even printed the Wedge Jack for the dip in center.
Next I replaced the glass with a mirror I purchased at Michaels crafts.
Results improved...but still had a first layer sticking problem from time to time.
Next up was the masking tape on TOP of the mirror -- I did this on the glass too. Did I forget to mention that detail? We were pretty close but removing things from tape -- ouch it was rough and always messed up the tape.
I moved on to putting this on my mirror. So far it has been the best combination of flat + adhesion and I get good prints.
I usually start first layer slow and if the print is small, I slow things down for a bit before there is a few layers down -- than I turn that knob and give it a whirl.
Some prints just like to test my patience and start off poor and I scrap and restart. Heat/cold in the room has affected my prep -- I have found 60 bed/200 tip for PLA has worked best.
If I did it all over -- given everything I have learned -- I would spend more $$ and consider a Prusa perhaps. I'd need to find out who best supported the flat bed.
Other than that the print quality of CR10S is amazing -- and prototypes are cranking out. I am building a gizmo -- and I thought it would be better to be able to just print my designs rather than get them mailed. When I look back at all this -- I think I ended up investing more time in printing than I would have waiting for the mail to arrive. But the adventure was fun.
Patience and good luck!
I will post those pictures soon. I am traveling out of town right now. These are the PTFE fittings I used.
I had this exact same problem with a recently purchased Ender 3 (not pro), following the same video by Teaching Tech. Using a Pin27 adapter board.
Here is the response I received from ANTCLABS:
> Thank you for your message and I am sorry for your waiting.
Please remove C7 at the control board as like at this link. https://www.antclabs.com/wiring3
Thank you and hope you to be happy with your BLTouch.
> Best regards,
ANTCLABS
Fortunately, I was able to get the latest Marlin 2.x working no problem and didn't need to hack away at my board. I'll pastebin my configs in a few and a checksum of the firmware zip I used.
Configuration.h ** mind the offsets here, obviously. Dunno what mount you're using. I've slowed down the probe speeds quite a bit too.
Configuration_adv.h
I'll put together a diff of the example configs and see what I changed.Here are the diff outputs from the Marlix-bugfix-2.x version I used. Left (red) is example ender3 config I started with, right (green) are my changes to support BLTouch:
Configuration.h
Doesn't look as though I made any changes to Configuration_adv.h, same as the example ender3 one.
I suspect the thing that actually fixed my problem was the shiny new
BLTOUCH_V3stuff. I bought my BLTouch less than a month ago:https://smile.amazon.com/gp/product/B01FFV2TOS
If you have a multimeter check the resistance at the connector that plugs into the board. Also check what it says the temp is with the thermistor disconnected and shorted to give you a clue what's happening.
I got this one when I broke mine, it screws in so no crushing it: https://www.amazon.com/gp/aw/d/B07B3W8XQ4/
I pulled the wires out cleaning off a huge blob of pla from my hotend. I can't remember what my symptoms were but I feel like I saw something like you. My best guess is that it's shorted, disconnected or you crushed the actual sensor.
That is the one that I ordered. Some people have said that they would rather use a 5" diameter disc, but 4-1/2" is a near perfect fit over the existing build surface. I removed the build surface (while the bed is heated to 60°). Then cutout a piece of silicon thermal pad the sane size as the glass and sandwiched it between the plate and glass. Works well and holds it pretty firmly. https://www.amazon.com/gp/product/B06XX7ZMN7/ref=oh_aui_detailpage_o06_s00?ie=UTF8&psc=1
Seconding everything people have said here and want to add the following.
A glass bed with 10mil PEI from CS Hyde will do wonders for bed leveling.
Upgrade your Y plate as soon as possible, the stock one warps over enough time making bed leveling nearly impossible.
All metal hotend such as the micro swiss is amazing, no more clogged PTFE tubing, easier to clean if it does.
Z brace is a must, also print a fan cooler like the Diicooler on thingiverse. Replace the stock part cooling fan with a nice radial fan, plenty on amazon, make sure its 12v. This helps prints come out cleaner.
Yours should come with thumbwheels, if not, print some, bed leveling is easier with it.
Print some spring cups as well, keeps the springs straight and not bending when leveling the bed.
DO THE MOSFET MOD TO MAKE IT SAFE!
Watch this vid and do his printed mods https://www.youtube.com/watch?v=Tpcm4XEbP1Q&t=752s&list=PLyIdpN_zILcknsQzSZSiWhQ685NxkWsvD&index=2
Also, stay far far FAR away from Shaxon filament! It broke my hotend, check my post history to see the red glob of death I dealt with. I have had very good luck with eSun PLA.
Links for bought parts:
Fans: [here (https://www.amazon.com/gp/product/B00MJU6JR2/ref=oh_aui_detailpage_o02_s00?ie=UTF8&psc=1)]
Glass plate: [Here (https://www.amazon.com/gp/product/B07B2YLWF9/ref=oh_aui_detailpage_o03_s00?ie=UTF8&psc=1)]
Hotend: [Here(https://www.amazon.com/gp/product/B01E1HANLS/ref=oh_aui_detailpage_o05_s00?ie=UTF8&psc=1)]
Y plate: [Here (https://www.amazon.com/gp/product/B07B251KBS/ref=oh_aui_detailpage_o01_s00?ie=UTF8&psc=1)]
MOSFET: [here(https://www.amazon.com/gp/product/B01HEQVQAK/ref=oh_aui_detailpage_o02_s00?ie=UTF8&psc=1)] and wires [here(https://www.amazon.com/gp/product/B017U6PGLO/ref=oh_aui_detailpage_o02_s00?ie=UTF8&psc=1)]
Well that's annoying, I wasn't aware that variances of .3mm in the heating cartridge were even a thing (this thing is in standard? That's odd when the entire rest of the printer is metric). Although it doesn't seem TOO hard to source, as KevMag above mentioned, and wasn't too hard to find on Amazon either:
https://www.amazon.com/6-35mm-Ceramic-Cartridge-Printer-Extruder/dp/B071K8Z9KF/
Although, now I am faced with a choice of it I just get a new MK10 block and a 6.35mm cartridge, or if I use that Uncle Chuck universal one.... but I would have no idea how to install or if it will work with the M3 threaded thermistors designed as a drop-in solution for existing MK10 heaterblocks since it only mentions M4 and M5 thermistors for the Universal one.
That is JUST the extruder. For Bowden extrusion, you also need a hotend. (that will be the part with the heatsink, fan, and nozzle)
I suggest this one, it's a clone of the official E3D v6. That said, I can't find anyone selling a replacement carriage to hold that hotend. It's traditional to just print one, so I don't know how you could switch to this setup without having a working printer to print the carriage in the first place.
Does your printer not work at all right now?
So I’ve found this on amazon:
https://www.amazon.com/Gwisdom-Extruder-Upgraded-Replacement-Extruders/dp/B07FKD4FZD
Is there a more official one? Want an aluminum replacement, but can anyone recommend a good brand?
Sounds like the part cooling fan! Mine is doing the same thing. I got this link as the recommended replacement:
https://www.amazon.com/dp/B07FTNCC9B
No I have a thermal silicone sheet between the glass and the heat bed. Serves 2 purposes. Conducts heat to the glass and kinda grabs the glass and holds it in place.
https://www.amazon.com/dp/B06XX7ZMN7/ref=cm_sw_r_cp_tai_CWLzDbGGRP9RB
Get an all metal one till you want to try one of the more advanced extruders. https://www.amazon.com/dp/B07QHBNYD9/ref=cm_sw_r_cp_apa_i_yJtzDbQ7KTZWW
I too love to build kits and I am going to school for computer engineering, and my Ender 3 is amazing. After some help from tuning and a firmware update, it prints amazingly and is extremely accurate. it takes a couple hours to set up, and to tune the printer to be perfectly dimentionally accurate, but I can say that was all worth it after I got the results from the prints. Since you have a little higher budget than the printer actually costs, I would advise buying a few upgrade kits for it also. I just put a BLTOUCH sensor onto mine, and I wish I had done it in the first place. It makes leveling a breeze, and makes the prints come off the bed extremely easily and smoothly. It also makes changing of build surface easy, as you don't need to relevel the bed every time you swap build plates. Also the bowden extruder that comes with the Ender 3 is not very good, but a machined aluminum one is relatively cheap, so I would also buy that right off and just replace the included one. After that is all said and done, you will still have some money left over for filament too.
https://banggood.app.link/09A68ozu8Y
https://banggood.app.link/4WoAcfDu8Y
https://www.amazon.com/dp/B07QHBNYD9/ref=cm_sw_r_cp_apa_i_Ic4uDb9KN8J3Q
I also recommend Hatchbox PLA or Inland PLA+, as I have had great experience with both.
https://www.amazon.com/dp/B00J0EE1D4/ref=cm_sw_r_cp_apa_i_0d4uDbADZH76K
https://www.microcenter.com/product/504219/inland-premium-175mm-gray-pla-3d-printer-filament---1kg-spool-(22-lbs)
TLDR; Ender 3 with linked upgrades and hatchbox or Inland PLA+. Happy Printing!
The TH3D board is 32 bit and has more room for firmware. So its "future proof" but I just got done installing exactly what you want to do, and the Creality 1.1.5 board with BLTouch worked just fine. Just make sure you get 2m of extension and not 1m.
​
https://www.amazon.com/dp/B07FR2LLZP/ref=twister_B07BH4PF2Y?_encoding=UTF8&psc=1
​
Print a BL touch Bracket first. I forget if I used the 3mm lower one or the regular one. I think I did the 3mm lower one.
https://www.thingiverse.com/thing:3388571
I just noticed that the official seller of the Ender 3 Pro design has lowered the price to $300, and is on sale besides for just $260
https://www.amazon.com/dp/B07K3SZBHJ/
If you get this, be sure to also get these essential tools:
https://www.amazon.com/dp/B072WS3M9H
^ for cutting support structures off of your models, the angled cutting head makes it easy to get into small crevices
https://www.amazon.com/dp/B075SLTY8B
^ after slightly bending the removable magnetic heatbed, use this to help pry the 3d print off the rest of the way
https://www.amazon.com/Gwisdom-Extruder-Upgraded-Replacement-Extruders/dp/B07FKD4FZD
​
https://www.amazon.com/gp/product/B01B7ZH2LG/
​
https://www.amazon.com/gp/product/B074XRYC1M/
​
https://www.amazon.com/gp/product/B0179IODB2/
​
https://www.amazon.com/gp/product/B07JPLV5K1/
​
https://www.amazon.com/gp/product/B07BC6WH7V/
​
https://www.amazon.com/gp/product/B07J9VGX54/
​
https://www.thingiverse.com/thing:3732669
​
https://www.thingiverse.com/thing:2920060
​
https://www.thingiverse.com/thing:3705354
​
https://www.thingiverse.com/thing:2887348
The one I bought is no longer made. Here is another. [Gulfcoast Robotics] M3 Stud Screw-In thermistor 100K NTC 3950 - drop in replacement, works for any China 3D Printer extruders - Anet, Wanhao, Maker Select etc. https://www.amazon.com/dp/B07B3W8XQ4/ref=cm_sw_r_cp_api_EVR3Ab1RHWZXM
I'm using one of these:
https://www.amazon.com/Athorbot-Printing-Surface-CR-10S-printer/dp/B073TW738G/ref=sr_1_1?ie=UTF8&qid=1522995749&sr=8-1&keywords=athorbot+build+sheet
Honestly I don't like it as much as genuine buildtak but it gets the job done and it is dirt cheap. I printed that with a big skirt so it wouldn't fall over, and bed adhesion is pretty solid.
Do you have pictures? I'm interested in what you actually got.
If you're missing the screw hole for the washer to hold it in, you can get https://www.amazon.com/Gulfcoast-Robotics-Thermistor-Duplicator-Printers/dp/B07B3ZYBTM/ or something similar, which is the same type thermistor, just in a screw mount instead.
Doubtful. You really need a schematic to know what is going on with the heater. It could be related to the low/high heat capability.
I would recommend building this out of individual components like these heater cartridges and adding a fan an temperature sensor, and several relays to control them (along with micro controller) unless you can find a simpler space heater with no actual complex circuitry inside.
That little heater you have looks surprisingly complex, several diodes in a probable bridge rectifier configuration, some kind of transformer, etc. it’s not at all clear why a mini space heater needs a low voltage power supply internally unless it has a digital temperature readout or an electronic temperature control (with an adjusting knob).
I haven't seen this mentioned yet - but when you eventually get tired of warping and buildtak issues on your heated bed, I've had great luck with this one
I can level the entire build surface to within a 0.05mm range, and it is harder than the removal tool that comes with the printer, so you don't scratch it. It also gets a glass like finish on the bottom without requiring hair-spray (unless it is something like PETG). Installing it can be a little tricky, because you have to rewire it for 24V (it supports both, but comes set to 12V).
I'm also a fan of this filament guide.
I've done z-braces, micro swiss all metal hotend upgrade, spring cups, thumbwheels, y carriage as well.
Lately I've been using the following cooling: Extruder Blower, CIIICooler, 24V Dual Bearing 50mm Radial Fans
I prefer the Ciiicooler for seeing the print as it happens. The dual bearing fans are expensive, but create great airflow for very little noise and vibration. I worried that some of the other fans I tried wear creating a lot of vibration at the tip of the hotend, which would translate into artifacts when printing.
I had more than a few false starts - I really tried to make drylin bearings work, but they ultimately had too much play in them. They are definitely quiet, and don't require lubrication, but if you can shift your hot end and heated bed by pushing on them, it will reflect in your print quality.
I also tried the M4 drive gear on the extruder, but the steel one that comes on the i3 plus was actually better for me. Beware that adding 1mm to the diameter of the drive gear (like the M4 version does) actually reduces your steps per mm, giving you less control.
Also, and I wish I had done this early on, make sure everything is tightened and squared. My idler on my y axis was loose so that it was at an angle and had play in it, which created problems that were hard to diagnose. Also, get a square layout tool and make sure your heated bed is square to your gantry frame and x axis rods.
It seems that your comment contains 1 or more links that are hard to tap for mobile users.
I will extend those so they're easier for our sausage fingers to click!
Here is link number 1 - Previous text "one"
----
^Please ^PM ^/u/eganwall ^with ^issues ^or ^feedback! ^| ^Delete
> https://www.amazon.com/Anycubic-43188-247109-Platform-Aluminum-220x220mm/dp/B075375HBY/ref=sr_1_1?keywords=AnyCubic+Ultrabase+tempered+glass+heat+bed&qid=1568382223&s=gateway&sr=8-1
Did you use a video or can you share the instructions you used to install this hot bed?
https://smile.amazon.com/Zeelo-Extruder-Upgraded-Replacement-Extruders/dp/B07QHBNYD9/ref=sr_1_4?crid=21I6F3166HVQC&keywords=ender+3+replacement+extruder&qid=1568573951&s=gateway&sprefix=ender+3+extruder+repl%2Caps%2C190&sr=8-4
There are a few on amazon just like this, I watched a youtube video and a few other pages like this one below recommended it. It took only a few minutes to put into place and now I don't have to worry about cracking it.
https://all3dp.com/1/20-must-creality-ender-3-upgrades-mods/
Just wanted to make a comment here that it was the thermistor. I bought this part and replaced it and it's working great again. Hope this helps anyone in the future with the same problem.
I have had mine for 3 months and I only replace things when they break. I now have replaced my Bowden tube and couplers with a capercorn tube and metal couplers. https://www.amazon.com/dp/B07PS3NH82/ref=cm_sw_r_sms_apa_i_GltDDb67XDCT1
Then my extruder broke had to replace it. https://www.amazon.com/dp/B07QHBNYD9/ref=cm_sw_r_sms_apa_i_KmtDDb9WPKV3T
Also a glass bed just cuz also get a bunch of .4 tips cuz you don't want to mess with cleaning or a degraded hole when you are already replacing stuff. But that was all in the little time I have had it. I maybe have done 50 prints. Although some had tons of parts.
No fan shrowd or fan replacements yet....... I am running basic cuz I am new to this but I learned a ton in the short time doing this.
ahh, yep! hah, that's where I've landed as well--I want to go back and try the OEM fan. My problem is that one of my fan blades snapped off (accidentally touched it with PETG filament when I was changing it out). So I just need to find a good OEM fan I can buy new.
This is what I've found: https://www.amazon.com/Creality-Original-40x40x10MM-Cooling-3D/dp/B07FTNCC9B
Hopefully it'll be equivalent (although FWIW my original fan had 9 blades, the one in the pic has 7.... we'll see when it arrives).
And wow what a difference on your two prints, night and day difference! The yellow print looks very similar to the issues I dealt with all weekend (but mine has been on a much smaller scale). I tried soo many different combinations of speed, retraction/coasting, temperature, and had both under/over extrusion. Nothing would consistently give me good results.
Just like my comment below this one, isn't the magnetic bed better? Do you know if the standard Ender 3 supports the magnetic bed if I bought the magnetic strip like this? Or is this only for the Ender 3 Pro?
There is an aluminum upgrade for that issue. Just bought mine on amazon a few days ago. Arrived yesterday, haven't put it on yet.
https://www.amazon.com/Gwisdom-Extruder-Upgraded-Replacement-Extruders/dp/B07FKD4FZD/ref=mp_s_a_1_1_sspa?keywords=ender+extruder+upgrade&qid=1567512578&s=gateway&sprefix=ender+e&sr=8-1-spons&psc=1&spLa=ZW5jcnlwdGVkUXVhbGlmaWVyPUExNEpHSUtCUTZRWUZEJmVuY3J5cHRlZElkPUEwMTI1NTYyMUo4S0xWNEk2UDZSVCZlbmNyeXB0ZWRBZElkPUEwMTQ2ODA0MTVQUldaSVY5UkI4SSZ3aWRnZXROYW1lPXNwX3Bob25lX3NlYXJjaF9hdGYmYWN0aW9uPWNsaWNrUmVkaXJlY3QmZG9Ob3RMb2dDbGljaz10cnVl
Also maybe look into this roller from thingiverse:
https://www.thingiverse.com/thing:3052488
That would work, you'll just have to be careful that you've still got enough length on the tube that you don't choke up the filament path when the X axis is all the way out.
Here's a link for replacement fittings.
https://www.amazon.com/gp/product/B00WE1A3D2
This is for extra PFTE tubing
https://www.amazon.com/Meters-Filament-3D-printer-Rostock/dp/B00THZKC8Y
If you bought one of thos $10 clones I think it would be better just buying the cables to your regular direct drive extruder that came with the printer, I bought one these thermistors and I also bought this heater cartridge. There is also this one that comes with 5 thermistors and 5 12v heater cartridges for $12.
It's possible that you forgot to switch the jumper back from USB to VREG. That would explain why the printer is only turning on the lcd and thermistor when plugin in the usb cable.
Is this what you are looking for?
I used these ones on Amazon on both my printers, and other then having to extend the wires on one of them the worked perfect. I think it was the duplicator that needed a bit more than 1 meter of wire which comes with this one, but I just spliced it into the old connectors wire and it was good to go. I used this 12v 1/4in heater cartridge in my Duplicator I3 and the 24v 1/4-in Heater Cartridge in my CTC Bizer Dual with MK10.
Best/easiest option is to get a Pin 27 board. It's a little breakout board that is a simple plug and play add on so that you don't have to cut any of the wires or do anything to change your wiring harness from stock so it can always be removed. It also leaves the buzzer intact which most mods do not.
They were just recently listed on Amazon as well. $20 is a bit pricey but it is worth it to save the time. I bought mine off of eBay from a guy in the UK for $12 each and they came in about a week. So you can always check eBay as well.
Im thinking of getting these, will they be compatible?
https://www.amazon.com/gp/product/B07KB1QJGJ/ref=ox_sc_act_title_2?smid=A39S0U3UP1U7UG&psc=1
https://www.amazon.com/gp/product/B01E1HANLS/ref=ox_sc_act_title_3?smid=A36KNDPALTN82Y&psc=1
https://www.amazon.com/6-35mm-Ceramic-Cartridge-Printer-Extruder/dp/B071K8Z9KF/ref=sr_1_1_sspa?ie=UTF8&qid=1549548097&sr=8-1-spons&keywords=wanhao+i3+heater+cartridge&psc=1
​
I believe the need the 6.35mm Diameter or 1/4in heater cartridge if yours is the same as the v2.1 MK10 which is more rare as most generics you find on sale are the standard 6mm (5.9mm) ones.
This one will work perfect in the v2.1, if that is what you have just splice it to your original wire/connector end going to your PCB as the wire length on this is 100mm (1 meter) with bare wire leads pre-stripped.
Wanahoo Duplicator I3 v2.1 / Monoprice Maker Select v2.1 6.35mm Heater Cartridge
Diameter: 6.35mm
Length: 20mm
Volts: 12v
Watts: 40w
If you are printing directly on the glass make sure it is clean. Oil from you touching it is bad. Clean with Isopropal Alcohol before a print.
I ended up buying a cheapie print surface from China. It is mind blowingly good. Now my problem is removing the prints if I am too impatient to let it cool down first.
Initiallly I could not remove the prints but I was being too impatient. I now swap out the print glass if i have to print something straight away, otherwise I have to just let it cool before removing the print.
https://www.amazon.com/Athorbot-Printing-Surface-CR-10S-printer/dp/B073TW738G
4 meters sounds like it would be plenty, a parts site I found lists a 5 meter belt as a replacement for the x and y axis, so 2.5 meters seems like the length it's asking for, but I'm not sure how much leftover you'd get with that.
The pro has a different bed surface, a neat magnetic one they sell by itself for around 18$ on amazon, an upgraded power supply that runs around 30$ on amazon, and a beefier Y axis bar. 40x40 instead of 20x40. The electronics area is inverted making a small fan cover print not needed. This is about all there is different from the regular ender 3.
Considering the two interesting parts are under 50$, I don't think it's worth going for the pro vs just getting those two parts yourself and upgrading.
Neither the ender 3 nor the pro have a bootloader, so be sure to add a tinyisp programmer to your aliexpress order.
I used one of these on my anet a8. It's a great bed.
Anycubic 43188-247109 Ultra Base 3D Printer Platform with Aluminum 12V/24V Dual Power MK3 Heatbed, Tempered Glass Plate, Durable Build Surface for Prusa I3 220x220mm https://www.amazon.com/dp/B075375HBY/ref=cm_sw_r_cp_apa_I-C-BbYQVVMK1
This is the one I ordered. I'll double check on the meter when I get back home for sure https://www.amazon.com/dp/B071K8Z9KF/ref=cm_sw_r_cp_apa_i_6Nu6CbVNX2YES
I had a hard time finding one. Ended up ordering the one off Amazon. It is 1/4" (6.35mm) and a PITA to find...
12V 40W 1/4-in (6.35mm) Ceramic Cartridge Heater for 3D Printer MK10 Extruder/Hotend https://www.amazon.com/dp/B071K8Z9KF
Edit: I ordered this prime and it said no ship date know... Came in a few days. I'm still waiting on the ones I ordered from AliExpress... It's been a month.
It is a glass plate on aluminum. Specifically this bed Anycubic 43188-247109 Ultra Base 3D Printer Platform with Aluminum 12V/24V Dual Power MK3 Heatbed, Tempered Glass Plate, Durable Build Surface for Prusa I3 220x220mm https://www.amazon.com/dp/B075375HBY/ref=cm_sw_r_cp_apa_q31TBb1HR4FW4 and this sensor at 12V BALITENSEN LJ18A3-8-Z/BX 8mm Approach Sensor Inductive Proximity NPN No Switch DC 6-36V https://www.amazon.com/dp/B078SF8SJ8/ref=cm_sw_r_cp_apa_.41TBbMVVGJGN no idea why it didn't work.
This is the one I got. It can be deceptively fragile and difficult to get it on but once you do, it works great.
I would cut an oversized piece, very carefully remove the plastic (both sides), lay it across the back of the glass very slowly, pop any big bubbles with a needle. Then flip it over and place it on the aluminum. You can trim the excess material by hand (tearing) or with a blade. Bring it up to temp for a couple hours and the rest of the bubbles will disappear.
Keep everything clean during the process and it will adhere as if there was glue on it. I washed my aluminum and glass with acetone before I started.
https://www.amazon.com/dp/B06XX7ZMN7?ref=ppx_pop_mob_ap_share
Man, thank you for helping me so so very much. I will begin by trying to help you answer anything you ask as best I can. From what I recall considering this thing is now over two weeks old and I've done like of stuff to it yet still having no luck (yet moving forward) I can say that the person I bought it from had apparently thought it was a thermistor issue as the old one was still on but in bad shape. So I tested it with the wires still attached and I thought it read pretty good like close to the 100k ohms I'm looking for on my other printers thermistor.
The one I put in it is one of the 100k ohm-er's I was speaking of and as far as I can tell it very likely is the cause of this 700° BS that is going on now...
Everything should be hooked up right as I went and double checked that as soon as I encountered.this issue after replacing the thermistor.
Here is the screw in thermistor I haven't tried yet:
[Gulfcoast Robotics] Thermistor Upgrade for Maker Select Plus and Wanhao Duplicator i3 Plus 3D Printers. https://www.amazon.com/dp/B07B3ZYBTM/ref=cm_sw_r_cp_apa_i_SHqyCbFDJB3A5
This is an Amazon link to the thermistors and heaters for the hotend that I've put into it since getting it:
Sunhokey 12V 40W Cartridge Heater and NTC Thermistor 100K 3950 for 3D Printer(Pack of 12pcs) https://www.amazon.com/dp/B07KXSFSKP/ref=cm_sw_r_cp_apap_kiwvfNkNbZTWP
And it looks like the E3D V6 hotend that I think comes stock on the makerfarm Pegasus 10 models.
And this all being said and what you have already mentioned it is highly likely that I need new thermistors? I did go to the site that sells these and the heater I put on it at least claims all the same specs. 12v 40 watt heater... So I felt better after reading that considering I had already put it on this machine...
You are a terrific person for reaching out to me about this I've had a few folks reach out and I'm still dealing with these issues some of them the same ones. I don't expect there to be a ton of folks out there that are expert enough to just take on this sort of thing site unseen so I will do my best to accommodate you in any way that may help me gonna go post links to some pics of I can....
https://smile.amazon.com/ANTCLABS-BLTouch-Leveling-Premium-Extension/dp/B07FR2LLZP/ref=sr_1_1?keywords=bltouch&qid=1570597988&sr=8-1&th=1
One of these:
https://www.amazon.com/Zeelo-Extruder-Upgraded-Replacement-Extruders/dp/B07QHBNYD9/ref=mp_s_a_1_4?keywords=ender+3+extruder&qid=1574692677&sprefix=ender+3+&sr=8-4
They’re inexpensive and well worth it. The stock extruder on my Ender 3 kept under extruding and making my prints come out all spongy, as the arm on the extruder wouldn’t grip the filament tight enough. I got one like this and haven’t had the issue since.
I'd say 8 months, PLENTY of printing. I only noticed it after rebuilding my printer with the Multi material mod, which required another run of the xyz calibration, which frustratingly it was not passing.
Very easy / cheep fix, 9 bucks on amazon for enough belt to replace both axis a number of times.
Unsure what specifically may have caused this failure, printer worked until I dissembled it, but they are bound to wear out eventually.
https://www.amazon.com/Meters-pitch-wide-Timing-printer/dp/B00F2IQNX8/ref=sr_1_2?ie=UTF8&qid=1502926845&sr=8-2&keywords=gt2+2mm+pitch+6mm+wide+timing+belt
I got a QIDI tech one which is just a older version of this which really I don’t think there is much different between the 2. I’ll try and quickly go over some answers and if I get time later today I’ll try and answer more.
1.) this print bed over time will be scratched up from use. You can replace the surface material which isn’t overly difficult but I would look for a different scraper tool. I use something like this and another set that is similar and it’s a lot easier to get prints off the bed. : https://www.amazon.com/dp/B075SLTY8B?ref=yo_pop_ma_swf
2.) it’s been done though I don’t know the process to swap out the bed to glass I just always used the surface pads. I got a new printer a month ago so this one has not been in use but I picked up some gecko tech surface pad I’ll try and find the link later but it’s like the build pad on the printer now but in theory it’s supposed to release the prints after it cools down.
4.) there is no set magic print speed it varies from material and model you print with I will try and find what my last speed was when I get home.
5.) temperature is another element based on the material you use. I got some brands that prints great at 200, 205, and some that prints at 215. Just have to try and find what works.
6.) you don’t really need a brim unless you get prints that don’t have a lot of surface contact think the last time I used a brim I had like 6 wide and 2-3 layers thick but try out different settings and see what might work for you.
7.) there is a few programs out there but I see a lot suggest fusion360 which is a good program but takes a bit of work to get used to.
8.) there’s several types of slicing programs out there. Slic3r and cura are the popular free programs but I used simplify3d which is a paid program which runs $150. Is it better than the other programs not really it has its good points and bad just need to look around and see what works.
9.) never used the slicer as they released it like 6-8 months after I got my printer so I can’t say for sure.
10.) This I think is the normal for other slicers I know slic3r, and simplify3d does it I never used cura but I think it also does it as well. The one that’s looking like vines is done by meshmixer.
11.) not sure the best way to go about this one but you can adjust the scale of the print on the x,y,z in the program and use a caliper for the dimensions and trial and error from there. There’s a little more that can effect this but I can maybe go over it when I get home.
12.) for tips I can’t think of any this moment but maybe try out some of the different YouTube channels out there like makers muse and 3d printing nerd and toms3d. Each cover different areas but should have some relation to some of the questions you asked.
I’ll get home in like 5 hours I’ll try and answer more then and try and go in depth on some other things.
edit: 1.75mm tubing - http://www.amazon.com/Meters-Filament-3D-printer-Rostock/dp/B00THZKC8Y/ref=sr_1_fkmr2_1?ie=UTF8&qid=1452791517&sr=8-1-fkmr2&keywords=mk10+ptfe+tubing
Just a cheap one.
I used this one: EAONE All-Metal V6 J-Head Hotend Full Kit with 5 Pcs Extruder Brass Print Head + 5 Pcs Stainless Steel Nozzle Throat for E3D V6 Makerbot RepRap 3D Printers https://www.amazon.co.uk/dp/B074NX68MP/ref=cm_sw_r_cp_apa_zw5NAb1C8GQ8V
However - it did come with a defective heater cartridge and Amazon did refund all of my money. I ended up using the original cartridge.
I also ordered a clone from Bangood as a spare - it took a while to arrive but looks identical.
The price you're seeing is quite high. It should be more like $15 for 2 meters, or about 6 ft. Here's some on Amazon for even less.
2 Meters PTFE Teflon Bowden Tube 1.75 Filament 3D printer RepRap Rostock Kossel https://www.amazon.com/dp/B00THZKC8Y/ref=cm_sw_r_cp_awd_owqywb1RNPAHK
I'm only two months into printing but would this be the one that would fit my monoprice maker select V2.1?
Anycubic Ultrabase 3D Printer Platform with Aluminum 12V/24V Dual Power MK3 Heatbed, Tempered Glass Plate, Durable Build Surface for Prusa i3 220x220mm https://www.amazon.com/dp/B075375HBY/ref=cm_sw_r_cp_api_UriXzbF2XV2SH
something along the lines of these: HERE (but for your bed size)
EAONE All-Metal V6 J-Head Hotend Full Kit with 5 Pcs Extruder Brass Print Head + 5 Pcs Stainless Steel Nozzle Throat for V6 Makerbot RepRap 3D Printers https://smile.amazon.com/dp/B074NX68MP/ref=cm_sw_r_cp_apa_i_qsqQCbFQ9MTFE
There are lots of sets pick one that has the stuff you need.
Got the same in a pack of 3 on Amazon for about $16 like a week ago. Switched to PETG on CR10 and didn’t want to mess with messy adhesion things. Printed a ton so far and 0 issues. https://www.amazon.com/dp/B073TW738G/ref=cm_sw_r_cp_tai_i_vtlcBb5J9PC69
Yup I saw both - the two cartridge sellers are:
https://www.amazon.com/gp/product/B078PRBP9Z/ref=oh_aui_detailpage_o00_s00?ie=UTF8&psc=1
and
https://www.amazon.com/gp/product/B00Q9Z1JUU/ref=oh_aui_detailpage_o01_s00?ie=UTF8&psc=1
Can you recommend any seller for a proper 6.25mm and/or heating blocks? These two sellers seem to have improper descriptions, and I haven't found a heating block with proper Maker Select specs. UncleChucks seems a bit overprices when compared to Amazon sellers selling packs of 5 for Chucks price of 1.
It's hard to tell what printer you mean (the names in your list that I know refer to multiple different printer models) but the Duplicator i3/Maker Select (and some Flashforges) use a Mk. 10 style extruder and hot end, and googling the others just gave me similar looking setups, so I assume that.
My understanding is that both heads on a dual head setup need to be correctly leveled to the build plate, whether they are both in use or not. If the second head crashes into the print while the first doesn't, either the second one is more than your layer height lower (which implies that this is more likely to be an issue whenever you print at a smaller layer height) or your print is shifting enough to cause part of it to stick up. That's assuming that you are not printing parts sequentially, which needs accurate clearance defined in the slicer to account for both print heads.
If by "bushing" you mean the PTFE liner inside the hot end, then running without it is, I would think, a bad idea. The hot end is designed to have that liner. Otherwise nobody would bother buying the all-metal hot end from Micro Swiss; they'd just take their liners out.
I suspect that without a liner, melted plastic is neither building up the correct pressure to fully depart the nozzle, nor constrained to do so, so it just sits there where the liner would normally be and burns. It may also be creeping back upward toward the cold end and solidifying.
(I'm also not clear how taking it out would help with Ninjaflex, since the extra wiggle room would give the filament more excuses to bunch up.)
You can buy lengths of PTFE liner from Amazon. Just make sure it's the same inner and outer diameter as the original (the mk.10 uses 2 mm and 4 mm, I believe).
On my machine, I have added the following upgrades:
I hope this helps!
I was losing hope that I might be able to move forward with using the BLTouch. Huge thank you for taking the time to reply with this in depth troubleshooting!
I didn't know that about TH3D but I had a hunch. I do like how it feels simpler to set things up though.
My BLTouch probe is a legitimate one from what I can tell. It has the QR code and version number (v3.1) on the little board where the wiring connects. I got it off amazon https://www.amazon.com/gp/product/B07FR2LLZP/ref=ppx_yo_dt_b_search_asin_title?ie=UTF8&psc=1
I didn't get a chance to do all of this but here is what I have done so far:
I want to check the mesh apply later so I went for the x gantry leveling and started to do the M48 test.
The gantry was slightly off so I tried to get it as level as possible. The right side is potentially 1-2 mm lower than the left. What I used to measure only measures in cm so this is eyeballing it.
Does the m48 test need to be ran on each corner or is a single run of m48 fine? If a single test is okay then the result is around .0014.
That is all I managed so far. I will finish the rest of the troubleshooting tonight.
I'll have a better look at the feeding tomorrow, if I watch it a while it should be visible if it's slipping like with the other part I'd tried.
​
I'll try get some test prints to check the belts first.
For the nozzle I'd bought a replacement set from most of my research they're a good brand figured they be trustworthy, and they're also who I used for my filament. I'm guessing half the stuff is imported from China and just rebranded, but you've got to put your money somewhere, I guess. I do have another spool but its flex, so not sure if that'll actually help.
I recently went through exactly this same situation. I was ready to upgrade to a microswiss all-metal hotend and the catastrophic failure of the print leaving gunk all over my heater block forced the issue. In my case, I opted to replace everything I could including the thermistor and heating element. They are both very inexpensive and you should have a spare laying around anyway in case you need one in a hurry. So...how to clean your heating block...
Fire. Seriously. I used a combination of blowtorch and solvent to remove all the gunk (and mine was a LOT worse than yours...it basically encapsulated one entire end of my heater block, entombing the thermistor, heater and associated wiring).
I used your typical propane torch, holding my heater block in a vise or vise grips. I'd heat it up then quickly wipe away the melted PLA with a clean cloth. Heat, repeat. Then I'd soak the whole thing in some solvent (acetone, MEK, etc). Repeat until clean. Pay careful attention to the tiny setscrew that holds the heater in place...work it free with a hex wrench while it is hot...chances are you got some PLA stuck on there, too. Obviously be super careful when you do this. Ventilation, fire-extinguisher handy, your mom on speed-dial.
When you replace the thermistor and heating element you'll need to do some soldering. This is pretty unavoidable. Those elements come with very long wires attached to them and the Wanhao/MP print heat doesn't need that length. Clip it short, make good solders and use heatshrink over your joints. For the thermistor I simply cut out the center section of the wire and spliced the connector back to the component at the length i needed.
Now, when you put it all back together you will have the option of re-wrapping the heater block with cotton and Kapton tape. People seem split on if this is necessary, but since I'd battled heat creep before I didn't want to introduce any more heat up the block...so I opted to do it. It's a bit tricky if you get the non-punched cotton strips like I did. Luckily I had hole punches handy to make the provision for the hotend and nozzle to get thru the insulation. If you don't have these tools (or don't quite know how to do it), i'd shop around for pre-punched sets.
good luck. Let me know if you need any more help.
here are the parts i used:
https://www.amazon.com/gp/product/B071K8Z9KF/ref=oh_aui_detailpage_o00_s00?ie=UTF8&psc=1
https://www.amazon.com/gp/product/B01N4KY6TR/ref=oh_aui_detailpage_o01_s00?ie=UTF8&psc=1
https://www.amazon.com/gp/product/B076NW3GNH/ref=oh_aui_detailpage_o02_s00?ie=UTF8&psc=1
https://www.amazon.com/gp/product/B01E1HANLS/ref=oh_aui_detailpage_o03_s00?ie=UTF8&psc=1
I used this one: https://www.amazon.com/gp/product/B06XX7ZMN7/ref=ppx_yo_dt_b_search_asin_title?ie=UTF8&psc=1
and it has worked great. I cut it in half and let a friend use the otehr half. NO MORE BINDER CLIPS! I freaking hated those clips from day 1.
https://www.amazon.com/gp/product/B01E1HANLS/ref=ppx_yo_dt_b_asin_title_o08_s01?ie=UTF8&psc=1
Had almost the same problem on my Monoprice clone - would stop feeding, changed brands, etc. until finally the filament had fused to the PTFE tube in the hot end. Required a complete tear down to find it. I figured as long as I'm in there, upgrade the extruder plate
https://www.amazon.com/gp/product/B06WVB6CYD/ref=ppx_yo_dt_b_asin_title_o08_s00?ie=UTF8&psc=1
and the thermistor
https://www.amazon.com/gp/product/B07B3ZYBTM/ref=ppx_yo_dt_b_asin_title_o08_s01?ie=UTF8&psc=1
Follow the instructions - do not skip the "tight, then back off 1/4 turn. Heat up to 250 and then tighten the nozzle" steps.
Strip off the Kapton tape (if it hasn't already torn off) and use these instead
https://www.amazon.com/gp/product/B07B9KW1L1/ref=ppx_yo_dt_b_asin_title_o05_s00?ie=UTF8&psc=1
I probably bought them from AliExpress since they're cheaper there but you can easily find them on amazon if you want them sooner than later, ebay, or pretty much anywhere that sells printer parts.. easy way is to search 'e3d v6 push fitting' or 'e3d v6 Bowden fitting'.. just remember you'll need to have m3 bolts that are a little longer and you need to print the part they screw into that's in the voron1.5 extras folder IIRC
Hi all! I've been pulling my hairs out trying to figure this out.
Printer is MP Maker Select v2.1 driven by the latest version of OctoPrint.
I just installed this 4mm glass bed with a PEI sheet: https://www.amazon.com/gp/product/B07B2YLWF9/
The glass is held in place by binder clips. The extruder doesn't bump into them and the glass or PEI didn't get knocked loose. The print was well adhered to the bed as well.
The first print (first two pics) had a shift in x and y direction.
The second print was resliced (last three pics) had a shift in the x direction.
I have no idea what's going on because it prints perfectly fine until that point, then seemingly shifts a random amount. Seems like both get shifted around the same time. (+/- 3 layers) I've checked belt tension and they seem tight enough. I don't see how adding a glass bed could cause a X-axis shift, I thought it might only cause the Y-shift.
I've uploaded both gcode files here:
https://drive.google.com/drive/folders/15f8mJKpEXk4W7qi-lONCpl3Ih5xEwrr6?usp=sharing
Both gcode files look fine to me when viewed on an analyzer. They were sliced in Cura 3.0.4. Here are my settings:
https://i.imgur.com/aR8jBUK.jpg
Going to print a benchy or calibration cube so I can see what's happening.
Any suggestions would be greatly appreciated. Thanks for looking!
Update: The benchy has gotten further along than the first two prints without any shifts.
It may be 10 times the price of a single thermistor, but this is convenient as hell.
https://www.amazon.com/gp/product/B07B3W8XQ4/ref=ppx_yo_dt_b_asin_title_o02__o00_s00?ie=UTF8&psc=1
Not from Prusa, but here are some other things I use over and over and over and am glad I bought. These are not affiliate links and you can probably find some of these items cheaper elsewhere:
Thin craft spatulas for removing prints: https://www.amazon.com/gp/product/B075SLTY8B (some say "never scrape using a metal tool" but these are very thin and flexible and really help with some prints)
Cleaning filament: https://www.amazon.com/gp/product/B00MVIYNFW
Silicone socks: https://www.amazon.com/gp/product/B07779TP4S
Good quality hex drivers https://www.amazon.com/gp/product/B0006O5014 these will make assembly and maintenance MUCH easier than the included tools. Especially the smallest one that fits the set screw in the Bondtech extruder gear really well, much better than the "decent" hex keys I already had in my toolkit
I wouldn't use glass. I tried glass and I can say that supports don't stick to it at all. try this.
I overpaid and got this , but temperature regulation is a big deal, you don’t want melted Teflon or a fire.
So far I've made the following Mods:
Z-Axis Stabilizer
https://www.thingiverse.com/thing:1549403
Cii Cooler
https://www.thingiverse.com/thing:2004629
Y-Carriage upgrade
https://www.amazon.com/gp/product/B07B251KBS/ref=oh_aui_detailpage_o03_s00?ie=UTF8&psc=1
Glass Bed
https://www.amazon.com/gp/product/B07B2YLWF9/ref=oh_aui_detailpage_o05_s00?ie=UTF8&psc=1
Y and X Belt Tensioners
https://www.thingiverse.com/thing:1784375
Adjustable Z stop
https://www.thingiverse.com/thing:2916757
I had a problem somewhat similar at times. My ender 3's bed was a bit warped. The buildtak surface worked well (never used tape) but yes, prints were a bit difficult to get off without scraping and damaging myself or the bed surface sometimes. So i bought this: https://www.amazon.com/gp/product/B07F6CLTD7/
And it has changed everything. As long as you get the bed heated up to 60 degrees (and let it sit for a short bit to make sure the actual glass is that temp) you will get fantastic, flat, first layers. And prints that pop off on their own once the glass cools down. Warning, make sure the nozzle doesn't scratch the glass and don't use sharp spatulas on it. I bought these: https://www.amazon.com/gp/product/B075SLTY8B and they work perfectly. Thin, not sharp, flexible, pops things off no problem, even if the bed isn't cooled down.
Hold the glass to the bed with some tiny binder clips. Just make sure the print head doesn't run into the clips and you're good. I ended up changing out the cooling set up so that i had a thinner profile around the extruder to make sure i lost less print area due to the clips. I printed this: https://www.thingiverse.com/thing:2911981 and like it, but there are many other fang style ones out there.
For leveling i use a piece of printer paper, folded over. Took calipers to it and it's about .2mm in that set up and i level just so the nozzle scratches the paper (not holds it) and that seems to work for me.
couldn't find em on their own but heres the one i ordered with the extensions https://www.amazon.com/gp/product/B07FR2LLZP/ref=ppx_yo_dt_b_asin_title_o00_s00?ie=UTF8&psc=1
I agree with /u/DesignFlaw06. The MMU2S is not difficult to assemble or use. It does add a few possible problems but they're negligible in the long run. Single color prints still work fine, you just have to
Load to Nozzlethe desired color after each printer reset, before starting the first single color print - other than that it works just like before, and you can print your old single color gcode without problem. I would definitely print this M10 passthrough adapter and use that instead of the stock one. It does require 5x m10 adapters which you can get here for $7, but is significantly better than the press fit design of the original.I haven't had any problems with my MMU2S since I swapped for the M10 adapter plate. I haven't tried using any dissolving supports yet but it's definitely on my list of things to try.
Edit: In my experience, if you forget to
Load to Nozzleafter a reset and before starting a print, on the first single color print the MK3S will run the mesh bed leveling and then prompt to do aLoad to Nozzleanyway, but will do so right against the bed leaving a mess on the nozzle. Not a huge deal at all, it's just a tad annoying since it gets filament on the nozzle and can screw up your first layer. After first turning on the printer, I prefer to move the extruder up maybe 100mm off the bed, then do aLoad to Nozzle, pull the filament trail left from the "swap", then start my print. This is the same as if you had manually swapped filament without the MMU2S. I am using a slightly older MMU2S firmware so it's possible they've changed this behaviour in the newest firmwares. I only have to do this when turning the printer off and on or doing a reset -- otherwise I can just keep printing and printing as long as I want without doing aLoad to NozzleYeah, that tube is toast. Try pulling the tube down through the coupler, as there is a huge bulge at the bottom... Though you've probably already tried that.
I would recommend all new couplers while you're at it. If you're on the stock couplers, they are pretty much crap.
If you don't have a length of tubing to replace it, I would recommend this kit:
https://www.amazon.com/gp/product/B07PS3NH82/ref=ppx_yo_dt_b_asin_title_o01_s00?ie=UTF8&psc=1
It's a full meter of tubing, two complete sets of couplers, a tube cutter and clips.
If you don't need the tubing, the couplers can be had for a few bucks.
Couple of thoughts -
Also, it will cost you some money but replacing the Y carriage and adding a good glass plate help too. I'll edit this in a sec with the links.
Edit!
Glass bed: https://www.amazon.com/gp/product/B07B2YLWF9
Y-carriage: https://www.amazon.com/gp/product/B07B251KBS
I originally was using thermal pads between the glass and the print surface. Eventually I found I had better results by skipping the pads, peeling off the print surface, and putting the glass directly on the metal bed with small binder clips on the left and right edges. I use Elmer's purple glue sticks for adhesion and rough it up with a sanding block between prints. Make sure your Y axis rods are level, as well.
Good luck!
https://www.amazon.com/Creality-Original-40x40x10MM-Cooling-3D/dp/B07FTNCC9B/ref=sr_1_3?keywords=ender+3+hotend+fan&qid=1563636450&s=gateway&sr=8-3
This is an exact replacement. I had zero problems since.
It's most likely your PTFE tubing. I recommend you get this here: https://www.amazon.com/Authentic-Capricorn-Filament-Upgraded-Pneumatic/dp/B07PS3NH82
I just installed it and my prints are beautiful.
https://i.imgur.com/EhRSqPF.jpg