(Part 2) Best beer brewing equipment according to redditors
We found 1,553 Reddit comments discussing the best beer brewing equipment. We ranked the 599 resulting products by number of redditors who mentioned them. Here are the products ranked 21-40. You can also go back to the previous section.


Don't buy a kit! They sell you all kinds of shit you won't use when there are better options for similar money.
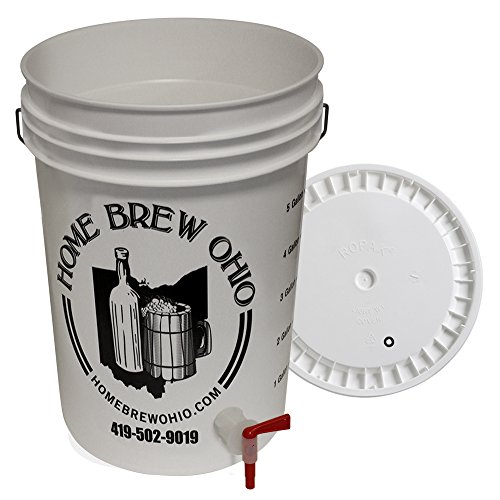
Get a brewing bucket as if you don't have a bottler then this will make your life so much better.
Get 2 carboys (glass is best but better bottles will work too). Check Craigslist for these...you can get some awesome deals.
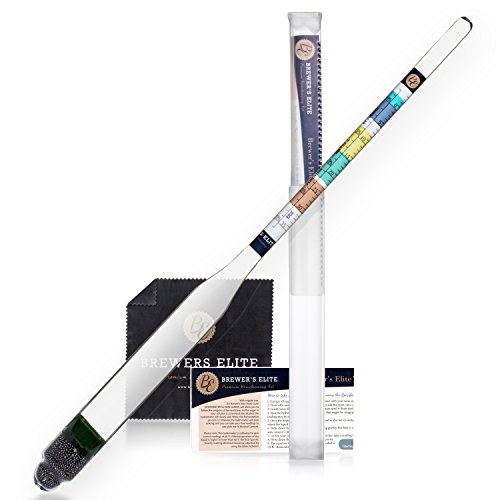
Get 1 Refractomoeter instead of a hydrometer because they use WAY less of your must to calculate and they aren't mega fragile like hydrometers are.
You will want an auto siphon
You will want a carboy brush that fits on a cordless drill because cleaning a carboy without one fucking sucks (and for 18 bucks this is a no brainer).
You will need sanitizer. I personally like Iodophor because it's super cheap, it doesn't really foam up and it lasts forever. I bought one of THESE bottles like 2 years ago and it is about half full even though I brew between 50-100 gallons a year.
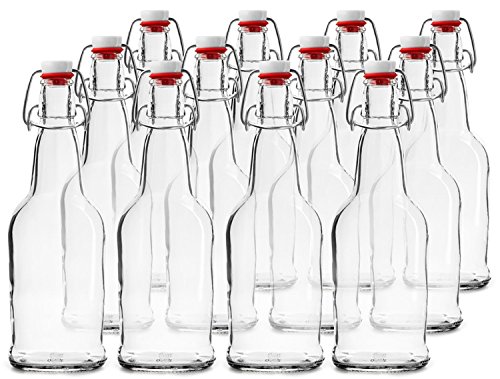
I always advocate people start with beer bottles rather than wine bottles. The reason for this has less to do with the bottles and more to do with equipment. The Ferrari Bottle Capper is 14 dollars while a good floor corker for wine bottles will set you back 60 bucks. In addition, it's cheaper to bottle in 20 ounce beer bottles with caps rather than in wine bottles with good corks. Use of a double lever corker for wine bottles should be considered a war crime...seriously...unless you're a masochist who loves dumping wine everywhere and having to clean it afterwards...then just avoid them...they are absolutely awful.
If you go the wine bottle route then NEVER use agglomerated or colmated corks (the ones made from tiny pieces of cork glued together) as they fall apart and will leave chunks in your bottles. In addition they don't age well, so you are much more likely to lose your brew to spoilage. I like synthetic Nomacorc but you can also buy very good quality solid natural corks as well.
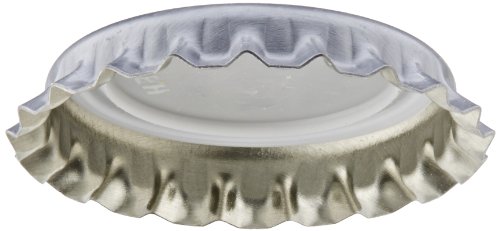
Good oxygen absorbing bottle caps on the other hand are mega cheap. Again...this isn't about one being better than the other, so you can use either one.
For wine bottles, I REALLY like the ones with screw tops because they make it nice and easy to cap your bottles once opened. But for all of your bottles buy these locally...shipping will double or triple the cost of these vs buying locally. I get them for 15 bucks a case a few miles from my house...they're almost 30 a case on Amazon or close to that from Midwest or from Ohio (shipping is like 11-15 dollars a case.)
For beer bottles...I prefer clear, but they'll be tough to find locally so I often end up with brown ones. Again...buy these locally not online due to shipping costs. Your local brewing supply stores buy these pallets at a time so even Amazon can't compete with the lack of shipping costs.
Firstly, once oxygen has entered the bottle, the countdown is on until it goes stale. You can try to reduce the time exposed to oxygen, but short of recarbonating the bottle with more sugar and yeast, you're never getting the oxygen out.
Secondly, you're battling against losing CO2. The best bet to keep CO2 in solution is to keep the beer cold. Beer loses CO2 as it warms up. So pour your first glass, and then get the bottle back in the fridge ASAP.
Thirdly, and I have no science to back this up, I like to use a rubber cap to seal my bottle in the fridge. I figure this will physically block some of the CO2 from escaping, and reduce the oxygen getting in, but I honestly don't know if it works or it's just placebo. I've left half full bombers sit in my fridge for 3-4 days with a rubber cap with some solid success though.
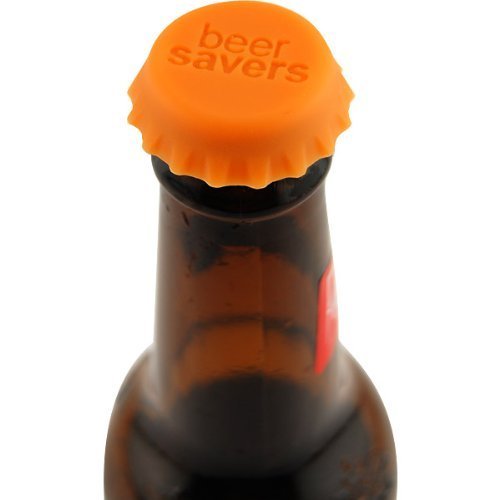
Beer Saver Cap I'm talking about : https://www.amazon.ca/Beer-Savers-Silicone-Rubber-Bottle/dp/B003Z5GW0O
Looks like the top two photos are in the open position, and the bottom is closed. Pushing down towards it closes the clip, pry the lever open to release tension. Describing this is hard.
Think about a bottle with this kind of top. Similar concept! https://www.amazon.com/dp/B078JYNSCR/ref=cm_sw_r_cp_api_i_ev8jDbJ87MJPR
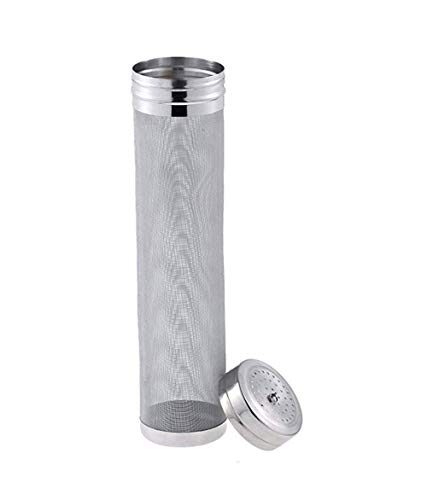
Stainless mesh hop strainers are amazing for racking liquid off of fruit. Something like this.
I recently made a melomel with 30# of crushed blueberries and about 18# of honey. It hit about the 5 gallon mark. As you can expect it was pretty crowded in the bucket. I gently finessed the strainer down into the mead, put my racking cane inside the strainer, and racked out into secondary. I doubt a single bit of fruit made its way in there and the siphon didn't get stuck at all.
In the end I was able to get about 2.8 gallons of mead without pressing which is pretty much what I was expecting to get. Pretty impressed!
otherwise known as amber bottles I can buy at my local Sprouts, Natural Food Grocers, or any other place that sells patchouli.
Also available on Amazon if you don't feel like venturing out. https://www.amazon.com/32-Ounce-Kombucha-Growler-Polycone-Phenolic/dp/B0749ZWF1C?ref=ast_p_pc_rc
Or you could get this for $30.
http://www.amazon.com/Faucet-Chrome-Cornelius-Disconnect-Attached/dp/B003ZZRR3K
Get one of those 2-3 gallon jar/beverage dispensers with a spigot (make sure spigot is not metal, many look metal but aren't). It makes bottling so much easier. Also, a funnel. And some type of bottle with lid like this
Beer Savers! I use them, they work. http://www.amazon.com/gp/aw/d/B003Z5GW0O?pc_redir=1413281083&robot_redir=1#
If you backfilled whatever vessel you were pouring into with CO2 you could use a coffee filter of some sort in theory without oxidation. When the mead flows through the filter it's aerated and oxidation from this is the #1 mead killer for rookies.
The reason it gets shit on (and rightfully) is that it is completely and totally useless and if you are doing it you are doing it for the wrong reasons, either due to having the wrong tools or not enough patience.
I just racked a 2 no water cherry 5 gal meads with a cane and no filter with no issues. A baffle on the cane prevents the worst of clogging.
https://www.amazon.com/Fermtech-5478-6H-Auto-Siphon-Tubing-Clamp/dp/B00SDLLZDY/
There is a photo of one with a clip. This allows you to not stuff it in the shite in the bottom, and the baffle prevents you from sucking it up.
If you don't want to waste any mead at all, you can toss the tailings in a smaller carboy in the fridge and decant of the sediment and consume right away. You should get 95%+ of your mead that way without fruit.
My cherry meads had 10 lbs of fruit per gallon, and one I bagged the other was free fruit. The free one was slightly more annoying to rack while the one in the bag was set and walk away after the bag of fruit was removed. Bags in a bucket primary are the easiest way to deal with fruit.
If you have piles of fluff from pureed fruit, badly flocculated yeast, or whatever else, cold crashing and bentonite is the proper answer, and failing that time. And don't puree fruit if you are concerned about yields.
Lastly, you won't clarify mead without ~1 micron filtering. Anything larger than that will settle in hours to a few days. Coffee filters are ~20 micron. They will only remove gross solids like fruit skins.
I have a sterile filter rig that steps from 25 micron to .45 under co2 pressure. Filtering has a purpose when it's being used as a good tool, not a crutch.
For extract brewing, taking gravity readings is less important as you are guaranteed roughly the correct amount of sugars that the recipe plans for. It will mean you could theoretically run into a problem with a stalled/incomplete fermentation and not know it, but I have done dozens of extract batches without taking gravity readings and have never had it be an issue.
As far as priming, you can do one of three things:
It's sold by Amazon, not a 3rd party... so I don't think it is. Unless whoever Amazon buys it from is promoting it, which I doubt.
ref=in amazon links just tells amazon which button the user clicked.tag=is what is used for the amazon affiliate program (examples)./u/Akira_Yamamoto could have removed everything after
/dp/B00H7HFINS/and the link would still work.6.5gal plastic fermentor - $17.88 (Don't bother with glass fermentors!)
6.5gal Bottling Bucket - $18.81
Hydrometer - $12.99
3 3-piece airlocks - $5.00 - trust me, they'll break.
stopper not needed with plastic fermentor
Bottle filler - $5.09
10 ft 3/8th inch tubing - $10.99
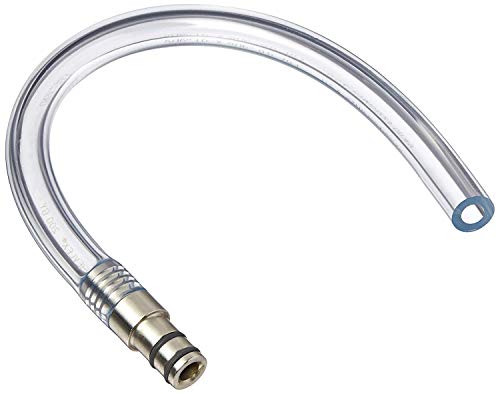
Auto siphon - $8.76
don't need a bottle brush with plastic fermentor
144 bottle caps - $5.78
Use any pure sugar for priming - just calculate it right. I use cane sugar without issue.
Wing bottle capper - $15.48
Dial thermometer not really needed if you're slapping on an adhesive one, but definitely get this for a hot liquor tun if you're doing that.
Wine thief - $11.20
I never used a funnel or fermentor brush - you can use anything to clean but I suggest Oxyclean rinses
32oz Star San - $20.70
Adhesive Thermometer - $4.84
Total Cost: $137.52. Not ridiculous savings BUT you get 32oz of star san instead of 4oz of io-star which will last you years and sanitizer is expensive. You get a plastic fermentor instead of glass which is so much easier to clean and keep light out. Glass carboys are good for aging and aging is good for wine or special beers. Focus on simple ales that don't require it first.
The real savings come when you do all grain and make your own equipment. You can save $137 alone if you buy a big stainless steel pot and slap on a dial thermometer with a ball valve.
>When I thought it was finished fermenting I bottled it.
"Nothing in this world can you trust. Not sight, not experience, not intuition... This you can trust." - Conan the Brewbarian
A bench capper is a nice upgrade and Amazon has few in the $38 range. Anything cheaper is probably going to be similar to the handheld red ones that are standard with most kits.
That's one way. Another is to use a Wine Thief: https://www.amazon.com/Fermtech-B0064O93RC-Wine-Thief-Clear/dp/B0722KD74Q
I'm not advocating such silliness, but here's an example: http://amzn.com/B003Z5GW0O
You'll want to get a sample out of the fermenter using your siphon and into the sample tube, or you could get a Sample Thief. Either way don't just drop the hydrometer into the fermenter. For one be hard to get back out :)
You don't need to check often. Everytime you open the fermenter you risk contamination. Instead wait for signs that fermentation has slowed (or stopped). The heady foam (Krausen) will have collapsed, or there aren't many bubbles in the beer.
Just make sure you sanitize anything you use to get the sample. And don't bother putting the sample back, might as well just drink it ;)
Amazon link
I bought a basic Fermtech 5478-6H Auto-Siphon Mini with 6 Feet of Tubing and Clamp https://www.amazon.com/dp/B00SDLLZDY/ref=cm_sw_r_cp_apa_i_f1EuDb9WJSGFD
Siphon. Had another sterilized carboy and transferred it. Then added my new spices and fruits.
You're always gonna need two containers in my opion. This is my second time and my first was a fucking failure. So I've done more studying. And what's best for at least 1gl brews. It's more investment. But worth it
Okay, here's what you do.
Get a six-gallon, food-safe plastic bucket, with a lid with a small (like, quarter-inch) circular hole in it. You'll also need an s-shape airlock to put in the little hole. Get five gallons of apple juice from the grocery store, and a packet of wine yeast.
Clean the bucket with a 1% bleach solution (...the other 99% water) and rinse thoroughly. Add apple juice and yeast to the bucket, seal with the lid and airlock. Wait three to four weeks.
During this time, also get 48 empty beer bottles (you can use your own empties if you drink enough), and enough beer bottle caps. You'll also want a capper -- there are cheaper and harder-to-use options.
After the three to four weeks of fermentation, open the bucket and add about half a cup of sugar (corn sugar works best), and stir it in. Fill the bottles using either the spout on the bucket or a siphon hose, leaving a half- to three-quarters-inch of air at the top of each bottle.
Let the bottles sit a couple weeks to condition (carbonate), then refrigerate and enjoy. The dryness of the resulting cider will be based on which yeast you chose, so if you want a sweet cider use a white wine yeast, and if you want ultra-dry cider, use champagne yeast.
I've made some slight modifications to this, mostly to make it easier to follow. I've also included steps that should be quite obvious to someone who's done any homebrewing before, but I wish someone had told me when I first started.
I'd link to the original, for the sake of attribution, but the user who posted this deleted their account not long after I wrote everything down.
This will produce a sweet fruit-mead (or melomel). WARNING this will be far more alcoholic than it tastes, and should not be consumed if you've recently taken antibiotics, or suffered gastric distress, as the yeast culture will still be alive, and will happily colonize your intestines if your gut microbiome is too fucked up.
Equipment: Most of this stuff will be a good deal cheaper at your local homebrew store, but I've included amazon links (also to the yeast).
At least 2 (3 is better, for reasons we'll get to) 1-gallon jugs (I don't recommend scaling this up), glass preferred. Add an extra jug for each additional batch. This one includes a drilled stopper and airlock
Drilled stoppers (or carboy bungs) and airlocks, non-drilled rubber stoppers.
An autosiphon and food-safe tubing.
Food-safe sanitizing solution (I recommend StarSan).
An electric kettle with temperature selector is useful, but not needed.
If you want to bottle it rather than just keeping a jug in your fridge:
Empty beer or wine bottles (just save your empties), capping or corking equipment, caps or corks, and a bottling wand.
Ingredients:
2.5 lbs (1130g) honey, clover recommended.
A cup (approximately 250ml) or so of fruit (I recommend blackberries, and I strongly recommend against cherries, other recipes have worked for me, but this yields a very medical flavor with cherries).
1 packet Lalvin EC-1118 yeast (a champagne yeast notable for its hardiness, its ability to out-compete other microorganisms, and its high alcohol tolerance).
Optional: potassium sorbate (to reduce yeast activity when our ferment is done), pectic enzyme (aka pectinase - for aesthetic purposes). Both are also available in bulk.
Process:
Day 1:
Mix sanitizing solution with clean water at specified proportions in one of your jugs, filling the jug most of the way. Stopper it, shake it. Remove stopper, set it down wet-side-up (to keep it sterile), pour the fluid to another jug. There will be foam left behind, this is fine, don't bother to rinse it or anything. At low concentrations this stuff is totally fine to drink, and won't ruin your fermentation or flavor.
Add honey to jug, all of it.
If you have a kettle, and your jug is glass, heat water to around 160F (71 Celsius), pour a volume into your jug roughly equal to the amount of honey present. Fix sterile stopper to jug. Shake until honey and water are thoroughly combined. The heat will make it FAR easier to dissolve the honey. Set aside for an hour or so while it cools. Add clean water 'til mostly full, leaving some room for fruit and headspace.
If you're missing a kettle, or using a plastic jug, this is gonna be a little harder. Fill most of the way with clean water (I recommend using a filter) leaving some room for fruit and headspace. Fix sterile stopper, shake 'til honey and water are thoroughly combined. This will take a while, and you will need to shake VERY vigorously.
At this point, you should have a jug mostly-full of combined honey and water. To this, add fruit (inspecting thoroughly for mold, don't want to add that). Then dump in a single packet of the Lalvin EC-1118 yeast, don't bother rehydrating it first or anything, it'll be fine going straight in. Add pectic enzyme if you have it (this does nothing to the flavor, it just makes the end product less cloudy). Stopper it up, shake it again. This jug now contains your "must" (pre-ferment mead).
Pour some sterilizing fluid in a bowl, put a carboy bung/drilled stopper in the bowl, with an airlock. Ensure full immersion. Let sit for a minute. Replace stopper with your bung/drilled stopper, affix airlock. Fill airlock with clean water, sanitizing fluid, or vodka. Rinse the stopper, fix it to your jug of sanitizing fluid.
Place must-jug in a dark place, I recommend a cabinet or closet.
Days 2-7:
Retrieve jug, give it a little jostle. Nothing so vigorous as to get your mead into the airlock, but enough to upset it. This is to release CO2 buildup, and to keep any part of the fruit from drying out. The foaming from the CO2 release may be very vigorous. Do this over a towel for your first batch. If the foam gets into your airlock, clean your airlock and reaffix it. Perform this jostling procedure at least once per day, more is better.
Day 8:
Final jostling, I recommend doing this in the morning.
Day 9:
let it sit, we want the sediment to settle.
Day 10: Time to get it off the sediment
Shake sterilizing fluid jug. Affix tubing to siphon. Put the siphon in the sterilizing fluid, shake the jug a little just to get the whole siphon wet. Siphon fluid into either a third container or a large bowl. This is all to sterilize both the inside and outside of your siphoning system.
Remove siphon from jug. Give it a couple pumps to empty it of any remaining fluid. Place siphon in your mead jug, leaving the end of the tubing in sterilizing fluid while you do this.
Take the jug that you just siphoned the sterilizing fluid from. Dump what fluid remains in it. Place the end of the tubing in this jug, then siphon the mead into it. Make no attempt to get the last bit of mead into your fresh container, it's mostly dead yeast and decomposing fruit.
Add potassium sorbate if you have it, stopper the jug, place it in your fridge.
Clean the jug you started in. Clean your siphon and tubing.
Day 11:
Let it sit
Day 12 or later: time to transfer again, or bottle it.
If you no longer have a jug full of sterilizing fluid, make one.
Repeat the earlier steps to sterilize the siphoning system, with a bottling wand attached to the end of the tubing if you want to bottle.
Sterilize your bottles or a clean jug, either with fluid or heat.
Siphon mead either into your bottles or jug. Stopper/cap/cork when done.
Put your jug/bottles in the fridge.
The yeast culture is still alive, and will continue to ferment. The fridge, and optional potassium sorbate, will merely slow this down. I recommend drinking any bottles within two months, to avoid a risk of bursting bottles. The mead should already be tasty at this point, but usually tastes much better after a couple more weeks.
EDIT: Fixed the formatting up a bit.
Carboy. It’s the same shape as a bucket and doesn’t have a handle. It’s a glass container that’s super heavy when filled with wort/beer. Usually slippery after you brew which makes it even more useful to be able to carry it like this. There’s a LOT of stories on the homebrew sub where people have broken their foot, sliced their tendons, sliced their nerves, etc not to mention had tons of broken glass and like 5 gallons of beer spill onto their floor.
I have this and it works fine. Only issue with a 3 gallon carboy is that you might not get enough liquid to float the hydrometer. If you're dead set on a giant turkey baster, use that as your diameter.
> Also, thoughts on returning hydrometer samples to the fermenter?
As long as everything is sanitized, you should be fine. If you're cautious/curious, pour it into a glass and sample the half finished wine to see what it tastes like at all parts of the process.
i'd guess you priming caps
https://www.amazon.com/Brewers-Best-Conditioning-Tablets-Count/dp/B006O2D9RE/
Wine thief
Some things I see that you could do are:
I can't say anything as to the strength of the swing tops. But they certainly look good and are perfect for bottling. However, you'll have to make/drink a lot of mocktails before you have enough bottles. I bought these on Amazon and they work great: https://www.amazon.com/gp/product/B0064ODUDK
Quicker way to the bottles. Unless you were going to buy a bunch of those mocktail things anyway. :-)
Possibly, but look at this instead. I just bought one, and it's working out great. Cheaper than the one you linked to, as well.
Are these essentially the same product? Is Bouncer double the price for a legitimate reason?
https://www.amazon.com/gp/product/B01JWO5RK2/ref=ox_sc_sfl_title_8?ie=UTF8&psc=1&smid=AXFBTTM28FB1
https://www.amazon.com/gp/product/B00CH2JSIY/ref=ox_sc_sfl_title_9?ie=UTF8&psc=1&smid=APP34LIR2J3LQ
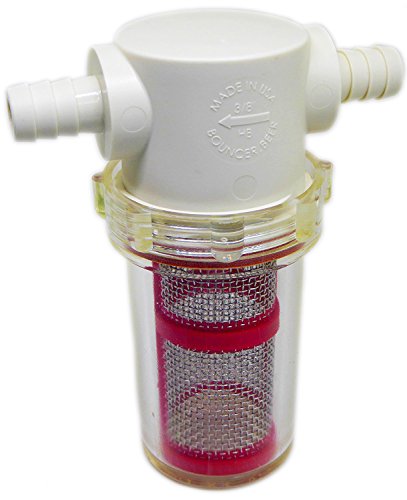
If you have issues getting the seeds out, I picked these up a while ago. It goes inline with your siphon hose and I got the smaller mesh to get out things like pulp or seeds. Works great.
https://www.amazon.com/gp/product/B06XR6M3GB/ref=ppx_yo_dt_b_search_asin_title?ie=UTF8&psc=1
https://www.amazon.com/gp/product/B01JWO5RK2/ref=ppx_yo_dt_b_search_asin_title?ie=UTF8&psc=1
Two weeks is a little quick; I find it usually takes 3 and sometimes 4 weeks for full carbonation to develop.
So,
First, let your bottles sit is 65-75F environment for another two weeks and see if it doesn't improve.
Second, if they are the same after two weeks, consider using Conditioning Tablets. Because you have some carbonation, you don't want to get the big ones designed for full carbonation of a 12 oz beer, but the ones I have linked to, which use from 3 to 5 depending on carbonation level desired. You can remove the caps, drop in a one or two tablets, and recap. Wait another two or three weeks and see if that doesn't do it for you.
Finally, don't pour the sugar directly into your beer, but, rather, dissolve it in about a cup of water and boil it to be sure it is all dissolved. No need to cool, you can pour this directly into your beer as the volume of beer is so much greater than the boiling sugar solution, it won't hurt anything. I typically will pour my boiled sugar solution into a bottling bucket and siphon my beer on top of it to be sure the sugar mixes well. You may have to give your beer a gentle stir with a sanitized spoon to make sure they sugar is well distributed throughout the beer before you start to bottle.
An old trick I heard of years ago was to bottle one or two beers in clean and sanitized soda bottles (they also make brown 16 oz PET bottles for this purpose). As the beer carbonates, the bottle will get hard, and you can better judge the carbonation level as time progresses.
Your recipe sounds like it'll turn out well if all goes according to plan! You may want to add some sweetness back if it ferments dry, but you've got several weeks to figure that out and read the Wiki to get all caught up on the method and terminology to things like back sweetening and nutrient addition schedules. I admire that you're being industrious with your fermentation equipment, I wasn't brave enough to start fermenting with whatever I had on hand with my first batch.
If you think you'll stick with it, here's the equipment I used for my first batch. I highly recommend looking into it if you think you'll do another batch! (I apologize if you aren't in the US, Amazon is my go-to)
All-in-all, this is just about my current setup excluding yeast, yeast nutrients, and extra carboys and airlocks. The list above comes out to about $127.45 USD before tax, which really isn't too bad considering one gallon should yield just shy of 5 standard wine bottles! Most commercial meads I've seen ranges from $15-$25 with some exceptions (There's a winery near me called Oliver Winery that makes a mead called Camelot Mead that sells for about $8 per bottle. Very good for such a cheap mead, you can probably find it at Total Wine & More if you have one nearby).
​
Sorry for such a long comment! Best of luck in your mead-making adventure!
Edit: If you have a local homebrew store, I would opt for that rather than Amazon. Prices may not be as cheap but you won't have to wait for shipping, you'll be able to support a local business, and employees at homebrew stores are usually really helpful and they can recommend recipes and give you pointers. Nothing beats face-to-face interaction!
the instructions for the unicolor develop kit requires 1000ml and the amber bottles i purchased limit at 950ml, should i be fine or purchase bigger bottles?
Yes sir.
CO2Meter RAD-0301 Mini CO2 Monitor, White
https://www.amazon.com/dp/B00H7HFINS/ref=cm_sw_r_cp_apa_i_uI0rDb4NME0AN
Don't know if this qualifies as a 'hack', but it made my life a hell of a lot easier, so here we are:
I can't say this emphatically enough: Get a bench capper
I'm serious, If you bottle your beer, don't be messing around with that twin lever bullshit, slipping and breaking bottle necks.
Just buy a bench capper (aka single lever capper). They are costlier, but I swear, it is still the best brewing investment I have ever made.
Before you pull the trigger on that, there's a groupon for a homebrew set:
http://www.groupon.com/deals/gx-midwest-hydroponic-atlanta
It's the basic kit plus brewing ingredients, PLUS a $25 coupon. The kit you linked also includes:
-Carboy, if you really want to get it. Honestly, for a first batch, you can get by without one and just do a single stage fermentation, but it's recommended to get a secondary. My first batch was an extract that spent ~2 weeks in a primary then straight to bottles. Came out great. There's a good deal at Amazon right now on a 6 gallon glass carboy. Also add a bung and Airlock
-Bottles. Drink some beer, keep some bottles. If you want to buy them, get 48 for a 5 gallon batch (about $25) or go cheap and get some plastic PET bottles. Also a good option. See: every argument of plastic vs. glass for a comparison.
-Large stock pot. For a first extract, you won't need more than a 2 gallon boil, so you can get by with as small as 12 qts. A cheap 12 qt pot can get you started.
Maybe something like this?
Otherwise I don't think a faucet would be easy to hold and pour with one hand. Even if you could figure that out, idk how you could figure out how to attach the beer line to the faucet w/o the shank. The headache, to me, wouldn't be worth the 10/15 bucks.
https://www.amazon.com/Gallon-Bottling-Bucket-Spigot-Beer/dp/B000E62H8I
Ah, then they probably AREN'T oxygen resistant caps. You'll want something along the lines of https://www.amazon.com/Beer-Bottle-Caps-Absorbing-Homebrew/dp/B000Q64T8M
And let us know if it's an anomaly!
For force carbing I just set to 40psi for 24 hours then drop to serving pressure and let it sit for a couple of days. It's pretty drinkable after the first day, but I'm not overly concerned about super accurate volumes of co2.
To bottle without some kind of beer gun, you'll want to drop pressure as low as you can and put the bottles in the freezer to get super cold first. I'd also pour half a glass first to let the beer cool down the faucet. I got one of these for filling growlers and it would make things easier for bottling from keg on the cheap too. Leave about as much space in the neck as if you were bottle conditioning and cap on top of the foam.
You have one of these?
https://www.amazon.com/Fermtech-5478-6H-Auto-Siphon-Tubing-Clamp/dp/B00SDLLZDY/ref=sr_1_2?crid=3FSQTFCNKS7D6&keywords=auto+siphon&qid=1569088031&s=gateway&sprefix=auto+si%2Caps%2C170&sr=8-2
Best to start the siphon in a pot of clean water to get it going, clamp off the hose and then transfer the cane into the mead to begin siphoning it out. If you hold it as you're doing it, you can prevent any of the sediment at the bottom from getting in. Just stop it before it gets there.
yep. hated it.
Buy a bench capper. you wont be disappointed that you did. You can probably find it for cheaper if you shop around. I got mine for free in a package deal on craigslist.
So I learned a long along the way. The graphs and stuff was the easy part!
Originally I wanted to wire up my own sensor so I picked up a breadboard, a dht22 sensor, some jumpers to wire it up, and a ribbon cable / adapter to connect the breadboard.
The basic guide for that can be followed from this tutorial here:
https://www.raspberryweather.com/wiring-for-dht22/
However, in my search for a co2 sensor to add to my breadboard, a fellow redditor pointed out a low cost usb sensor that includes temp and co2! The hackaday project seems to mention one that also does humidity along with it, but it appears to be over twice as expensive on their site ($200!). So decide if you want humidity. It's an important stat, but you can get it with the dht22 if you go that route.
The usb co2 sensor and hackaday links are here:
https://hackaday.io/project/5301/logs
https://www.amazon.com/CO2Meter-RAD-0301-Mini-Monitor-White/dp/B00H7HFINS
Ok, so now all the sensors are up, you need code that reads the sensors and outputs json. I put these together based on the samples from dht22, and the hackaday project. I can post these if you need them.
Ok, next step. This is overkill I suppose for what we are doing, because it's designed to be super scalable. Anyway, I have a server running influxdb (open source, free) and it runs a time series database. I would not recommend saving the influxdb database onto a sd card. Either put it on a server that is always running, or get a second raspberry pi, and attach a usb harddrive, and write to the harddrive. USB speeds are slow, but sd card writes are atroicious, and sometimes kill cards
Then on the raspberry pi, which is connected via wifi, I run a client called telegraf which will run the scripts that parse the sensor data and output json. Telegraf sends the sensor data to influxdb where it is stored very effeciently.
Here are the links for graphing side of things:
https://docs.influxdata.com/influxdb/v1.2/introduction/installation/
https://docs.influxdata.com/telegraf/v1.2/introduction/getting_started/
Ok so now we have all of our data in the database, the last step is presentation. There's a "standard" opensource tool for this too, again, because this software is used by major players in the tech industry, we can leverage their work.
A project called grafana is my dashboard tool. I run this on my server and it allows me to point it at influxdb, and design queries to create graphs and dashboards. grafana installation info is here:
http://docs.grafana.org/installation/
http://docs.grafana.org/guides/gettingstarted/
Sorry this is getting long....
I also installed the raspberry pi camera, so that I can run timelapses. Originally this was simply a timelapse, but once I had influxdb running I had to take it a step further!
Now I added a couple steps to my timelapse script. Between each picture, I ran a script that queries influxdb to get the json data out of it, then runs a ruby script to create a graph based on that json using a gem called gruff, then superimposing that on the source images so when my timelapse was created later it had the environmental data.
It's still a work in progress (no co2 yet) but here's a recent one I made to show off the floodtrays / irrigation timers I got going this weekend:
https://www.instagram.com/p/BQKAUu7DXed/
Anyway, it was . If you want some code dumps from my setup or help with parts lists let me know. The data is all realtime, and the dashboard auto refreshes as data comes in :)
Usable desktop link for the same product.
(this should be a bot)
To piggy back on u/stormbeforedawn's comment.
This is the equipment I used that I've had good luck with so far. It's what he recommended, I'm just providing links to the specific product I used.
I use clear flip top bottles like these. Add a speed pourer for precision, and you're good to go. Of course the later is optional.
http://www.amazon.com/CASE-OF-12-Bottles-CLEAR/dp/B0064ODUDK/ref=sr_1_2?ie=UTF8&qid=1412296599&sr=8-2&keywords=flip+top+bottles
or for larger batches
http://www.amazon.com/Bormioli-Rocco-Giara-Bottle-Stopper/dp/B003QZPY6Q/ref=sr_1_3?ie=UTF8&qid=1412296599&sr=8-3&keywords=flip+top+bottles
I haven't used coconut in a tincture, so I can't speak to if that is preferable option to what you have.
I have added coconut to the fermenter in a dry hopper to good results. I would suggest using something like that or the muslin bag, because the shredded coconut can very easily clog siphon lines and keg post, which are always a pain to clear. And it unfortunately takes only one little shred to do that.
I recently did a toasted coconut porter and "dry hopped" 12 oz. in the fermenter for over a week and then used the dry hopper I referenced earlier with an additonal 12oz. in the keg itself. Definitely came out coconuty but was well balanced with the porter itself, so wasn't like drinking coconut milk or anything. It did seem to hurt head retention at first, but as I drank through the keg, that seemed to clear up a bit.
I recently got on of these guys Dry Hopper
I used it for a tropical IPA for a party last week, and it went rather well. No hop particles and no clogged dip tube. The top is pretty secure on it, too.
Those are EZ Cap brand 16oz flip-top bottles. You can find them here:
http://amazon.com/dp/B0064ODUDK/
But I recommend getting them at your local brewing supply store. They were only $25 bucks for a case of 12 at my local shop.
These can be nice, re: transfer:
https://www.amazon.com/Bouncer-inline-beer-filter-regular/dp/B01JWO5RK2
I visited them a few weeks back since I have heard some good things about them. Overall I thought they had a good line-up with nothing offensive but also not really anything that made me stand-up and cheer. I visited again on the Hartbeat release and while it was a good offering, I thought it was actually more underwhelming than their normal IPA offerings. It really needed a more generous dry hop punch.
And not to be a beer snob or anything, but they fill the growlers straight from the tap. They don't use a growler filler (which is basically tubing that allows the beer to fill from the bottom of the growler to the top) or flush with CO2 prior to filling. This was noticeable the next day when we opened the growler and it was under-carbonated and had lost a bunch of aroma.
Get some EZ-Cap bottles from your local homebrew supply or Amazon and print your own labels.
If you're not looking to spend much I would suggest some half gallon growlers. You can usually pick them up for 5 dollars empty at your local craft beer brewery. They're great if you have a second fermentation recipe that you enjoy. It is a lot less work filling up one of these instead of multiple grolsch style bottles. Another thing I use is an auto siphon. Also cheap on Amazon. Makes filling bottles a breeze.
Auto-Siphon Mini with 6 Feet of Tubing and Clamp https://www.amazon.com/dp/B00SDLLZDY/ref=cm_sw_r_cp_apa_sJwuybWN82B85
I use a stainless steel corny keg container. I currently have a keg on tap with 3 oz of pellets in it and have had no clogs.
I recently picked up one of these -- haven't used it yet, but I intend to just drop it in and let it sink. I actually like that it sinks so that I know I am getting complete submersion -- I was always suspicious of how much I was getting out of the socks that would float at the top.
To your inquiry of how will it be fastened -- it won't, but I really can't think of how that could be an issue. Instead of retrieving the hops, I would recommend that you push your beer to an empty corny and leave the hops behind -- way better in concerns of exposure/quality.
EDIT: Looked around on amazon a bit more and apparently some come with a small chain, but you still have a valid question -- not exactly sure what it would be attaching to...
Bottle size: 12 or 16 oz
I use a keg instead of a bottling bucket. Siphon beer into keg, prime with sugar, fill bottles. At 5 psi the kegs works better than a gravity bucket.
Fill 6 or so, then cap. Bottling is much better with a friend. One person to fill, the other to cap. Standard caps only.
No gloves.
Pro-tip: get a decent bench capper. Woah - when I bought one the price was only $30. This really is the king of cappers.
I like to use Amber bottles. I just think they look super cool. But they also keep UV light away from the chemicals.
32-Ounce Amber Kombucha Growler Bottles (4-Pack); 1 Quart Boston Round Glass Bottles w/ 6 Polycone Phenolic Lids for Home Brewing https://www.amazon.com/dp/B0749ZWF1C/ref=cm_sw_r_cp_apa_i_gXFTDbK31SN6T
My brother is getting married in October (which is good news by itself) and because he and his fiancée want more than the 6 people City Hall allows to attend, I GET TO MARRY THEM! I have been ordained through Universal Life Church (the real one, not the fake one) since March 2006 and I finally get to marry someone! I put in my minister profile that I'll only do same-sex weddings, but I made an exception because, well, it's my brother.
Hooray!
(if you're taking suggestions, I'd go for the beer savers, but I'm fine with a surprise!)
Thanks for the contest!
This thing was pretty recently on sale for ~$85
https://www.amazon.com/dp/B06ZYQRLSS/ref=sspa_mw_detail_3?psc=1
Ha nvm! I'm gonna spend the money on dual-body three gauge regulator for my keezer instead :-P
And I'll get this for beer dispensing
I bought these off Amazon and have had no issues whatsoever with them: https://www.amazon.com/gp/product/B078JYNSCR/ref=ppx_yo_dt_b_asin_title_o03__o00_s00?ie=UTF8&psc=1
It's not a perlick, but I found this on amazon.
http://www.amazon.com/gp/aw/d/B003ZZRR3K/ref=pd_aw_sim_79_3?ie=UTF8&dpID=41BFBUX9KcL&dpSrc=sims&preST=_AC_UL100_SR100%2C100_&refRID=0CF56R1NTYF00TJ9ADEY
I got a c02 mini desktop usb sensor on amazon, actually works with linux! only about $60! I have not used it yet but in testing it has worked great.
Edit Link: https://www.amazon.com/gp/product/B00H7HFINS/ref=oh_aui_detailpage_o05_s00?ie=UTF8&psc=1
I got this one a few months ago and have been more than happy with it. Think I got it for around 40 bucks.
https://smile.amazon.com/gp/aw/d/B06Y2F4BMY
Oh yes, and it is quite simple to get the stuff together without buying a kit. Do you have a local home brew store?
This subreddit's wiki which includes a beginner section: https://www.reddit.com/r/Homebrewing/wiki/index
There are several videos on youtube that have good instructions.
Here is a basic list of gear to brew beer in a bag. You can get all of this stuff on amazon if you don't have it already. This is not the best list, but it works.
http://homebrewmanual.com/home-brewing-equipment/
Some of the stuff you won't likely have at home:
Beer recipes: http://beerrecipes.org/
To get grains from amazon, type in the grain type and it will provide you options. If you don't have the ability to mill it yourself, you can order it crushed. Its not ideal, but if you don't have a homebrew store near you and don't have your own mill....it will work. You will have to measure out the correct amounts for each grain that you add on your own from the bulk that you ordered. If you want to brew with extracts, you can also order those on amazon as well.
You can order hops on amazon the same way as grains or extracts.
I've got this thing to go with my perlick taps on my kegorator. I haven't tried it yet though.
I used one of these for my last batch that I bottled yesterday and it worked very well to keep the fermenter trub to a minimum, and it also allowed the hops to be fully submerged, introducing all that wonderful hop oil to the fermenting wort.
Hops will introduce DO to the fermenting wort, so it's important to dry hop at high krausen so the yeast has plenty of opportunity to push that oxygen out. I imagine you're adding dry hops too late to the party, so there's increased DO in the fermenter and the fermentation has slowed to the point where the DO is sticking around too long.
I almost always dry hop on day 2 or 3 at the very latest, and found that there was more oxidation to my NEIPAs when I did a second dry hop at day 7 or so, so I've just started chucking all of my dry hops in at once to minimize the amount of oxygen I'm introducing.
After dry hopping with my hop sock and realizing I can't get the knot undone to re-use it, I've decided to get one of the metal hop spiders like this one. only question I have is that they all seem to have those big holes at the top (like a salt shaker), don't they defeat the purpose of the fine mesh? Do I need to tie this kind of hop spider to the lid of my fermenter to keep it from falling over, because that seems unnecessary when it could just have a solid top
Get a couple of stainless steel 1 gallon growlers with a tap and CO2 adapter. I have 2 of the growlers and one dispensing cap between them, so it's like a tiny Brite tank. Sure beats bottling.
Amazon has it, and it'll be delivered by tomorrow: http://www.amazon.com/Beer-Bottle-Caps-Absorbing-Homebrew/dp/B000Q64T8M/ref=sr_1_1?ie=UTF8&qid=1410318689&sr=8-1&keywords=homebrew+bottle+caps
I mean, I'd waste 37 bucks on this one just to see how it goes...but that's just me.
Is this not roughly the same thing, but sold as a package deal (I'd just need to buy c02 cans) https://www.amazon.com/HAVEGET-Pressurized-Dispenser-Adjustable-Regulator/dp/B06ZYQRLSS/
I just used one of these for the first time. I used pellet hops. It’s pretty rad!
https://www.amazon.com/dp/B06Y2F4BMY/ref=asc_df_B06Y2F4BMY5266918/?tag=hyprod-20&creative=395033&creativeASIN=B06Y2F4BMY&linkCode=df0&hvadid=198078807540&hvpos=1o1&hvnetw=g&hvrand=17215079381502969390&hvpone=&hvptwo=&hvqmt=&hvdev=m&hvdvcmdl=&hvlocint=&hvlocphy=1020955&hvtargid=pla-319252294200
Hah! That URL! Sorry, on mobile
Problem solved, $30 shipped
> Proteins are what you're feeling in a 'full' beer, and taking care to ensure they stay in the beer will get you the body/mouthfeel/head retention you're looking for
What would you recommend to do in order to achieve this?
I haven't taken the pH of my water, I've just been using it from the tap. My neighbor brews some of the same exact recipes I did (same LHBS) using his faucet water as well. He does partial mash, but I don't believe he's treating his water/adjusting his pH.
My cleaning process has been pretty light, as far as I can tell. I bought everything new, but I did a PBW clean of my kettle and fermeters before I used any of them. I fill the fermeter with StarSan on brew day and dump that into the bottling bucket just before I transfer from the kettle. I have never used dish soap or anything aside from PBW and StarSan (and then a rinse with water after cleaning) on my equipment.
Meh, I use one of these not that exact one but one that fits my tap. I just turn the flow down to a trickle and it fills bottles or growlers fine.
$22 for 4 of these! Here is the link :)
32-Ounce Amber Kombucha Growler... https://www.amazon.com/dp/B0749ZWF1C?ref=ppx_pop_mob_ap_share
How about drilling out a small stainless filter like this for the dip tube (https://www.amazon.com/Micron-Filter-Stainless-Cornelius-Brewing/dp/B06Y2F4BMY/ref=sr_1_2_sspa?keywords=hop+filter&qid=1563815355&s=home-garden&sr=1-2-spons&psc=1)
Connecting that to the dip tube, Fermenting in the keg, adding fruit and letting it do its thing, then transferring out to another keg when you're ready to? I bought one of these to do that with my fruited berliners but haven't had the time. I have also removed the poppet for transfers like you're saying but have ended up with clogs from the serving keg to the tap.
Growler filler would work. I keg almost everything but a growler for travel is great sometimes. Maybe like this: https://www.amazon.com/Bev-Rite-Extraordinary-Jug-Growler/dp/B003FW6BA8
Rather than sending it off, you can get a pretty good estimate of the alcohol yourself with a cheap hygrometer. The one that I use cost ~$15. You can get them at a homebrew store, or else online at Amazon among others (for example, https://www.amazon.com/dp/B01CITP03W). It won't be anywhere near as accurate as a lab, but it should get you in the ~+/- 0.5% ABV range and just takes a minute or so.
With standard bottle caps they say the brew remains true for about 6 mo. after bottling. They have oxygen absorbing bottle caps that are supposed to keep beer for over a year. I've also read that you can wax the top of your bottles to prevent oxygen from seeping in. I'm thinking about doing this for my most recent bourbon vanilla porter brew.
NOTE: I've never tried aging beer for more than 3 or so months so I cannot attest to either wax or oxygen absorbing caps methods.
Do you think I'm better off spending $20 more for 2 6-Gallon carboys? Such as the ones on today's homebrew find?
10 dollar wine thief worth every penny
Fermtech Wine Thief, Clear https://www.amazon.com/dp/B0722KD74Q/ref=cm_sw_r_cp_api_Y28EAb5VPF4TK
Just items like these:
$103 - 1 Gal Keg Kit with Regulator and Tap
$45 - Additional 1 Gal Keg
$43 - An alternative adaptor that requires an external tank and regulator
Price History
ReviewMeta: ★★★★☆ 4.0/5 from 59 valid reviews
CamelCamelCamel - [Info] │ Keepa - [Info]
_
These savings aren't just Black and White.
^(Info) ^| ^(Developer) ^| ^(Inquiries) ^| ^(Support Me!) ^| **[^(Report Bug)](/message/compose?to=The_White_Light&subject=Bug+Report&message=%2Fr%2Fbapcsalescanada%2Fcomments%2Fcyte23%2Fother_desktop_co2meter_sensormonitor_109_tax126%2Feyu3i1c%2F%0D%0A%0D%0A%0D%0A%0D%0APlease+explain+here+what+you+expected+to+happen%2Fwhat+went+wrong.)**
I got one of these a few months ago http://www.amazon.com/Super-Agata-Bench-Bottle-Capper/dp/B000Q638P2/ref=sr_1_5?ie=UTF8&qid=1415486973&sr=8-5&keywords=bottle+capper and it makes the bottling process SO much easier. Its worth every dollar.
Even with that, though, I'm seriously tired of bottling. I'm seriously considering switching to kegs.
Why do so many people dry hop in these canisters? They’re an awkward fit in a fermenter, they have holes in top and the space could be cramped 😕
I think I like these bags more. It’s way bigger and I think it seals off better.
>in day 3-4 and then closed transfer to a keg with 3oz loose in the keg
Personally I do mine on day 1 or 2, at high krausen. As for loose, save yourself the hassle of clogged posts and get something like this for keg hopping. Works great. I've never had grassy/off flavors doing this, and I tend to take a solid month or two to kill a keg.
$7 Amazon US.
£90 Amazon UK!
Whaaaaaat!
Hey I just came across a solution for this problem in a video by the Mad Fermentationist . He uses an inline bouncer filter while transferring. I may order one and see how it goes!
Get some swing-top bottles if you want to be classy.
If you have amazon prime then get a gallon of juice $9 and not only do you get the juice but a 1 gallon glass jug. Buy a airlock and a hydrometer
No worries! On cheesecloth in the keg - I did that once and some loose strands of cheesecloth ended up in the valve poppet, which made everything foamy. Not fun.
​
A couple other options:
These are the ones I bought and they’re perfect - Bellemain Swing Top Grolsch Glass Bottles 16oz - CLEAR - For Brewing Kombucha Kefir Beer (6 Set) https://www.amazon.com/dp/B078JYNSCR/ref=cm_sw_r_cp_api_i_N9Q1CbK58REDZ
Let's talk about keg to keg closed transfers. My first transfer experience was successful. My second transfer didn't work due to hop matter blocking the dip tube at the top of the keg. Any reccomendations how to avoid this in the future? Something like this or this?
Looking into cask condition homebrew. Thinking of trying a beer faucet to dispense, but unsure of a good way to vent.
Any experience in this? Tips and tricks?
Local brew shop. They're ez-cap bottles: https://www.amazon.com/CASE-12-Beer-Bottles-CLEAR/dp/B0064ODUDK
I think this is a better option for a pocket Randall
https://www.amazon.com/Bouncer-inline-beer-filter-regular/dp/B01JWO5RK2
Here. Buy a blue screen for it. The red one isn’t fine enough.
I've recently bought a few of these but have yet to use them. After having a few muslin bags get stuck on the tip of the dip tube at the bottom of the keg, I've decided that stainless is probably a better option.
There's a million of them.
something like this:
https://smile.amazon.com/Brewers-Elite-Hydrometer-Kombucha-Hardcase/dp/B01CITP03W
I’d recommend something like this to put the peaches in. You should also keep then in through fermentation. I’d also start with 3 lbs for a 5 gallon batch.
Fermtech 5478-6H Auto-Siphon Mini... https://www.amazon.com/dp/B00SDLLZDY?ref=ppx_pop_mob_ap_share
This one comes with tubing and a clip to adjust the siphon depth.
Do you use OneStep to clean your bottles? I noticed I was only getting a metallic off flavor when using OneStep as my cleaner/sanitizer.
**Edit: For one batch you could try using conditioning tablets instead of bottling from a bottling bucket. That further reduces the chances of oxidation, as you'll be bottling straight from your fermenter.
I use these:https://www.amazon.com/Brewers-Best-Conditioning-Tablets-Count/dp/B006O2D9RE
3- Low carbonation
4-Medium Carbonation
5-High Carbonation
I used Amazon Prime
These.
https://www.amazon.ca/Beer-Savers-Silicone-Rubber-Bottle/dp/B003Z5GW0O
Don't have these exact ones cause I got some for free at an event but they actually seal really well and hold a fair bit of pressure! Beer always tastes fine the next day when bottle was half empty or less.
No, I got it at my local hydro shop. It's probably equivalent to this. Plus a couple aeration stones and a small fish tank pump for the top feeding.
I like the setup a lot. I don't have much to compare it to, but it works well for me. Changing the water in the bucket is the only annoying thing, but I have an auto-siphon from home brewing which helps a lot.
$65 https://www.amazon.com/CO2Meter-RAD-0301-Mini-Monitor-White/dp/B00H7HFINS/
Hi everyone! I have This kegerator http://www.edgestar.com/KC2000TWIN-EdgeStar-Full-Size-Dual-Tap-Kegerator-And-Keg-Beer-Cooler/KC2000TWIN,default,pd.html I am trying to find a hose big enough to fit. I bought this growler filler http://www.amazon.com/Draft-Warehouse-Extraordinary-Jug-Growler/dp/B003FW6BA8/ref=sr_1_1?ie=UTF8&qid=1453319907&sr=8-1&keywords=growler+filler however, its too big. Does anyone have a similar kegerator and perhaps can direct me to the right diameter hose that will work for this? Thanks in advance.
Edit - sorry for the poor formatting. I copy pasted this from a couple of days ago when I asked and it wont let me put links in update mode.
Thanks!
I just made a post about this.
If cost is the only reason for the switch to better bottles check out this $24 glass carboy:
http://www.amazon.com/Paklab-Glass-Carboy-Liter-1-9-Pound/dp/B002VFXW5W/ref=sr_1_cc_1?t=slickdeals&tag=slickdeals&ie=UTF8&qid=1291137175&sr=1-1-catcorr
Do you have one of these?
>I am now considering just bottling it where it is. I've prepared the bottles. I'll strain the beer into the bottles through a sieve because there's some debris in what I've pulled out for samples. Tastes gritty, no fun.
No no no! Absolutely do not do this, it will oxidize the crap out of the beer. If anything you can use an inline beer filter, e.g. Bouncer. There's a reason siphons are so popular in this hobby. Draw liquid from the top, don't suck up sediment. Personally I really dislike plastic fermenters with spigots, this being one of the lesser reasons, sanitation being one of the bigger ones.
​
> Also might be worth noting I fermented it in a bucket with a tap. I've been taking samples from. The tap to check gravity.
You should know that every time you take a sample this way, you suck in oxygen from the top, just FYI. I'd limit it to no more than one or two if you're measuring.
Just pop the caps, put in the carbonation tablets and cap them again. Its no big deal, just a little extra time. These are the easiest things to use. https://www.amazon.com/Brewers-Best-Conditioning-Tablets-Count/dp/B006O2D9RE
No, just regular metal ones like the ones below.
I am wondering if my capper failed on me. It seemed like it sealed everything fine but it also seems like that's the only possible explanation.
https://smile.amazon.com/Silver-Oxygen-Barrier-Crown-Count/dp/B000Q64T8M/ref=mp_s_a_1_4?keywords=bottle+caps+for+homebrew&qid=1572026207&sprefix=bottle+caps+&sr=8-4
Sounds about right, I get 1 gal/hr on my electric stove.
I use these ones, they're tiny so you can adjust based on desired carbonation. Just reading now they have some bad reviews, not sure how these people are messing it up, it's basically just pressed sugar lol.
I'd like to do 5 gallon batches. I don't think the quantity from the Mr Beer keg is worth it.
How's this look? Total is around $80.
Fermentation bucket
Bung/airlock
Stock pot
Autosiphon
Star San or Idophor (What's the difference?)
Is there any advantage to having a carboy as well? How long would I leave the beer in the fermentation bucket?
So if I wanted to do sours, I'd basically have to get 2 of everything?
Edit - actually, wouldn't this kit be about the same, but with an extra bucket but no stock pot?
Edit 2 - another pot, 36qt is good price, leaving this here so I can find it again.
Definitely not on sale now. Keep an eye on it. I had it droplisted, and was notified when it was a deal of the day.
https://www.amazon.com/dp/B06ZYQRLSS/ref=cm_sw_r_other_apa_i_KPAbBb0R7BF17
I can't find the specific ones I bought, but anything like these should work:
https://www.amazon.com/gp/product/B0749ZWF1C/ref=ppx_yo_dt_b_asin_title_o01_s00?ie=UTF8
You might be able to find them for cheaper on Ebay/Craigslist or random stores in-person if you have any nearby.
I have a couple of questions regarding dry hopping in a keg. I am looking for a more efficient and better way to to do this. I purchased one of these https://www.amazon.com/gp/product/B01GHSI9WO/ref=oh_aui_detailpage_o00_s00?ie=UTF8&psc=1 and my plan would be the following:
1-After primary move the beer to a dryhop keg.
2-Insert the tube with the hops in the keg. Give it some CO2 pressure to seal it.
3-Dry hop for 5 days.
4-prepthe serving keg.
5-connect the two kegs.
6-transfer beer to serving keg.
A few questions:
-I should dry hop at room temp?
-I shouldn't carbonate until the beer gets to the serving keg?
-Any other tips?
Thanks.
I ordered mine yesterday....I also assumed they were Italian, since I couldn't find where they were made. I also checked out the reviews before I made the purchase. They seemed pretty favorable for the most part.
http://www.amazon.com/Paklab-Glass-Carboy-Liter-1-9-Pound/product-reviews/B002VFXW5W/ref=dp_top_cm_cr_acr_pop_hist_all?ie=UTF8&showViewpoints=1
Thanks for the response,
I will pick up some Star San for the next batch.
​
For your measuring question. Do you mean when adding the Water/Honey? I used a scale. Similarly TBSP/TSP for adding nutrient. Or where you refering to the hydrometer? This is the one I bought https://www.amazon.com/gp/product/B01CITP03W/ref=oh_aui_search_detailpage?ie=UTF8&psc=1
​
I think I maybe should have waited longer to start the secondary fermentation based on the other comment.
I also plan on getting a yeast energizer for the next batch as well.
​
​
thats not a regular bottles though it has the swing top. Those are supposed to give out pressure if it builds up too much. I have had this happen to me before with just 1-2 days of fermenting and it made a mess int he kitchen but didn't blow up the bottle. Your freaking me out now though....
These are the bottles I have https://www.amazon.com/gp/product/B078JYNSCR/ref=ppx_yo_dt_b_asin_title_o02_s00?ie=UTF8&psc=1
From amazon! https://www.amazon.com/gp/aw/d/B078JYNSCR?psc=1&ref=yo_pop_mb_pd_t2
I buy replacement tops though because the ones they come with don’t provide a great seal. I got these: https://www.amazon.com/gp/aw/d/B01M31XE0W?psc=1&ref=yo_pop_mb_pd_t2
I hear you. It was $70 on Amazon: https://www.amazon.com/gp/product/B00H7HFINS/ref=ppx_yo_dt_b_asin_title_o03_s00
Even though it's a low-end model it logs data over USB, so I have to hooked up to a raspberry pi feeding data to a graph. It's very handy for knowing empirically how any of my attemtps to lower CO2 actually perform.
I was recently gifted this 128oz mini keg/growler. Would a setup like this be better to force carbonate or should I just pour into the keg from bottles after bottle conditioning and use as a pressurized growler?
Also does anyone have this model or a similar one? How do you like it?
This is now the easiest method you've found :-)
https://www.amazon.com/gp/product/B003FW6BA8/
I got this one from Amazon and I really like it: https://www.amazon.com/gp/product/B00H7HFINS/ref=oh_aui_detailpage_o07_s00?ie=UTF8&psc=1
So something like this would not be good?
Maybe beer carbonation tabs?
https://www.amazon.com/Brewers-Best-Conditioning-Tablets-Count/dp/B006O2D9RE