(Part 2) Best brewing & fermentation equipment according to redditors
We found 467 Reddit comments discussing the best brewing & fermentation equipment. We ranked the 150 resulting products by number of redditors who mentioned them. Here are the products ranked 21-40. You can also go back to the previous section.


You raise some good points, but your attitude sucks. Anyway, here are the answers you are looking for:
The comic is definitely vague; it ends with "let age", but knowing how to rack and age wine is an art all in itself!
TL;DR: If you know nothing about dandelion wine then this comic is a nice primer to which is actually a fairly simple process. It leaves out some details but you probably shouldn't be making wine from a comic's instructions to begin with.
Source: I make dandelion wine, so I guess you were right.
I'm a complete noob when it comes to making mead (or any booze). Google it and you'll find a lot of expert advice. Basically I just got a carboy from Amazon ($15 for a gallon one), and also ordered some rose hips and ale yeast because I couldn't find that stuff in the grocery store. Then it was:
Boil some water, dissolve 40oz or so of honey in it. Add some flavor stuff (box of blackberries, cinnamon stick, 2 tbsp rose hips, tsp of cloves) let it cool, add a packet of ale yeast, put it in the carboy, fill it almost all the way, and come back in two weeks. Strain it, drink it.
I'm sure the Internet will give you better advice, but that worked fine for me.
Here's the carboy I got:
https://www.amazon.com/Home-Brew-Ohio-Fermenter-Stopper/dp/B014T3LHFA/ref=sr_1_4?keywords=carboy&qid=1571874288&sr=8-4
Airlocks are easy/cheap but you can make your own with a hose and water in a bucket
The sanatizer is also easily done and cheap but you can use a highly diluted solution of bleach and water but dont want any bleach in your brew.
The yeast do all the work, put it in a closet and check on it, works easily and well. I haven't done a mead yet but about 5 batches of cider and 4 of beer in 5 gal. carboys, investment costs at first for a full set up can be high (but still sub $200) to make your brews/ciders/meads in 5 gallon batches.
Check out /r/homebrew good people over there and excellent information to get you into it if you're really interested in a hobby you can really enjoy.
Brewer's airlock for fermentation. Lets out the co2, but doesn't let any nasties in. https://www.amazon.com/E-C-Kraus-1L-ME8X-6SVS-S-Shape-Airlock/dp/B0057JBABM
https://www.amazon.com/VEVOR-Stainless-Fermenter-Brewing-Equipment/dp/B07MXGSK5C
I try to keep it really simple so I don't screw it up:
-Boil a pot with all of your jars, weights (if using -- I do), and silicone rings to sanitize and set on dry paper towels, only handling with tongs, once sanitized
-Quarter and core your cabbage, then slice to desired thickness.
-Wash and drain ribbons (I use a salad spinner for this)
-Place in large bowl or whatever and toss thoroughly with 1 tablespoon of salt per head of cabbage and let sit for about 15 minutes.
-Place cabbage in jars, pressing down as you go so it is as compact as possible.
-Pour liquid from the bowl over the cabbage. It needs to be completely submerged. If your cabbage did not give off enough liquid, supplement with additional brine (I've seen different ratios, but I dissolve 1 tablespoon salt per cup of water and use what I need, after the solution has cooled)
-Seal your jars (here are the lids I used). If you're using mason jars, DO NOT USE THE REGULAR LIDS. The CO2 that fermentation creates will bust them in dramatic fashion.
-Set in a cool, dry space and leave them the hell alone. I give mine about 6 weeks in my 65* basement. If it's warmer it may be ready sooner, or you like it a bit more tart, give it some extra time.
That's pretty much it.
​
With the issue you have, my guess would be contact with oxygen, or some sort of contamination. I really can't recommend the lids enough. They take pretty much all of the guesswork out of it.
Good luck!
I use a 1 tbsp - quart water mix. I also like wide mouth 1/2 ball jars but have moved up to 5 gallon containers. These lids also made life much easier. You can open your jar up and test the ferment and use a pump to remove the oxygen from it when you close it back up. I have no affiliation to this company btw. https://www.amazon.com/dp/B0719PCL7Y/ref=cm_sw_r_cp_apa_jwQRzbJCKRSZW
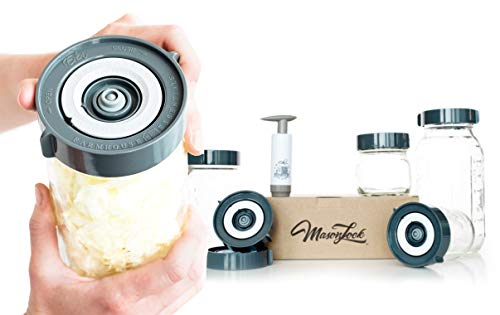
They're Masontops Pickle Pipes. They function like an airlock. There's a tiny hole in the nipple and when the CO2 puts pressure on it from the inside, it will expand enough to release the gas but it's small enough to prevent oxygen from getting in.
Make your own! Honestly, if you like kimchi and eat it a lot, it's the best solution.
You can also get the kit as an "all in one" package. But if you plan on fermenting a bunch of stuff, or storing multiple batches, it's more economic to buy it the way I listed. You can see the kit is just exactly what I listed, marked up in price in individual sets.
One of this https://www.amazon.com/gp/product/B00KTJXOBO/ref=oh_aui_detailpage_o05_s00?ie=UTF8&psc=1 and https://www.amazon.com/gp/product/B0041F2DL4/ref=oh_aui_detailpage_o05_s00?ie=UTF8&psc=1
I found these grommets and airlocks are bigger than the ones I got from my lhbs.
Alright. There are two schools of thought here. I'm a big fan of mash ferments (vs brine ferments). I've been at this for about 3 years now. Here's what I recommend. This article is what kicked off what I do now.
I take chilies, and depending on their fire power, pulse them in a food processor with other things. Carrot, garlic, sweet peppers and onion being the most common. You take that mash and salt it. I've always done 6% salt by weight personally. Mix that all up in a big mixing bowl. Then, pack it in to jars ensuring some head space and minimal air pockets in the mash. Make sure you get any juices from the bowl in there as well using a spatula. There may be some mash not submerged in it's own juices but it should be close. Before I got these I would put a piece of saran wrap on top with a rubber band and leave it sit for a couple months. I did have one mold issue with saran wrap but none with the airlocks. I make so much now they are totally worth it. (although it looks like the prices have gone up, I swear I paid $25, now they are $37.) Now I don't stir or mess with the mash. I let it does it's think for a couple months at least. When it's done
When it's done I simmer it for a bit, then run it through a medium food mill, then play with adding fun things like fruit, vinegar (maybe flavored) or what have you. There you go.
I noticed you have some firepower there. It takes a while to figure out what ratios you enjoy, but for ghost peppers I'm usually mashing just 3 in a 1/2 gallon and the rest is all adjunct and that is plenty hot for me.
I grow sprouts and also countertop small batch lactoferment with these.
For sprouts I use this. There is no bad smell (???), and if there was, it would mean the sprouts were bad.
This is one of the more popular commercial setups.
https://toddycafe.com/toddy-cold-brew-system
I prefer a coffee sock and a gallon glass jar. 12 oz. of coffee on the counter for 12 hours and you are good to go.
https://www.amazon.com/CoffeeSock-ColdBrew-Filter-Certified-Reusable/dp/B015WTS0RS/ref=sxin_3_ac_d_pm?ac_md=2-0-VW5kZXIgJDE1-ac_d_pm&keywords=coffee+sock&pd_rd_i=B015WTS0RS&pd_rd_r=45644cf3-98f2-4160-8b80-661607b5eb18&pd_rd_w=0lsUO&pd_rd_wg=upwNC&pf_rd_p=24d053a8-30a1-4822-a2ff-4d1ab2b984fc&pf_rd_r=35C6GYY1NGEMM77M5AQ6&psc=1&qid=1574886893&s=home-garden
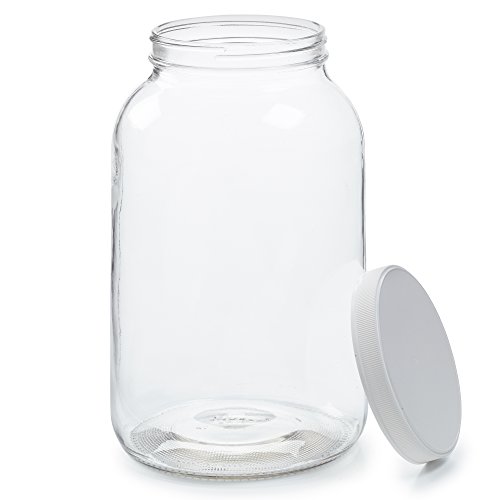
https://www.amazon.com/Empty-Gallon-Airtight-Leakproof-Plastic/dp/B075JR6H11/ref=sr_1_8?keywords=one+gallon+glass+jar&qid=1574886910&sr=8-8
Whatever type you choose,
just don't install them like this.Edit: it's been fixed now, the 3 piece airlock was shoved in the lid upside down.
If you're in a hotter part of the world you might want to try brewing a saison as they usually ferment a bit hotter. Assuming you're in the US, might be easier to heat than to cool right now.
Picked up one of these and it does the job.
https://www.google.com/url?sa=t&source=web&rct=j&url=https://www.amazon.com/Kenley-Fermentation-Carboy-Heater-Thermostat/dp/B071RXYCMK&ved=2ahUKEwiKwKKO0tDeAhVMvKwKHcLsBy4QFjABegQICRAB&usg=AOvVaw1XfcDJGFjkR-dgoSlAXE9j
Okay, here's what you do.
Get a six-gallon, food-safe plastic bucket, with a lid with a small (like, quarter-inch) circular hole in it. You'll also need an s-shape airlock to put in the little hole. Get five gallons of apple juice from the grocery store, and a packet of wine yeast.
Clean the bucket with a 1% bleach solution (...the other 99% water) and rinse thoroughly. Add apple juice and yeast to the bucket, seal with the lid and airlock. Wait three to four weeks.
During this time, also get 48 empty beer bottles (you can use your own empties if you drink enough), and enough beer bottle caps. You'll also want a capper -- there are cheaper and harder-to-use options.
After the three to four weeks of fermentation, open the bucket and add about half a cup of sugar (corn sugar works best), and stir it in. Fill the bottles using either the spout on the bucket or a siphon hose, leaving a half- to three-quarters-inch of air at the top of each bottle.
Let the bottles sit a couple weeks to condition (carbonate), then refrigerate and enjoy. The dryness of the resulting cider will be based on which yeast you chose, so if you want a sweet cider use a white wine yeast, and if you want ultra-dry cider, use champagne yeast.
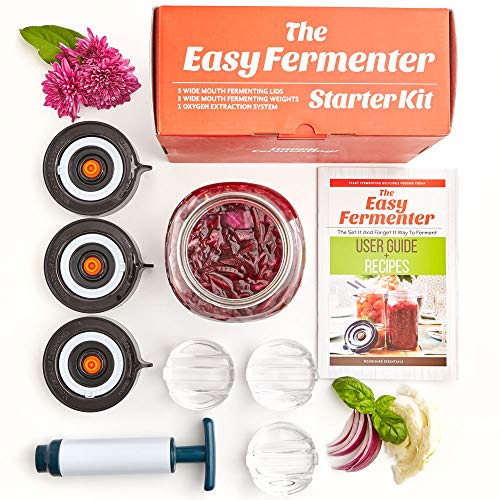
I got this own from amazon with weights: Easy Fermenter Wide Mouth Lid Kit... https://www.amazon.com/dp/B0789QYV52?ref=ppx_pop_mob_ap_share
You need these.
Just ordered them on Amazon! Just regular Mason jars. These are the lids: https://www.amazon.com/gp/aw/d/B07921Y1CY?psc=1&ref=ppx_pop_mob_b_asin_title
I found a comment of mine from a while ago with links to the hardware I use.
>That humidity/temp controller will only run a humidifier/dehumidifier or the fridge/heater... one of each, not all four. I have it running my "winter" curing chamber that only needs to be heated up to 55 degrees and dehumidified. If you will need to heat your chamber part of the year, cool it another part, humidify it at times, and dehumidify it at other times, then you should get one controller that can do heat or cold: https://www.amazon.com/Inkbird-Temperature-Controller-Thermostats-Germination/dp/B019Q3K4EI/ref=sr_1_4?ie=UTF8&qid=1489682368&sr=8-4&keywords=inkbird
and a controller that can humidify and dehumidify: https://www.amazon.com/Inkbird-Dehumidification-Humidifaction-Dehumidifier-Charcuterie/dp/B01FQKXRXA/ref=sr_1_15?ie=UTF8&qid=1489682368&sr=8-15&keywords=inkbird
If you make a lot of product in one session, you will probably need a dehumidifier: https://www.amazon.com/Pro-Breeze-PB-02-US-Electric-Dehumidifier/dp/B01DC5PPWM/ref=sr_1_5?s=home-garden&ie=UTF8&qid=1490184197&sr=1-5&keywords=dehumidifier
When you hang 10+ lbs of meat in a fridge, that humidity is going to shoot up to 85+% even if you are in the desert.
I know that a fan is a basic and common component, but I've never put one in either of my chambers. I open the door every day to check on things and am constantly adding and removing product from the rotation... I haven't really had any problems yet. I don't think it would hurt at all to have a fan in there, though.
The equipment everyone is suggesting is a good idea. I'd also at least use wine yeast instead of bread yeast (it's not that expensive).
Honestly, though, I'd suggest buying something like this one gallon fermenter or this wide mouth fermenter. They both come with an airlock cost you less than $10 and they will make this process a lot easier.
If you want something super cheap, but not quite so disgusting, I suggest you start with Skeeter Pee. You can cut all the proportions down by 1/5. I always make mine with this champagne yeast instead of a yeast slurry. I just mix the yeast in a clean jelly jar with some apple juice, cover with foil, and wait until it starts to get bubbly. You can omit the tanin. I always blend up some frozen strawberries and throw that in there too (they probably have enough nutrition that you can also omit the yeast nutrient and yeast energizer if you start the yeast in apple juice). You can also use just the Potassium sorbate and leave out the Potassium metabisulfite and if you don't mind a cloudy drink, you can eliminate the Sparkloid as well (although I like how crystal clear it makes mine and that it takes out any of the seeds, strawberry pulp, yeast, etc.)
If you make all those alterations you can probably make a 1 gallon batch of delicious hard strawberry lemonade for less than $5 in ingredients and less than $10 in materials--it'll taste much better than the recipe you had and won't cost you much more either.
I've set this up: https://www.amazon.com/gp/product/B071RXYCMK?ref=em_1p_0_ti&ref_=pe_210840_356610280
However to minimize electric cost I put it on a shelf in the utility room above my water heater. That room so far has stayed warm enough that the heater has never had to kick on.
I turn off/down the furnace/heater when I'm at work for the day and at night, but my water heater stays on.
I don't have any experience with them, but it looks like it is the same type as this one on Amazon. Sounds like the biggest complaint is the lid not sealing well.
I bought one of these kits not long ago and honestly, it's day and night. It's 100% set it and forget it.
​
I know there are other options that are cheaper, but I can't vouch for how good they are because I haven't tried those.
​
https://www.amazon.com/gp/product/B0789QYV52
To be honest it's going to be a good prison hooch, Hold off and get a Hydrometer
Airlock with #6 Stopper then go shopping at the cvs,rite aid,market for a 1 gallon cheap wine ($8-9) and dump the wine and wash the jug well. Now you can start making cider.
My recipe: Apple juice (1.040), Can of tree top apple juice concentrate (1.035) now add enough concentrate to get the gravity reading up to 1.065 (about 113 grams or 1/3 can) and munich classic wheat beer yeast and let it ferment about 30 days. It should be done fermenting (1.012 or so) and is drinkable or let it age longer.
Also, someone introduced me to these lovelies for making sauerkraut with, I would imagine they would also be handy when making kimchi (hopefully I'm allowed to post, if not grab the info and delete my comment): https://www.amazon.ca/dp/B01LWS63OF/?coliid=I334PGNMEWURNZ&colid=1O0N3J44KWXW&psc=0&ref_=lv_ov_lig_dp_it
Buy an airlock and stopper that’ll fit whatever you’re fermenting in.
Use Starsan to sanitize.
IDK where you can get yeast but maybe an online home brew store will ship you some dry yeast.
You also will probably want to do a staggered nutrient addition or you could add raisins.
Also check out r/mead
If you're gonna stick with glass get a large mouth fermenter like this
https://www.amazon.com/Big-Mouth-Bubbler®-Gallon-Fermentor/dp/B00W3PYBMS
Or get PET, and use a non-abrasive sponge for cleaning. I have seen too many pictures and videos of glass carboys breaking so I only use PET now. Glass is much heavier as well. I haven't had issues with plastic at all.
Try these weights: https://www.amazon.com/gp/product/B07CXJ92CG/ref=ppx_yo_dt_b_asin_title_o01_s00?ie=UTF8&psc=1 Make sure you buy wide mouth weights and wide mouth ball jars... I found ball jars delievered WAY cheaper through target and walmart vs amazon.
Try these lids: https://www.amazon.com/gp/product/B07921Y1CY/ref=ppx_yo_dt_b_asin_title_o01_s01?ie=UTF8&psc=1 These worked great as well.
I stuffed my 32oz jars way too full, and each jar yielded 2.5 5oz hot sauce bottles. Next time I will use 64oz jars...
And yes, also suggest getting a small digital scale to make sure your brines are right... that way you can be sure it stays shelf stable and edible for a lot longer.
Used would be fine for now. I've been looking at these glass big mouth carboys for a while now I just can't bring myself to pay the price. I'm sure I'lll get to it eventually:
https://www.amazon.com/Big-Mouth-Bubbler-Fermentor-Universal/dp/B00W3PYBMS/ref=sr_1_2_sspa?gclid=CjwKCAjwwtTmBRBqEiwA-b6c_3cuQPu7B8YXwu0Cf1RttF8Fws04bj1wEda7sh0ngyJRmI9yrIE3vRoC10IQAvD_BwE&hvadid=174232965350&hvdev=c&hvlocphy=9001869&hvnetw=g&hvpos=1t1&hvqmt=e&hvrand=2199293582037460939&hvtargid=kwd-57435854080&hydadcr=24658_9648989&keywords=big+mouth+bubbler&qid=1557514370&s=gateway&sr=8-2-spons&psc=1
yes, I use these but you can make your own with a drill, rubber grommet and airlock. But I'm lazy. They fit over all Ball wide-mouth jars. I usually stick with 32oz jars.
To piggy back on u/stormbeforedawn's comment.
This is the equipment I used that I've had good luck with so far. It's what he recommended, I'm just providing links to the specific product I used.
This is my fermenter Since I pitched the yeast it has not gotten to a violent ferment it only bubbles about every 1 to 2 seconds out of the airlock on the lid.
I just picked up a 7gal wide mouth from kegco. The glass feels a bit thin but I've got no qualms with it after using it as primary 2x and secondary 1x. Came in with some serious over-packing to prevent damage, and the straps were a nice courtesy.
https://www.amazon.com/gp/product/B01ANDX4WO/ref=oh_aui_detailpage_o00_s00?ie=UTF8&psc=1
I normally scrape off the surface stuff and give the food a taste. I bought some pickling stones from Amazon and they work very well holding everything under the brine (if using Mason jars) mine are for wide mouth.
http://www.amazon.com/gp/aw/d/B00V41EZNC/ref=mp_s_a_1_1?qid=1464484798&sr=8-1&pi=SL75_QL70&keywords=Pickling+pebble
Also you can get airlocks for the jars. These ones are simple to use!
http://www.amazon.com/gp/aw/d/B01726CJ9Y/ref=mp_s_a_1_2?qid=1464485203&sr=8-2&pi=SL75_QL70&keywords=pickle+pipe
I've never had any good experiences with those silicone airlocks, I find this style to work a lot better. Also, it's best to base your salt off of the total weight of ingredients, especially something like beans where you can pack them in tight and have a high vegetable:water ratio.
Ours is a little more complicated than most:
Supplies
Ingredients
Directions
Notes
I've considered using a jar, although you'd probably also need a way to release excess gasses. I haven't done it yet, but my idea is to run an airhose from the jar to above the water-level, and using one of these:
https://www.amazon.com/gp/product/B00IGY9P2G
ITC-310T is also good for brewing. You can set 6 period of time temperature. It is also cheaper than Jophson's.
http://www.amazon.com/gp/product/B019Q3K4EI/ref=olp_product_details?ie=UTF8&me=
>Will you be giving the yeast a proper starter and vitamins?
I don't think I will, unless it's something I can do with household items. I'm trying to challenge myself to do this as frugally as I can. I'm basically just using yeast and this airlock
> Will you be crashing them or running them the entire time?
I'm not too familiar with the terminology, but my plan is to add the yeast to fruit juice, wait until it stops reacting, and then pour it into another container through a cheesecloth to filter out the inactive yeast.
>What is the temperature where they are fermenting?
Room temp, roughly 65-70
>What is the starting gravity?
Not too sure about this. I'm probably going with grape juice or some fruit concentrate. Could I measure this with a scale?
>What is the max ABV of the yeast?
I couldn't find those specifications, but all the reviews suggest it's the ideal product for brewing with juice. Maybe it'll say on the back of the packet?
I also try to minimize leaving the house. I like DIY projects so I made airlocks using plastic mason jar lids.
You can also get the entire mason jar fermenting lids pre-fab ready to go
I got silicone seals to make them airtight.
I drilled 9/16" holes and inserted plastic grommets.
Then I use 3 piece acrylic airlocks. I think that 3piece makes it easier to clean and acrylic is sturdier than plastic but that's just me. They make plastic ones.
I found this to be pretty cost-effective especially since I don't already own any reCAP lids. It was an easy-peasy project. Just be sure to clamp the lids to something otherwise you can't drill proper holes.
I am super happy with them; they work great and I didn't have to leave the house ;)
Edited because I hit "save" prematurely
Depends on the ingredients of the beer, but it really is basically just that. You just need a cointainer and something then to keep oxygen out. Those things cost several dollars only. They're little plastic/glass airlocks you stuff on top of the bottle:
https://www.amazon.ca/gp/product/B00IGXQ5I4/ref=ox_sc_act_title_1?smid=A3DWYIK6Y9EEQB&psc=1
Wine's easier to make though.
These are the ones I bought
It took some searching to find ones that weren't ridiculously pricey.
The silicone lid gaskets I have
I don't recall if I used 1/2" or 9/16" as recommended on the grommet packaging.
Happy Birthday! This bung is $2.99 with free shipping
Thanks!
Kombucha, sauerkraut, and as chef says, pickles of all kinds are easy too. I just harvested some kraut that's been fermenting on my counter for 6 weeks, and I harvest about a gallon of kombucha every 3 or 4 weeks. Mmm good. Again like Chef says, I do everything simply in quart sized wide-mouth mason jars, and if you really get into it, luxuries like these are great:
https://www.amazon.com/Fermentology-Sauer-System-Fermentation-Airlock/dp/B01H7G1NF0/ref=sr_1_9?s=home-garden&ie=UTF8&qid=1539862019&sr=1-9&keywords=mason+jar+fermenting+lids
I used them for the first time with the kraut. Nice.
Haha, considering you don't know anything about brewing beer he probably could have done a better job explaining some terminology. Gravity doesn't refer at all to the weight or mass, gravity refers to the sugars present in the liquid and therefore the potential ABV. This is what you must measure to determine how alcoholic your beverage will become, and ABV cannot be measured in any other way. Gravity can be measured with a hydrometer, and must be measured before the mixture has fermented at all. Potassium sorbate can also be found on Amazon if you aren't near any brew supply stores, but while cheap you'll probably have to buy around a pound if you want it shipped to you for free.
Lastly, as for equipment you'll need an airlock, an airtight glass jug or plastic bucket the airlock can go into, and some kind of siphon to get it out. That should be good enough for a basic setup.
OSH sells plastic buckets manufactured by Argee with their name on it. I checked Argee's website and found this statement:
> All of Argee’s White Pails are Food Safe, and contain No-BPA.
So I bought them and I bought these grommets to put in a ½" hole I drilled in the lids.
These lids are great and allow you to suck air out of your ferment.
Using these+ not leaving a lot of headroom + using a glass fermentation weight to keep everything submerged under the brine pretty much ensure a mold free ferment.
Of course this is not necessary, just keeping everything under the brine will do. However, I like these lids because they are very hands off because you don’t need to burb the jars (they let CO2 out).
This might get you started. At least it's funny. This is probably what you're looking for. Airlocks can be purchased at a local homebrew store or easily on Amazon. They let carbon dioxide from the fermenting juice out while not allowing any germ-laden air (or flies) in.
This should make over carbonation impossible!
Obviously you want some carbonation for Komubucha, so this might not work for that. But for kimchi saurkraut etc it is great!
For larger brews of kombucha it gets tough depending on what you prefer to brew in. Some also get very heavy as you go up in gallons. I've been looking into this for a while and it's not a simple decision. You have to decide what way you want to go with your brewing when you get to the point of wanting a higher yield.
The choices you have are brewing grade plastics, brewing grade stainless steel, ceramic, glass, and wood.
Wooden barrels are going to be the one of the most expensive and the hardest to purchase. It costs about 175 dollars for a 5 gallon vinegar/kombucha barrel. Note this is a special barrel and is different from wine barrels in construction. 20 Liter Oak Kombucha Barrel
Stainless is going to be the other more expensive one but costs will vary. Though it seems to be a lot easier to get a large capacity stainless fermenter versus the bigger barrels. These are commonplace from pretty much any brewing equipment seller. 14 Gallon Stainless Steel Fermenter
Glass and Ceramic are rarer in gallon sizes larger than 5-10. I have hear tell of specially made glass/ceramic large containers but they would not be cheap. The largest easily accessible glass container I've found is the 6.5 gallon big mouth bubbler carboy. The largest ceramic container I've found is a 10 gallon preserving crock.
Plastic will be hands down the cheapest and lightest way to go for larger brews. 6.5 Gallon plastic fermenter with lid and Drum Tap
Basically if you go with anything outside of plastic you will be paying from 75-175 for 5+ gallons in a single container. My 1st choice has been to try out the Big Mouth Bubbler and see how I like that but my second is to get into brewing in barrels but that just my choice.
I've between using this. It works very well. https://www.amazon.com/dp/B019Q3K4EI/ref=cm_sw_r_awd_srB6wbB1AHMKG
https://www.amazon.com/Fermentology-Sauer-System-Fermentation-Airlock/dp/B01M2D9BIV?ref_=fsclp_pl_dp_10
Cut out the middleman:
10 packets of Champagne yeast: $5.50
2 airlocks: $5.99
I use mason jars and attach those air lock lids people use for fermenting things. They let co2 out so the coffee can degas and you can just use the pump to suck out the air. It’s not as slick as the atoms containers but it’s a money saver... if you’re curious
Even using those airlocks? Pressure could build up and blow out the little orange airlock thing in the middle and spray that sauce everywhere when shaked.
https://www.amazon.com/dp/B0789QYV52/ref=psdc_979850011_t3_B0791V942S
Glass Weights:
https://www.amazon.com/dp/B079893ZT1/ref=cm_sw_em_r_mt_dp_U_5iiWDbAYYG5WR
Jars:
https://www.amazon.com/dp/B07HGG3DD1/ref=cm_sw_em_r_mt_dp_U_OjiWDb9764K9F
Airlocks:
https://www.amazon.com/dp/B01M2D9BIV/ref=cm_sw_em_r_mt_dp_U_xkiWDbY723EJ4
This: https://www.amazon.com/Masontops-Pickle-Pipe-One-Piece-Fermentation/dp/B01LWS63OF
Plus some wide mouth jars you can get on Amazon or locally.
It's worth paying a few bucks up front to avoid wasting time and money down the road. When you pour the saltwater into the jar, only do it part way up. Take a small ziplock bag, fill it with a bit of water (you can adjust it to fit) and put it in the top of the jar. It will keep all the big bits that tend to spoil from floating to the top.
Here's a reddit thread where someone did it for hot sauce: https://www.reddit.com/r/fermentation/comments/9958k1/hot_sauce_ferment_modification_with_the_ziploc/
Hope this helps. Sometimes it still fucks up. You might try slightly upping the salinity % if that happens a lot.
Thanks! What about a large 1 gal jar? https://www.amazon.com/Empty-Gallon-Airtight-Leakproof-Plastic/dp/B075JR6H11
That's actually not bad but as mentioned below, a decent pot will go a long way. I bought a 30quart turkey fryer and put in a ball valve and that's been one of the best upgrades I've made. I have a fermentor now, but I got some free 6+ gallon food grade icing buckets from my grocery's bakery. Spigots, air locks, and bottling wands are $6 on Amazon. Tubing can be found pretty cheap online or at LHBS/hardware store.
Kettle - $25
Ball Valve - $22
Bazooka Screen - $9
Buckets - Free
Spigot - $6
Airlocks - $7
BIAB Bag - $5
Bottling Wand - $5
Capper with Caps - $18
Various Tubing - $15
This doesn't include your first beer kit, but you can pull off an all grain BIAB as long as you've got fire. My second favorite piece I own is my mash tun which is just a 10 gallon cooler with a bazooka screen and ball valve. I don't bottle anymore, but I feel like if I were to do it again that's all I would need to start. Oh, and a thermometer and some StarSan.
So I’m not sure where I pulled this recipe from, it was probably inspired from another webpage but with my own twist and I’m still changing it as I go. So I originally tried 150g peeled ginger in a ninja single serve blender, filled to max line with water which was ~310ml and blended to hell. Then I put in pot, heated to ~65°C (150°F) and added 53g turbinado sugar (~4Tbsp) and 43g (~3 Tbsp) table sugar. I stirred for a few minutes to dissolve, covered and let sit about 30 min. Then I strained out the ginger muck, topped up with cold water to the 1L mark and chilled in fridge to room temp. Once it’s about room temp I put in the GBP grains to prevent any thermal shock. I also only use bottled (preferably Poland spring) water. Now the most recent batch was roughly quadruple of that but not topped up to 4L, instead closer to 3.5L making it a bit more concentrated. I let mine ferment fully dry and then force carbonate in a tiny 1.75 gal keg. If you wanna do swing tops I have one conditioning now with 3g of sugar added to the ~400ml that was in the bottle (I got them on amazon I think they’re 16oz bottles and this one was slightly under filled) I actually used 6ml from my cocktail simple syrup (1:1) and just put it in the bottle the other day.
Edit: sorry I wrote my recipes in real units and have to convert because... well Murica
Second edit: don’t forget to feed the grains! Even if you’re not gonna make another batch to drink, make a small 1L batch and give it a few hours on a vented container (I like using mason jars with these https://www.amazon.com/dp/B01H7G1NF0?ref=ppx_pop_mob_ap_share )
before putting in the fridge! Once in fridge their metabolic rate will come to a crawl and they’ll be in a solution of food and won’t starve (not for a good long while at least)
Third edit! Lol: the 5”? OXO strainer is ideal for harvesting grains and I also use one of these https://www.amazon.com/dp/B0064ODL1G?ref=ppx_pop_mob_ap_share to remove the bulk of the gingerbeer into another container before harvesting the grains out. It leaves all the muck leftover at the bottom and out of finished product. Also, most recent batch was neglected while heating and hit a boil so I’ll let you know how that changed it. I made one batch with fresh squeezed blackberry juice pressed and filtered as not to contaminate the grains and while it was wonderful it was a PITA. I plan to repeat but with some sacrificial amount of grains so I can just add mashed blackberry and let the culture extract the bulk of flavor then toss those grains with the vegetative waste at the bottom
http://www.amazon.com/Inkbird-Pre-wired-Temperature-Controller-Thermostats/dp/B019Q3K4EI
How about something like this then? Sounds similar to what I think you're talking about, but for wide mouth jars. And the 8 pack figures out to just over $4 each: https://www.amazon.com/dp/B01M2D9BIV/ref=sxr_pa_click_within_right_1?pf_rd_m=ATVPDKIKX0DER&pf_rd_p=3163805422&pf_rd_r=WA04E2861G3G08CQ4PK6&pd_rd_wg=ymO25&pf_rd_s=desktop-rhs-carousels&pf_rd_t=301&pd_rd_w=N4TPm&pf_rd_i=airlock&pd_rd_r=K7MKMVZWA852PT6RB0V1&psc=1
OK, here's my feedback:
The only other thing I'd add is maybe a heating mat like this if it gets cold inside where you are. I have one and another on the way, and they really help ensure an active ferment.
If you are diy inclined and homebrew shop will have them but you’ll have to mod a mason lid. I decided to try these and am impressed with the quality.
Empty 1 Gallon Glass Jar w/Airtight Leakproof Plastic Lid - Wide Mouth Easy to Clean - BPA Free & Dishwasher Safe - USDA Certified - Kombucha Tea, Kefir, Canning, Sun Tea, Fermentation, Food Storage https://www.amazon.com/dp/B075JR6H11/ref=cm_sw_r_cp_api_i_.MVGDbF2XQ6Y6
These work really well for heating.. I haven't used this particular set up, but I have used the heating pad with a 1/2 bbl keg fermenter kit and a johnson controller. I used that set up to brew a berlinerweisse and it kept the wort at 105*F perfectly.
well, in my experience, if you ferment at a higher temp you get less yeast expansion at the top.
I still leave a lot more headroom, i usually do 20 liters in a 30 liter bucket.
btw, you could use something like this: https://www.amazon.com/Kegco-Gallon-Carboy-Fermenter-Homebrew/dp/B01ANDX4WO
So I got this Kenley on amazon and to date it works well. I am only about 10 days in so I cannot comment on the longevity of the item. It is a bit large for a 1 gallon brew but I roll the end or you could just overlap it. I cross referenced the thermometer reading with another temp gauge and it was identical.