(Part 2) Best ceiling light fixtures according to redditors
We found 681 Reddit comments discussing the best ceiling light fixtures. We ranked the 338 resulting products by number of redditors who mentioned them. Here are the products ranked 21-40. You can also go back to the previous section.


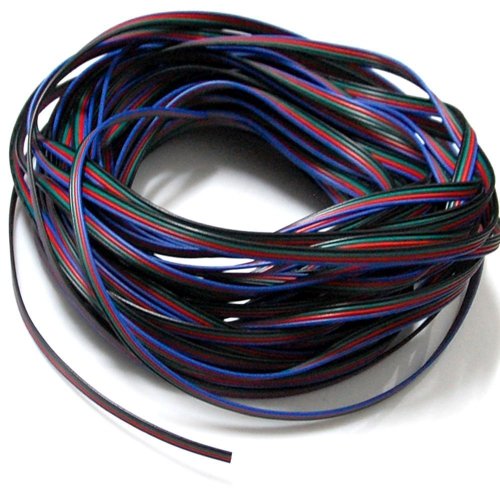


Links to the LED's and wire that I bought:
Music Led Strip Lights, TaoTronics Christmas Rope Lights Kit (300 Leds, RGB,20 Key, 16.4ft) 5050 RGB SMD Leds
[4 Color 12M 4 Pin RGB Extension Cable Line Wire For LED Strip RGB 5050 3528 Cord]
(https://www.amazon.com/EvZ-Color-Extension-Cable-Strip/dp/B00XFSNKXS/ref=sr_1_3?ie=UTF8&qid=1487516299&sr=8-3&keywords=4+Color+4+Pin+RGB)
*Edit, just noticed that the specific lights I bought are not available but These seem to be the same thing
Easy way to make really obnoxious portable LED projects:
USB Battery for 5v power. Minimum 2A output.
USB to barrel jack adapter
Radio Remote Control - lots of options here
Extra connectors
ws2812b LED strips
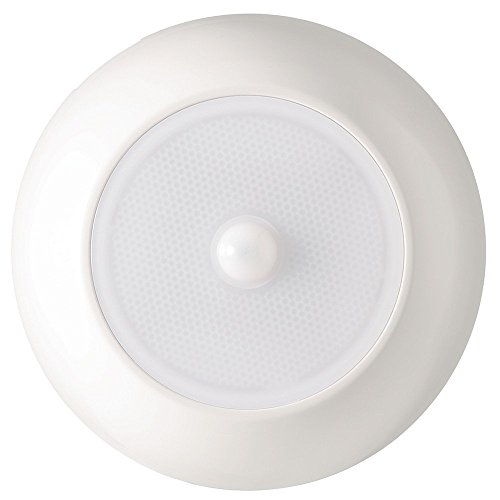
nice! all jokes aside, i use the Mr. Beams MB990 as a light source for closets with no lights. takes D cells, u can use AA to D sleeve or the 3 AA to 1 D modules as well. or just use plain jane D cells (thats what i use)
https://www.amazon.com/Mr-Beams-MB990-UltraBright-Wireless/dp/B01JS9CCHC/ref=sr_1_4?keywords=Mr.+Beams+MB990&qid=1571757236&sr=8-4
OP, do yourself a favor and get one of THESE - a suction cup tool used to remove these bulbs. Makes it a lot easier.
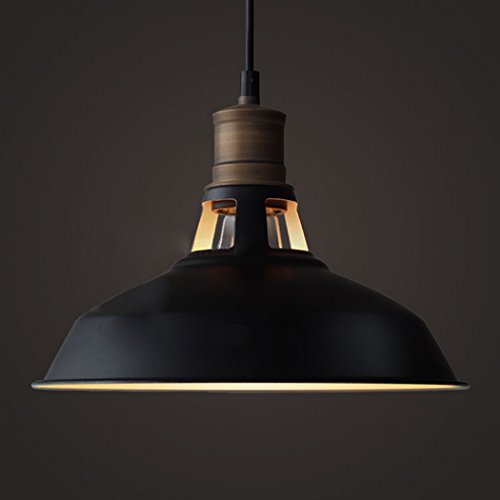
The first thing I would do is replace the butterfly light, perhaps with a simple black pendant?
Example 1
Example 2
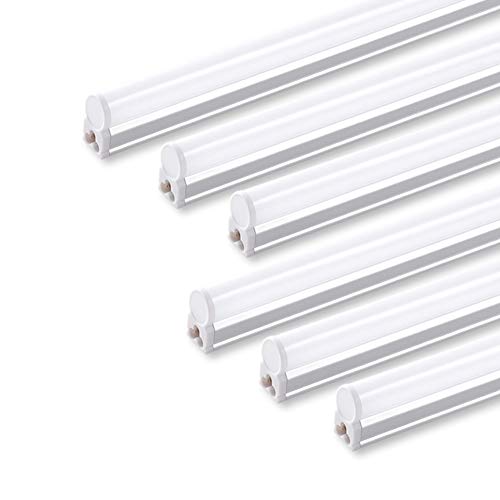
Good prime day deal on barrina t-5 LEDs. I have two sets for the garage. Great value, highly recommend
(Pack of 6) Barrina LED T5 Integrated Single Fixture, 4FT, 2200lm, 4000K (Daylight Glow), 20W, Utility Shop Light, Ceiling and Under Cabinet Light, Corded Electric with Built-in ON/Off Switch https://www.amazon.com/dp/B01MUKSZE3/ref=cm_sw_r_cp_apa_i_d4ulDbEYTYB2A
These are the ones I got: Barrina LED T5 and I friggin' love them. The only possible downside is that they're pretty fragile, so be careful putting them up.
So I bought a used 2008 pontoon last year, and decided to do a budget update to get her ready for the new season. Tried to keep it under $1000, but the last minute decision to get a new Bimini put the project over that.
For those curious, here are the materials I used.
60' of .030 black aluminum paneling: $295 from Pontoonfence.com
Nav Lights:$20
Docking Lights: $30. I'm keeping an eye on these. Some reviews complained of them not being waterproof. I ran a bead of silicone around the lens and where the wires enter the body. Hoping they hold up.
Waterproof LED Strip Lights $40 for two sets. I'm really happy with these.
LED RGB control wires $9
Polk DB651 6.5" Speakers $118 ($59/pair)
Kenwood Marine Bluetooth Amplifier $135
Pyle Marine speaker wire $9
Engine Parts (Plugs, Impeller, Lube) $40
Power wash rental: $30
Misc expenses (mounting tape, nonskid tape, screws, bolts, etc) ~$100
Replacement Bimini and boot from restorepontoon.com $219
Total: $1,045
If you just want to hold a clone or two, any light will work. Take them while in veg, and get them stable at 8" tall or so. They can sit under a desk lamp almost indefinitely, and will require very little water and attention.
Have a bookshelf you can clear off? A single T5 fixture runs about $20. You could keep a dozen clones healthy and happy, indefinitely, under one. 1g cloth pots will keep them from getting rootbound.
If you wait until harvest, then try to reveg the plant, it'll work, but it will take a long time to get things back to a true veg state (months, potentially). And if you take a cutting or flip to flower before that happens, you likely have permanently altered the plant. Cloning from veg is really the best choice.
Those sockets often come with a suction cup meant to be used to stick to the crystal of the bulb (when it's cool) so you can then twist and pull the bulb with the handle of the suction cup. (I assume this is a GU-10 type bulb/socket?)
If you don't have the suction cup that came with it, probably any window decoration one can be used in a pinch.
EDIT: something like these: http://www.amazon.com/Nora-Track-Light-NRS90-N20-Suction/dp/B002ZPD4R4/ref=pd_sxp_f_pt
I'd suggest looking for 3528 LED strips. They consume less power and are narrower, making it easier to conceal inside the case. Even with a tinted window, they are obscenely bright. You can also purchase crimp-on terminations for these strips. This means you can order bulk strip and cut only lengths you need.
Mini in-line RBG controller w/ remote
Crimp on terminations
If you do multiple systems, you could easily save money by buying these parts instead of individual kits each time.
It's definitely a hurt your bank account option, but ProChrono, plus the indoor lighting kit will get you high accuracy results with much fewer random outliers. If you want to just go all out, then you add the optional Bluetooth adapter which lets you use their smartphone app to easily manage and export your data.
People will hopefully be posting perfectly good options that don't break the bank, but that's subjectively what I consider the "best."
Nothing special.
Just simple 6000K LED T5 lights instead of something more specialized. Hard to say no when they're $10 a piece. Went the quantity vs. quality route and have three lights per level.
I used SMD RGBWW Lights from Amazon. Here is and album of them at night. I have used 3 of 4 strips so far. The remote works great from a long distance without line of site and allows for multiple zones. I have it set on a timer to turn on at dusk. I leave them on fading between colors and during holidays I can choose whatever color I see fit. It is a bit of work but I love the look. Very unique.
Supplies:
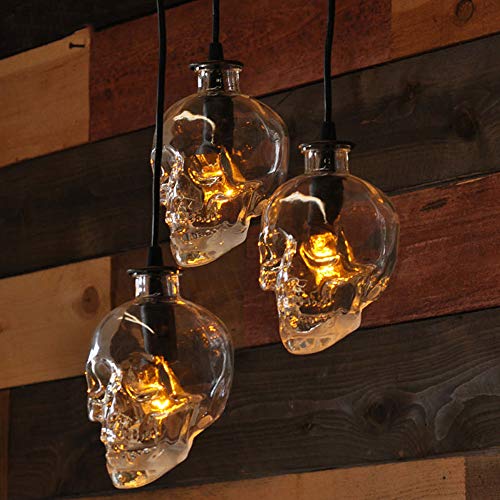
https://www.beautifulhalo.com/industrial-hanging-pendant-light-skull-glass-shade-p-277794.html
Amazon if you prefer — https://www.amazon.com/NIUYAO-Industrial-Vintage-Creative-Chandelier/dp/B07MXTW4Y9/ref=asc_df_B07MXTW4Y9/
Here are the components I got:
RGB LED Strip Lights Kit,BEILAI RGB LED Light Strip Waterproof SMD 5050 DC 12V Flexible Neon Tape 16.4 Ft (5M) 300leds with 44key Controller for Christmas Kitchen Party Indoor and Outdoor decoration https://www.amazon.com/dp/B01KSPR5GS/ref=cm_sw_r_cp_api_p6mWBbZ9XWQ7N
EvZ 22AWG 4pin LED Electric Wire 22 Gauge 33ft 10m Conductor Extension Cable Line Cord for RGB LED Strip 5050 3528 https://www.amazon.com/dp/B00DPQMKBS/ref=cm_sw_r_cp_api_r7mWBbSQEZB0T
EvZ 10PCS LED 5050 RGB Strip... https://www.amazon.com/dp/B01CMLLKHG?ref=yo_pop_ma_swf
12V DC Battery Pack, 6000 mAh... https://www.amazon.com/dp/B00U2PVX36?ref=yo_pop_ma_swf
And a bunch of male/female connectors - but I can’t find the link. Also make power connectors for the power bank.
Soldering was a pain because the led leads are so close together. Used a knitting ring in the hoodie opening to keep it stiff and hot glued the whole contraption onto some black sweats. No time this year but I want to play with Tron type costumes next year.
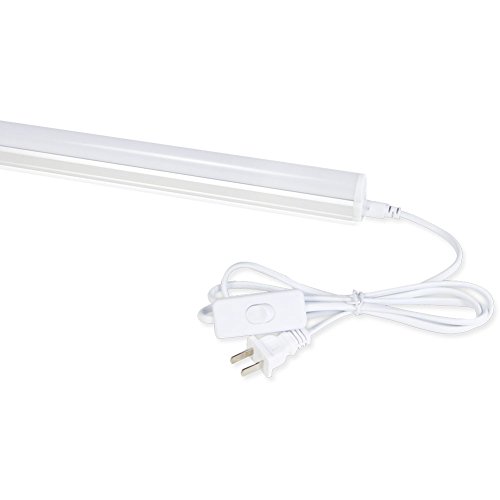
I added these. Can set them up separately or link them all together. I did the latter and they work fantastic. I previously used the shop lights others linked but I find this way to be cleaner in terms of look.
T5 Integrated Single Fixture,LED Shop Light for in Garag,4FT, 2200lm, (Super Bright White), 20W, Utility Shop Light, Ceiling and Under Cabinet Light,Corded Electric with ON/Off Switch,6000-6500k 6pk https://www.amazon.com/dp/B078FY9KMQ/ref=cm_sw_r_cp_api_knr1BbV6E0HNE
So this is my, in progress, setup. Please ignore the mess as I've been changing things around, adding stuff etc. And yes the TV power cord will eventually be hidden 😉
My goal is to RGBW the back of the desk. I at least wanna do the whole straight desk and possibly the curved part too(opinions?). That's simple enough and I have the LED strip to do that. My question comes in for the monitor and TV. I'm not sure of the best way to get RGBW strips behind both of those without running separate power supplies etc. I don't want to do this so they all operate off the same remote.
I have this being shipped to me and I was just gonna run the cable through the wall to each screen, then attach additional LED strip to it:
http://s.aliexpress.com/qyIfeiUN
1, I'm not sure how to attach it. Do I solder the extension onto each end? And #2, should I buy some sort of connector that's easier? That's where I'm getting confused. Because I see things like these and they seem so much easier:
https://www.amazon.com/dp/B013JRRPCG/ref=cm_sw_r_cp_apa_98iSybFKW6B25
Or
https://www.amazon.com/dp/B019MTK554/ref=cm_sw_r_cp_apa_P9iSyb3JRFMJK
Thanks!!
It would be cheap, and far less hassle if you used daylight LED's in that basement. You could make it like the surface of the sun, for just pennies a day.
https://www.amazon.com/Barrina-Integrated-Fixture-Utility-electric/dp/B01HBT32PW
Are you talking about these? I just got some Mr. Beams motion sensing lights for my closet, and they work pretty nicely. Mr. Beams also makes these night lights. I imagine they should be good.
Otherwise, I'd go with /u/fivethirds's suggestion. I personally have some GE branded version of those, and I like them. As (s)he said, they're basically just like a giant indiglo watch face. There is literally just enough light to not step on something, and nothing more.
There are light fixtures which use batteries, which can be attached to any surface, like the one below:
https://www.amazon.com/Mr-Beams-MB990-UltraBright-Wireless/dp/B01JS9CCHC/ref=cm_cr_arp_d_product_top?ie=UTF8
Maybe that's what you are looking for?
I bought these strip lights - LED Strip Lights, ATTUOSUN... https://www.amazon.com/dp/B07P61XM9J?ref=ppx_pop_mob_ap_share
And these connectors - JACKYLED RGB 5050 3528 LED Light... https://www.amazon.com/dp/B072KRCJLD?ref=ppx_pop_mob_ap_share
I just ran them up the sides and over and drilled a hole in the bottom for the cables.
The adhesive is super sticky though, had to redo a small section and needed to use rubbing alcohol to get the adhesive off the glass.
Consider this: https://www.amazon.com/dp/B002ZPD4R4/ref=cm_sw_r_cp_apa_UIo.zbWVHVBBN
Mine comes in quite handy
I redid all of the closets in my house shortly after I moved in, using the ClosetMaid system. It made a world of difference and easily doubled the amount of useful space in every closet, and as a bonus the shelves and bars can be moved around as my daughter gets older to better accommodate her needs. I also added these Mr. Beams ceiling-mounted LED lights in every closet, as well as those in my mother's house, which made every closet even more useful now that I could see inside of them.
I'm currently renovating the (half) bathroom in my shop; it's extremely small, just 4 1/2' square, so I'm all about the details now. I bought a sink that was narrower but deeper than the previous sink which makes the room feel larger without taking up additional space, and to make it more useful I bought a faucet that's taller so that I can fill a bucket in there if I need to. I also added one of those "Pur" water filters to it since my shop doesn't have space for a water cooler. I added a shelf to the space under the sink (in the vanity) so I've got more storage space there. The bathroom has no venting system so I bought an air purifier and set it up behind the toilet. I installed a GFI outlet that the purifier is powered by, and that outlet goes on and off with the light switch so whenever someone's using the bathroom the purifier is working. I replaced the wall-mount mirror with a tall medicine cabinet for storage there, then bought a small shelf unit from Ikea and mounted it on the wall above/behind the toilet. Finally, where there previously was a useless hole in the wall on one side (literally) I built a small wood box with a shelf in it and mounted it inside that hole for additional storage and decorative space.
Good question! You can solder them if you want but each strip contains 4 tiny wires which are a pain to solder. And if you accidentally let solder touch 2 wires then the color doesn't get processed correctly. So they make female to female straight connectors and angled connectors. They also make extension cords if you want to get behind a wall. If you want to save money just buy bulk wire. But if you connect more than 16ft of lights in a single circuit, then you needed an amplifier which needs to be plugged into an extra power supply otherwise the lights near the ends of the circuit will be dimmer and also off color. Color correctness comes from adequate power. Finally you can optionally buy a music sensor so all of your lights blink to the music!
Mr. Beams MB990
https://www.amazon.com/Mr-Beams-MB990-UltraBright-Wireless/dp/B01JS9CCHC
When I disconnect the last strip I get no lights anywhere. To test what may have happened I also tried connecting a completely new light strip to the power supply and controller but this also yielded no light. I am assuming this is because I fried the controller and/or power supply. Hopefully the actual strips are still functional but time will tell. I have purchased a new 'starter kit' from the Best Buy and will be testing the viability of a run of my intended length soon (before actually mounting any wires in my shelves). I am also going to try to use some Hualand extension cables to see if they will be more stable than my homemade extensions with soldered connections. My basic plan is to run eight 3.3 foot LIFX strips with a 6.6 foot Hualand in between each strip to see if the power supply and controller can handle the voltage drop that will result from this kind of run. I am cautiously optimistic that this approach will at least determine one way of the other if LIFX strips will be able to do what I want them to before I start running cables and making connections in tight spaces behind and under shelves. Will try to update this post once I have tested this out.
The minimal amount of soldering would be to purchase some 5050 smd strip connectors.
This video shows how to do what I'm talking about
When running them together like so, you should only have to plug one end into the molex connector.
How many lights are there per strip? 1 light usually uses about 0.15-0.25 Watts.
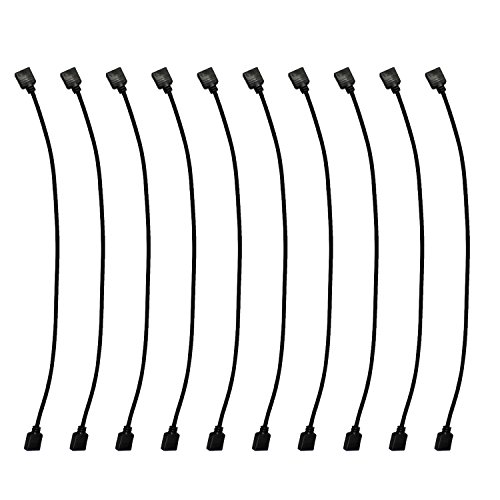
The actual extension cables between the led strips are pretty standard https://www.amazon.com/ESUMIC-Cable-Connector-Extension-Female/dp/B00XX41VD0/ref=sr_1_3?s=electronics&ie=UTF8&qid=1502315577&sr=1-3&keywords=led+extension+cable
Just an example but make sure they the arrow telling you where the 5v is for whatever size you buy.
I bought a couple of packs of these:
https://www.amazon.com/gp/product/B078Y8LGG7/ref=ppx_yo_dt_b_search_asin_title?ie=UTF8&psc=1
they light up the shop beautifully, are more cost effective than spending $20 for every 4ft, and were super easy to install. I have them plugged into an outlet that is controlled from the light switch to my shop.
I've purchased several sets of these:
https://smile.amazon.com/gp/product/B01MUKSZE3/ref=ppx_yo_dt_b_asin_title_o01_s01?ie=UTF8&psc=1
I've set them up in my basement, attic, garage, and garden shed. They are cheap enough that I just put one up in any place that seemed too dark.
Ah you're right, my apologies. Yes the plan is to buy THIS led kit and THESE connecting wires and solder a connector onto the pcb which will connect to one strip of about the same number (7) leds, and then an extension wire over to the back side for an additional strip of 7 leds. Basically the plan is to add an additional 14 leds to it.
My first thought would be to get these:
https://www.amazon.com/gp/aw/d/B01MG9KYCD?psc=1&ref=yo_pop_mb_pd_title
https://www.amazon.com/gp/aw/d/B00DTOAWZ2?psc=1&ref=yo_pop_mb_pd_title
https://www.amazon.com/gp/aw/d/B00XFSNKXS?psc=1&ref=yo_pop_mb_pd_title
https://www.amazon.com/gp/aw/d/B00D7CWSCG?psc=1&ref=yo_pop_mb_pd_title
You’ll get 10 DMX channels of RGB control that can support 10ft of LED strip each. Put a few inches of LED in each lantern then connect to the next, so you’d be able to link together about 15-20 lanterns or more on a single channel. Won’t be “individually” controllable, but you’ll have control over the groups of lights that are connected. Do this for each of the 10 channels and you could easily fill a room.
Super interested to hear everyone else’s approach for this
https://www.amazon.com/gp/aw/d/B01CMLLKHG?psc=1&ref=yo_pop_mb_pd_title
I got a pack of these which allowed me to have as many strips as I did so it depends on what you plan to do with it.
I did it all myself so that saved money but basically this
1 roll, 2 to be safe. (I got this kit because it was cheaper than buying spools on their own at the time, didnt use the controller from here though you could and save more money. They were on sale at the time for like 15$ or something cheap af)
https://www.amazon.com/gp/product/B004T0BM0O/ref=oh_aui_detailpage_o02_s02?ie=UTF8&psc=1
Extra wiring
https://www.amazon.com/gp/product/B00XFSNKXS/ref=oh_aui_detailpage_o02_s00?ie=UTF8&psc=1
Bluetooth controller
https://www.amazon.com/gp/product/B00ZQVWU2O/ref=oh_aui_detailpage_o02_s01?ie=UTF8&psc=1
connectors to make life easier
https://www.amazon.com/gp/product/B00G1BYJQS/ref=oh_aui_detailpage_o00_s00?ie=UTF8&psc=1
splitters to make life easier
https://www.amazon.com/gp/product/B00OMKDUB0/ref=oh_aui_detailpage_o02_s00?ie=UTF8&psc=1
I wired mine up with switches and whatnot which cost a few extra bucks.
But overall should be able to do it sub 100$ easily.
You should be able to use LED extension cables, but I don't know how finicky the HUE system is with them.
Like this.
Yeah I could see the unburnt powder causing issues. If you use it indoors or in low lighting you need these otherwise it doesn't work for shit
You need connectors like this or you could get a bunch.
How long? RGB (white is blueish) or RGBW (extra white LED)?
This seems to be the same model I used for a project (giant lamp). Worked perfectly fine. Afaik if you got yourself another controller it'd respond to the same remote.
You can cut the stripes as you see fit and reconnect them. You'd need something like this for easy connection when you cut it up. As an extension cable you can use whatever you like as long as it provides 5 wires.
They are similar to these:
https://www.amazon.com/FSJEE-Connectors-Solderless-Connector-Connect/dp/B077CLT75F/
The led strip is a flexible strip with copper contacts that slide under the clips. Over time, this is no longer a consistent contact. The copper contacts dimple, and the clips probably lose some grip.
I think I may heed your advice and get some RGB ones.
As for your comment on soldering, I am a little nervous about that. At least at my newbie status with all of this. Do any of these do the same thing?
EvZ 4 Color 10m RGB Extension Cable Line for LED Strip RGB 5050 3528 Cord 4pin
Zitrades 10PCS LED 5050 RGB Strip Light Connector 4 Conductor 10 mm Wide Strip to Strip Jumper
4PCS 2M 6.56ft 4 Color RGB Extension Cable LED Strip Connector Extension Cable Cord Wire 4 Pin LED Connector for SMD 5050 3528 2835 RGB LED Light Strip ( 4 PCS )
Mobile Users: This is pretty photo heavy.
​
I've worked on this over the last two and a half weeks in the evenings and on weekends. I've probably got around 50-60 hours in so far.
The project is complete, there are just some other things I'd like to eventually do with the programming for the LEDs.
Tools
Exacto/razor blades
Heatgun - for heat shrink, you can just use a lighter
Soldering Iron
Phillips Screwdriver
Laptop/Computer for programming with Arduino or CircuitPython
Printer - laser or inkjet
​
Supplies/Parts
Various Rustoleum Spray paints - $20 total
Multi-Strip - $15
Masking tape and paper - $10-15
Extra razor blades - $5
Printer sticker paper - $15
Electrical Tape - $1
3m double sided foam tape - $4
Heat Shrink - Not sure, maybe $5 new for the assorted kit?
Adafruit Trinket: https://www.adafruit.com/product/3500 - $8
5v 4 amp Power Supply: https://www.adafruit.com/product/1466 - $15
White LED On/Off switch: https://www.adafruit.com/product/917 - $5
White LED Momentary Switch: https://www.adafruit.com/product/558 - $5
DC Power Jack: https://www.adafruit.com/product/373 - $0.95
Small Perma Proto PCB Board: https://www.adafruit.com/product/1608 - $3
50 feet (I used about 15 feet) 4 pin RGB extension wire: https://www.amazon.com/dp/B07GFW6ZB3/ref=pd_luc_rh_sspa_dk_huc_pt_expsub_2?psc=1&spLa=ZW5jcnlwdGVkUXVhbGlmaWVyPUExUlMwQ1ZSRzJSQ0tUJmVuY3J5cHRlZElkPUEwNTQzMzg2M1FSRk9TSUFIMllNMyZlbmNyeXB0ZWRBZElkPUEwMzEzNDU5QlQ3MFBCSTZKRUVDJndpZGdldE5hbWU9c3BfaHVjX21yYWkmYWN0aW9uPWNsaWNrUmVkaXJlY3QmZG9Ob3RMb2dDbGljaz10cnVl - $10
50 pair (lol) JST Connectors: https://www.amazon.com/gp/product/B00NBSH4CA/ref=ppx_yo_dt_b_asin_title_o00_s00?ie=UTF8&psc=1 - $11
16.7 foot reel of addressable LEDs: https://www.amazon.com/gp/product/B01LSF4Q00/ref=ppx_yo_dt_b_asin_title_o03_s00?ie=UTF8&psc=1 - $21
​
I think that's all of it, I'll update if I think of anything else.
> I agree eating alone is probably the worst part of solo travel but from my experience, local people are quite friendly. There has been many occasions where they invited me to eat with them even with the language barrier. It was quite enjoyable. Maybe I just got lucky with people.
Ow yes absolutely, I've had a couple occasions where I was invited or simply joined a table and had a great chat. I even made some friendships this way, saw one of them back last year too.
> LOL. My GF will be very happy to see that you've been working hard on her section of the room. Those options do create more space, she'll probably like it. Many thanks.
Hah, no problem! I like to help out as best as I can. I really get joy out of 'designing' as well, so this was fun. Let me know what she thinks as well.
> I'm definitely going to add RGB and Kraken x62 and NZXT Vue+ lol. Going to go all out~
Will do this for you! I don't recommend the NZXT Hue+, instead I highly recommend to just use on-board RGB headers!
^(hilarious video, but it shows you how to set it up)
This allows you to sync other RGB parts together if the products allow for it, but the main reason is that you don't need a box inside the case and a controller. You simply use software to control the RGBs.
> Yeah I'm going to wait out on the monitor. i'm thinking either the ROG or ASUS or ACER 34+"
I think it's too much money personally. I mean.. my lasts years holiday was about equal the price of those two monitors. And I had to save a good bit to get this together. If you can justify it, I won't stop you. But I don't recommend it highly.
> The curved monitor I'm still debating. I heard photo editing is hard as well but I love the gimmick. I would never buy a curved TV so why not a curved monitor. Haha! + I heard it is decent for gaming?
I've got experience with a small sample of curved monitors, both TVs and gaming monitors I had a bit of time with. The curved TV was just.. weird and didn't work at all for me. I adjusted my distance from the TV many times to find a 'comfortable' viewing spot. The main problem I had was when I was not right in the centre, it just really makes it a bit weird. I mean, you probably get used to it, but I would not cash out on this at all personally.
> The curved monitor I'm still debating. I heard photo editing is hard as well but I love the gimmick. I would never buy a curved TV so why not a curved monitor. Haha! + I heard it is decent for gaming?
Do what you want, there are a lot of curved 3440x1440 displays. I will not stop you.
I personally love Dell and would really like that monitor.. If it wasn't curved. xD
It's something I just don't find useful. It does probably helps a little bit depending on your eyes field of view. But I currently use a 16:9 2560x1440p monitor and when I look at the left now (I am typing here), I can still see the right side just fine where the extra couple inches would be when I upgrade to a 3440x1440p display.
It is indeed not great for photo editing especially. I have no personal experience with this, but I can really imagine that it's not going to be helpful in the slightest. Depending on how serious you're into editing I suppose..
For games, it depends again on what games I think. The demo that I saw had Rise of the Tomb raider running which absolutely looked fenominal. But the curves didn't really add much for me personally.
---
Please ask anything that you want to know. This would be extremely overkill for you, but your girlfriend will love it. If you get the exact same system.
Here is my list of explanation videos and guides to help you understand what you're getting yourself into! Not sure if you saw this one already or not. I know it is a big list, but you don't have to watch everything, just what you want more information on. If you get any questions while watching those videos, ask ask ask!
Here is what I would recommend.
PCPartPicker part list / Price breakdown by merchant
Type|Item|Price
:----|:----|:----
CPU | AMD - Ryzen 7 1700X 3.4GHz 8-Core Processor | $347.76 @ Amazon
CPU Cooler | NZXT - Kraken X62 Rev 2 98.2 CFM Liquid CPU Cooler | $159.99 @ B&H
Motherboard | MSI - B350 TOMAHAWK ARCTIC ATX AM4 Motherboard | $119.99 @ Amazon
Memory | G.Skill - Trident Z RGB 16GB (2 x 8GB) DDR4-3000 Memory | $154.99 @ Newegg
Storage | Samsung - 960 EVO 500GB M.2-2280 Solid State Drive | $219.99 @ B&H
Storage | Seagate - Barracuda 2TB 3.5" 7200RPM Internal Hard Drive | $66.99 @ Amazon
Video Card | Asus - GeForce GTX 1080 Ti 11GB STRIX GAMING Video Card | $739.99 @ Newegg
Case | NZXT - S340 Elite (White) ATX Mid Tower Case | $99.99 @ B&H
Power Supply | EVGA - SuperNOVA G2 650W 80+ Gold Certified Fully-Modular ATX Power Supply | $85.42 @ Amazon
Monitor | LG - 34UM88C-P 34.0" 3440x1440 60Hz Monitor | $697.00 @ Adorama
RGB | ESUMIC® LED Cable Connector Extension Cable Wire 4 Pin Female to Female For SMD 5050 3528 RGB LED Strip Light 30cm Black 10 Pack | $9 @ Amazon
RGB | CableMod WideBeam Magnetic LED Strip RGB - 30cm / 15 LEDs | $18.99 @ Amazon
RGB | CableMod WideBeam Magnetic LED Strip RGB - 30cm / 15 LEDs | $18.99 @ Amazon
RGB | TronicsPros 4 Pin LED Strip Connector RGB Extension Cable LED Splitter for SMD 5050 3528 RGB LED Strip Lights | $5.00 @ Amazon
Cables| CableMod Basic White kit - EVGA (incl. shipping)| $70.00 @ CableMod
| Prices include shipping, taxes and discounts |
| Total | $2814.09
| Generated by Kiwiandapple |
I am not kidding, you can ask anything! Aside from my pin code..
https://www.amazon.com/Barrina-Integrated-Fixture-Utility-electric/dp/B01HBT32PW
Sure. You will need to purchase a power supply (this one is 12 volt) to drive this controller. So figure out if your strips are either 12 or 24 volt. If they happen to be 24 volt, this controller has a built in power supply for 24 volt LED strips only. Both can be added to the Philips Hue Bridge.
As for connections, I used these for RGB strips and these for power connections.
​
​
https://www.amazon.com/CLAXY-Ecopower-Industrial-Metal-Pendant/dp/B00ODYDJ4S/ref=sr_1_4?s=lamps-light&ie=UTF8&qid=1496261252&sr=1-4&keywords=industrial+pendant+light
Here is the desktop version of your link
Nothing to code, most work the same way. https://smile.amazon.com/econoLED-Flexible-Multi-colors-Non-waterproof-Changing/dp/B006LW2NJM?sa-no-redirect=1
Something like this I am fairly certain will work 505 addressable are pretty common in devices now adays.
You will need the 4 pin connector like this, https://smile.amazon.com/EvZ-10PCS-Connector-Conductor-Jumper/dp/B01CMLLKHG/ref=sr_1_9?ie=UTF8&qid=1496367228&sr=8-9&keywords=RGB+connectors&sa-no-redirect=1.
Or if you search 5050 12v addressable LEDs im sure you can find cheap options on ebay or amazon.
Edit: /u/HeyItsBlu I see you found some on a comment below. Remember you can always cut them to size too. Just cut across the contacts that connect multiple strips together to get the total size you want.
Buy
($6)Wires:For the MOFSET mod
($1o)MOFSET
($6)Wire spades:For the MOFSET mod
($8)Assorted M3 Bolts:You need some for a few mods and for the bolts you will inevitably strip on this
cheapwonderful machine($13)Longer assorted M3 Bolts:For a few mods
($9)M4 Bolts:For one of the mods
($9)Metric allen wrench set:Had to order one of these since metric tools aren’t common round these parts
(~$20) PLA of preferred choice- You’ll run out of the sample bit quick so go ahead and order a roll or two to be prepared. You will note some upgrades require ABS so a small spool of that to your order will also help.
($6)M3 Lock nuts:Critically needed for a simple mod
($10)Threaded rod and nuts:Please note that this item seemed difficult to find online. I recommend going to your local hardware store and getting two 5/16” rods of at least 16” in length. They should have an assortment of threaded rod in various lengths available. Also note that the pitch of the threading matches the nuts you buy. Further instructions regarding this can be seen in Azza’s Z-Axis braces below.)
($6)9mm Wrench for the nozzle: Don’t wait for your first clog, go ahead and have this on hand to remove/change the nozzle. Note to only tighten/loosen the nozzle when heated.
Below is the order of printable upgrades I recommend but I suggest you mix in a few other prints along the way because this is a hobby after all and you should be having fun. It helps to have your quality as tuned in as much as possible for some of these so be patient and keep trying if you need to.
Print
Spool holder- temporary : Until you can mount your spool on top of the enclosure or any other personal preference.
Belt tensioner- print x2
Z-brace
Shielded stop button
Cable relocator : It’s a pain, but if you spend the time to do this and turn your extruder motor 90 degrees then you can get the full Z height without ruining your cables. It does involve opening all the cables to the PSU and feeding a few extra inches back through the cable chains.
Cable shroud : Looks nice if you do the cable relocator.
The following need to be printed in ABS:
M3 Bed Nut retainer: 10/10 upgrade. I know they look worse than the nice metal stock ones, but these help keep your bed level longer.
CiiCooler
Glass bed Holder
Now that the first major round of printed upgrades is done it’s time to shift to a few more supplies to pick up to really fine tune the machine.
Buy
($5)Radial fan: For CiiCooler
($5)Glue sticksThis and a glass bed is magic
($25)Borosilicate glass 8” x 8”
($26)Y-Carriage plate upgrade: This has been a nice upgrade as I now only need to relevel the bed every couple weeks instead of every print. Check out this guide for a ‘how to’ as well as a free upgrade by shifting your Y pulley over.
($15)rechargeable dehumidifier: For keeping in the bin with your opened filaments
($9)Extruder gears: Might be able to hold off on these, but will need eventually. If for some reason you have a Maker Select with metal X-axis blocks (V1 and V2, but not V2.1) then this is a must. You can follow this guide for a how to.
($28)Metal extruder plate and lever: Not needed, but nice.
($14)Noctua 40mm fan: Not needed, but makes the printer a lot quitter. A LOT quieter.
($50)MicroSwiss All Metal Hot End: The destruction of my PTFE tube by this point pushed me to doing this upgrade. If needed you can follow this guide for replacement. Remember to tighten/loosen when the nozzle its hot.
($6)Ceramic cotton: Tore off the stock one when replacing for the all metal hot end by accident. At least its thicker than stock
Now that the printer is in its final form, its time for the enclosure which is a stacked Ikea Lack hack.
Print
Spool holder
Pi Case
120mm fan cover
Fan grill
120mm fan PSU modification: I edited this to fit upside down since my PSU is mounted on the underside. This was nice since I blew the 40mm fan anyways so it made everything a lot quieter than before.
IKEA Lack filament guide
Webcam holder: This is one I designed specifically for the webcam I happen to have lying around. The camera mount piece can be changed out no problem though for what ever webcam you have or buy. The SketchUp file is included on Thingiverse for such purpose.
Buy
($20)2x Ikea Lack: Luckily there is one right down the street from me. I am located in North America though, so we do not have the STUVA, if you live literally anywhere else you may check in to this as an alternative.
($80)Plexi glass for enclosure: Could be cheaper alternatives, but it looks cool
($9)Foam pads for feet
($42)Raspberry Pi3: For OctoPrint. I also suggest using a different USB cable than the stock one provided by Monoprice or you will have issues.
($9)2x 120mm fans: Used for the power supply cooling and enclosure
($6)Rocker Switches so that the enclosure fan can be on for PLA, but off for ABS
($15)Dimmable LED lights
($10)8mm LED light connectors
Total:
$250 printer + $452 upgrades/parts + ~$80 PLA/ABS to date
Here you go! sold on amazon but fairly rare and expensive. Maybe they’ll come back in stock!
Since your edit said your going battery powered light with motion sensing, just wanted to pass along a link to the ones i bought for all of our closets.
Mr. Beams MB982 Wireless Battery Operated Indoor/Outdoor Motion Sensing LED Ceiling Light, White (Pack of 2)
I put 3 of these over an 8’ table with vaulted ceilings.
CLAXY® Ecopower Industrial Barn... https://www.amazon.com/dp/B00ODYDJ4S?ref=ppx_pop_mob_ap_share
I did my one-stall garage workshop with 7 of these linkable LED fixtures from Sams Club, and the brightness is so worth it. One of the best upgrades I’ve ever done to my shop. I also did my basement gym with these and love them both.
If you want to get nitty-gritty, there are lighting calculators online to help you determine how many fixtures you would need to get a certain amount of foot candles at your workbench, based on lumen output, spacing, and height of the ceiling/distance above workbench. It sounds more complicated than it is... I basically bought two or three fixtures at a time for the garage until I was satisfied with the light.
Thank you! I see amazon has several. Is it 1.0? 2.0?
Here's a bit of what I found:
20 Sets Mini Micro Jst 2.0 Ph 3 Pin Connector Plug Male With 150mm Cable & Female https://www.amazon.com/dp/B01DUC1PW6/ref=cm_sw_r_cp_api_wkMDzbY8XK2KT
HKBAYI® 10Pair / 10sets 3 pin JST SM Male Female plug LED Connector Cable For WS2812B WS2812 WS2811 LED Strip Lamp with 15cm Long Wire https://www.amazon.com/dp/B00NBSF724/ref=cm_sw_r_cp_api_7kMDzb3MHSA56
20 Sets Mini Micro Sh 1.0 Jst 3-Pin Connector Plug Male With 100Mm Cable & Female https://www.amazon.com/dp/B01DUC1KEO/ref=cm_sw_r_cp_api_BlMDzbRQWQ2J3
Here is the BOM:
Got these because they were black PCB, don't like the way it was waterproofed but actually worked pretty well probably more robust than the coated ones.
IKSACE WS2811 1903 DC12V 5M 300LEDs 60LEDs/M Addressable Programmable Dream Color LED Digital Strip Pixel Strings 5050 RGB Flexible Colorful Rope LED Strip 16.4ft Black PCB https://www.amazon.com/dp/B06ZZ7T7X5/ref=cm_sw_r_other_apa_i_-iT1DbP3R271X
This was the controller I used (I'm sure you can find them without the LEDs, it's Bluetooth which isn't as common as you might think)
KORJO Dream Color LED Strip Lights, 32.8ft/10M Bluetooth LED Chasing Light with APP, Waterproof 12V 300 LEDs 5050 RGB Color Changing Rope Light Kit, Flexible Led Strip Lighting for Home Kitchen https://www.amazon.com/dp/B07L5C8GQM/ref=cm_sw_r_sms_apa_i_flT1DbHEY6CPC
Handy connectors
HKBAYI 50Pair / 50sets 3 pin JST SM Male Female plug LED Connector Cable For WS2812B WS2812 WS2811 LED Strip Lamp with 15cm Long Wire https://www.amazon.com/dp/B00NBSH4CA/ref=cm_sw_r_em_apa_i_ooT1DbGNZ4GFD
I also used some nice outdoor rated PSA foam tape to hold everything on along with a few black zip ties just in case. Wired everything and sealed with silicone. Make sure you don't serialize the strips they should be all connected in parallel so they chase in unison.
They are connected to my AUX power output using the standard automotive 12V plug. They come one when my bike does. Which is fine. If I want to turn them off you can do so from the app for the controller.
That's it. Now to start on the custom controller. Anyone connected to the CAN bus on this bike? That would be the easiest way to get speed.