(Part 2) Best hand punches according to redditors
We found 356 Reddit comments discussing the best hand punches. We ranked the 147 resulting products by number of redditors who mentioned them. Here are the products ranked 21-40. You can also go back to the previous section.


I just posted another comment so you'd see a notification.
Here's the list! Hope it's not too long. All the tools listed are the ones I bought. If I have other suggestions, I've listed them as well. I've also listed details on the functions of the tools, and why they're superior to some other alternatives. If you look for the same amount of tools in one of those "kits," they would set you back roughly 200-400, depending on where you bought it from. The tools in these kits are usually quite inferiorly made as well. This list is a result of about a week long search and perusal. Tandy is a well known and easily accessible aggregation of tools, but they're overpriced for what they do and their quality is mediocre at best.
*Some of the eBay listings might have ended, but I'm sure you'll be able to find identical tools for the equivalent price or even cheaper.
For me the tools came out to a grand total of roughly $115. You can give or take $20 if you want to improvise your own tools, or switch them out. I'd say this setup works just fine for mid to smaller projects like what I made, or wallets, etc.
As for the leather, Springfield Leather sells some quality leather by the square foot, which is nice for first timers, as most tanneries only sell by the side, like what I had, which usually average around 21-28 square feet. Pretty big investment. Maverick Leather Company sells quality leathers as well as Horween "Seconds", like what I got for a very nice discount. These seconds are full sides with minor defects in the leather, but unless you're making huge bags it's easy to cut around the brand marks/scars etc, and your leather will look spotless. I got a full side of Horween Essex for roughly $130, and I'm guessing if I bought the same straight for Horween it would have run me in the ballpark of $300 or so. Since my laptop case only used about 7-8% of my leather, I used about $10 worth of leather. Quite a bargain if you ask me. If you're looking to do many projects like I am, I'd advise you to invest in a nice Horween side. Can't beat it for value and price.
All told, the laptop case itself cost about $11-12 worth of materials** (leather, fabric, thread, glue) and took the better part of 2 days to complete. Granted, much of that time was spent just sitting and thinking as most of it was improvisation, as you can see by my horrible sketch.
As far as my "learning" went, it was literally just Google. Some youtube videos help, and I glanced through some forums, but overall, as I've often found in woodworking too, nothing beats hand-on experience.
Well, hope this helped you guys out and answered some questions. I know I definitely would have appreciated a specialized list like this when I was starting out.
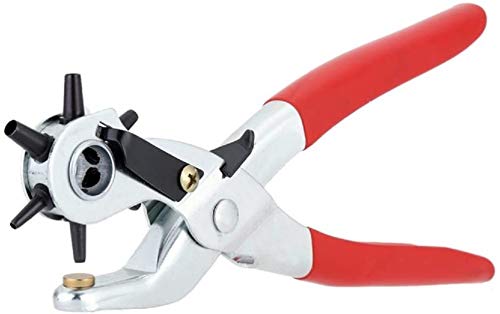
https://www.amazon.com/Sized-Heavy-Leather-Pliers-Punches/dp/B07D28DBC6
leather punch. makes holes in ears
Leather punch. The little piece of removed leather pops out the side.
https://www.amazon.com/SE-790LP-Leather-Punch-Set/dp/B001F27AMI
This is the one I have. Expensive but super heavy duty and makes consistent clean cuts
​
https://www.amazon.com/2-5mm-Radius-Corner-Rounder-Cutter/dp/B00G2QUZO2/ref=sr_1_16?keywords=corner+clipper&qid=1563551158&s=gateway&sr=8-16
This might be excessive, but I wanted to be thorough so you can see what all is out there. I am having trouble thinking of anything that the following tools can't do, in terms of AR building and maintenance. This is basically my setup at home, though some.of the brands and whatnot are different.
I am operating under the assumption that you already have some basic hand tools in addition to the torque wrench.
The only things you absolutely need are roll pin punches and an armorer's wrench and some basic hand tools like Allen wrenches, screwdrivers, needlenose pliers and so on. The rest just expedite the process and help solve weird issues that may come up.
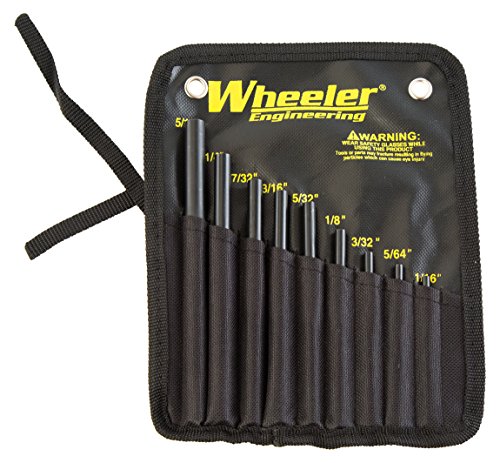
Wheeler Engineering Roll Pin Starter Punch Set https://www.amazon.com/dp/B01B3NWBVI/ref=cm_sw_r_cp_apa_QJZDAb1ZFBQ80
Wheeler Roll Pin Punch Set https://www.amazon.com/dp/B00EE6GHVW/ref=cm_sw_r_cp_apa_4JZDAbV5YGA8M
Wheeler Hammer and Punch Set In Plastic Case https://www.amazon.com/dp/B004SY07HU/ref=cm_sw_r_cp_apa_FNZDAb1Y74EF0
Geissele Automatics 10-169 AR15/M4 Reaction Rod https://www.amazon.com/dp/B01EY6WFAI/ref=cm_sw_r_cp_apa_hOZDAbD3JHBAE
Aeroshell 33ms / MIL-G-21164D / MIL-SPEC Barrel Nut Thread Grease + 1/2oz can https://www.amazon.com/dp/B01BJ3HE0K/ref=cm_sw_r_cp_apa_4OZDAbQGRYJJ2
TEKTON Long Arm Ball End Hex Key Wrench Set, Inch/Metric, 26-Piece | 25282 https://www.amazon.com/dp/B00I5THF4W/ref=cm_sw_r_cp_apa_PPZDAbQ05H680
TEKTON Long Arm Star Key Wrench Set, T10-T50, 9-Piece | 25291 https://www.amazon.com/dp/B00I5THF9M/ref=cm_sw_r_cp_apa_cQZDAbRX59VNW
IRWIN Tools Multi-Purpose Bench Vise, 5-Inch (4935505) https://www.amazon.com/dp/B009TOCZEC/ref=cm_sw_r_cp_apa_1QZDAbT8R47J0
Yost UP-360 Universal 6 Inch Prism Style Jaw Cover https://www.amazon.com/dp/B01EVQH42U/ref=cm_sw_r_cp_apa_aRZDAbRHAV73E
Real Avid Gun Tool Pro - for Modern Sporting Rifles https://www.amazon.com/dp/B00IMHX5KA/ref=cm_sw_r_cp_apa_bUZDAbEB87JFB
Wheeler Firearms Accurizing Torque Wrench https://www.amazon.com/dp/B0012AXR4S/ref=cm_sw_r_cp_apa_xWZDAb1SRYD6D
Wheeler Professional Gunsmithing Screwdriver Set (43-Piece) https://www.amazon.com/dp/B00HTN4EWG/ref=cm_sw_r_cp_apa_HXZDAbQX5BEWF
TacWater USA AR15/M4/M16 Tools Multi-Purpose Tool Set (W) https://www.amazon.com/dp/B079H5WWZ3/ref=cm_sw_r_cp_apa_GYZDAbRGY3CNH
Takedown Pivot PIN Tool set 223 556 6.8 SPC 300 AAC https://www.amazon.com/dp/B017OUSJFQ/ref=cm_sw_r_cp_apa_V.ZDAbSHZPEG5
Magpul Bev Block https://www.midwayusa.com/product/1015877615/magpul-bev-block-ar-15-action-block
Just a simple setup would be, in no particular order:
 
 
That's what i can think of off the top of my head, you probably won't need all of that if you only plan on building a lower first. It'll be useful down the line to get most of those tools, but i'd go with first:
If you have Amazon Prime, there's quite a bit of stuff you can get on there, it's where i got most of my tools.
 
^Edit: ^Formatting.
Go get a center hole punch and use it on the frame. If it tings, its just surface rust. If it dents in or punches through, there is deep rust.
Don't buy a truck with deep rust in the frame. Anywhere in the frame. I live in salty areas too and rust happens. But rust still is a safety issue and if it wasn't washed and taken care of, the frame is mechanically compromised and shouldn't be purchased.
Now surface rust, even quite a bit of it, is to be expected. It can look rusty all over and still be ok. Phosphorus conversion coatings (what the frame goes through at the factory) work that way. Most of the body can also have rust and be fixed. Rocker panels, cab corners, over wheel wells, etc. And you can lose quite a bit of those body areas and be fine.
But deep rust anywhere in the frame and it's done.
I like these at $11.97 delivered.
edit: formatting
I don't think these are the roll pin starters, since they say they can be used to finish driving nails. If they were roll pin starters they would be hollow and pretty useless for nails. I think there are four pin punches and one large solid punch in this set. And pin punches aren't even the right tool for finish nails, every nail set I've ever seen is a center punch style.
Here is a set that has an excellent illustration of different types. It includes everything except the roll pin starter style, but you can see those here.
It's a few bucks, but I got bought both of the above within the last year and been very happy with them, and both are made in the USA. I really like the big Tekton set as it is pretty much everything you need for firearms, except the roll pin starters, and I've gotten rid of all my cheap ones.
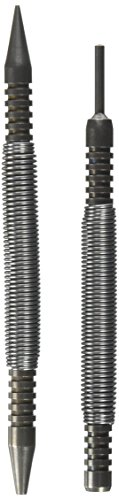
It is a spring loaded nail set / center punch.
https://www.amazon.com/Spring-Tools-32R02-1-Counter-Punch/dp/B0006Q4I60
Clearance below the NMO is about 3/8 inch (~10mm). You really only need a bit more than the clearance of the coax in the bushing assembly as shown here.
I just drilled a couple of NMO's on my (aluminium body) F-150 last weekend and I use a wrench tightened metal hole punch like this one: https://www.amazon.com/Greenlee-730BB-3-Standard-Knockout-4-Inch/dp/B001UL13M2
It produces a clean burr-free cut.
I agree with this, and I'd like to say spend some money on a set of roll pin starter and roll pin punch set.
And wow, my full service, machine-shop smith, only charges $65/hr. I know that good work costs $$$, but.... Wow
edit: and some masking/electrical tape. Its not hard, but a modicum of appropriate tools and preventive measures for oopsies, is relatively cheap.
In one catalog, 3 Prong Parts Retriever, it seems
http://www.amazon.com/Elenco-3-Prong-Parts-Retriever-PR-3/dp/B0002JEZ32/ref=sr_1_18?s=hi&ie=UTF8&qid=1405878321&sr=1-18&keywords=claw+grabber
Do you mean 24"? 14" is a biggish-sized bicep...gun belts go on your body, not your arm. You can always get a bigger belt and punch more holes in it. Use a drill or a hollow punch set and make it whatever size you want.
Try going to a Tandy Leather store, or a store that caters to bikers (motorcyclists) and ask for scrap leather. I bought a shopping bag of black and burgundy scraps for $10.
Get a hole puncher like this one on Amazon for $6.88
Next, get some waxed, thin shoelaces for mens' dress shoes, like these for $6.99.
Then, make as many custom wraps as you want. Lacing your wraps will enable you to make custom-fit pieces that can go around and/or cover the unique contours of your horn.
First buy some pin punches, like Grace or Tekton (avoid going cheap, they always break).
Then of course a proper hammer
Then some starter punches
Then some finishing punches (I know they say starter but they're better for finishing)
Yes, it costs money, but they pay for themselves. Also you don't have to dick around with taping things off as much if you have proper tools. The brass punches and the pin capturing starter punches help IMMENSELY in this area.
As a leatherworker your tools just some times wear out
http://www.amazon.com/dp/B0002964CC/ref=wl_it_dp_o_pd_nS_ttl?_encoding=UTF8&colid=YO644O1X57X3&coliid=I2N7S5KNGPJB62
or
http://www.amazon.com/dp/B00OINBRM0/ref=wl_it_dp_o_pC_S_ttl?_encoding=UTF8&colid=YO644O1X57X3&coliid=I2E1867ME6DVUH
https://www.amazon.com/Spring-Tools-32R02-1-Counter-Punch/dp/B0006Q4I60/ref=mp_s_a_1_1?ie=UTF8&qid=1539615379&sr=8-1&pi=AC_SX236_SY340_FMwebp_QL65&keywords=spring+loaded+nail+set&dpPl=1&dpID=41hDMKGosQL&ref=plSrch
Spring loaded nail set. Idk what you would do w the other $90 but this alone he will love.
I use an Oregon Lamination Corner Rounder, 2mm size. Absolutely worth the price if you want to have perfectly rounded corners on your counters. Once you get the hang of it, it's quick and consistent.
Here is the same model I purchased on Amazon
Looks like the same one I have (although there are 3 different radii styles). I have the 2.5mm which I use for everything - works great. If you're real picky you'll want all 3 depending on the counter size.
https://www.amazon.com/2-5mm-Radius-Corner-Rounder-Cutter/dp/B00G2QUZO2/ref=sr_1_8?ie=UTF8&qid=1495730730&sr=8-8&keywords=lamination+clipper
Pins or ball joints?
If you really need to tighten a pinned hinge (like a shoulder) an automatic center punch is the easiest tool to use. It will allow you to push the pin in more but doesn't require a hammer and separate pin punch so you're less likely to damage the toy.
https://www.amazon.com/SE-790LP-Leather-Punch-Set/dp/B001F27AMI
That is exactly what it is.
I believe it is to add additional holes if needed.
I just built exactly what you're describing. I can share some of my experiences.
I'm super happy with the results of my build. The process is fraught with a lot of cursing and you're probably going to lose a couple of the tiny parts (like detent pins and tension springs) but the end result will be totally worth it. You'll be intimately familiar with the insides of your AR-15 and share a sentimental connection with your firearm thanks to its DIY nature. Enjoy!
One of these guys, basically just put one end against the pin and apply the hammer to the other side of the punch.
You're going to want to use something like this. http://www.amazon.com/SE-7909LP-9-Piece-Hollow-Leather/dp/B0002964CC
This thing: 3-Prong Parts Retriever, Link: http://amzn.com/B0002JEZ32
Or this: SE - Pick-Up Tool - 4 Prong, Link: http://amzn.com/B000RB3KZ4
Cheaper to get in a kit, for example:
Belkin Computer Tool Kit with Case
Link: http://amzn.com/B00004Z5VS
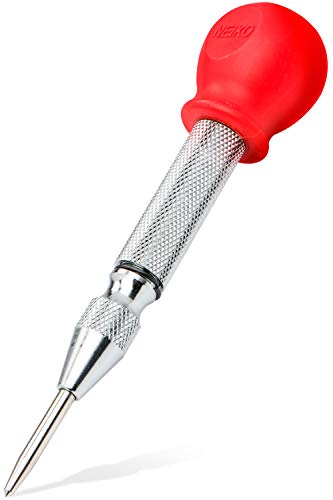
This is the one I got.
Neiko 02638A 5" Automatic Center Hole Punch | Adjustable Impact https://www.amazon.com/dp/B008DXYOLC/ref=cm_sw_r_cp_api_iweUAbPE045DC
It gets the job done for most pins in figures.
What you are looking for is a radio punch instead of a conduit punch. This will work:
http://www.amazon.com/Greenlee-730BB-3-Standard-Knockout-4-Inch/dp/B001UL13M2
vix bits make the world a better place and youre gonna want to take the door off this makes those annoying bottom pins jump right out and comes with what will be your favorite nail set or at least mine.
loctite blue and aeroshell 33ms for the barrel install, also great for installing a freefloat handguard and scope mounts. https://www.amazon.com/gp/product/B0012AXR4S/ref=oh_aui_detailpage_o06_s01?ie=UTF8&psc=1
Ive found luck with this punch set, although the 3/32 did bend a smidge when I was pounding the hell out of it when pinning my gas block. also a rollpin starter punch set is a nice addition.
https://www.amazon.com/Fixxxer-Hollow-Stainless-Steel-Starter/dp/B0191RFK4I/ref=sr_1_4?s=sporting-goods&ie=UTF8&qid=1480117372&sr=1-4&keywords=starter+punch+set
https://www.amazon.com/gp/product/B012TKY0VI/ref=oh_aui_detailpage_o06_s01?ie=UTF8&psc=1
http://www.amazon.ca/Greenlee-730BB-3-Standard-Knockout-4-Inch/dp/B001UL13M2
This is what you want. Ask on your local homebrew club's forum if someone has one, because these are expensive and only used a few times. You can also go to a metal shop in an industrial park and ask them to do it for you. They won't charge a lot and they will clean it up nice for you.
This works too, for a mere $25 :x
http://smile.amazon.com/Radius-Corner-Rounder-Punch-Cutter/dp/B008CG7D1S/
Used Snap on punches that I pick up at the swap meet (there are a bunch of used tool guys out there) AND This set from Amazon - http://www.amazon.com/gp/product/B000NPPBN8 -
I talked with a custom builder after I bent a few punches and asked him about punches and he said even his good punches (Starret etc) break/bend over time especially when working on FSBs and gs blocks.. It's just a cost of doing business.
User error. You have to make sure the counter is properly aligned against the stops. Which model cutter did you get, the completely handheld one, or the one that sits on the table and you push down the top handle?
I use this one because you can hold it upside-down and clearly see how well the counter is aligned before you punch.
I have this set and it's worked well for my p10c
I also have a small hammer with a plastic / rubber side I think.
I also grabbed the real avid brand universal gun block.
I swapped to the HB industries trigger using these tools.
They do offer larger punch sets too for not too much more money, like the Tekton or Wheeler master punch set
Wheeler punch set
So I came to a similar conclusion that it would probably make sense to replace the gas block (im new to guns so I didn't know I could swap that out). Here are some pictures of the front of my gun and my current gas block: http://imgur.com/a/RwHFx
The end goal is simply to have a rail in the front to mount my magpul flip up sight. So based on my research, my thoughts are this:
The operation to install it seems simple enough, but do you have any tips on preforming the installation? Any thoughts on different front gas blocks (I know you linked one, but im just looking for a replacement that has 1-4 rails)?
I tried the other methods such as various vice grips with electrical tape, and I still ended up scratching the shit out of my lower. This time around I bought some decent roll pin punches off amazon here and here.
Its much better having the correct tools in my opinion. Plus the ones I linked are from a company called Grace, made in the USA (Michigan)
Here's one on Amazon.
Depends on how small you need. If you only need one or two more holes you can always punch it yourself.
edit: Use one of these. https://www.amazon.com/SE-790LP-Leather-Punch-Set/dp/B001F27AMI/ref=pd_lpo_vtph_469_bs_lp_t_1?_encoding=UTF8&psc=1&refRID=XW672TC1CD0QXG4MCF02&dpID=41sUAyxDaEL&preST=_SX300_QL70_&dpSrc=detail
These are what I use. The nail sets are great too.
I have used Allen wrenches and small drill bits that I was willing to sacrifice previously. That being said...
https://www.amazon.com/America-Hollow-Steel-Starter-Punch/dp/B01BL4TW3Y/ref=sr_1_12?ie=UTF8&qid=1469788510&sr=8-12&keywords=roll+pin+punch
https://www.amazon.com/Wheeler-Engineering-Roll-Pin-Punch/dp/B00EE6GHVW/ref=sr_1_5?ie=UTF8&qid=1469788510&sr=8-5&keywords=roll+pin+punch
Punch sets can be had relatively cheaply. I bought the wheeler, though the hollow type might be better for your application.
My most useful tool for PC building? This thing -
3 Prong Part Retreiver
Basically a 3 prong item that allows you to grab those dropped screws. It is also handy for unscrewing stuff that is finger tight and out of reach.
I have 3 American Locks that I had to do that to. The first one I drilled it with a small bit and stepped up the size twice before using the punch. The second one I used only the larger size bit before using the punch and by the third I was just done with the BS and only used the punch. That one took two swift wacks with the back of a screw driver to push it through enough to grab the bottom with pliers and yank out. That was the easiest and least time consuming out of the 3.
This is the set that I used.
No way, man. THESE are the bomb: https://www.amazon.com/Spring-Tools-32R02-1-Counter-Punch/dp/B0006Q4I60
First I center punch the rivets on the bottom with one of these-
Bastex Steel Automatic Center Punch For Stable Hole Drill Indentation. with Adjustable Tension, Push-to-strike Function. https://www.amazon.com/dp/B072HSWV3B/ref=cm_sw_r_cp_api_i_6smvCb6ZKRCC8
Then I will use a 1/4” drill bit to take the head of the rivets off so the body and base can be separated. Just be slow and careful at this point so you don’t damage the base. Sometimes you may need to use a smaller bit on this part so just check and see what works best for the application.
Then I drill down about 3/16” into the rivet with one of these drills and then tap the hole with the tap-
Du-Bro 360 2-56 Tap And Drill Set https://www.amazon.com/dp/B0006O4GYG/ref=cm_sw_r_cp_api_i_KrmvCbDECZ061
Then I install one of these to make sure it fits correctly and holds everything together properly after all the work is done. You could also do a 2-56x3/16” screw if you want one a little bit longer-
2-56 x 1/8" Button Head Socket Cap Screws, Allen Socket Drive, Stainless Steel 18-8, Full Thread, Bright Finish, Machine Thread, Quantity 100 By Fastenere https://www.amazon.com/dp/B00YSS9CYA/ref=cm_sw_r_cp_api_i_ormvCbP5S7Q34
I think that’s about it. Send me a DM if you have any other questions.
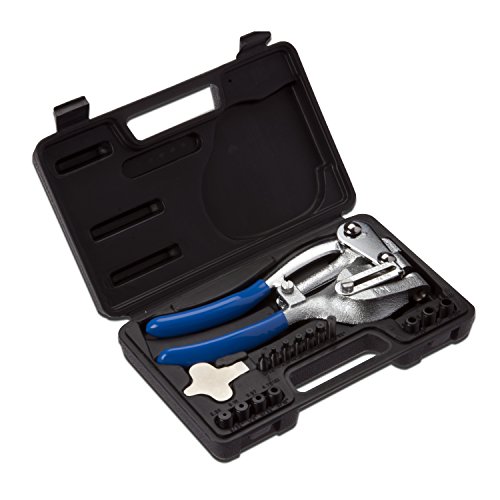
I've got one like this. I could have sworn I got it from Harbor freight but they don't show it anymore on their website.
It will do the job just fine, but the handles open really far, so sometimes it's a bit awkward to use.
Pilot cartridges come with a disk sealing them. Putting it back in place seals the cartridge. I have been doing this for years with not one single leak.
This is how I refill my vanishing points cartridges . I would also recommend using something like an altoid tin to carry them in for extra protection.
A punch looks like this. They are used to drive pins.
https://www.amazon.com/dp/B01N2LGZUQ/ref=cm_sw_r_cp_awdb_V-W.zbPKPPF0Q
That sounds like a bad idea.
https://www.amazon.com/Sized-Heavy-Leather-Pliers-Punches/dp/B07D28DBC6/ref=sr_1_3?crid=3EPUXKF6STCFQ&keywords=leather+hole+punch&qid=1556136207&s=gateway&sprefix=Leather+hole%2Caps%2C226&sr=8-3
You can look in to the FastCap Knuckle Bender . It’s handy for all sorts of hinge work, easy to use with gloves, and has a huuuuge hinge pin on it.
Also, the Spring Tools Hinge Pin Popper is tremendously quick and easy to use... But small, easier to lose, harder to use with gloves.
Bonus! These Wedge-It Door Stops were designed by a firefighter, come in a variety of colors, easily clip on to a carabiner, and are disgustingly durable.
Here are some links for the product in the above comment for different countries:
Link: this
|Country|Link|
|:-----------|:------------|
|UK|amazon.co.uk|
|Canada|amazon.ca|
This bot is currently in testing so let me know what you think by voting (or commenting).
A pair of channel locks?
Get a punch set and a roll pin start set.
Use the right tools for the job.
> I recently grabbed a leather strap and it's having a similar issue of being too loose or too tight
You might get a strap punch, put a hole between the one that's too tight and the one that's too loose. I have this one that I like quite a bit, but there are cheaper alternatives out there too.