(Part 2) Best hardware nuts according to redditors
We found 146 Reddit comments discussing the best hardware nuts. We ranked the 103 resulting products by number of redditors who mentioned them. Here are the products ranked 21-40. You can also go back to the previous section.


Everybody is bad-mouthing it but nobody is offering advice.
You can salvage this if you lay a piece of 3/8" over the top of the control board and undermount the joysticks. Then use some of these to undermount the joysticks. They will show through the top though, so get yourself some spray adhesive and some laminate/melamine to cover the top of it.
Secondly, the piece that your monitor is mounted to and that (what appears to be) an audio controller... Redo it and this time take your time and use measurements and a template.
Cardboard is your friend. Use it to template things with exact measurements. Use a ruler, a straight edge, and a nice pointy pencil.
You've got this!
CHEP has a side mount adapter than doesn't need any special hardware - just the screws that come with the printer.
My only complaint about his side mount design is that it could interfere with the most common style cable chain. But it will work until you can get better screws.
Speaking of which, if this is someone's first printer, they should pick up a package of T-nuts. They're super handy for mounting things on the 2020 extrusion that printers tend to be made from.
And a little assortment of M4 screws to go with it is helpful too, although you can find similar screws at most decent hardware stores.
Get some threaded inserts ( like these ) so you don't break the wood if they get moved
I've been using these: Glarks 370Pcs M2 M3 M4 M5 Female Thread Knurled Brass Threaded Insert Embedment Nut Assortment Kit for 3D Printing https://www.amazon.com/dp/B07L96KVP3/ref=cm_sw_r_cp_apa_i_y9eZDb0HFEHM9
I suspect they're not as resistant to shear as the McMaster ones, but they're way over spec for anything I've needed, and they're all nicely threaded. I've also fused a bit of filament inside when I've needed them to be locking nuts.
How much movement do you expect?
Does the top need to be fastener free?
One thought would be to install rivnuts into the sheet metal top then fasten the wood top using connector bolts. The holes thru the wood top would have enough clearance to the bolts to allow movement as long as you dont let a 500lb gorilla tighten the bolts.
The connector bolts are relatively low profile and shouldn't interfere with the tops function. But They could also be set in a counter bore with similar clearance between bore and head as the shaft and thru hole to allow clearance.
Rivnut example https://www.amazon.com/dp/B07BFVHCTL/
Connector bolt example
https://www.amazon.com/Hard-Find-Fastener-014973445744-Connector/dp/B00KM4OYJC
Any of these sets will do you well.
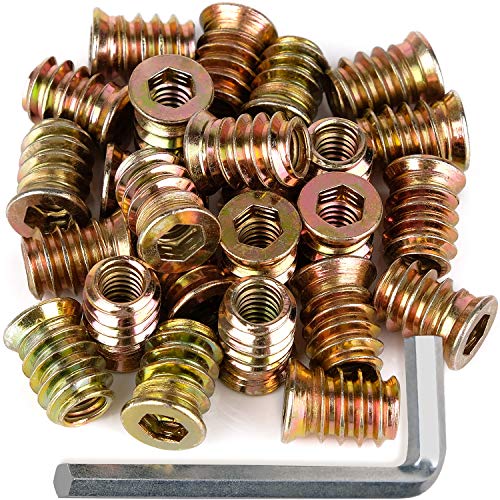
It's a threaded wood insert screw. Something like these.
E-Z Lok Threaded Insert, Zinc, Hex-Flanged, 5/16"-18 Internal Threads, 25mm Length (Pack of 25) https://www.amazon.com/dp/B002WC8TV6/ref=cm_sw_r_cp_apa_i_HGuEDbNCDTXEB
40pcs 1/4"-20 Furniture Screw in Nut Threaded Insert Nutsert for Wood Furniture Connector 15mm Length https://www.amazon.com/dp/B07Q6HKK45/ref=cm_sw_r_cp_apa_i_dHuEDbBKV3F74
The ones you have in those legs are screwed in with an Allen wrench.
Second on Augustus' recommend of 1800 Destiny-- they have some pretty affordable spider+holder options in the $35 range that use M3 threaded rods, rather than thin vanes -- they're a little thicker, but will make a world of difference in making it easy to center the secondary, providing a solid mounting.
On one of my smaller project scopes, I used an inexpensive 3 vane 1800 Destiny spider with M3 threaded rods to hold the secondary, keeping it centered and nice and tight. I used a hacksaw to cut off the excess rod so that it's not sticking out too much.
You can see it in a recent build thread I shared last night:
https://imgur.com/a/35LET6w
If you look at the secondary assembly above, I have nuts on the inside of the tube, attached to the threaded m3 rod, and nuts on the outside. I'll likely change the outside fastener from regular nuts to knurled thumb nuts, like these-- https://www.amazon.com/uxcell-Knurled-Thumb-Collar-Plating/dp/B07LFSNNSK which only cost a few bucks and make it much easier to adjust and center the assembly (loosen the inner nut to create room for movement, and then tighten or loosen the thumb nuts until the secondary is perfectly centered in the tube). Once set, it usually doesn't become undone, but having thumb nuts makes it easier to make small adjustments and fine tuning at the eyepiece, to ensure perfect centering and even illumination of the primary mirror.
Amazon
100Pcs 2020 Series M5 T-Nuts Carbon Steel Nickel-Plated Half Round Roll in Sliding T Slot Nut https://www.amazon.com/dp/B07KSFB7BG/ref=cm_sw_r_cp_apa_i_4S8TDbZ6A0XAD
I got a long piece of all thread that matched the same thread as the Clicgear wheels I bought for it. Drilled out the holes where the bottom roller blade wheels are so the allthread could fit through snug. Then used female to female nut union/coupling to fasten the Clicgear wheels to the allthread. Here's about what I used. Cost ~$80 to do, so I'd make sure you get the right stuff as this was a quick google. You could call Clicgear and ask them all the thread size info and go to grainger and make sure you order the right nut/allthread. You could also go on Zuca Mods on facebook and ask there. Very active community.
https://www.clicgearusa.com/products/clicgear-maintenance-free-wheelscB
https://www.amazon.com/Threaded-plated-M12-1-75-Thread-Threads/dp/B00G3QETRU/ref=sr_1_5?keywords=M12+threaded+rod&qid=1568719070&s=industrial&sr=1-5
https://www.amazon.com/uxcell-1-75-Pitch-Length-Stainless-Coupling/dp/B07JNPWGBF/ref=sr_1_1?qid=1568719215&refinements=p_n_feature_fourteen_browse-bin%3A11434082011&s=industrial&sr=1-1
https://www.amazon.com/dp/B07DLWC7RP/ref=cm_sw_r_sms_c_api_i_GoXLDbHEHM75N
https://www.amazon.com/Hillman-Group-44948-Stainless-10-Pack/dp/B00JDU1LT2/ into the wall
https://www.amazon.com/Coupling-Grade-Steel-Plated-Quantity/dp/B07D5DBFHM/ onto them
5/16-18 all thread into that, nut flat washer plywood flat washer locknut nut in that order, and Robert is your mother's brother.
I would probably do eight, three on the top, three on the bottom, then one in the middle on the sides. Might go up to 3/8", this is just the first search results of the appropriate kind of parts I was looking for. If you're fancy, you can even get wing nuts for the outside nut to allow it to be hand openable.
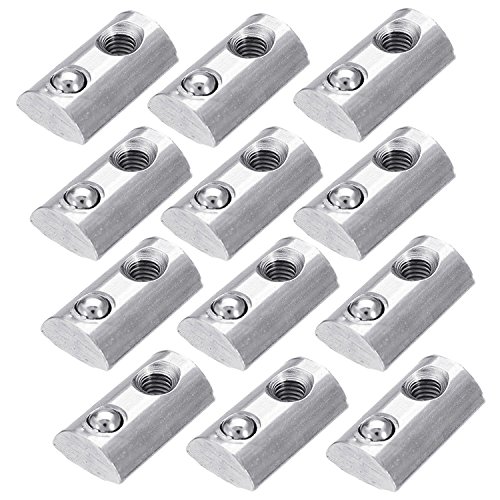
I got t-bolts to put in my slots, and then use nylock nuts to connect to them. So no rattle free. Nice thing about T-bolts is you can put them in at any time, they don’t have to go in the end like nuts do.
Bolts like this: PZRT 10pcs M6 x 12mm Hammer Head Bolt T Screw,10pcs M6 Hexagon Flange Nuts Set, Carbon Steel Nickel Plated for 3030 Series Standard 8mm T-Slot Aluminum Profile https://www.amazon.com/dp/B07CYZRTCW/ref=cm_sw_r_cp_api_i_D68XCbP0S3QH3
But I bought them cheap via Alibaba.com from China. And then regular stainless nuts with nylon lock. This means only two pieces for each fastening point, rather than needing a locking washer... and also I can add anything anywhere I want as the bolt head goes in then locks in the slot when tightened down.
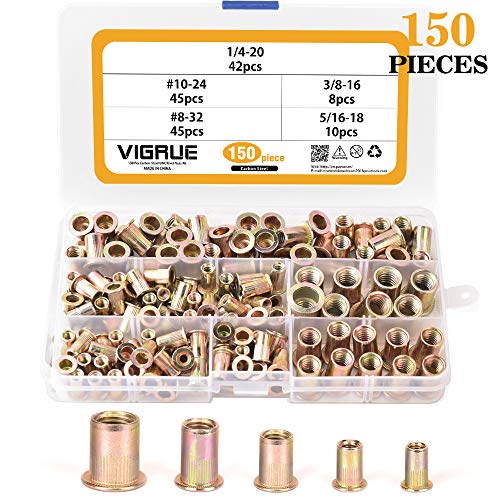
Sutemribor 304 Stainless Steel Flat Head Threaded Rivetnut Insert Nutsert Rivet Nut Assortment Kit 120 Pcs, 6 Sizes - M3 M4 M5 M6 M8 M10 https://www.amazon.com/dp/B07CMKS9K6/ref=cm_sw_r_cp_api_u0LNBbWDBX667
Lock in screws is how I did this for a few pieces these the are the ones I used: 40Pcs Anwenk 1/4"-20 x 15mm Furniture Screw in Nut Threaded Wood Inserts Bolt Fastener Connector Hex Socket Drive for Wood Furniture Assortment https://www.amazon.com/dp/B07HR63VF5/ref=cm_sw_r_cp_apa_i_SN4OCb2CHT01F
>Foil pommel nut inside
>
>Foil pommel nut outside
The inside-hex nut on my epee is 22mm (0.866 inches, or just under 7/8 inches) long, has an outside diameter of 10mm (0.394 inches, or just over 3/8 inches), and is sized for a 6mm (0.236 inches, or just under 1/4 inches) hex key. Approximately the top 5mm are not threaded, leaving approximately 17mm of threading.
Most fencing tangs are threaded using 6mmx1mm threading (source 1, source 2, source 3).
It seems like the inside-hex hut would be an example of an "Allen nut"/"socket nut", which McMaster-Carr apparently does not carry in metric specifications.
Though, these, these, and these look like they would be able to serve as replacement outside-hex nuts.
>Foil pommel lock washer
The "split lock washer" would have the same OD as the nut (that is, 10mm, or just over 3/8 inches) and an ID equal to or greater than the OD of the threading (that is, 6mm, or just under 1/4 inches). You can probably find matching split lock washers at your local hardware store without too much difficulty.
>Foil insulation tubing
As others have suggested, heat-shrink tubing from McMaster-Carr with a 3mm (0.118 inches, or just under 1/8 inches) diameter should work.
>Foil german point spring
You'll have to measure several aspects of the springs in question - specifically: the diameter/gauge of the wire that makes up the spring, the outer diameter of the spring (that is, the outer diameter of the cylinder represented by the spring), the uncompressed length of the spring (that is, the height of the cylinder represented by the spring), and the number of coils in the spring - to find a match; see here and here.
The point spring, and the other components not already discussed, are probably more-easily sourced from a fencing equipment supplier than trying to find the same components elsewhere.
Hmmm.... As there’s only us living here I hadn’t considered it...
Perhaps these https://www.amazon.co.uk/dp/B07KDH3G16/ref=cm_sw_r_cp_api_i_jZB5CbMYDQHT7 coupled with these https://www.amazon.co.uk/dp/B009APB92E/ref=cm_sw_r_cp_api_i_C0B5Cb940988P might make them less noticeable. I don’t know if there’s anything that would hide them completely though.
One of the reasons I jumped in here is because there was a post in r/RetroPie yesterday? where someone wanted to have an 8-way and a 4-way. I was thinking that was you.
I'm not sure what you mean about pulling pins out. I would do this in the most "non-destructive" way possible -- in/with the wires -- but that's just me and my preferences.
EDIT
I would use "single pin JST"? connectors on the wires. I've never used them before so I'm not sure I'm using the right terminology. Neither am I sure the best place/way to obtain them but this is what I'm talking about:
https://www.amazon.com/KINCREA-Housing-Connector-Adaptor-Assortment/dp/B07DF9BJKH
The "single" / small one in the upper right corner of the pics. Not sure if there are different sizes of the "singles" either and if they'll fit on the pins coming out of the 5-pin joystick.
They're basically these things called T-Nuts
BUT I don't know the exact size. It should be in the manual which you can download from their website, 6mm rings a bell for some reason.
Worst case, you can buy standard hex nuts, slide that in and tighten. It's fiddly because you're relying on friction unless you get the diameter just right, but I've had to do that on 3d printer builds in the past, so it does work.