Best pipe cutters according to redditors
We found 64 Reddit comments discussing the best pipe cutters. We ranked the 31 resulting products by number of redditors who mentioned them. Here are the top 20.
We found 64 Reddit comments discussing the best pipe cutters. We ranked the 31 resulting products by number of redditors who mentioned them. Here are the top 20.


I built it so long ago that I don't remember the exact parts, but it was pretty simple.
They key thing I did was use hard boiled egg holders to hold the touch controllers. Basically you drop the bottom of your touch controller into this holder, then wrap your hand around the egg holder itself. Holding both the controller in the holder, and the holder itself.
The PVC parts are just 1' PVC pipe with a pair of PVC 90 degree elbows. You'll need something to cut the PVC pipe, a hacksaw works well, I used a dremel, or you can pickup a pipe cutter while you're on amazon
I also used one small piece of 3/4 inch PVC pipe wrapped in duct tape to hold the AR-15 stock onto the end. This is a luxury, but as someone who shoots real guns a lot, having a real gun stock on the end of it really makes a difference to your cheek weld.. So if you want dat real AR feel, you can pickup an AR stock right here.. All you need is the plastic stock, the tube and all the other stuff isn't required. I just warpped the 3/4 inch PVC pip in tape until it fit VERY snuggly into one of the 1" PVC elbows. I left it about 6" long, so that the rreal AR-15 stock would slide over it. I used a bunch fo tape around the 3/4" PVC pipe until the AR-15 stock very snuggly.
You will also need some 5 minute epoxy, and I used some instamorph. I used the epoxy to glue the egg holders onto the PVC pipe, and then wrapped the bases in electrical tape. Make sure you scuff up the PVC pipe before putting the epoxy on. I used a knife to scratch it up, and then some snad paper to really rough it up. This helps the epoxy hold.
I wrapped the base of my touch controllers in plastic wrap, then I heated up the instamorph and placed a bunch of it in the egg holder. Then I pushed the touch controller into the egg holder, so that the instamorph took the shape of the touch controller. DO NOT use epoxy for this.
After that, all you need to do is cut your PVC pipe to length and put the 90 degree elbows on there. The AR 15 stock is optional, not required.
I also recommend a sling, so that you can pop your hands in and out of your stock as need be. When your done with the stock, it'll just hold on the sling. And old cheapy rifle sling will work.
Neat design. I'm afraid it's going to die pretty quick though.
I've put together about 10 different designs of target holders that I used for both steel and paper, I think I'm closing in on the ultimate design (for me at least.)
One truism is "you will always miss." You never intend to, you never plan to, it may not even be you, but someone will miss and smash the pipe.
PVC is completely unsuitable for steel. The spalling will shred a set of pipes within a couple of shots depending on caliber.
If you're using it to hold paper, it's definitely usable.
What I'd suggest doing is drop down from inch and a quarter to half inch. Put together the base as per that design but glue the joints together (super glue is fine) and fill it with something that has some weight. You can make a plug out of glue to keep your filler in the base.
Once you do that, build the rest of the stand but don't glue it together.
Pick up a PVC cutter and you can easily chop long sections of the half inch to the size you need.
Thinner pipes are less likely to be hit and easy to cut to size by hand as well as cheaper than pre-sized pieces. The weighted base keeps it upright and allows for a smaller footprint without sacrificing the ability to stand. If you want some insurance, get some inch or inch and a quarter pipe and cut them so they fit over the pipe that makes up the base. They will help protect the base from sun damage and getting cracked by banging around. They won't protect from a direct strike from a bullet but they can help absorb spalling.
Without tools, the best you can really do is look for oiliness on the pipe. When you find a joint that feels oily (look for dark colours on the pipe, usually covered in very fine dust. Once you rub the dusty area with your fingers you'll feel the oiliness), spray/pour a small amount of washing up liquid over it and look for bubbles. If there's any refrigerant left in the system, you'll usually see bubbles appear (or over a longer period, foam). Of course if the gas has all escaped already - and we're only talking a couple of hundred grams here - then you won't see any bubbles.
Most domestic gear has no access fitting at all so even locating the leak can be difficult if there's no visual indication. You need to get pressure in there so you can leak test - this means adding a bullet piercing valve (like this).
Then you need to put something in via your bullet piercing valve to raise the system pressure. It's best to use dry nitrogen to leak test to save wasting refrigerant, but since you most likely don't have that on hand you could buy yourself some refrigerant (most likely R134a) and pressurise with that. That's a big no-no here (both disposable cylinders and dumping gas to atmosphere by charging a system with a known leak) but I'm guessing your in the US, and those sorts of laws seem remarkably lax so go for gold. It's not like you'll be ruining MY ozone layer too, right? ;)
You also need to regulate the pressure going in to the system. This is where you need gauges. Connect the yellow line to your bottle, connect the blue line loosely to your bullet piercing valve, purge from cylinder to piercing valve by opening the cylinder tap + gauges tap, and releasing some pressure via the loose fitting, then tighten the fitting and close your gauges tap. Open the bullet piercing valve. Open the gauges tap slowly and give it ~50psi of system pressure.
Then you can go for gold with your soap, or you can lash out and grab yourself some "proper" leak detection fluid (like this), or better yet an electronic leak detector (like this one).
Once you've found your leak, you want to release your nitrogen (or reclaim your refrigerant using a reclaim plant and a spare cylinder), then repair it using an oxy/acetalyne set, or since it's only tiny pipework you can get away with a MAPP gas set.
If it's a copper->copper joint, you're laughing - polish the pipework up with emery cloth, heat the pipe until it's just this side of glowing red, and feed the joint with brown tip silver solder.
If it's a copper->steel joint, then it's a bit more of a pain. You need blue tip silver solder and flux. Clean your joint with the emery cloth, give it a nice coating of flux on every surface you need solder to stick to, then heat it up until it's a fair way short of glowing red. Feed the blue tip solder in and STOP. Unlike brown tip (15% silver) you can't just keep feeding blue tip (45% silver) as it ruins the weld.
Now, since you put on a bullet piercing valve and they leak like a sieve in the long term, we need to replace that with a schrader access valve. Since it's most likely going to be in a straight through piece of pipe, you can save time and grab yourself a pre made access valve in 1/4" pipe. Cut away the hole left by the bullet piercing valve, polish the copper and cut the pipework with a ~10mm gap using a tube cutter. Then slip your access fitting assembly in there, and follow the copper->copper joint procedure.
Of course, now that we've done all that you need to change the liquid line filter drier too. I'd recommend a 1/4" solder in core drier in place of the original copper spun drier because... well, copper spun driers are terrible. Follow the pipe cutting procedure from the piercing valve instructions and the soldering instructions from the copper->copper joint instructions and that's done too. Remember - always try and mount the drier so it's outlet is LOWER than its inlet. This turns the drier into a small liquid receiver and helps ensure a good liquid seal over the capillary tube. Speaking of capillary tubes, if it was inserted straight into the original copper spun drier CUT the capillary, don't try and unsweat it. The chances of blocking it up are about 82.5634% (approximately) when you unsweat capillarys. You're much better off chopping it with a set of capillary tube cutters and ensuring a good clean capillary. The ~30mm of wasted capillary will affect performance, but almost certainly not to any sort of measurable degree.
Then give the system a good evacuation using a vacuum pump and ensure it reaches a good vacuum (sub-500 micron) with a digital vacuum gauge.
Then using a set of electronic scales, charge your freshly evacuated system (remembering to purge!) to the charge recommended by the manufacturer.
Voila! You have just fixed your chest freezer.
..... Alternatively, pay someone to do it for you and/or recycle the components and buy yourself a new one.
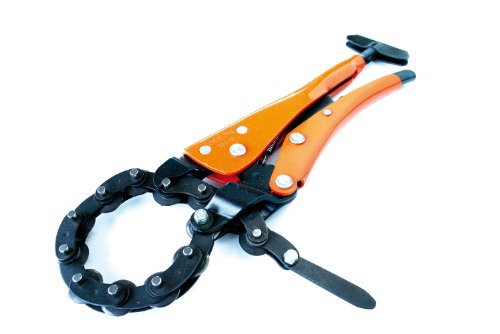
Some type of pipe cutter, they use for cutting steering column I would bet.
edit: https://www.amazon.com/186-12-12-Inch-Cutter-Locking-Epoxy-Coated/dp/B000SOVR3W
edit again: or cutting catlytic converters off if people still do that.
I just redid my kitchen as well so I bought one of these and one of these to clean up the ends, to make sure I got a clean cut every time. If you think you might do more pex work in future, probably worth dropping $20 to get them.
But if this is a one time thing, pex is pretty soft - you could use a hacksaw, or even a utility knife, and just clean up the cut with the knife afterward. Key is to make sure your cut is perpendicular to the pipe, and that there are NO stray bits of plastic around the rim at the cut end Put a little bevel on the end with a knife for best results. And make a little mark 1" from the end of the pipe, so you can make sure it is inserted all the way into the fitting.
Amazon have a flare tool for 30 bucks, I helped him cut the flare and it really easy. You can also buy a regulator and rent a nitrogen tank from a welding shop.
I have one of these. works fine, wouldn't want to use it all day, but for how much I need to cut pipe, it's fine.
edit: fix link
Super easy with one of these..
RIDGID 32975 Model 103 Close Quarters Tubing Cutter, 1/8-inch to 5/8-inch Tube Cutter https://www.amazon.com/dp/B000LDGNCU/ref=cm_sw_r_cp_apa_i_gVIvCbPDB4Z10
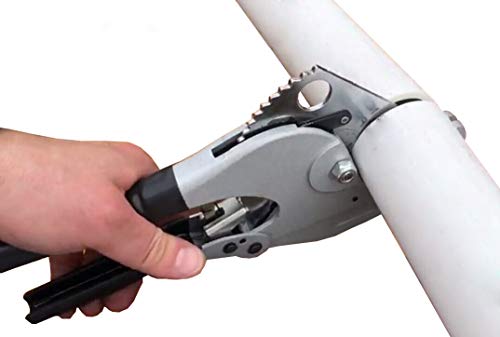
To cut the pipe, any pipe cutter should work like this.
Personally I would take measurements with some string or twine to get a close accurate length of the tube to be cut. Alternatively, you could purchase a foot of regular tubing to use as your measuring device. A few inches on either side is a bit much but when it comes to tubing, it is ALWAYS better to leave too much than too little.
RIDGID 29983 223S Stainless Steel Pipe Reamer, 1/4-inch to 1-1/4-inch Inner/Outer Reamer
https://www.amazon.com/dp/B001P81OKG/ref=cm_sw_r_cp_taa_4116BbCAW48D0
Have you tried flipping the blade around in the reciprocating saw? You may be able to get a more favorable angle cutting with the to of the dark towards the wall.
Other than that, pics might help but I'm not coming up with much. Is this what you tried? It claims to work in tight quarters.
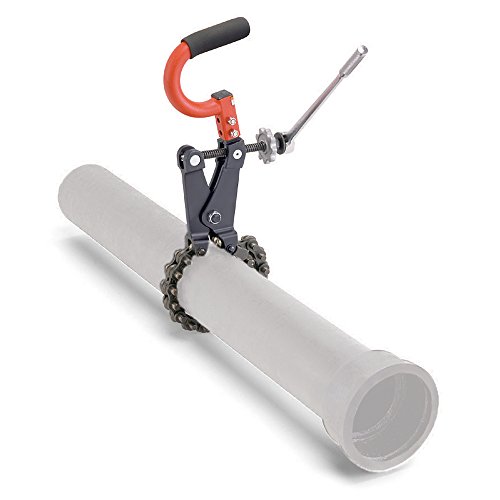
RIDGID 69982 Model 226 In-Place Soil Pipe Cutter, 1-1/2-inch to 6-inch Chain Pipe Cutter https://www.amazon.com/dp/B001HWQA0Y
We use this bad boy.
But if that's not in the budget, a sharp razor blade.
There's not one that I know of that will do what this one will do with copper, but for simple chamfering, these work very well.
Chain pipe cutter: https://www.amazon.com/RIDGID-69982-Place-Cutter-2-inch/dp/B001HWQA0Y
​
I don't any other trade that might have a use for these. They are awesome. If your set and you have a drill hooked up to it. you can pop a large cast iron pipe quicker then 2 pump joe
What size/type of tubing are you using?
I use 12mm bitspower acrylic or 12mm PETG barrow tubing.
My favorite set of tools are:
https://www.amazon.com/3Pcs-Hardline-Mandrel-45-90-180-Rigid/dp/B01IDVQC8Q
https://www.amazon.com/Wagner-Digital-Heat-HT3500-503040/dp/B00BV14VMA
https://www.amazon.com/Wolverine-PST085-Inner-Outer-Reamer/dp/B0002YVLHA
For the barrow PETG:
For cutting: https://www.amazon.com/Apollo-Valves-69PTKC001-Plastic-Tubing/dp/B0054YDY0A or similar
The insert: https://www.amazon.com/Barrow-Silicone-Bending-Tubing-Black/dp/B01M9CTQ1S for when I buy barrow tubing (it's 8mm ID, 12mm OD)
For the bitspower acrylic:
For cutting: https://www.amazon.com/Premium-Mini-Hack-Blade-Angles/dp/B01COE3YZ2 or similar
Edit: Found the insert: http://www.performance-pcs.com/bitspower-silicon-bending-cord-10mm-clear-1m.html
Cleaning up and shaving down to size (this thing is amazing): https://www.primochill.com/products/primochill-rfb-rigid-tubing-finishing-bit
Buy the insert made by the company that makes the tubing for best compatibility imo.
Also I use a belt sander.
Edit: Also I use Mayhems dyes with either white pastel or their X1 clear. Both should be safe with PETG or Acrylic.
oh! Ok, so we bought copper tubing that you can purchase in the plumbing section of Home Depot, we also got the copper elbows and tri...bows... to fit, and if you choose to make this, buy a pipe cutter. It was pretty simple! Then we bought a large .5" sheet of plywood, I think it was 6'x4', birch maybe? It was pretty cheap. Then we used a circular saw to cut out the middle, and tied it to the copper with the twine. the copper is fairly thin, so we used a plumbing glue to keep the pieces together and stable. I had the "king and queen" made from Etsy.
You're right, of course, and I wish you well with your marriage.
But you forgot the other option: A finger tattoo is as simple to remove as the finger itself is. It's cheap, too: one of these will get the job done neatly.
(And then you can mail it back to them!)
Sawzall is noisy. They use pipe cutters:
http://www.amazon.com/Grip-On-186-12-12-Inch-Locking-Epoxy-Coated/dp/B000SOVR3W
something like this? http://www.amazon.com/Grip-On-186-12-12-Inch-Locking-Epoxy-Coated/dp/B000SOVR3W
maybe you could rent one?
http://www.amazon.com/Ridgid-32975-8-Inch-Quarters-Tubing/dp/B000LDGNCU/ref=sr_1_1?ie=UTF8&qid=1394220300&sr=8-1&keywords=small+pipe+cutter
I've used one of these to open hard plastic ones.
Fwiw, a circular pipe cutter is all you need and they are less than $5 at any box store or $10 on Amazon. May be worth it if clogged kegs are a frequent occurrence.
Mini Pipe & Tube Cutter (HEAVY DUTY INDUSTRIAL GRADE) Adjustable Tubing Cutter Diameter of 3-22MM (1/8 to 55/64 Inches) - Perfect for Cutting Copper, Aluminum, Brass, PVC, Steel, Plastic, and More! https://www.amazon.com/dp/B06XC9BZ6M/ref=cm_sw_r_cp_apa_WW9YzbAETTS8R
Thanks!
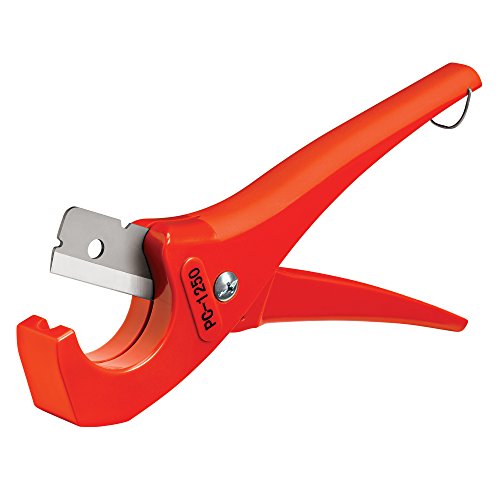
Here's my secret "weapon": https://www.amazon.com/TEKTON-6466-PVC-Pipe-Cutter/dp/B000NY4THS
It's made for cutting pvc pipe, but works great on vines. It's about the size of a pair of pliers.
You can't unscrew it because it's a compression fitting. Meaning there's a brass ring behind the nut in the valve which becomes compressed to create the water tight fit and hold he valve in place. This ring and the nut won't come off.
You need something like this. They're sold anywhere plumbing supplies are.
Ridgid Tools 32975 1/8-Inch To 5/8-Inch Close Quarters Tubing Cutter https://www.amazon.ca/dp/B000LDGNCU/ref=cm_sw_r_cp_apa_i_XLBrDbP96EPJK
Buy a flaring tool. They're cheap usually. Same with the cutter and bender. You can use lines from Napa as well as the fittings. Just use the same size line as what's being replaced. If you can't find a fitting that mates with the old one you can always replace the old fitting by cutting the flare off the line, sliding a new one on, and then reflaring.
I had to replace all the lines on my father in law's F350 and once you get it down its pretty cake.
Wheel one for sure.
Used this one. https://www.amazon.com/gp/product/B000LDGNCU/ref=oh_aui_detailpage_o06_s00?ie=UTF8&psc=1
As said... a hacksaw will do the job.
Any decent pipe cutter will work... but it'll take you s'more time to cut through chromed steel vs copper or whatever.
Sawzall with a metal blade.
Bandsaw.
Grinder with a metal wheel.
I'm sure there are others.
What I'm wondering though... is how fucking low you play your hihat that necessitates cutting the stand.
Pipe slice, must be a coloquial term. If you are talking about tubing cutters then MCC makes the best, bar none. Seriously worth every penny. I've had mine for 2 years, and it needs a little TLC now and then but just a little WD and wiping down.
MCC high quality 1 1/2'' up to 1 3/4'' inch tubing cutter (copper and stainless stell) 6 ball bearings compact ,ergonomic design ,long lasting blade
https://www.amazon.com/dp/B0095JL902/ref=cm_sw_r_cp_apa_AbgCybNFCMA2G
I've made several perches out of PVC (like your design but only one perch).
I got the PVC pipe and fittings for cheap at home depot. Probably cost $5. I bought maybe 2 long pieces of pvc pipe, and a bunch of elbows and a few Ts. I also bought a cutter like this for maybe $12, and it makes everything really really easy. I used 1/2" pvc for everything.
I've gone through several revisions, and my final design ended up looking like this
At the bottom, I put a tray like one of these. I basically built the bottom of the perch around the dimensions of the tray so it pops in and is supported.
The idea was to put absorbent stuff on the tray. I found dog training pads like this at costco for $16 for 100 and now wrap the tray and put it at the bottom of the perch. I can't stress enough how great this is.
I assembled the perch without using any pvc adhesive. This works fine and you can take it down any time you want. It's also let me tweak and adapt the perch over time. No fumes either.
I wrapped the cross bar of the perch with self-adhesive bandage like this. It's the kind of bandage that's not sticky, but sticks to itself. Goes for maybe $5 at target. My green cheek never falls off. She can fly to it and always gets hold of it. She can hold on so well, she can avoid stepping up at bedtime by backing up upside down and continue around until she's done a full loop.
At first I had a perch only, but later I replaced the elbow with a T, maybe 6" of pvc and another elbow. (hard to explain, look at the design). I drilled a hole in the elbow and hang toys on it of all types.
It comes up just about shoulder level. That way I can walk over to the perch and lean over so she can jump off and later walk by and have her jump back onto my shoulder. It's great for potty training. I put her on the perch, say "poop!" and when she finally does it, we whoop and holler and I lean close so she can be rewarded by stepping on my shoulder.
Wow, wall of text. Hope it encourages you to experiment. It's a cheap and forgiving project.
You'll need a small tubing cutter. Like this. You can get away with compression fittings as they should hold the pressure. Should be no need to flare the ends.
https://www.amazon.ca/gp/aw/d/B000LDGNCU?psc=1&ref=ppx_pop_mob_b_pd_title
That's what I used to cut 12mm acrylic. Worked very well for me
This kit? it doesn't seem any of the extra tools beyond the screwdriver and bits would be useful for setting up a custom loop.
For loop installation, I'd recommend getting a tube cutter for soft tubing or PETG hard tubing. You'll need a saw if you you want acrylic hard tubing. A tube reamer for PETG hard tubing. I haven't done an acrylic loop, so I'm not sure if a reamer like that is good for acrylic as well. maybe need sandpaper instead. All that you can buy at Home Depot, or whatever hardware store. You'll want a tube insert and heatgun if you want to bend hard tubing, but other than that, just need a screwdriver.
http://www.amazon.com/Ridgid-23488-Scissor-Style-Plastic-Tubing/dp/B0019MLSLS
https://www.amazon.com/Flexzion-Flaring-Tools-Tubing-Sizes/dp/B016MEB65K/ref=sr_1_3?ie=UTF8&qid=1522509906&sr=8-3&keywords=flaring+tool
this is a orbital flaring tool. honestly it looks like a chinese manufacturer took apart a Ridgid flaring tool, copied all its parts and started making them, to me its almost exactly the same. been using mine for about three months now and havent had any problems.
it's $31
here's the ridgid one for comparison, you can see what i mean about the reverse engineering https://www.amazon.com/41162-Precision-Non-Ratcheting-Flaring-37-degree/dp/B001HWNS40/ref=sr_1_18?ie=UTF8&qid=1522509906&sr=8-18&keywords=flaring+tool
Hacksaw. Or... https://www.amazon.com/RIDGID-32975-Quarters-Tubing-Cutter/dp/B000LDGNCU/ref=sr_1_3?keywords=pipe+cutter&qid=1567027857&s=gateway&sr=8-3
One of these could do it.. Wrong size but you get the idea. Thieves in my dispatch area have been busted with those and ceramic spark plug tops for breaking windows.
From what i've read you can just use a normal pipe cutter that you would use for copper pipes and such. If you don't have one in your house you can get them pretty damn cheap.
To cut the pipe from the inside, use this. Take your time and make sure the cut is level.
What NinjaCoder said. After you resolve the water at the source, you can use a hacksaw, Sawzall, Dremel or a copper pipe cutter like this to cut off the hosebib.
Yes, that's what he's saying. https://www.amazon.com/Superior-Tool-37516-Internal-Cutter-One/dp/B004Q05TTC for example
How about this? http://www.amazon.com/TEKTON-6463-Pipe-Cutter-O/dp/B000NY8PGY/ref=lp_553180_1_6?s=power-hand-tools&ie=UTF8&qid=1409544418&sr=1-6
http://www.amazon.com/TEKTON-6463-Pipe-Cutter/dp/B000NY8PGY/ref=sr_1_9?s=power-hand-tools&ie=UTF8&qid=1332642122&sr=1-9
Try something like that. Any hardware store will have one and it will most likely do the trick. And if it doesn't work as you would like, just return it!
I use a PEX tube ratcheting cutter to cut electrical service wire. Makes a much cleaner cut, with a lot less effort. Like a perfect cut. This tool looks much harder to use.
Ah gotcha.
Also just watched the videos you posted, very slick for a diy job! I wish I had a drill press (I saw you could use a hand drill) and a chop saw for cutting stainless tubing (edit, fuck the saw, just need something like this bad boy). I suppose I could run the PVC but I would think that shit would start to melt pretty damn quick.
That deburring tool isn't very good for deburring.
If you're doing petg, you'll be very unhappy with its outer edge deburring performance.
This is the same tool that is much better made: https://www.amazon.com/dp/B0002YVLHA/
It still will NOT do external edge deburring well on petg. But it is made better :)
I recommend a circular pipe cutter over a hacksaw. They will leave much cleaner cuts.
Capri Tools MiniKlinge Mini Tube Cutter, Klinge Close Quarters with 1/8" to 1-1/8" OD, Blue https://www.amazon.com/dp/B01DCHA3RC/
They appear to be some sort of tubing scissors similar to these: http://www.amazon.com/Milwaukee-48-22-4200-Pex-Tubing-Cutter/dp/B005G1134K