Best terminal blocks according to redditors
We found 60 Reddit comments discussing the best terminal blocks. We ranked the 36 resulting products by number of redditors who mentioned them. Here are the top 20.
We found 60 Reddit comments discussing the best terminal blocks. We ranked the 36 resulting products by number of redditors who mentioned them. Here are the top 20.


Looks very nice. I'm an electrician, put in a lot of lights, and I think your frame within a frame idea is spot on; it's a great way to design a light so it can be installed or taken down without juggling the entire fixture on the top of a ladder.
Your use of the wagos to make a "busbar" was a very creative way of making neat wiring. An alternative would be to use terminal strips with jumpers and if you want to make the wiring super neat, use sticky backs and zip ties.
Great stuff!
Just some cheap plastic spacers. Works perfectly. Links:
Spacers: https://smile.amazon.com/gp/product/B013G1Q300/ref=od_aui_detailpages00?ie=UTF8&psc=1
Nuts:
https://smile.amazon.com/gp/product/B009EFSE32/ref=od_aui_detailpages00?ie=UTF8&psc=1
Washers:
https://smile.amazon.com/gp/product/B013GA116M/ref=od_aui_detailpages00?ie=UTF8&psc=1
Also worth noting:
Power supply (40A version):
https://smile.amazon.com/gp/product/B01HTM53W6/ref=oh_aui_detailpage_o00_s00?ie=UTF8&psc=1
Used with these terminal strips:
https://smile.amazon.com/gp/product/B010UDG6NG/ref=oh_aui_detailpage_o01_s00?ie=UTF8&psc=1
Way better than USBs.
The black brick thing with the screws on top? Terminal block, I think. You put wires in there and tighten down the screws and it makes an electrical connection.
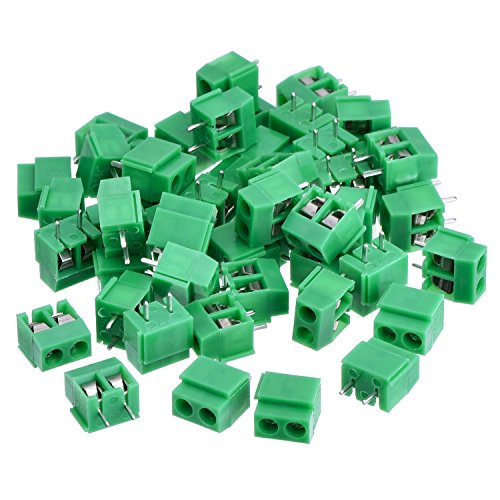
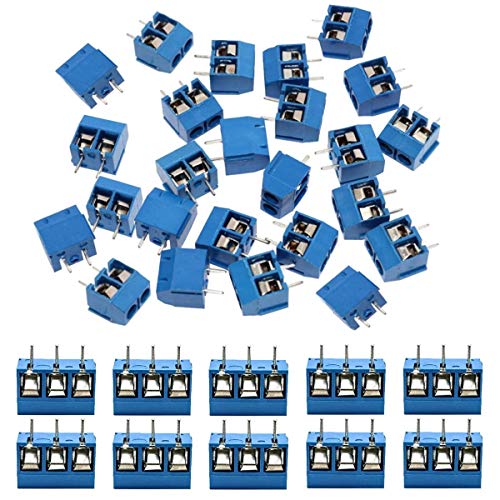
PCB Mount Screw Terminal Block
Couple things:
This slider dolly will be used to take overnight timelapse videos of the milky way. I want to hike this up an abandoned logging road in mountains near where I live, set it up on a timer, hike back down and sit around a campfire while it does its thing overnight. There were a few design goals in this project:
If I did this over agin here is what I might do different:
Here is the inside of the "big case". The potentiometer controls the brightness of the backlight. The USB cable thing is just a USB cable so I don't have to unscrew the damn thing every time I want to update the code...
Source code & schematic: https://github.com/coryking/MotionController
Example videos:
Quick 20 Minute Jaunt Down The Fire Escape
Capitol Hill At Night
"Terminal strip" or "terminal block" or "barrier strip".
https://www.amazon.com/Position-Terminal-Postions-Insulated-Barrier/dp/B01DY7L5KY/ref=sr_1_10?ie=UTF8&qid=1519057406&sr=8-10&keywords=terminal+block
Teensy 2.0 ++ 46 I/O pins if you need them.
I got this cheap OLED screen for $10.99. The text looks nice and it's able to display plenty of information for only being 0.96" diagonal. I got the blue colored one just because it was first available, but they have different colors.
It comes pre-soldered and you just need four jumper wires. Easy.
Only UAT, ES, CPU temp, and towers displayed for now. It can easily be extended to show more information.
I wrote this Python script to display the information and update once per second. It gets the data from Stratux via webinterface, parses the JSON, and draws the information on the screen.
Set the script to start up on boot, and now don't have to look at the iPad to get reception stats. Neat.
And just for fun, the startup screen: http://i.imgur.com/qIUOzkK.jpg
Get a NodeMCU D1 mini. it's a tiny esp8266 with built in microusb port and many input/output pins. Costs $4-8. The screen is listing below requires only four pins two operate using i2c protocol with the Wire library. Costs $2-5
Diymall 0.96" Inch Yellow Blue I2c IIC Serial Oled LCD LED Module 12864 128X64 for Arduino Display 51 Msp420 Stim32 SCR https://www.amazon.com/dp/B00O2LLT30/ref=cm_sw_r_cp_api_AJxHyb8WHR49A
For the OLED
Check out the mini 05, the Pico, or even the Teensy.
Dont use an inverter for USB, use this https://www.amazon.com/AmazonBasics-Dual-Port-Charger-Android-Devices/dp/B071SKHZXG/
plugged into this https://www.amazon.com/KUNCAN-Cigarette-Lighter-Extension-Connector/dp/B07594WT6K/
connected directly to the battery or if you have multiple 12v loads, use two of these https://www.amazon.com/Position-Terminal-Postions-Insulated-Barrier/dp/B01AQ94ERY/ to make two + and - bus bars
I recommend a four position so you have enough space for both grounds, 5v, and 12v. Also, a cover over the terminals is always a good idea. I'm picking up some of these, should fit just fine inside my power supply shroud. In my experience, all the brands are about the same.
https://www.amazon.com/dp/B015VY0X38/ref=cm_sw_r_cp_awdb_6EJczbZGP516R
limit/home switches if you want them (you should)
an e-stop - you probably have this
fan for the electronics case
power switch/plug for the power supply - you probably have this
connectors for wires (eg to get e-stop and limit switch wires into the case and connected. I use xlr plugs like These and these.
I also use these to help with wiring the limit/home switches in the case, but you may not need them, depending on what you use.
Barrier terminal strip would be your best bet. Anything with a quick connect is rated for low-voltage (banana plugs like the one you listed are rated for 30V @ 15A for a quality one), whereas line voltage requires a cord and plug assembly.
Another option would be something like this: https://www.amazon.com/30pcs-Connector-Terminal-Spring-Connecting/dp/B01GB7J8C6.
> I use a RTC break-out chip for keeping track of time
As I mentioned in my other post, I first tried this route and gave up. I just let the "real" home automation controller do the scheduling as it was significantly easier to make schedule changes.
One other thing I should have mentioned that you might want to include just because why not.... Get a one-wire temperature probe like this one and wire it up to a display like this. If you do go the home automation route, you can "broadcast it" so to speak using a plugin like this.
BTW, if you don't want to live in the apple ecosystem, there is also HomeAssistant (/r/homeassistant). You can run it on a raspberry pi. I'm pretty sure there is also equivalents for whatever google's home automation solution is but I can't speak to that...
No worries! It's exciting to me that you're so excited lol.
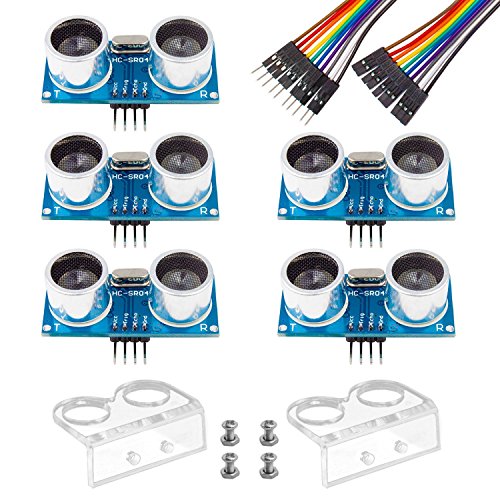
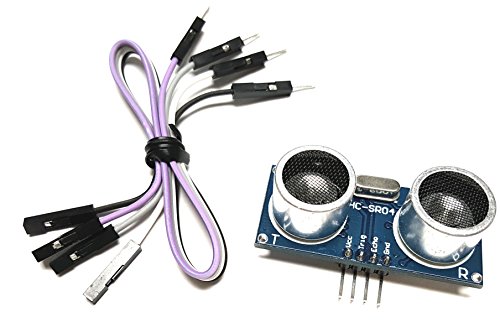
Just a heads up, I'm gonna try and set up a different type of sensor for the water level reading, as the current water sensor gets some false readings when a pine needle floats onto it.
So if you want to have one on hand if it turns out to work better, here's the type of distance sensor I'll be trying out: https://www.amazon.com/HC-SR04-Ranging-Detector-Ultrasonic-Distance/dp/B01GNEHJNC?ref_=fsclp_pl_
Even if it doesn't work out for this application, it's a great sensor to have on hand.
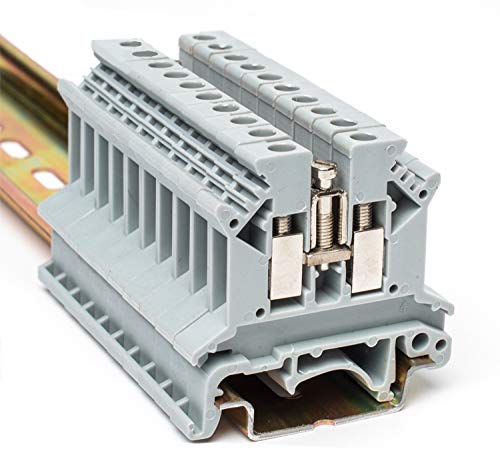
Not just for your grounds. Screw a DIN rail or two in there and terminate to terminal blocks.
I'm using a diymall 128x64 oled in that setup. should be a few bucks through some place like aliexpress [amazon link]
It looks like one of these.
It's a .96" oled display with an i2c interface. The underlying controller is an SSD1306 and by searching for that you can find lots of code for the ESP8266.
I could see this happening in the same way you might build a custom macro pad. You would need to wire everything up and connect it to something like a Teensy 2 controller.
Look into custom keyboards, there are some programs out there that let you customize the layout and all that.
depending what you're doing you're might need/want fuses or circuit breakers. The "correct" way, granted the rather pricey way is the use DIN rail mounted terminals with jumpers. It'll end up looking something like this:
https://i.imgur.com/h30BlK6.png
Although these look reasonably affordable. https://www.amazon.ca/Dinkle-Terminal-DK4N-PE-DSS4N-10P-Brackets/dp/B01IDL6OW0/ref=asc_df_B01IDL6OW0/
Alternatively you can use a terminal strip like you've identified like this: https://i.imgur.com/UQVeGRU.png
The trick with those is securely fixing the strip down so that wires don't pop out. That's what the rail accomplishes with the first option.
Alternatively I suppose you could use something like these, but that's really just a newer way of "twisting" the wires together.
https://www.youtube.com/watch?v=zZyGqCssdCU
Oh lol I didn't even think about Amazon and are these the right ones?
50 Pieces 2 Pin 5 mm Pinch PCB Mount Screw Terminal Block Connector 300V 10A (Green) https://www.amazon.com/dp/B01MT4LC0F/ref=cm_sw_r_cp_apa_i_d.w7Cb9WA1Q7N
No problem. The other option is to get a level shifter.
Like this. https://www.amazon.com/dp/B074V17F64/
This is the same hardware that is sold programmed under the Stratux brand. https://www.amazon.com/Cenrykay-Serial-Module-CP2102-Windows/dp/B07H4KMXDK/
I think the example you found is a great starting place - way easier than alternatives I'm aware of. I'm not sure if this is exactly what they're using in the example, but here's an example of the choc block connector on amazon. You might be able to find something similar in a local hardware store.
You might also consider these:
http://www.ultimarc.com/goldleaf.html
I find that they're a bit unusual in that:
They support a normal 3/4 inch cabinet...
...but are low profile (things can get tight around the flipper buttons... especially on the plunger side).
I'm not entirely sure if the are compatible with the Zeb wiring harnesses (I don't know if his end in bare wire or spade connectors) but either way you could do a no solder install with those buttons and one of these:
https://www.focusattack.com/16pc-22-awg-wire-with-110-quick-disconnect/
One (but maybe two if your cabinet is wide) of these:
https://www.focusattack.com/10-connection-22-awg-110-ground-daisy-chain-wire/
And one of these:
https://www.amazon.com/gp/aw/d/B01DY7L5KY?psc=1&ref=ppx_pop_mob_b_asin_image
Note that all buttons are not compatible with these harnesses. There are two common spade connector sizes (.110 and .187).
Also...it's really useful if your video card has multiple outs. I use one display port and two HDMI outs.
You need to size this via power rather than ampacity (which is a common mistake).
Pdc=(Amps)*(Volts) => P = 1.2 * 12 = 14.4W per motor * 8 motors = 115.2W * 1.5 = 172.8W
So you want to size this array for whatever psu you can get right around that wattage. Get something with a bit of adjustment. As far as getting power to the system, just get you a set of terminal blocks with some din rail and a PSU, or some kind of enclosure/box. For wire use any old 2 conductor cable. You could even use ethernet cable between them and be fine. 18-2 wire like on garage door openers would work well.
You can go to the supply house and get the terminals, but you could just as easily screw a piece of this to plywood:
https://www.amazon.com/Erayco-Terminal-Brackets-UK-2-5BG-Aluminum/dp/B07KWSZVR9/ref=sr_1_10?keywords=35mm+din+terminal+blocks&qid=1569294295&s=industrial&sr=1-10
Screw something like this to plywood:
https://www.amazon.com/LRS-200-12-Switching-Supply-Single-Output/dp/B0131UU9E2/ref=sr_1_4?keywords=12v+psu&qid=1569294116&s=industrial&sr=1-4
And go to town. I was going to source out the parts, but that kit has pretty much all you need.
Not much soldering with something like this
Hilitchi 12pcs 600V 15A 5 Position Double Row Screw Terminal Strip and 400V 10A 12 Postions Red/Black Pre Insulated Terminal Barrier Strip https://www.amazon.com/dp/B01CND6ZZU/
Thanks for the ideas!
I've been thinking and looking for a way to be able to use at least one extra button for years. So far no success, since I can't move my legs or any other body parts enough for the devices you described above, but I'll keep searching. (I found lately that there are muscle sensors, and if they can be set to extremely sensitive to muscle activities, I could use them for many ways.)
I understand only half of what you wrote in the autohotkey part (sorry, I'm Hungarian), but yes, the virtual keyboard can be toggled via a hotkey, so this might work.
Although, I got an idea while I was writing this comment. Is it possible to do the following? If I click and hold a button on the virtual keyboard, the in-game camera will rotate (by mouse moving), and when I release that button it won't. This way it wouldn't be necessary to toggle the virtual keyboard, it could be turned on all the time.
Thanks.
I have two cars and three 'projects'.
One underhood project:
Two under-dash projects that are identical, one for each car:
The hard part is figuring out where to get a non-fused 12V supply under the dash. An add-a-fuse circuit is very appealing and I should find places where an extra 5-10A won't pop anything, so I may end up doing one 5-10A-add-a-fuse on an ignition-hot line, instead of a 12v-master-fuse + ignition-hot-relay, as the single master fuse for all these.
Then it would just be a 15A strip terminal instead of a big fat 100A ground bar at the ground side, and a small fuse box at the positive side (with 1A or 2A fuses for each circuit, depending on their needs).
---
I really appreciate your feedback. The only reason I haven't already built all this is because of worries of fucking up and coming back to a smoldering ash heap.
---
I'm also figuring out how to mount all this securely under the hood... I figure these little wire clamps for the wires, and something like this velcro alternative to mount things like the fuse box, except it's hard to tell what temperature they're rated for (and it seems that the 3M stuff I linked will fall off due to heat.) Any ideas there? I want something that is 1) secure as fuck, but 2) that I could potentially remove without damage in the future, maybe using a heat gun or something. I would be mounting it mostly to plastic, but I don't want to drill any holes if possible.
My thought would be to move the hunter up about a foot. I have opened mine once since i installed it..
Replace (or close up the knock outs) the HV box with a new one. Run flex out the bottom up to the hunter power.
https://imgur.com/a/iwK4rPp
Between the LV box and the hunter add another box (9x9). Splice via terminal strip in this box
Some thing like https://www.amazon.com/Position-Terminal-Postions-Insulated-Barrier/dp/B010UDG6NG
i just got one of these they are dirt cheap https://smile.amazon.com/gp/product/B00O2LLT30/ref=oh_aui_detailpage_o02_s01?ie=UTF8&psc=1
I'll try to get a diagram tonight, unfortunately my tinkering time for this morning has now expired, so I must go do other things. But in short:
It's a 4 pin OLED, doesn't SPI need 3 pins to communicate? CS, CLK, and Data? Or am I mistaken in this case? (It seems I might be, as I look now, someone on that amazon page is using spi. hmmm.)
I tried putting the resisters inline as you suggested, now it is as if the screen weren't connected at all.
I currently have:
A4 -> SCL
A5 -> SDA
GND -> GND
5V -> VCC
I was under the impression that the one I was using could handle 5v? The original test on a breadboard was from 5v... I can change and hopefully didnt fry it yet if I a wrong.
I would say about $25-$30 with parts and everything. Once you have the code for one, putting it on others would be quick and simple. It would be a good option for future projects as well since you could just add other things to the board.
Screen
Temp sensor
Get started by prototyping with an arduino.
I would imagine you would want to use a screen like this:
https://www.amazon.com/Diymall-Yellow-Arduino-Display-Raspberry/dp/B00O2LLT30/ref=sr_1_6?ie=UTF8&qid=1550895612&sr=8-6&keywords=arduino+screen
https://www.amazon.com/gp/product/B00O2LKEW2/ref=oh_aui_search_detailpage?ie=UTF8&psc=1
This screen is pretty great, there's a python library for it too
https://www.amazon.com/dp/B00O2LKEW2/ref=cm_sw_r_sms_awd_x_AID7xb5PTG0ZH
Mine's blue; there are other colors too.
How would I connect the teensy 2.0 to my switches?
This is the one you are talking about right? https://www.amazon.com/PJRC-Teensy-2-0/dp/B00NC4302Q/ref=mp_s_a_1_4?keywords=teensy+2.0&qid=1565571740&s=gateway&sr=8-4
Radar. Unless the beam is being broken by a mirror.
https://www.amazon.com/Smraza-Ultrasonic-Distance-Mounting-Duemilanove/dp/B01JG09DCK
Am I the only one on Reddit with Google ?