(Part 2) Best dimensional measurement products according to redditors
We found 583 Reddit comments discussing the best dimensional measurement products. We ranked the 228 resulting products by number of redditors who mentioned them. Here are the products ranked 21-40. You can also go back to the previous section.


OMG. Just got my new micrometer. It can tell that the printed part of a business card has swollen up by 0.0002 inches or so due to the ink.
http://www.amazon.com/gp/product/B002SG7QCO/ref=oh_aui_detailpage_o00_s00?ie=UTF8&psc=1
They look OK, but the real answer is to buy a pair of calipers (~ $10) and measure.... The pads have a minimum thickness spec
Accurate table saw and a digital protractor.
I also have one of these and it is wonderful, just slap it on the blade: https://www.amazon.com/dp/B0148M7P4O/
The perfect micrometer for mechanic work is a Mitutoyo digital caliper. Link.
If his mechanic work truly requires the precision of a micrometer, you should buy him a mechanical micrometer where the entire thimble is a ratchet. Link.
If your mechanic boyfriend is actually a machinist, you should buy him this. Link. Be careful with this one though... he may take a knee and propose to you on the spot.
I just picked out the first link to the product I'm describing. There may or may not be cheaper options out there.
Best of luck! You're awesome for deciding to buy him a tool he will use.
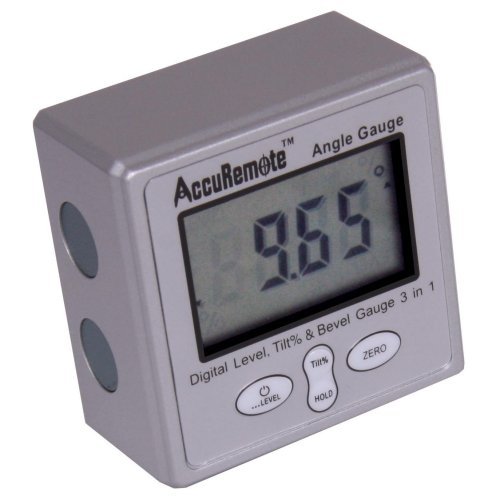
Get yourself one of these AccuRemote Digital Electronic Magnetic Angle Gage Level / Protractor / Bevel Gauge. Literally takes the guess work out of it. Set on the bed, zero it, stick to blade and set angle. It's great for miter saws, tables saws, etc.
Congrats, just got mine 2 months ago.
SeeMeCNC forums are awesome. Start reading every new post.
Best upgrade I've done: PEI Bed
http://www.amazon.com/gp/product/B0013HKZTA
http://www.amazon.com/gp/product/B007Y7D5NQ
~$30 in upgrades; all my prints stick and pop off with ease. Also, the underside of every part is glassy and smooth. So good.
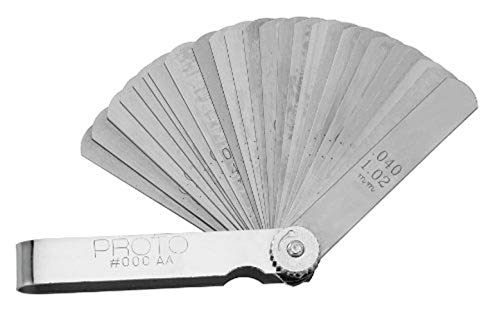
Buy "feeler gages" to assist with leveling the bed.
http://www.amazon.com/Stanley-Proto-J000AA-Master-Feeler/dp/B001HWDOK8/
My bed leveling process is kinda like this:
Let's see, what else. If you can spare the cash, I moved to Simplify3d for all my slicing needs ($100~$150 for the license). Love it. If you can't afford it, maybe you'll find a way.
Also, get ready to do a bajillion calibration runs. I mean it, don't be in a rush.
Find a nice 20mm box off thingiverse or whatever, and you're gonna want to print that repeatedly while you dial in your settings. Once that's set, move on to the hollow pyramid, or the 5mm stairs.
I seriously printed at least 20 of each of these while I dialed in my settings:
ASAP, move over to PLA. Prints so much nicer for me than ABS.
Oh, before you go to PLA, make sure you print 3x of the layer fans housings (not just 1x) and order up 2 more of the "squirrel cage" fans (centrifugal fans) from SeeMeCNC. edit: I spliced the single pair of layer-fan wires into three right at the connectors, I didn't bother running extra wire for them.
Oh, and one other big improvement I made was putting connectors in-line with the hot-end and for all the fans. This way, if I have to replace a fan or upgrade the hot-end I don't have to cut and splice wires, I can just pop it off and connectorize another new one. Here are the connectors I used:
That was probably too much info -- just take your time and try not to get frustrated while you get things all set up. It is not a plug-'n-play object, it requires care and feeding.
... oh, and have fun! Whatcha gonna print?
I agree with most of what has been suggested here. A microjig Gripper, a better saw blade, the one that comes with the saw is crap. A dado set. He can make push sticks, I like the ones I made better than the store bought. You could also get him a gift card to a hardwood store or HD/Lowes so he can buy lumber or anything else he needs.
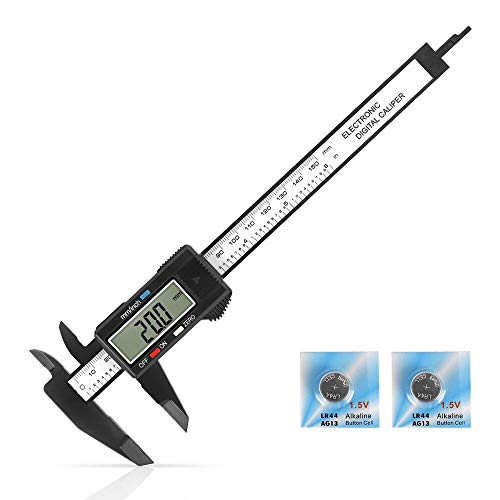
I picked up this digital caliper from Amazon about 3 years ago, indispensable for this sort of thing. Make sure you measure in several places around the filament and average. Filament is rarely round.
https://www.amazon.com/gp/product/B001PTGBR6/ref=oh_aui_search_detailpage?ie=UTF8&psc=1
I use this one on a daily basis.
https://www.amazon.com/gp/aw/d/B002SG7QCO/ref=pd_aw_sim_sbs_328_3?ie=UTF8&psc=1&refRID=AW2WQWTHW3EQKG68VV2P
Not the OP, but you can get by with a good caliper and tinkercad.com. You can model your objects there, export to STL and print on your printer.
Hard to say for sure without knowing his shop, so you'd probably want to try to scope out any recommendations for specific stuff to see if he already has something similar before you buy.
A good suggestion that I think always works well for any budget is to go to a local hardwood dealer and just pick out a selection of interesting exotic lumber, any woodworker will always appreciate getting cool woods to use in their projects.
If you want to have some ideas for stocking stuffers / tools though I'll list some cool things that I think are not super common that I enjoy owning or make my life easier.
Tiny-T Pocket rule
6" precision t rule
A really nice miter gauge
Router setup bars
A nice marking knife
Marking gauge
Magports
Tapeboss
Grr-ripper
Dozuki & Ryoba
Alexa (Alexa, what is 5 and 3/8 times 16... Alexa set reminder for 30 minutes to spray the second coat... Alexa order shop towels... etc, it's actually really useful, and it plays music too)
Shop apron
Quick sanding strips
Digital Angle Gauge
Digital Height Gauge
Anything from Woodpeckers is pretty much guaranteed to be great, albeit kinda pricey
You just need something like this. The metal thing with the two notches is for bending the top (ground) electrode. The wire feelers are exact thicknesses and you just pull it through the gap to measure the distance.
You'll see feeler guages that have flat blades like this. Those are for measuring/setting valve lash and you can't be accurate on a plug with those.
Personally, I prefer dial calipers. I enjoy knowing the machinery that went into them (I know how digital work but it isn't the same). I also think that they are more accurate. You can feel them catch, screw up. You can see the tiny changes that thumb pressure can make in size that can be easy to miss with digital.
The beauty of a digital caliper is that it can do imperial and metric in the same device. Metric calipers are rare and priced accordingly. This pair https://www.amazon.com/gp/product/B000UCIGCW (which I own) will also give you a fractional measurement in 64ths.
That being said, I have both. A pair I bought from a shop, and hand selected from a pile, and those generals. They get used in different roles. I pretty much only use the digitals when I need a metric measurement.
I'm not a reloader, but personally I would use my dial calipers over the generals. The dial will drift half a thousandth, but those generals will drift a thou and a half or more. I had a (cheaper) pair that would drift even more depending on how fast I slid them open and closed.
I use my calipers a fare bit in other interests and those are the ones I trust.
When you're buying one in store (the best way in my opinion), they should read consistently despite how fast\slow\short\far you open them. Do not slam them shut, and for the sake of all things do not close them to zero and lock the screw. They should always be stored slightly open, with the lock screw released.
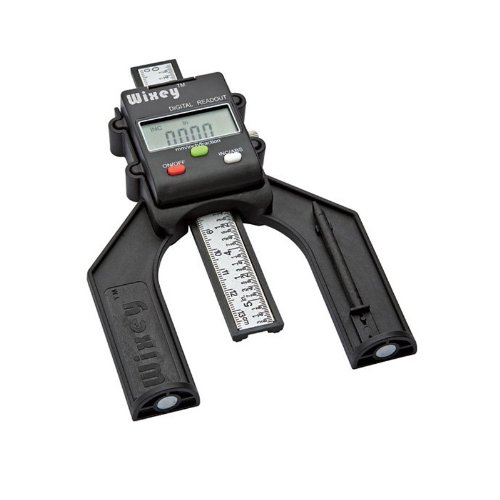
Could be plunger style gauges too, https://www.amazon.com/Wixey-WR25-Digital-Height-Gauge/dp/B006WMRVS4
Metric offset feeler gauge made setting the height easier and more precise. Try something like this :
ABN Universal Standard SAE and Metric Offset Valve Feeler Gauge 16-Piece Blade Tool for Measuring Gap Width/Thickness
https://www.amazon.com/dp/B01IPWOAOQ
Discussed here and here, and shown in some more detail here. In short, set a shim around the square base of the LED and slide a razor blade across it. I've had very good results with a 0.9mm feeler gauge, unscrewing the binding post and using the attachment hole to surround the LED. A fresh utility knife or single-edged scraper razor blade works well to actually make the cut (I tried a double-edge razor blade meant for shaving, and it was too flexible).
It drops the total output by about 20% but makes it more focused, less green, and a bit warmer. You can do something similar on most flip-chip LEDs (anything where you can't see the bond wires), but something with the way they're assembled makes the Samsungs particularly easy to do.
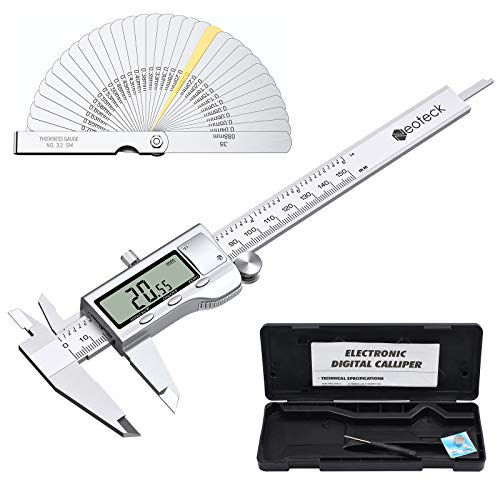
https://www.amazon.ca/Neoteck-Stainless-Electronic-Fractions-Conversion/dp/B074M6LX1N/ref=sr_1_3?ie=UTF8&qid=1549892126&sr=8-3&keywords=Vernier+Caliper+digital
I have this Wixey set (do you call them a set?) and have been perfectly happy with them (it?); I bought this model/brand because I was happy with their angle gauge, and the price was right.
Edit: misspelled brand name.
Very calibrated machine...here's how I calibrate: 1: level X-axis to metal bed mounting plate using calipers, here's what I used: http://www.amazon.com/General-Tools-Instruments-147-Extra-Large/dp/B000UCIGCW/ref=sr_1_1?ie=UTF8&qid=1450496515&sr=8-1&keywords=general+caliper
Use a dial indicator to level the bed, here's the one that I used: http://www.amazon.com/gp/product/B002PTUXRO?psc=1&redirect=true&ref_=oh_aui_detailpage_o04_s00
and if you have a Taz 5, use this dial indicator mount: https://www.thingiverse.com/thing:551366
http://www.amazon.com/SE-784EC-Digital-Caliper-Metric/dp/B003MA08VQ/ref=sr_1_1?ie=UTF8&qid=1453590190&sr=8-1-spons&keywords=digital+caliper&psc=1
=)
I wouldn't worry about it at all then, personally, I'd just mix alittle concrete and patch it right up and call it a day. But if you want some peace of mind, you can get something like this which will let you monitor the crack and see if it is growing. But pretty much all concrete slabs will eventually get some cracks in them, it's just the nature of concrete. My garage is detached and on a concrete slab and I have a number of cracks in the slab. It's even worse in my area because I'm in NJ where it gets quite cold, so cracks are pretty much expected in any concrete slab you lay.
You would see if it is getting larger:
https://www.amazon.com/CRACKMON%C2%AE-5020AV-Reinforced-Foundations-Retrofits/dp/B00UVUJG3G
Mount it in an out of the way spot, and just watch it. Chances are nothing will happen. Which is what you want.
For those of you wondering what is in the case:
Decent digitals will outlast you as well btw.
https://smile.amazon.com/Mitutoyo-293-185-0-001mm-QuantuMike-Micrometer/dp/B002SG7QCO/
IMO, etalons are a luxury item in this era. I wouldn't be purchasing them new since their price is so high relative to what's out there.
My first 0-1" micrometer was a digital but I also bought an analog one. I used the analog since it fit into my apron...
This
http://www.amazon.com/Lee-Precision-Breech-Lock-Press/dp/B0050Z5A6E
Plus this
http://www.amazon.com/Lee-Precision-45-Die-Steel/dp/B000N8QLNE/ref=sr_1_1?s=sporting-goods&ie=UTF8&qid=1462373534&sr=1-1&keywords=45-70+dies
Then a caliper
http://www.amazon.com/SE-784EC-Digital-Caliper-Metric/dp/B003MA08VQ/ref=sr_1_2?ie=UTF8&qid=1462373575&sr=8-2-spons&keywords=digital+caliper&psc=1
All that is left is primers, powder and projectiles.
you can clean your old brass is dish soap and a small wire brush from a gun cleaning kit
I'm just getting into reload/custom loading and my buddy suggested this, it's real cheap but works perfectly for OAL, diameter, etc,
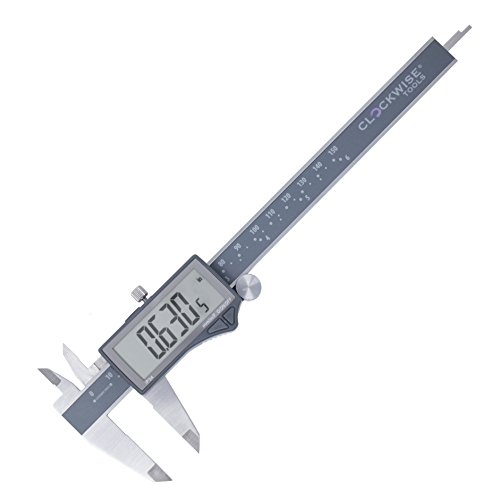
Clockwise Tools DCLR-0605 Electronic... https://www.amazon.com/dp/B018D9JPPA?ref=yo_pop_ma_swf
take an afternoon and make yourself a template. Put the bit in, make a groove an inch or 2 long at many different depths, measure and label them. Then just use that to quickly setup the router for your desired task.
They make guides that are already done like this.. But its a simple task that you could have fun with.
personally i have both of these digital / physical but tend to favor the physical version mostly.
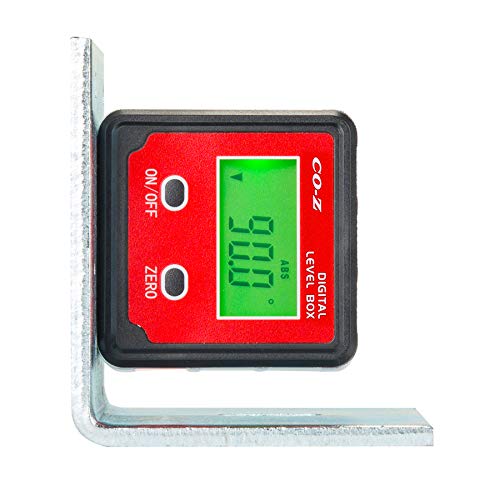
The level's also very handy for setting the angle on LED strips, ground-focussing a wash, etc. especially if you take it one step further and get a little magnetic digital level, i.e. along the lines of this one
Can you recommend me one under $30?
Maybe one of these?
These are in Canadian $
Digital Vernier Caliper Tacklife Upgraded Stainless Steel Caliper 3 Units Conversion With Thumb-Roll Accurate Setting|Auto Off Mode|±0.001" Accuracy|6" Range--DC02 https://www.amazon.ca/dp/B071X63837/ref=cm_sw_r_cp_apa_i_25oTDbK5CP5K2
$25
Digital Caliper Tacklife 150mm 0-6'' Vernier Caliper with 2 inches Wide Super Clear Display Auto Off for Length Depth Step Values, Plastic Material- DC01 https://www.amazon.ca/dp/B07DHLS3TF/ref=cm_sw_r_cp_apa_i_c6oTDb1NBFVFF
$17
Neoteck 6 inch/150mm Digital Caliper + Feeler Gauge Set, Stainless Steel Electronic Vernier Caliper Fractions/ Inch/ Metric Conversion https://www.amazon.ca/dp/B074M6LX1N/ref=cm_sw_r_cp_apa_i_o6oTDb5D39CHZ
$32
What is a feeler gauge set?
FWIW, I've been impressed with these for the price.
This Caliper.
Link to the item:
https://www.amazon.com/Tacklife-DC01-Fractions-Millimeter-Conversion/dp/B072KGHRML/ref=sr_1_1?ie=UTF8&qid=1525402980&sr=8-1&keywords=tacklife+dc01
OriGlam Screw Thread Pitch Cutting Gauge Tool Set, Stainless Steel Metric Screw Pitch Thread Gauge Measuring Tool, 55-Degree & Metric 60-Degree Grip Whitworth Screw Thread Pitch Gauge https://www.amazon.com/dp/B071H8GP18/ref=cm_sw_r_cp_apa_i_X-ceBbCZHXN45
Replying to myself immediately after hitting reply seems silly, but these are separate thoughts so whatever...
If you don't currently use Octoprint/Octopi, you can get the readings from the bed level command on a computer plugged into the printer. Passing just G28 commands should do it. There are a number of pieces of software that'll pass gcode directly and return the results. I've been an Octoprint convert for some time so the only time I plug in my printer to a computer is when updating the firmware (the one thing I don't quite trust Octoprint to do).
Also, sometime I found helped was ensuring the PINDA probe was aligned properly. This is supposed to only effect the gap between the probe and the nozzle, and the live adjust Z is really just account for that to my understanding, but I think part of the problem is Prusa Research's lack of specificity in this regard. The manual for the Prusa MK3/MK3S kit (and I think other models) suggests using a zip tie to get the PINDA probe aligned to the nozzle end. I'm not a fan of this. I kept having problems related to this, mostly in that it's really hard screw the probe in place while keeping it steady resting on the zip tie, probably because I sadly only have two hands. Instead, I picked up a set of feeler gauges (these in particular) to do this instead. I do the whole "manually lower the z axis by hand, move the nozzle to just barely touching on the left, repeat on the right" thing, but stop there. I move it back and forth a couple times to make sure it's not touching in the center, move the bed back and the extruder to the right, then use the 0.85mm gauge to slide under the PINDA probe while I lock in the screw to hold it in place. I've found it far more consistent at least. The magnets near the edge of the bed hold the gauge in place, so I can use one hand to balance the probe on it and the other to screw it into place.
Edit: and yet another thought while I'm changing filament to print another couple things for work...
The spring steel sheets themselves could be a problem for some. I got one of the non-powder coated PEI sheets with my printer, bought another a few months later because my first had gotten scratched up (and I just wanted a second), then when the powder coated ones became a thing I picked up one of those. Besides the powder coated sheet being much thinner, requiring a much "higher" live adjust Z value (in quotes because technically you're lowering the value, but it's hard not to think of it as a positive number), I've also found it to be really inconsistent in stickiness. I love the texture, but I've had a lot of models suffering lift on the corners. It's been so bad I switched back to my sticker PEI sheets and the problem magically disappeared. I didn't see it often, but occasionally during the first layer it did happen in a few spots which could look like a similar problem. It doesn't look like you have one, OP, but pointing it out for others that may stumbled on this thread.
Related, only bending you sheeting in one direction to get things off can introduce warping of the sheet. I always try to bend an equal amount "in" and "out", as well as from the sides and top and bottom. While we don't think we're applying much force to bend the sheets it is enough to cause it deform, so try to apply even and opposite bending forcing to reduce the changes of developing warps in the sheet itself.
If you're spending almost as much on a pencil as you are on calipers, you're wasting your money on the calipers.
Now this is a quality gift
Can you link a guide of this method to me? Seems practical. Also is this the Digital Inclinometer you were talking about? I already have a good compass with a view finder so i'm good on that part. And moreover, Will this kind of polar allignment allows me to be able to get good 45-60 tracking at around 400mm ? One more thing, if possible do you have any other methods that you think i should try? expensive/cheap. I really wanna nail this one.
Could be risky then. Do you have a paint thickness gauge?
If not, I would try compounding for several minutes on it first.
you look close, use more brake clean and a rag and more elbow grease to try and get that residual gasket off. a razor blade will help some. hopefully you have a machinist straight edge and feeler gauges for piece of mind, if not it is a worthy investment for what you are doing.
https://www.amazon.com/Starrett-380-24-24-Inch-Steel-Straight/dp/B0006J4GKK
and
https://www.amazon.com/Stanley-Proto-J000AA-Master-Feeler/dp/B001HWDOK8/ref=sr_1_1?s=industrial&ie=UTF8&qid=1465746330&sr=1-1&keywords=feeler+gauge
pair of calipers. pretty cheap on amazon and should be a standard tool for 3d printing.
here is a pair for $13 shipped
https://www.amazon.com/SE-784EC-Digital-Caliper-Metric/dp/B003MA08VQ
personally I would go with something better.
These are well reviews and liked and come with a case
https://www.amazon.com/gp/product/B00INL0BTS/
$40
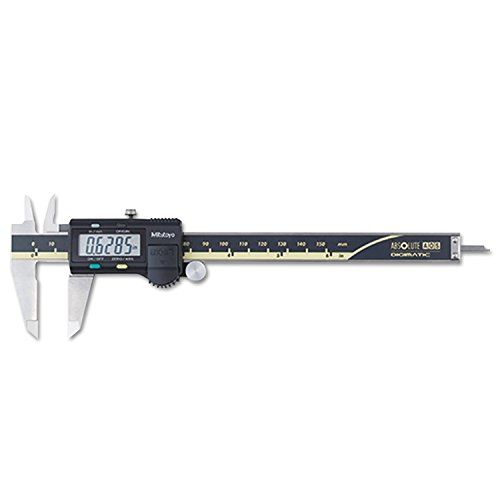
https://www.amazon.com/Mitutoyo-Advanced-Absolute-Digital-Caliper/dp/B00WMKUUAQ
This is what you want. Couple bucks over asking but theres only really two companies worth looking at when it comes to quality measuring tools. Starrett and Mitutoyo. Starrett in my experience is generally a little more expensive.
Both brands are a "buy for life" variety when taken care of.
Every comment below is recommending there calipers so feel free to save yourself a headache. Merry Christmas.
Looking into this level here.
https://www.amazon.com/dp/B0797R51WX/ref=cm_sw_r_cp_apa_kX73BbHJG3SG9
No, make sure they are exact.
Sometimes you need to combine two smaller feelers to make the size you need. However you should buy a metric one. They cost about $5.
https://www.amazon.com/OEMTOOLS-25345-Metric-Feeler-25-Blade/dp/B000BYEQ3C/ref=sr_1_5?ie=UTF8&qid=1542597599&sr=8-5&keywords=metric+feeler+gauge
Wow, I've never seen a nozzle temp that high for PLA.
I've considered going at a lower temp for the build plate. I'll try that.
The Buildtak is very similar to the original Ender surface.
I'm going to order this Caliper, I think. Comes with a set of gagues so maybe that will help.
https://www.amazon.ca/Neoteck-Stainless-Electronic-Fractions-Conversion/dp/B074M6LX1N/ref=sr_1_4?ie=UTF8&qid=1536243511&sr=8-4&keywords=caliper
https://www.amazon.com/Mitutoyo-Advanced-Absolute-Digital-Caliper/dp/B00WMKUUAQ I've been using a set of these professionally for the last 20 years, they're awesome. I used to be an automotive prototype fabricator and this is what I used to measure parts being machined, etc..
This is a watch item. As it looks like it's pulling away, I'd put in sealant and attach a Foundation Crack Monitor to see how much movement it has from now through following years.
https://www.amazon.com/CRACKMON%C2%AE-5020AV-Reinforced-Foundations-Retrofits/dp/B00UVUJG3G
Most of that stuff really isn't that scary to mess with, you just have to do stuff in a specific order and usually loosen up the strings before making any adjustments. Its really more patience than anything.
as for the input jack, it's probably gotten twisted in the socket where it's pressing against the wall/wood and that makes it hard to click the plug in. Just take the whole plate off, loosen up the nut (if it's not loose already) and turn the jack until you can put it back in the hole without it touching the sides. tighten the nut down holding the jack in that spot, then screw the plate back on. That should take care of the plug problem
iif wires have come loose from it, it's super simple to solder them back on. it's only 2 wires, so you can only screw it up once (theoretically).
7-9th fret buzz could be a bunch of different things. once you gt the strings off, use a straight edge and a fret-rocker to see if your frets are all even and the neck relief is correct, and fix those following a tutorial. then put the NEW strings on and go at bridge adjustments. Sometimes just a new set of strings will stop a lot of the buzzing too. figure out how to adjust the bridge for height, radius, and intonation, and after that your guitar should play AMAZING.
And remember to get the same gauge strings, that will make any adjustments a very minor job. if you go up or down in string size, the adjustments need to be a little more drastic so you can save trouble that way. If you don't know the gauge of your strings, find somebody that has one of these, a caliper and you can measure the first + last strings with it to figure out what gauge they are.
Depending on your clearance, these offset valve feeler gauges might work... They only go to 0.127mm, tho.
What's your budget? The cheapo $20 dial calipers I have work pretty well, actually. Good enough for me, but I'm not a machinist.
Poke around the local pawn shops. I got a Mitutoyo 500-196 digital caliper for $60 from my local pawn shop.
Otherwise, they're $124 on Amazon.
I bought this digital one for around $10
https://www.amazon.com/dp/B072KGHRML/ref=cm_sw_r_cp_apa_qKkXBb3K6PER4
If you invest in a thread gauge (it has multiple gauges for different threads) you should be able to determine what threads are in the hole.
https://www.amazon.com/Deal%E3%80%91OriGlam-Thread-Cutting-Stainless-Metric/dp/B071H8GP18
You can measure the major diameter of the bolt's threads easily with a regular micromenter or a dial caliper, but the minor diameter of the bolt requires a thread micrometer, because the points of the micrometer jaws must fit down into the root of the thread.
https://www.google.com/search?q=measuring+the+major+and+minor+diameters+of+a+bolt&tbm=isch&source=univ&sa=X&ved=2ahUKEwiPsurInrvkAhU8FzQIHe7GCHEQsAR6BAgEEAE&biw=1366&bih=657
This kind of sounds like a manufacturing screw-up. Crash bars for a Harley should have thread sizes that match whatever is already on a Harley Davidson. It is possible to re-thread a hole to a thread size close to the existing threads, but doing so is kind of a jake-leg job. A hole re-threaded from metric to SAE (or vice versa) may work, but it will never be as strong as the correct threads to begin with. There are some places on a motorcycle where this might not be critical, but in my opinion crash bars ain't one of those places.
Take it to a mechanic to have them check for frame. If you want, grab one of these to test the paint thickness. BUT you won't be able to haggle down a few grand, MAYBE 1k, more likely 500, but rarely ever 1k. Unless you find something with the same specs and miles and color as yours, you can price match and then a bit less than that.
There is one more way you can do it. Get a paint thickness indicator that will allow you to check whether any part of the car has been repainted. It works most of the time because there are parts of the car that can't be replaced and have to be repaired and repainted.
A lot of the used car guys use it to check for accidents.
Something like this...
https://www.amazon.com/all-sun-Digital-Painting-Thickness-Coating/dp/B0126JMCQM/ref=sr_1_3?s=industrial&ie=UTF8&qid=1482076429&sr=1-3&keywords=paint+thickness+gauge
Just from my experience, sometimes the print bed can get dusty if I don't use it for a long time. Something like Acetone works well to clean the bed if you have glass. My printer doesn't have a bed height probe, so I also use a feeler gauge to set the initial height.
Something like this will do it.
https://www.amazon.com/ABN-Valve-Offset-Feeler-Gauge/dp/B01IPWOAOQ/ref=sr_1_2?ie=UTF8&qid=1481432332&sr=8-2-spons&keywords=feeler+gauge&psc=1
Let us know if you are able to solve it.
The General Tools 147 is something like 25 bones and you'd be hard pressed to be disappointed with the accuracy and reliability.
Not worth it to spend more to get something that is more accurate than a printer can print.
https://www.amazon.com/General-Tools-147-Fractional-Extra-Large/dp/B000UCIGCW
If you want a medium-range one i.e. good enough but replaceable for everyday/student use, my research led me to these. They have a unique display with large-format decimal in/mm as well as full-format fractions (of an inch). From Clockwise Tools:
It is not a clone of the cheaply-mass-produced ones, or a clone of the other one or two styles.
I've had my eye on them for a while but then my friend's drill was stolen off the porch or garage when it was half open. So until I talk with the door-to-door flyer distributors, I should put that first...
Why not one of these doodads?
CO-Z Digital Level and Angle Finder, Angle Gauge and Protractor, Inclinometer, Box, Magnetic Base and Backlight, Easy Two-Button Operation for Bevel, Table Saw, Miter Saw Measurements and Leveling https://www.amazon.com/dp/B0797R51WX/ref=cm_sw_r_cp_apa_i_Bqv0Db5EGMF73