(Part 3) Best measuring & layout products according to redditors
We found 1,295 Reddit comments discussing the best measuring & layout products. We ranked the 560 resulting products by number of redditors who mentioned them. Here are the products ranked 41-60. You can also go back to the previous section.


Jigsaw - http://www.amazon.com/Black-Decker-JS515-Variable-Jigsaw/dp/B001CL4ZHK/ref=sr_1_3?s=hi&ie=UTF8&qid=1405629429&sr=1-3&keywords=jigsaw
Bits - http://www.amazon.com/Black-Decker-71-081-Screwdriving-10-Piece/dp/B000RH3DW8/ref=sr_1_5?s=hi&ie=UTF8&qid=1405629356&sr=1-5&keywords=power+drill
Power Drill - http://www.amazon.com/Black-Decker-DR260B-8-Inch-Driver/dp/B004FRXWRW/ref=sr_1_4?s=hi&ie=UTF8&qid=1405629356&sr=1-4&keywords=power+drill
Tape measure - http://www.amazon.com/Stanley-33-115-10-Foot--4-Inch-PowerLock/dp/B00009OYGH/ref=sr_1_7?s=hi&ie=UTF8&qid=1405629447&sr=1-7&keywords=tape+measure
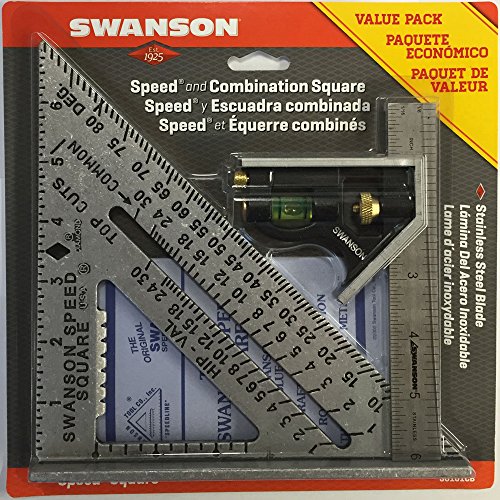
Square - http://www.amazon.com/Swanson-SO101-7-inch-Speed-Square/dp/B00002255O/ref=sr_1_1?s=hi&ie=UTF8&qid=1405629470&sr=1-1&keywords=square
You actually will have some more money for clamps and wood to make projects. There's a lot you can make for yourself with just these things and some creativity. Plus, it'll let you be pretty handy around the house.
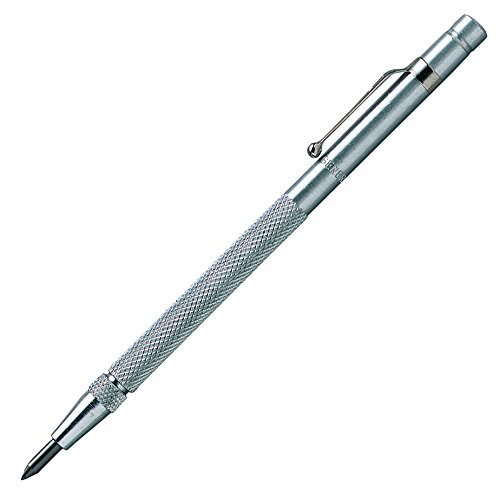
Tungsten carbide tipped scribe. Similar to this one https://www.amazon.com/General-Tools-88CM-Tungsten-Carbide/dp/B00004T7S1
Tools/Materials:
You find all of these supplies at Walmart.
As far as an approach, for some games I've used existing plans (Castles of Burgundy, Descent), but others I haven't found plans or didn't like the plans others had.
When creating my own plans I use the following process.
Having good spacial awareness helps to visual how the components will fit. My insert for Agricola took forever to figure out how to fit the pieces in a useful way. That game is dense.
Some good suggestions, but this ruler would be my pick. It is constantly being used when doing precision work. Always in my pocket. Got my dad who is an old school woodworker one, and he loved it.
http://www.amazon.com/INCRA-TINYT03-Precision-T-Rule-3-Inch/dp/B002GU68LM/ref=pd_cp_hi_3
For reference, discarding took about 4.5 months in my 1400 sq foot home and two storage sheds. I have started working on deep cleaning, upgrading necessary yet ugly items, and storage/organizing. I expect this to take another two months. I am watching "Clean My Space" and "Home Organizing by Alejandra.tv" channels on YouTube now to help with the process.
I am trying to keep in mind getting products out of original packaging, if possible, to limit exposure to constant advertising in my home. I am choosing to spend quite a bit on higher quality products that I love and expect to last many years. Fortunately, I have a budget that allows for some luxuries.
Bedroom
I started with my closet and these great baskets from the container store http://www.containerstore.com/s/whitewash-rattan-bins/d?productId=10037633&q=Large%20Rattan%20Bin%20Whitewash. The closet has a built in shoe organizer and I used my label maker to indicate what style shoes go on which shelf – heels, sandals, sneakers, flats and boots. I also labeled the shelf for each basket. Clothes hangers are all white. They used to be all kinds of colors, and I realized that white is more calming. I am now using these for my socks and undies since konmari folding did not quite work for me on those items http://www.amazon.com/MIU-COLOR-Collapsible-Underwear-Organizer/dp/B009A3HTXY. The folding works great for most of my other clothes. I am still pondering how to organize the nightstand drawers.
Kitchen
I bought a couple of 10" bamboo lazy susans for keeping my oils and vinegars organized in my cabinets. I bought some refrigerator organization units from InterDesign and the Rubbermaid FreshWorks Produce savers. I intend to get Oxo food storage containers for dry goods.
I upgraded to these measuring spoons http://www.amazon.com/Cuisipro-Stainless-Steel-Measuring-Spoon/dp/B00004SU1I and these measuring cups http://www.amazon.com/Sagler-Measuring-Piece-Heavy-duty-Stainless/dp/B00V5EFWTO.
When I was discarding in my kitchen I found I did not really love my dinnerware so I got this set http://www.amazon.com/Corelle-Coordinates-18-Piece-Dinnerware-Service/dp/B00R790CLY plus matching lunch sized plates. I love the simple clean lines and the durability of the product. I downsized from a 12 person setting to 6 and it is great.
Bath
Have not done much here yet. I don’t have much need for storage organization in the cabinets. Still considering what I want to do with the drawers. Right now the drawers are still organized with small cardboard boxes from Glossybox, a cut down cereal box, and an empty jigsaw puzzle box. I upgraded my plunger and brush to nice stainless steel containers, and got a toilet paper holder that matches them http://www.amazon.com/Home-Basics-Vented-Stainless-Toilet/dp/B00JB20IDW.
Laundry
I replaced my bulky plastic basket with this http://www.amazon.com/Bajer-Design-Marketing-5234-Basket/dp/B0010KZCFC. It now hangs on a Command Hook next to the washer.
Car
I have repacked the car kit and 72 hour emergency kits in these for my car and my son's car. ttp://www.amazon.com/TrunkCratePro-Best-Premium-Trunk-Organizer/dp/B01AHK0J9Y. We live in an area prone to natural disasters so I like to be prepared wherever we are. I bought a car trash container (http://www.amazon.com/Highland-1932600-Car-Trash-Keeper/dp/B0027QWNGO) and created a little kit in a ziplock bag in the glovebox with essentials. Also, found tissues in a round container that fits perfectly in the door cup holder. I also bought a set of matching reusable grocery bags (http://www.amazon.com/ReBagMe-Reusable-Grocery-Reinforced-Handles/dp/B00Y17OIR4) so I don’t have the mismatched set. Finally, I have these on order (http://www.amazon.com/Car-Hammer-Seatbelt-Emergency-Must-Have/dp/B00CB8WM2S). Not organization related, just something I have been thinking that I needed for safety.
Purse
I reassessed what is in my purse. I used a couple small cosmetics bags that I had on hand and now have many things I wished I had at various times. Everything is neatly organized and I know exactly what is in there and why I have it. Everything from safety pins, to pen and notebook (http://www.amazon.com/Marble-Composition-Books-Notebooks-Green/dp/B00WRDIS9I), to a tiny flashlight, a granola bar in case I am out and hungry, a tide stain remover pen, a tiny Band-Aid package, tiny measuring tape (http://www.amazon.com/Stanley-33-115-10-Foot-4-Inch-PowerLock/dp/B00009OYGH), my phone, my wallet, and my keys are always on the little hook. Not exactly Konmari minimalism, but those are all things that I wished I had at various times and I am happy that I will not be caught without again. It is a medium size purse, packed just right, with stuff easily accessible.
Home office
I have not done much there yet, but this drawer organizer is working pretty well http://www.amazon.com/Rolodex-Regeneration-Deep-Drawer-Organizer-21864/dp/B002JG48R4.
Command center
I am currently working on a “Command Center” to keep clutter off the kitchen counter. I have not purchased anything for that yet. I am writing down ideas, measuring, and considering products. http://thehappyhousie.porch.com/20-fabulous-command-centers-to-get-your-life-completely-organized/
Other random stuff:
I moved my CDs into a holder http://www.amazon.com/Case-Logic-DVDW-92-Capacity-Classic/dp/B00005ATMD and they now live on a Command Hook in my car. For movies I transferred them to these Sleeves http://www.amazon.com/Atlantic-74604729-Movie-Sleeves/dp/B002JR2V7C and they now live in a small drawer in my living room. I tossed the packaging because it was bulky and does not give me joy.
I am using these in my linen closet http://www.amazon.com/Honey-Can-Do-STO-02986-Nested-Woven-Esspresso. This box for my jewelry http://www.amazon.com/Black-Leather-Jewelry-Travel-Case/dp/B0006JCGUM.
Not related to organizing, but I am loving these brushes for getting tiny spaces clean. So much better than an old toothbrush. http://www.amazon.com/OXO-Good-Grips-Clean-Brush/dp/B003M8GMS6
If you made it this far, congrats. Something that I have noticed is that I can now shop with confidence, I can easily toss or donate the old unloved items, and I am organized enough to return those few items that don’t work as well as I hoped. My home feels much more open and inviting. I know where everything is and my clear vision is starting to come to fruition.
> Bring your speed square up against the shoe of the saw...
Speed squares (sometimes called rafters squares or triangles) are awesome, and cheap. Get a couple of stair guages (also for cheap) and you can quickly make repeatable angled cuts.
I have this and it works great to more visibly see the stud
https://www.amazon.com/Franklin-Sensors-FS710PROProSensor-Professional-Finder/dp/B0195K8OT4/
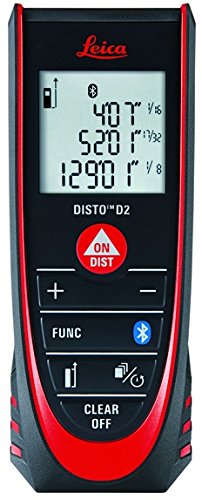
I use a Leica D2 and it’s been really good.
https://www.amazon.com/Leica-DISTO-Distance-Measure-Bluetooth/dp/B01D8HNPSK/ref=sxbs_sxwds-stvp?keywords=hilti+laser+distance&pd_rd_i=B01D8HNPSK&pd_rd_r=02e8b553-04e5-4b5a-b0af-2b06d86b9d23&pd_rd_w=FuyEf&pd_rd_wg=3b1ay&pf_rd_p=d006b618-5fac-44e6-850d-a0fdd19f7847&pf_rd_r=37XCY8MMP45BC350M8RS&qid=1569027927
Here are some suggestions of good brands but substitute with lesser brand as you see fitted:
power tool, cordless is preferred. Some brands to consider, makita, Dewalt, Milwaukee, Bosch:
Get a better stud finder.
Empire Level 4004 48-Inch Aluminum Straight Edge
https://www.amazon.com/gp/product/B00004YYFV/ref=oh_aui_detailpage_o08_s00?ie=UTF8&psc=1
You put the ball at the one end in the little hole that is punched out. Then you putt the ball down the length of the ruler, keeping the ball on the ruler the entire time.
Whenever I want a golf fix and I can't get out at all, hitting putts over and over down this ruler in the living room while the golf channel is on gets me there. On top of that, it is incredibly helpful. It has also made me aware of so many other aspects of my putting - my stance, grip position, eye placement, etc.
Highly recommend it.
http://www.amazon.com/Johnson-Level-Tool-Contractor-Square/dp/B00002NBKH
For locking points on a framing square. Normally to set rise/run of stairs
The combined stress of all 6 (or 7) strings of your guitar is quite a bit of force for the neck to resist. A minor change in the string tension shouldn't greatly affect your neck action. If your neck was a noodle it would go out of tune when you bent a note. Also the change in stress the neck of your guitar feels by changing from 9 to 10's is probably small compared to the amount of stress induced by thermal variations your guitar experiences during the day. If your guitar buzzes like hell with 10's, it probably buzzes like hell with 9's. Just saying.
These things aren't really separate, but all fall under the umbrella of "guitar setup". Setting up a guitar takes time, practice and experience. There are several variables at play here, namely: height of the nut, height of the saddle, bow of the neck (i.e. truss rod). Also involved are height of the pickups, height of the frets, evenness of the frets, radius of the fretboard. If you have a properly setup guitar and you want to then adjust the intonation, it is fairly easy. If you want to adjust the action, it is fairly easy. If you want to do one or the other with a guitar that is poorly setup, then changing one will probably greatly change the other.
Here is an image that I made a number of years ago for the deanguitars.com/forum. I made it because it seemed that everyone was trying to get their action as low as possible with no fret buzzing, but they weren't getting the results they wanted: everyone instinctively wanted to put the bridge as low as it would go, and use the truss rod to put enough of a curve in the neck to stop buzzing. Doing the opposite gives much better results: http://imgur.com/mhMOu Maybe this image will help you, maybe not. (note that I'm not saying that you want a "flat" fretboard, I am just saying that higher saddle height and "less" curve of the neck can give much better action).
If you are serious about setting up your guitars action, do not delay and buy one of these:
http://www.amazon.com/General-Tools-300-Precision-Stainless/dp/B00004T7SW/ref=sr_1_4?ie=UTF8&qid=1311814731&sr=8-4
You will need something that measures the action of your guitar to the 1/64 th of an inch. Rather than relying on "feel" as you drunkenly adjust one of the many variables controlling your guitars action, you can quantitatively measure it and know exactly how a quarter turn of your truss rod changes things.
It’s a scribe. Like this one:
https://www.amazon.com/dp/B00004T7S0/ref=cm_sw_r_sms_c_api_i_mmB2CbSBQN28P
The officer's observations and testimony are evidence. You need to counter that if you want to put forth a defense. This is the tint meter the cops use in my area. Pick one up, test your tint, and show the results to the court if you pass.
Amazon has 25% off the Starret 12" combo set
I actually don't know, but if you just need basic truss rod/action adjustments, I would recommend learning to do it yourself. It's really not that hard and the tools can be found at any local hardware store. Adjust in this order:
Truss Rod: You will need Feeler Gauges and a Capo on the first fret. press down with one had on the low E on the fret where the neck meets the body and stick a feeler gauge (.010") between the fret and the E string halfway between the first fret and the one you are pressing (usually 8th or 9th). Adjust the truss rod until the gap allows the gauge to slide in without pushing the string, and with no residual gap. The truss rod section of this page is good.
Bridge Height: You need a 6" Steel Ruler to measure the strings to your comfort, around 5/64's of an inch on the low E and 4/64's on the high e measured at the 17th fret. Adjust the bridge height with a screwdriver or allen wrenches as applicable.
Nut Height: You'll need your feeler gauges again and nut files that match the gauge of each string. You may be able to find a cheap alternative in a hardware store. As a rule of thumb, any tool branded as a luthier tool probably has a dirt cheap exact alternative at your local hardware store. Nuts should be filed down so that the string lays in halfway in the groove, halfway over the top. Bottom of the trough should be filed down to be .010" from the top of the first fret (use the feeler gauge).
Intonation: quoting from that fender link i posted above
>Set the pickup selector switch in the middle position, and turn the volume and tone controls to their maximum settings. Check tuning. Check each string at the 12th fret, harmonic to fretted note (make sure you are depressing the string evenly to the fret, not the fingerboard). If sharp, lengthen the string by adjusting the saddle back. If flat, shorten the string by moving the saddle forward. Remember, guitars are tempered instruments! Re-tune, play and make further adjustments as needed.
skipping the nut height isn't the end of the world if you dont want to shell out for the files.
Edit: oh and pretty much any tool has a high quality demo video on stewmac.com so check those out.
Maybe this? I bet it doesn't detect pvc
Hard to say for sure without knowing his shop, so you'd probably want to try to scope out any recommendations for specific stuff to see if he already has something similar before you buy.
A good suggestion that I think always works well for any budget is to go to a local hardwood dealer and just pick out a selection of interesting exotic lumber, any woodworker will always appreciate getting cool woods to use in their projects.
If you want to have some ideas for stocking stuffers / tools though I'll list some cool things that I think are not super common that I enjoy owning or make my life easier.
Tiny-T Pocket rule
6" precision t rule
A really nice miter gauge
Router setup bars
A nice marking knife
Marking gauge
Magports
Tapeboss
Grr-ripper
Dozuki & Ryoba
Alexa (Alexa, what is 5 and 3/8 times 16... Alexa set reminder for 30 minutes to spray the second coat... Alexa order shop towels... etc, it's actually really useful, and it plays music too)
Shop apron
Quick sanding strips
Digital Angle Gauge
Digital Height Gauge
Anything from Woodpeckers is pretty much guaranteed to be great, albeit kinda pricey
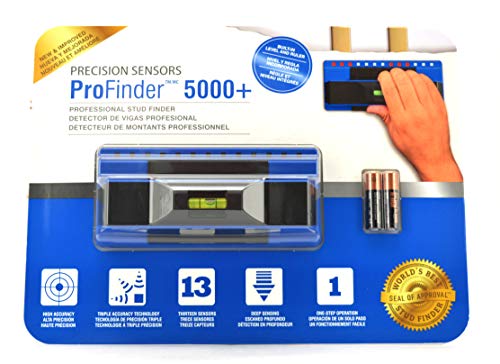
Hey bro, I felt the same about every single stud finder for decades until this one came out.
https://www.amazon.com/Precision-Sensors-ProFinder-Scanning-Finder/dp/B019HKNO1A/ref=sr_1_11?s=hi&ie=UTF8&qid=1501259435&sr=1-11&keywords=stud+finder
I've never missed a stud since then. It's the only that works and the price is pretty reasonable since there are many more expensive ones that doesn't work. All you have to do is hold the button and move the thing around. The LEDs will tell you the shape and size of the stud.
I like this, might just pick one up tonight. I had been considering the Original Putting Alley because it returns the golf ball to you, but I can always use a straight-edge around the house if I do end up with both.
EDIT: ordered tonight, Amazon Prime $7.97
1kg 00 flour
600ml Yorkshire water
30g pink salt
Teaspoon of ADY
Made 10x 170-175g balls which for me are 9 to 11 inch pies depending if I want big crust or not.
2 room temp prove after mix and kneed. 24hr cold ferment, out of fridge and 2 hours room temp then balled, then another hour to rise abit.
New flour really made a difference, higher protein than my normal one, lots more colour. Link below.
Molino Grassi Italian Flour for Pizzas and Focaccia, 1 kg, Pack of 10 https://www.amazon.co.uk/dp/B07FWMVW5R/ref=cm_sw_r_cp_apa_i_OKWuDbK6MY3KR
the factory edges on a sheet of plywood can be considered straight. Rip the long edges of a sheet of plywood off for the rails of a router flattening setup then rip the factory edged short ends off of the plywood to use as the vertical ribs of the router sled. Spring for a high grade plywood for this sort of thing, baltic birch or other cabinet grade plywood is a pleasure to work with.
Edit 2 more pieces of something straight can be used as winding sticks to make sure your rails when set up don't twist. I recommend a metal straight edge/ruler, these can be had cheaply here: http://www.amazon.com/Starrett-ASE-24-Anodized-Aluminum-Straight/dp/B002C29SG6/ref=sr_1_4?ie=UTF8&qid=1414522871&sr=8-4&keywords=straight+edge
A few hundred years is actually quite conservative. We have dovetailed boxes from Ancient Egypt that are thousands of years old. It's an incredibly strong joint, so barring fire or some other physical destruction this box will last a very long time.
The basic kit of tools for cutting dovetails is:
When it comes to these tools, if you buy high quality once it means you won't have to buy them again. They will be your companions for the rest of your life and whoever you pass them down too. Unfortunately that means they can be kind of pricey. This is a few hundred dollars worth of tools. But for quality tools I firmly believe it's worth it. Also, all of these tools can be found used for significantly lower prices. These are just the ones in my kit. I hope that helped!
I think it's wiser to learn how to properly setup a guitar on your own. It's not as difficult as many people think and only requires a few amount of tools. Here's what I use:
That's basically it. You don't really need anything else unless you are getting into advanced guitar repair stuff like fretwork or wiring and the like (in which case I would advise you do take it to a pro unless you know what you're doing).
Total cost = $39.93 That's cheaper than any professional guitar setup I know of.
From there you just have learn how to do simple things like neck adjustments, intonation, string height, and pickup height. You can find out how to do all of this stuff with a simple search on youtube.
The advantages of doing it yourself are plentiful. You can find out exactly what relief you like in the neck and exactly what type of action you like on your strings. Professional setups just setup the guitars the way they think they should be setup which isn't always the way you would want to do it.
Also, my guitars go out of whack with the seasons as the neck can fluctuate with the temperature and other things. Rather than pay another x amount of dollars to get it setup again, you can just set it back to the way you original set it up.
TL;DR Learn to setup a guitar yourself. It's better.
EDIT: You need a tuner too. For some reason I just think every guitar player has one of these already.
I didn't use any books, I just watched the video. I saw the beginning where the guy showed how the slot isn't square, and thought "I can make a cut that isn't square."
I used this, one of these, these, and a pencil.
Yes, A nail or (scribe)[http://www.amazon.com/General-Tools-88CM-Tungsten-Carbide/dp/B00004T7S1/] would be your best bet for very long term, not scrubbing off, food-safe method for marking metal (and maybe glass)
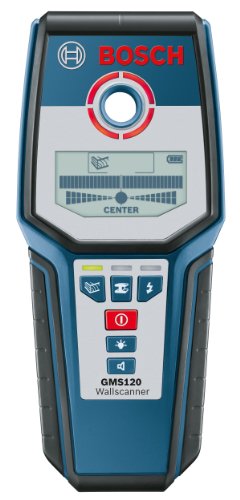
http://www.amazon.com/Bosch-GMS120-Digital-Multi-Scanner/dp/B004TACMZ8
This detects live wires in walls, I have an older version of this and it works.
Someone just asked a similar question yesterday. Their budget was only $20 but there are a ton of good ideas in that thread and you could just get him a few items.
The most popular item was the Incra Precision T-Rule and Incra has a quite a few other items that he may find useful (regular precision rule, bend rule, centering rule, protractor) and they all come in different sizes. If the 3" is too small, there is 6", 12" and 18". Just search Amazon for "Incra Rule" and you'll see them all. I've added the 3" T-Rule and Regular Precision Rule to my Xmas list. I've also added the 6" T-Rule and the protractor to my own "Wanted List" for a future purchase.
My recommendation in that thread was a woodworking calculator that computes within Feet and Inches down to 1/32. It does metric, areas, board feet, and more as well. Very useful tool that most people don't realize how much they would use.
And here's a link to the thread itself: http://www.reddit.com/r/woodworking/comments/2olpbx/best_woodworking_gift_for_under_15/
Personally I’d just use a drill chart for the quick conversion. But if you need a recommendation I’d go with Leica.
Leica DISTO D2 New 330ft Laser Distance Measure with Bluetooth 4.0, Black/Red https://www.amazon.com/dp/B01D8HNPSK/ref=cm_sw_r_cp_api_c0V6Bb9SPVBDS
No, the full set with the crappy cast heads is $220 on amazon, and the full set with a forged head is $328.90
With a moisture meter.
Leica DISTO D2 New 330ft Laser Distance Measure with Bluetooth 4.0, Black/Red https://www.amazon.com/dp/B01D8HNPSK/ref=cm_sw_r_cp_api_i_s9ZvCb54ZZ6K8
A good chisel to go along with her rock hammer is great for sampling
Also, a scratcher/scribe with a neodymium magnet on the end is incredibly useful for testing hardness and magnetics of a rock
I use a compact mineral identification guide a ton as well. There are many out there, but this one is the one I use - others may be better
Edit: And the most (imo) important part of fieldwork are the notes you take, so a waterproof field notebook is a must-have if she'll be mapping in a rainy environment. This one has geological charts and diagrams in it as well
Above are good lower priced items, but if you really want to go all-out, good boots and a rain jacket are indispensable , but they have to fit very well so she may be better off picking those out herself (at least that's the way I feel about them)
Hope this helps!
I've been a homeowner/handyman for almost 30 years and have quite a collection of stud finders.
Cheap stud finders are literally worse than having nothing at all. after incrementally spending more and more trying to find one that worked worth a crap, eventually just said screw it and bought the most expensive Zircon model Home Depot had. It works ok...just ok.
Eventually I picked up one of these type at costco and it's been my goto stud finder ever since. There's a lot of value in knowing where the center of the stud is, not just "somewhere in here".
I'm not a fan of magnetic stud finders...they do work, but you don't know how precisely a screw/nail was put in the stud...maybe the center, maybe barely nicking a side.
whatever you do, don't buy a cheap electronic one...it'll just make you angry.
Here's a few really good gifts that I got recently:
Highly recommended:
Other really good ideas:
Some great tips already, but go through and calibrate all of your tools to make sure they are actually cutting at 90 degrees. Also, I know it's expensive, but buying a quality square is worth every penny. It alone has removed much frustration. I recommend the Starrett Combination Square.
The "reversible" just means that the protractor can be rotated 180 degrees in either direction. That's why it has two "0" marks, one for using it with the flat facing left, one for using with the flat facing right.
Amazon has pictures of both sides. Sounds like you got a real one to me.
Sure:
Molino Grassi Italian Flour for Pizzas
Quite honestly it will be a revelation to your dough making compared to bread flour. Make it as wet as you can get away with while still being manageable then knead in with sprinklings of extra flour until you get that perfect texture.
I did some looking on Amazon and found this gauge and it comes with a deal on epoxy to attach it. Do you think this would make sense? https://www.amazon.com/gp/product/B00QWFYA7G/ref=ox_sc_act_title_2?smid=A1M28DLBL7Z5KO&psc=1
Three things he's missing here from a 30+ year modelling/gaming vet:
Using a push pin is great...on 28mm plastics. If you're dealing with metals, that pin isn't going to last long. I use a Tungsten Carbide Scriber to mark my pilot holes, (this does other duties with scratchbulding plasticard)
Using paperclips is ok if you're doing this casually. I've found 1/32" (and other sizes) brass rod is less hassle as it's A: thinner diameter B: No unfolding and straightening, and C: puts less wear and tear on cutters (you can use your sprue trimmers with no ill effect). Also works great as scratch-built hand holds on tanks, antennae, arrow shafts, etc.
He missed a great oppurtunity to share the ancient art of locating the opposing hole with a bit of blu-tak (poster putty). Comes in handy particularly when the first hole isn't centered, or you're pinning to an area that isn't obvious where the mating hole goes (uneven surface, etc)
+1 on the level. I also recommend a good stud finder too. I use this one and it works really well. https://www.amazon.com/gp/product/B019HKNO1A/ref=oh_aui_search_detailpage?ie=UTF8&psc=1
It's pretty much impossible to find seasoned firewood... people say its seasoned but their full of BS. Build a rick and buy in the spring.
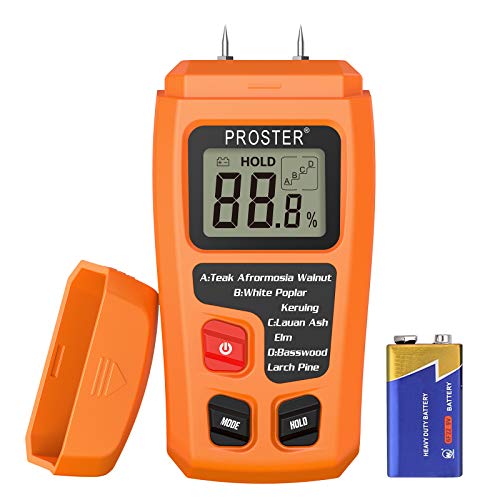
Save yourself some trouble and get a wood moisture tester for $15 - https://www.amazon.com/Proster-Moisture-Handheld-Detector-Measuring/dp/B01MV3PSF6/ref=sr_1_1?keywords=firewood+tester&qid=1571346892&sr=8-1
If it reads above 20% just walk away.
Pizza Flour: https://www.amazon.co.uk/gp/product/B07FWMVW5R/ref=ppx_yo_dt_b_search_asin_title?ie=UTF8&psc=1
Your post says soil humidity but you should clarify a bit more.
If you are looking for sensors that measure air humidity, you can easily use a DHT11, DHT22, or for more precision a HTU21DF. If you don't want them to get wet then simply come up with some sort of enclosure (Tupperware, empty yogurt container, whatever) drill some holes for ventilation and put the lid on, with adequate holes it can still read humidity and remain dry.
If you mean soil moisture, then you can buy one of those moisture sensors (like this https://www.amazon.com/gp/aw/d/B00AYCNEKW/ref=pd_aw_lpo_328_lp_img_2?ie=UTF8&psc=1&refRID=G9FJ3BJ3B69VC9XKCVA3) and just... Well... Stick it in the dirt. Done.
If I haven't answered the question then let me know!
Sorry for link formatting, am on mobile and too lazy to look for code.
Here's a good square: https://www.amazon.com/Swanson-S0101CB-Square-Layout-Combination/dp/B00SOVRPXW/ref=sr_1_2?ie=UTF8&qid=1504672358&sr=8-2&keywords=swanson+square
Black and Decker isn't currently known for being a great brand, but they have some great prices on cordless tools.
This black and decker cordless drill is a great bang for the low asking price: https://www.amazon.com/BLACK-DECKER-LDX120C-Lithium-Ion-Cordless/dp/B005NNF0YU/ref=sr_1_4?s=hi&ie=UTF8&qid=1504672428&sr=1-4&keywords=drill
The combo with the circular saw is pretty damn good. If you don't need to cut curves, I would pick a circular saw instead of a jigsaw.
Black and decker also sells a cordless jigsaw: https://www.amazon.com/Black-Decker-BDCJS20B-Lithium-Jigsaw/dp/B019OF6T38/ref=sr_1_2?s=hi&ie=UTF8&qid=1504673042&sr=1-2&keywords=black+and+decker+jigsaw
The Harbor freight aluminum bar clamps are fantastic for clamping larger pieces together, and the smaller steel bar clamps are also fantastic for everything else. You can go with pipe clamps, that will cost slightly more than the aluminum bar clamps, but they will work significantly better.
Don't use scrap steel. Go here http://newjerseysteelbaron.com/ and buy some 3/32" 1075 (2) inches wide. Cut out your pattern using some cheap, thin (1/8" thick) A36 steel plate that you can get at a scrap yard. Draw your pattern on paper, cut it out (roughly) and glue it to the A36 with that white glue we used in the first grade. Drill the rivet holes BEFORE you cut out the pattern. Cause once you cut out the pattern it is difficult to clamp in a vice. Once you have the pattern the way you want it clamp the pattern to the 1075 down on your bench and etch around it and mark the holes with this https://www.amazon.com/General-Tools-88-Tungsten-Carbide/dp/B00004T7S0/ref=pd_yo_rr_bia_t_2?_encoding=UTF8&psc=1&refRID=6KE1W903PPP22FSCHQC6 Drill the holes BEFORE you cut it out. Buy some temp ssticks at a welding store. Get 1450 degree and 1500 degree sticks. That way you will know when its hot enough to quench. Canola oil is ok to quench 1075.
They have a device that measures the amount of light that enters the device outside the glass as 100% and then measures the amount of light on the inside of the glass relative to the initial amount. If that readout is a lower percentage than what is legally allowed in your state for that window, then you may get a ticket.
https://www.amazon.com/Laser-Labs-Meter-Enforcer-TM1000/dp/B00P6V7TO8
stair nuts.+a square
or just get a stair square. http://www.stairsquare.com/ they make it amazingly simple.
You can use a framing square with stair gauges.
I have some experience with this.
https://www.amazon.com/Franklin-Sensors-FS710PROProSensor-Professional-Finder/dp/B0195K8OT4/ref=sr_1_4?ie=UTF8&qid=1519272814&sr=8-4&keywords=ProSensor%2B710&th=1
(Sometimes available at Costco)
https://www.amazon.com/gp/product/B074ZMZMT9/ref=s9_acsd_top_hd_bw_b16qtJ_c_x_2_w?pf_rd_m=ATVPDKIKX0DER&pf_rd_s=merchandised-search-4&pf_rd_r=J14PERT8ZSKA9GRZVC1H&pf_rd_t=101&pf_rd_p=c0cdc314-6aee-50c9-b0bb-83f1e9593841&pf_rd_i=1640962
Good luck.
Thanks! I'm more than happy to answer any question you have about my setup.
So I'm using the RPi and controlling stuff using the Wolfram Language. With one line of code I can turn on/off the lights or read/write to other devices/sensors.
For temp/humidity I'm using the DHT22 sensor.
Hygrometer is this one
And light sensor
I setup some cronjobs to control the lights.
It's still in beta shape. Lights are working but I still need to automate the other sensors.
I'm not using an Android app. What I'm thinking is adding to my code some lines to publish my stats in the Wolfram Cloud so I'll always have access to a log/dashboard online.
I’ve got pencils and that very same tape measure.
Looking at this hammer: Stanley STHT51246 20-Ounce Steel Hammer https://www.amazon.com/dp/B00B5A1VVG/
And this speed square (figure the combination square may come in handy later, only a couple dollars extra): Swanson Tool S0101CB Speed Square Layout Tool with Blue Book and Combination Square Value Pack https://www.amazon.com/dp/B00SOVRPXW/
And tool belt:
Bucket Boss 50200 Builders Rig https://www.amazon.com/dp/B00GK4TZ2E/
And cats paw: Estwing Nail Puller - 12" Double-Ended Pry Bar with Straight & Wedge Claw End - DEP12 https://www.amazon.com/dp/B0015YPJMY/
See any problem with these for starting off?
It's a scriber for marking/etching metal, ceramic, glass etc. Similar to this one.
Three putts are definitely part of it...other times it’s just losing it off the tee and a random chunk on an approach shot. I wish I could pinpoint it to just one thing, but it seems like a variety of errors that creep up every week. Sometimes it’s the 3 putts, other times it’s the driver or something else.
Great idea about the putting practice at home. Do you do this on hard wood floor or carpet? Also, is this kind of ruler that you’re referring to: Empire Level 4004 48-Inch Aluminum Straight Edge https://www.amazon.com/dp/B00004YYFV/ref=cm_sw_r_cp_api_i_LsZkDbR9M3M9E ...?
are you sure something like this isn't better suited for your needs?
https://www.amazon.com/Leica-DISTO-Distance-Measure-Bluetooth/dp/B01D8HNPSK
yeah there are lots of drone related surveying tools and apps. very expensive though.
Given that the cracks are minor and the house is 30 years old, I wouldn't be that concerned. I'd be surprised to find an uncracked basement foundation in a house that age. Sealing and monitoring would be appropriate.
If you really wanted to go nuts you could install some of these and check them every three months or so.
Not needing to lock down after moving makes squareness much easier to achieve.
I just bought this and I love it. highly recommend.
You only need a mark for the beginning and the end of the line. Once those are marked, it's best to use a straight edge like this or this.
Bill was using a triangular scale which are really common in the engineering fields.
It is and it isn't, drafting is still taught in most schools as an introduction to CAD to understand the drawing standards. All the engineering programs I've seen stick with CAD or 3D modeling but architectural programs still like hand drawn models.
I modified my setup a bit, to accodomodate feedback from other people and to see what works best for me
Somebody suggest to use this knife:
https://www.amazon.com/gp/product/B0016KHW2W/ref=oh_aui_detailpage_o02_s00?ie=UTF8&psc=1
Here's my new setup:
RIGHT FRONT POCKET
Any dynomighty wallet, just pick a design
https://www.dynomighty.com/categories/
Car keys (whatever your carkeys are). If you want a USB stick added on to your keys, use a Micro-HDMI for low profile and convenience
https://www.amazon.com/gp/product/B00RBGYGPG/ref=oh_aui_search_detailpage?ie=UTF8&psc=1
LEFT FRONT POCKET
Iphone6, Samsung S6, etc etc. Whatever floats your boat
Pick a small battery charger, search for it on amazon:
https://www.amazon.com/s/ref=nb_sb_noss_2?url=search-alias%3Daps&field-keywords=portable+battery+charger&rh=i%3Aaps%2Ck%3Aportable+battery+charger
Get a retractable cable for your charger if you need too (low profile)
https://www.amazon.com/Cable-Matters%C2%AE-Gold-Plated-Retractable-Micro-USB/dp/B00SVVY844/ref=sr_1_4?ie=UTF8&qid=1474558782&sr=8-4&keywords=USB+retractable+cable
JEAN COIN POCKET (on front right pocket)
That gerber fold up knife https://www.amazon.com/gp/product/B0016KHW2W/ref=oh_aui_detailpage_o02_s00?ie=UTF8&psc=1
RIGHT MOST JEAN STRAP ( was the front right before)
Carbiner
https://www.amazon.com/LeBeila-Carabiner-Aluminum-Locking-Keychain/dp/B013NNG18U/ref=sr_1_1?ie=UTF8&qid=1474558280&sr=8-1&keywords=carabiner
duck tape
Tape planet had the cheapest prices at $1.54 each
http://www.tapeplanet.com/Mini-Rainbow-Duck-Tape-Duckling-p/stdtpl-282322.htm
BACK LEFT POCKET
Measuring tape. This one has the lowest profile so it doesn't hurt to sit on, 10' is good enough for almost everything
https://www.amazon.com/Stanley-33-115-10-Foot--4-Inch-PowerLock/dp/B00009OYGH/ref=sr_1_7?ie=UTF8&qid=1474558504&sr=8-7&keywords=measuring+tape
BACK RIGHT POCKET
Get sticky notes, I suggest highland brand 3"x3" since it works for nearly everything you might need sticky notes. I suggest getting both, alternate colors by day
Plain yellow:
https://www.amazon.com/Post--Markers-Assorted-Bright-670-10AB/dp/B007QFATEO/ref=sr_1_6?s=office-products&ie=UTF8&qid=1474558871&sr=1-6&keywords=sticky+notes
Color:
https://www.amazon.com/gp/product/B000OCPJK0/ref=oh_aui_search_detailpage?ie=UTF8&psc=1
Also, get a sharpie too. Fine points are good
https://www.amazon.com/Sharpie-Permanent-Markers-Point-Black/dp/B00006IFHD/ref=sr_1_1?s=office-products&ie=UTF8&qid=1474558955&sr=1-1&keywords=sharpie
Alternatively or ultra fine
https://www.amazon.com/Sharpie-37001WM-Permanent-Marker-12-Pack/dp/B00006IFI3/ref=pd_sim_229_1?ie=UTF8&psc=1&refRID=08FBBP33PZV82ZY7AT41
--------------
that's my current setup
Sorry for the double up comment, but if you're really interested in a kit, here are each of the tool's they'll give you
Feeler Gauge
Allen Wrench Set (this is actually more comprehensive)
64th inch ruler
Straight Edge (For judging neck relief/bow)
Mini Screwdrivers
String Winder (with wire cutter)
Compare to $60 dollars
$100:(http://www.stewmac.com/Luthier_Tools/Essential_Tool_Kits/Basic_Setup_Kit.html)
This actually seems like a solid deal, but you can get all of these at a hardware store for less and not pay for shipping and wait around for it.
https://www.amazon.com/Laser-Labs-Meter-Enforcer-TM1000/dp/B00P6V7TO8/ref=asc_df_B00P6V7TO8/?tag=hyprod-20&linkCode=df0&hvadid=309760780746&hvpos=1o2&hvnetw=g&hvrand=10846946022290050622&hvpone=&hvptwo=&hvqmt=&hvdev=c&hvdvcmdl=&hvlocint=&hvlocphy=9012136&hvtargid=pla-569207808380&psc=1
As someone who's only a few steps further into woodworking than you are, but has done an outrageous amount of research and poured every last spare minute I have into experimenting with projects in my garage over the past two months (no legit furniture projects under my belt yet, but plenty of random shop projects), don't get either of those combo sets. The circular saw and drill are useful, but the rest of the stuff is a waste of money.
Pick up a cheap drill / driver combo (by that I mean a drill that has a chuck that accepts drill bits and driver bits - something like this), some brad-point drill bits, and a cheap circular saw. Then go an aisle over and pick up a long straight-edge and a speed-square. Go a few more aisles over and pick up some wood screws and wood glue. You'll be using the glue more than the screws - in fact, you don't even need the screws - using dowels is more fun and looks nice. If you go with dowels, pick up a cheap flush cut saw and some 80/120/220-grit sandpapers also so you can clean them up. Last, walk a few more aisles over and pick up some 3/4" birch plywood (you can get the sande plywood if you have a tight budget, especially if this is a shop project). Altogether it should be just a hair over $200, if that. Then leave the big-box store and never go back.
That should be enough to put together a few beginner projects. Then, a month later, buy a Saw Stop table saw.
Just kidding about the Saw Stop, but really – you'll outgrow those tools really quick and start needing bigger / more powerful machines. Buy a table saw next (the Ridgid R4512 is a good starting place – price is pretty reasonable, and it's a decent table saw). That opens up a whole new world of possibilities, and soon your wallet will be empty but your garage will be full of toys.
A few hundred dollars is plenty to get setup with a basic set of tools. With only a basic set of tools you can get a lot done. Additional tools will only improve the speed and make things a bit easier.
You'll need a few marking tools. A combo square, marking gauge, bevel gauge and marking knife should cover most of your marking and layout needs. Empire makes decent entry level combo squares. They certainly aren't the best but they're cheap and should be enough to get you started. If you wanted to get something a bit better Lee Valley makes nice double squares the a in the mid level price range. The ducks guts of marking tools is starrett. They're expensive but are buy it for life tools. For the marking gauge you can make your own if you want or buy one. Veritas make nice marking gauges for a reasonable price. Same goes for the marking knife. If you want to buy one Veritas also make an inexpensive one that works nice. For the bevel gauge just pick one up from a home center. They cost around $10 for a decent one.
From there you'll need some saws. A panel saw is good for cutting wood to rough size and backsaw is good for joinery. For an inexpensive panel saw these are fairly good. They aren't the best but the only other real option is to restore a vintage saw. If you did want to go for a vintage saw you should find plenty of info on that though google. Backsaws need to be a little bit better quality because they are used for finer work. The entry level into back saws are the Veritas backsaws. I'd recommend starting with a crosscut carcass saw which is good for general use.
A jack plane will allow you to flatten are square up your wood. The only good inexpensive option is to buy vintage. Fortunately there is a lot of guides and info on restoring vintage planes online. Do some research on finding and restoring vintage planes then find a No. 5 bench plane to restore. A decent No. 5 should cost you about $30-50.
A 1/4" and 1/2" chisels will cover your chiseling needs for getting started. Narex makes inexpensive but good quality chisels. I wouldn't but a set, jst get a 1/4" and 1/2" and then add sizes you want later. You'll need a mallet to use with the chisels. they're fairly easy to make but you can buy one if you want.
The last thing for a basic tool kit is something to drill holes with. A lot of hand tool users still opt for a cordless electric drill. If you want a unpowered hand tool option you need a brace + auger bits for larger holes and a eggbeater drill + twist bits for smaller holes. Again you'll need to buy vintage for these tools as no one makes them for a reasonable price anymore.
Here's a link:
https://www.amazon.com/SUNKEE-Soil-Hygrometer-Moisture-Sensor/dp/B00AYCNEKW%3FSubscriptionId%3DAKIAILSHYYTFIVPWUY6Q%26tag%3Dduckduckgo-d-20%26linkCode%3Dxm2%26camp%3D2025%26creative%3D165953%26creativeASIN%3DB00AYCNEKW
It confuses me because there are 2 sticks for ground
https://www.amazon.in/Absolute-Electronics-Soil-Moisture-Testing/dp/B00AYCNEKW M:
https://www.amazon.com/Bosch-GMS-120-Digital-Multi-Scanner/dp/B004TACMZ8/ref=mp_s_a_1_2?ie=UTF8&qid=1540874404&sr=8-2&pi=AC_SX236_SY340_FMwebp_QL65&keywords=bosch+stud+finder
You can use a crack monitoring gauge:
https://www.amazon.com/CRACKMON-4020A-Heavy-Duty-Building-Foundation/dp/B00QWFYA7G
For reference only. You can get them for significantly less money, if you shop around.
We would need more pictures of the surrounding area, and maybe the exterior, before we'd have any sense on if this is benign or something that needs immediate attention.
How about a crack gauge to monitor this? It'd allow you to see if it has stabilized, or is continuing to grow:
https://www.amazon.com/CRACKMON-4020A-Heavy-Duty-Building-Foundation/dp/B00QWFYA7G
If it is stable, you could use a self-leveling caulk to seal it:
https://www.homedepot.com/p/Sikaflex-29-oz-Gray-Self-Leveling-Sealant-106711/202523824
A moisture meter for wood is cheap $15. 12% is good. In the sun they may get even drier and shrink more
Since you're a student, instead of an engraver you could get a carbide scribe instead. I love mine and use it to mark my tools.
This is the one I use, got it cheaper at Ace Hardware. General Tools 88 Tungsten Carbide Scriber https://www.amazon.com/dp/B00004T7S0/ref=cm_sw_r_cp_apa_i_kvVZCb5BJTQYX
Checking your chain alignment is really really easy.
Get a ruler. Metric is preferable, but if all you have is inches, we can work with that. However, if it's an inch ruler, this is going to be a lot harder. I have one of these. I use it for a lot of stuff, and you can get them almost anywhere, so I would recommend you get one.
Measure from the center of your seat tube to the inside edge of your sprocket. The more precise you measure, the better your chainline will end up, but at a minimum, you need to measure to the nearest 1mm (or 1/32 inch). Write that number down. We'll call this dimension S.
Now measure from the inside of your dropout to the inside of the driver teeth, again to the nearest 1mm (1/32 inch). White that number down. We'll call this dimension D.
Finally, add S and D together. If you used inches, you need to convert fractional inches to decimal inches, then convert the inches to mm. Don't be scared, Google will do it for you.
For a perfect chainline, S+D=55. If it's less, add spacers between the sprocket and the frame to make up the difference.
For example, suppose you measured your sprocket at 42mm, and your driver at 12mm. That's 54mm, so add a 1mm spacer.
If S+D is greater than 55, remove spacers. You might get in trouble with stuff hitting your chainstays though.
By the way, 55mm is 1/2 the width of the hub (BMX hub spacing is 110mm). We are just using the inside of the dropout as a reference plane to measure the distance from the driver to the centerline of the bike. If you have a driveside hubguard, you need to subtract that thickness from the D measurement.
I hope that helps.
Do you even studfinder?
https://www.amazon.com/Precision-Sensors-ProFinder-Scanning-Finder/dp/B019HKNO1A/ref=sr_1_1?ie=UTF8&qid=1492231100&sr=8-1&keywords=led+stud+finder
Cut across its not hard to visualize a 45° angle, 90° is square, 45° is half of that straight across or diagonal. They have combination squares at any place that sells tools really. This will take care of any degrees of measurement, square or 45°, center of tubing or any varying degrees of measurement its called a combination square I have a starret set but any cheap set will do. I use it for metal fabrication, I have to fabricate a lot of stuff by blueprints from scratch at my job. https://www.amazon.com/Starrett-C435-12-4R-Combination-Heads-Chrome/dp/B000KUA2OO/ref=mp_s_a_1_11?ie=UTF8&qid=1549104729&sr=8-11&pi=AC_SX236_SY340_FMwebp_QL65&keywords=starrett+combination+square&dpPl=1&dpID=41tZuP1%2BF9L&ref=plSrch