(Part 2) Best sculpture supplies according to redditors
We found 397 Reddit comments discussing the best sculpture supplies. We ranked the 141 resulting products by number of redditors who mentioned them. Here are the products ranked 21-40. You can also go back to the previous section.


Honestly, I'd say ditch the kit and DIY it.
First, you want some alginate. This is what you will make the mold out of. A kit is going to give you enough for one try and this is where most people have problems (if it sets up too fast you are screwed). The 1-lb bag on Amazon is enough for four or five molds.
Second, you need body-safe silicone. I'd try either this or this. The 20A is going to be softer than the 30a. The two pints that you get from Smooth-on is enough for 3 or 4 replicas. You can also buy just the silicone from Clone A Willy. They claim that is body-safe and you'd get enough silicone for one dildo.
Third, you'd want to get something to make a tube out of to create the mold. A plastic water bottle like a 1L smart water bottle would work fine.
Fourth, you may want a vibrator to insert into the silicone before it cures (if you want a vibrator instead of a dildo). The one that comes in a kit is pretty bad. A Tango would be pretty awesome.
Finally, a good cock ring is indispensable when it comes to keeping your FWB hard through the molding process.
If you are set on a kit, the Clone A Willy kit works OK. The biggest issue I had was that it comes with a big, piece o' junk vibrator to insert into the silicone. If you didn't use the vibrator there wasn't enough silicone to get the job done. When you did insert the vibrator it was almost impossible to keep it from getting to close to an edge, creating a weak spot in the toy. After about three or four uses a small tear developed and it was no longer safe to use. If you do go for the kit, I'd highly recommend that you ditch the vibrator that comes with it and replace it with a Tango. Better vibrations and the thinner profile would work a lot better in this application.
Hello all, thanks for looking!
These are the first batch of Dugout One Hitters that my dad and I are making in our garage. We used Amazing Cast Clear epoxy resin. The blue one is dyed with a liquid coloring and the green one is a powder with some metallic flake. We wet sanded them up to 3000 and then used 3M buffing compound for the final finish.
Here are some more pictures.
Resin Used
Liquid Coloring
Powder Coloring
Buffing Compound
We made custom molds out of HDPE and used Smooth On releasing agent.
Any feedback or questions would be appreciated! Check out more on my Instagram
ADDENDUM - Posted wrong link to Amazon in the other post, edited for correct link. THIS is the stuff.
http://www.amazon.com/Dragon-Skin-Making-Silicone-Rubber/dp/B00EOA0EC6
Glad you mentioned the safety thing because it made me double check the link I posted.
The problem with using paints or glues is that they require exposure to air to cure, so it will never set under the top layer of skin.
I recommend to go with resin. This mixes 1:1 ratio and dries to a white solid, semi-translucent at the thin areas, plus any bubbles will make it look legitimate. It’s exactly what came to my mind when you mentioned milk:
Alumilite Amazing Casting Resin, 16-Ounce https://www.amazon.com/dp/B0058V9KMK/ref=cm_sw_r_cp_apip_3CBhw6kz94uzW
Alternately (and inexpensively), you can use Plaster or Hydrocal. It will cost under $10 in that case.
Plaster: http://www.walmart.com/ip/DAP-Plaster-Of-Paris-Dry-Mix-4-Lb-Box/190101660
Hydrocal (as perfect cast, get this at Joann and use a coupon): Perfect Cast 2lb Cast & Paint Casting Material https://www.amazon.com/dp/B0006O87CS/ref=cm_sw_r_cp_api_i_xB9wDbPRN1SXD
How To Start Your Own Dildo Making Business
Tube - (Amazon)
Temporary Molds - (Amazon)
Long-term Molds - (Amazon) https://www.smooth-on.com/products/dragon-skin-10-nv/
Rubber To Fill Mold - (Amazon) https://www.smooth-on.com/products/dragon-skin-30/
Color (optional) - https://shop.smooth-on.com/silc-pig
Google "polycaprolactone". I use it to make DIY mounts. You heat it up to 150F (water in coffee mug, nuke it in the microwave for a minute), and it becomes moldable like silly putty when it's heated up and hardens when it cools.
The one brand name I know off-hand is InstaMorph, but I buy it in bulk now.
I can't help you with gingerbread cookies, though I'm sure someone here has a great recipe for them. :)
As for royal icing, everyone has their own preferred recipe. I use Antonia74's Royal Icing Recipe. I cut the Cream of Tartar in half, because I don't like the aftertaste, and I usually add about 1 tbsp of Almond Extract.
I would recommend watching a few youtube tutorials on royal icing to decide how you want to go about it. There are so many different options for icing consistency, recipes, flavors, and colors, that you really need to play around and find what works best for you.
To start, I'd recommend Haniela's video on royal icing consistency. Also, Sweetambs has a good tutorial, as well. And Julia Usher has a very in-depth video about icing.
If you have a small table-top fan, it will go a long way towards helping with cratering, which is when icing caves in on itself, and is the bane of my cookie decorating experience. Also, a needle tool is excellent for smoothing out icing and getting rid of bubbles. If you don't have one, toothpicks will work. :)
Let me know if you have any specific questions. Hope this helps!
You should try it out! I had no experience whatsoever with mold making and resin casting, and though there was definitely a lot of trial and error, it was pretty simple to get the hang of. It really depends on the complexity of what you're molding and casting. This pin was actually three separate pieces (mockingjay, ring, and arrow) that were all molded separately and then attached. I couldn't figure out a way to do it as one piece, though with some things I'm sure you can and that'd be a lot simpler. ANYWAY, I got this kit here which has everything you need to start making molds and resin casts, plus it comes with an instructional DVD and some mold release spray. I say, go for it :)
You could get some moldable pellets like this (currently looking for a more eco-friendly version), use your broken clip as a guide, and shape a new clip: https://www.amazon.com/dp/B01N9Z5B39/ref=cm_sw_r_cp_apa_i_lbs1Db1BQVXE7
https://www.amazon.com/gp/aw/d/B00OS1DGNA/ref=mp_s_a_1_2?ie=UTF8&qid=1520746832&sr=8-2&pi=AC_SX236_SY340_QL65&keywords=fake+water+2+part&dpPl=1&dpID=41RqxMO7ZiL&ref=plSrch
For nurgly greenstuff there's a few things that will help. Get some metal, not plastic sculpting tools from amazon. You will want something that makes dimples, something shaped like a trowel, something pointy, and something that looks like a spatula for smoothing edges down to the model so the transition is without a seam.
Keep your fingers and the tools damp. As greenstuff starts to dry it will pick up fingerprints or drag. Keeping surfaces damp ensures that you'll keep from ripping.
As greenstuff goes from freshly mixed to hard it slowly starts to harden, making it less pliable as time passes. This can work to your advantage but what I recommend is that you don't mix up a large chunk at once. Mix bits that are marble sized that you can deal with in about 5-10 minutes. If something looks great, stop messing with that spot and return to it in a couple hours after it sets up.
To make depressions, use the tool that looks like a round ball on the end of your tool. To make boils, find something with a nice round hole - I use different parts of pens that have been taken apart. You press down with the opening, making a raised round area with a depression around it, then you press down in a circle around your boil with the spatula tool, or other one for a different effect.
I also would practice before you touch up a knight or other large piece. That Rhino is a great idea. I have found some janky ones on Ebay that are perfect for corruption. I don't mind taking something that looks rough if the idea is to cover it with corruption. Grandfather is pleased with this.
If you're going to convert, take some time to google image search ideas, get a folder together. A herald bell I always thought was very cool on a Nurgle knight.
Greenstuff also makes their own tentacle maker. You could wing it with something home made but its not expensive and with a little practice you can make really great tendrils and corrugated tubes.
Amazon stainless steel sculpting set $11.65
I need some more casting material so I can make more figures!
I want to soak in a hot tub
SE DD312 12-Piece Stainless Steel Wax Carvers Set https://www.amazon.com/dp/B000SVRSRY/ref=cm_sw_r_cp_apa_i_GAPFDbPW0RSP7
Apoxie Sculpt 1 lb. White, 2 Part Modeling Compound (A & B) https://www.amazon.com/dp/B0013UDWXI/ref=cm_sw_r_cp_apa_i_9APFDb4BZREHF
Sand Detailer Finishing Kit, Finer Grits, 24 piece https://www.amazon.com/dp/B0039ZCQAK/ref=cm_sw_r_cp_apa_i_BCPFDbBV5SSGW
SERONLINE 24pcs Ball Stylus Dotting Tools, Polymer Modeling Clay Sculpting Tools Set Rock Painting Kit for Sculpture Pottery https://www.amazon.com/dp/B0776SN7Y5/ref=cm_sw_r_cp_apa_i_JDPFDbTH56VM0
Monster Clay Premium Grade Modeling Clay (5lb) https://www.amazon.com/dp/B0722NKKYF/ref=cm_sw_r_cp_apa_i_dEPFDb1WPY7K2
So when you cast something, the original is called the master. Im saying you could make a negative of the shapes you need of out something like
https://www.youtube.com/watch?v=KQAOLeOwg-k
You use plaster so you can finish any imperfections by hand so they dont appear in your master. then you cast the plaster piece in silicone.
As silicone can get VERY expensive, if you are just starting out I'd use a low temp resin and a recastable mold material like https://www.amazon.com/ComposiMold-Used-3lbs-Reusable-Making/dp/B01NBMEKWA/ref=pd_lpo_sbs_201_img_0?_encoding=UTF8&psc=1&refRID=K7MYRAMF5YJGR5TVS9B5
I hate recommending Amazon, but this plastic is worth knowing about for situations like this.
oh dear, those don't look standard at all. My bad. You could try to mold your own replacement using something like this, or just glue on the rubber tips from another pair of earbuds (though I can see why you might be reluctant to do something like that).
Hey thanks for the shoutout man! And really cool/clever design!! I had never even considered using my own arm as part of the stock. Its really cool to see the designs that think outside of the box. Every design has its pros and cons but that's why the different variety is so good. We can all choose what will suit our needs best. It's a really good feeling to make something and leave your mark on this first gen of VR isnt it!!
PS i used this stuff when I made my 1st prototype. You might like it for making a different cup for your main controller if that one isn't exactly how you want it. It's really easy to mold and reusable. I just put some painters tape around my controllers before I molded it to it. Then after it hardened, it was a nearly perfect fit.
https://flic.kr/p/Yoz9Ph
https://www.amazon.com/Polydoh-Moldable-coloring-granules-polymorph/dp/B01N6Q9JSH
I used a wooden form pressed into delf sand to make the mold. I tried making a form out of wax but it was crumbling and falling apart constantly. I hadn't heard of using foam yet.
Has anyone tried low temp moldable plastic for the form? It melts at lower than boiling water, but I'm concerned it might burn up and leave black carbonized ash embedded in the metal. If you've tried it, how did it go?
Polly Plastics Moldable Plastic Pellets. 5 lbs. In Heavy Duty Resealable Bag. Bonus Idea Booklet Included https://www.amazon.com/dp/B01C559GC0/ref=cm_sw_r_cp_apa_i_h91vCb37W9YK3
What did Cinderella do when she got to the ball?
Gag
Ba dum tsss 🥁😂
If I win, I’d love this item from my list
Happy Birthday! 🎂🎉🎈
https://www.amazon.com/dp/B01E4LWBLQ?ref=ppx_pop_mob_ap_share
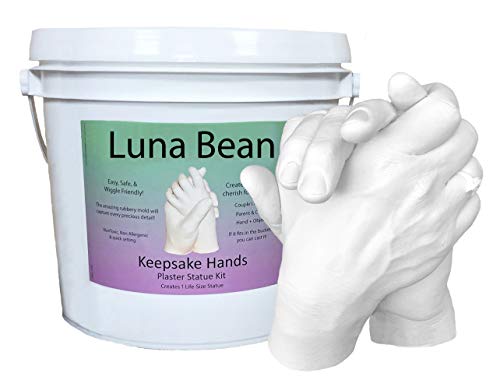
You could knock out 2 people with one of these. Sentimental and something fun to do. Just under 40$.
Pressure gauge:
https://www.amazon.com/gp/product/B006VE306A/ref=ppx_yo_dt_b_asin_title_o03_s01?ie=UTF8&psc=1
Cloche:
https://www.amazon.com/gp/product/B0797GVSXJ/ref=ppx_yo_dt_b_asin_title_o04_s00?ie=UTF8&psc=1
Silicone:
https://www.amazon.com/gp/product/B01C4YQ4TU/ref=ppx_yo_dt_b_asin_title_o06_s00?ie=UTF8&psc=1
Vacuum Pump:
https://www.ebay.com/itm/3-5-CFM-Rotary-Vane-Vacuum-Pump-1-4HP-HVAC-R134a-Air-Refrigerant-Conditioning/131845616776?ssPageName=STRK%3AMEBIDX%3AIT&_trksid=p2057872.m2749.l2649
Vinyl-flex tubing:
https://www.amazon.com/gp/product/B00E6BCV0G/ref=ppx_yo_dt_b_asin_title_o03_s01?ie=UTF8&psc=1
​
​
​
Maybe poli pastic or maybe Ingo Plastic
I bought a Synth too, but haven't used it yet - not pictured here, but the stem could definitely use work (hoping the Synth will help with that).
Honestly, I do a lot of DIY stuff and usually don't have trouble finding tutorials that I can halfway-decently follow (usually thanks to good posters). Unfortunately, that hasn't been the case for keycap molding/casting - it's pretty hard to find detailed/informative guides out there.
The best resource I've found isn't keycap related at all, it's this YouTube series: https://www.youtube.com/playlist?list=PL6q0fd3ileWLwTQ6pOUb8isS4BYLjkNhH
Let me know what you think!
As far as the resin goes, I read a post somewhere that said it's best to get it from a distributor because the majority of stuff on Amazon is bunk... That being said, I'm an Amazon fiend and just wanted enough material to get started.
I bought this set for the mold and resin: https://smile.amazon.com/gp/product/B000QCHVC2/ref=oh_aui_detailpage_o02_s00?ie=UTF8&psc=1
And this for coloring the resin: https://smile.amazon.com/gp/product/B005ZH0SFU/ref=oh_aui_detailpage_o02_s01?ie=UTF8&psc=1
I'm sure neither are the optimal choice, but they should be enough to get you started. From what I've gathered, information/secrets are held pretty close to the chest around here... So if you learn anything during your exploratory process, help a brother out! I'll try to do the same if you have any questions. :)
Good luck!
I’ve been using Amazing Casting Products and so far so good. I think it would work well for dice. You’d have to color the numbers by hand, but it would look good. May need a lot of polishing.
Amazing Casting Products 10591 Clear Resin,Includes parts A & B; 16 FL. OZ./473 mL each , Packaging may Vary https://www.amazon.com/dp/B072RV2LHC/ref=cm_sw_r_cp_api_i_BkD1DbMCGRB9Q
For the mold: https://www.amazon.com/gp/aw/d/B00LU4YFK6?psc=1&ref=ppx_pop_mob_b_asin_image
For the toy: https://www.amazon.com/gp/aw/d/B00CA5VY3U
For the vacuum pump: https://www.amazon.com/gp/aw/d/B071KZXVRR
Other supplies you'll need: vinyl gloves, cardboard and hot glue gun to make the mold box, paint mixing sticks, graduated measuring cups, disposable coffee cups, silicone or mica pigments, release agent (smooth on universal release agent), and a whatever you want as a model
Edit: if you have any other questions feel free to pm me
You have two separate problems to solve. 1st how to melt the metal. 2nd how to cast it into interesting shapes.
i'll start with the melting problem. I suggested an oxy-propane torch like this and a crucible like this. Those items are likely above your price point and I am just using the Riogrande.com catalog as an example for you, cheaper prices can be had if you shop around or go used. You will find these type of torches on Craig's list, they are common metal working equipment. Oxy-propane requires an oxygen tank and regulator. The reason I suggest this is because the oxygen will burn way hotter which means you can melt metal right in a crucible out in the open. Oxygen tanks can be found at your local welding supply store and are easy enough to obtain. No insulated foundry required and you can melt aluminum, pewter, bronze, brass, nickle silver, silver, and gold with this setup.
Anywho, that's the ideal setup for you. It will likely cost a hundred bucks or so to get it running. To be frank I think it's worth it because once people lean you can cast buckles they will buy them from you and the setup will pay for itself pretty quick. That's what happened to me, lol.
But if you insist on the no to zero cost option go ahead and build your mini foundry following the various online instructionals like this. Skip the steel crucible part and get a graphite one like this. Go with propane, not MAPP gas. Propane is cheaper and easier to obtain since it is available at every grocery store. I have to warn you once again though. There is a reason why everyone only talks about melting aluminum in these things. And its because they don't get that hot without an oxygen supply. Copper alloys melt hotter than aluminum. Upside is that you don't have much sunk cost, and melting aluminum is fun too.
OK, next step. Casting the metal into different shapes.
[I've seen this stuff recommend. You heat it and mold it to form a lil bumper. ](InstaMorph - Moldable Plastic - 12oz https://www.amazon.com/dp/B06XFDFVLM/ref=cm_sw_r_cp_apa_I38hzbRKBY21N)
The aforementioned 3m tape is a good alternative too.
Casting tutorial
Mold making kit
I used sculpey clay and sculpted it over a pbt cap and it hardens in the oven (don't use ABS plastic or it might melt). And just some basic clay sculpting tools from Amazon. https://www.amazon.com/gp/product/B0776SN7Y5/ref=ox_sc_act_title_7?smid=A18KJ1DUGA3EYY&psc=1
I used this but switched to dental stone bc it was cheaper than the Skullduggery.
Ugh, sorry - I use the technique they hid in the details
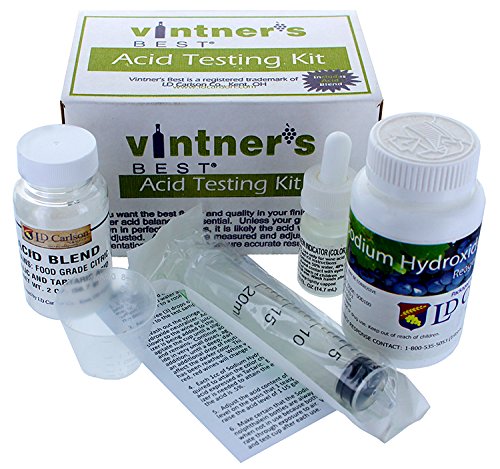
"A pH of 8.2 is also where a titration dye, phenolphthalein, changes color". It's definitely true that a GOOD ph meter will measure 8.2 more reliably than phenolphthalein, but mine is decidedly not a good one lol (I should really upgrade but they're such a pain). In either case it's generally true that measuring TA is more closely correlated to perceived sourness than PH so its a useful metric for deciding "sour enough" or at least "repeatable perception".
We bought one of these kits (from a local hbs but link for clarity) https://www.amazon.com/Midwest-Homebrewing-and-Winemaking-Supplies/dp/B0064OFUCY which has both the indicator and the 0.2N sodium hydroxide (note that that is 2x what most ppl are using for beer which is 0.1N - you can just use 1/2 as much -i.e. 1ml instead of 2ml or dilute 2:1 with distilled water - the latter will give more accurate readings).
The default setup for that kit is to measure acidity as tartaric so you have to do a slightly different calculation - basically take the calculation that comes with the kit and multiple the result by 1.2 to account for the different density of tartaric vs lactic.
If you work out the math the wort density is pretty much something you can just ignore (yeah it moves it a fraction of a point but.. whatever) especially if you're mostly controlling for "repeatable perception" on similar wort bases. The FG will have a dramatic impact on perception (sour beer == sweet/sour balance) so its worth taking into account in that regard but doesn't change measured acidity meaningfully.
Note also that different acids perceive dramatically different. Plantarum is good for producing very clean lactic, but if you're using something that produces acetic or other acids you can't strictly compare the perception 1:1 with a straight lactic ferment based on a simple analysis like this (or ph). Remember if you can smell the acidity using only your nose there's likely acetic in there (or some other funk your brain is translating as "sour").
I use one of these -
https://www.amazon.com/Midwest-Homebrewing-and-Winemaking-Supplies/dp/B0064OFUCY/ref=sr_1_3?keywords=acid+test+kit+wine&qid=1556626594&s=gateway&sr=8-3
I used a recipe from Montreal Confections on Youtube.
Royal Icing Recipe:
Note that this recipe makes quite a bit of icing. I made a large batch of cookies (50 or so cookies) and I had more than enough. You may want to cut the recipe in half.
She also has another video on how to get correct consistency.
I worked with mine until I got close to a "20 second icing" so I could pipe and flood with the same icing.
Also, I highly recommend purchasing a scribe needle tool to smooth out the icing.
As other commenters have said, don't bother with clone-a-willy. But that doesn't mean all is lost! If you get this (or some other bag of alginate, you dont need the plaster) and this it's a little more complicated/you might need to practice casting something else first, but overall it works much better. I've tried both and it's definitely a better silicone, and for me the casting gave way better detail. All can feel free to PM for... detail😉 and some pointers I guess
this
also this
might be into this
who doesn’t love a good taco holder
stick your genitals in this
A note on silicone brands: I like Smooth-On Oomoo 25. I've tried that and the Oomoo 30 with good results. The '25' is a little bit more (but only like $6 or so), but it cures much faster (I think something around 1 hour, compared to the '30' which took maybe six hours).
https://www.amazon.com/Smooth-OOMOO-25-Curing-Silicone/dp/B01C4YQ4TU/ref=mp_s_a_1_1_sspa?keywords=oomoo+25
YOu can find silicone clay shapers, like these, in small sizes that I find very useful and do most of the detail and smoothing of my clay with those. My small ones have a width on 2mm I think.
I also have steel tools, like these which I use for rougher work. These are really similar to dental tools which are great if you can get a hold of them too.
Of course I have a few very sharp hobby knives with replaceable blades (something like this but I don't know what brand for cutting clay and and making fine detail.
Other than that, I mostly use homemade tools. I have a few sewing needles and pins which are useful for fine detail. I also have a few hyperdermic needles, the end of which is like a tiny, super-sharp blade, for the finest of details.
To make tools with them, I usually drill a small hole into the end of a disposable wooden chopstick and superglue the needle into that. I fill around the edges with milliput to fix it firmly in place.
Trovarion, Redditor and YouTuber, has a cool video on how to make homemade tools, too, that you may find helpful.
Also, there is a whole book by G. Schellert on homemade mini-sculpting tools, but it mat be too in depth for most peoples needs.
They are ok for PH but acid level is a different animal. Google titration or "acid test" kits.
http://www.amazon.com/Midwest-Homebrewing-and-Winemaking-Supplies/dp/B0064OFUCY
Actually yes! Just for the first time this past quarter actually. I 3d printed an object, then cast the negative in silicone. I then cast resin in resin that I will link below. The Tested series on Youtube was my guide, so I will also link that. I'm not sure how long it would take to cure for an entire site, if I am reading your post correctly, but for concept models its great.
https://www.amazon.com/Alumilite-Clear-Casting-Resin-Kit/dp/B00OS1DGNA/ref=sr_1_5?ie=UTF8&qid=1511853976&sr=8-5&keywords=alumilite+clear+casting+resin
https://www.youtube.com/watch?v=J1jDaZX6PCk
I bought some of this thinking it wouldn't work, but I'm very happy with it. I used it to mold severalpicture frames and it worked perfectly. You melt it in the microwave and then pour, very easy. And you can reuse it, you just remelt. I just saw this deal where you can get 3lbs of it used, that should be more than enough for your planter as long as you have a container to mold in
Used ComposiMold 3lbs https://www.amazon.com/dp/B01NBMEKWA/ref=cm_sw_r_cp_apa_fmPYAbNBBQBTX
Any two-part epoxy with a smooth finish can work. Kneadatite from Polymeric Systems is what most people end up using; usually referred to as Greenstuff. You can order it online through Amazon or find it at most hobby stores that carry miniatures. I use Polymeric's QuikPlastik because it's cheaper and available at larger DIY stores. Milliput is also a popular choice.
Any way you go, be careful to mix it thoroughly and not to use too much. While you can trim it back with a sharp knife, it's easier to add more if you need to. You may also want to get some sculpting tools or dental picks to shape the putty and sculpt details into it. Then you can use it to repair damaged models, fill in gaps in larger metal pieces, and even to make custom parts.
I actually use one of these bad boys. http://www.amazon.com/Kemper-Tools-Professional-Needle-Tool/dp/B0023ATIM6 It's great for getting into tight places, or working out beads if you mess up.
[text you want your link to show](address you want your link to go to)
So, in your case:
[InstaMorph - Moldable Plastic - 12oz](https://www.amazon.com/dp/B06XFDFVLM/ref=cm_sw_r_cp_apa_I38hzbRKBY21N)
Becomes:
InstaMorph - Moldable Plastic - 12oz
Maybe like this.
InstaMorph - Moldable Plastic - 12oz (Black) https://www.amazon.com/dp/B06XFDFVLM/ref=cm_sw_r_cp_api_ndnWBbHD0CZGC
I was getting ready to make this thread too :D
Here's what I've found so far.
Link 1
Link 2
There are a few other guides and a YouTube video (mixed reviews) on doing it without a pressure pot/vacuum chamber.
I was thinking about picking this (QM262) or this (Smooth-On) up for the mold and I already have a two-part resin mixture from a previous project that I never used.
My main issue will probably be getting a pressure pot/vacuum chamber though. They seem to run a bit pricey, and I'm scared if I try to make something like this (PrimeCaps) or this (Idea23), that it will come out too blurry. I saw a few examples of comparisons between with/without a pressure pot and the results seem to vary a good amount.
I'm a bit hesitant to purchase the mold material right now just because if I do it, I'd like to have that set in a pressure pot as well.
I'll let you know if I end up trying this out.
Maybe these will help?
https://en.wikipedia.org/wiki/Cope_and_drag
https://www.amazon.com/2-Piece-Flask-Casting-Jewelry-Making/dp/B018ZMI7TA
https://www.amazon.com/UJ-Ramelson-Co-clayset-Casting/dp/B00JJ07G4K
You only need a cutting mat (I use this one), a decent knife (mine again) and a metal ruler. Some designs are intended to be assembled without glue, but some basic paper adhesive can be helpful anyway.
Patience is pretty important; sometimes I rush a cut and it ends up drifting away from the ruler, which has resulted in having to reprint something.
I've done something slightly similar with thermoplastics and a heat gun like "friendly plastic" by Amaco. If you could get a thin sheet of thermoplastic and use a heat gun to soften the plastic enough to take the shape of what's underneath it, and repeat that for each different shape it could work. You would run the risk of losing the previous shape each time it's heated if it gets too hot and isn't supported from below very well, but I think it's possible if you control the temperature well enough. I used a variable temperature hot-air desolderer to heat my plastic that was around $75 on ebay, but any sort of heat gun would work (possibly even a hot hair dryer)
this is the kind of stuff I'm talking about I made sheets myself from the pellets before I knew they sold it in sheets.