(Part 3) Best body repair & restoration chemicals according to redditors
We found 416 Reddit comments discussing the best body repair & restoration chemicals. We ranked the 145 resulting products by number of redditors who mentioned them. Here are the products ranked 41-60. You can also go back to the previous section.


My Saab has a known issue with poorly made metals on the tips of the valves.
It's a known issue. I didn't know about it, HE didn't know about it even though he's a master tech and his shop is well established.
Quoted me $1700 to take apart my entire engine, this is a $3k job. Coolant kept leaking into the block. He took it apart 2 more times, for free, because he felt bad that he didn't do a good job. Turns out I had a porous block, not uncommon, but it doesn't really affect the Saab engine, it'll still go like hell once it's sealed.
I did some online research and found AC Delco leak tabs for like $7. I said "Hey man, lets give it a shot!"
My car has been flawless, and I drive 150mi/day for work, my engine is just as good as it's ever been, I'm approaching 100k/mi and it's smooth as silk.
This guy took it apart 3 times to try to fix an issue he never heard about, fixed the issue once I figured out what it was, and my car is still solid as a rock.
My mechanic is a hell of a guy.
EDIT: I work in IT, you can spend over a decade doing IT/troubleshooting but that doesn't mean something comes across your desk you haven't heard about. My mech was sincere and really cared about his shop, his reputation, and his customers. He's a hell of a guy.
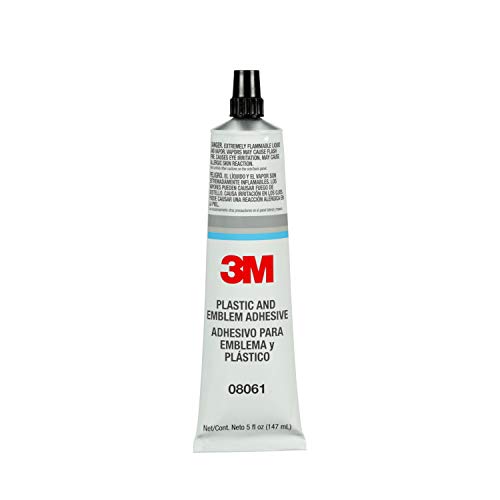
Most parts stores carry an emblem adhesive.
Here's how to cheat: get a $0.25 hex wrench that fits inside the screw as tightly as possible (or pay $3 for set of 25 on amazon), then make up some epoxy ($4) and glue the hex wrench in there. After it cures, unscrew the screw, and replace it with a more sensible screw.
http://www.amazon.com/Permatex-15067-Window-Defogger-Repair/dp/B000HBI9YQ
car guy here.
Here you go
The main advantage of MMA is that it chemically bonds to plastic, creating one solid unit - whereas epoxies are dependent on mechanical keying between the set epoxy and imperfections in the surfaces being bonded. In addition, set MMA has mechanical properties similar to plastic and does not create stress concentrations as strong as epoxy does when the underlying plastic flexes. That advertised "130kg/cm^2" probably represents ideal conditions, i.e. porous and inflexible surfaces with force applied evenly, which will not be met when someone trips and falls on an integration.
MMA can be ordered online:
https://www.amazon.com/Permatex-84115-5-minute-Plastic-Adhesive/dp/B000ALBZK8/ref=sr_1_43?ie=UTF8&qid=1527606011&sr=8-43&keywords=plastic+epoxy
You can do a 'good enough' integration without MMA, but you seem to care a lot about the strength of your finished product. I am aware of no practically feasible way to match the strength that it provides when bonding plastic to plastic.
I have used the paint in a rear window defroster repair kit to repair a broken trace in a keyboard film before. You can find it in just about any auto parts store. The mask they include is a bit wide for this, so I just used masking tape to control where the paint went.
Optional, but first, get you a little bottle of CA glue (cyanoacrylate, same as krazy glue or whatever). Just glue enough to hold the piece together for the next step:
Go to the auto parts store and look in the Bondo section. You'll find an adhesive metal mesh type patch that can go on the inside. Use that and some 2-part epoxy on the back side to get the structure of it all squared up.
For the front, ideally you'll just have the crack showing. Easiest thing is to just fill that with Bondo. That way you can sand it back down and get it smooth (of course, you'll have to repaint).
If the fairing is ABS, I've got another trick for you. It's called "the slush". We use this for ABS stormtrooper costumes. Get some ABS plastic, like from a sheet or something. Cut it up into as small of pieces as you can (like sawdust is even better). Put it in a jar with acetone. ABS will 100% dissolve in acetone, leaving a slush behind. Use a paintbrush and paint some acetone onto your fairings, getting them a bit melty right there where its broken. Then apply the slush as a filler. When it all dries out, it'll be one solid piece chemically welded together.
3M makes a body trim and weather strip adhesive.
http://www.amazon.com/3M-08001-Yellow-Weatherstrip-Adhesive/dp/B000HTNNDA
I just did the same thing while making a different upgrade. I'm trying Muffler Sealer to put it back in (hasn't arrived yet).
Edit: also replacing my thermistor with this one.
Looks cool but the things that stand out to me are, 1. The review that says it's single use rolls 2. The amount on the rolls. The 1" tape gets you ~1/3rd of a square foot of coverage with no overlap for $6 ($21.6/sqft), the 2" tape gets you ~2/3rd sq ft for $8 ($11.5/sqft), and the 4" tape gets you 1.7 sq ft of coverage ($6/sqft). Seems pricey, even more so if I have to toss out any partially used rolls. I might still try it because new materials intrigue me but it seems about as good as laying fiberglass over a plaster guaze cast or just wrapping in fiberglass and resin. Surface finish will be a factor because hours saved sanding are valuable hours indeed.
EDIT: math
EDIT2: For comparison, the fiberglass kit gets 8 sqft of cloth and 32oz of resin. I'd expect it to get me 4-8 coats on 8 sqft (never had a project that used the whole 8 sqft of cloth at once but I'm estimating about 4-6 oz of resin per coat and that 1st one always takes a bit more). Throw in a 50 cent chip brush for each of 4 coats and the price is about $25 or $3.1/sqft with the added bonus of being able to save the resin left over for your next project.
PC CULTURE WARNING
It's an FSWERKS CAI. I bought it on Amazon. 30 feet for $44. Called DEI reflectagold
Edit: here's the link DEI 010397 Reflect-A-GOLD High-Temperature Heat Reflective Adhesive Backed Roll, 2" x 30' Roll https://www.amazon.com/dp/B0039Z1V1K/ref=cm_sw_r_cp_api_Jf.vzb02TZG1F
30 feet was just enough for the top tube, and the entire heat shield. Had 6" left over.
Get some blue painters tape, some good drop cloth to protect and cover the stuff under and around this, and some 3M gasket adhesive:
https://www.amazon.com/3M-08001-Weatherstrip-Gasket-Adhesive-5/dp/B000HTNNDA/ref=sr_1_3?keywords=3m+gasket+glue&qid=1568910027&s=gateway&sr=8-3
Clean the area with some rubbing alcohol, put some of this between the surfaces (not too much that it oozes out) and then get it tightly wrapped up to set. The shit is magical but gooey and stringy as hell when you are dispensing it.
I've used this on door gaskets on Audis before. This is for the gasket stuck onto the door with that nicer double sided tape that likes to detach over time. Simply clean the surfaces, dribble a line of this stuff on and use some painters tape or something to hold it in place while it sets. For door gaskets the bleed out wouldn't be a big deal, but for the e-brake you'd see it. This glue is pretty robust, but given the cosmetic nature you'd want to be really careful on how much you use. Maybe play with it to get a sense for how quick it sets up if you want to spread it around lightly.
You can get it on Amazon or most autoparts stores https://www.amazon.com/Permatex-80697-Gasket-Hi-Temp-Adhesive/dp/B000HBNUDQ It was used a lot in the past for sealing one piece metal head gaskets and not as common now with the multilayer gaskets. It helps fill in any imperfections that might not seal so never a bad idea when reusing a gasket.
3M adhesive remover. http://www.amazon.com/3M-38983-General-Purpose-Adhesive/dp/B004EBNTYK/ref=sr_sp-atf_title_1_3?ie=UTF8&qid=1374548247&sr=8-3&keywords=3m+adhesive+remover
worked better then goo gone, goof off, and rubbing alcohol and didnt have any adverse effects on the paint. I used it for a large metallic business decal removal.
Add a couple of these when its cold. They are used regularly to delay fixing small internal leaks. Likely the start of a head-gasket failure. Can be purchased local i assume also.
https://www.amazon.ca/ACDelco-Cooling-System-Tablets-grams/dp/B000QIH3C4
Not bad, but I'd suggest stepping up to 3M Window-Weld (AKA Butyl rope). This stuff is super sticky and never dries out or loses it's elasticity. It's also waterproof.
I used it in my build last summer to kill metal on metal rattles and it was really effective.
Okay, I'll try to get this done on mobile.
Headlights: heat them and pop them open. It's honestly a huge pain in the ass Lol. Mask off and paint the internal bezel to your preference, but at least leave the ribbed and textured parts silver to ensure you still get good beams out of your lights. (The corner turn lens is also in there, see below for the tinting process.) Buy some butyl rubber ribbon and use that to heat and reseal your lights. I'll post links to the process I followed if I can dig them up on my PC. it's a little labor intensive, but the unique look is worth it.
Taillights and front corner turn signals: follow the process for applying VHT Nightshade spray on tint. I think mine are 3 or 4 coats and then clear coat. The clear reverse lights were masked for the tint and unmasked for the clear. You can then sand and buff them to whatever level of gloss you want. Mine were left slightly matted.
Lift/shocks/wheels/tires: it's an RC 2" bb with load levelers I got from Kolak on Jeep forums. Wheels are Discount tire MB TKOs and tires are 265/70R17 Goodyear Duratracs.
It's got a pinchweld mod to clear the tires.
If you want deeper info say the word and I'll give you a deeper write up when I'm on a PC.
EDIT for links
Wow. Lots of rough advice here. Permatex makes a two part epoxy they call "Plastic Weld." It's ugly, but it will do the job. Find another piece of similar plastic to use as scrap, glue your knocked out piece onto it, and then glue the whole patch piece to the back of this panel.
It'll be stronger than it was when it was new.
Car exhaust putty that contains sodium silicate. It's what I saw recommended a lot when I was assembling my jhead hot end. I bought some from a local car parts store.
http://www.amazon.com/gp/aw/d/B000BOAZM8/ref=mp_s_a_1_sc_1?qid=1464616690&sr=8-1-spell&pi=AC_SX236_SY340_FMwebp_QL65&keywords=miffler+putty
Also here is a post about that http://zennmaster.com/random-things/reprap-101-using-silicate-based-putty-to-install-a-thermistor-in-a-hotend
My guess is it may be this. http://www.amazon.com/gp/aw/d/B0002MID28
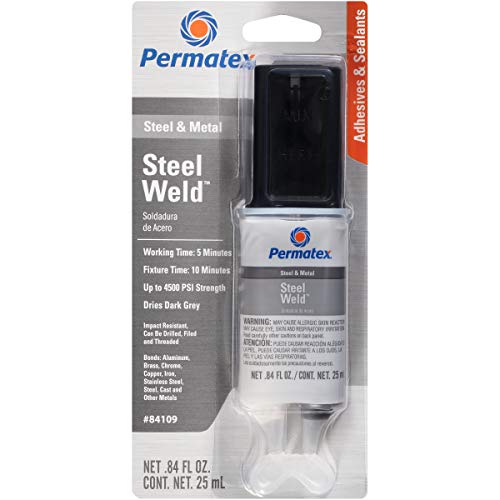
Yeah like an epoxy of some kind. Gorilla glue maybe? Or some sort of specific metal glue like this that I found on amazon.
I made it.... I got some old Nicholson files off ebay..... I think I paid $30 for 10 different files.... Then I annealed it by throwing it in the coals/ashes of a brush pile that I was burning and let it air cool overnight.... Cut out the size and blade tip with a hacksaw (tiring process) Used a belt sander to shape it down until I got the profile I liked and the blade was about the thickness of a dime. Drilled out the holes on my drill press. Used a makeshift kiln with a MAPP gas torch to get it to cherry red (about 25 minutes of torch time, I'll use charcoal next time) and quenched it in motor oil. Threw it in my shop toaster oven at about 425 for an hour to temper it, then quenched in water. I used Padauk wood for the handles ( I had some scrap leftover from a picture frame and gun rest that I made) I used a 5 minute epoxy, http://www.amazon.com/gp/product/B000ALJ4NS/ref=oh_aui_search_detailpage?ie=UTF8&psc=1
Which setup in about an hour and a half. And 1/4 brass rod,
http://www.amazon.com/gp/product/B000FMWZ5Q/ref=oh_aui_search_detailpage?ie=UTF8&psc=1
Then shaped the handle with my bandsaw, belt sander, and lots of hand sanding (to try and get all the bandsaw marks off)
Finished off with Boiled Linseed Oil which helps make the wood really pop with it's natural color.....
Then used a Gatco system to sharpen it,
http://www.amazon.com/Gatco-10005-5-Stone-sharpening-system/dp/B001DB9CQS/ref=sr_1_1?ie=UTF8&qid=1422323386&sr=8-1&keywords=gatco+knife+sharpener
And honed on a strop with some green compound
http://www.amazon.com/Woodstock-D2902-1-Pound-Buffing-Compound/dp/B0000DD35C/ref=sr_1_3?ie=UTF8&qid=1422323451&sr=8-3&keywords=honing+compound
and now I have to make a sheath...
My rack came off fine but my rig was garaged kept before me and completely rust free. Some people run into problems. There weren't any nuts below.
Heres exactly what I used based off this thread:https://forum.ih8mud.com/threads/factory-rack-removal-options.609224/
Bolts (8x):https://www.boltdepot.com/Product-Details.aspx?product=6677
Washers (8x):https://www.boltdepot.com/Product-Details.aspx?product=2938
Thread Sealant:https://www.amazon.com/Loctite-37396-Thread-Sealant-50-Mililiter/dp/B0002KKTGS
It just rained and so far so good. I'm gonna paint over the oval area where the rack sat with something here soon.
Ce fel de lipici/spumă îmi trebuie să lipsesc o bucată de plastic de o altă bucată de metal/plastic (s-a rupt ceva la un mecanism, și vreau să-l repar).
Vreau ceva ușor de folosit, nu hot glue, etc.
Un link către Amazon ar fi grozav.
Edit: am cumpărat asta și asta, nu știu dacă sunt bune, puteți recomanda și altceva.
Are you talking about sealing your air fittings? I would use something like Loctite 565. You don’t need thread locker on tapered pipe fittings.
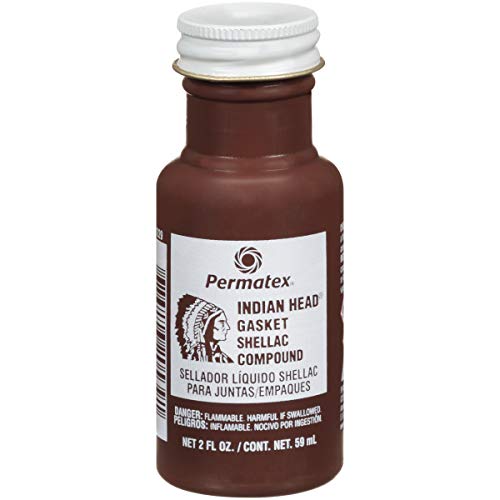
Home mechanics have used Indian Head gasket shellac on air-cooled cylinder heads which get up to around 450 degrees, but your cylinder base gasket will only see about 250 degrees at most.
http://www.amazon.com/Permatex-20539-Indian-Shellac-Compound/product-reviews/B0008KLOG6
Most people don't like the round applicator that looks like it belongs in a bottle of liquid shoe polish.
Hmmm. Who polishes shoes anymore?
Harder exhaust hangers to keep it from rattling around.
example: https://www.summitracing.com/int/search/part-type/exhaust-hangers/exhaust-hanger-material/rubber
Gold tape reflects heat very well.
example: https://www.amazon.com/Design-Engineering-010397-High-Temperature-Reflective/dp/B0039Z1V1K
Given the desires and constraints I see in your other comments, I'd say shorten the earth wire and dip it in the local equivalent of "brush-on insulator":
One example
second
third
fourth
This was the stuff I used as it had the highest temp rating I could find according to the tech info compared to the other brands.
It's so strange you posted this question, because I have a similar problem. A brand new car I just bought has finger smear marks on the edges of the back window. Ammonia based glass cleaner had no effect. It appears to be some kind of dried adhesive, similar to super glue. I'm guessing it's what was used to glue the back window on and the idiots at the factory weren't careful. It's right around the defroster grid near the edge. If it was on the outside, I'd be able to use a razor blade. Unfortunately, the dealership I bought the car from is in another state. The service manager suggested 3M Adhesive Remover, but there are various part numbers to confuse me:
https://www.amazon.com/3M-03618-Adhesive-Remover-oz/dp/B000BQYA7W/ref=sr_1_5?ie=UTF8&qid=1536818222&sr=8-5&keywords=3m+adhesive+remover
https://www.amazon.com/3M-38983-General-Purpose-Adhesive/dp/B004EBNTYK/ref=sr_1_6?ie=UTF8&qid=1536818222&sr=8-6&keywords=3m+adhesive+remover
https://www.amazon.com/3M-General-Purpose-Adhesive-Cleaner/dp/B0002NUO6K/ref=sr_1_4?ie=UTF8&qid=1536818222&sr=8-4&keywords=3m+adhesive+remover
I contacted 3M about this twice and and this was their only response:
"We’re uncertain as to what the residue Is but it will likely work. If used properly I wouldn’t expect any harm to come from trying it. Use nitrile gloves: Spray it onto a clean detailing cloth and use it to remove the adhesive.
Any of the part numbers they mention should work, these vary due to package size options and volatile organic compound restrictions."
The second part to their answer doesn't make sense to me, and I'm not sure what the qualifications were of the person who responded. I responded by asking which one was the least aggressive and didn't get a response.
When is the last GPU you saw that reached 650f?
https://www.google.com/url?sa=t&source=web&rct=j&url=https://www.amazon.com/Pro-Seal-80726-Hi-Temp-Silicone/dp/B000FW7VNW&ved=0ahUKEwiTwtC5_MnTAhVR6GMKHeEMB1cQFggwMAA&usg=AFQjCNFpDDgNw8rM-PcUg40sUkPUjMm7-A&sig2=8T8LOsimCZvE90qno7NDmg
Q-Bond QB2 Ultra Strong Adhesive Repair Kit https://www.amazon.co.uk/dp/B002XF4S6C/ref=cm_sw_r_cp_apa_.zJ2AbT61FQ0E
This is pretty good stuff.
I'd like to "glue" the piece back on and not worry about it coming off again. I thought about silicone, but wasn't sure how strong that would be. I think this would get some 'pressure' each time the window is closed as it it meant to press against the base of the window opening and compress rubber gasket.
​
This is what I'm now looking at -- 4oz should be more than enough for say... 3ft of window flashing to affix?
The stock system has gaskets at the stock exhaust manifolds-to-downpipe but uses metal donuts between the pipes otherwise. Called gaskets, but are really compression donuts. They can be reused unless you see visible damage that may allow the gases to escape on the outside. i.e. cuts, severe pitting, etc. They're only $2 a piece or so if you want to change them.
Alternatively, you could buy a can of Permatex copper high temp gasket sealer and spray them down to seal up those imperfections for added reassurance.
https://www.amazon.com/Permatex-80697-Gasket-Hi-Temp-Adhesive/dp/B000HBNUDQ
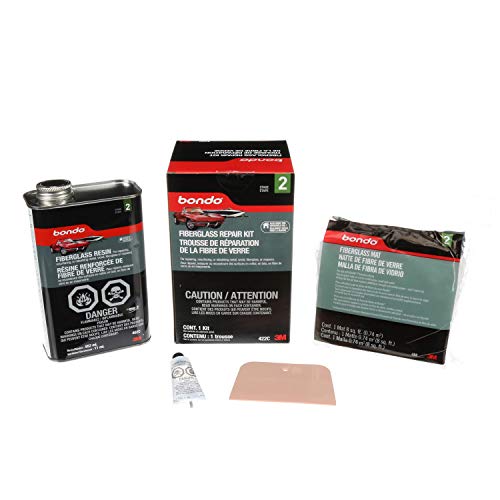
If you want to do it right, you're going to need some fiberglass sheeting and some resin. For the first one, you could use some surfboard repair resin like this
I think the second one is too large just for that. This looks like a good, cheap kit that would repair both of them.
Just remember, if you haven't worked with this kind of stuff before, the cleaner you apply it, the less you'll have to sand later!
Any ideas for dealing with this at home? I've always used bondo and rust converter, but this has finally gotten quite big and I'm not sure how to proceed. Don't have welding equipment.
Opinion on those net things you can buy for structural support for bondo? Here's what I'm looking at -
Bondo 932 Self Adhesive Patch
https://www.amazon.com/dp/B000HA9O5A/ref=cm_sw_r_cp_api_2PpFzbCTZVRTW
I used this Bondo Fiberglass Resin. http://www.amazon.com/gp/product/B000CCOK48/ref=oh_aui_detailpage_o09_s00?ie=UTF8&psc=1
I used this and used the tiniest little bit on each corner. Waaay too much in the tube for a delid, but pretty handy to have around.