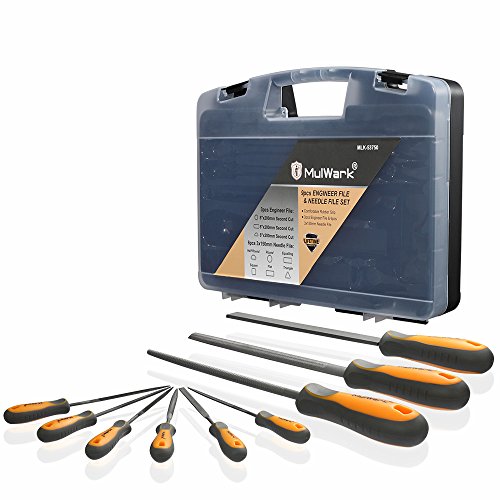
Best file handles according to redditors
We found 101 Reddit comments discussing the best file handles. We ranked the 40 resulting products by number of redditors who mentioned them. Here are the top 20.
We found 101 Reddit comments discussing the best file handles. We ranked the 40 resulting products by number of redditors who mentioned them. Here are the top 20.


https://www.amazon.com/dp/B07TCB4847/ref=mp_s_a_1_6?keywords=Conical+file&qid=1562485253&sr=8-6
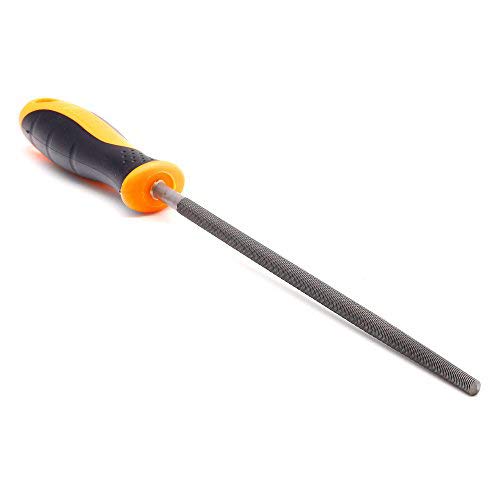
https://www.amazon.com/dp/B01MRCZKIX/ref=mp_s_a_1_2?keywords=Round+file&qid=1562485355&sr=8-2
Something like these should be fine. I ended up getting one in a multi pack of files.
Glue: Super glue. Plastic glue only works on very specific types of plastic, and not what PP traditionally uses (though that may change with the new plastic kits, I hear the TEP works with plastic glue, but not sure). You don't need any special type of super glue, it's basically all the same aside from the viscosity. There's basically no difference in performance between one of the expensive hobby brands and a general purpose super glue.
Brushes: In general you get what you pay for, but I would skip the branded brushes from the hobby companies. Some are good, but it's a crap shoot. Invest in some good red sable brushes from a real artist brand like Raphael or Windsor & Newton, and some brush soap. I am partial to these.. If you take care of them they will last basically forever. Good natural fiber brushes are more resilient than synthetic (in my experience), and hold their shape longer. You'll want to pick up a few cheap brushes for drybrushing, though. That will ruin the bristles. Size 2 is what I use for most of my painting. Don't get trapped in using tiny brushes. The sables will hold a fine point, even on the bigger brushes, and you want the large brush because it holds more paint in the belly and gives you more work time before it dries on the bristles.
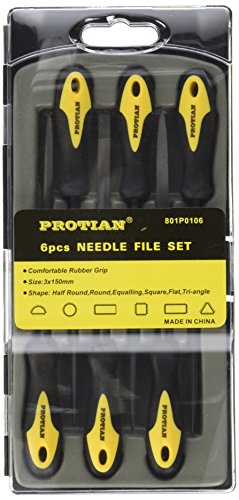
Files: Just get a cheap set of needle files like this. However, you won't need them for a lot of things. Most plastic models can be cleaned up just by scraping an xacto blade along the mold lines (holding the blade perpendicular to the line), and even some metal models can be cleaned this way unless they are poorly cast. The files are just for the larger models or for badly cast areas.
Primer: There are too many choices here to really cover that, just use a little google-fu and see what you like. I have used everything from cheap krylon to brush on. Army painter primers are good if you are painting a set scheme because the tinted primer can double as a basecoat, but they are a bit pricy. I also use gesso sometimesas it is very humid around here, and that takes some of the variability out of the issue of priming models in a swamp.
Misc: I don't use a clamp, generally. I tend paint the models on the base. To hold them steady I usually just stick a glob of blu tack on top of a nearby bottle or object and use the bottle as a handle. Most of the time it's a can of primer I use as my handle, the larger / weighted object helps to steady the model in my hand. Blu tack also does double duty as "painter's tape" for me sometimes if I want to keep some section of a model free of paint. It's also good for removing dust from a primed model if you're like me and prime a huge batch of minis, then forget about them for 6 months.
If you're pinning models to the bases, you can also just stick the pin into the chuck of your model drill and use that as a handle.
That's a general purpose handle for anything with a tapered tang. Files use this type of handle for instance. https://www.amazon.com/ToolUSA-Wooden-Handle-Smooth-Finish/dp/B01EVQP7VU/ref=sr_1_13?ie=UTF8&qid=1523804611&sr=8-13&keywords=file+handle
Just adjust your deadbolt hole, it’s normally not hard... if you get a file or chisel, it shouldn’t take more than 10 minutes. If the plate is really far off, just file a bit of the plate off or loosen it and try to move the plate a bit down.
Something like this would work: https://www.amazon.com/dp/B0728HH8KG/ref=cm_sw_r_cp_api_i_9ZBvDbR3FZK3E
Most people will suggest skipping GW for paint and hobby tools to save money. I suggest hitting amazon for a pair of flush cutters, set of needle files, and pack of testors model cement. Krylon camo black spray paint is a fine substitute for expensive primers. Vallejo paints are a top reccomended brand, and there is a conversion chart to convert old and new gw colors to vallejo colors.
A set of just standard tac marines is a great place to start, you'll use them for sure and theres plenty there to work on technique, hit up the warhammer youtube channel, as they have painting tutorials that are really great, watch as many as possible as each has something you can use even if they aren't painting space marine models.
http://www.amazon.com/gp/aw/d/B00FZPDG1K/ref=mp_s_a_1_1?qid=1459352340&sr=8-1&pi=SX200_QL40&keywords=flush+cutter&dpPl=1&dpID=414t7uLh8KL&ref=plSrch
https://www.amazon.com/gp/aw/d/B0013E68SU/ref=yo_ii_img?ie=UTF8&psc=1
(Starting out you should be fine with just a zero, but if you really have moneh burnig a hole in your pocket a 1 and 00 would also come in handy eventually. Never leave your brush sitting in your water cup, don't let paint dry in your brush, and keep paint out of the metal part.)
http://www.amazon.com/gp/aw/d/B0013D53CS/ref=mp_s_a_1_2?qid=1459352997&sr=8-2&pi=SY200_QL40&keywords=testors+model+glue&dpPl=1&dpID=51QQU8wrc-L&ref=plSrch
https://www.amazon.com/gp/aw/d/B000NPUKYS/ref=mp_s_a_1_2?qid=1459352697&sr=8-2&pi=SX200_QL40&keywords=needle+file+set+for+metal&dpPl=1&dpID=412lincr%2B5L&ref=plSrch
Add an xacto and tube of superglue from your local superstore and you have all the tools needed to crank out perfectly acceptable models. I'll admit the brush is a bit overkill, but you're saving so much money on the rest of the tools, and a good brush makes the experience much more enjoyable, I suggest splurging there. Also don't bee fooled into buying a basing kit, regular old sand does just fine,
yes.. i modified the tip, i have a set of miniature hobby files, (like here). i used the round one becauase of its tapered end, you can
findfeel the perfect part of the taper that will file the entire groove at once (the sides and bottom).i dont know why those are so expensive though. i know i didnt pay more than 8 bucks or so at sears a loooooong time ago.
i tried all the shapes, and the round tapered point worked the best. i thought the triangle would work well with its sharp angle to grind a deep groove, but just wasnt enough surface area for the file to work properly. the metal is too hard for that approach, let the tool do the work for you.
all in all, with trial and error (easily half of the time) it took a couple hours of patiently filing the grooves in the tip, working in 1/4" long sections at a time along the entire length of the groove. then move onto the next.
http://i.imgur.com/SRff2bs.jpg
pardon the dirtiness of my M tip, just means its been used (and loved :) )
you cant really see that i filed the grooves deeper, the only thing that is obvious is the notches in the top. i have a friend who has an unmodified M tip, and he likes mine more, wants me to do the same to his as he likes the minor increase in air flow while carb is fully capped.
For the sprues you need some actual sprue cutters
https://www.amazon.com/dp/B00FZPDG1K/ref=cm_sw_r_cp_apa_n2UWBbBM7Y938
Nothing much more expensive than those as you really shouldn't run into a need for hard jobs from them
Should also consider some mini files
https://www.amazon.com/dp/B078MHF415/ref=cm_sw_r_cp_apa_b4UWBb9P1BYBP
Something that really let you get at small angles, ideally you do these things before glueing but can be done after.
Doing everything with the exacto is definitely dangerous, and theres not often a need to put your hands in that much danger.
The 3 things you need are:
That's pretty much it. If you want to dive in really deep I have a massive post that lists other tools and touches on a lot of customization that people have done. But none of that's mandatory, you can very easily forge ahead with just the 3 tools I linked above.
Bourns PTD90 (datasheet) are in stock at DigiKey.uk at £1.63 per piece.
Honestly, though, using a gear wheel type of pot and cutting a slot in the Altoids tin is probably the "best" option. Drill holes along the centerline and then smooth the edges to a nice slot using a (needle file set)
Here is what I consider the bare necessities:
Radius block: Get one with the radius to match your fretboard. Attach self-adhesive sandpaper or use double-sided tape, mark your frets with a Sharpie, and start leveling.
Fret crowning file: Pick one that's the appropriate size for your frets. You can find info on what size to use on Stew Mac's site.
Needle files: These are just good to have. They'll be helpful to file the fret ends among other things.
Extra fine sandpaper/0000 steel wool: Once your frets are shaped, you will want to polish them. Steel wool won't give you the shiniest finish, but it's perfectly presentable. If you want mirror-finish frets, use fine sandpapers or fret erasers. ALWAYS mask your pickups or do your fretting with the neck detached from the body. You will end up with fret filings and steel wool particles all over your pups otherwise.
For tutorials and advice, check out r/Luthier or the Crimson Guitars YouTube channel.
> First, how do I patch holes in the plastic
You really can't unless you want to repaint the entire SNES case. You'd need to use Bondo, fill it, sand it, prime, then paint ... or spend $6 on a new shell and be done with it.
>how do I smooth out the edges of the holes I cut.
Use a fine grit file. You gotta remember that filing eats away at material too. Make your initial cut smaller than you need, then file it to the proper size.
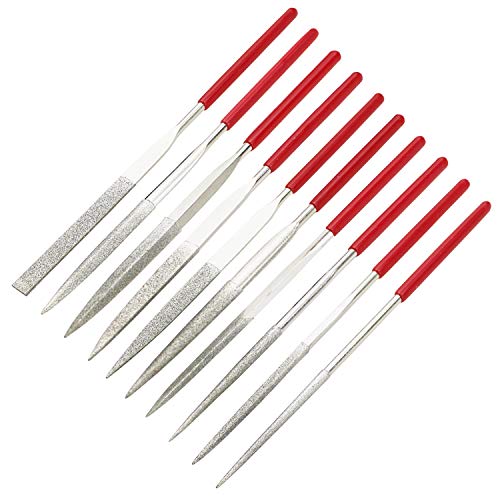
its easy to do this yourself if you want to take a shot at it. it’ll take about 15-20 mins if you use these diamond files
i bought these and do my own detent ramps.
Give me a minute, I can link you to a comment I found explaining it in depth
EDIT: I'm just gonna paste it here. For reference, I,believe priming is coating it in a thin layer of paint to act as a base. Use black primer for darker results and white for lighter. Credit to u/pyrese
I love painting the hero forge minis; sounds like you did yours in the new high detail plastic.
I've done a few of those recently and once you get them primed, it's not much different than painting die cast minis.
some constructive criticism: The great paint job is offset by the visible seams on the legs. Sand them down as much as possible. Get a cheap set of micro files (https://www.amazon.com/dp/B076Q32XP8/ref=sspa_dk_detail_1?psc=1&pd_rd_i=B076Q32XP8&pd_rd_wg=iN6qm&pd_rd_r=VZ7SG6V2YP3S2GRE6E1F&pd_rd_w=s3J88) - you can probably get them for $5 if you look around - to refile any grooves/panel seams that are out. Use a little automotive putty (its cheaper than model putty and just as flexible) to cover any really out of whack seams, then you can use a triangular file or a scribe to recreate them.
That will take your modelling to the next level. You already have the painting side covered.
Good stuff. I actually don't have a file to use, so I'll have to get one. Would this -- click here work?
I'm gonna have to do like 3-5 stem transplants soon. What (tool) did you use to chop off/remove the old stem?
What's your handle on Discord?
I love painting the hero forge minis; sounds like you did yours in the new high detail plastic.
I've done a few of those recently and once you get them primed, it's not much different than painting die cast minis.
For what your needs are I would say you need a hand drill and a hobby knife (xacto) not files. I have used a cheap knife from my local hobby stores to slice off iconography before and it is very easy although you do need to file off some remains. As for magnitizing you want a hand drill with the right sized drill bits. As for recommendations I recently got a pack of files off amazon for cheap that I am loving.
https://www.amazon.com/dp/B000NPUKYS/ref=cm_sw_r_cp_apa_vcZvyb0CSA63A
A basic needle file set
and some chainsaw files in different diameters.
Most local hardware/lowes/HD etc will have these so no need to order online and wait
For the fretboard scrape the heavy gunk off with a razor blade then wipe it down with naptha. Then you can spray a little guitar honey fingerboard oil on it if you like the look of darker fingerboards. You don't necessarily have to oil it, but I think it looks nice. Boiled linseed can be an alternative, but keep in mind it's a drying oil and will stay there.
For the nut, a tusq but is a cheap and pretty much a drop in replacement. Bone nuts can get pretty expensive, and tusq is just as good if not better. There's precut fender style nuts for like $8.
If the frets are just a little tarnished, tape off the pickups with masking tape first. Then go 0000 steel wool->Dremel felt polishing pad with jewelers rouge->metal polish with a microfiber pad, then rub everything down with a dry part of the microfiber.
If they're totally messed up and divorced, uneven, etc then you can completely do the frets or take it to a shop. Level/crown/polish them. Regardless of the route you take I would probably file down any protruding frets that poke out past the fingerboard.
Anything perfectly level with some sandpaper to level frets, long granite scraps from companies who do countertops can be super cheap/free. You'll also need a sharpie, fret rocker, and straightedge. Make sure the straightedge is actually straight, cheap rulers generally aren't.
Any flat file for protruding frets. A small needle file with a safe edge ground on for dressing the ends after bevelling. For crowning use a triangular file with the corners ground smooth.
Bevelling and protruding frets
Fret ends
Crowning
I listed cheap options to get started. You can always buy nicer ones. Stewmac, crimson guitars, LMI, and similar sell specialized ones for a pretty big markup.
If you use something like the TAM74104 Tamiya Tools - Basic File Set - Smooth Double-Cut, it will cut down the time it takes to sand down a nub. Here's a link if you want to try them: https://smile.amazon.com/gp/product/B00CE3L96K/ref=oh_aui_search_detailpage?ie=UTF8&psc=1 to
For despite there price of 8.15 with (prime free shipping) there great files, I just love my set. These can also be used on metals.
I finished building this as soon as my R8 78g zealios showed up. They feel very nice! Assembly was a blast. The pcb and plate were really marvelous to work on; all the tolerances are so tight and precise, and the kit is so well thought out. I have to give much praise to Justin for how excellent of a job he did.
-------------------------------------
About the keycaps:
A custom keyset on a TEX Yoda II requires modding (cut and file) because of the trackpoint, so I only use basic White on Black alphas, or vice versa. The G, H, and B caps I used are actually DCS profile, which is close-ish to Cherry. I used them because they were part of a grab bag from long ago so figured I'd save some money especially if I screw up.
The white G/H/B caps are from a $30 NPKC pbt keyset I got from mechmarket. Like with the DCS caps, preparing them for a TEX Yoda requires a little cutting from a flush jewelry cutter and some filing with a file. And some spare keycaps to render useless for any other keyboard without a trackpoint.
-------------------------------------
About the keyboard:
My first TEX Yoda gave me really bad RSI so I had to sell it and use just ergo/split keebs for a while. Oddly enough, I noticed my Thinkpads never gave me any issues. I discovered later that it was due to lack of a palmrest, which I need to compensate for my ergonomically poor typing habits.
I mapped all my bottom right keys to arrows and caps lock to ctrl. The default mapping of the middle scroll button to a Function Layer is downright brilliant. The online layout customizer is super simple to use. TEX Yoda II + palmrest + GMK + 78g R8 zealios = heaven to type on.
Although there's all kinds of branded equipment (from pin vises to knives to files) specifically for minis, you usually don't need to get the "official" stuff. Cheap pin vises (for drilling and pinning) can be found at any hobby shop, and my $5 set of files works splendidly.
That said, I did get the official wet pallette simply because it was much smaller than any non-branded ones and takes up less bench space. And, admittedly, I'm ok with paying for the convenience of pre-measured pallette sheets. If you wanted to try out painting with a wet palette (and you should!), you can make your own pretty easily.
You might also consider putting something over the table/desk/whatever you work on. So you don't get paint on it or accidentally cut into it with exacto knives. I just use a desk pad that I found at staples. That way I can also write notes to myself on it.
I've started using a metal file set made by Tamiya . They are great for removing sprue left overs on parts and you don't use up all your sand paper or sticks in the process. For other sanding, use sand paper/sticks like the others have suggested.
https://www.amazon.com/TAM74104-Tamiya-Tools-Smooth-Double-Cut/dp/B00CE3L96K/ref=sr_1_2?ie=UTF8&qid=1474641150&sr=8-2&keywords=tamiya+file
If you like the puzzle of it perhaps making bump keys would also interest you, mini file set with blank keys can be useful https://www.amazon.com/dp/B0058EDUM8/
A cheap set works fine for plastic. Something with a grip like these should do.
https://www.amazon.com/TEKTON-6655-Needle-File-10-Piece/dp/B000NPUKYS/ref=sr_1_4?s=hi&ie=UTF8&qid=1502283785&sr=1-4&keywords=needle+files
Thank you.
I used Sunkee Brand from Amazon. They are just barely the right size. In order to get the Pro Micro to fit I had to use a small round file to taper the openings on the PCB for the pins of the sockets. You really need to be careful, it would be easy to rip the pads off the pcb, so go slow. By doing this it also allowed the socket row to set firm on the pcb so it was very easy to get it at a 90 deg angle to the pcb, turn over the pcb and solder the socket row into place. I snip the pins flush, so the solder points are nice and smooth.. but you do not have to do that.
I was lucky, the problem was staring me in the face... I actually took a photo of it during the build and did not see it until later. There was a part below the USB jack that had not been soldered during manufacture. See that C106 part? The end is clearly not soldered. I have a very tiny solder tip so was able to just heat it and drop a tiny spot of solder.
I started investigating because everything except the far right column, column 12 with BackSpace, Quote, Enter and Right Arrow... did not work. I thought it was a bad diode but as soon as I looked at the Pro Micro it was clear. I was lucky, did not even have to take the Pro Micro off.
But socketing is a MUST with Pro Micro's. I use a half a Nyquist at work and this AM the USB broke right off... I have to take it home tonight and throw a new Pro Micro on there and re-flash it. I am going to try and add some kind of epoxy somehow too... these things are WAY too fragile for what we need them to do. I plug an unplug mine almost every day... even with a magnetic cable this one broke.
Good luck.
I have this set of diamond needle files and they work great. There’s a bunch of different shapes so you can get into any spot, they are cheap, and they last forever when used against wood. I use them all the time for spirals.
Here's a big fat messy shopping list I made for someone a while ago. You might find it useful too.
http://www.amazon.com/Quickshade-Ink-Warpaints-Army-Painter/dp/B00HC8D80W
Amazon.com: Quickshade Ink Set Warpaints Army Painter
http://www.amazon.com/Pacer-Technology-Zap-Zap-Adhesives/dp/B00SXJJ2QI
Amazon.com: Pacer Technology (Zap) Pacer Technology (Zap) Zap-A-Gap Adhesives, 1 oz
http://www.amazon.com/General-Pencil-Company-Masters-Preserver/dp/B0009RRT9Y
Amazon.com : General Pencil Company The Masters Brush Cleaner & Preserver 2.5 0z. : Brush Soap
http://www.amazon.com/Army-Painter-Wargame-Starter-Paint/dp/B01BJ55UDQ
Buy Army Painter Wargame Starter Paint Set - PLUS Promo Undead figure
http://www.amazon.com/280715-American-Accents-Primer-12-Ounce/dp/B00KZ6LLZW?
Buy Rust Oleum 280715 American Accents Ultra Cover 2X Spray Paint, White Primer, 12-Ounce
http://www.amazon.com/TEKTON-6655-Needle-File-10-Piece/dp/B000NPUKYS?
TEKTON 6655 Needle File Set, 10-Piece
http://www.amazon.com/Xacto-X3311-Precision-Knife-Blades/dp/B0000DD1N4?
Buy Xacto X3311 N0. 1 Precision Knife With 5 No. 11 Blades
http://www.amazon.com/Most-Wanted-Wargamer-Set/dp/B007H4YR8S
Amazon.com: 1 X Most Wanted Wargamer Brush Set
http://www.amazon.com/Xuron-170-II-Micro-Shear-Flush-Cutter/dp/B000IBSFAI
Xuron 170-II Micro-Shear Flush Cutter: Wire Cutters
http://www.amazon.com/Milliput-Standard-2-Part-Hardening-Yellow/dp/B011BO9R5W
Amazon.com: 2 X Milliput Standard 2-Part Self Hardening Putty, Yellow/Grey
Edit: Of, and I used this guide for making my Thinner. http://www.reapermini.com/Thecraft/15 But I'm going to experiment more, because this is not perfect.
Nah.
Here are tools that will get you going well, IMO.
http://www.amazon.com/Xuron-410T-Tapered-Tip-Shear/dp/B000IBQEEW/ref=pd_sim_sbs_469_4?ie=UTF8&dpID=31aHJgL3pNL&dpSrc=sims&preST=_AC_UL160_SR160%2C160_&refRID=1QA091E0TTJ7J8FW3MKN
http://www.amazon.com/X-ACTO-Series-Knife-Cap-XZ3601/dp/B005KRSWM6/ref=pd_bxgy_469_img_2?ie=UTF8&refRID=0QC3ZT6985MJV0ZTB72N
http://www.amazon.com/Piece-Precision-Needle-File-Set/dp/B006N3EPKE/ref=sr_1_3?ie=UTF8&qid=1453474293&sr=8-3&keywords=needle+files
give diamond file a try. they are the best. I have this one and it sands prints flat in a few swipes.
https://www.amazon.com/Premium-Grade-Diamond-Needle-Stone-Glass/dp/B0048087RQ/ref=sr_1_3?ie=UTF8&qid=1468984238&sr=8-3&keywords=diamond+file
In addition to whats listed here:
Self Healing Cutting Pad
Roll of paper towels
Exacto Knife with spare blades
Mini Files
Pin Vise (aka Mini Drill)
You're going to need to get that down a bit further or the recoil spring assembly will get caught. A round bastard file will make that easy.
https://www.amazon.com/KW1-Kwikset-Brass-Blanks-JMA/dp/B00681KWW6/ref=sr_1_1?s=hardware&ie=UTF8&qid=1524020562&sr=1-1&keywords=key+blanks&dpID=5174G6CF3cL&preST=_SX300_QL70_&dpSrc=srch
https://www.amazon.com/TEKTON-6686-6-Inch-Mill-File/dp/B000NPT7A6/ref=sr_1_4?s=hi&ie=UTF8&qid=1524020581&sr=1-4&keywords=metal+file
I got a set of these. There is really just one in the set I used regularly. Flat on one side and curved on the other, coming to a small point at the end.
http://www.amazon.com/Nicholson-Piece-Hobby-Carded-Length/dp/B00002N5JT/ref=sr_1_2?ie=UTF8&qid=1407434449&sr=8-2&keywords=small+files
Try a hardware store. Ask for a wood rasp. Then pat yourself on the back for paying half as much as you wood in a cooking store.
http://www.amazon.com/WOODSTOCK-D3113-3-Piece-Rubber-Handles/dp/B0000DD4KE/ref=sr_1_1?ie=UTF8&qid=1375906753&sr=8-1&keywords=wood+rasp
I just started using files to shape wood this week and it surprised me how easy it is. Now, I am shaping larger pieces but I would imagine smaller rasps or files would really help out.
Maybe someone else can give more information, but below are a few examples.
Detail Rasp Set
Small files
If you are going to do this on an ATH, I would highly recommend getting a rounded bastard file.
It will make your life so much easier, I was using a triangle file that has inconsistent sizing all along it so trying to file the slot for the audio jack was a bit of a nightmare.
Needle nose pliers, the little snippers that come with your printer and cheap files. I'll also add that you rarely need supports for the inside of circles. I can print very large circles without the need for supports.
Here are the files I use, https://www.amazon.com/Needle-HIGHEST-QUALITY-Hardened-Strength/dp/B01MRCZKIX
nice!
I use jewelers files for the majority of my cleanup...
https://www.amazon.com/gp/product/B000NPUKYS/
The Polymer 80 kit comes with everything you need to finish the lower (minus the parts you put into it). Lower, jig, drill bits, and an end mill bit. It's super easy. Get yourself a set of precision files to clean up some of the tighter spots.
That file? Not very well, no. You need one where the file pattern is present on the end of the file like the far-end one here. This means that you can get right in to the cap to smoothen it off!
I used a pair of wire cutters similar to these to cut the rest of the cap away to leave just the stem.
If you're LightningXI, I've just messaged you!
I used a glue stick to cover the box with paper and drew out the dimensions of the meter. After that I drilled holes to cut out most of the area and finished squaring off the hole with small hobby files, like the ones in the FAQ. These files: http://www.amazon.com/TEKTON-6655-Needle-File-10-Piece/dp/B000NPUKYS/ref=sr_1_2?s=hi&ie=UTF8&qid=1416093199&sr=1-2&keywords=tekton+files
these are the ones I use for reference
I don't know what to tell you with specifics for Spain, but I can give you some general info that may or may not be helpful to you.
First off, there's this link in the sidebar. It'll give you a bunch of options.
Your hobby knife and mouldline remover will be the same thing. The handles all function the same way. However, I'd recommend picking up some kind of hobby knife set so you get a variety of blade shapes to try and multiple handles to use. #11 blades are the standard, and I prefer X-acto brand, but your mileage may vary. Some larger blade sizes won't fit into smaller handles. Buy in bulk to save money. You can remove mouldlines with the back of a blade, rather than a separate tool.
Any kind of cheap and well-reviewed wax tool / clay tool / dental tool set will work for scupting. Same deal with needle file sets. And with your pin vise. The drill bits will break (for any set), though, and bits can be problematic to replace if you're not sure of exact sizing.
A set of needle files like these will help with sanding in hard to reach places: https://www.amazon.com/Fatmingo-LX-0001DT-Titanium-Coated-Diamond-3x140x70mm/dp/B01DC7PPJ8/ I have a cheap set from Aldi. The plastic handles have fallen off a couple though, so maybe look for ones that are a single piece like the ones in the link.
After sanding, I fill any seams or defects with Tamiya basic putty, or for really large areas I use a water based wood filler. After giving that many hours to dry, usually overnight, I sand / file that too.
For painting, Tamiya acrylics. I am not a shill, honest. It has just worked well so far, and you can thin it down for airbrushing if you want to. I do a coat of spray on primer first.
It helps to have decent brushes which will last a while, put down an even coat, and not leave hairs in the paint. They can be a bit expensive, but if you take care of them, it's worth it in the long run.
After all that, I usually do a clear spray overcoat.
Best of luck with your painting!
To smooth out the bare clay on your pot's foot, use a diamond pad under running water so you are not breathing in silica.
If you want to sharpen a tool use a diamond file. Even if you use cheap tools that you don't care about, sharpening by hand will let you get the best edge, and it will not go dull as quickly since you are not heating the metal up.
This is what I ended up using:
https://www.amazon.com/gp/product/B000NPUKYS/ref=oh_aui_detailpage_o05_s01?ie=UTF8&psc=1
non-mobile link: http://www.amazon.com/gp/product/B004A768OG
I posted a review in the comments section if you want to read that. The fits are kind of all over the place some stuff fits nice, other stuff is way too loose, a lot of it especially if you paint it requires a lot of sanding and filing to get them to fit so make sure to pick up some of these. They will make it relatively easy to get the fit right. I would say I ended up gluing about 60% of it together though, so look at it like a glue kit that has some parts that snap together. I also did this because there is a lot going on with each unit of it, and it really builds on itself. I did not want anything shaking loose so even stuff that fit well I would glue just to be sure. In spite of all of this, if you are an experienced modeler, I would recommend this kit. It is definitely a challenge, it makes you work for it.
My work flow for the assembly basically became filing down a fitting, making sure it fit, then gluing it
I would say make sure you have a couple of PGs under your belt before this, I'd also recommend having experience with older glue kits, and probably some of the mod kits or resin kits as well. It isn't easy like Bandai but I legitimately did have fun with this kit.
If you end up getting it and have questions about it feel free to contact me.
Like this?
It took a LONG time. Took me almost 1.5 hours. Here are the files I bought.
http://www.amazon.com/gp/aw/d/B004A768OG
What about using something like this?
I use hard Wave sticks too and love them. They sand very flat (something I liked files for) but are quite gentle on the plastic in terms of deap scratches. BUT for some reason the 800 grit is disconnected like in your link. Anyone know where else you can get it?
In terms of files I have the Tamiya basic , Tamiya fine basic , and a (hopefully) nicer plastic hobby file on order just to try. Files are nice for larger jobs like serious molding flaws (not common in Bandai kits) and the fine ones are OK for nubs but still quite rough compared to any sanding stick. Although, as you know I'm sure, files last forever and require much less effort and time to chew through plastic. I'm hoping the plastic file is the Holy grail and is a good balance. I bought a set of needle files and diamond files from harbor freight and they blow. The trash just don't grip or cut don't waste your $3.
And as a reference I own Revell, squadron , nail buff sticks, and have made my own sticks from automotive sand paper. The nail files are way too rough imo, making my own is a pain, and while the squadron sticks are nice I mainly only used the tri-grit while I used all the Revell except the roughest and are probably the best value imo. I still use the other more flexible kinds but dramatically prefer wave. Wish the 800 grit still were available.
Long post sorry. Hope it helps
Edits: spelling, phrasing, and lots of links
I've used this file set to alter some of the exact same plates to work with different layouts. The plate is aluminum, so it's surprisingly easy to file
A file set should do the trick.
Used to happen to me all the time. Get a decent, or cheap, hobby saw and file set. I got these from Amazon real cheap and they work so well compared to a razor and/or knife.
Get some Nicholson files, or needle files. https://www.amazon.com/gp/product/B002YLYJHI/ref=oh_aui_detailpage_o00_s00?ie=UTF8&psc=1
https://www.amazon.com/gp/product/B001R1TB6K/ref=oh_aui_detailpage_o00_s00?ie=UTF8&psc=1
https://www.amazon.com/gp/product/B001R1SCR4/ref=oh_aui_detailpage_o00_s01?ie=UTF8&psc=1
https://www.amazon.com/gp/product/B00X5I5ZAE/ref=oh_aui_detailpage_o00_s00?ie=UTF8&psc=1
https://www.amazon.com/gp/product/B0000DD4KD/ref=oh_aui_detailpage_o00_s00?ie=UTF8&psc=1
Can you explain this a bit further? I've read the top few google hits for 'rasp woodworking' and actually realized that I used one way back in middle school (?)(high school?) when I took basic wood working. Is it just a matter of starting at coarse and going towards fine (like sanding)? I see Amazon actually carries a few, would something like this be reasonable?
Thanks for your help, I really appreciate it!
A friend of mine who paints minis recommended that I get small files to clean up my prints. I just got some from Amazon and tried them out last night. They make a huge difference
https://www.amazon.com/dp/B000NPUKYS
Links to cheap files.
Link
Link
Link
Try this; a triangular tapered steel file/rasp. It's much easier to store with your fencing tools (and travel with - although I don't know why one would).
It's easier than a hacksaw in my opinion and won't damage the threading on the tang like bolt cutters will.
A dremel is probably the easiest option but, the triangular file is so simple that I've never felt the need to use buy a dremel.
I'm a noob but no one else has said anything:
Material:
For larger figures you'll probably want some sort of clay as opposed to epoxies like green stuff/ graystuff/ milliput. ( https://www.sculpey.com/super-sculpey/9-super-sculpey-firm ) super sculpy firm is the only polymer clay I've used (oven hardening). Unless anyone with more experience pops by I'd say just get some super sculpy and play around with it. Learn what you like about it or dont like, and branch out from there.
Tools:
https://www.amazon.com/SE-DD312-12-Piece-Stainless-Carvers/dp/B000SVRSRY/ref=mp_s_a_1_3?keywords=wax+carving+tools&qid=1573851649&sprefix=wax+car&sr=8-3
I think this is what I have, plenty of shapes and sizes for all your detailing needs. You may also want some files for after you bake the clay:
https://www.amazon.com/10-Piece-Diamond-Needle-Total-Length/dp/B07R3R9461/ref=mp_s_a_1_9?keywords=diamond+file&qid=1573851744&sr=8-9
These work well in my experience. As far as your armature question goes I'd definitely recommend arnatures, I'd just go on amazon and search "copper wire", obviously dont get anything insulated. I think I have 24 gauge wire and it's perfect for what I do on the ~25mm scale, so a thicker gauge may be beneficial to you.
Paints:
Make a thread at /r/minipainting it's a more active sub and has some really good painters.
Again, I'm no expert. The tools/ files I can vouch for, and the clay will be a good starting point if no one else pipes up. Good luck!
Also, I like the drawings!
Edit: I should say that if you're on a budget the files and tools are not required, you can get by with whatever you have around the house. Toothpicks, silverware, hobby knives, paperclips, safety pins, etc.
For mold lines, I use an x-acto knife and just scrape across the lines. Something like this.
I also use some hobby files for the sprue bits and smoothing.
Before I got an airbrush, I used to prime with the Testors flat black spray paint. Make sure you don't spray too close to the mini and do it in short, quick bursts to preserve model detail.
You could prime with Retributor gold spray for stormcast but I personally would prime black and then paint gold. Metallics seem to shine better when painted over black IMO.
Not sure where your are looking to find them 'too expensive'.
Pin Vise
Tamiya Basic File Set
Tamiya Plastic Scriber II
Those are cheap and or par the course for finding them elsewhere. I don't think going with used tools is a good idea when you can get them new for very reasonable prices on amazon.
different inserts probably wont fix it. this is a typical problem with costar stabilizers. this is fixable.
the issue is that the opening is not big enough for the insert to fit into without bending. you need to either file out some of the opening in the plate, or some of the insert where it clips into the plate.
i suggest filing the insert because it is plastic, and thus easier. i suggest using a needle file. here is a cheap set
just a little bit at a time. you dont want these to sit loose when you're done
http://i.imgur.com/y7Ee4xs.png
I would also give nod to the matte top coat. It doesn't completely hide the scratches from sanding but it makes it almost invisible unless you try and look for them. Only painting will completely hide them.
As for how I remove nubs I recently started using these to get as close as possible and sand it with a 600 grit sandpaper to make the scratches a bit smoother.
Another method that I use if the file is too large to fit somehow is to use as hobby/xacto knife and get it flush. I hope these help.
https://www.amazon.com/TAM74104-Tamiya-Tools-Smooth-Double-Cut/dp/B00CE3L96K?psc=1&SubscriptionId=AKIAILSHYYTFIVPWUY6Q&tag=duckduckgo-d-20&linkCode=xm2&camp=2025&creative=165953&creativeASIN=B00CE3L96K
​
tamiya files are a good start. you dont need to go all in with some super expensive ones
​
as far as sand paper goes i use sanding sticks that are washable so I can wet sand. but paper is fine too
​
heres a great tutorial video on sanding
https://www.youtube.com/watch?v=gF7AluLTDoc
I agree I wasn’t to impressed with that orange that was shipped with the machine the quality of the material was just bad and never printed well. Oddly enough that seems to be the popular color when I do token gifts for the different holidays like Easter and such. I should order a wider range of colors as I always get asked if you have x color and I don’t.
As for storage I just went into Walmart and bought a simple food vacuum sealer and will just do a run when I have multiple spools open. I never thought of a ziplock bag I would assume if you could get it airtight it should work but even short term I would think it would work. Those storage bins I agree takes up way to much room so I never thought of them.
Now air quality has always been a question many ask and as far as PLA the general consensus is that it’s safe and should be non toxic. Now ABS that is a different thing that is toxic and depending on the brand just smells awful so that is something you need to vent the room. Some people will install air filters on their enclosures when they print that stuff. As far as all the other materials types I am not sure. I got a spool of carbon fiber and PETG but have yet to print with it. The wood pla I did print with had a little smell to it but I think was more from the sawdust than anything else. This glow in the dark dark material I’m trying out this week seems fine as well as far as I can tell. Guess it all depends on what chemical they use to make this stuff.
Let’s see for materials I got right now I have a roll of glow in the dark, carbon fiber, wood pla, pc-max white , black petg, and for pla I got black (multiple), white (multiple), red, blue, silver, gold, transparent neon yellow, and then a couple spools of abs I got free that will most likely never be used. Well I got that orange to but I basically don’t talk about it as I just hate the quality it prints at so it’s most likely just going to be be tossed at some point.
As far as what I print it’s basically what ever I find that I think would be fun to print with. Sort of similar with my color choices. I try and do something fun for the holidays as token gifts and they generally are a hit. Once I get enough time to learn fusion360 I do plan to create my own models just never feels like I got the time to.
So figured I list some things I bought/printed to use with my printer.
Thingiverse.com/thing:647425
Flesh cutters
Hobby knife
Needle nose pliers
Dremel
Bob Smith Industries BSI-157H Maxi Cure/Insta-Set Glue. https://www.amazon.com/dp/B0166FFCHS?ref=yo_pop_ma_swf
91% isopropyl alcohol
Stainless steel ruler
Blue painters tape
Adjustable wrench
Socket set
Digital caliper
Small file
Head lamp and small flashlight
Can of compressed air
As for painting I bought a airbrush and such I don’t paint very often but maybe more in the future so I just have some basic stuff you buy with that. Sand paper in different grits, small paint brushes, paints, primer and so forth.
Oh and never use acetone on your print bed it just dissolves the bed surface they use with there printer and destroys it.
For oil I just been using a drop every now and then of some all purpose machine oil that I bought for the sowing machine and it’s worked fine. Little goes a long ways just cover your build plate before applying to keep any from dripping down. As for grease I don’t know I never used any and not sure what to suggest.
But that’s basically what I got around my printer outside of the set of tools that came with the printer. It’s all stuff that at one point in time I found useful. Well that and a small trash can for all the scrap material from prints.
At some point I want to design my own desktop organizer I know people got designs for them but I just want something personal.
I have these rasps that i got off of amazon. They're cheap and leave a very rough surface but they take off material at a decent pace.
After that move onto a regular file. In fact, if you used a four-in-hand it would have everything you need to do the shaping.
I have a couple sets similar to these - the secret when filing is minimal pressure. The goal isn't to saw the part in half, after all.
Cough cough.
Yes! Acquire some tiny needle files for detail work. Small emery boards (even from the dollar store) work too :) You also want to go very light on filler primer on these details; more primer will just obliterate details rather than fill crevices/steplines.
As a rule I avoid using Dremels on 3D prints in general; they often create enough heat to warp and melt the plastic rather than truly sand it.
Yeah, they're not through mortises, but I still want as much wood grain in contact with wood grain as possible to let the glue do its work properly, right?
Also thanks for the link. I don't have any files so far. Does it make sense to drop the $35 on what I assume is a high quality file, or spend $20 on an undoubtedly lower quality 6-piece set like this:
http://www.amazon.com/Woodstock-D3112-Rubber-Handles-6-Piece/dp/B0000DD4KD/ref=sr_1_1?ie=UTF8&qid=1457216402&sr=8-1&keywords=wood+working+files
Keeping in mind of course that I'm a hobbyist, not a pro and right now can't afford the "buy the last tool first" mindset.