(Part 2) Best temperature controllers according to redditors
We found 914 Reddit comments discussing the best temperature controllers. We ranked the 95 resulting products by number of redditors who mentioned them. Here are the products ranked 21-40. You can also go back to the previous section.


To prevent this, a couple things -
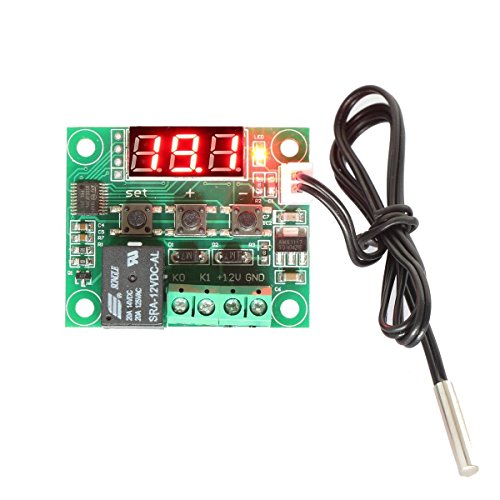
I've actually done what you're asking for with a chest freezer. I bought a PID thermostat, like this.
Then I replaced the thermostat in the fridge with the PID thermostat, that thermostat had a chiller output and a heater output (and heater could be configured to use the internal relay so I didn't need to use a second SSR). I connected the chiller to the compressor and the heater relay to an outlet box. The heater was just a reptile heating pad I plugged into the box and threw into the fridge, but that was a little on the low power end, I'd probably use a ceramic heater if I had to do it again. Also, all the PID controllers seem to be sold with a K-probe, those are no good, they don't measure below 0C, and the thermostat needs swing, so I needed to keep the set point over 2C to get it to work (which is not terrible). I ended up buying a PT100 probe which works well.
About 150 so far, thats for all the internals and coil. I already have an infiniTi to use.
I still need to get shrink wrap, screws and random odds and ends
I bought everything off amazon except for the coil
http://www.aliexpress.com/item/Coil-Heater-Hot-Runner-Coil-Heater-ID-15-8mm-Height-12-7mm-120V250W-Thermocouple-K-with/1637549209.html
http://www.amazon.com/gp/product/B00B886JHG/ref=oh_details_o00_s00_i00?ie=UTF8&psc=1
http://www.amazon.com/gp/product/B00067JSOG/ref=oh_details_o01_s00_i00?ie=UTF8&psc=1
http://www.amazon.com/gp/product/B00E1JPHA4/ref=oh_details_o02_s00_i00?ie=UTF8&psc=1
http://www.amazon.com/gp/product/B00HG7EOYI/ref=oh_details_o02_s00_i01?ie=UTF8&psc=1
http://www.amazon.com/gp/product/B00843L13A/ref=oh_details_o03_s00_i00?ie=UTF8&psc=1
http://www.amazon.com/gp/product/B00EZTPSOK/ref=oh_details_o04_s00_i00?ie=UTF8&psc=1
http://www.amazon.com/gp/product/B003GZRCCK/ref=oh_details_o05_s00_i00?ie=UTF8&psc=1
http://www.amazon.com/gp/product/B005NGL4KG/ref=oh_details_o05_s00_i01?ie=UTF8&psc=1
These pics are very helpful. So there are 19 holes for the ?? gallon bucket. I assume it is a 3 gallon inside the 5 gallon.
For the SCROG technique, I observed that you start the plant on the side. I've read that for LST you manipulate the plant around so it spirals around and ends in the center. From the looks of it you started this LST technique on the photo 9 but in photo 10 the plant began to veer off to the left and you began to take it counter clockwise. Attached are pics of what Im saying. In the end though, ideally you want a node per scrog square correct?
How many feet of LED strip do you recommend? I saw /u/bucketoflight design with 16.4 feet of LED is this overkill?
What are your thoughts on a thermostat like this?
How much did the grow cost you electricity wise?
What are your thoughts on using thermal resistant sealant to secure your LEDs to the side of your bucket? The cooler your LEDs are the better they preform. The resistant sealant makes LEDs act like a heat sink of their own instead of allowing the heat to accumulate in the plastic and mylar to which they are attached.
thanks
I put a temperature switched filter / fan in my lack enclosure.
Net-net it works great. I've got it set to turn on at ~28 degrees c. So it automatically turns on/off based on the ambient heat in the enclosure.
Here's a quick video of it in action, prior to installing the fan & control. YT Video
I've got extra adderall in my system that I need to burn off, so you're going to get the benefit of a decade of mechanical engineering and prototyping work in defense, consumer products, aerospace and medical. Not all of this will apply to a senior design project, but it is my thought process when prototyping.
If you have specific or more focused questions around your project, I can reply to PM's if you'd like.
This is what i used for the heating pad although any size or type will work, some have embedded temp probes and 3M adhesive backing to make things a bit easier. Ebay has an awesome selection of silicone heating pads. This temp controller works very well for the money and wiring is very easy, however pad wattage must be kept under 120w for this controller as the internal relay can only handle 10A. Edit: I do want to add that power supply for a low wattage pad like the one listed can be from any 12v @ 2a household power brick with the end cut off, however higher wattage pads may require a higher powered 12v psu. If you use higher powered silicone heating pads it's better to go 110v due to amp requirements at 12v. My solution above is just the entry lvl budget version. If you wanted to, you can go full in with a PID temp controller, high amp PSU and high quality heating pad with internal thermometer to achieve pinpoint temps but something simple like heating a glass syringe really doesn't need that. I wrapped the pad around my syringe, tucked the temp probe included with the controller in the wrapped roll and gave it a good once over with duck tape. The syringe slides in and out like a sleeve to use it for different things like filtering and when i need it heated you just slide it back in your homemade sleeve and your good to go.
You'll need one or more Heating Elements inside your keg. The one I linked to is for water heaters. You need a 240V hookup, too. If you don't have one, these elements will work on 120V, but you're going to need more of them unless you want to wait an hour to get 5 gallons of water to boil.
You'll control these elements with a PID controller and one relay per heating element. The PID controller I linked comes with one good solid state relay that's capable of switching 240v. The PID controller also supplies you with the temp probe you need to put into the kettle somehow.
In addition to this, you'll need some various connectors, and probably an electrical box. I'd say budget a couple hundred bucks for odds and ends.
Finally, when messing with 240v... or even 120v, you really should get a real electrician to look over your connections before you apply power to it. A: to keep you safer, and B: to keep your investment safer.
I am using a fire stop device:
WilliamsRDM 675-3D Stovetop Firestop Rangehood, Pair https://www.amazon.com/dp/B00FL6VU3Y/ref=cm_sw_r_cp_api_i_7yg1Cb0FGKZQ0
But that’s behind this:
The entire set-up fits inside the case, which made it very quite.
https://www.thingiverse.com/thing:3374299
Controlled by this
Thorne Research - Formula SF722 -... https://www.amazon.com/dp/B07B8ZLWGG?ref=ppx_pop_mob_ap_share
And
AC Infinity, Fan Speed Controller for 100 to 125V AC Axial Muffin Cooling Fans, Single Connector, for DIY Cooling Ventilation Exhaust Projects https://www.amazon.com/dp/B00809BQZG/ref=cm_sw_r_cp_api_i_1Cg1CbA6P6KRB
To control more fumes I added this:
It is enclosed inside the case
https://www.thingiverse.com/thing:1487286
If you do go this route.. maybe incorporate a tempeture relay so, as to not even kick on and waste the energy unless it's below 35F (About 1C I guess??)?
https://www.amazon.com/gp/product/B008KVGWT4/
Edit: Temps
For $15 a stc 1000
and build a son of a fermentation chiller, About $40 for all.
http://www.amazon.com/gp/offer-listing/B00KCCX0EE/ref=dp_olp_new_mbc?ie=UTF8&condition=new
This one is $11.19 shipped and digital. Not sure of quality/reliability differences between the two.
I too am just getting into this and have converted a mini fridge into a cave. I'm building a controller for temp and humidity. It's similar to this https://www.amazon.com/Digital-Humidity-Control-Controller-WH8040/dp/B009VY1BZY but I have one for temp and one for humidity. For the humidifier I just picked up a small USB one from amazon.
Back in the not so long ago, bad old days, we had six, 7 BBL fermenters hooked up in this fashion. We had 3 line chillers made by UBC from Foxx, each with 2 pumps. Each pump was hooked up to a Ranco temperature controller that would turn on based on the fermenter's temperature. We used braided vinyl for the glycol drops and everything worked fine for 2000+ barrels of beer.
I would do it again, but instead of Rancos, I would use these new fangled cheapo controllers.
Not if you buy a flashed version:
Inkbird is developing a good reputation amongst homebrewers for good reason. But for this kind of thing, you really want a PID controller to manage the temperature a bit more precisely. Inkbird did just release an all in one setup that would do the job. Though, if you're not intimidated by the wiring, a PID, probe, and separate SSR can be had cheaper.
Slow money is better than no money! :)
​
Sorry for the delayed response. Here's some of my recommendations:
Jumpstart/Century Pulse Thermostat - $17 - Super reliable and cheap!
Slightly cheaper 'Repti Zoo' Pulse Thermostat - $16 I've had this one previously, the brand was different but it's the same model. I'd only choose this over the jumpstart if you are forced to - due to stocking issues etc.
- I can't seem to find many of the ones that we have in the UK on the Amazon US site, but Id' 100% recommend the jumpstart.
​
Also, you're gonna need two of them. I've heard of people using this product here ($36) to control two at once. Might be worth looking in to :-)
Or just buy this thermostat on Amazon (not affiliate link)... This writeup might help, however lifehacker says " Energy usage with a chest-freezer-turned-fridge is barely 0.1kWh a day. Modern stand-up refrigerators use around 1kWh a day."
DIGITEN Digital LCD Thermostat Pre-wired Temperature Controller Heating Cooling 2 Stage Outlet https://www.amazon.com/dp/B071SDVLBG/ref=cm_sw_r_sms_apa_IOtQAbC0G64AG
Bam.
You will need a pid temperature controller, water pump, and heating unit, as well as some basic things (a bit of sheathed wire, things to cut and strip it, screwdriver, electrical tape) to wire everything up. The controller and heater can be substituted for cheaper components. You should also get a resistance thermometer (search on ebay, it's like $1) to get higher accuracy than a thermocouple.
pump
controller
heater
I hope this will help.
?my take on this event as described is user error, but an easy one to make. It seems to me you removed the heater while it was still on, maybe noticed it was hot, unplugged it, the glass was really hot, came into contact with cold water, and blew up. I've broken glass heaters this way which is why i don't buy glass heaters anymore (hence the aqueon pro recommendation, but the premise is still true that you should unplug them before taking them out of the tank or they can break)
per the heaters failing on and cooking everything? that's chance, everything breaks eventually. I'm trying to assure you that modern heaters don't maybe fail AS MUCH but they have the worst occurances when they do.
They're not cheap, but if safe is what you're after, i reccomend a backup thermometer/thermal cut off these days: https://www.amazon.com/Inkbird-Aquarium-Temperature-Controller-Sensor/dp/B01ANCB24W
In all my experience, and I've kept literally millions of gallons of stuff, from industrial aquaculture to hundreds of zebra danios tanks for genetics experiments for the NIH to large reef tanks. I've got a degree in marine biology specializing in aquaculture, I've kept and bred just about every freshwater fish known to man, and some salt too.
​
While all equipment fails "russian roulette" is a bit of a stretch, if it's your choice to keep them at 62, keep them at 62, that's your choice.
​
That controller is the right idea, although you'll want a 12V one unless you have AC power nearby and easily accessible
Here's a 12V version: http://www.amazon.com/Elitech-All-Purpose-Temperature-Controller-Thermostat/dp/B008KVGWT4
It says 12V AC but in theory it should work just fine with DC
that sucks. There are outside controllers for heaters like:
https://www.amazon.com/Finnex-Max-300-Digital-Aquarium-Controller/dp/B007480AP6
more expensive units would alarm on high and low temps:
https://www.amazon.com/dp/B002TMTA7G/
I made a foam insulation box and have a Heat Cable and a stc-1000 temperature controller and my fermantation chamber stays withing 1-2 ° of set temps.
Inkbird released new model PID pre-wired controller. You can try this one. It can fit for sous vide, slow cooking.
https://www.amazon.com/dp/B06WD6X17V?m=A1RUFFFCQ74BCW&ref_=v_sp_detail_page
As for the cost estimate, I think you may be a bit off. I'm not sure what P&H is short for, but you will need more than just an element plugged into a socket. First thing's first: you will use a GFCI. Making beer is great, but it's not worth it if you electrocute yourself. If you don't have a GFCI outlet, you'll need to install one or work around it by getting a spa panel. Second, you're going to need some kind of controller. You're not going to flip on the element and measure temps until you hit your strike/boil. Every successful e-kettle uses some kind of controller to rapidly flip the element on and off. This avoids scorching. You'll need a PID temp controller like this http://www.amazon.com/Digital-Display-Temperature-Controller-Alarms/dp/B005NGL4KG/ref=sr_1_fkmr0_2?ie=UTF8&qid=1375460323&sr=8-2-fkmr0&keywords=auber+pid+2352 . Most people use the Auber 2352, but their website seems to be down right now. You might also want to peruse Kal's site http://www.theelectricbrewery.com/ and think about how you can scale it down to a 1 pot operation. If you can wait a few months, I'll be done with my BIAB e-kettle and I plan on posting a walk through of the build here.
If you're handy, you can use something like this and this and this to roll your own with a slow cooker like this, all fairly cheaply. Plus, you now have a slow cooker.
Edit: extra "have" removed.
[ITC-308S with shorter probe](http://www.amazon.com /dp/B01ASYNO00) works great while it was working.
The adventure of /u/BrewsterC continues. So I ended up buying one of these bad boys to create a more consistent environment to ferment my wort, along with this temperature controller. I feel like I am missing something to make this happen. I'm no expert at electrical engineering by any means. Could someone point me in the direction of a modern guide of how to convert a chest freezer into a fermentation chamber?
Thanks fellow Bro-wers.
Hello, everyone, we sincerely apologize for the inconvenience. We know we have no excuse for this issue.
We Inkbird always keep improving our product and our service, we are a growing company and appreciate every purchase. We strive to ensure that all of our customers are completely satisfied, and hope you can give us a chance to solve the problem.
​
Regarding to the probe, we engineering department is now working on a new version with updated probe of ITC-308, it is still under testing and need time to release. And we have already collected all you guys suggestion to our engineering department. Therefore, sorry again for it.
Also, we have another controller which the probe is detachable, here is the link for your reference:
USA: https://www.amazon.com/gp/product/B01ANCB24W
CANADA: https://www.amazon.ca/dp/B01GZLYXVO
​
If there is any question, please feel free to contact us, we sincerely apologize for this issue. We will make every effort to help all of our customers.
​
Wish all of you a good day.
​
Inkbird
If you were lucky and you averaged 4 solid hours of good sun on a winter day that 100W panel would produce 400 Watt-hours of energy. Even with that you're only looking at raising the temperature a maximum of 0.59°F.
Even with panels as inexpensive as they are today you're probably still going to need a whole lot of them to make this all work.
I like the other guy's suggestion of putting a pump in it to keep the water moving. You could run that off of your battery using a thermostat like this one which run $10-$15 in numberous places online.
I had to replace my fridge's dial thermostat with a digital one; it looks a bit hacked together but was able to control the temperatures much better
this is similar to the one i used:
https://www.amazon.com/Inkbird-Temperature-Controller-Fahrenheit-Thermostat/dp/B0152LYY0I
but if your fridge gets can stay below your target temp you could set the fridge to max and use something like this:
https://www.amazon.com/Inkbird-Temperature-Controller-Thermostat-Fermentation/dp/B015E2UFGM
Absolutely!
Almost everything came from Amazon, it was a little more in some cases... but you cant beat their support. If something is broken its replaced immediately and I wanted that reassurance.
Here is a list of the important stuff:
Nitro Regulator: https://www.amazon.com/gp/product/B07DY9SBMB/ref=oh_aui_detailpage_o09_s01?ie=UTF8&psc=1
CO2 Regulator (dual tap):https://www.amazon.com/gp/product/B0060NOX40/ref=oh_aui_detailpage_o08_s00?ie=UTF8&psc=1
Stout Faucet: https://www.amazon.com/gp/product/B000BO1KFY/ref=oh_aui_detailpage_o08_s00?ie=UTF8&psc=1
Shank for the stout faucet (beer faucets came with shanks): https://www.amazon.com/gp/product/B00829HN7E/ref=oh_aui_detailpage_o09_s02?ie=UTF8&psc=1
Beer Faucets: https://www.amazon.com/gp/product/B01D6MSELA/ref=oh_aui_detailpage_o08_s00?ie=UTF8&psc=1
Thermostat: https://www.amazon.com/gp/product/B0152LYY0I/ref=oh_aui_detailpage_o09_s00?ie=UTF8&psc=1
Drip tray: https://www.amazon.com/gp/product/B002NQIROA/ref=oh_aui_detailpage_o04_s00?ie=UTF8&psc=1
This was the nitro tank (probably the best deal IMO), its a nitro coffee place but it holds beer gas fine :) - I had to use this specific one because of the space it had to fit into, I wanted everything to be self contained in my build: https://beveragelements.com/beverage_elements_shop/cold-brew-nitro-coffee/cold-brew-coffee-nitro-coffee-cylinders/23-cu-ft-nitrogen-cylinder-nitro-coffee/?gclid=Cj0KCQjwlqLdBRCKARIsAPxTGaVyfeABi5S7mFR-ByXCWkDGRbyimzJ52J-2TXkyxDyYABYQxXios2oaAiDuEALw_wcB
​
Obviously this thin wasn't cheap, but 3 tap kegerators aren't cheap either and this one does nitro! It was a decent investment spread over about 2 months of the build so that eased the pain on the wallet.
​
Sorry to hear you did go through it. The important part is to use that lesson to your advantage! Or use this as an opportunity to join us on the evil salt side.
Edit:
This is the one. Good so far @ ~3 months.
DIGITEN Digital LCD Thermostat Pre-wired Temperature Controller Heating Cooling 2 Stage Outlet https://www.amazon.com/dp/B071SDVLBG/ref=cm_sw_r_cp_api_vGZdAbAAVVFNM
Totally agree, the frozen bottle method is very common, and 2 degrees across 3 hours is nothing to worry about. Also agree that fans work great, you'll have to top off more, but that's not hard. I would reccomend one of these controllers, at $40 it's very affordable for the safety it provides. Hook a fan up to it for when it reaches a high temp, and plug your heater in for low temps. This can save your butt if you heater gets stuck on, which happens all the time.
(Wiring diagram included in with images)
​
I finally put together a basic parts list for those of you that are interested in building a DIY heat treat oven. I've included a wiring diagram, but I take no responsibility for anyone who wants to make one. If you don't know what you're doing, find someone who does. Its up to you to figure out how to mount the door switch, and to design and make a door latch (I made mine on the fly and have to dimensions or drawings).
Its not a project for the faint of heart, but if you have some electrical knowledge, and the help of someone with a welder, its very doable.
I've included CAD files for the frame and electrical box. Any fabrication shop with a waterjet, plasma or laser cutter should be able to cut these for you. I'll give a break down of the parts required and how much I spent on everything. You're prices may vary:
​
24x Insulating fire bricks 2.5" x 4.5" x 9". I bought direct from the manufacture for $130 shipped.
MyPin Temperature Controller $35(https://www.amazon.ca/gp/product/B005NGL53W/ref=oh_aui_detailpage_o05_s00?ie=UTF8&psc=1)
Solid State Relay $18 (https://www.amazon.ca/gp/product/B06W9LNZDX/ref=oh_aui_detailpage_o05_s00?ie=UTF8&psc=1)
Thermocouple $15 (https://www.amazon.ca/gp/product/B00XJB4DYQ/ref=oh_aui_detailpage_o05_s00?ie=UTF8&psc=1)
3x KANTOL wire elements $12/ea (https://www.amazon.ca/gp/product/B07CLLW3BG/ref=oh_aui_detailpage_o03_s00?ie=UTF8&psc=1)
​
You'll also need to find a 120V+ 20 Amp fuse, a Normally open door switch, and 2 On/Off switches.
DXF CAD Files: https://www.dropbox.com/s/diwuui3qtw247uh/kiln%20layout.dxf?dl=0
​
I found the best way to make the grooves for the wires was to score the likes with a 3/16" thick file on is side, and follow that by widening them with a drillbit just under 1/4". The fire bricks are very soft so just take your time and dont force anything.
​
Feel free to modify and redistribute these drawings as you wish, but you take your safety into your own hands. Good luck!
​
A lot of them use this for humidity and there is a similar model for temperature. Although it is not "smart" it does have the ability to set ranges
https://www.amazon.com/gp/aw/d/B009VY1BZY?psc=1&ref=yo_pop_mb_pd_title
all machines are made of components manufactured in asia. The issue is in the assembler, and their quality control testing. This one is assembled in china. The problem I see is that while an american company can quality control their goods by plugging it into the wall and letting it run for an amount of time, china tipcally has 220v 50 hz electricity (ours is 110 v 60 hz). So there is going to be a problem with testing the units designed for the american market. (not a big problem, the PID shodul be fine on either electricity, but you never know....)
In my experience with Chinese made components from bulk suppliers, there is a 10% failure rate within the first day of use (considered DOA). There are only really 3 things that can go wrong inside due to their complex nature, a PID, the coil assembly, and the relay device (much less likely, but I've had it happen in other fields). With a 10% chance of each failing, it's a 74% chance your unit will be fine (my math might be off, help here if you know satistics better than I do). If your unit is NOT fine, you can easily order replacement parts on amazon.com
Save the money, and use the cheap stuff, be prepared to repair it with spare parts by having these links ready to go
For the PID: http://www.amazon.com/gp/product/B005NGL4KG/ref=ox_sc_act_title_1?ie=UTF8&psc=1&smid=A1BREQ8I6OHSBG
For the SSR:
http://www.amazon.com/gp/product/B004HZN628/ref=ox_sc_sfl_image_1?ie=UTF8&psc=1&smid=A3NSJ1JIMWS963.
for the coil.... thats still goign to be a problem, as they are all made in china, but, I think enhale.com might be a good course for coils.
I used to experience the same heating problem. I have since started controlling my temperature from one of these and have had no issues. I also use mine to control a set of fans to cool my tank if needed.
If you want to keep them electric, making them computer controlled is FAR easier! You can use an SSR and a commercial PID controller to do the control without brewing your own electronics like I'm doing.
We moved a few months ago from using a humidifier on a timer to wiring a humidifier into a [cheap controller] (https://www.amazon.com/gp/product/B009VY1BZY/ref=oh_aui_detailpage_o03_s00?ie=UTF8&psc=1), and it helped dramatically. Cost $25. Not that hard to wire up with minimal skills, which are the skills I've got. Because I was new to this sort of thing, I cut the wire on the humidifier and wired both sides into the controller, which works fine. If I was going to do it again though, which I did later with a chest freezer and a temperature controller to create a refrigerator, I would wire an outlet (or a short extension cord) into the controller, then just plug the humidifier into the outlet.
Anyway, my point is that with some gumption and minimal skills, you can make yourself a cheap and effective humidity control system.
I just ran into the same frustration with my DC-DC 40A Renogy charger. I ran all my wiring and have covered it with my wall so too late to run a line for the power on. I think I am going to just run splice it into the positive wire of my tail light, since I have DRL they are always on when the van is on and should have the same end result. Still, pretty frustrating!!
I noticed the DC DC charger had a temperature sensor accessory and purchased it, I assumed since it is compatible with LiFePo4 this has a low temp cut off (similar to my victron charge controller does with a temp sensor) but I am now afraid that may not be the case as there is no mention in the manual of a low temp cut off. I sent them an email to ask about it, and so far its been a week and no reply other than the automated "support ticket was opened expect a reply in 24 hours"
Hoping it does, but have a feeling it does not...I do plan to have a heater but it would suck if something went wrong and it was too cold and tried to charge the batteries. Worst case, I can install a temperature sensor relay so it only connects the power on line with something like this https://www.amazon.com/RioRand-Thermostat-Temperature-Controller-Waterproof/dp/B00KCCX0EE/ref=sr_1_1_sspa?keywords=temperature+relay&qid=1571857868&sr=8-1-spons&psc=1&spLa=ZW5jcnlwdGVkUXVhbGlmaWVyPUEzNDNYVUtNNzFVVDIyJmVuY3J5cHRlZElkPUEwMTMxMDYzMkRNSFNJRVcwOVZGTCZlbmNyeXB0ZWRBZElkPUEwNjIyMjA4S0k5WlBSSTRNRDBKJndpZGdldE5hbWU9c3BfYXRmJmFjdGlvbj1jbGlja1JlZGlyZWN0JmRvTm90TG9nQ2xpY2s9dHJ1ZQ==
Heating pads are usually inconsistent. Your hedgehog needs multiple heat lamps if your home can't be the proper temperature. https://www.amazon.com/Inkbird-Pre-Wired-Temperature-Controller-Thermostats/dp/B01ASYNO00/ref=sr_1_10?crid=1O4JFLDFCZZCT&keywords=heat+lamp+thermostat&qid=1554766564&s=gateway&sprefix=heat+lamp+ther%2Caps%2C162&sr=8-10
​
Something like this would be extremely helpful if you get a heat lamp so you can know for sure how much heat the light is emitting and if it's enough, and that it will never drop below a specific temp.
Buy an stc-1000 and follow any one of the many builds on this forum or on homebrewtalks. It's cheap, easy, and you get to learn something from it.
Mine has been attached for multiple years to the side of my fridge in a project box and works like a charm.
Not sure of exactly who but there are many clones on Amazon Origin Elitech STC-1000 110V Digital Temperature Controller Centigrade Thermostat w Sensor 2 Relays https://www.amazon.com/dp/B00Y8T9YZG/ref=cm_sw_r_cp_apa_tgSZzbK1EQ63J
I have an old refrigerator connected to an Inkbird temperature controller that I fermented this batch in.
https://www.amazon.com/gp/product/B01ANCB24W/ref=s9_dcacsd_dcoop_bw_c_x_3_w
So you obviously have electricity cause you are going to be using a light. Why don't you get a 4x4 tent (my biggest regret is not getting a bigger tent, i have plenty of space) and place a small heater and humidifier inside (your air will be dry if you are using a wood burning stove).
Grab yourself one of these
https://www.amazon.ca/gp/product/B07B8ZLWGG/ref=ox_sc_saved_title_5?smid=A3NP2ORRCG15VI&psc=1
The heater will only kick on when its needed
All your problems solved I think? lol
https://www.amazon.com/gp/product/B01N1ZUGUZ/ref=ppx_yo_dt_b_asin_title_o05_s01?ie=UTF8&psc=1
PID I got from Amazon. Inkbird. $40. Works great.
Thanks for the detailed response dude, I really appreciate it. Do you have a humidity and temp controller you recommend? I found this on Amazon. Im wondering if its worth it.
You can do it proper if you get some fans mounted in the windows and rig up a couple heating elements on separate 20 amp circuits. Don't forget the GFCI.
https://www.morebeer.com/products/weldless-stainless-steel-heating-element.html
https://smile.amazon.com/gp/product/B0049B3DIW/
https://www.brewhardware.com/product_p/hotrodrtu_xl.htm
https://smile.amazon.com/gp/product/B06WD6X17V
https://smile.amazon.com/gp/product/B000065DKJ/
https://www.homebrewing.org/10-Gallon-2-Weld-Volume-Marked-Brew-Pot_p_6827.html
Something I'd like to try sometime would be to purchase an external PID temperature controller like this.
Or... just found this
... and remove the entire process from the printer control board.
Hopville is down for their upgrade to 2.0, so I can't post the exact recipe, but here it is from memory.
Lemony American Wheat
I had a bunch of small problems with this beer.
I do BIAB and thought I'd try mashing in around 140F, and then heat to 152F and mash there for 60 minutes. I turned off the heat at 151F, but it just kept rising to 157F. I stirred and stirred trying to bring it down, but after about 7 or 8 minutes I added a little ice, which brought it down to 150F. I let it convert at 150F for about 55 minutes, then stirred while mashing out to 165F. My extraction was still good (83% efficiency), but I don't know what kind of body I'm going to get out of this. My new $25 refractometer seemed to work really well.
Due to high humidity, my boil off rate was lower than I estimated, so my planned 60 minute boil was closer to 90. Then, due to high temps, I couldn't get my wort to chill below 78F, even after 45 minutes with my immersion chiller and a frozen 2 liter. I should have saved the 2 liter for the end when it plateaued. The next time I brew in the summer I'm going to borrow my buddy's IC and put his in a bucket of ice water and use that as the input to my IC.
I setup a swamp chiller in the basement, wrapping the primary bucket with an old towel and set it in the path of the exhaust fan of my dehumidfier. I added some ice to bring the swamp chiller down to 67F, but it rose quickly again to 72F. This might not be the cleanest American wheat after fermenting so high, but hopefully it will be ok. My temperature controller and SSR will be here tomorrow. I guess I should have waited a week until I had temperature control set up and working.
And HOLY COW 1010 stinks like rotten eggs! Hopefully that won't take too long to clear up.
the safest way would be to use something with feedback. there are a decent number of kiln controllers that will control the temperature for you.
something like this: https://www.amazon.com/Inkbird-Temperature-Controllers-Thermostat-ITC-106VH/dp/B01N1ZUGUZ/ref=sr_1_3?crid=1NY321DR1B9Q8&keywords=kiln+temperature+controller&qid=1567110461&s=gateway&sprefix=kiln+temp%2Caps%2C123&sr=8-3
https://www.amazon.com/Elitech-STC-1000-Temperature-Controller-Centigrade/dp/B00Y8T9YZG
I have used these for sous vide with great success. They are pretty easy to wire up. It is just a temperature controlled relay.
To keep my kombucha warm I just cover it with a t-shirt and place a 25w incandescent bulb next to it.
I wired a space heater to a One of these. You can set the desired temperature and the max range outside that before it turns back on. It learns though and if the temperature is falling quickly it will turn on before it falls below the threshold.
No need.
All you need is one of these things and a crock pot.
Getting everything working requires a bit of handiwork and some wiring, but it's a half hour project that has many uses beyond sous vide. I initially made mine for homebrewing, but now I use it more often for sous vide.
Here's a handy instructional.
I've found that water circulation isn't necessary unless you're doing large cuts in a massive crock, but if it's something you require you can use a high-temp water pump from Amazon for a few bucks.
All said my sous vide rig cost me about 40 bucks, plus putting the controller together was a fun project. I also use it to save money by controlling my fridge's temperature more precisely, control traditional crock meals more accurately, and to keep my space heater from over-heating my room.
Edit: I should have linked this: Inkbird ITC-1000
The other one only allows either cooling or heating at any given time as opposed to both at once. This other model is more versatile (though admittedly it won't make a difference for sous vide).
sure, you can even go wireless if you only need single stage. I'd still use the 308 myself.
Internet of things. Internet connectivity is the next big thing for everything in our lives. Soon everything from your mash tun to your kegerator will be connected to the internet.
I realize that internet connected fermentation vessels are already a thing if you are willing to put a little DIY into it, but now we are starting to see things like wifi connected temperature controllers and bluetooth hydrometers. It is only a matter of time before your mash tun sends you an email to let you know that it's time to stir.
I haven't started my tank yet, planning on a 20 tall. I was going to use this.
https://www.amazon.com/dp/B071SDVLBG/ref=sspa_mw_detail_0?psc=1
Or something similar to combat possible heater runaway.
Look into using one of these
Buy two of these
I like the bin the other commenter mentioned; using a case of frozen water bottles make great reuseable ice cubes too.
A chest freezer is a legit way as well since the cold mechanism is built in. Especially if you can find a good used one. If you go this route, I'd suggest looking into getting two things over time:
I turned a similar chest freezer into a low power fridge and fixed my crappy kegerator temp controller with a digital model. Highly recommended for precise temperature control: http://www.amazon.com/dp/B00C4TMSWI/.
could it be that i should have bought http://www.amazon.com/Digital-Display-Temperature-Controller-Alarms/dp/B005NGL4KG/ref=sr_1_1?ie=UTF8&qid=1376442730&sr=8-1&keywords=mypin+ta4
instead of
http://www.amazon.com/AGPtek-Temperature-Controller-TA4-SNaRWith-alarm/dp/B00BVWYHVO/ref=sr_1_4?ie=UTF8&qid=1406390962&sr=8-4&keywords=mypin+ta4
You could easily make one with This for $20, get the enclosure too. It will handle up to 10Amps internally or with an appropriate SSR almost any current. It has a cooling and heating set points. I use them in the greenhouse and my brewery. It will do exactly what you want, but you have to be handy to build it. There are DIYs everywhere though. Look for it with the brewing crowd, your application is the same.
In Canada...
https://www.amazon.ca/Inkbird-ITC-2000-Temperature-Controller-Thermostat/dp/B00QQ02U42/ref=sr_1_fkmr0_2?ie=UTF8&qid=1499280083&sr=8-2-fkmr0&keywords=Inkbird+Itc-308+Digital+Temperature+Controller+Outlet+Thermostat%2C+2-stage%2C+1100w%2C+w%2F+Sensor
I homebrew beer and in it seems more common for beer brewers to use a PID+SSR for controlling the heating element. Any reason for the PAC instead of PID?
PID + SSR + heating element:
http://www.homebrewtalk.com/showthread.php?t=160145
PID vs PAC:
http://www.homebrewtalk.com/showthread.php?t=410119
PID+SSR+thermowell on Amazon (US, but I'm sure you could find this or something similar on the UK site):
https://www.amazon.com/dp/B00ADHNSGI/
Might want to consider a spa panel. You'll see this in quite a few DIY setups for controllers for boilers mostly in home brew builds but that's just because home brewing is more popular then home distilling, but they work for distilling as well.
Spa panels are used if you do not have a GFCI breaker setup. Apparently this is overall cheaper route then installing a new GFCI breaker in your fuse box.
Also for $4.00 less then that controller you could buy this which is a PID controller + 40AMP SSR + heat sink + Thermocouple. This setup allows you to monitor the temperature as well specifically set a temperature instead of depending on a separate analog thermometer. So you get far far more for less money.
Here is the build I will be making soon. Just waiting on some new projects to fund it.
Mine came with a 40A 240V SSR (Solid State Relay). I've used it with both a 240V 1500W and a 120V 1200W element.
You are planning on using 240V to run the heater, right? That'll put you at just over 10A, which is nothing for that SSR. If you try to use 120V, you need to make sure that your circuit can stand it, and my guess is that it cannot. Most residential 120V circuits aren't meant for a 20A load, neither the wiring in the walls nor the plugs or receptacles; even though the circuit breaker might say 20A.
Here is the one I used, I think. http://www.amazon.com/Inkbird-100-Thermostat-Temperature-Thermocouple/dp/B01489AQAW
edit: I should confess that I know more about controls than I do about distiller boilers (not much). /u/sillycyco raises a good point. The PID controller that I linked switches too slowly; you might be able to tune it to work satisfactorily, but that would probably not work as well as a variac or thyristor based controller, or a combination of the two (which would be needlessly complex).
Those SSRs are good though, and they're useful in either type of control system. I didn't like the one controller in your OP post though because I didn't see a triac in the kit and the kit doesn't list one; which would make it operate about as good as my wrong suggestion would have.edit2: The stilldragon site says SSR, but it's actually a Phase Angle Controller which isn't the same thing.
Nothing fancy. Inkbird PID controller off Amazon came with a type K thermocouple and SSR. I chose this heater because at some point I'll build a bigger still and the same company has 240V heaters with the same electrical connection, so it'll be a drop in replacement since the PID controller is powered by 100-240VAC. Also got the triclamps on Amazon
If it's for the enclosure you probably don't want to run it off the control board, then. What would be the purpose?
You need to control the enclosure's temp separate from what's going on for print cooling. You need something like this to do that and then you can mount it inside your enclosure with something like this thing. That way you can set your enclosure temperature independent of your control board and draw as many amps as you need without worrying about blowing out a mosfet on your controller.
This is the best controller(albeit 120V) that I know of. It has a built in pump button as well.and is used in most of the clawhammer systems.
Yowsa! That sounds flat-out luxurious. But take it from a guy with a reputation for overthinking it - you're waaay overthinking it. It's a beautiful design, but anything that takes me 6 months to build is an obstacle. Also consider this - it's a prototype design. It's almost certainly not going to be entirely right the first go-round. Do you really want to spend a ton of time and money building something that you'll probably remodel several times?
My suggestion is to build your enclosure to a reasonable minimum spec and then make the improvements you need. Up and running in a couple of weekends, test it, mod it, rinse, repeat. Once you know what works for you, then go all Taj Mahal on it.
I print polycarbonate at 310C, bed at 135-145C, and the enclosure at 65C. The following ideas are based on my own experience.
Most any sheet insulation used in construction will be flame retardant enough to be safe and much cheaper than durock & rockwool. More importantly, durock is heavy.
Cooling the motors is a great idea, but putting them outside the enclosure is better. Since you're running a delta, and assuming a Bowden extruder, you're mostly there already.
If you do want active cooling, consider this: if the waterblocks are all in the same fluid circuit you can control flow according to the exiting coolant temp.
I use this to manage enclosure temperature:
https://www.amazon.com/dp/B00QQ02U42
It's accurate enough and dead reliable. I haven't needed to cool the box yet but in the summer I'll add another unit to control the fan system. Basically like your description except I used old 12VDC 120mm PC case fans. Cheap, quiet, PWM-ready. You neither need nor want to move a lot of air.
Note the secondary alarm output. Reviews say that running any serious current on that output will kill the board, and the wiring diagrams explain that. It's meant to trip a relay, not power anything directly. The relay in turn would power an alarm system and maybe, I dunno, a servo-activated fire suppression system? :-)
Finally, a suggestion regarding the power supply. Crappy PSUs seem to be a primary factor in most printer-related fires, but a good one can be part of the "fire-avoidance" system.
I run a 24V system and power it off a converted pair of PC server PSUs, connected in series. They output 12V and 3.3V only, are ridiculously stable and efficient, and are designed to be reliable at constant high load. They're also hot-swappable, which matters because that means there are connectors for the wiring harness and no dangling excess. They have built-in current fault and over-temp shutoffs, and most have connectors for external safety sensors. They're cheap on the surplus market.
If you have basic soldering skills they're quite easy to convert. My setup is capable of 54A at 24V, powers up and down from the printers control board, and cost a total of about $30 and a couple of hours.
That looks super awesome. Ambitious but awesome.
If you want to print Nylon you may consider a heat controller type deal.
This one is a pretty simple hookup; I just wired a standard wall outlet to it and mounted it all in a plastic hobby box.
Ah, then this might be more your speed.
Edit: Sorry to hear about your elephant nose.
I don't think it matters to much if they reorient, the yeast will settle with time. I suppose it could matter a bit if you opened it pretty quickly, but so would transporting it.
I haven't heard of a CoolBot before, but looking it up it sounds like it's just a PID. If you're handy with electronics at all you can do this yourself for a lot less, I use this PID and this relay, after that you just need a thermocouple. It's about 10x cheaper and probably not all that less usable. Just an option.
And the project sounds cool, how much are you storing? 35 cases is probably more than I have total, and you might need 3? That's one hell of a cellar.
I think this one could fit your needs. It is low voltage. But it needs to be wired. I think it is easy to you for wiring.
http://www.amazon.com/gp/product/B008KVGWT4/ref=olp_product_details?ie=UTF8&me=