Best american patter files according to redditors
We found 66 Reddit comments discussing the best american patter files. We ranked the 23 resulting products by number of redditors who mentioned them. Here are the top 20.
We found 66 Reddit comments discussing the best american patter files. We ranked the 23 resulting products by number of redditors who mentioned them. Here are the top 20.


It's not that much stuff - Here's the cheapest things on Amazon. For sure a lot better deals if you just go into Harbor Freight though.
Torch - $17
Mallet - $9
Jeweler Saw - $14
Tiny Files - $10 or A rotary tool - $15
​
A regular file - $8 (optional)
​
If you want to process the silver yourself you need a
Crucible - $15
That torch again
Tongs - $9
Welding Gloves - $9
Jewelry Rolling Mill - $169
I'll also note that a file can be much faster and easier than a knife in many situations.
A nice tapered round, Something like this can work wonders.
"TM misdesigned the outer barrel for the g17 but since they made it in plastic is flexed and caused no issues. When companies copied the design into metal, the flex was gone and issues arise. All you need to do is take a small file to the bottom of the outer barrel lugs to allow the barrel to drop lower while the slide is cycling so the two don’t scratch and grind against each other; slowing down the cycle, stressing and damaging parts, jamming the gun, and possibly snapping the barrel.
https://i.imgur.com/l6gzCzE.jpg
You will want to take the file to the tight corner high lighted in yellow. Opening it up to have a round crown there instead. Depending on the brand you may need to level the area in red.
Heres a clear photo of what this looks like. https://i.imgur.com/yQjRrrx.jpg
With this tuning you can expect smoother cycling of the gun, the finish on the barrel and top chamber to be preserved, and much less filth in the gun from paint and metal being ground away. also with the less stress on the barrel as the gun cycles, it wont crack over time.
https://www.amazon.com/SE-744DF-R-Diamond-Piece-140mm/dp/B0011565LG/ref=sr_1_2?ie=UTF8&qid=1523025884&sr=8-2&keywords=jeweler+file
I use the round file from this set"
http://www.boomarms.com/shop/item.cfm?id=BM-BEARING-8MM&curr_code=USD
here is the hammer bearing. It replaces the stock solid one with a wheel that spins on a ball bearing. this greatly reduces the resistance on the slide as it cycles and also reduces wear on the hammer since the outer wheel is what moves, and not the post in the hole.
The slide will cycle faster / be more snappy now and will have the benefit of not sticking halfway on the hammer when you slowly rack the slide.
Files
Looks amazing, and I love the passion you are sharing with your posts. The only thing I would advise you to do is take a moment and look for mold lines, sprue attachment points, and gaps. I didn't see any mold lines, but they blend in with the plastic, but generally stand out once you paint. The sprue attachement point will also stand out. I bought a file set on amazon here that I find work amazingly. For gaps there is green stuff and milliputt for large gaps. There is liquid green stuff, but I have never bought a pot that wasn't dried out. Rather I learned from another mini painter that you can take milliputt, and make a small disk, and using an old brush and water make a liquid milliputt that can be used to paint in small gaps.
​
Go for the color scheme that most inspires you. It may be technically difficult to pull off, but you will learn with every iteration that you attempt. The worst that can happen is that you strip it and start over. Enjoy and keep the updates coming.
Some of the less intuitive acccessories I've found helpful:
Here's the tools I use most frequently in 3d printing and assembly - I suspect you'll have most of these from modelling work:
Get yourself a small file and clean up any burrs that may exist on the back of the bolt carrier. Drag is on a t-shirt or some paper to check for any burrs that may exist.
You need to get to know the power of diamonds, my friend!
Carbide can be good. Honestly, rasping your item against hard cured concrete, especially if done in the first few days after casting while it's green (softer), might do the trick.
Things like these are great: https://smile.amazon.com/Toolocity-DHPSET-Diamond-Polishing-Stone/dp/B00MCL4NHG
But even something like this would work for a small piece: https://smile.amazon.com/gp/product/B003XZI2LI/
If you're planning om using only brushes, then you should look up Quick kits on youtube. He uses enamel paints which are better suited for brush painting to get Good results.
I use Diamond files, those small ones that you get at the hardware store. They never wear out and and are cheap in the Long term. Also very precise. You also want a filler, I'd recomend perfect plastic putty. Works wonders and is removable with water. Good for small cracks that is present in all models, due to bad engineering or user error.
https://www.amazon.co.uk/Rolson-24621-Diamond-File-Set/dp/B006X1CFTO
Er ... I don't know, sorry. (They don't seem to be stocked this side of the pond).
A quick look, probably a decent bet; but I'm kinda guessing.
I did spot http://www.amazon.com/Nicholson-Piece-General-Purpose-Hand/dp/B000TDGHVY which might be a decent starter set, if you can cope with getting handles for them (or, even, one handle - you only push files, so you can, in theory, swap a handle over. That gets old really fast, however). It looks to cover the range I suggested (not exactly ... close enough), and appears to be good value.
Depending on how much filing you expect to do - you might be ok getting the cheapest files, and then moving up once they wear out; but I reckon that the cheapest ones won't last long filing steel. (If you were working anything softer (e.g. brass, aluminium) they're probably fine - but I'm assuming that's not the case here!)
(I note someone's downvoted my post above - you might want to hang on for a bit, in case someone disagrees, and wants to suggest something else as the first files to get).
I have this set, which is 6 files from 40 to 600 grit. You'll honestly only use the 400 & 600 most of the time, but the others can be nice for drastically reshaping a part.
http://www.amazon.com/dp/B00292IOAA/
For the fretboard scrape the heavy gunk off with a razor blade then wipe it down with naptha. Then you can spray a little guitar honey fingerboard oil on it if you like the look of darker fingerboards. You don't necessarily have to oil it, but I think it looks nice. Boiled linseed can be an alternative, but keep in mind it's a drying oil and will stay there.
For the nut, a tusq but is a cheap and pretty much a drop in replacement. Bone nuts can get pretty expensive, and tusq is just as good if not better. There's precut fender style nuts for like $8.
If the frets are just a little tarnished, tape off the pickups with masking tape first. Then go 0000 steel wool->Dremel felt polishing pad with jewelers rouge->metal polish with a microfiber pad, then rub everything down with a dry part of the microfiber.
If they're totally messed up and divorced, uneven, etc then you can completely do the frets or take it to a shop. Level/crown/polish them. Regardless of the route you take I would probably file down any protruding frets that poke out past the fingerboard.
Anything perfectly level with some sandpaper to level frets, long granite scraps from companies who do countertops can be super cheap/free. You'll also need a sharpie, fret rocker, and straightedge. Make sure the straightedge is actually straight, cheap rulers generally aren't.
Any flat file for protruding frets. A small needle file with a safe edge ground on for dressing the ends after bevelling. For crowning use a triangular file with the corners ground smooth.
Bevelling and protruding frets
Fret ends
Crowning
I listed cheap options to get started. You can always buy nicer ones. Stewmac, crimson guitars, LMI, and similar sell specialized ones for a pretty big markup.
I've found that eliminating layer lines isn't too important if you go down to .08mm; the big issue is that overhangs and drooping on fine details can be a killer that overshadows the smooth surfaces. A few tools I've found handy:
Get a good round scalpel handle and a pack of carbon steel 15C scalpel blades. They'll be your go-to for nicking out tiny little stray globs and trimming plastic. Way more precise and durable than X-Acto or hobby knives.
Then get a set of diamond mini-needle files — they'll be useful for smoothing rough spots. Diamond grit may seem like overkill for PLA, but the fine texture of the grit is what matters: it won't leave your models ragged and with care you can actually restore detail that's lost to droopy overhangs, etc.
Finally, get a sharp-edged "soldering pick" and use the needle files to sharpen it to a nice sharp edge. It'll be your go-to for levering out bits of support, and picking away at larger globs of plastic. If you ever find that the scalpel blade bends while you're trying to clean up a defect, go to the soldering pick.
If you place 1 or 2 pieces of 100 grit sandpaper on top of a bamboo sushi mat, you can slide together all 3 of them over the good wood trim and they should keep their shape while sanding over your repaired area.
https://www.amazon.com/JapanBargain-Brand-Rolling-rolling-spreader/dp/B00O8J2L6K/ref=sr_1_11?ie=UTF8&qid=1474240446&sr=8-11&keywords=bamboo+sushi+mat
These files alone or with sandpaper wrapped around them also will work.
https://www.amazon.com/Stanley-22-176-Double-Bastard-10-Inch/dp/B004EBP2T0/ref=sr_1_8?s=hi&ie=UTF8&qid=1474240833&sr=1-8&keywords=stanley+flat++file
half round file.
https://www.amazon.com/Stanley-22-099-Round-Bastard-10-Inch/dp/B0045PSF3U/ref=sr_1_3?s=hi&ie=UTF8&qid=1474240922&sr=1-3&keywords=stanley+round+file
round file.
https://www.amazon.com/Stanley-22-098-Single-Bastard-8-Inch/dp/B0045PQBL8/ref=sr_1_7?s=hi&ie=UTF8&qid=1474240922&sr=1-7&keywords=stanley+round+file
Depending on the intricacy if the design you might want some needle files .
No worries at all. Not only do you have your own life, you're on the opposite side of the world from me. I've really enjoyed this discussion - not only am I able to help you out, but you're curious about a subject I love. Basically a win/win for me. :)
I honestly couldn't tell you how many teeth snakes have. I've seen maybe 6? on Puppy.
Those pictures are actually a few months old. She's going to shed tonight or tomorrow, though.
--------------
I bought this pump and filter combination, and this bowl to use as the basin. I also purchased some PVC pipe (3/4" inner diameter I think, 1" outer diameter), a couple sheets of flagstone, some flexible tubing (5/8" inner diameter, 3/4" outer diameter - so it fits inside the PVC pipe), some large diameter black pipe for spacing out the rocks, some gravel, and assorted fittings for the PVC pipe.
I built the frame out of the PVC pipe - you can see it a bit in the picture. It's the white pipe. The frame is composed of a rectangular cube, with T-fittings around the bottom edge. Each of the Ts points inward. I then have a single fitting that takes in all four of the Ts and lets you send a central pipe straight up. The gravel is in the bottom of the bowl, and the frame sits on it.
Next up, I cut the flagstone. Flagstone breaks in straight lines, so all you have to do is get a chisel you don't care about, score the line that you want to cut, and then put the chisel in the score and smack it with a hammer. It will break along that line.
Next I used this 1" diamond core drill bit to cut holes in the center of each piece of flagstone. The holes wound up being slightly too small, so I used these diamond files to make them wide enough to fit the PVC pipe.
Then I put the stones onto the frame, using the black spacer pipes between them.
Now, in order to get the water to actually flow, I drilled a hole through the center pipe in the frame, below where the lowest piece of flagstone sits and fed the flexible tubing through that hole and up to the top of the waterfall. Then I hooked up the pump to the flexible tubing.
Last but not least, I got a lamp dimmer and connected the pump's power cord to it. So, I basically have an on/off switch for it. That's necessary because the waterfall splashes a bit. If I left it on all the time, it would soak the substrate.
All told, the waterfall took months of work and a lot of mistakes. The final product turned out well, though.
------
If you have the freezer space and your snake cooperates, f/t is the way to go. It's the cheapest and safest option.
I feed Puppy live, but that's because she's a very picky eater. She refuses to eat anything unless it's alive. I recently switched her from a species called African Soft Furs (bigger than mice, smaller than rats) to regular old rats, which she didn't like at all. The entire process took around 3 months of hard, moderately traumatizing work.
However, that's a very specific issue that happens with carpet pythons - they get fixated on a single food source and can refuse to switch. I doubt you'll have that sort of problem.
One more thing - usually you want to let your snake digest for 1 - 3 days after you feed them. If they are full and become very bothered, sometimes they will regurgitate their meal. That is definitely bad.
----------
Yeah, ideally the shed will be in one single piece. The shed is actually longer than your snake is however - as they are shedding, the skin stretches to let them get out.
What I'd suggest is looking at the skin initially. You should be able to see the eyecaps on the discarded skin, the tip of the tail, etc. If you do notice stuck shed, there are a few common approaches:
Shedding is hard work, so I usually feed them a large meal, let them rest for a few days, and then hang out with them. However, it's totally cool if you want to hang out with your snake immediately after a shed, as long as your snake isn't acting stressed.
I'm about 1/2 way through my assembly. Here's a few tips:
goofy filing is difficult, and will take you quite a bit of practice to get good at it.
tips:
here are some other resources:
http://treefalling.com
https://www.youtube.com/watch?v=KjAeRF0Vedc
hope this helps! it took me a long time to get anywhere close to being able to free-hand. building the muscle memory to accurately push a file in that orientation is a long process for most.
OK, here's my experience, but in general, just go with what /u/bandit69 says if he shows up. He's the wise old man around these parts.(Although for all I know, "he" could be a 27 year old girl. I like to think of him as a wise old man in a rocking chair.)
Anyhow, back to why I'm here:
I made so many mistakes when I started out and one of those mistakes was being afraid of using wood finish because I thought I would mess it up. I used mineral oil for a while. Definitely don't do that unless you're making cutting boards.
There's a difference between wood stain and wood finish. Wood stain adds color. I've never used wood stain before.
Wood finish is what protects the wood from water/scratches/bumps and makes it look shiny (although you can buy matte finish that doesn't add shine at all). Wood finish will deepen the natural color of the wood (the way wood looks when it is wet).
There are a bunch of different kinds and after using a few, I've settled on clear shellac premixed in a can from Home Depot.
A lot of people use oil-based polyurethane, and it's a beautiful choice, it just takes a lot longer to dry than shellac and I am impatient.
Whether you're using poly or shellac, you'll want to brush on a coat, let it dry, lightly sand, and then repeat the process 3-4 times. It won't look good after just one coat. Being impatient, I don't like this process, but I do it because the results are so beautiful.
I have found that applying wood finish with a bristle brush (as opposed to a foam brush) produces better results.
For sanding in crevices, I use one of these. I have also used a nail file in the past.
Overall, wood finishing is not as complicated as it sounds and you can definitely do it.
Best bet is probably to pick up a needle file set. Something like this. I had some CNC wooden ones that I miscut, so I put one of my 1mm bits on a dremel and managed to clean them up well enough. For reference, the slots are about 1.3-1.5mm which is less than 1/16".
Just build your own semiautomatic rifle.
Here's what you need:
https://www.amazon.com/VISE-GRIP-Original-Curved-Locking-502L3/dp/B00004YO5M
https://www.amazon.com/Nicholson-Piece-General-Purpose-Hand/dp/B000TDGHVY
https://www.metalsdepot.com/aluminum-products/aluminum-square-bar
I added an LSR to my partscaster project and I'll never have a strat without one ever again. With a good two post tremolo and locking tuners, it's as stable as any locking nut system I've ever tried. I don't understand why Fender only offers it on the HSS version of the deluxe.
I don't have the magic ears like some of the folks who'll tell you the metal nut "suks muh tonez". IMHO, unless you're playing 100% clean jazz type stuff, there's no discernable difference. And the trem comes back to tune even after EVH type abuse, but without the setup hassle or tuning change limitations of a Floyd Rose. Added bonus: worry free string gauge changes. The bearings accommodate 008" to .056" without you having to worry about modifying string slots. And if you want to go lighter gauge with traditional nuts, you sometimes have to replace the nut entirely.
For what it's worth, you can always change out the pups. Or just get a Standard and have an LSR put on it.
EDIT: If you attempt to do an LSR mod yourself, I highly recommend getting a proper file (flat square edges, the exact dimensions of the LSR). I learned the hard way. My neck only cost me $125, so I'm not too bummed about it, but my next one will look alot cleaner and have a much tighter fit. Best to clamp a makeshift jig to guide the file, right onto the neck and use calipers and a straight edge to check your depth and angle often.
This tool kit may be more than you want to spend, but mine is an amalgam of random stuff that just lasts. I built this kit over 3 years ago and the only thing I've replaced is the Hakko bent tweezers because I used to abuse them. It is my opinion that good tools pay for themselves if you do something regularly with them.
Phillips Driver: Moody 000
Pentalobe: Wiha PL1
Opening tool that I've sharpened into a square blade on one end and a standoff screw remover on the other: Metal spudger
Used to be more relevant when I did more gen 2/3/4 iPads for quick bezel cleaning: 3/32 stubby flathead
Curved tweezers (so many uses): Hakko
Spudgers that last (unless you really abuse them): Menda
Best Y000 for iPhones I've found so far (this one I'm not married to): Bunkaikoubou
The flat file in this set: File
One of those cheap driver sets for bigger stuff like torx, etc. I don't work on stuff that really beats those bigger bits up, so I buy a cheap set for that.
Any dental pick for getting shit out of charge ports, etc.
Edit: I'm sure you can shop around and find cheaper prices, and I also do not claim these are the absolute best tools, just that my set of this stuff has lasted over 3 years and I repair mobile devices full time.
I also suggest a set of diamond files to file off the prints.
I got mine a week ago, and my prints look a lot better with some love.
I did, it's very easy to do and only takes a couple of minutes. I used this diamond needle file set I got off Amazon
https://www.amazon.com/dp/B001R1JWUK/ref=pd_lpo_sbs_dp_ss_2?pf_rd_p=1944687522&pf_rd_s=lpo-top-stripe-1&pf_rd_t=201&pf_rd_i=B006P2X9FU&pf_rd_m=ATVPDKIKX0DER&pf_rd_r=GMTYNFVDA0NRPRBKK3KS
Maybe start your hole with a forstner, do as much as you can with a smaller spade bit, then finish up with the original forstner. That's if you really need a flat-bottomed hole. If you're going all the way through, just start with the forstner so you get a clean start, then go the rest of the way with the spade. That's if you don't need a clean back hole. If you need a clean in and out, a forstner-spade-forstner sequence might do the trick. I think my forstners and spades that are the same size are actually enough different that you'd have to finish with the original forstner, either way.
Get a pack of diamond files.
Here's a quick how-to. You can use water as a lube when using diamonds.
Definitely don’t want to do it yourself? I haven’t yet but I’ve thought about it a lot, all you would need is some diamond files like this:
Link:
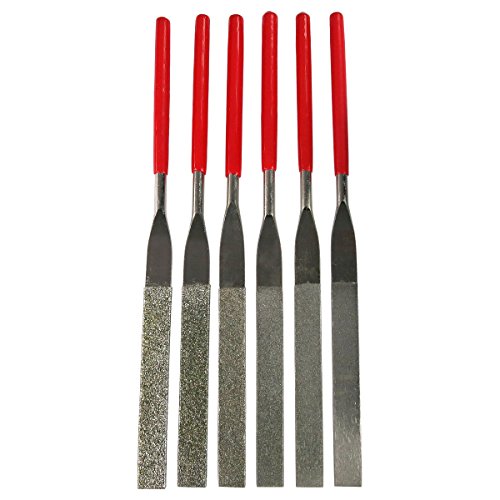
SE 10-Piece Diamond Needle File Set with 150 Grit https://www.amazon.com/dp/B0011565LG/ref=cm_sw_r_cp_api_i_wsGwDbBF9SYBZ
Non-mobile: http://www.amazon.com/dp/B0002JT40Q/ref=mp_s_a_1_1?qid=1425782454&sr=8-1&pi=AC_SX200_QL40&keywords=triangle+saw+file&dpPl=1&dpID=11xe6%2Be%2BOJL&ref=plSrch
^That's ^why ^I'm ^here, ^I ^don't ^judge ^you. ^PM ^/u/xl0 ^if ^I'm ^causing ^any ^trouble. ^WUT?
http://www.amazon.com/gp/aw/d/B0002JT40Q/ref=mp_s_a_1_1?qid=1425782454&sr=8-1&pi=AC_SX200_QL40&keywords=triangle+saw+file&dpPl=1&dpID=11xe6%2Be%2BOJL&ref=plSrch
Do you think this would probably be fine? With a handle its $7 bucks.
https://www.eternaltools.com/blog/top-10-uses-for-diamond-files
Bought a cheap one on amazon: it cuts through steel like it's butter (in seconds) and polymers are like cardboard with that thing.
Mine is a replacement for an arc saw, though, something like the following should be enough (they have the same surface as mine, meaning, real industrial diamonds).
https://www.amazon.com/HTS-101I0-180mm-40-600-Diamond/dp/B00292IOAA
Also, if you don't know this yet, industrial diamonds are man made, artificially. They have no value as jewels, hence the lowest price ever.
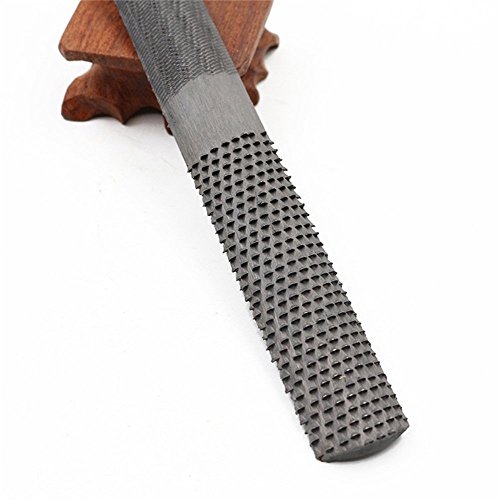
4 Way Rasp File - Constantly use it to smooth out rough cuts, get interlocking parts to fit, shape wood handles.
https://www.amazon.com/Multifunctional-Carpentry-Woodworking-Cabinetmaker-Repairment/dp/B0791CB441
Eze-lap are a not too expensive American made option. I have used these before, they work pretty well, but even the coarsest here isn't super aggressive.
this Chinese set has some coarser options. I have never used a diamond file that coarse though, I'm not sure how well the cheap ones hold onto their grit.
I bought these recently. They're all flat, though. Don't know if that's what your looking for.
I already owned a needle file set. If you want an all-purpose set, then just search for "needle file set"
SE 742DF File Set Tapered Diamond...
https://www.amazon.com/dp/B001BSJD76
I ordered a set of these just for the occasion.
https://www.amazon.ca/gp/product/B001AE7RRO/ref=as_li_qf_asin_il_tl?ie=UTF8&tag=3dprintedtabl-20&creative=9325&linkCode=as2&creativeASIN=B001AE7RRO&linkId=0818deea100a21fd61e9bc084bf72017
http://www.amazon.com/gp/product/B000TDGHVY/ref=oh_aui_detailpage_o06_s00?ie=UTF8&psc=1
These work amazing for me
This may be it.
I’ve got a similar set and they work well, had it for 7 years now.
what else would i need to add to these tools, I don't understand what the divider's purpose is exactly, and I have the rest of the stuff you suggested
Tools needed
Drill press
http://www.amazon.com/WEN-4208-8-Inch-Speed-Drill/dp/B00HQONFVE/ref=sr_1_1?s=power-hand-tools&ie=UTF8&qid=1422478362&sr=1-1
80$
Angle Grinder
http://www.homedepot.com/p/Makita-4-1-2-in-Angle-Grinder-9557NB/202105761
70$
Cutoff wheel and flap wheel
10$
cabinet makers rasp http://www.amazon.com/Nicholson-Half-Round-American-Pattern-Length/dp/B006P2X4Q4/ref=sr_1_4?s=industrial&ie=UTF8&qid=1422479106&sr=1-4&keywords=cabinet+rasp
20$
bench vise
30$
also from what i understand when I am making the blade do I just grind it so it is thing and sharp at the bottom and thicker on the top??
I'm a big fan of Army Painter products. I've had pretty good luck with them so I'm kind of slanted towards them. So I recommend...
1- a set of these brushes.
2- Any of the Army Painter primers are good. But this is my favorite. Coats and covers well. Also works for a lot of different models.
3- A set of these have come in handy for me several times.
4- These clear bases are my favorite. I've rebased several figures with these. Love them for there ability to show the terrain the figure is standing on.
5- And a cheap basecoat sized brush for mixing paints and brushing on quickshades.
This is obviously just my opinion. But I hope it helps.
Don't have a 3D printer? Just attach one of these.
Here are some links in case you're interested:
Stanley 10" bastard with one safe edge
Nicholson file set I bought
File card and brush
Round file I bought
Links to cheap files.
Link
Link
Link
Thanks everyone for the advice everyone, I probably would have bought them had I found them yesterday, but I decided to go the DIY route. Since picking must be a very budget conscious hobby for me, I went ahead and took the plunge and bought the important tools. I figured making my own pins would be difficult and require a lot of crazy equipment, but I looked into it and realized it was a lot easier than expected. So just for anyone who's curious, here's what I got:
 
So in total $112 for all the components needed to make as many locks as I can imagine, many of which can be used for other projects.
 
To add supplies for a few other DIY projects I also added:
 
So another $21 brings it to $133 plus $2 per 2-3 tools that you need. Add in this $6 case and a few $4-$6 practice locks around aliexpress (1st, 2nd, 3rd, 4th 5th, 6th, 7th), and you've got a great starter kit that sets you up to DIY anything you might need in the future. I also took advantage of Peterson's mega christmas sale (plus the 10% discount code they gave us) and got a ~$25 order of $1-$3 picks to start me off
I'd suggest staying away from a Dremel unless you're reeeeeaaaalllllyyyyy careful. Power tools can take off to much at a time if you slip up.
I would suggest getting some diamond needle files from Amazon (like $8 for the set) and using those. It will take longer but less chance of a massive oops
[Needle file link](SE 73810DF 10-Piece Mini Diamond Needle File Set, 150 Grit https://www.amazon.com/dp/B0019N6CV8/ref=cm_sw_r_cp_apa_i_Gjm1BbT3WABEQ)
Diamond files like these would work well. These come in handy more than you'd think.
I can't comment on the Gen 4 Noiseless, as I've never used them. My wiring is more like a Les Paul, with dual HB, three way switch and push-pulls for coil splits. This is a pretty good resource for wiring ideas, if you're looking for inspiration. Generally speaking, you'll also want to replace the switches and pots with Switchcraft, CTS, etc. My guess is that the MIM's come with Alpha, but I could be wrong.
EDIT: Keep in mind, when researching wiring diagrams, that "Noiseless" usually means humbucker. It might look like a single coil, but it will be two coils stacked one on top of the other. Check manufacturer specs to confirm whether you're dealing with four or two wires, then plan accordingly.
This is what I used for files:
https://www.amazon.com/Miniature-and-Model-Files-Set/dp/B001AE7RRO/ref=sr_1_2?ie=UTF8&qid=1498081654&sr=8-2
Not sure the grit, but they work great!
As for bits... What are you using to pin with? I started with Privateer Press models so I just got their pinning set. Comes with a bunch of metal to pin with and then 2 or 3 bits. Work great for me! It was one of these three, I forget the exact size I bought:
https://www.amazon.com/s/ref=nb_sb_noss?url=search-alias%3Daps&field-keywords=P3+Pinning+Expansion
As for getting more bits: I would just search Amazon for pin vice bit set or just pin vice set. That will be what you're looking for. I don't know of any place that would sell individual sets of small bits except for a specialty hardware store or a hobby store(Michaels, ACMoore, etc)
get something like this, with the drills maybe in your local measurements.
then a set of files like this or a complete set like that. than this strange substance.
consider this in case he gets funny. some collection of magnets like those. prices vary drasticly, again go for local measurement system. he will probably need 1x1mm, 2x1mm, 3x2mm. just check if the drills you got and the magnets fit size wise and the magnets have to be neodynium.
​
i am not very familar with skaven so i cant give much advice on models but i assume this one will make him happy. it qualifizes for "anything really cool", can be used to build different things he might like and you can use the stuff mentioned above to fill out the rest of the budget if you like.
​
this overrated book vendor in the links was just used as example of product and quality and prizes of products will vary drastically. with this stuff you cant make too much wrong with going cheap.
somebody from your country might offer you a good vendor. i cant really suggest specific products since they maybe are not availlable where you are from.
​
my most sincere condolences that you lost your partner to plastic crack :(