Best electromechanical controllers according to redditors
We found 103 Reddit comments discussing the best electromechanical controllers. We ranked the 52 resulting products by number of redditors who mentioned them. Here are the top 20.
We found 103 Reddit comments discussing the best electromechanical controllers. We ranked the 52 resulting products by number of redditors who mentioned them. Here are the top 20.


This can be accomplished with a voltage converter and a voltage regulator design for solar power for less than fifteen bucks
EDIT: People wanted details.
Batteries, panel, wiring, tools, housings, not included.
There's a bunch of better guides online, but the main components are a voltage converter, and a charge controller to get your pi powered by battery while charging the battery with what solar is available.
I think their product requires more investment than that little hat, personally. Do you think that little thing is going to step down 12v-5v with good heat management? I don't think it handles power conversion, and there might be something else in the line before it, like a regulator. Maybe you need their 12v battery.
But like any kickstarter, no guarantee on delivery of product, or features so be skeptical.
(looking for guide that I used...)
This is my induction heater.
I got the idea because I thought that some of the colors and textures in this (dark wood, glass, copper coiled wire, metal) reminded me of an olde-tyme'y "Edison lab" or "steampunk" theme.
So, I prototyped a build in this container. Parts list below, for those interested:
​
Parts List
​
Miscellaneous parts:
internal shot
Parts list:
Tools:
STL for 3d printing:
All three files
Wiring diagram:
Terrible MS paint Diagram
No worries, sounds like you only have the cell right now. I'll skip all the safety stuff but I will say, if you aren't absolutely positive what you are doing, stop. The lowly NA outlet has a tremendous current surge rating. You'll die and never know it. Before continuing, you do absolutely need to know your outlet is wired correctly and you'll want to confirm which part of your circuit is the live or hot wire.
Do you need AC or DC to operate your cell? If you can operate it on AC, you'll only need a heavy 3 prong power cord, the circuit board in the link above and a fuse holder and fuse rated for the power input required.
If you need DC then you'll also need a bridge rectifier rated (guessing) 35 amps.
Since you don't yet know the actual circuit current, you'll need some device to monitor the incoming power. Here is what I'd do:
Before plugging this death trap into the wall, confirm you have a 2-5 amp fast blow fuse Installed in the fuse holder. We only want to initially tickle the dragon. Double check the device is turned off. This one looks more beefy:
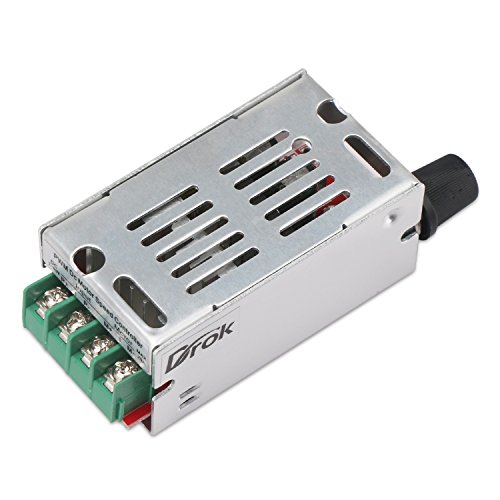
https://www.amazon.com/DROK-Regulator-Controller-Temperature-Governor/dp/B00BXUCWQG/ref=pd_sbs_60_2?_encoding=UTF8&pd_rd_i=B00BXUCWQG&pd_rd_r=SCK4RH8538ARSNVKPSVS&pd_rd_w=WLQ1A&pd_rd_wg=qgTGd&psc=1&refRID=SCK4RH8538ARSNVKPSVS
Hide your wife and kids, connect to power while shielding your eyes.
You should now be able to slowly turn up the power while monitoring the input current. You really need something to at least be able to look at how much current you are pushing.
If all goes well, swap the fuse to something in the 10 amp range and keep slowly turning it up.
If you need DC let me know own and I'll draw something up for you.
If you have even the smallest question about anything I've said ask. Please. I don't want to hear about anyone on the news..
UPDATE:
That site seems to aim toward 12 volt DC hho cells. At 1100 design watts that's pushing nearly 100 amps! Is this part of your design? To run that off of a standard 110 volt AC outlet, you are definitely going to need a large power supply. Again, I can help but it likely isn't going to be cheap unless you are ready to scrounge and learn more about electricity.
https://www.amazon.com/gp/product/B011AQCDLG
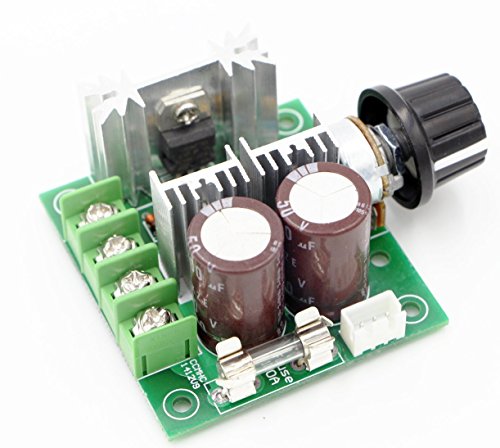
https://www.amazon.com/DROK-Controller-Regulator-Modulator-Indicator/dp/B00DVGGWC0
https://www.amazon.com/Minger-Supply-Adapter-Transformer-Flexible/dp/B01AJQ9G2C
hey man, about to build my first heater tomorrow, I have a list of parts I ordered based on several threads and stuff you and others recommend I came up with this:
https://www.amazon.com/gp/product/B0060U92FS/ref=ppx_od_dt_b_asin_title_s00?ie=UTF8&psc=1
https://www.amazon.com/gp/product/B071NCKQFW/ref=ppx_od_dt_b_asin_title_s00?ie=UTF8&psc=1
https://www.amazon.com/gp/product/B01G00GHQY/ref=ppx_od_dt_b_asin_title_s00?ie=UTF8&psc=1
https://www.amazon.com/gp/product/B00VNSO3OM/ref=ppx_od_dt_b_asin_title_s00?ie=UTF8&psc=1
https://www.amazon.com/gp/product/B003TUMDWG/ref=ppx_od_dt_b_asin_title_s00?ie=UTF8&psc=1
https://www.amazon.com/gp/product/B01GDVVANA/ref=ppx_od_dt_b_asin_title_s00?ie=UTF8&psc=1
aside from wires, a box and tools (Ill get tomorrow from work)
am I set or do I need anything else, also if any of those things I bought incomatible?
Picture of the pressure sensor then, that's simply an electrical micro switch not much different from a light switch on the wall in regards of what it does. You push the button or some actuator pushes the button or something moves and pushes the button. In this related video you can see the inner workings of a pressure switch, you can see the similar micro switch that you have. AFAIK they are a package, the pressure part is constructed and a desired micro switch is fitted in during the design process.
Are you trying to find a pressure part that will fit this specific micro switch? I think this is going to be difficult. For example here is a pressure switch with a micro switch, do you want everything except the included micro switch and to be able to fit your micro switch?
Insulation
Controller
High temp silicone
Supply cord
Thermometer
Elements
Insulation adhesive
So, this setup is certainly not perfect and has the potential for uneven heat disbursement but it has worked well for me.
I drilled 3 holes about 3 inches from the bottom of the cabinet for the heating elements and used thin aluminum stock cross members to support them. The holes were sealed with silicon which also helps keep the elements in place.
The entire inside of the cabinet has a layer of cut-to-fit insulation and the seams are taped with high temp flue tape.
I have 2 threaded steel rods running horizontally and offset for hanging parts.
The thermometer is at the top and generally runs a large number of degrees cooler than the parts but I have a good feel for time and tackiness when flashing and layering. I prefer longer cure times at lower temperatures. You can cure this stuff at 150 degrees if you want...it just takes a hell of a lot longer.
The rest of the stuff is just wired up and I'm sure its a huge fire hazard and I have zero experience with this kind of thing but it has worked for me so far without a problem. It's set up in my garage with tons of ventilation and a fire extinguisher close by.
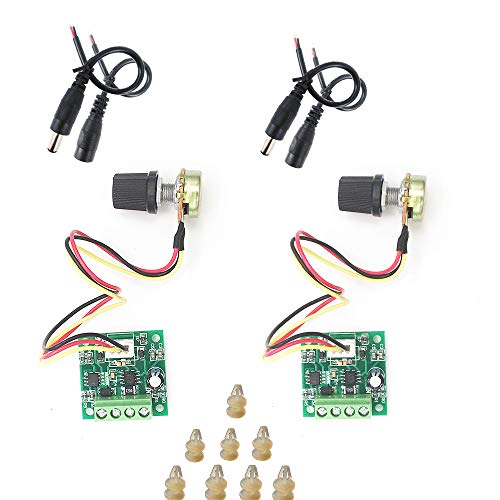
Stick one of these on there, so the switch powers the speed control and the speed control drives the motor.
Then you'll have an adjustable speed control and the regular switch. Pretty good for ten bucks.
EDIT: even cheaper
Here you go
I got this recently: https://www.amazon.com/gp/product/B00SL0U3RG
It worked perfectly to program mini pro clones, and it was automagically setup in Rasbian (Debian for the Raspberry Pi).
Yes, this shield supports up to 4 DC motors. What type of DC motors do you have? Specs?
They should ship to Australia.
Amazon also sells a similar shield made by SainSmart (http://www.amazon.com/SainSmart-L293D-Shield-Arduino-Duemilanove/dp/B00813HBBO/ref=sr_1_2?ie=UTF8&qid=1369849137&sr=8-2&keywords=motor+shield). It's essentially the same design (since Adafruit's design is open source), just cheaper. I have one, but I have yet to test it to see if it is any different than Adafruit's. I'll report back later those results. If there is no difference, then you can save $8 on Amazon!
Something like this?
I built the same thing for my still. Except I used this instead of the voltage regulator, because you still want the constant voltage, but just less power:
https://www.amazon.com/gp/product/B00OZ5MBM6/ref=oh_aui_detailpage_o06_s00?ie=UTF8&psc=1
I also got a killawatt or whatever it's called so I can dial things in, wired the pulse width modulator in the middle of what is basically an extension cord. "works great!"
This?
https://www.amazon.com/RioRand-trade-Upgraded-6V-90V-Controller/dp/B00F839VNQ
Here's a vernier drive I found on an RF parts place: https://www.rfparts.com/capacitors/capacitor-vernier.html (People who construct radios often want to expand the range on tuning capacitors, so these devices used to be very common. Less so now, with digital tuning.)
Note: i edited this node. The original content is below, but after re-reading the page, I'm not confident that the device is as described.
This little guy will give you a 8::1 turns ratio for your potentiometer: https://www.amazon.com/Philmore-S38-Vernier-Control-Knob/dp/B00A9HHTCQ
You don't really have to adjust voltage. A PWM speed controller can be used for the same purpose (adjusting average voltage) and they're much cheaper. A 10A PWM speed controller can be purchased from Amazon for $11 shipped. Most of them will output in the same voltage you supply.
https://www.amazon.com/RioRand-trade-Upgraded-6V-90V-Controller/dp/B00F839VNQ
No problem! I just got mine wired up and used one of these to control the speed and it worked fantastically! I recommend them highly!
I have wired an L298n to a stepper motor using an Arduino before, however, this time I wanted to use this PWM generator with a pot and some buttons already integrated into it: https://www.amazon.com/15-160V-Adjustable-Controller-Generator-Regulator/dp/B07HNSVMVH/ref=sr_1_2?keywords=stepper+pwm&qid=1572015567&refinements=p_72%3A2661618011&rnid=2661617011&sr=8-2#customerReviews
I haven't found any tutorials for this and I am not too well versed in electronics to understand how to hook it all up. Any help is much appreciated!!
this http://www.amazon.com/Tamiya-70108-Tracked-Vehicle-Chassis/dp/B00061HHTK/ref=sr_1_1?ie=UTF8&qid=1367962437&sr=8-1&keywords=arduino+tank
this http://www.amazon.com/Tamiya-Double-Gearbox-Independ-4-Speed/dp/B000C8F802/ref=sr_1_2?ie=UTF8&qid=1367962437&sr=8-2&keywords=arduino+tank
and thishttp://www.amazon.com/SainSmart-L293D-Shield-Arduino-Duemilanove/dp/B00813HBBO/ref=sr_1_1?ie=UTF8&qid=1367962500&sr=8-1&keywords=adafruit+motor+shield
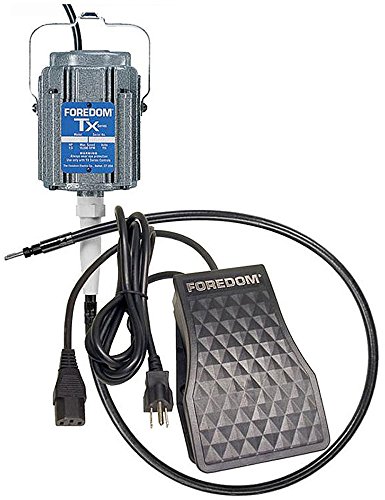
http://www.amazon.com/Foredom-M-TX-TXR-TX-motor-control/dp/B000NOQWJG/ref=sr_1_8?s=hi&ie=UTF8&qid=1368583537&sr=1-8&keywords=Foredom+Tools
I would look for something like this. if you have a tool like this with the foot control you should have no problem using it with water.
Would this work for you?
https://www.amazon.com/gp/product/B00EERJDY4/
using this: https://www.amazon.com/gp/product/B00F839VNQ/ref=ox_sc_act_title_1?smid=A298K45OP416LP&psc=1 between the input and the relays would work?
I like the simplicity of the resistor idea but It's hard to tell how hot its going to get or what speed a particular ohm value is going to reduce it to until its all said and done.
I use this to control the heating coils:
https://www.amazon.com/gp/aw/d/B00OZ5MBM6?psc=1&ref=yo_pop_mb_pd_title
I have a HF router control on a shop vac as a blower, I can roast 250 grams at a time, and could probably do more if I built a larger chamber. My roast this afternoon hit first crack at 8:07 and ended at 12 minutes.
If you're interested in the Raspberry Pi route, look up the ELF roaster. It uses a breakout board for the thermocouple and an SSR to cycle the coil on and off. You can download the software from the developers blog.
I'm not sure about #1, but for #2, you're looking for jumper cables. These let you plug in components to the arduio/breadboard without having to solder. The eBay listing is a great deal, but you can buy them at Fry's Electronics if you have one local to you(also, the eBay link is from a Chinese seller, which could take a long time to get to you).
EDIT: I just took a look at the link you posted, and in the questions section there are people asking about how to power the shield and what kind of solutions they used.
You can undervolt a fan, but most stutter and stall out at around 50%, without enough power to keep the blades moving. With something this loud, I'd guess that's still not going to be enough.
I'd actually recommend making or buying a PWM controller. They work by rapidly turning the fan on and off, changing the ratio to adjust the speed. Because it's always at full voltage, you never get the stalling issue at low speeds. They're also pretty efficient.
Sure, here's the controller: https://www.amazon.com/gp/product/B00BXUCWQG/ref=oh_aui_detailpage_o01_s00?ie=UTF8&psc=1
The bridge rectifier:https://www.amazon.com/gp/product/B00E1GEZHS/ref=oh_aui_detailpage_o02_s01?ie=UTF8&psc=1
And the replacement potentiometer, although you don't really need this: https://www.amazon.com/gp/product/B01AA5OIFC/ref=oh_aui_detailpage_o02_s01?ie=UTF8&psc=1
And yes, this eliminates the control board, this is now your control. You'll also need a 30a power switch and an electrical box to put all this in. I had a switch am fabricating the box.
Something like this should work. Just don't turn it past 60% or so.
Use the L298N.
H-Bridge (for the UNO there are also shields)
Sensors e.g. this / that though you can also get tctr5000 modules for cents elsewhere.
And note that if you are not set on a line-follower, the kit you've chosen already includes the ultrasonic distance sensor which is nie for robotic projects as well :-)
Do you have a soldering iron and multimeter? Even a cheap $4 multimeter is fine for low-current & low-voltage tasks, and makes your life easier (checking voltages, connections, resistor values...)
As for a soldering iron, even a $1 will do (if it doesn't burn down your house ;-) ) - but an adjustable temperature one will be more worthwhile. Even a $20 soldering station will do to get started if you don't want to spend $80-$100. I tried to avoid soldering for years, and it was a big mistake. It's actually easy and useful.
And another note: The 2wd and 4wd chars will not always go in a straight line. Motors don't run 100% in sync, even at the same voltage.
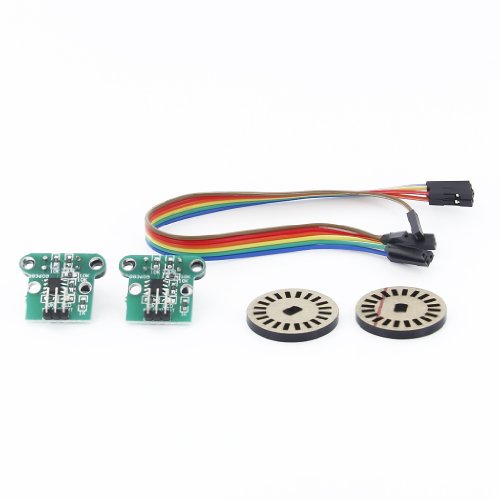
With a rotary encoder you can ajust the speed in software. You can use one of those IR reflective sensors modules, or a gap sensor, or even a hall sensor... example
You can also get 2wd kits example, but overall, they aren't as great of a value (and as you can see, they just include the standard modules)
A "sensor shield" like in that kit is nice though as it reduces the wiring chaos a bit :-) They cost $1 for the UNO at Aliexpress, probably more expensive at Amazon.
I was just looking it up in my shopping history. Lol. It was the pwm by ZJLBTY on Amazon.
2 / Pack PWM 1.8V 3V 5V 6V 15V 2A... https://www.amazon.com/dp/B07F65W9KQ?ref=ppx_pop_mob_ap_share
I suggest getting a Motor Shield. AdaFruit has a good one, and so does the arduino store. I picked up a very good one for cheap on amazon. SainSmart L293D Motor Drive Shield Motor shields do require a second power supply though.
This might work to control the speed on an ac motor. It claims to be able to provide 4000 watts max.
That's helpful. The relays are rated 10A t0 12A so the current is less than I'd assumed. I mean it should be less than the rating of the relay... big assumption, perhaps. It puts the current in the range of some low voltage PWM speed controllers sold on Amazon. My concern is the lower voltage is 6V and you need it to run down to 5-5.5V will it work? https://www.amazon.com/RioRandTM-Upgraded-6V-90V-Motor-Controller/dp/B00F839VNQ Better than a resistor if i works, depends on how much of a project you want to make of it.
Thank you so much for the response. If I have a scenario like below:
​
In the above scenario, if the motor's current demand exceeds 10A, would it damage the motor or the driver, or would the motor simply not have the needed power to do its work and all electronics will be safe? Thanks again.
That's pretty neat. I wonder how well this one works now that I'm looking around. There are professional made knobs that reduce as well, but they're pricy!.
I tried doing something similar recently with a small brass casting. Some of the lettering wasn't as visible as I wanted it to be so I put a small 1/32 end mill in the dremel and tried to take a little off at a time.
This didn't work. The runout on the dremel was so severe that the tool just bounced around an very quickly broke. I learned that dremel tools are crap for precision work, and the rpm plus low power makes the tool a poor choice for small tools on hard materials.
I think something like this (http://www.amazon.com/Foredom-M-TX-TXR-TX-motor-control/dp/B000NOQWJG/ref=sr_1_3?ie=UTF8&qid=1458338059&sr=8-3&keywords=Foredom+flex+shaft+1%2F3+hp) would be a much better choice. There are also some cheapo knockoffs of these if price is a concern.
Thanks! A few more (possibly dumb) questions:
I run my dew heaters year-round. I tried the hard warmers, but they are not very good. I bought a controller and straps. Then made my own controller because the Kendrick controller thinks it is doing you a favour buy shutting off when the battery gets down to 11.6V. Which is the dark of night when everything is finally working and you start to get good pictures. Which sucks. I would be happy to wreck my battery if I am getting good pics.
> Doesn't seem to require a controller at all, which is right up my ally.
Does not require a controller. But that means it is always running at 100% power, which can be bad for your image quality when the lens is so hot that thermal currents of air are flowing from it. And if you are using a battery it runs down faster.
AstroZap makes less expensive gear. You can make a controller for yourself for 30 euros:
This https://www.amazon.com/Controller-Yeeco-Stepless-Variable-Generator/dp/B07DVZPFL1/ref=sr_1_5?ie=UTF8&qid=1539060539&sr=8-5&keywords=5a+pwm+controller
a box,
and a couple of connectors.
I would buy a dew strap from AstroZap and not try to make one at home.
Awesome man. I cannot tell you how cool I find all this. Science!
Here is what I have purchased so far.
12v 6a 72w power supply
ZVS Heater and Coil Combo
Switch. Can hold up to 20amps not sure that mattters whatever, room for extra isn't bad.
[Glass Tube]I DELETED THIS AS WHAT I HAD HERE IS TOO BIG! DO NOT BUY THE GUITAR SLIDE I HAD LISTED! NEW TUBE. I ordered this from China on a Thursday, let's see how long it takes to get here.
So, I would just be missing the mosfet and momentary switches that you have. Do you find them necessary? I might just buy the mosfet and momentary for peace of mind, but I did see a couple build that avoided the mosfet for simplicity's sake. This build seems to have avoided one.
Any further advice (wire gauge, soldering tips, etc)? I am currently looking for a good box to put it all in. Thanks again for the reply.
EDIT - MOSFET
Momentary Buttons
Mounting things for the momentary buttons
IF ANYONE IS READING THIS IN THE FUTURE, CONSIDER USING A 120W POWER SUPPLY. I DO NOT REALLY UNDERSTAND BUT SUPPOSEDLY IT MATTERS.
Just test it with the power supply before hooking it up to batteries? Still a good idea to have a fuse and some kind of current limiter, either resistive or one of those Drok board you can get on Amazon for $10.
If you want something a bit more straight forward Hobbyking has a packaged device that does the same and more... can’t find a link, I’ll post one when I find it.
Yeah I'm thinking the same thing. I did a little research and apparently Chinese fakes are very common with this particular converter and they don't work with the legit drivers or windows 8/8.1/10.
I ordered a 2102 as well. Thanks!
Just to throw another option out there - I use 12v bilge blower fans (similar to: SEAFLO 4" In-Line Marine Bilge Air Blower 12V 270 CFM Quiet Boat White https://www.amazon.com/dp/B0166S2PA2/ref=cm_sw_r_cp_apa_i_SscDCbTQMY3Y9). If you go with a 4" you can just use dryer vent to get it outside. You can also put a motor adjustment switch on it (12V Motor Speed Controller, DROK DC Motor Driver Board for Brush Motor 7V-60V 20A 420W PWM Control 12V 24V 36V 48V Regulator Cooling Fans Dimmer Governor Pulse Width Modulator with Adjust Knob https://www.amazon.com/dp/B00DVGGWC0/ref=cm_sw_r_cp_apa_i_vvcDCbXK0FE4Z). These move a lot of air, which could help depending on the size of your run, etc.
Something like this?
This motor controller!
I'm looking at these two:
http://www.amazon.com/Bipolar-Stepper-0-9deg-steps-62-3oz/dp/B00PNEQMLY/ref=sr_1_8?ie=UTF8&qid=1421105539&sr=8-8&keywords=nema17+stepper+motor
http://www.amazon.com/RioRand-57oz--Stepper-router-mill-K42HS40-1304/dp/B00JI5LTYE/ref=sr_1_10?ie=UTF8&qid=1421106142&sr=8-10&keywords=nema17+stepper+motor
Do you have any opinion on either of them?
http://www.amazon.com/RioRand-57oz--Stepper-router-mill-K42HS40-1304/dp/B00JI5LTYE/ref=sr_1_10?ie=UTF8&qid=1421106142&sr=8-10&keywords=nema17+stepper+motor
that one. The other is 400 steps/rev and will not get you any more accuracy over the 200 steps/rev
https://www.amazon.com/DROK-Regulator-Controller-Temperature-Governor/dp/B00BXUCWQG/ref=pd_day0_60_1?_encoding=UTF8&pd_rd_i=B00BXUCWQG&pd_rd_r=RHDVTMHJAVMYQ4SCW7R1&pd_rd_w=bCbon&pd_rd_wg=JacZ0&psc=1&refRID=RHDVTMHJAVMYQ4SCW7R1
There's another. $20 ish.
No need to paypal, please just post your results! Success or failure, we want to see, learn and maybe help! Going straight from one battery to another poses the same problem as going from solar to battery directly. Little or no control. You can get basic buck down constant current constant voltage power supplies that would work with these. Again, they won't be smart and may have some ripple in their voltage, but they should work as long as you input the right stuff. https://www.amazon.com/dp/B01CE5P33M/ref=cm_sw_r_sms_apa_G9NHzbZ3YAENK. Be super careful, watch and measure voltage regularly, and set the voltage conservatively low to start. I'd start at 3.7 volts per cell. Best of luck!
Also maybe you can ssh/vnc or use tx/rx pins with some uart usb adapter to it then use this:
http://www.ebay.com/bhp/usb-to-vga-adapter?rmvSB=true
then with xrandr change screen output to that usb2vga
Something like this I would think, you will just need to search out one rated for your voltage req. RioRand™ Upgraded 6V-90V 15A DC Motor Pump Speed Controller https://www.amazon.com/dp/B00F839VNQ/ref=cm_sw_r_cp_apa_i_TuI3Db0B6842P
Something like this should work.
If your battery is 100 amp hour, and your fan draws 5 amps it will last 20 hours(in theory).
The one you linked is not available in time for when I plan to install the floor heating element (this weekend). Would you be able to tell me if this one would work the same?
Additionally, the wiring diagram for it shows connection for a "floor sensor", but floor sensors can't be one-size-fits-all right? Also worried about how would the sensor be calibrated?
Lots of people dont use controllers. have a couple thermometers to see where to cut your heads and tails. Its pretty simple stuff.
Edit: These can help but are not required
https://www.amazon.com/DROK-Electronic-Regulator-Governor-Thermostat/dp/B00BXUCWQG/ref=sr_1_1?s=electronics&ie=UTF8&qid=1373347764&sr=1-1&keywords=110v+ac+scr