Best jobber drill bits according to redditors
We found 207 Reddit comments discussing the best jobber drill bits. We ranked the 121 resulting products by number of redditors who mentioned them. Here are the top 20.
We found 207 Reddit comments discussing the best jobber drill bits. We ranked the 121 resulting products by number of redditors who mentioned them. Here are the top 20.


Only $10!
https://www.amazon.com/dp/B0751893Y2/
Cool stuff!
Here's one thing- when stacking them improves the sound, I'm wondering if that's just due to having more resonant coupled mass. Try not stacking them but instead put something heavy and rigid (old HDDs, cordless drill battery, a brick, etc) on top of the drives. See if you get a similar effect. Also try putting something heavy on top of the stack...
By resonant coupled mass I mean material that gets the vibrations of the drive transferred to it, and thus helps with putting those vibrations into the air. Thus bolting the drives down to the board will help a lot. But let's come back to that.
-----
To build your box, you really only need a couple of tools and parts, which I'll link you to now.
Cordless Drill
Cheap Drill Bits
Circular Saw (a jigsaw is also OK)
Set of 4 clamps
Carpenter's Square
Angle Brackets
Wood Screws (probably want some 1/2 inch screws too for the brackets)
A piece of 1x2 wood moulding or similar
A piece of quality 1/2" plywood or MDF
Feel free to substitute whatever's on offer at your local big box home improvement store, it's the concepts that matter not the specific models of things. With that stuff you can build almost anything, your little box will be a snap.
The key with all that- use two of the clamps to clamp the board you're cutting down to the table. Then use the other two clamps to clamp a 2-4' piece of moulding down to the board. The moulding then serves two purposes: Along with the square and a pencil, it lets you draw a very straight and very long line along where you want to cut, and then when you move the molding back a bit (by the exact distance between the edge of the saw's skid plate and the sawblade), it forms a guide for the edge of the circular saw skid plate to slide against, giving you a perfectly straight cut even from a handheld saw.
Note: always cut with the saw facing away from you or your body, and keep your fingers away from the path of the blade! Let the tool do the cutting, don't force it. When you drill a hole for a screw, pick the drill bit that's as wide as the screw shaft (not the screw teeth).
I suggest using more angle brackets to rigidly mount the floppy drives to the casing itself. Obviously brackets that have the hole in a place which holds the drive flush against the casing are preferred. Angle brackets come in all different sizes, and you can always just drill another hole through the bracket if you need to. A larger angle bracket could hold both the upper and lower drive. Or for a stack of two drives, mount one to the inside of the main casing, and the other to the outside of the HDD casing.
-----
Now back on audio. A box like you designed might really help, especially if the back is closed as you're creating a cavity which focuses all the sound forward.
However you should also get a better microphone. If as you say it sounds great in person, well, that isn't being captured well on your video. The video is seriously lacking in bass- floppys make a great raspy bass and that doesn't come over well in the video. :(
I suggest an external mic, something which will stay right next to the drives and enclosure. There are also portable audio recording gadgets which have a good mic built in, I'm thinking something like this.
(Random sidenote- that's why the clapper slate exists, seeing the clap on film and hearing it on a separately-recorded audio track is used to sync up the video with the audio...)
For reference, consider how What is Love has really strong bass, but has a good quality mic right there.
Also production wise- what that guy sometimes does is first record half the drives with the mic right next to them, then record the other half of the drives with the mic right next to them, then sync the recordings and make the two (mono) recordings into the L and R of a stereo track and lay it over the video of the drives moving which is recorded without any microphone...
Hope that helps!
For one thing, it heavily restricts your range of motion when using driving screws. If you're driving them at any angle other than exactly perpendicular to the surface you're driving into the chuck will grind against the surface. It also restricts your ability to drive screws into any tight spaces.
I'm not a huge B&D fan for any sort of heavy use, but this homeowner special includes the apex and several bits for $9. If $9 is too much, this at least has the longer bits for $5.
Use the right tools for the job; those small 1" bits are meant to go in some sort of magnetic apex, not directly into a drill chuck.
The other rainy day I was contemplating how to organize my drill accessories drawer with dividers.
It brought to my attention the sad shape of my older twist drill bit indexes. I always start out with good intentions of keeping up with all the drill bits, but over time I had broke or misplaced about 1/2 of the drill bits. I suppose most of yall can relate.
So I was looking around to buy me a new complete set, when I stumbled across the KISS Drill Bit System.
https://www.youtube.com/watch?v=uqUHmH_kL94
You can get it loaded with new bits of unknown quality for $189.
https://www.amazon.com/FastCap-KISS-SYSTEM-16-inch-Color-Coded/dp/B00VVHETZI
Which is about what I was prepared to spend on a good new set.
But then I sat there and stared at those 3 old indexes missing 1/2 the bits, and decided to just order the empty plastic organizer.
https://www.amazon.com/FastCap-KISS-INDEX-16-inch-Color-Coded/dp/B00VVHLZ7S/ref=pd_lpo_sbs_469_t_1?_encoding=UTF8&psc=1&refRID=NF2HD1T1GKAH7VRZYCX3
So when it came I dumped all my drill bits out on the desk and had my sharp eyed daughters go through them and put them in the right holes, and then paint them to match the color coded system.
Turns out I only had to buy about $30 worth of individual ( Drill America) jobber length bits to have at least 2 of every size.
https://drillsandcutters.com/jobber-drills/
..... worked out pretty good. Now even my old eyes can find the right bit without having to cut myself prying it out of the metal indexes.
I still have to figure out how to organize the remaining stuff in the drawer though. I'm open for suggestions on that.
well for your side missile there is a legit bit holder from dewalt that screws in there, but that top one is one isn't something i've seen.
Edit: a bit more amazon shopping reveals this fucking monstrosity lol
First: That filament is on amazon for a couple bucks less:
https://smile.amazon.com/Filabot-T6451-Taulman-Nylon-Filament/dp/B00TOOBUA2/
Second, I'd ask your sister for more information on what printer he has. But I'll make a few wild speculations based on the filament linked and the brief description.
Hobbyist, 1.75 mm nylon, possibly no heated bed, probably 0.4 mm nozzle,
https://smile.amazon.com/0-4mm-MakerBot-Printer-Nozzle-Cleaning/dp/B00MQKW230/ - Good for cleaning 0.4 mm nozzles
https://smile.amazon.com/HATCHBOX-3D-Filament-Dimension-Accuracy/dp/B01DWMMJTW/ - Everybody wants to try GitD at least once. Some people have shown that printing with it can reduce the lifetime of the nozzle.
https://smile.amazon.com/MG-Chemicals-Printer-Filament-1-75mm/dp/B018MG4SFQ/ - same thing with wood filament
https://smile.amazon.com/10-100pcs-Neodymium-Strong-Magnets-MarbellStore/dp/B01LYFG2F3 - You can usually find a reason to throw a magnet inside a 3D print. This particular one won't ship before Christmas, but you can probably find some locally.
https://www.adafruit.com/products/3055 - Raspberry Pi can always be thrown into a project of some sort.
-----
Finally, some older links:
https://www.reddit.com/r/3Dprinting/comments/22hh2q/i_have_a_rostock_kit_on_the_waywhat_accessories/
https://www.reddit.com/r/3Dprinting/comments/3u3v3h/3d_printing_holiday_gift_guide_what_3d_printers/
https://www.reddit.com/r/3Dprinting/comments/3bmpam/what_accessories_should_every_3d_printing_maker/
https://www.reddit.com/r/3Dprinting/comments/3w1r7q/just_bought_a_printer_heres_a_list_of_the_tools/
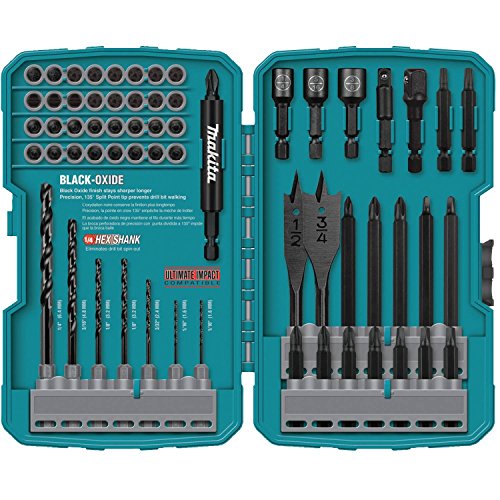
I have that Makita set and they have miniature swing lock arms that keep the rows in. You pop the lock off and they slide in and out. https://www.amazon.com/Makita-T-01725-Contractor-Grade-Bit-70-Pc/dp/B000UZ0VTU/ref=sr_1_3?ie=UTF8&qid=1526985802&sr=8-3&keywords=makita+t-01725 it's this one
I've used the hell out of them and love them. Full disclaimer I am a huge Makita fan but I also have the Milwaukee hole dozer set and about a dozen of dewalt brad point drill bits that I love. Seems to me that your issue is a QC issue on Milwaukee's end (which you'll find anywhere every once in awhile).
I left it un-trimmed so the edges provide a bit of proof that I actually did it! I have yet to drill my pads and vias, but I use this PCB Drill Bit set with a Dremel mounted in a Dremel drill press.
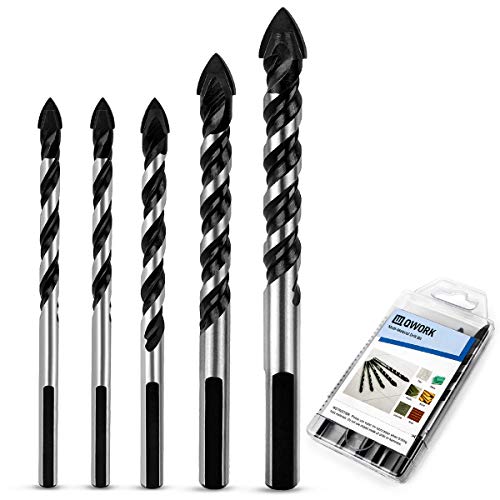
I bought these and they work great. QWORK 5 Pcs Set (6, 6, 8, 10, 12mm) Multi-Material Drill Bit Set for Tile,Concrete, Brick, Glass, Plastic and Wood Tungsten Carbide Tip Best for Wall Mirror and Ceramic Tile on Concrete and Brick Wall https://www.amazon.com/dp/B0751893Y2/ref=cm_sw_r_cp_apa_i_5LqJDbYK679T1
Just take it nice and slow without applying too much pressure. I've drilled into ceramic and glass without any problems.
Use a glass drill bit like these
Make sure to use lots of water while you're drilling to keep it cool. If you keep it cool enough you can drill a nice clean hole.
If you're feeling handy you can use a tap and die set to put threads in it to put in a downstem that wont jiggle around as seen here
Edit: Don't tap the glass itself instead fit a piece of metal which is tapped. Fix the metal to the glass with super glue
The only difference between LP and NG orifices is the hole size. However, you cannot tell the difference with the naked eye as the difference is pretty small. But if they did give you the wrong jets, it would explain everything. You can check the orifice diameter by getting a wire gauge drill bit set (like this) and checking for yourself.
NG doesn't use a regulator, at least not one near your roaster, as the pressure is dictated by what comes into your building and what the local gas company has set the pressure to. Since you are getting 11 inches, that ought to be enough, but maybe not. You should get a good variable pressure regulator (like this) and dial it up to 22 inches. A bbq regulator may provide the pressure but it's got a small diaphragm regulator that might freeze up under high flow conditions.
Also, what does your flame look like? Check the flame color charts to make sure it's right. (Google it.)
You don't need an adapter when the drill bits are formed like these
A glass bit is a normal household tool. They are not very expensive and you can drill lots of holes:
http://www.amazon.com/Mibro-456831-4-Piece-8-Inch-16-Inches/dp/B000FK3ZE8/ref=sr_1_2?ie=UTF8&qid=1395952006&sr=8-2&keywords=drill+bit+glass
No, not really, other than using my drill tip specifically made for drilling into ceramic and glass. It's the handiest thing I have in my house since most of my planters are usually thrift store finds that were not originally meant to be used as a planter LOL. The bigger the pot, the more holes I drill. I should have put something to do a size comparison, but its almost a foot long, so this one has five holes in the bottom.
I use 1/8" magnets for my Crisis Suit weapons. They are basically the maximum size that will fit in the weapons. You could probably go a bit smaller and use 3/32" magnets and have some more wiggle room.
​
100 1/8" for $14 with prime shipping: https://smile.amazon.com/MagNetSol-Magnets-Drill-Combo-100pcs/dp/B0753M1ZYQ
​
3/32" for $15 with prime: https://smile.amazon.com/Primal-Horizon-Magnets-Drill-Combo/dp/B00CA58RJY
You can get sets of carbide PCB drills with a 1/8" shank far cheaper than a decent micro chuck.
If you have a walmart nearby they should have some. Amazon should have them too. This Kit would work, and you could have different sizes for coils or making air holes bigger.
Edit: Just noticed the reviews, looks like they might suck for drilling air holes. But they would work fine for wrapping on.
I apologize... I mis-remembered the cost of the kit. It was actually $16. Sorry.
https://www.amazon.com/gp/product/B00CA58RJY/ref=oh_aui_detailpage_o01_s01?ie=UTF8&psc=1
What metal, and how thick?
Mild steels and softer (Copper, aluminum, tin, etc) can be drilled with a standard hand drill and drill bit.
Unless you're drilling holes in tool-steel or tungsten or the like you can use standard off-the-shelf drill bits.
TL;DR - Unless it's something extremely hard, you can get a set of drill bits that will do the job for $5
They already do. It's how I got the idea. Thanks though! https://www.amazon.com/dp/B00VVHLZ7S/ref=cm_sw_r_cp_apa_i_ZY0kDbVW12V96
yeah, if I had to guess, for a chain lock on a door, I suspect those screws would be quite beefy, which would make them difficult to turn by hand.
If I were doing this task, I would certainly grab my drill, Id drill a 1/8" pilot hole, than screw the screws in.
For that you would need this as well https://www.amazon.com/Black-Decker-15557-Drill-10-Piece/dp/B000RH22WA/ref=pd_sim_469_1?ie=UTF8&pd_rd_i=B000RH22WA&pd_rd_r=65QE3ETZGVR6A835WKD2&pd_rd_w=W1W87&pd_rd_wg=XC81C&psc=1&refRID=65QE3ETZGVR6A835WKD2
good point, it does come with 2 bits, so your covered on that side.
Yes, HSS is fine for the majority of materials. If you hit up local hardware stores, stay away from any of the coated junk, it's useless. If you want good quality at a good price, pick up either a Norseman or Drill Hog 29pc set in whatever composition you prefer (M2, M7 hi-moly, M35 Cobalt, M42 cobalt hi-moly). The prices don't vary too much in that range so it probably comes down to preference. If you're in a production environment and will be drilling thousands of holes, yeah, go with cobalt. If not, go with an M7 set.
https://www.amazon.com/Norseman-44170-240-UB-Degree-Premium/dp/B00627C8ZU/
http://www.ebay.com/itm/Drill-Hog-29-Pc-Drill-Bit-Set-Index-Molybdenum-M7-MADE-IN-USA-Lifetime-Warranty-/181651567209
If the 29pc set doesn't suit your needs or you just want individual sizes
http://www.norsemandrill.com/
http://stores.ebay.com/Drill-Hog
Note: My guess is that both Norseman and Drill Hog are identical and manufactured at the Norseman facility in St. Paul, Minnesota. (oh and Viking are probably also the same drill bits)*
I use Kamo 5PCS 0.4mm Drill Bits for 3D MakerBot Printer Nozzle Cleaning Kit $7.00 always when the hot end was hot. But since I started removing the filament when I was done with the printer for the next few hours, I've not had any need to use them. Not a single clog.
Buy a glass drillbit at home depot. That will run you a few bucks. Use the glass drillbit with yiur drill and presto! perfect hole. Find a downstem and add that. If you're lazy and don't want to have to pull the bowl you can make the dowstem and the bowl the same piece and add a shottie on the back. http://www.amazon.com/Mibro-456831-4-Piece-8-Inch-16-Inches/dp/B000FK3ZE8/ref=sr_1_5?ie=UTF8&qid=134365945http://www.bongoutlet.ca/bong-slider-p-444.html?osCsid=7ebfba2110d8735b9613796f77cec1470&sr=8-5&keywords=glass+drill+bit glass drillbit buy a downstem at a headshop and use it.
Yeah everything looks right in there. I still think its a clog. If turning up the heat made the quality better, that indicates a flow issue. I would bet if you turned the speed to like 30, it would be better as well. Clog can be a misnomer, as you can still have decent flow, but not perfect flow with a clog. Get a set of these to help if needed. I used the lead on a resistor for a while but its not exactly .4mm.
I had a pesky clog that wouldn't come out. What I ended up doing was heat up the machine, push a bit of filament, ream the drill bit in and out and twisting the whole time. I felt something come loose but it still wasn't 100%, even after pulling the filament. So then I put the drill bit in about 1-2mm and cooled down the hot end while spinning the bit the whole time so the plastic wouldn't catch it. Then at around 100C I pulled out the drill bit and pulled the filament out. This was so I could be sure that the clogging element didn't seat itself in the exit and resist coming out with the rest of the filament. Since then, i've been golden.
Favorite Economy cobalt bits
The bits I recommend if you can afford $70
I've got a set of Norsemen that are great. http://www.amazon.com/Norseman-29pc-16-1-Black-Gold/dp/B00627C8ZU the cheapy big box store bits don't last long enough
https://www.amazon.com/Vermont-American-13310-4-Piece-Glass/dp/B000ETWIKM
glass drill bits
That looks amazing. You did a great job. I love your fabric choice.
Also, if you think 1/16" drill bits are small, you should check out micro drill bits. One use for them is for drilling small holes on PCBs. These on Amazon are metric and go from 1.3mm down to 0.3mm. For reference, 1/16" is about 1.5mm.
These are the bits I got from Amazon, I haven’t broken anything yet! ;)
It all depends on how much you want to spend. There's some decent drill and driver kits out there, like this one: link. That's got a ton of driver bits in it though, and it's probably much more than you'll need for basic home improvements.
Black and Decker also sells a combo kit, but it may be too extreme in the other direction, because it's pretty basic in the drill bit area: link.
You could always get a decent set of drill bits, and then pick up a separate set of drivers. Here's a basic set of drivers for $3.80
Edit: I just saw your edit. Maybe the second link would be in your range?
Try left hand drill bits.
https://www.amazon.com/dp/B000HS0UJQ/ref=cm_sw_r_em_api_c_AuoVAbDE1HYQ2
And an extractor set.
https://www.amazon.com/dp/B006YDQ812/ref=cm_sw_r_em_api_c_YsoVAbKFN93D3
whoops attach
https://www.amazon.com/Drill-Mate-Bit-Driver-Holder/dp/B00MP4J924
I can't vouch for your particular situation, but these puppies have punched through anything I've thrown them at. Toughest I've used them on was stainless industrial kitchen equipment and they went through like butter.
https://www.amazon.ca/Norseman-44170-240-UB-Degree-Premium/dp/B00627C8ZU
In mechanics, I'd use a drill bit that spins counter to tight. So, in the typical case that's a left-hand bit. These are fairly specialized and aren't the kind of thing you'll find at Home Depot. Amazon can help.
Use cutting fluid to keep the bits cool. Start with a bit that's smaller than the broken screw shaft and drill slow and successively use larger bits until you either drill out the broken screw or the screw rotates out.
Most of the time, the bits loosen the shaft and eventually just spin out the screw without having to drill it all the way out. Thing is, with the head off the screw, there's no tension holding the threads in place. Just need to spin it free.
The "My First RDA" Mechanical Mod Kit
Nemesis Clone Mechanical Mod - Great price, great features, an awesome place to start without breaking the bank.
Green Sony VTC4's - I would suggest at least 2, I prefer 4.
Nitecore Intellicharger i4 (Or the i2 if you only have 2 batteries) - Great premium safe charger. What's worth more? The few bucks you save on a cheapo charger, or your house which you burned down by overcharging your batteries on a cheapo charger.
IGO-W2 or IGO-W - The IGO-W is a go-to for many, however it will likely require drilling the air holes out. The W2 costs a few more bucks, and has a different pin configuration internally, but has adjustable airflow. If you go with the IGO-W, you will also need some kind of mini screwdriver. Here's a super cheap kit
A Drip Tip - You'll need one to go with your IGO, style is up to you. You can get them pretty much anywhere, I just linked to this store because if you are putting in an order there anyway, you may as well save on shipping.
That will get you setup with your mod/RDA. Now you are going to need your building materials. Here's what I suggest.
Rebuilding Materials
An Ohm Reader - Do not skip out on this. Knowing the resistance of your coils keeps you out of harms way.
28ga Kanthal - This seems to be the preferred gauge for RDA's.
Chefs torch - This isn't necessary, but is hugely helpful for making microcoils
This cheap grooming kit - What you need from this are the nail clippers, tweezers, and scissors (also the pouch it comes with is handy for keeping your rebuilding tools in)
Cotton Balls - You can get sterilized cotton from most pharmacies. I use plain old 100% cotton balls. Just make sure to read the package and check of additives. You don't want any makeup-remover or anything like that. Just pure cotton.
Drill Bit Kit - For wrapping your coils. 1/16th seems to be everybody's favorite standard, so if you're prone to losing small things this might be a better kit for you.
They are Primal Horizon 3/32” x 1/16”. I got mine at my FLGS. Amazon has them with drill bits. Mine didn’t come with the bits. https://www.amazon.com/Magnets-Drill-Bits-Combo-Pack/dp/B00CA58RJY
I glued one into the head of the AT-RT where the guns would be glued. I used my hand drill to put a hole in the peg for each gun. I then used some picture hanging nails and clippers to cut a little metal post I could glue into the gun pegs.
https://www.amazon.com/gp/aw/d/B0751893Y2/ref=mp_s_a_1_2?ie=UTF8&qid=1523296808&sr=8-2&pi=AC_SX236_SY340_FMwebp_QL65&keywords=6mm+glass+drill+bit&dpPl=1&dpID=417He%2BJmkoL&ref=plSrch
Assuming you have a drill, these aren't hard to use. Keep it flooded with water while cutting and go slow.
https://www.amazon.com/Norseman-44170-240-UB-Degree-Premium/dp/B00627C8ZU/
Here's one I found on Amazon (US)
Vermont American 13310 4-Piece Glass & Tile Drill Bit Set https://www.amazon.com/dp/B000ETWIKM/ref=cm_sw_r_awd_vrkAwbAR4VGJG
I have mounted things into 3/4" marble at work. Use a flame-tip tile drill bit to make a hole then depending on the weight of the blinds (do not do this for heavy roller blinds or roman shades) use a drywall anchor in the hole or use a washer and pass the screw right through the stone and into the window frame.
Ok so get a really thin sewing or hypodermic needle and carefully put it into the nozzles end, if it doesn’t fit, don’t force it. I’ll link a thing for that specifically in just a second.
Edit:ok here you go.
eBay: https://m.ebay.com/itm/8pcs-Nozzle-Cleaning-Needle-0-2-0-25-0-3-0-35mm-3D-printer-Cleaning-Needles-/222630788518
Amazon: https://www.amazon.com/gp/aw/d/B00MQKW230/ref=pd_aw_sim_229_1?ie=UTF8&psc=1&refRID=VV7QD5F4WX772BSX6J10&dpPl=1&dpID=617jklFtJDL
I just bought an 18v Makita Impact Driver and it's destroying the heads on some #10 3in flat head Phillips wood screws (made by Everbilt). The box says they are Zinc. The driver bit I'm using is a PH3 from this set: https://www.amazon.com/Makita-T-01725-Contractor-Grade-Bit-70-Pc/dp/B000UZ0VTU/ref=sr_1_3?ie=UTF8&qid=1504981505&sr=8-3&keywords=makita+bit+set . Are these screws or bits just low quality, or should they be working and I'm using the tool incorrectly? What are the most durable wood screws made of?
I would love these because I'm hoping to buy the drill soon and want to be able to use it for some home projects.
I'm thrilled you are happy and your username is very inspiring.
Straight fluted screw extractors like this work much better than those spiral or ribbed ones.
Another trick that sometimes works is to try other screw bits square or torx of various sizes, sometimes it's just enough to grab it and start to back it out. Usually that's an in-the-field hack when you don't have anything else to work with.
I use left handed drill bits to extract broken bolts, usually works really well and doesn't require multiple steps
Cheap drill bits are absolute crap. A lot of the odd fractional sizes aren't even properly hardened because they don't expect them to see much use. Buy them from people who actually make drill bits, not just companies that slap their name on whatever products they can rebrand (Millfuckee and Default do this shit too). Cry once by spending some money, or cry every time you use the cheap shit.
Wiki is: http://mpselectmini.com/
Some items I bought from Amazon (don't buy the hot end pieces if you have a V2. They changed the hot end to an all metal one):
https://www.amazon.com/gp/product/B00WE1A3D2/ref=oh_aui_detailpage_o00_s00?ie=UTF8&psc=1
https://www.amazon.com/gp/product/B00T2DNKJY/ref=oh_aui_detailpage_o01_s00?ie=UTF8&psc=1
https://smile.amazon.com/gp/product/B01LAYCRAA/ref=oh_aui_detailpage_o07_s00?ie=UTF8&psc=1
https://smile.amazon.com/gp/product/B00L4UXQ42/ref=oh_aui_detailpage_o08_s00?ie=UTF8&psc=1
V
https://smile.amazon.com/gp/product/B00MQKW230/ref=oh_aui_detailpage_o09_s01?ie=UTF8&psc=1
https://smile.amazon.com/gp/product/B01A81FXMK/ref=oh_aui_detailpage_o05_s00?ie=UTF8&psc=1
https://smile.amazon.com/gp/product/B01ACIFPYA/ref=oh_aui_detailpage_o00_s00?ie=UTF8&psc=1
both have been linked in this thread.
you yourself found the hex shank bits:
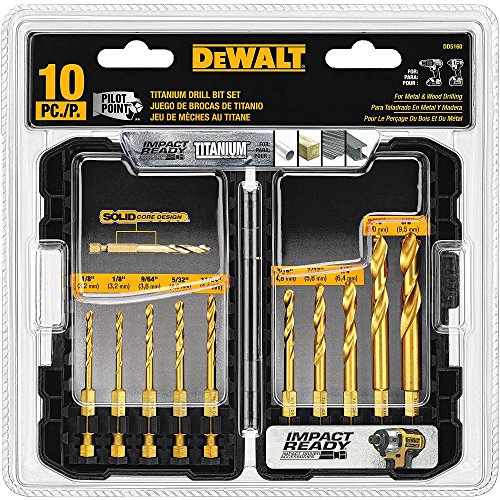
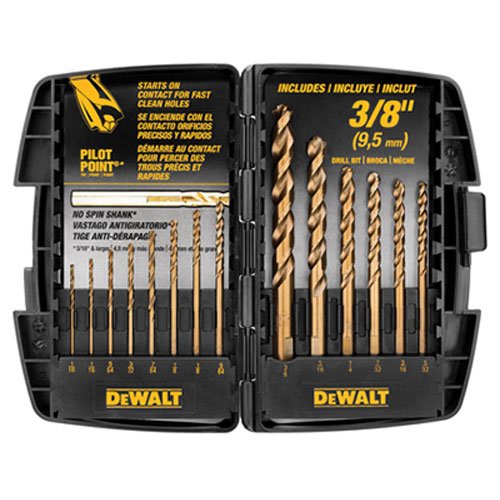
> I’m assuming my only option is impact ready like this DEWALT DD5160 Impact Ready 10 Piece Titanium Drill Bit Set https://www.amazon.com/dp/B017KUENH8/ref=cm_sw_r_cp_api_i_BH57AbSDWFX1B
and the top comment linked you to the keyless adapter:
> That chuck only accepts 1/4" hex bits. You'll need something like this in order to use twist drills, or you can buy 1/4" hex/"impact ready" drill bits like these.. The other style you are used to is called a keyless chuck.
I’m assuming my only option is impact ready like this DEWALT DD5160 Impact Ready 10 Piece Titanium Drill Bit Set https://www.amazon.com/dp/B017KUENH8/ref=cm_sw_r_cp_api_i_BH57AbSDWFX1B
Amazon.
I have:
Generic Hobby Knife - Generic hobby knife kit. Blades were shit so I buy Xacto brand but the knives and case are good.
Needle Files - Extremely useful for polishing off mold lines or smoothing cuts.
Adjustable Jeweler's Saw - Handles a ton of different size blades for cutting metal, plastic, or wood.
Swivel Handle Pin Vice - Probably the best tool you can buy. Great for customizing what your troops are carrying.
Third Hand - Stupidly useful. Mostly for gluing.
Jeweler's Saw Blades - Bought these for my saw. Useful. Others might be better.
Micro Drill Bits - Bought for my pin vice. Useful. Others might be better.
Mini Drill Bits - Bought for my pin vice. Useful. Others might be better.
Worth a try, you'll need the smallest kit they make like this:
https://www.amazon.com/d/B000HS0UJQ
And you'll want the scorpion secured in a vise or clamp to keep it steady.
Hello friend,
I just got into magnetizing and have done all my research and my models came out great. The best magnets to get are made by "Primal Horizon".
My final note, and this is my BEST piece of advice! ALWAYS CHECK POLARITY! I cannot tell you how many times I had everything set, magnets on both ends of what I was trying to adhere together and then arrrggghhh.... wrong polarity. The best approach to this I found is keeping the magnets stacked and stuck together... kinda like this > [[[[] I hope that crude picture helps haha. What I would do is keep them stuck to a piece of metal that has a good surface area, place my first magnet into the arm socket of the model while they are still stacked and then let the first magnet settle and dry. After that, remove the tool in which the magnets are stuck to and with the other piece you are trying to attach, just simply put the magnet on the opposite end into the hole on the piece in which you are attaching. This will ensure polarity is correct. I am sorry if that was a crude way of explaining it, but I would be happy to take photos and link them to explain this process.
Most of all, have fun! There is no better feeling being able to swap out all my Dread weapons, melee weapons on squads etc... I also put some magnets on the torso of my Dreads to give it some nice movement and rotation (almost makes it feel like a ball bearing). If you have anymore questions or need any clarification please let me know and I would be happy to help ya out, upload photos etc..
Good luck, have fun!!
Does what you link totally replace the stock assembly? The nozzle goes up into some kind of block that appears to have tape around it. Will I need to rethread everything through that? I was unable to get the nozzle out of that block (I tried). Is there a trick to that?
And would these work to get the piece of metal out? https://www.amazon.com/0-4mm-MakerBot-Printer-Nozzle-Cleaning/dp/B00MQKW230/ref=pd_bxgy_328_2?ie=UTF8&psc=1&refRID=7BCEZ83W2VV756AWMCFZ or are they too thick?
Drill bits: our Canadian leader has good things to say about: Norseman bits. https://www.amazon.com/dp/B00627C8ZU/
Not all their tools are bad.
For instance, this AA powered screwdriver combined with this set of bits makes a really handy kit for light around-the-house work like assembling furniture. Running off alkalines means that it won't go dead sitting on the shelf for six months between jobs.
Kk
https://www.amazon.com/QWORK-Multi-Material-Concrete-Plastic-Tungsten/dp/B0751893Y2
Ha. That's not a bad idea. Amazon.us btw.
How's this for common sizes? But then that isn't bits for all -- wood, masonry, metal.
Yes. This style of bit also works.
http://www.amazon.com/Vermont-American-13310-4-Piece-Glass/dp/B000ETWIKM/ref=sr_1_3?s=hi&ie=UTF8&qid=1411526817&sr=1-3&keywords=glass+drill+bit
Looking through the options, I may get some of those diamond bits because they're a lot cheaper and come in a bigger range of sizes than my hometown hardware store. Fun side fact, the diamond bits work well for really thin, delicate pieces of glass.
1: Dremels create high speed, but not torque. They heat the metal (to the point of minor burns), skip across surfaces and get stuck. For Drilling into metal minis, you want torque and pressure. I went BACK to hand drills after having too many lockups, overheated models and dulled bits.
2: Speaking of dulled bits, this is one of the most common reasons for lack of performance. Either find a way to sharpen your itty bitty bits, or have a stock of them on hand; I change mine regularly.
Start with a bit index like the one below, and get spares of the ones you find yourself using the most.
https://www.amazon.com/SE-826HDP-20-Piece-Drills-Plastic/dp/B000TY190C
3. Lastly, the KIND of hand drill you use can make a huge difference; try to find a ball-end type grip; something like this:
https://www.amazon.com/CML-Supply-Wood-Ball-Chuck/dp/B003LR73E0
The ball rests in your palm and allows you to better exert/control pressure on the drill bit and stabilized the whole process. It's also MUCH more comfortable on your hand.
Hope this helps!
Edit: If you're using paperclips to pin, i find #64 or #63 bits are best for the average small paperclip.
You can probably get them out pretty easy with a left handed drill bit. These Irwin bits are pretty baller. Just use a self centering punch or a small pointy punch and mark the center, then start with the smallest or second smallest one.
The idea is that the bit will catch the bolt and spin it out.
They also make this set that has spiral flute extractors, just in case the left handed bit doesn't catch.
You should use a torque wrench if you're not (I've totes broken bolts when torquing to spec before, so no hate if you are), a small 3/8" wrench that does inch lbs. Those bolts are probably supposed to be between 80 in lbs and 110 in lbs. Torque wrench will a) ensure you're not over-torquing and breaking bolts, and b) it's even all the way around, so you're not pinching the gasket weird in some spot.
these and the straight shank ones are the only ones that have worked for me. Obviously not every time.
https://www.amazon.com/Drill-Hog-Square-Straight-Extractor/dp/B071VXFR8Y/ref=sr_1_19_sspa?crid=3HLUCZKHF4JR0&keywords=bolt+extractor+set&qid=1565644326&s=gateway&sprefix=bolt+ex%2Caps%2C230&sr=8-19-spons&psc=1&spLa=ZW5jcnlwdGVkUXVhbGlmaWVyPUE2REtXNUsyR1g3WDMmZW5jcnlwdGVkSWQ9QTA1NjYxNzZKUjE1TFpJSDU2VUomZW5jcnlwdGVkQWRJZD1BMDQ5MTcyNDFOMDlER0VRT0hWOTMmd2lkZ2V0TmFtZT1zcF9tdGYmYWN0aW9uPWNsaWNrUmVkaXJlY3QmZG9Ob3RMb2dDbGljaz10cnVl
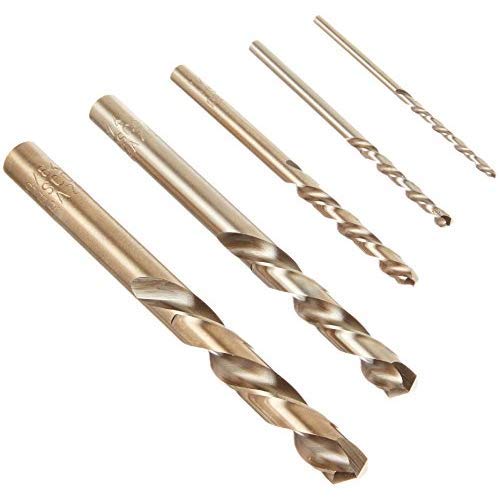
Depends on what you're drilling but Cobalt drill bits are much more resillient than most other types. We drilled out an outboard motor and burned through about 5 drill bits, only a cobalt bit would do the job. It was a dewalt, check this set out: http://www.amazon.com/DEWALT-DW1263-14-Piece-Cobalt-Pilot/dp/B00004RGVZ/ref=sr_1_1?ie=UTF8&qid=1395929700&sr=8-1&keywords=dewalt+cobalt
Not sure where your are looking to find them 'too expensive'.
Pin Vise
Tamiya Basic File Set
Tamiya Plastic Scriber II
Those are cheap and or par the course for finding them elsewhere. I don't think going with used tools is a good idea when you can get them new for very reasonable prices on amazon.
Get a set of left handed drill bits (Amazon link) then take the smallest one from this kit, press it against the screw head, and turn the drill counter clock wise slowly.
You're trying to get the bit to bite into the head, grab a hold and unscrew it. You can apply a bit of presure.
I am not totally sure what you are looking for. it appears that this is a glorified bit set that is designed for a proprietary system. I am sure you can easily buy the bits that work with any chuck for significantly less, you just don't get as nice of a case and organizational setup.i mean you can buy a dewalt or makita driver bit set for like $20, and that will give you half of what is in this kit. hell if you want to get closer there is this makita set for $82 that has prety much everything that festool set has plus some hole saws. just search amazon for bit sets and you can get an equally useful kit for much less money. you say you are a DIY kindof guy. for that the performance will not be noticeable between brands. hell even a pro would not notice much of a difference IMO.
Even ones like these? https://www.amazon.com/0-4mm-MakerBot-Printer-Nozzle-Cleaning/dp/B00MQKW230
Found these on Amazon. Will they work?
Also, Will this pin vice set work?
I also went ahead and contacted GSC to see if they are willing to send a replacement joint.
Treat yourself to a set of left hand drill bits. The bits usually start drilling and end up catching and un-threading the stripped/stuck screw.
I got this set of multi-material droll bits from Amazon for less than $10, and use them to drill holes for planters all the time! 😊
QWORK 5 Pcs Set (6, 6, 8, 10,... https://www.amazon.com/dp/B0751893Y2?ref=ppx_pop_mob_ap_share
I just got these yesterday. I’ve only tested them on one planter, but they went through it nice and clean.
QWORK 5 Pcs Set (6, 6, 8, 10, 12mm) Multi-Material Drill Bit Set for Tile,Concrete, Brick, Glass, Plastic and Wood Tungsten Carbide Tip Best for Wall Mirror and Ceramic Tile on Concrete and Brick Wall https://www.amazon.com/dp/B0751893Y2/ref=cm_sw_r_cp_apa_i_vjEDCb016R0RX
Make sure the bit is fully seated into the chuck--with small bits, this is a particular problem because sometimes you need a longer drill depth. I prefer to use hex shank drill bits like, say, these: https://www.amazon.com/DEWALT-DD5160-Impact-Ready-Titanium/dp/B017KUENH8/ -- they'll never slip.
http://www.amazon.com/Neiko-13-Piece-Handed-Titanium-Coated/dp/B000HS0UJQ/ref=sr_1_1?ie=UTF8&qid=1373697461&sr=8-1&keywords=left+handed+drill+bits
Digs in when going CCW removing the screw.
Pin vices generally don't hurt for quality, they're just spinny bits with a chuck or two on the front. I use a privateer press one personally but that's just because it's what was available at the time. I like the longer skinnier metal ones (http://www.amazon.com/Empire-Level-2715-Precision-Drill/dp/B001DZE5BQ/ref=sr_1_4?ie=UTF8&qid=1420998371&sr=8-4&keywords=pin+vise) over the ones with a big ball on the end, but that's to personal taste.
The main application is putting in self tappers. Using the impact for drilling is just an efficient/lazy compromise. Here. Look.
I've had luck with the cheaper Dewalt sets.
http://www.amazon.com/DEWALT-DW1263-14-Piece-Cobalt-Pilot/dp/B00004RGVZ
I'm sure there are much better bits out there, but I find that these cut fast and last a long time for general automotive/shop use. I do not work with stainless.
I can appreciate the criticism if you started with a solution first then moved onto that.
But for someone who had been doing machine work for years and has never seen left-handed bits "reverse bits" or whatever... Makes me suspect anyway. https://www.amazon.com/Tools-Cobalt-64-Inch-Assortment-30520/dp/B0002NYBJG
All that being said I appreciated his solution in the end.