(Part 2) Best power transmission products according to redditors
We found 657 Reddit comments discussing the best power transmission products. We ranked the 364 resulting products by number of redditors who mentioned them. Here are the products ranked 21-40. You can also go back to the previous section.


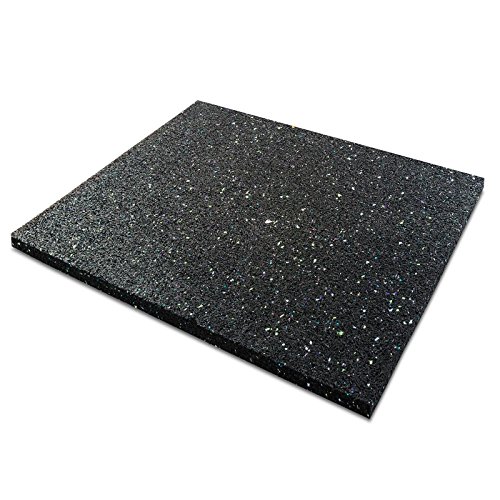


Grab a small condensed foam footing pad from home depot or Lowes that they carry in the flooring section as you can cut it to size. Another option is casa pura Anti-Vibration Pad - Rubber Vibration Isolator Mat | Matting for Washing Machines, Washers, Dryers and Appliances | Multiple Thicknesses & Sizes | 1/4" Thick - 24" x 24" https://www.amazon.com/dp/B071DVFWTW/ref=cm_sw_r_cp_apa_i_B5w5CbGRG77RA
to my untrained eye it looks in ok condition, grab tons of rust remover (evaporust) and scotchbright and start cleaning it up.
​
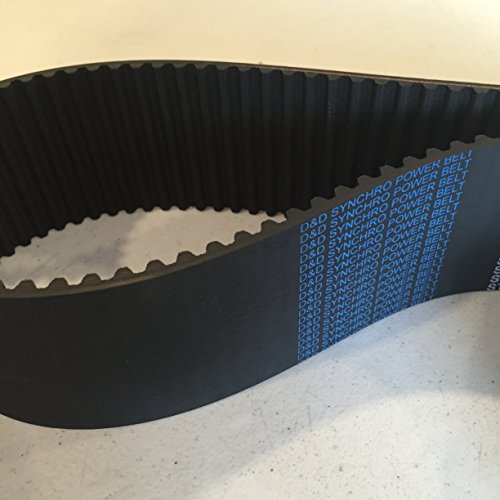
The belt you are wondering about is an adjustable belt often used where the exact length is not known or where installing a normal belt is a pain in the a** (like my Atlas Lathe where I have to disassemble the headstock and the jack-shaft in order to install a normal belt).
2 [Neodymium Cup Magnets] (https://www.amazon.com/dp/B01NAEF59W/ref=cm_sw_r_cp_apa_wrZ6ybYNF05FF) glued together (Note the magnets will repell slightly because they're backwards, I held them together while they dried with a potato bag clip)
And a [3/4" Diameter Steel Ball Bearing] (https://www.amazon.com/dp/B008L3V098/ref=cm_sw_r_cp_apa_isZ6ybP374PVF)
The glue I used was Gorilla glue, the one that dries white and expands some. It worked really really well. I could scrape it off with my knife if there was too much but it's also incredibly strong. I recommend this over soldering because the ball needs a tiny bit of space as a track to roll around and because the glue expanded it provided a track to go around. Otherwise solder it if you have a mini washer to use as a spacer.
I've also dropped it on hard floor a few times and no marks or any signs of damage.
The only real difference from this an the Orbiter is that the centers are incredibly attractive unlike the Orbiter, they are also not as concave but the ball will still fit into the divot. But because of the high attraction it won't roll around in that divot but you can still run your thumb around the stationary ball which feels nice. There is also a hole in the center of this so I can expand on this toy too :)
Here you go:
https://www.amazon.com/gp/product/B000H5SJGA/ref=ox_sc_act_title_2?smid=A1AUFI5NHGNZ61&psc=1
https://www.amazon.com/gp/product/B0031HT8JS/ref=ox_sc_act_title_1?smid=ATVPDKIKX0DER&psc=1
​
You can also do the trunk:
https://www.youtube.com/watch?v=o5Dun6iNnoY
Something like this
You should buy a few anyway, just in case you break another one during your trip. I bought 4 from here
https://www.amazon.com/dp/B00ISC5B6U/ref=cm_sw_r_cp_api_eJirybW9SE7KD
StrongArm 6304 Jeep Grand... https://www.amazon.com/dp/B0031HT8JS?ref=ppx_pop_mob_ap_share
I bought two of these. Had to buy two singles for some reason amazon wouldn’t ship a pair to California.
Century Spring C-77 2 Count... https://www.amazon.com/dp/B000H5SJGA?ref=ppx_pop_mob_ap_share
Bought this spring.
There are several how to videos. The process is simple and takes 5 minutes. remove oem shock replace, remove second oem shock replace. Test opening function. Then pull up the cover that has the illuminated frunk release button and replace heavy spring with lightweight one.
One of the how to videos showed that doing this does not prevent the frunk safety catch from operating.
Edit video https://imgur.com/a/K3cUFZ1
If it was a piece of machinery I'd have gone for a foam pad like this. Ideally that's what you'd stick between the source of the vibration and the ground. But it should work for your bed.
You can get puck shaped rubber feet too.
Depending on the vibration you'll want a different hardness. As this is just transmitted vibrations, these may be a little stiff, but might be worth a go.
I can't really vouch for either of these items in particular. And they do seem to report a bit hit and miss with the reviews. I suppose the hard part will be making sure that your bed stays on top of them and doesn't crush the material they've made from.
Also, make sure you don't have the bed against the wall, because the vibrations will be transmitted up that too.
If you want a low tech solution, cut tennis balls in half and stuff them with a firm foam.
Already a lot of great answers by clever people here! I can add a bit on motors and electricals, but I also want to say that you're probably underestimating how big a 3' arm is. Imagine that on your desk- it takes up half a table! Sizing the motors for static torque alone doesn't work well, as the inertia at the end effector increases with length^2 which is proportional to dynamic torque, speed, and vibration. Larger limb sections are also heavier and more complicated to make, which makes them even more heavy. Sizing down a little bit will make the arm dramatically more stable and performant.
> Belts or Gears for the actuators?
For 3 lb @ 35" you're looking at a minimum torque of 12.2 N-m at the shoulder. That will require reduction. Belts are far cheaper than gears, especially if you have a 3d printer- plastic pullys work great, although they need to be well glued to metal shafts (NB that a shaft key will greatly reduce strength and durability). Red loctite is great for that. A single belt reduction can do 5x, although you can do 10x+ with idlers. Mcmaster is a good place for belts, but amazon has a small selection that can be cheaper.
Note that belts can be very rigid: highly tensioned, fiber reinforced belts at moderate torque (otherwise the teeth start pulling out) are actually stiffer than most gears, which have a grease film and a gap between teeth that has a slight initial give/backlash. The reason you switch from belts to gears is because you need to tension the belts more tightly for higher torque. Once the tension becomes hard on the bearings and gearbox frame, you switch to gears. Basically you want to avoid gears if at all possible; they're expensive, hard to find, and hard to mount without metal backplates and the ability to cut bearing mounts. SDP/SI is a good place to get gears.
> Once I know how much torque I need, how do I know which type of motor is best for me? Stepper, Servo, Brushless?
Depends how much you want to spend. Hobby servos won't work for a 35" arm, even the $350 dynamixels. You also don't want to be designing your own brushless drivers, and the range of robotics controllers for bldc is limited. You are basically stuck between NEMA 23 and odrive.
NEMA 23 is the cheap choice- you can get very big NEMA 23s on amazon, hook them up to a single-stage 5x reduction, and have gobs of torque and good control. You can even get NEMA 34 for affordable prices. The drivers are stupidly cheap- for <$70 all-in you can have an arduino-controlled joint with 15 N-m of torque and top out solidly over 500 rpm. Add a couple heat sinks and you can increase that a lot- 500+ watts no problem, or 7 watts per dollar.
Downsides are you don't get any regen (not so important on an arm), low/no backdriveability (although this can be nice since the robot usually holds position when it turns off), very loud operation, low efficiency, and pretty low acceleration. Brushless motors require higher reduction and closed loop control, but are quiet, efficient, and can be used to build very responsive + high regen robots. Driving them is the weak link: the 56 V odrive dual driver cost a whopping $150. However for $70-80 per motor you get 40-90 amps continuous for 2 to 5 kilowatts, WITH regen and accuracy to >512 steps. That can be over 20 watts per dollar for the motor, reduction, sensors and driver. The limiting factor is even finding motors that can handle that power.
If your budget is <$500, go for steppers. If it's >$800, I'd go for brushless. You'll get an immense amount of speed and power, both of which are very good for an arm with a 3' reach. Note that 3' is a very large arm- the weight of the arm itself will be very limiting if you don't used fairly sophisticated techniques. 8"-12" sections are a hassle to 3d print. Rotational inertia increases with reach^2 so you'll need quadratically more power for the same acceleration (and to fight wobble). A 26" arm will require only half the power.
> Do I start my design from the end effector or do I start at the base?
I'd start at the end effector- that will set your payload weight and the torque required at the next joint, and so on back to the shoulder. Doing it the other way requires a lot more iteration.
The one thing I always say on posts like this is to learn how to use bearings. Bearings are the #1 cause of wobble in poorly designed arms, and the easiest way to tell if the designer had any clue what they were doing. Use 608 bearings for everything you can. They're incredibly cheap and precise because they're used in skateboards- 20 to 50 cents each. They're deep groove bearings, which are excellent for machinery, and can take 300 lbs radial and 150 lbs axial static load and 2-3x that for dynamic load. They're easily a 50x better value than any other types of bearings. If you want other bearings (maybe very large thin section) go to onlinebearingstore, despite having a 2000s era website/name they're really great. Unrelated, theoringstore is also really great.
The most important thing to know about bearings is that they always, always need a preload. The bearing will not meet specs if it does not have some axial force. It will have a very noticeable play and will wear out quickly. This is why you always use bearings in pairs- not because they can't take it, but because you can't preload a single bearing. You need two bearings to be pressed together. I like disc springs for this, but shims and even just bolts also work well for providing the axial force. You can usually just set your preload by feel (so make it possible to bolt down one bearing closer to the other), but if you want to do the math it's good to aim for an axial force of 50% of the maximum radial force you expect. That can come from static load, or torque from twisting the bearing.
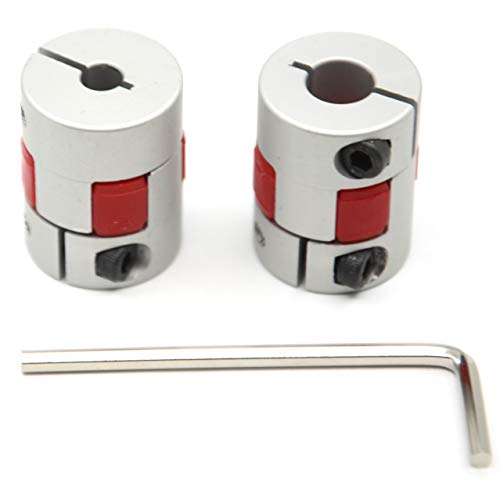
The two part shaft coupling/prune type coupler/whatever is the best! Absolutely worth its extra cost, however you have to make sure you get a good quality one. I bought one off of eBay before for cheap, and it's really not worth the extra cost.
The one in the picture doesn't look as good (due to the red pieces being much smaller than they should), but this type is so much better for one simple reason: if your print head ever slams into the bed on accident or goes too far up (because you leveled incorrectly or pushed Z too far up or down) the piece will act as a safety mechanism and actually dislodge. The two pieces will separate and will save the motor, coupler, and anything else from getting destroyed.
The stock ender 3 coupler that I had actually was destroyed because I kept on using my hand to push the X axis up, and after using too much force, the piece bent upward. It was stuck permanently until I took the dremel out to cut the screw out.
If anyone looks for a coupler, GET one of these. Most people don't think this is an upgrade, but it has saved my life multiple times.
UXCell's model is by far the best, but quite expensive. Here is the link. If you do choose to buy it, you'll actually need a button head screw for the bottom coupler piece as it will hit against the motor mount. Unlike the stock one, it is super heavy duty thick (which is why the screw hits the mount) and is quite well cut.
D&D belt is in stock for $7.
ebay
amazon
ReliaBot 400mm T8 Lead Screw and... https://www.amazon.com/dp/B07QXYT9MH?ref=ppx_pop_mob_ap_share
Or buy one of these
I just went to Amazon.
I got these various bits and bobs:
608 Bearings (about 50 cents a peice)
M2 screws + nuts
M3 Screws + nuts
Got those in, saw that they were philips
Ordered some M2+3 screws + nuts that were hex
Washers came with most of those sets
Some springs, compression and otherwise
Steel ball bearings (I actually don't know what I'm going to do with this)
Nylon Lock Nut set
Might run ya 30-40 bucks but you got a few ways to put things together.
Edit: Some links to get you started
M2 Screws
https://www.amazon.com/gp/product/B01J7NM9JA/ref=oh_aui_detailpage_o03_s00?ie=UTF8&amp;psc=1 - $15
M3 Screws
https://www.amazon.com/gp/product/B01J7IUBG8/ref=oh_aui_detailpage_o03_s00?ie=UTF8&amp;psc=1 - $15
608 Bearings
https://www.amazon.com/gp/product/B002BBICBK/ref=oh_aui_detailpage_o03_s01?ie=UTF8&amp;psc=1 - $6
Nylon nuts
https://www.amazon.com/gp/product/B000K7M37G/ref=oh_aui_detailpage_o03_s01?ie=UTF8&amp;psc=1 - $10
Springs
https://www.amazon.com/gp/product/B000K7M36W/ref=oh_aui_detailpage_o03_s01?ie=UTF8&amp;psc=1 - - $8
The extruder isn’t needed right away, and if you print a good filament guide you won’t need it at all since the filament wont wear into it. You can also get a sheet of glass or mirror at home depot or lowes for cheaper, which is what I am going to do soon. So far the regular bed has been working fine for me. For the springs, I actually just bought these today: https://www.amazon.com/dp/B07MTGXYLW/. They should work well as they’re marketed towards the printer. The PTFE tube isn’t an upgrade I’ve done but you can for sure.
I used
1.26" Neodymium Cup Magnets (qty 2) from Amazon
3/4" Diameter Steel Ball Bearing (qty 1) from Amazon but only had a 6 pack
You could always just buy these and also get a saw. Alternatively, use this page, select the approximate size of your rod (in this case 8mm/251-498.5mm) and then enter the exact length you need in the "customize" section before adding it to your cart.
I would replace the bed springs before you get rid of the glass, I was having to level my bed a lot more often after going with a glass bed so I swapped the springs with some stiffer ones. I only level my bed now once every few weeks.
Here is a link to the springs I bought.
EDIT: Make sure to tighten the leveling knobs as far down as possible (monkey tight, not gorilla tight), adjust the end stop until the nozzle is about a millimeter above the highest corner, and then level from there.
Here is the z screw, you have to update you z steps after installing obviously
Here is the Dual Z, but he is working on a version 2 that will fix some issues so you should prob wait for that. I had some issues with binding
Century Spring C-77 2 Count... https://www.amazon.com/dp/B000H5SJGA?ref=ppx_pop_mob_ap_share
Took those and and relaxed the latch spring with them.
I would suggest manual operation. Attach timing pulleys to your threaded rods, wrap a timing belt around all four, and then just pull on the belt in either direction to raise/lower the table. The biggest trick here is that you have to splice the belt together on your own and you'd need to calculate the available throw vs screw pitch vs gear teeth to make sure your splice doesn't need to roll over the gears to get the height you need.
Sorry, it's 3/4 inch...
http://www.amazon.com/gp/product/B008L3V098/ref=oh_details_o01_s00_i00?ie=UTF8&amp;psc=1
I'll just this here, you'll be finding it helpful: http://www.amazon.com/gp/product/B002BBICBK/
I probably talked to the same team you did at Houston. I’ve never made it, but think I grasp the concept. Using a belt like this , one side is mounted to the back of the last stage of the slide, then loops around to the front of the next stage, then to the back of that stage, and so on (just like in a string lift). After the last stage, the belt loops around the pulley attached to the motor, and then Is once again looped around the slide except in the opposite direction. (If you’ve ever strung a lift with two strings, it’s the same concept). You don’t need a pulley on any of the points the belt loop back, just something to minimize the friction of it rubbing. Also you’d need to find pulley for the output that can interface with the FTC motor output shafts, since most of the ones I find on amazon are for stepper motor shafts. Servocity might have something.
I think one of these should work. The thingiverse mentiones 45cm long, which is roughly 17 inches, so I think a 16inch or 19inch should be fine without cutting.
https://www.amazon.com/Hardened-Chrome-Linear-Motion-Shafts/dp/B01LXAZFKZ/ref=sr_1_3?keywords=8mm+rod&amp;qid=1566315274&amp;s=gateway&amp;sr=8-3
https://www.amazon.com/ReliaBot-Hardened-Chrome-Plated-Linear/dp/B07DPFH7HL/ref=sr_1_5?keywords=8mm+rod&amp;qid=1566315497&amp;s=gateway&amp;sr=8-5
Aside from the aforementioned glass plate, there are several easy and useful mods. There's many threads going over this actually. Search around.
Get this and make some mods using the bearings. I made the Filament Guide along with a snap-in filament guide for closer to the spool. Both highly recommended.
Also using the bearings, I made a Spool Holder. Not crucial, but might save wear on extruder mechanism.
Get This or something like it and at least install the couplers instead of stock ones. I haven't replaced the tube itself yet. It requires fairly precise cutting but you can get PTFE tube cutting guides and cutters printed from thingiverse.
Get This and install it before glass bed or anything else, except for maybe a bed handle (which you can print from thingiverse. Handle isn't crucial but will help.
I haven't yet but will get:
Buy Spare Nozzles, including a hardened steel one if you want to do any amount of printing with wood-grain, metal or glow-in-the-dark material.
I picked up red springs from Tinawood on Amazon and I like them - it seems to have help stabilize the level some, but when I have to force a print off the plate I know I'll likely have to re-level. They're 3-4 mm shorter, but after cranking the yellows down to clear the nozzle, they're long enough to still compress.
I'm considering blue threadlock where the heads sit below the heat bed surface to help deter them spinning and some on the nuts / wheels to keep any resonance from letting them move on their own
It's pretty easy to make your own "kit" if you have the BOM and access to Amazon or a site like it. I'm biased because I've always gotten good service from them. Some people have said that I'm biased because they pay me, but I really do try not to recommend places of business that I don't frequent myself.
Anyhow, here are the x upgrade and the y upgrade that I was looking at when I went searching.
Both use 608 bearings and a 10 pack should take care of it and give you several spares for further upgrades or replacements in the future. (want a spool coaster?)
Next you need the GT2 belt and 2 pulleys. Done.
The BOM doesn't say it, but you might need some m3 screws
Edit: Full disclosure: Amazon pays me something like 4% on items that aren't sold by third parties. If everything on this list qualifies and you buy it all I expect to make about a dollar.
Haven't tried these, but I have seen them recommended a few times. https://www.amazon.com/gp/aw/d/B06X9TVW64/ref=mp_s_a_1_1?ie=UTF8&amp;qid=1527124792&amp;sr=8-1-spons&amp;pi=AC_SX236_SY340_FMwebp_QL65&amp;keywords=uxcell+5mm+8mm&amp;psc=1
There are cheaper spiral cut flex couplers out there too. 5mm to 8mm is what you need. Can also try swapping the couplers on either side and see if the issue moves to the other side. Do some research on properly mounting and adjusting them before you attempt though.
These are the cheapest to experiment that I could find (and mentioned in my last post). I would suggest removing the un-removable shields with a knife to make them spin longer. The same company has some ceramic bearings I am messing with that are about 10+ bucks each.
Bought this belt deflection gage because I had a loose belt in my car.
As for the holidays, I just moved on my own, so I'm asking my family for the one glaring missing piece of my tool kit, a nice combo wrench set.
The rail systems are over $50, typically.
Get some decent bearings - I used these @ $10 for 30 - https://www.amazon.com/gp/product/B002BBD6X4
For those bearings a 5/16" steel rod (about $2/ft, purchased at Lowe's) fits in nicely. Mount two of those bearings on the rod and sandwich it between two pieces of wood (or steel if you desire) and it'll ride atop a 3/4" wood rail smooth as butter. Put as many of these as you want along the top of your barn door and for about 1/10th of the cost you have the same thing.
I need to finish up and post photos of the system I did, it's just too expensive to buy a few pieces of metal.
This is what I use (for the middle bearing):
https://www.amazon.com/gp/product/B01JKBUR1Q/ref=oh_aui_detailpage_o09_s00?ie=UTF8&amp;psc=1
(for the outside bearings)
https://www.amazon.com/gp/product/B002BBD6X4/ref=oh_aui_detailpage_o00_s00?ie=UTF8&amp;psc=1
I timed my spin to 2mins 20 seconds. Not too bad
Here you go, it was for 14$ but still, cheap. link
Hi I am also a new guy with the Ender3. I think the first thing you should get at the same time as the printer is Filament, because you will only be able to print one or two very little things with the filament provided with the printer.
Then, leveling or 'traming' of the bed is the most critical thing to achieve. After some research here and at other places the general advice is to change the stock springs under the bed get those yellow ones from amazon or other places. The problem with the original ones is that you have to level you bed almost at each print. But the best thing I did to improve the bed leveling issue, is to change the bed surface for a flexible magnetic build surface.
For the rest you will find out by yourself as you gain experience working with your printer. One other thing I did is to change the position of the filament wheel to put it on the side of the printer so that the filament enters more directly in the extruder reducing the angle of penetration to almost 0. For this just download this file from Thingiverse. I will try to get you the link soon.
Hope this will help for a starter.
https://www.amazon.com/gp/aw/d/B00ISC5B6U/ref=mp_s_a_1_7?ie=UTF8&amp;qid=1479407813&amp;sr=8-7&amp;pi=AC_SX236_SY340_FMwebp_QL65&amp;keywords=225+15+3m
two 8mm x 295mm leadscrews w/ the brass nut things, clamp-style couplers, and then print any parts you may need for converting from threaded rods to leadscrews. The couplers I linked are expensive, but they work really well.
Be warned though, these parts will not help you fix any misalignment in your z-axis, they'll only help with bent rods. You need to ensure that everything is aligned yourself.
You can do this by installing the parts that hold the brass nuts and looking through the hole to align it with the motor shaft, or screwing the leadscrews in and using those to help align everything.
I bought a pencil style tension gauge but I'm not sure if it's accurate, or if the specs I found were really off but I tried to tension to those specs and it seemed unreasonably tight so I just ignored it. For the most part I've been pulling it as tight as I can around the drive pulley in the back and the idler pulley at the front, clamping them down then slipping the belt over the idler bearing just in front of the drive pulley. That seems to be working well enough for me and the prints I've shown were printed using that method. Not ideal, but it allowed me to focus on other issues. I would like to do it properly proper though, just not sure if my gauge is good and if so, what specs are needed.
The X belt lasted considerably longer and I suspect it was only due to my custom idler bearings wearing out and the walls breaking free since I had to make them from nylon which was the only thing I had available. I had to use washers to trap the belt and they didn't spin with the bearing so I'm guessing that's why they failed at all. I'm going to be making new idler bearings from delrin once I get a proper mini lathe. I tried using a Sinwise 6 in 1 machine but they are such garbage and are pretty useless as a lathe since the chuck wobbles lol I might still opt to go overkill on the X belt though since it would be more expensive to replace due to it's generous length, but I'll go with your recommendation if you think it would be wise to do otherwise.
Belt Failure
Y Belt Path
X Belt Path shortened for illustraion purposes, drive gear on right side of image, others are idlers
Belt Tensioner
So after weighing every part on the gantry and X carriage (steppers, extrusions, plates, bolts, nuts, washers, etc.), the weights are as follows:
gantry alone - 14.7 lbs
X carriage - 3.9 lbs
All - 18.5 lbs
I didn't factor the weight of the belts or pulleys in but I'm sure it won't be a problem just add a pound or so on the top.
Do you have it on a shitty particleboard table or similar? They transmit a lot of vibrations into the floor. I have a set of these under my MK3 and it made it even quieter:
https://www.amazon.com/Diversitech-MP-4E-Eva-Anti-Vibration/dp/B008HQ2AAW
Please keep this updated I really want to see how it all turns out. Looks like the start of a great project. I am interested to see how changing the motor mount works out.
If you have not done it already get a Power Twist V Belt. It really does make a difference on these old saws. Also when you change the motor position you can easily lengthen or shorten the belt as needed to accommodate the new position.
I replaced the frunk spring with this one and I can easily close with one hand now.
Century Spring C-77 2 Count 1-7/8" Extension Springs with 11/32" Outside Diameter https://www.amazon.com/dp/B000H5SJGA/ref=cm_sw_r_cp_api_i_OyYzDbMDNBKG9
I got mine from Amazon by typing ender 3 springs. Personally I got this
Can't confirm these are the ones I got but they look like something Id buy, i just look for case hardened. If you dont have long lm8luus check those out too. And white lithium grease lube
https://www.amazon.com/Hardened-Chrome-Linear-Motion-Shafts/dp/B01LXAZFKZ/ref=mp_s_a_1_3?ie=UTF8&amp;qid=1525048454&amp;sr=8-3&amp;pi=AC_SX236_SY340_FMwebp_QL65&amp;keywords=8mm+linear+shaft
Dang, sadly those aren't on Amazon nor on ebay US. I'm gonna try out this for the PS: https://www.amazon.com/gp/product/B00B887CXG/ref=ox_sc_act_title_5?smid=ATVPDKIKX0DER&amp;psc=1
These for the hot end and case: https://www.amazon.com/gp/product/B07RJGXHPY/ref=ox_sc_act_title_6?smid=A1QECY8JRTZPBV&amp;psc=1
Trying these (and some similar ones) to replace the stock, trying to keep the belt more centered: https://www.amazon.com/gp/product/B078GPKRP1/ref=ox_sc_act_title_2?smid=A144J8BE3R51KJ&amp;psc=1
Does anyone know if these are an upgrade? I don't have any issues with the wheels now, except they gather a ton of dust.
https://www.amazon.com/Creality-3D-Printer-Polycarbonate-Plastic/dp/B07R3ZRDRF/ref=sr_1_3?keywords=vslot+wheel&amp;qid=1569173000&amp;sr=8-3
I think I know exactly what you are talking about. I have a roll in my toolbox for making intake and throttle body gaskets.
Keep it from scratching, yes. Keep it from vibrating, probably not.
Something like this would be about perfect, but I am sure you could find something much cheaper.
I would probably just go to the hardware store and look at something like garage door or regular door seal to find something with the right durometer (squishiness) rubber. Too soft and it will just squash flat and not do anything. Too stiff and it won't soak up much vibration.
1/8" would dampen a helluva lot of vibration, but 1/16" would probably do the trick too.
Amazon, we got a pack of 30 for ~$12
I think it was these: 30 Bearing 608ZZ 8x22x7 Shielded Greased Miniature Ball Bearings https://www.amazon.com/dp/B002BBD6X4/ref=cm_sw_r_cp_apa_OykNybTZ859CZ
So, I like to listen to music (loudly) in my car, but as I increase the volume, certain sub bass frequencies will begin rattling the items in my glove compartment. This obviously becomes a nuisance during my morning/evening commutes.
My proposed solution is to line the glove compartment with a material designed to absorb low frequency vibrations. After some googling, I found a material called Sorbothane, which many people use for dampening low frequency vibrations.
Questions:
Note: my car is a 2-year-leased 2016 Honda Accord Coupe, so extensive/invasive solutions are unfortunately a no-go. Additionally, it does not have an actual subwoofer, just standard built-in speakers with fairly decent low-frequency response.
Many thanks in advance to anyone who can steer me in the right direction. Also, apologies for the lengthy post. Just wanted to get everything explained properly.
Look they come in black too
Sunhokey 2pcs GT2 5mm Bore Black Aluminum Toothless Timing Belt Idler Pulley for 3D Printer 6mm Width Timing Belt https://www.amazon.com/dp/B078GPKRP1/ref=cm_sw_r_cp_api_i_5DU4CbBFZRBT5
I just ordered this kit, I'll let you know how it goes.
https://www.amazon.com/dp/B0776KXY8G/ref=cm_sw_r_cp_awdb_t1_pTfvCbBXTW5CQ
Edit: Parts came in and everything is fantastic. Installed the dampers and it is amazingly quiet.
Aside from the suggestions about lowering the Z stop....
&#x200B;
replace the stock springs with something stiffer like this -- if you set things so they are midway tight after homing your host end you will get a more consistent level for longer... in my case I check level on most prints, but only have to adjust maybe every 15~20 prints...
https://smile.amazon.com/Marketty-Printer-Compression-Actually-Perfectly/dp/B07MTGXYLW/
&#x200B;
Second, if your screws spin on their own... just put a drop of elmers under the screw head between it and the aluminum plate... it just gives it something keep it in place verse free spin...
&#x200B;
Last, but not least... I use this marked at proper levels so I can swap out bed surfaces (plain, glass, PEI sheet on glass, etc) ... then it is just a few turns up or down to get everything back into the right position and check level...
https://www.thingiverse.com/thing:2725795
It's possible that the belt won't be easy to replace because you may have to take a bearing and/or housing apart to get the old one out.
YOu can get segmented belts that click together link by link.
https://www.amazon.com/Grizzly-T21992-V-Belt-2-Inch-4-Foot/dp/B001BQDS8I
You can also use two of those belts side by side
You can use something like this. Just verify width and bore size
https://www.amazon.com/Sunhokey-Aluminum-Toothless-Timing-Printer/dp/B078GPKRP1/ref=mp_s_a_1_17?keywords=gt2+5mm+bore&amp;qid=1573616003&amp;sr=8-17
I'm planning on doing a motorcycle road trip and taking my dslr. The bouncing around will be prevented as I will strap it to either the rear seat or tank bag. But then that opens up the question of vibration.
Would THESE work if I lined the bottom of my bag with 4 (they are only 4" square) or is there something else someone can recommend?
The first photo shows the orientation on the bed. If you look, you can see lines at the bottom of the print, but they aren't too bad, if at all as the print goes up.
This is on a Tevo Tarantula on which I have relocated the z-axis motor to the bottom and I am using this coupler - https://www.amazon.com/Befenybay-Aluminium-Flexible-Coupling-Connector/dp/B07RMZCLZ3. I am running this oldham coupler - https://www.thingiverse.com/thing:2568712. I am wondering if the coupler is causing more wobble at the bottom than the oldham can compensate for but as it goes up, the oldham is better able to compensate?
Any help will be appreciated.
I have a similar weekend! Adding an aluminum extruder and this coupler for the lead screw:
https://www.amazon.com/dp/B07RMZCLZ3/ref=cm_sw_r_sms_apa_i_dTu2DbW7VEA45
This: https://media.bahag.com/assets/resp_product/58/86/90588655_21550839.jpg
You can get those usually in hardware stores or where washing machines / dryers and so on are sold. A general "anti vibration mat".
Or something like this: https://www.amazon.com/casa-pura-Anti-Vibration-Vibration-Appliances/dp/B071DVFWTW
It's not common practice, but it should be.
It won't help a modern flight computer all that much, but it'll help video a lot. Cut little discs of something like this: http://www.amazon.com/Isolate-Sorbothane-Vibration-Damping-Sheet/dp/B004LY8UTY/ref=sr_1_22?ie=UTF8&amp;qid=1427644430&amp;sr=8-22&amp;keywords=sorbothane (It's costly, but you use barely any of it...) Be sure to use loctite on the motor threads and to compress the sorbothane SOME but not too much.
Basically, it's much better to isolate/damp vibration before it excites the rest of the frame, rather than try and keep it out of a couple of critical components (camera, flight board)... Especially the flight board: damping can be harmful, because the flight board itself can "bounce" in response to accelerations of the aircraft.