(Part 3) Best security & surveillance accessories according to redditors
We found 926 Reddit comments discussing the best security & surveillance accessories. We ranked the 311 resulting products by number of redditors who mentioned them. Here are the products ranked 41-60. You can also go back to the previous section.


The issue is that the infrared bulbs are reflecting off the glass. You could try and put a red filter on the camera itself. If that doesn’t work. Turn of the infrared on the camera and purchase a separate infrared light and mount that outside. This will allow you to keep the camera inside. The culprit will not be the wiser about the light panel as it is not going to shine light on him that he can see. [ir panel](ICAMI IR Illuminators 96pcs,High Power Infrared LED Lights for Security Camera https://www.amazon.ca/dp/B01GZYS326/ref=cm_sw_r_cp_api_JMHJBb7TKZZ4F)
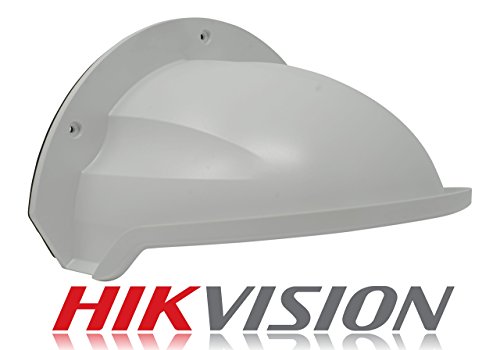
Although rated for outdoor use, they could overheat and just shut off for sometime while it cools off, happened to my backyard cam. I would recommend this
SDS DS-1250ZJ Universal Sun Rain Shade Camera Cover Shield for Outdoor Camera https://www.amazon.com/dp/B018WJQL0S/ref=cm_sw_r_cp_api_i_QENlDbMVQZKHQ
Materials:
Gut this wall clock
Cut this in half and adhere around board. I used carpet tape
Stick these LEDs around the inner perimeter
note that these LEDs were intentionally chosen for their brightness and color, you can use others but I can't guarantee you'll like the illumination
Plug this guy in between the power supply and LEDs for a power switch
That's it! Now just pressure fit that bad boy on top of the foam you adhered around your board and this thing stays put, it's super sturdy and super sleek, way less intrusive than the retail options available right now I think.
I'll link the full order:
I am
not 100%happy with the light strip I got.They are super sensitive to the power draw and flickers time to time(maybe it's the power adapter =/). Though, it's cheap and does its job pretty well![EDIT] correcting the led power connect as opinted out by /u/BishoujoReview
[EDIT] flickering was due to an old extension cord. I plugged the power adapter directly to the wall outlet and that solved the problem.
The key factor is going to be your infrared lights/LEDs. I've seen really cheap cameras with amazing night quality due to dedicated (separate) IR lamps, and insanely expensive cameras that show next to nothing with poor IR illumination.
I have a few Axis cameras, and after trying one of these IR LEDs, I'll never put anything outdoors without one: https://www.axis.com/en-us/products/illuminators/axis-t90c-ir-illuminators
I have one of these pointing at an area about the size of half a football field and it's amazing: https://www.axis.com/en-us/products/axis-t90d-irled-illuminators (a client paid for it, otherwise it would be well beyond my budget for a home IR lamp).
Keep in mind that the Axis models are *probably* grossly overpriced, and you are likely able to find cheaper / more custom variants. A quick search on amazon (Canada) showed this as one of the first items: https://www.amazon.ca/ICAMI-Illuminators-Infrared-Lights-Security/dp/B01GZYS326. I'd try something like that first, and see how it affects your current setup before changing cameras. Note that I have no idea if that particular product is good, it just came up on the first page. Do your own research on IR lights to find one that is in your budget and hits the angles that you want!
For controllers, I've been happy with this: https://www.amazon.com/gp/product/B018ICLC3K/ref=oh_aui_detailpage_o02_s00?ie=UTF8&psc=1
It's simple and the two USB outlets are very convenient. I haven't tested it on the playa yet but it works great in my backyard!
SUNKINGDOM still has a massive sale going on right now for panels: https://www.amazon.com/SUNKINGDOM/b/ref=bl_dp_s_web_9956573011?ie=UTF8&node=9956573011&field-lbr_brands_browse-bin=SUNKINGDOM
For battery, I 'm going to pick up a 100+ AH deep cycle in reno. Even without my 39 watt panel, it should be enough to run my swamp cooler for several hours a day. That said, I like having the back up trickle.
I use similar gauge to wherever my part uses and I use these to connect them: https://www.amazon.com/gp/product/B015OCV5XO/ref=oh_aui_detailpage_o09_s00?ie=UTF8&psc=1
Currently using:
https://www.amazon.com/gp/product/B0745BZV6T
and I have one of these wired to the breakout board:
https://www.amazon.com/gp/product/B079RCNNCK
​
Landscape edging: https://thd.co/1iWcILO
LEDs: https://www.amazon.com/dp/B00JQV6Q4I/ref=cm_sw_r_cp_apa_lBEgzbGCKJFKQ
Power supply: https://www.amazon.com/dp/B01KM3OIAW/ref=cm_sw_r_cp_apa_dCEgzbZV2F3W3
Switch: https://www.amazon.com/dp/B01CM30TQM/ref=cm_sw_r_cp_apa_WCEgzb9027XB0
I used contact cement to help keep the LEDs on the edging.
I'll add pictures of the whole deal tonight.
Glad Y'all like it! 😊
Drop ceiling mounts are really easy. Use these mounts:
https://smile.amazon.com/dp/B07BPQS2XG/ref=cm_sw_em_r_mt_dp_U_o7zyCb512PHSN
​
But don't use the included hardware, use a method as detailed here:
https://www.security-camera-warehouse.com/installation-portal/bullet-camera-ceiling.php
I answered above in this thread with some thoughts on smart switches, the tl;dr is the Lutron Caseta is by far the most versatile option for converting a full house. Leviton has some good options if you want hardware switches in 3-way environments instead of utilizing the remotes from the Lutron system, but frankly the hardware switches from Leviton cost about the same as the remotes from Lutron and the Lutron is a lot easier to install and operate...
https://www.reddit.com/r/HomeKit/comments/d7r9ch/monthly_buying_megathread_ask_which_accessory_to/f1mskrn?utm_source=share&utm_medium=web2x
This goes doubly for ceiling fans, I adore their ceiling fan controllers. I have 4 of them, and in one room where I didn't have the wiring necessary to wire in a lutron fan controller I actually installed an insteon fan controller inside the fan housing and connected that to homekit via their insteon pro hub. Its a huge hassle, and the lutron wall fan controllers are a million times better but they do require neutral wiring in the wall.
Finally, for garage doors my reco is to go with the insignia universal garage door adapter and pair it with this magnetic sensor instead of the one included because its a hell of a lot better and will give you a more reliable sensor reading: https://www.amazon.com/gp/product/B000GUSNQW/ref=ppx_yo_dt_b_search_asin_title?ie=UTF8&psc=1
I set up home-bridge (https://github.com/nfarina/homebridge) running a generic sensor extension (https://www.npmjs.com/package/homebridge-contact-sensor) on a raspberry pi (https://www.adafruit.com/product/3400) and connected it to some magnetic sensors (https://www.amazon.com/Aleph-DC-1561-Surface-Magnetic-Contact/dp/B00LYCUSBY/ref=sr_1_4?ie=UTF8&qid=1525992779&sr=8-4&keywords=magnetic+sensor)
The sensor to the raspberry pi is hardwired, so you could use conduit or some kind of outdoor wire. In my setup, the pi lives in the garage where it also controls the garage door, I just ran wire from the garage, through the wall, along the fence, to the gate.
They're $6 on amazon. Link.
I'm setting up cable raceways like these in the corners where each Lighthouse is mounted, and using cable extensions like these.
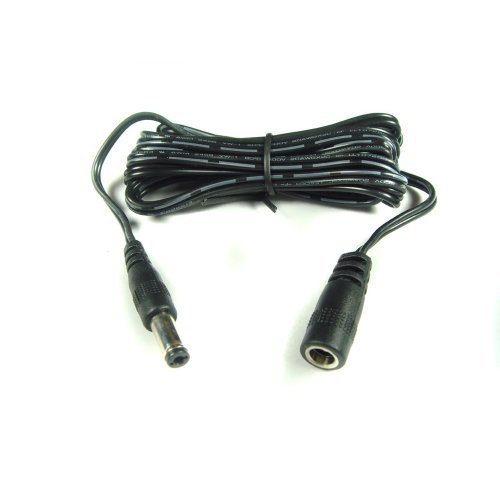
I ran power cables to 2/4 of my cameras and will be doing the other two shortly. I ran wires and an outlet through my attic into the soffit cavity close to my cameras where I was able to plugged the cameras in. You can't just use any power cable. In my attempts you had to get specific "arlo" cables.
I got ones that were designed for outdoors that had a little boot on the end to keep water out.
Wasserstein Weatherproof 16ft/5m... https://www.amazon.ca/dp/B06XYBRVX9?ref=ppx_pop_mob_ap_share
Apparently some people had issues with these cables but mine worked flawlessly. YMMV
IMO you need to power your arlo cameras if they are in any area of high traffic.
Anyway. That has been experience
There is one where the LENS is covered. I have a few of these.
https://www.amazon.com/SEEKONE-Protective-Waterproof-Protection-Adjustable/dp/B07TMZ8PJ6/ref=sxts_sxwds-bia
But one of them on a roof in Manhattan, the USB connector still got wet and would not stay on I have soldered the 5V directly to fix.
Now, that one rocks back and forth a lot. I think the plastic where it pivots is wearing down from the wind/weather.
Another thing to consider is that as well as being Grade 1, the Schlage Connect is cheaper than the Yale. As far as I can tell they're roughly equivalent feature-wise.
I can almost guarantee it's a 5.5x2.1 barrel jack, as that's more or less the standard on cheaper PSUs. You could possibly try picking up one of these to help adapt your PSU, as you just need to screw the wires into the terminals the way you're used to. I will say, though, that I'm somewhat unsure what kind of power load those can withstand.
Here it is
Something like https://www.amazon.co.uk/gp/product/B004K94SQY/ref=oh_aui_detailpage_o01_s00?ie=UTF8&psc=1 is super cheap though :)
You want to use 24v strip in these cases in order to not have to deal with power injection, which is where novices can easily get into trouble. With 24v you can run up to 10M, or 32.8ft, and is such often sold in 10M reels. Purchase four of these and cut each down to the length of it's respective wall, being sure to only cut on the line in the center of the copper pads every 6 LEDs.
{With addressable strip, the pixel "size" is TYPICALLY determined by voltage, so for 24v strip, each 6 LEDs will act as a single "pixel," when playing back patterns, 12v strip is 3 LEDs, 5v is 1.}
After cutting the strip to length, you will want to remove the connectors from the cut off ends and solder them to your new ends. IT IS IMPORTANT FOR THIS SCENARIO TO NOT solder on the RED (+24v) wire, as it will be safer to use 4 smaller power supplies, you are only wanting to interconnect the green Data wire and white Ground wire between each strip. If using IP68 waterproof strip, don't forget to remove the silicone endcap from your cut end, replacing it on the new end with a dab of silicone sealant.
Attach the 2.1mm socket adapters to the RED (+) and White (-) bare wires at the beginning of each strip using a jewelers screwdriver. Connect the 3-pin connectors between each strip, and tape off the bare wires with electrical tape, then connect the PSUs to the last three strips. For the first strip, connect it's PSU to the 2.1mm splitter, plugging one end into the strip and the other into the controller. Wire the 3pin connector included with the controller to the Data and Ground of the controller, again in this case, DO NOT CONNECT THE RED (+24v) WIRE to the controller; just wrap the end in electrical tape. Finally, connect the 3-pin connector from the controller to the first strip and power up your PSUs. From here it's just configuring the controller with your phone or tablet.
4x: https://www.amazon.com/Waterproof-Visdoll-Flexible-Addressable-Programmable/dp/B075GCKPHB?th=1&psc=1
4x:https://www.amazon.com/gp/aw/d/B074GJ22P6/ref=ox_sc_act_image_1?smid=A325274ZEF9XYZ&psc=1
1x: https://www.amazon.com/ALITOVE-Controller-Individually-Addressable-Programmable/dp/B01LW1J10W/ref=mp_s_a_1_1?ie=UTF8&qid=1541825064&sr=8-1-spons&pi=AC_SX236_SY340_QL65&keywords=4+output+ws2811+controller&psc=1
1x: https://www.amazon.com/Chanzon-Female-Connector-Security-Adapter/dp/B079RCNNCK
1x: https://www.amazon.com/dp/B00G6G5DJ0/ref=sspa_dk_detail_1?psc=1
You could skip steps 1, 2, 4, 5, and 6 and save ~$20 by just buying a couple tripod clamp mounts: https://www.amazon.com/BESTEAM-Tripod-Camera-Reflector-Backdrop/dp/B00Y4FVLYG/
Or if you're comfortable with putting screws in your wall you could save ~$30 by using a camera wall mount: https://www.amazon.com/FastSnail-Security-Adjustable-Interface-Standard/dp/B01M1CDI8G/
I used same brand as Joel but different style. They also have them in black but I got these as would blend with my wall more. Wall Mounts I Used!
No shit. I just received the barebones board today and must have opened about 30 different browser tabs trying to figure out how to power the damn thing *tonight* with what I have on hand (not much, basically a PC power supply with molex connector.) Can't do it.
​
Didn't want to leave a bad review for the seller, but for a while there I was SERIOUSLY thinking about just returning it cuz I could feel my blood pressure literally rising and stress getting to be a little too much.
​
Ended up ordering a $10 power supply, $7.50 10-pack of ends for the adapter, and a $6 pack of dupont breadboard wires. So all in all ~$23.50 extra expense JUST TO GET POWER (and JACKLEG power, at that!) TO THE BOARD. Because the easier way, the mini breakout board, is out of stock on Amazon until June 6th or something. We'll see if it's worth it. If not, next step is prolly a Jetson Nano.
​
GenBasic 80 Piece Male to Male 4 and 8 Inch Solderless Ribbon Dupont-Compatible Jumper Wires for Breadboard Prototyping
Sold by: LoveRPi - $5.99
Chanzon (10 x Female) 12V DC Power Connector 5.5mm x 2.1mm 24V Power Jack Socket for Led Strip CCTV Security Camera Cable Wire Ends 10Pcs Plug Barrel Adapter
Sold by: Chanzon - $7.49
IBERLS AC to DC Regulated Transformer Wall Power Adapter Supply Cord Plug Charger 5V 3A(Compatible with 5V2A) for LED Pixel Light, USB-HUB, Kindle Fire Tablet, DJ Controller, Nextbook
Sold by: IBERLS - $9.99
Which ecosystems are you already using (zwave, zigbee, wifi, 433 etc..)?
I've been using these zwave door sensors for a while and they are ok. Funky little batteries (you can get rechargeable ones on amazon), but they pair pretty easily and respond quickly for both open and close events.
For my master bedroom, I've wired magnetic contact switches to a wemo d1 mini. So far so good. I wish I was able to hardwire all of my doors and windows to a central location. Seems more reliable, no batteries and a *lot* cheaper than wireless devices on every door and window.
found something on amazon. I'm not sure what stores locally might carry something like this, sorry.
https://www.amazon.ca/ICAMI-Illuminators-Infrared-Lights-Security/dp/B01GZYS326/ref=sr_1_1?ie=UTF8&qid=1510168299&sr=8-1&keywords=infrared+lights
edit: really depends on what exactly you need this for, but most TV remotes use infrared light which you can pick up on camera when you click buttons.
I haven't installed it yet, but I have one of those standard reed switches. I have plenty of pins left on the Wemo so it's really just a matter of hooking it up.
Just finished similar project. At first I tried placing a small magnet on the chain with sensor physically mounted on the opener. Bad idea - the magnet kept falling.
Ended up with this: https://www.amazon.com/gp/product/B00V57QGRI/ref=oh_aui_detailpage_o05_s00?ie=UTF8&psc=1.
A bit expensive but very reliable and looks great. It also solved the open / close issues as the sensor is "on" when the door is 2" or less from the floor - really closed.
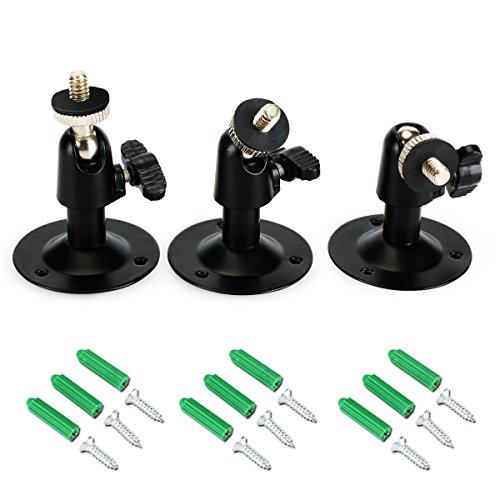
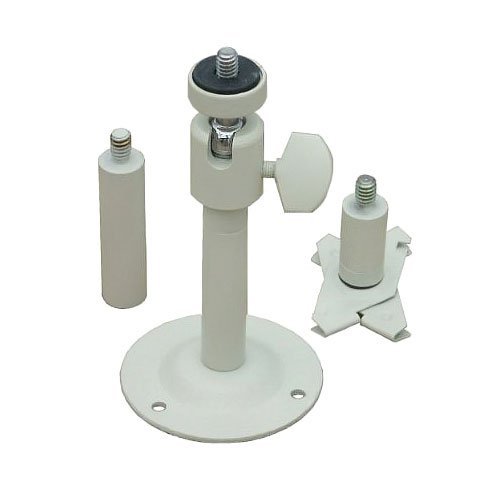
This is my oculus room setup. Most of the details are with the photo, but basically 7' wide x 10' deep room with sensors wall mounted 56' apart. My center is the back left corner of the mat. Right sensor tilted down to all better chair game tracking for things like "I expect you to die". When my back sensor gets here I think it will be perfect. This is more than enough room for any oculus game and any Steam game I have tried. Here is the link to the wall mounts I used...highly recommend them: https://www.amazon.com/gp/product/B000IDBXBO/ref=oh_aui_detailpage_o00_s00?ie=UTF8&psc=1
I like these.. you can find them in other colors
https://www.amazon.com/gp/product/B01EL17TNO/ref=oh_aui_detailpage_o00_s00?ie=UTF8&psc=1
https://www.amazon.com/gp/product/B000X23I22/ref=oh_aui_detailpage_o02_s00?ie=UTF8&psc=1
This is ours, working on Pre and dk1. Note, the long USB from PC to the box has an old powered USB 2 hub just before the box.
For HDMI cables you should stick with Category 2 HDMI cables, often marked as "High Speed".
Extension cable for lighthouse power:
https://www.amazon.co.uk/gp/product/B004K94SQY/ref=oh_aui_detailpage_o01_s00?ie=UTF8&psc=1
In-line switch for lighthouse power:
https://www.amazon.co.uk/gp/product/B00KLDPX8U/ref=oh_aui_detailpage_o07_s00?ie=UTF8&psc=1
Usb 3.0 extension for breakout box:
https://www.amazon.co.uk/gp/product/B005CR1IPW/ref=oh_aui_detailpage_o03_s00?ie=UTF8&psc=1
Extra long HDMI cable for breakout box:
https://www.amazon.co.uk/gp/product/B008JR72SO/ref=oh_aui_detailpage_o07_s00?ie=UTF8&psc=1
As for Touch, I'm yet to by the cables for mine. My plan is to set it up 3m x 4m and do a tracking VOLUME comparison. Unfortunately it's going to cost me an extra £150 in USB hubs and extension cables to set it up in the same space (on top of cables I've already got for the Vive). This is because of the requirement of amplifier usb 3.0 cables cause of the length, and the requirement of now 3 USB 3.0 ports on that side of the room, rather than just 1. I know the volume can't support Unseen Diplomacy, but I need to know the limitations before any platform development.
Grab some female led connectors https://www.amazon.com/gp/aw/d/B015OCV5XO/ref=mp_s_a_1_10?ie=UTF8&qid=1466779525&sr=8-10&pi=AC_SX236_SY340_QL65&keywords=female+led+connector
And then get rid of the standard connector for the fan, and hook them into the female connector. make sure you use the right two. http://i.stack.imgur.com/NpPzH.png :)
Not sure exactly what you're looking for, but I got this wire and inline switch when I was extending the base stations for our office, and they've been running just fine for several years:
https://www.amazon.co.uk/gp/product/B00KLDPX8U/
https://www.amazon.co.uk/gp/product/B004K94SQY/
Mostly you need to make sure the plug is a 2.1mm barrel jack. The actual transformer only puts out 12V and 2.5A so any cables for home CCTV seem to work. I highly recommend getting and additional inline switch btw, it makes it way easier to turn them on and off again without nudging them and needing to recalibrate.
https://www.amazon.com/gp/product/B01EL17TNO/ref=oh_aui_detailpage_o00_s00?ie=UTF8&psc=1
I am using a mimo lite like this: http://www.fortrezz.com/shop/mimo-lite
I have it paired with a wired contact sensor similar to:
https://www.amazon.com/gp/product/B000GUSNQW/ref=oh_aui_detailpage_o04_s00?ie=UTF8&psc=1
It has been rock solid so far. Prior to this I had a MyQ and had several cases of phantom notifications that the door had opened or closed when it didn't. I also had a couple cases where it opened randomly. It became too unreliable to know what was real and what was fake.
I like the idea of the wired sensor because I don't have to worry about batteries or anything, and I also like that it is actually wired to the opener itself. It has proven, at least in my experience, to be way more reliable than the MyQ. It also integrates with all my other devices in smartthings.
I built a similar controller using the [GarHAge project](https://github.com/marthoc/GarHAge). Like yours, my garage is a simple 'push button to do something' type. I used [these overhead door sensors from Amazon](https://www.amazon.com/gp/product/B00V57QGRI) to detect whether the door is open or closed.
I have 2 automations concerning the garage doors: the recommended [check status on start up](https://github.com/marthoc/GarHAge#hass-automation-workaround) script, and then an automation that send an alert to our phones if the garage door has been open for more than 5 minutes. It's not a "smart" automation, so it will go off if I'm out working in the garage with the door open, but it lets us catch when the door bounces back open after the cat sneaks out.
This is what I used for the setup:
LED Strip lights
Plug splitter
[LED Power supply extension]
(https://www.amazon.com/gp/product/B00FTH6WNS/ref=oh_aui_detailpage_o00_s00?ie=UTF8&psc=1)
LED Lights remote adapter
I bought it on amazon in 2013. It worked 90% of the time 6 months in. Then became less and less as iOS updates came out and the lock got older. Started getting annoying in mid 2014 and I kept tweaking and recalibrating it til march this year. It was working enough to not deal with it but also messed up 1 out of 5 times and usually when it's raining or you have your hands full. Happened that way every time without fail. I guess I figured I was out of the warrant period when the lock started malfunctioning more. Anyway whole experience as a whole left me salty. Bought this few months ago and it has been working great, lock opens based on our phones location with home assistant or just use the keypad. Schlage Lock Company BE468CEN619 Connect Century Touchscreen Deadbolt, Satin Nickel https://www.amazon.com/dp/B00OCCSST2/ref=cm_sw_r_cp_api_Sfjqzb484QMBN
TX and I haven’t had any issue yet with mines. Do you have yours directly out with no cover??? I have mines on top of the garage/ under the roof so it’s always covered from the sun and rain.
If you have yours out with no cover then considere getting this or you might have a defective one.
SDS DS-1250ZJ Universal Sun Rain Shade Camera Cover Shield for Outdoor Camera https://www.amazon.com/dp/B018WJQL0S/ref=cm_sw_r_cp_api_i_bTMpDbXXXK0W0
I just bought one of these 6 ft 2.1mm x 5.5mm DC Plug Extension Cables https://www.amazon.com/dp/B00FTH6WNS/ref=cm_sw_r_cp_apa_jqh6xbBWAFQHB it takes the weight off you head and as a bonus you no longer have a bomb strapped to your skull so that's nice.
You could always wire the pump up with one of these and plug in a 12v wall adapter. I'm just putting the info out if anyone is interested.
For the TPlink integrates I got tired of removing and reading it constantly to try and get all the switches and plugs reintegrated. I'm glad it's working for you I hate adding stuff to the config yaml it just keeps getting bigger and bigger.
https://www.amazon.com/SEEKONE-Protective-Waterproof-Protection-Adjustable/dp/B07TMZ8PJ6/ref=pd_ybh_a_6?_encoding=UTF8&psc=1&refRID=R3T1NEXYBTFQP9GGFW1W已经
I use these camera wall mounts from Amazon in my room, and they look a lot nicer than the generic L brackets I bought the first time. They come in sets, with cheap but sufficient wall anchors, and are inexpensive. I have mine coming from the ceiling, but they also work well on the walls.
If those are no good, just search your preferred store or site with the same keywords as I did above, in blue. You'll get tons of results :)
Something worth mentioning is that the cameras don't have the usual 90° fov, it's more like 120°. There's a free utility Sensor Bounds that will show you the coverage your cameras are getting from inside VR, I have found it helpful.
You can buy the deadbolt only on Amazon! I wanted to keep my existing handle so I ended up doing that. Here's the one I purchased: https://www.amazon.com/dp/B00OCCSST2/
Here is the equipment list.
BTF-LIGHTING Digital Addressable Led Strip Music Controller X2 35.88
https://www.amazon.com/gp/product/B0759PQ46B/ref=oh_aui_detailpage_o03_s00?ie=UTF8&psc=1
BTF-LIGHTING WS2812 32.88
https://www.amazon.com/gp/product/B01CDTEKAG/ref=oh_aui_detailpage_o00_s00?ie=UTF8&psc=1
You will need a 5volt 10 am power supply. 15.99
https://www.amazon.com/gp/product/B075CZ9G11/ref=oh_aui_detailpage_o01_s01?ie=UTF8&psc=1
​
Might need some small gauge wire although not needed.
I think power supply came with a DC Power Connector you will need one. 6.00 for a couple of them.
https://www.amazon.com/Chanzon-Connector-Female-Security-Adapter/dp/B079R9WCG2/ref=sr_1_1_sspa?ie=UTF8&qid=1539355038&sr=8-1-spons&keywords=DC+Power+Connector&psc=1
​
Place the power supply and reciever in a plastic or weather proof container if you intend to use outdoors. I drll 2 holes in each side. One hole for power cable going in container to strip, the other hole for 1/8 min and led strip power going out of container. I use hot glue gun to seal the holes.
​
Here is a great tutorial video from strip company. the above is for 5v 10amp strip.
https://www.youtube.com/watch?v=14i_7Rzz5Y0
Hit me up if you get stuck.
NOW GO ENJOY YOURSELVES.
​
​
​
​
​
Well my plug is indoors in my garage and the camera is under an awning so not too much rain. But i bought the Wassertein Cable and it seems to fit in snug. I have the official arlo base it wouldnt fit on my offbrand base because it was too bulky. I also had to use the charger that came with my arlo pro. Some newer units come with a charger.
> You could skip steps 1, 2, 4, 5, and 6 and save ~$20 by just buying a couple tripod clamp mounts: https://www.amazon.com/BESTEAM-Tripod-Camera-Reflector-Backdrop/dp/B00Y4FVLYG/
You could indeed! However, the gripping pressure of those is far less and they won't open up as wide as the ones I mentioned. Although the steps I listed sound complex, actual assembly takes literally about 2 minutes for both clamps.
> Or if you're comfortable with putting screws in your wall you could save ~$30 by using a camera wall mount: https://www.amazon.com/FastSnail-Security-Adjustable-Interface-Standard/dp/B01M1CDI8G/
Correct! however, the mini ball heads present in those mounts are very poor quality and will wear out over time. I have had those Giottos mini ball heads for half a decade and they're still as flexible and grippy as when I bought them.
I mentioned this earlier, but you can definitely get cheaper parts than the ones I listed. However, they will also definitely be inferior.
I did find this on amazon though https://www.amazon.com/Arlo-Weatherproof-Cable-Wasserstein-White/dp/B06XYBRVX9/ref=sr_1_5?s=electronics&ie=UTF8&qid=1498654626&sr=1-5&keywords=arlo+pro+power+adapter
Do you mind sharing the link for the mounts?
This is the closest that I’ve found so far: Security Wall Mount for Oculus Sensor Arlo, Arlo Pro,SERMICLE Metal Security Camera Bracket Outdoor Indoor Oculus Rift Mount Bracket 360° Rotation 1/4" Screw Camera Wall Mounts CCD CCTV (3 Pack,Black) https://www.amazon.com/dp/B07BPQS2XG/ref=cm_sw_r_cp_api_i_gMDBCbZV4EHX3
You can use any standard 1/4" camera mount. There's not really any shortage of options and styles.
https://www.amazon.com/dp/B000X23I22/
https://www.amazon.com/dp/B01A15ZKQC/
https://www.amazon.com/dp/B009AOWF50/
These are easy to use: https://www.amazon.com/Areyourshop-5-5mm-2-5mm-Camera-Connectors/dp/B01CJE0ZLI/ref=sr_1_10?s=electronics&ie=UTF8&qid=1502987887&sr=1-10&keywords=5.5+x+2.5+male+power
Anyone try these?
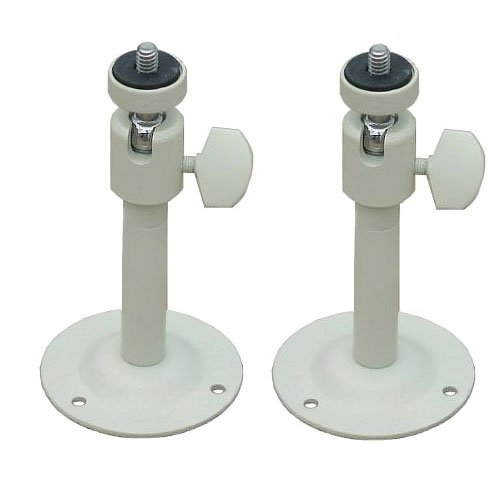
https://www.amazon.com/VideoSecu-Adjustable-Security-Brackets-Surveillance/dp/B000IDBXBO/ref=pd_cp_23_1?_encoding=UTF8&psc=1&refRID=JMGQNPX89RY99N0DF9PD
Or These
https://www.amazon.com/VideoSecu-Adjustable-Installation-Surveillance-1SG/dp/B001D49TU4/ref=sr_1_3?ie=UTF8&qid=1481039147&sr=8-3&keywords=ceiling+mount+camera
I used these sensors for my garage last year and have been really happy with them. Running then back to a raspberry pi running some custom Python software I've written.
Thanks for replying. That’s exactly what I was thinking. Here’s the mount I was considering.
Arlo Camera Mount
It would keep the orbi upright. They definitely look like camera mount screws but I didn’t know if they were standard sizes.
I used these as it worked with my setup. https://www.amazon.com/Potter-Amseco-ODC-59A-Overhead-Switch/dp/B000GUSNQW/ref=mp_s_a_1_13?crid=1QV6K3GF45HYY&keywords=wired+garage+door+sensor&qid=1556336767&s=gateway&sprefix=wired+garage+door+&sr=8-13
They need to wire into the iSmartgate unit (not the gate/garage motor) so if that’s in your garage you’d need to run wiring back to your garage to supoort it.
You don't need a stepdown transformer, just buy a 12Vdc 1A+ wall wart and rewire the plug in reverse with these
SDS DS-1250ZJ Universal Sun Rain Shade Camera Cover Shield for Outdoor Camera https://www.amazon.com/dp/B018WJQL0S/ref=cm_sw_r_cp_apa_i_CCknDbBWVJ8S9
OP from your comment sounds like you could use an old PC power supply since it puts out 12V, 5V and 3.3V.
Power supply ATX pinout board with fuses
https://www.amazon.com/dp/B078XD1652/ref=cm_sw_r_cp_awdb_t1_27GRCb4QZRJK6
TRS adapter
https://www.amazon.com/dp/B01N4N9MMZ/ref=cm_sw_r_cp_awdb_t1_x.GRCbA7GT44F
Banana tip
https://www.amazon.com/dp/B0097JLRFM/ref=cm_sw_r_cp_awdb_t1_ecHRCb108B23B
DC socket
https://www.amazon.com/dp/B079R9WCG2/ref=cm_sw_r_cp_awdb_t1_OdHRCbHH53TTS
On the ATX board just make sure to put some low amp fuses like 2 amps. Solder, Shrink wrap and LABEL to avoid plugging 12V into a mixing board.
EDIT: you could accomplish the same task much cheaper but using the 4 items listed above you would not have to modify the snake at all.