Best computer & mobile device repair kits according to redditors
We found 181 Reddit comments discussing the best computer & mobile device repair kits. We ranked the 49 resulting products by number of redditors who mentioned them. Here are the top 20.


This is the kit I use. Has every tiny bit you need for electronics and such. Cleaned my PS4 recently and it made a world of difference sound wise. Almost thought the fan was broke.
>electronics so forgive the basic question
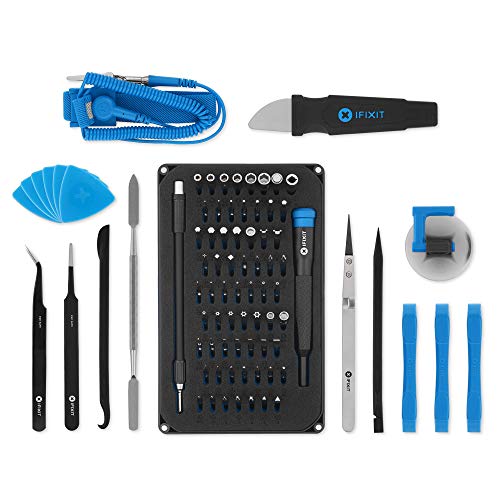
don't be bashful! This is a great kit for little electronic repair and contains lots of special bits. Here's a list of what it contains from the site:
64 Bit Driver
150 mm Flex Extension
4 mm Screwdriver Bits
Phillips - 000, 00, 0, 1, 2
Flathead - 1, 1.5, 2, 2.5, 3, 4 mm
Torx - T2, T3, T4, T5
Torx Security - TR6, TR7, TR8, TR9, TR10, TR15, TR20, TR25
Pentalobe - P2, P5, P6
JIS - J000, J00, J0, J1
Hex - 0.7, 0.9, 1.3, 1.5, 2, 2.5, 3, 3.5, 4, 4.5, 5 mm
Tri-point - Y000, Y00, Y0, Y1
Nut Driver - 2.5, 3, 3.5, 4, 4.5, 5, 5.5 mm
Square - 0, 1, 2
Gamebit - 3.8, 4.5 mm
Spanner - 4, 6, 8
Triangle - 2, 3 mm
SIM Eject Bit
1/4" to 4 mm Driver Adapter
Just remember, that with any repair/hobby, you're gonna need more than this. Before you buy this, check to see if ifixit has larger bundles that come with more stuff and fits your budget.
With this kit, you will have to buy other tools, like tweezers, spatulas, and what not. The bundles will have them, but will obviously more expensive.
Is the price difference worth the tools and time to buy them as you need them? If so, buy a bundle. If you are just taking it slow, go with this.
One more thing, do NOT buy any of the cheaper Chinese versions you see on Amazon/ebay. I've dealt with those, ifix, wera, wiha, snapon, and other kinds. ifixit is not bad, snap-on is too pricey, wera and wiha, imo, are better than snap-on and might be cheaper if you can source them right. The cheap versions often use Chinesium metals to make them, so they bend, break, and wear fast.
I had to fix my Ring doorbell and used a torx from the cheap kit, unused, and it twisted the head, so yea..
ifixit is good and for this kit at that price is great`
I recommend a bundle of iFixit tools. Lots of useful stuff for small electronics work https://www.amazon.com/dp/B01GF0KV6G/ref=cm_sw_r_cp_api_XDNQAb9PK66BC
You need nonmarring black plasitic sticks, you sick bastard!!!
Improper tool usage makes me cry!
Ugly mobile link but this is safest
https://www.amazon.com/dp/B00DIQA3WS/ref=cm_sw_r_cp_awdb_t1_9R6wCb65B7PNR
Adding this can help too, just be careful near the pins of you f one up it’s done
https://www.amazon.com/dp/B01DGNCNR0/ref=cm_sw_r_cp_awdb_t1_pU6wCb8Z7NCZR
I just meant that some of the pins/sockets are just ground pins or unassigned.
And if you have something like a Datavac maybe you could blow it out? Otherwise I would just get some tweezers from a drug store, or a toolkit like this.
Yesterday I took some time and blacked out the chrome on my headlights and installed Diode Dynamics Switchback C-Lights on my 2015 Premium. I think it turned out pretty well, as you can see from the before / after photos above.
It was pretty warm out and - while I left the headlights in the sun for a while before opening them - I didn't bake them and thought they came apart fairly (10 minutes / side) easily. Overall, the job took about 5 hours and I'd rate it a 6/10 for difficulty.
Total cost came out to be about $155, Rallysport Direct had a 10% sale so I got the boards and retro-rubber for $150, and got a $5 can of matte black Krylon paint + primer at Lowes. I also purchased some Frog Tape but didn't end up using it.
Some thoughts...
I'm not a huge fan of the turn signal connectors on the LED boards. I would have preferred the wires to be about 12" longer, and I ended up stripping a section of my (blue) turn signal wire, soldering, and then taping them (would prefer heat shrink tubing, but it worked) instead of using the vampire taps.
I also didn't use the (i think) T-10 connector. I couldn't find anywhere in the headlights that I liked to mount the drivers, and there wasn't a good place to run the wires out, so instead I removed the socket from the light, cut / stripped / soldered the white and black wires to the driver to the red and black C-light wires. Then, I used VHB tape to stick the driver boxes to the back of the headlights, and sealed the holes with some extra retro-rubber.
I should have bought the DRL harness, because even though I disconnected my DRL resistor I couldn't confidently find the place to connect it to the new C-boards for DRLs. I'm not sure if I got a different / newer model of C lights than most sites describe, because the red wire went from the driver board to the LED board. I may buy that and connect it in the future.
It was a bit tricky putting the C-light diffuser back in over the LED boards. The little clips wanted to scratch the newly painted surface, and the LED boards didn't fit as nicely as I thought they would. I eventually got them together, but I had to take them apart and touch up once.
Fingers crossed on fogging. If I do get fogging, I have a few silica gel packets that I'm going to stuff in there for a day or two to see if that knocks down the moisture.
The stock silicon sealant is pretty gross, but cleans up easier than I expected. Regular soap washes it off, but Goo-Gone might not be a bad idea.
Pulling the bumper was pretty easy. About a dozen clips / screws, and it popped right off without too much trouble. I put a mover's blanked down (which really wasn't necessary - you aren't going to mess anything up on the bottom of the bumper) and had enough play that I didn't bother disconnecting the fog lights and turn signals.
Either have a helper, or something reflective enough that you can see the lights sitting in the car. You'll want to test all the light settings, turn signals / hazards, and test with the handbrake on and off.
I did everything myself and didn't feel like a helper would have made things any easier.
Having a set of body panel tools and spudger kit is invaluable, both for this job and in general. Just spend the $20, it'll pay for itself.
I did scare myself taking apart the headlights - I hadn't removed the stock bulbs in my c-lights, and one of them broke on me. Fortunately it didn't damage anything. Make sure you remove those c-light bulbs first if you want to avoid a sphincter tightening surprise.
If I were to do it again, I would probably get some frosting paint and paint the c-light diffusers. It looks good, but I think I would prefer the full C-light diffuser to appear a bit whiter and even out the light from the LED boards. If I end up taking them apart again I will probably do this.
I didn't replace my halogen bulbs - the extra $100 or so it would cost to switch to LEDs wasn't in my budget. I'll probably do that not too far down the line, but for now it looks fine with the orange halogens. Since I disconnected the high beam DRL resistor, it'll only matter at night anyways. I thought about doing an HID retrofit, but again - budget.
I didn't replace the amber side-marker covers with tinted ones. They darken up a bit when you paint the chrome under them, but I wouldn't mind having them a shade or two darker.
It looks pretty good, a very worthwhile mod for one person to do in 5 hours for ~$150.
​
​
There was a treasure trove of tools left over from the former sysadmin: pliers, wire slips, allen keys, craft knife, punch down tool, and network cable tester. And one of the first things I had them purchase when I got here was the iFixit Pro Tech Toolkit. I do need a tool wrap, that's a good idea. I'm putting together a list of stuff for a purchase, thanks for the suggestions.
Possibly a teach spudger https://www.amazon.com/Universal-Spudger-Opening-Tablets-MacBook/dp/B01DGNCNR0
I bought some of these. I used it extensively for like a week, cleaned all my electronics and dusty shelf decor. A month later I open it up again to use and the entire bag is full of mold, it was really gross. Not sure if I just bought a cheap brand, but I'm hesitant now.
https://www.amazon.com/gp/product/B01GTOOQI2/ref=oh_aui_detailpage_o00_s00?ie=UTF8&psc=1
I plan to DIY my own Whitestone Dome glass protector. I'm waiting until I can find a TGSP that:
This is the glue I'm going to use, it should be enough for 5 tgsp installs:
https://www.amazon.com/gp/product/B00IOPYLJE/
This is the IR curing light I'm going to use:
https://www.amazon.com/gp/product/B008133KB4/
I'm going to end up doing this for 4 devices, 2 x GS8 and 2x GN8. Total cost ~$40 or $10 each.
iFixit has several tool kits on Amazon. The ones I was referring to were these.
I have this cheapo one that came with the gunpla toolkit I bought off amazon when I just started gunpla and it saved me a ton of times. There are just those stubborn parts, especially abs in some cases, that just dont want to come off.
If you put too much force with your hands or other tools, you can end up breaking the pegs or even the piece.
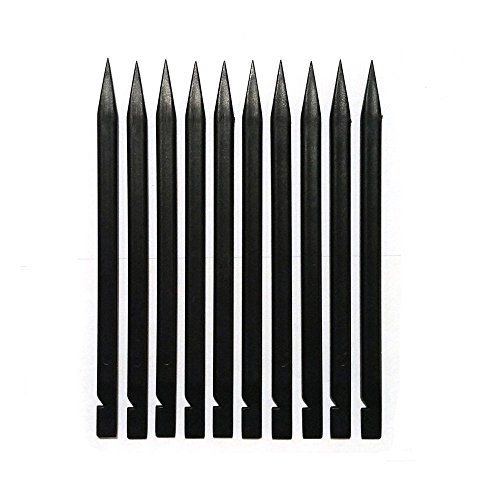
You don't need anything fancy, you can buy a spudger meant for phones for like 5 bucks on amazon; anything with a wedge will work. Here are 10 for 6 dollars.
tl;dr: Add one to your toolkit!
You really don't need a toolset, you could get something like this but if you have a Philips head screwdriver lying around, you can pretty much build a PC. You can also magnetise non-magnetic screwdrivers.
Floureon 38-piece Precision Screwdriver Set Repair Tool Kit for iPad,iPhone,PC,Watch,Samsung and Other Smartphone Tablet Computer Electronic Devices https://www.amazon.com/dp/B00SURH7W4/ref=cm_sw_r_cp_apa_TKC3BbK4S0T88
You can go cheap on the opening tools without being penalized.
Laptops and the like aren't cars - they don't require tons of force but you DO need the right bits and/or shims to get them open without stripping heads or damaging plastics.
Something similar to this which has a bunch of bits, magnetized pickup, and "guitar" style plastic pry tools should do fine.
https://www.amazon.com/dp/B073ZWY386/ref=twister_B07FMWPBKN
A portable multimeter is always useful, I like the ones that fold in on themselves so you can throw them in a bag.
https://www.amazon.com/Digital-Multimeter-Ranging-Pocket-Tester/dp/B06Y4RZY45
Get some Cat5e clips, put them in a ziploc, and throw them in your bag along with a crimping tool, needle nose pliers, and wire stripper. You will be surprised how often you need to re-crimp a cable or make a new one on-site.
Note - if you don't know how to make a cable, definitely practice that first!
Get an ethernet/phone continuity tester. You don't need a Fluke CableIQ (they're nice though!) but a basic continuity tester will let you (laboriously) trace any ethernet jacks that need tracing. And you can test those cables you just made or just fixed.
I have one basically identical to this and I've used it for over 10 years now I think. Money well spent.
https://www.amazon.com/Tonor-RJ45-Network-Cable-Tester/dp/B00OUFX38W
As mentioned before, something to read a drive(s).
Any multi sd-card reader will do but instead of a dock you may want something like this since it is more portable. Yet another thing I've had for over 5 years and used countless times.
https://www.amazon.com/AGPtek-Drive-Adapter-Converter-External/dp/B00BIE996S
Or
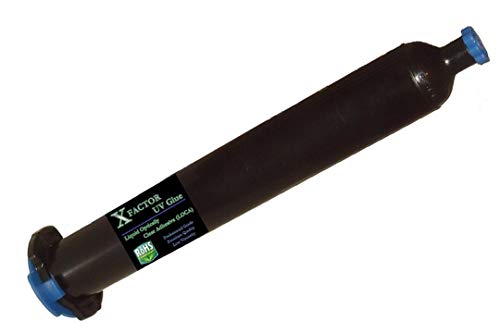
Octopus Glue® - Liquid Optically Clear Adhesive (Loca) 10 ml Graduated Syringe - The Original Premium Loca UV Glue for Phone Glass, Digitizer, LCD Repair https://www.amazon.com/dp/B014RN9UGK/ref=cm_sw_r_cp_apa_ZVuVzb6HRR5CB
3)NuLink Light Lamp 36 Watt UV Ultraviolet Dryer with 120 Second Timer & Slide Out Tray for Galaxy iPhone Refurbished LCD Front Glass LOCA Glue - White https://www.amazon.com/dp/B00MJI8OCW/ref=cm_sw_r_cp_apap_I9QnHIUoyMIzz
I also used a template that was bundled with the Beetle Supcase Tempered glass to make it easy.
When applying the LOCA put in the center of the phone a capatlized "i". Octopus LOCA includes a mL measurement and you should put near 5mL. It will get messy. That's the advantage of the WhiteStone Dome as they give you a lower viscosity with the right measurement needed.
Make sure you put tape in all coverings. People will say painters tape, but I use Shipping tape with good adhesive. My first try, painters tape lifted and I got glue over my speaker. If this happens, make sure you put the phone in the UV light. It's easier to remove dried than piece by piece. But if you put good adhesive tape this will not happen.
Yup. I think it is this one although I bought it 3 years ago so it might be a different name on the same product. Not as big a selection as this, but for $13 it's great for my needs.
https://www.amazon.com/gp/aw/d/B00SURH7W4/ref=mp_s_a_1_11?ie=UTF8&qid=1512063503&sr=8-11&pi=AC_SX236_SY340_QL65&keywords=Electronic+tool+kit
Can you guys recommend me a cheap screwdriver kit for fixing electronics? There's one from fixit but it's like $55
iFixit Pro Tech Toolkit - Electronics, Smartphone, Computer & Tablet Repair Kit https://www.amazon.com/dp/B01GF0KV6G/
I want something like this but... Less and cheaper. Does it exist?
My immediate need is to shuck an easy store but I need one of these in general
those flat plastic 'spudger' tools may come in handy. like a thin plastic screwdriver.
https://www.amazon.com/Zacro-Professional-Non-Abrasive-Spudgers-Anti-Static/dp/B01F52ZPBQ
This is much easier than you'd think.
My MacBook Pro sat in 1 inch deep water in my backpack (a waterproof backpack, so nothing escaped haha!), and it's still kicking two years later!
What I did first was similar to what you've done so far. I elevated it and propped it on its side. HOWEVER, despite what folks here are saying, that's not enough.
I quickly ordered this iFixit kit with one-day shipping. I then went down the street and purchase 20-lbs. of rice and submerged my MBP in them, open about 20 degrees, the same direction I'd had it propped up.
I don't know if the rice actually did anything, but I knew we would eat it, and it was only $1 per pound.
At the same time, I purchased 99% isopropyl alcohol. It's much cheaper from RiteAid, Walgreens, etc., than from Amazon, but expect to spend ~$9.
I also made sure I had cotton swabs available.
When my kit arrived, I just started dismantling the puppy and taking things apart, inspecting them one-by-one. I did use the iFixit repair guide (I think for the battery, since it goes the deepest). Keep the screws in groups and follow that guide.
Whenever you find moisture, soak it up with an anti-static cloth or a cotton swab.
Once you get to the actual boards, though, is where you'll start to see corrosion. Yes, already, you'll see corrosion. Bust open that 99% isopropyl alcohol, dip a cotton swab in there, and get rid of it. Soak up any excess alcohol.
I had water penetration halfway from one side of the screen to the other. All of my ports work perfectly fine, battery didn't suffer any damage, all keys are good, etc. The only lasting damage was to my right speaker, which plays at roughly 15% of the original volume, if I were to take a wild guess. I think those are only $30, so if I ever find myself without headphones, maybe I'll get the replacement.
Good luck!
Heres your $80 tool kit.
If you don't have any plastic opening tools then you might want to order some of these with the battery.
https://www.amazon.com/Universal-Spudger-Opening-Tablets-Macbook/dp/B01DGNCNR0
https://www.amazon.com/dp/B01GF0KV6G/ref=cm_sw_r_cp_apa_0pj-Bb1SDT9FT
Here's a good tool kit. Personally for zip ties I have a hoard of velcro ties I have kept that have come from PC parts. Any small zip ties are fine though, it's not like you'll need strong ones since they shouldn't be on anything moving or exposed to elements.
If you do electronics stuff fairly regularly, I'd recommend one of the ifixit kits. They're kinda pricy but really high quality bits.
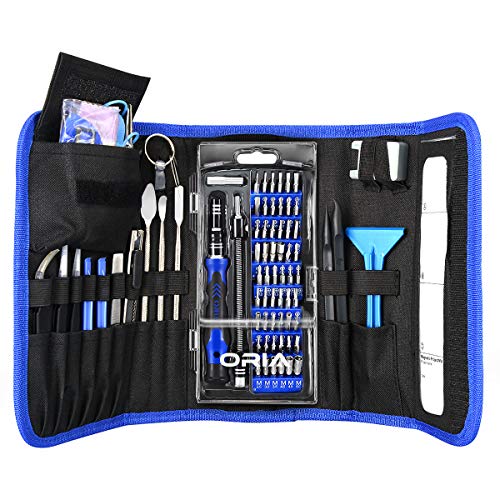
You can get cheaper ones that are still pretty good like this screwdriver kit for $15, https://www.amazon.com/ORIA-Screwdriver-Professional-Precision-Smartphone/dp/B01E16J6RQ/ref=sr_1_4?ie=UTF8&qid=1525454044&sr=8-4&keywords=Screwdriver+kit
Or if you want one with every little tool you could ever possibly need this is a good deal for $35. https://www.amazon.com/ORIA-Precision-Screwdriver-Magnetic-Electronics/dp/B06Y2N568J/ref=sr_1_2_sspa?ie=UTF8&qid=1525454044&sr=8-2-spons&keywords=Screwdriver+kit&psc=1&smid=A2FOADTO08BQD0
Just don't get one of the sub $10 kits that come with all sorts of extra junk, those bits and tools are really low quality in my experience.
I bought a set of these, can't really fault it for the money, and most importantly it has the T2 bit you need:
https://www.amazon.co.uk/gp/product/B00DXZ5PE0/ref=oh_aui_detailpage_o01_s00?ie=UTF8&psc=1
+1 on cleaning the earpiece, I did it to mine and it made a huge difference.
A quick tip: when you remove the earpiece, it may look like there is no dirt in there, but there is another piece of cloth/gauze you need to peel back to get to it. Good luck!
I used this set
https://www.amazon.co.uk/gp/product/B00DXZ5PE0/ref=oh_aui_detailpage_o08_s00?ie=UTF8&psc=1
Worked perfectly.
Tools went up a dollar or 2 I think :
https://www.amazon.com/gp/aw/d/B015CMAJVK/
https://www.ifixit.com/Guide/Samsung+Galaxy+Note+4+Motherboard+Replacement/38884
https://www.ifixit.com/Teardown/Samsung+Galaxy+Note+4+Teardown/34359
The last link also has a good YouTube video embedded that helped a lot.
No it does not. Go with this one if you need the portable bag.
https://www.amazon.com/gp/product/B073ZWY386/ref=oh_aui_detailpage_o07_s00?ie=UTF8&th=1
Repairing the old kindle is an option, if you are so inclined. A replacement screen, a simple tool kit, and about 30 min of your time is all it takes.
It honestly wasn't bad at all. Took me about 10 minutes and would be much quicker now that I know what to do.
You have to remove 5 screws from the exterier and once you're inside another 3 screws I think.
You'll needa Torx 10 and Torx 20 screwdriver. Something like this would work and give you both and you'll need something to pry off the rubber feet with. I bought one of these but you can probably find something around the house to use.
Here's a good set of instructions for taking apart the Xbox:
https://www.ifixit.com/Teardown/Xbox+Teardown/1308
And this video shows someone taking one apart and removing the capacitor: https://youtu.be/9cdR8Ryn4wE
I used this one and it works great.
10ml LOCA UV GLUE - Xfactor PREMIUM GRADE LOCA (Liquid Optical Clear Adhesive) - LOW Viscosity !! https://www.amazon.com/dp/B00IOPYLJE/ref=cm_sw_r_cp_apap_CWgNDTjfZkwgi
IFixit Kit
Fivestar Graph Ruled composition book
M50xBTs
Eyeglass cleaner
Hydroflask (pictured version no longer sold)
Ticwatch E
Note 9 Midnight black(taking picture)
Pentel BL407
Uni Kuru Toga 0.7mm (best $8 I've ever spent)
Cheap staples ruler
Batman Mighty wallet
I bought one of these and it's come in quite handy for pc building/mouse tear downs etc.
https://www.amazon.com/iFixit-Pro-Tech-Toolkit-Electronics/dp/B01GF0KV6G
iFixit kit.
The cooling solution is more than adequate... when it works. The problem is the quality control stinks. So, if you have a problem, deal with it. If you don't, be happy that you don't.
Now, if you do have heat issues, and need to resolve it, Alienware provides you with all the documentation you need to do the job correctly. Go to the dell support site, look up your machine, and download the full users manual. It will tell you how to take that machine apart step by step. Read the manual, go to Amazon to get a couple plastic tools to help open the machine up. A kit like this is amazing for opening up electronics. That allows you to get between the plastic pieces without damaging them. Also get some new thermal paste, appropriate pads, and decent alcohol. I use this stuff here because it is a cheap, big ass bottle of 99.9% pure alcohol.
The first thing would order is an iFixit toolkit.
I'm not able to answer all of you're questions, but I'll kick off your post by answering the ones that I can:
>
> 1) ... Am I over and/or under purchasing at any spots? Especially when it comes to CPU Cooling and Power Supplies, I really have no idea what I am looking at when choosing between them.
Other people here will be able to better answer this question -- but generally for high end gaming I see people shooting for the 700-850W mark on power supplies. I personally run an 850. A lot of people say that's overkill, but if you're purchasing a decent psu brand, at least bronze certified, the worst that happens is you're spending $20 for the security that you're not under buying. It won't over-power your computer if that's your concern.
As for the cooler -- it really depends on how much you'd like to overclock. If you're not pushing the line, this cooler is probably a little bit overkill, but if you have the money and the space in your case, cooler's always better.
> 2) ... Is this an easy problem to solve?
No idea, sorry =/
> 3) I want to take advantage of the G-Sync feature
Yep you're good to go.
> 4) I considered adding another 16 GB of RAM
Probably overkill for gaming and easily upgradable if you change your mind. The one thing I will point out here is that this Noctua cooler may prevent you from fitting 4 sticks of RAM on your motherboard. Just something to keep in mind.
> 5) Is there any reason not to go ahead and build this now?
You may want to take a look at the Black Friday deals coming up, but likely it won't save you a ton of money on primary components like these. We will see some next gen CPUs early-ish 2018 as well as Nvidia's next cards, but it's not like you'd be postponing only a month -- there's no known date, so it depends on how much you want a PC, and how "current" you need your parts to be. My thought is, just go for it.
> 6) Any other comments or concerns that stem from the selected parts?
I'm an Intel guy, especially when it comes to gaming, so I tend to recommend the 8700k -- but a ton of people love Ryzen too. Just do you.
> 1) What do I need to make sure that I am ready to put this together?
I've got one of these at home, and I love it. Other than that all hardware should come with mounting brackets and stuff that you need. Looks like your case comes with 3 stock fans -- I can't speak to quality or that specific case's airflow, but it's definitely plenty to get you up and running. Once you're overclocking and/or monitoring temps, you can decide if you need more/better fans for your case. Some people like to purchase thermal paste separately for higher quality stuff, but your parts should come with enough.
> 2) Water cooling seems awesome but is also terrifying. Can I get by without it?
Same. I use an air cooler, smaller than the one you're buying, and I'm overclocking -- granted it's a modest overclock, but I haven't even bothered pushing temps. Air cooling is fine unless you need the looks, or need to go the extra mile, overclocking.
> 3) What are you guys playing that will look fucking sweet on this new setup?
The truth is the games I play are mostly not meant to be pretty or even really played on Ultra (PUBG and Overwatch mainly) but I love the look and feel of Destiny, Wolfenstein, Fallout 4, Witcher 3, and Titanfall 2.
> 4) I also need a new chair
This is what I use. Though my wife gave me the "no racecar chair" mandate.
> 5) ... static can be an issue when putting this all together.
I have wooden floors, so I've never had an issue -- but I know several people that have built on carpet without problem. Not really a question I can speak to though.
I'd recommend something like this for the ISOs: https://www.amazon.com/Iodd-Iodd2531-Black-Virtual-Enclosures/dp/B00TDJ4BJU/
This for a tool kit: https://www.amazon.com/iFixit-Pro-Tech-Toolkit-2016/dp/B01GF0KV6G/ref=sr_1_3?s=power-hand-tools&ie=UTF8&qid=1511801169&sr=1-3&keywords=ifixit
As far as ISOs for the iodd, I'd suggest in addition to what you have already:
http://windowsmatters.com/2017/10/02/gandalfs-win10pe-x64-redstone-2-build-15063-version-10-01-2017/
If you work on Macs, a bootable USB of El Capitan and Sierra/High Sierra. You can create a virtual USB on the iodd for this.
If you're going to be prying open plastic electronics parts, please consider getting some plastic prying tools. Or at least improvising with something similar.
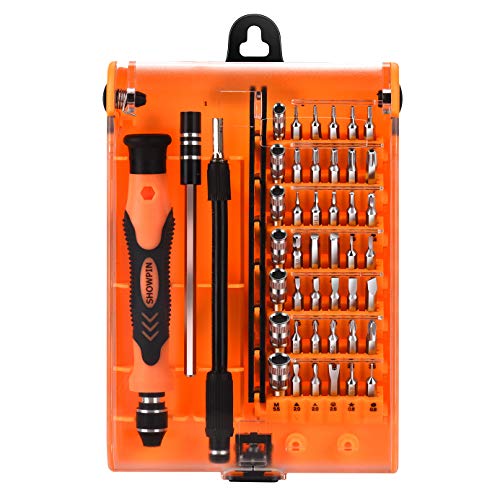
Just get a scredriver set like this https://www.amazon.com/Showpin-Precision-Screwdriver-Professional-Magnetic/dp/B00RCXE5EU/ref=sr_1_1_sspa?ie=UTF8&qid=1524551656&sr=8-1-spons&keywords=hex+screwdriver+set&psc=1
Thats what i use :-)
I have had good luck using Tech Armor Ballistic Glass
Take off the included edge adhesive/clean with alcohol
And used this LOCA glue
There are many LOCA glue youtubes that show easy ways to apply.
In my opinion it's as good as a White Dome for much less cost. I have no sensitivity issues or complaints.
I bought that kit for mobile repairing, and I'm very happy with it. If you don't mind to spend extra bucks, it's a piece of choice
https://www.amazon.com/iFixit-Pro-Tech-Toolkit-Electronics/dp/B01GF0KV6G
Ugh... Fix those links please:
https://www.amazon.com/dp/B01MRNIFR6/
https://www.amazon.com/dp/B01GF0KV6G/
Or use []() - [ name ] ( link )
>It's a bitch to remove though.
I found one of the tools in this kit to be super helpful when it came to removing the rubber plug for the fire selector detent/spring.
Blow out the fan with some canned air (you have access to the vents on the left side of the case) and see if that makes an improvement. If you're absolutely dead set on having the thermal paste replaced, take a stab at it. As long as you pay attention to which screws went where, you'll be fine. Take pics as you disassemble it so you have a record of what goes where.
You may need a spudger or guitar pick tool to help ease the case open. I have this set of tools (non-referral link), they're thoroughly useful for taking things apart.
You'll need to clean off the old thermal paste - 90% rubbing alcohol and a q-tip will do this nicely assuming it's actually thermal paste on there and not that grey rubbery crap, in which case you'll need a razor blade and patience.
Thermal paste is cheap to acquire, either the Cooler Master or Arctic Silver should do fine.
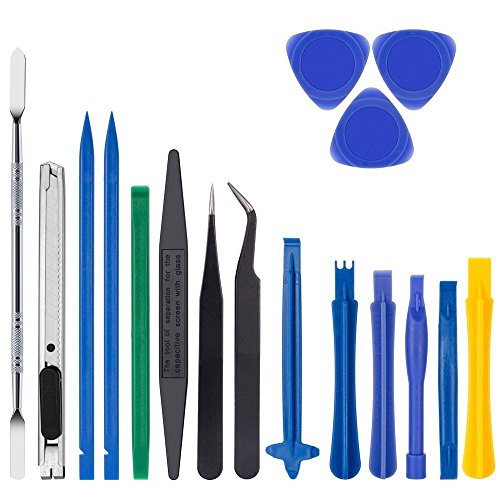
If you plan to disassemble it completely (to upgrade the cpu for example), I would recommend one of these kit : https://www.amazon.com/Zacro-Professional-Non-Abrasive-Spudgers-Anti-Static/dp/B01F52ZPBQ/ref=sr_1_1?ie=UTF8&qid=1487607985&sr=8-1&keywords=laptop+opening+kit
Try filling in the scratch with optical adhesive.
www.amazon.com/10ml-LOCA-UV-GLUE-Viscosity/dp/B00IOPYLJE/
Getting back to you. Next time I do this, I'll probably buy some Loca Glue and tape down the sides with rubber tape, to prevent anything to entering any gaps in the phone sides (see this thread). If you're going with oil, taping down the sides might help too.
I totally get you. I got it for a little over 4.5 years and I loved the phone. In the end I let it go because of a different issue but I had already saved up.
I would try to change the battery, if anything get 2 batteries and just repeat the process after a year. The battery itself isn't too expensive. This is the one I got: https://www.amazon.com/dp/B01MY45AU4/ and the tools: https://www.amazon.com/gp/product/B014LZEAY6/
Xfactor Hydro XFUV10BLK 10ml LOCA... https://www.amazon.com/dp/B00IOPYLJE?ref=ppx_pop_mob_ap_share. I've used this several times with great success.
This tool kit has been amazing for me in 3D printing. I use the tweezers and especially the metal separator spatulas: those are perfect for getting out tricky supports. As a bonus the driver kit has every bizarre size bit you'll even need for repairing your printer (time and again.)
​
I also like to use soldering picks.
Here is the essentials kit which should have everything you need.
https://www.google.com/aclk?sa=L&ai=DChcSEwj6rvmn-6_kAhWJ_-MHHem9BNkYABALGgJ5bQ&ae=1&sig=AOD64_1CcWksMGxgmWAQR4EHFajByu-kXQ&ctype=5&q=&ved=2ahUKEwiW0e6n-6_kAhUKS6wKHTHGBWwQ-pECegUIDBCBAQ&adurl=https://www.amazon.com/iFixit-Essential-Electronics-Toolkit-Do-everything/dp/B01MRNIFR6/ref%3Dasc_df_B01MRNIFR6/%3Ftag%3Dhyprod-20%26linkCode%3Ddf0%26hvadid%3D309763890402%26hvpos%3D1o5%26hvnetw%3Dg%26hvrand%3D6819601340394979510%26hvpone%3D%26hvptwo%3D%26hvqmt%3D%26hvdev%3Dm%26hvdvcmdl%3D%26hvlocint%3D%26hvlocphy%3D9028269%26hvtargid%3Dpla-351776178180%26psc%3D1
But if you like fixing all kinds of small electronics, this kit has done me well over the years:
https://www.google.com/aclk?sa=L&ai=DChcSEwj6rvmn-6_kAhWJ_-MHHem9BNkYABAHGgJ5bQ&ae=1&sig=AOD64_1ncx1rwLmYIs6QzQtfcp66vJPCgg&ctype=5&q=&ved=2ahUKEwiW0e6n-6_kAhUKS6wKHTHGBWwQ-pECegQIDBBn&adurl=https://www.amazon.com/iFixit-Pro-Tech-Toolkit-Electronics/dp/B01GF0KV6G/ref%3Dasc_df_B01GF0KV6G/%3Ftag%3Dhyprod-20%26linkCode%3Ddf0%26hvadid%3D309735728871%26hvpos%3D1o1%26hvnetw%3Dg%26hvrand%3D6819601340394979510%26hvpone%3D%26hvptwo%3D%26hvqmt%3D%26hvdev%3Dm%26hvdvcmdl%3D%26hvlocint%3D%26hvlocphy%3D9028269%26hvtargid%3Dpla-354681947454%26psc%3D1
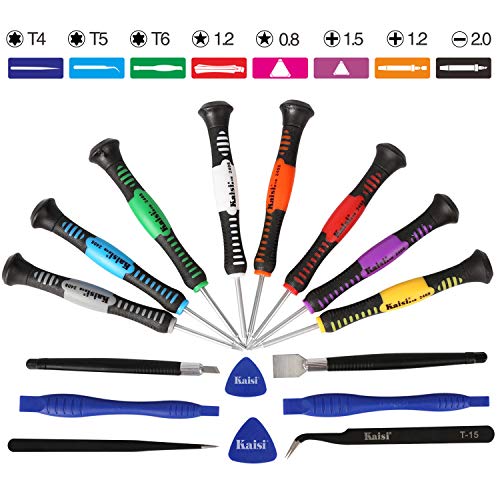
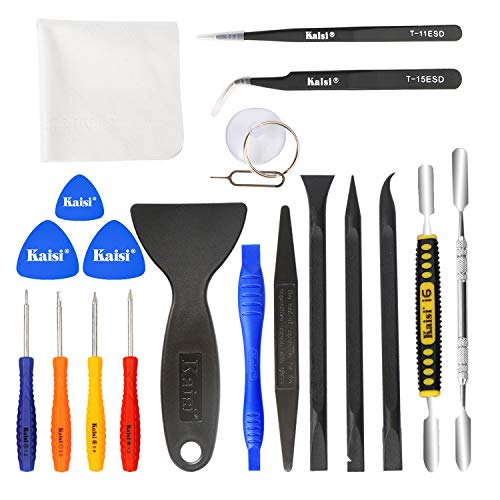
https://www.amazon.com/Kaisi-Precision-Screwdriver-16-Piece/dp/B00E3CHLLC/ref=sr_1_15?ie=UTF8&qid=1505171804&sr=8-15&keywords=precision+tool+kit
Sure bud, here is the cooler and here is the fan I put on the rad, completely optional but I'm certain makes a big difference in noise, as Noctuas are top end.
Also, here is the video tutorial for installation, an easy installation that takes a little over an hour if you have the right tools, but is pretty simple. Here is the tool set I used, and it gave me any size or fit that I needed to do this easily, plus is great if you ever do any computer customizing in general and need a nice set.
If you have any more questions feel free to ask.
I assume you are talking about this set?!
A few points:
Hm, both methods have advantages and disadvantages. I've tried both, and here are my thoughts on each:
Property| Whitestone | DIY
---|---|----
Cost | Expensive ($50)| Can be cheap ($15-20) if you already have a UV light
Installation Difficulty| Not too hard if you watch instruction videos| Can be more difficult due to lack of nice installation kit.
Quality| Protector has no dot matrix, good oleophobic coating, and no black borders| Hard to find protector with all of Whitestone's properties. Most protectors for the S8 still have minor dot matrix, but comes with oleophobic coating and no black borders.
Research Time | None besides watching instruction videos| Recommended to read through thread to find best protector and glue to buy. This can take a significant amount of time, because many of the links go to sold out/discontinued items. Xfactor is one recommended LOCA glue that's regularly in stock.
This toolkit would have everything you would ever need...including triwing and Gamebit screw driver bits.
Thisa popular soldering iron. I use it myself and it hasn’t let me down. Just get some wire, flux, and solder and you’re set.
Edit: fixed the link lol
Get a nice precision screwdriver set.
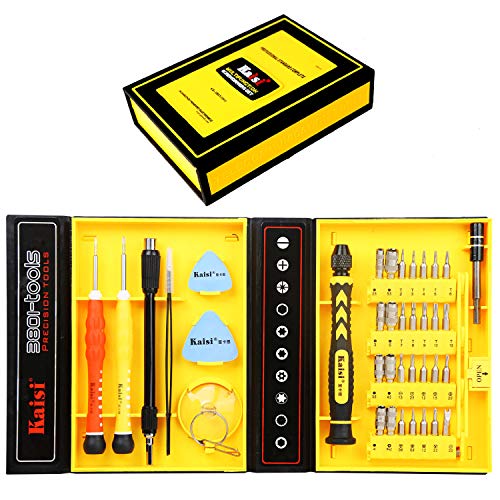
http://www.amazon.com/Kaisi%C2%AE-38in1-Multipurpose-Screwdriver-Repair/dp/B00KBR713G/ref=sr_1_4?ie=UTF8&qid=1426137816&sr=8-4&keywords=screwdriver+set+repair
Pretty much everything in this rig. But if you wish, get one of higher quality than this if you want.
After my own extensive R&D, I've come up with this. Give me a dollar.
Edit: Or try this. It's less than $7 and even comes with a Torx screwdriver if you need to take your Pax apart.
iFixit Screwdriver set and if you have more money and my personal recommendation (buy it for life) the iFixit Pro Tech Toolkit
https://www.amazon.com/gp/product/B01A0EXE44/ref=oh_aui_detailpage_o05_s00?ie=UTF8&psc=1
This will help with opening it up.
https://www.amazon.com/Kaisi-Precision-Screwdriver-16-Piece/dp/B00E3CHLLC/ref=pd_bxgy_147_2?_encoding=UTF8&pd_rd_i=B00E3CHLLC&pd_rd_r=5HGZ0SEW8RGY75FNQXVF&pd_rd_w=hSlxs&pd_rd_wg=aj4MU&psc=1&refRID=5HGZ0SEW8RGY75FNQXVF
I bought one of the these.
Has most of what I need. I don't do much custom cabling so I don't really need a crimper. Other than that maybe get yourself a voltmeter and you should be good to go.
Don't use a screwdriver, use a plastic "spudger". It will reduce the possibility of damage to the cartridge. These are the ones I use:
https://www.amazon.com/gp/aw/d/B01DGNCNR0/ref=mp_s_a_1_5?ie=UTF8&qid=1518523343&sr=8-5&pi=AC_SX236_SY340_FMwebp_QL65&keywords=spudger&dpPl=1&dpID=410usWkw0pL&ref=plSrch
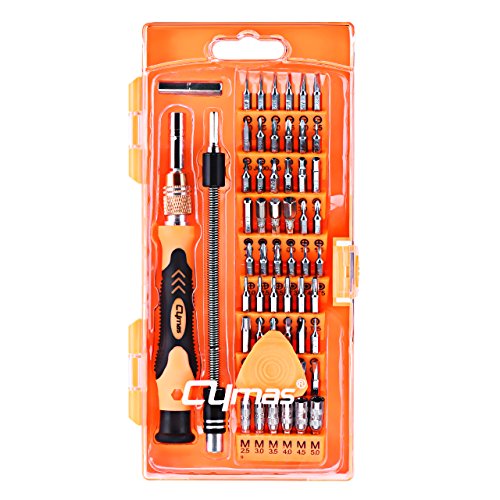
It was just like this sale back then https://www.amazon.com/gp/product/B01IBHE0MC/ref=oh_aui_detailpage_o00_s00?ie=UTF8&psc=1 (price at 10).
Regardless, this is still a good deal for all those tool bits that would last for a while all for 10.
I got mine from here http://www.fixez.com/store/lg/lg-nexus-4/lg-nexus-4-e960-battery-replacement. They were a little bit pricier then some of the guys on ebay, but the battery that I got from them seems to be the same one that was originally in my phone. If you don't have the tools need to remove the torx screws and such I bought this pretty cheap set of them of Amazon that worked http://www.amazon.com/gp/product/B00E3CHLLC/ref=oh_aui_detailpage_o00_s00?ie=UTF8&psc=1.
I used this one: https://www.amazon.com/gp/aw/d/B00IOPYLJE/ref=oh_aui_i_d_old_o0_img?ie=UTF8&psc=1
https://www.amazon.com/gp/aw/d/B00IOPYLJE
Should be identical
this is the one https://www.amazon.co.uk/gp/product/B00DXZ5PE0/ref=ppx_yo_dt_b_search_asin_title?ie=UTF8&psc=1
Not ideal if you need it sharpish, but I just bought this big set of screwdrivers for electronics off Amazon for fixing my phone, they do the job and not really bank breaking at 11 quid. Good to have them around if you need to call on them in the future as well.
Here's a few links you may find helpfull:
You may also want to get a heatgun since it's useful for a few other things including releasing the glue.
The box switches weren't an easy lubing job like i'd hoped. Mainly since I didn't have any resources or video/guides on it when I did them. To open, you can use your fingernails but I bought [this] (https://www.amazon.com/gp/product/B006QH7JKA) tool kit and used the small pry tool. I honestly just went overboard with the lube and expected to go back and clean up since i didn't know what I was doing. Turns out it went well when I put lube literally everywhere except the box part around the stem. There is a bracket on the top housing of the switches that I did put too much lube and had to wipe it off of the box part of the stem after pressing it a few times.
The base of the switch was lubed everywhere especially around and inside the little pole that the spring goes around. Similar to how you would lube a cherry mx base.
I use tweezers for dipping the spring inside a bottle of lube and wipe off the extra lube. You waste a lot of lube this way though.
For the stem I lubed both wider sides of the walls entirely and all around the 2 sides with the little sliding brackets. As well as inside where the spring goes.
For the top housing I put a little bit on the 2 sides that the stem brackets go into. This was the part I added too much lube and had to go wipe off the sides of the box part of the stems after some presses. So it might not even be a good idea in the first place but it's too late for me xD
I have heard multiple times that it isn't necessary to lube box switches since they already come "lubed". From what I saw, it was just a toothpick tip sized smudge of lube on the one little nub part. Lubing the rest of the switch did make a noticeable difference. Was it worth it? Sure, but i'll never want to do it again on this kind of switch.
I really don't know the wording for a lot of the parts. I'm sorry if that made it more difficult to understand.
I might do a small picture guide of how I did them and try to get some feedback from others who have lubed box linear.
According to camelcamelcamel it hasn't gotten lower by much. 3rd party, yes, but not through Amazon. I mean, you save a couple of bucks and if you were in the market for a new screw then it's not bad.
Edit: https://camelcamelcamel.com/Cymas-Screwdriver-Magnetic-Driver-Electronic/product/B01IBHE0MC
You're gonna need some spludgers or any non-metal objects with a thin, flat end to pry the pieces apart on the chest and the feet. The wrist guard should be ok without it.
I’d also recommend these tools and magnetic mat if you’re going to do this more than just a few times.
iFixit Pro Tech Toolkit - Electronics, Smartphone, Computer & Tablet Repair Kit https://www.amazon.com/dp/B01GF0KV6G/ref=cm_sw_r_cp_api_i_r7FpDbW1SEVXQ
iFixit Pro Magnetic Project Mat https://www.amazon.com/dp/B00876JHBM/ref=cm_sw_r_cp_api_i_i8FpDb5M178ST
https://www.amazon.com/Kaisi-Precision-Screwdriver-16-Piece/dp/B00E3CHLLC
I bought something like this to take the phone apart. It is a very easy process to get to the camera module. I'm not sure how you would go about cleaning it. I'd assume you just have some dust on the inside part of the phone (not inside the module?). Google an ifixit article and give it a shot! The Nexus 5 was the first phone I ever took apart and it was very simple.
(I had to remove my camera modules - front and back - due to security at my job). Good luck!
Do you think something like this would work?
https://www.amazon.co.uk/Deyard-Precision-Screwdriver-Smartphone-MacBook/dp/B00DXZ5PE0/ref=sr_1_4_sspa?crid=3FVNIYRZK7YMF&keywords=precision+screwdriver+set&qid=1565012706&s=gateway&sprefix=precision+%2Caps%2C150&sr=8-4-spons&psc=1
Not much is needed in the way of tools. Just something for prying. A nylon spudger like this is probably ideal: https://www.amazon.com/Universal-Spudger-Opening-Tablets-MacBook/dp/B01DGNCNR0/ref=mp_s_a_1_3?keywords=Spudger&qid=1566001149&s=gateway&sr=8-3
But you could definitely get away with a small flathead screwdriver too, just be careful not to crack the cap. Putting it back on is trickier than getting it off, but I don't know of any way to do it other than by hand. A hands-free magnifying glass can help.
It's not critical but paper coffee filters are great for wiping up the alcohol and cleaning electronics, since they don't leave behind any residue.
I guess it's moot if you already bought that set, but I like this spudger kit since it has variety of devices instead of a bunch of the same ones.
For the one you got, you'll probably want to use the flat end. Push it into the gap just a little and then twist it to pry the case apart. The exact technique will depend on exactly which ThinkPad you are opening.
Ive been drooling over one of these Ifixit toolkits for awhile now. This one is just an example, there are more basic ones for cheaper and fancier ones for as well. Buying tools for people can be tricky though.
How's this?
https://www.amazon.com/Kaisi-Precision-Screwdriver-16-Piece/dp/B00E3CHLLC/ref=pd_bxgy_469_3?ie=UTF8&psc=1&refRID=DHE8F8X8BZR4P9JF20P9
I will check tomorrow when im back in the shop where I ordered it from.
EDIT: PM'd link but incase anyone else is interested it's from Amazon
One extra screwdriver that sells for $4 shipped in 2 days with Prime stopped you from opening your computer after you managed to get yourself a set of jewelers screwdrivers and mini torx drivers that are necessary for preparing almost every laptop or mobile phone?
I suppose I question your actual commitment to self repair if that’s the case...
You can buy one of the following toolkits. They are amazing for its price and you may reuse them at some point. I use them all the time. Don’t ware money on cheap shit. You will damage your expensive peace of tech.
iFixit Essential Electronics Toolkit DIY Werkzeugset bit set für iPhone Elekronik PC laptop Reparatur https://www.amazon.de/dp/B01MRNIFR6/ref=cm_sw_r_cp_api_i_zddjDb18ZHN7T
iFixit 64 Bit Driver Kit Set mit 64 lange bits aluminium bithalter präzisionswerkzeug steckschlüssel schraubendreher torx security imbus kreuz schlitz diy präzisionswerkzeug https://www.amazon.de/dp/B0189YWOIO/ref=cm_sw_r_cp_api_i_MedjDbAG0BBPX
iFixit Pro Tech Toolkit inklusive 64 Bit Driver Kit DIY werkzeug set zum reparieren reparatur reinigung schrauben öffnen von handy reparatur smartphones laptops und elektronik https://www.amazon.de/dp/B01GF0KV6G/ref=cm_sw_r_cp_api_i_afdjDbNPDVSWX
These are German links. But google the toolkit name that you want and buy on your amazon page. Every of these three kits contains the screwdrivers that you need. I recommend you go for the last one since it includes good extra tools you may need.
Very easy for me anyways. On Ebay or Amazon, you should buy a spare back glass, you can get them complete with the camera and flash glass pieces already installed. Some sellers will send a repair kit with it as well. I didn't have a heat gun so what I did is just hold the phone 8 inches or so over an open flame on your stovetop to loosen the sticker tape on the back cover on your phone, then use the suction cup to slowly pull it up while using a guitar pick to help get underneath. Plenty of YouTube videos. If your battery was going bad you may want to replace that at the same time. Save your money and do it yourself as these phones are worth less than $200 now. Links below....
Cover....
https://www.amazon.com/dp/B077XKZZ21/ref=cm_sw_r_other_apa_qPEPAbDBPYMG6
Repair tools....
https://www.amazon.com/dp/B006QH7JKA/ref=cm_sw_r_other_apa_ZREPAbR5YDSCM
Video tutorial....
https://youtu.be/h5WClIKKffw
Regular or XL? They're pretty easy to change. The XL ones are $7 each on ifixit and you might have the right screwdrivers for the job. If you don't, they cost very little, a $10 screwdriver Screwdrivkit would do great. It might just have been a connection that came unseated.
But if it's your motherboard that's bad, I'd just get a new 3DS. That thing is terrible to change, imo.
Just any random phillips head screw driver you can find will do the trick.
But if you want a nice kit that'll come in handy for all sorts of elecrtonics stuff, I'd suggest the iFixit kits
Are you talking about this? https://www.amazon.com/Complete-Cleaner-Reusable-Keyboard-Electronic/dp/B01GTOOQI2
I also have 6 cats but I use a nylon paint brush to clean out the keyboard and it works like a charm.
For something less aggressive than those metal tools, I use this.
I believe it's the IFixIt Pro Tool kit, on amazon for 80 bucks https://www.amazon.com/iFixit-IF145-307-1-Pro-Tech-Toolkit/dp/B01GF0KV6G/ref=sr_1_2?ie=UTF8&qid=1486544422&sr=8-2&keywords=ifixit+kit
10ml LOCA UV GLUE - Xfactor PREMIUM GRADE LOCA (Liquid Optical Clear Adhesive) - LOW Viscosity !! https://www.amazon.com/dp/B00IOPYLJE/ref=cm_sw_r_cp_apa_EF1UBbHTWWPN9
Would this one suffice?
OP, buy this toolkit. It's a newer version of what I have.
I use this driver set for fucking everything, from airsoft to computers. It is one of the handiest things I own, and the quality of it is pretty good. The one I have is a couple years old now, but I haven't had a single issue with it
A quality 3rd party iPhone 6S battery + tools needed to open it is about 20 bucks on Amazon and it's really easy to replace.
follow the iFixit guide and maybe buy the dual suction cup tool because it has a hard limit on how far apart the cups can split so you don't tear the LCD ribbon cable.
https://www.amazon.com/Kaisi-Opening-Electronics-Compatible-Cellphone/dp/B014LZEAY6/ref=sr_1_5?s=electronics&ie=UTF8&qid=1543386545&sr=1-5&keywords=suction+cup+tool+phone
I like to use the phone enough to warm up the entire battery so that the adhesive strips are easier to remove.
enjoy refreshed battery life! The extra costs possibly spent on the suction cup tool is worth the peace of mind knowing that you'll keep your JB.
For triwing, you could just get a set like this: https://www.amazon.com/dp/B073ZWY386/ref=cm_sw_r_cp_awdb_t1_28c5Bb6EQ6SZ5
I own this kit, and it comes in handy a ton.
iFixit Pro Tech Toolkit - Electronics, Smartphone, Computer & Tablet Repair Kit https://www.amazon.com/dp/B01GF0KV6G/ref=cm_sw_r_cp_apa_s1T5Bb2M0NWKG
> You'll probably find iFixit or similar site useful here for repairing that.
I found the iFixit Toolkit to be one of the best to not only work with the Vive (when I did the lens upgrade) but for other small electronics in general. Good recommendation.
Some suggestions:
The nicer driver set from ifixit.
They are much more reliable and so much better in quality.
Currently on sale: https://www.amazon.com/iFixit-Pro-Tech-Toolkit-Electronics/dp/B01GF0KV6G
https://www.amazon.com/Universal-Spudger-Opening-Tablets-Macbook/dp/B01DGNCNR0/ this is pretty much what I use.
What I purchased were these:
Darice Embossing Multi-Purpose Heat Tool, 320 Watt https://www.amazon.com/dp/B0013LAYUQ/ref=cm_sw_r_cp_apa_eT84yb8VWZ025
Kaisi Ultrathin Steel Professional Opening Pry Tool Repair Kit with Non-Abrasive Nylon Spudgers and Anti-Static Tweezers, 20 Piece Repair Tool Set https://www.amazon.com/dp/B015CMAJVK/ref=cm_sw_r_cp_apa_5T84ybRMJ5QX9
I will say that you really only need a thin pry tool, like razor blade thin, and this set wasn't the greatest for that, but it did work for me. I guess this isn't a heat gun either so sorry if I mislead you on that, but it was what was used in the video I watched and it worked well for me.
This kit is the one I use, the metal tool all the way to they left has been perfect for prying prints off of any surface.
Ever since i switched to glass, all I have to do his hit the print with a hammer and it pops right off. By the way I'm using a watch makers hammer, not a 5lb maul. Also the 5x7 glass will cover your leveling screws, you can get a cheap set of glass cutters from lowes for $4. I used them to change the ends of the glass to leave the leaving screws exposed. Its not necessary but makes life easier. I've also found these clips to be a perfect fit for picture frame glass. Hope this helps you in some way.
Look for something like this, for electronic repair. Not a big magnetic tip screwdriver from home depot.
Can you remove the motherboard and turn it upside down to get the screw out?
So it sounds like you need to adhear the glass to the LCD, is that correct? If that is the case, you need something called OCA, optical clear adhesive. Whatever you do, don't go cheap in this stuff, I paid the price for doing that, the first three screens I did had to be redone because I used cheap glue.
I would tell you to go on amazon and buy some of the highly rated stuff, I do a lot of these so I bought this:
https://www.amazon.com/Xfactor-PROFESSIONAL-GRADE-Adhesive-Viscosity/dp/B01B2ZLAXM/ref=sr_1_12?ie=UTF8&qid=1494436041&sr=8-12&keywords=loca+glue
But this stuff is the same thing, just on sale, and in a smaller amount:
https://www.amazon.com/10ml-LOCA-UV-GLUE-Viscosity/dp/B00IOPYLJE/ref=sr_1_1?ie=UTF8&qid=1494436041&sr=8-1&keywords=loca+glue
Each tube of that is enough for about 3-5 phones, don't use it all at once, please...
This kit? it doesn't seem any of the extra tools beyond the screwdriver and bits would be useful for setting up a custom loop.
For loop installation, I'd recommend getting a tube cutter for soft tubing or PETG hard tubing. You'll need a saw if you you want acrylic hard tubing. A tube reamer for PETG hard tubing. I haven't done an acrylic loop, so I'm not sure if a reamer like that is good for acrylic as well. maybe need sandpaper instead. All that you can buy at Home Depot, or whatever hardware store. You'll want a tube insert and heatgun if you want to bend hard tubing, but other than that, just need a screwdriver.
Thanks for the advice.
Would you say the one I linked on Amazon would be fine?
Yeah I know. This one is just too much lol.
https://www.amazon.com/dp/B01GF0KV6G/ref=cm_sw_r_cp_api_OHyTAb0FSTT75
I believe the PS4 has torx security screws to prevent people like you from open it.
We will of course tell you how to open it so you'll do what Sony was concerned about.
What you need to get is a precision/security screwdriver set, which usually contains a driver and lots of bits like this:
https://www.amazon.ca/Screwdriver-Durable-Electronics-Electronic-Appliances/dp/B06XHWL4SK/ref=pd_lpo_vtph_469_bs_t_1?_encoding=UTF8&psc=1&refRID=Z5D0KXGATM7AYQV06220
A simple google search suggests you need to use a T8 security bit (a torx bit with a hole in the center).
https://www.amazon.com/Cymas-Screwdriver-Magnetic-Driver-Electronic/dp/B01IBHE0MC/ref=sr_1_15?ie=UTF8&qid=1482435539&sr=8-15&keywords=hex+screw+set
you could get this set and it'd would helpful for many things vaping and non vaping related in the future aside from just tightening your coils.
I would recommend this tool kit here, you can tech with air soft and it doubles as a cellphone repair tool kit, it has all the features OP's tool kit has and more: here It's only 16$
The large capacitors in a PSU can hold a charge for days, so after you open it, wear rubber gloves, and do not touch ANYTHING metal inside the PSU. Here is some safety equipment to consider:
https://www.amazon.com/Electrical-Insulated-Electrician-Protective-Insulating/dp/B07S878KNX/
https://www.amazon.com/Magid-Glove-Safety-M011B12-Electrical/dp/B078GLBCLD/
This kit has several plastic tools with it that would be safe, just don't use the metal or metal-tipped ones:
https://www.amazon.com/Zacro-Professional-Non-Abrasive-Spudgers-Anti-Static/dp/B01F52ZPBQ/
if you want to stick with wiha and get a bit of other bits
cheapest wiha set
[this is what I used a for along time, the other bits come in handy for random jobs but it's a cheap metal that will warp sometimes. I mainly use the micro bit holder for my wiha bits now]
(https://www.amazon.com/dp/B07GYM7W6L/ref=cm_sw_r_cp_apa_i_UcmTCbSMSF3KB)
the cheapest micro bit holder, they other bits probably suck but the holders are usually fine, I mean, how can you really screw that up
The wifi antenna wires are part of the LCD panel assembly.
You'd have to buy new antennae wires and then route them up through the hinge and back up in the panel display. So, you'd need some pry tools to separate the bezel of the panel display. Which could be dicey as there is a risk to cracking the display panel when removing the bezel.Buy a new antenna assembly
Edit: Shoulda check manual this model has a removable antennae assembly.
[Video Link] (https://www.youtube.com/watch?v=cjWuHRLxlt8)
[Screen replacement itself for G3123, my model] (https://www.ebay.com/itm/USA-LCD-Touch-Screen-Assembly-Replacement-For-Sony-Xperia-XA1-G3121-G3123-G3116/202468065673?hash=item2f24098189:rk:1:pf:0&var)
Now i DIDNT use a lot of heat to take off the glue, nor did i have to reglue it but it did leave a couple small dents on my back cover. So you decide how carefully you want to do it
[Repair kit i bought to use] (https://www.amazon.com/gp/product/B015CMAJVK/ref=oh_aui_detailpage_o00_s00?ie=UTF8&psc=1)
Not sure about cheap knockoff, but https://www.amazon.com/gp/product/B01IBHE0MC/ref=oh_aui_search_detailpage?ie=UTF8&psc=1 goes on sale for like 8 bucks from time to time, and I have it and it's fantastic. There's also another one that's identical from like Oria or premium or something, not sure on those but it looks like the same kit.
Anyway, great for the price.
The pry tools are kind of difficult to wedge in there, so you have to be careful to not damage the plastic ring that acts as a buffer between the display and the back case. It takes about 30-60 minutes start to finish depending on how comfortable you get with it.
Links:
Video Guide: https://www.ifixit.com/Guide/Oneplus+3+Rear+Facing+Camera+Replacement/72752
Ebay kit:
https://www.ebay.com/itm/For-OnePlus-3-OnePlus-3T-Rear-Back-Camera-Replacement-Part-16MP/173364683506?hash=item285d5722f2:g:U1gAAOSwFFZbIjnV
Extra pry tool kit:
https://www.amazon.com/gp/product/B01F52ZPBQ/ref=oh_aui_detailpage_o01_s00?ie=UTF8&psc=1
Replacing the screen assembly is fairly easy and not horribly expensive if you're any good with a spudger and a screwdriver.
I bought [this] (http://www.amazon.com/gp/product/B00HKL3DEM/ref=oh_aui_detailpage_o07_s00?ie=UTF8&psc=1) from Amazon and used [these] (http://www.amazon.com/gp/product/B00E3CHLLC/ref=oh_aui_detailpage_o07_s00?ie=UTF8&psc=1) tools to install it following [this] (https://www.ifixit.com/Teardown/Nexus+5+Teardown/19016) iFixit teardown. Took about 20 minutes.
Screwdriver Kit
Get this and use the Torque 5 screw to open the laptop and I can't remember the screw to get the SSD out but it's in the kit. This is super high quality (own one) and will ensure you have all screws needed for future projects as well.
Go for it!
I used:
Honestly the most important thing IMO is having a good solder sucker. The Engineer is pretty good. I've broken a few cheap ones and it's pretty annoying to be half-way through a project and have it break.
The Masterkeys Pro is a pretty straight forward keyboard. Fairly standard key sizes, easy to take a part (especially with a spudger). The solder they use is a pain to remove though. Just take your time and be careful not to damage the PCB like I did.
I mentioned it as a possible solution on the onset, and he offered it up as a solution as soon as he saw the issue. It's cheaper for Dell to ship a card vs getting a whole computer back and replacing it themselves.
And no, you need to buy the screwdriver (I bought this on Amazon).
RE: the iFixit bit kit, there are several. Which one? I'm assuming the Pro one? http://amzn.to/2fT5h8C or would a smaller kit suffice?
https://www.amazon.com/gp/product/B00RCXE5EU/ref=oh_aui_detailpage_o00_s00?ie=UTF8&th=1
Note: You'll probably want to go to a hardware store and get a 1.3 and 1.4mm allen/hex bit for the set. Some of my RDAs use 1.4mm screws, but the kit covers most everything else. And it's cheap.
same way as fc660c
I personally use those triangle pry tools (similar to one in this kit), which works pretty well for this
Here's the comment you may be looking for:
Ok I canceled my order on eBay and going to buy the xfactor one. How is this one? It says 2000mpa but also says low viscosity which is strange.
Everything.
#expectedthanos#avengers#endgame
The thermal paste+pads cost me roughly $18 total. I already had the security torx and spudgers, so they didn't cost me anything.
If you need to buy Torx wrenches, these are the ones I used. I quite like Bondhus because they're made in the USA and they offer a lifetime warranty. They cost more than Chinese made tools, but I've never had one break, and if they do, its not a huge deal to get them replaced.
These are the spudgers I use. Any spudger would probably work just as well. I would stay away from metal ones though. Plastic spudgers won't mar plastic, while metal ones will.
If you do assemble, I highly suggest getting a nylon spudger, and not fitting things too tightly. Since I've had aspudger, Ihaven't broken any pieces. I got mine here
https://www.amazon.com/gp/product/B00IOPYLJE/ref=oh_aui_search_detailpage?ie=UTF8&psc=1
Cough