(Part 2) Best electromechanical products according to redditors
We found 830 Reddit comments discussing the best electromechanical products. We ranked the 452 resulting products by number of redditors who mentioned them. Here are the products ranked 21-40. You can also go back to the previous section.


This can be accomplished with a voltage converter and a voltage regulator design for solar power for less than fifteen bucks
EDIT: People wanted details.
Batteries, panel, wiring, tools, housings, not included.
There's a bunch of better guides online, but the main components are a voltage converter, and a charge controller to get your pi powered by battery while charging the battery with what solar is available.
I think their product requires more investment than that little hat, personally. Do you think that little thing is going to step down 12v-5v with good heat management? I don't think it handles power conversion, and there might be something else in the line before it, like a regulator. Maybe you need their 12v battery.
But like any kickstarter, no guarantee on delivery of product, or features so be skeptical.
(looking for guide that I used...)
A few weeks ago I posted some pics of a "quick and dirty" induction heater I made:
https://www.reddit.com/r/vaporents/comments/8igobf/gear_shot_yet_another_quick_and_dirty_dynavap/
The heater I built in the previous post worked great, but I wasn't happy that it heated continuously when it was powered on. I decided to add an "on demand" mode, similar to the way the Portside functions: I wanted the induction heater to be energized only when the vapcap was in need of being heated.
I decided to use the same method and hardware that the Portside uses for its triggering mechanism: a small momentary switch at the base of the coil, utilizing the same 12 mm x 12 mm Arduino 'tactile' input switch as the Portside. This switch is normally open but closes (and activates the circuit) when the vapcap is inserted in the induction heater opening and lightly pressed down. I mounted this to a 25 mm square Zip tie "sticky base" using a small dab of hot glue, and ran the wires under the base through a drilled hole. I am happy with how it came out.
I took one other feature from the Portside design and decided to use a MOS FET triggering module to handle the actual power switching, sparing my momentary switch from having to pass enough current to power the heater.
This is the finished desktop unit - pictures, diagrams and some other notes:
https://imgur.com/a/pzRe3SV
PARTS LIST:
12mm x 12mm Arduino Switches:
https://www.amazon.com/gp/product/B01NCQVGLC/ref=oh_aui_detailpage_o03_s00?ie=UTF8&psc=1
My original 'big red switch' was a pull from an Epiphone Valve Junior guitar amplifier, left over from an earlier project. It looks nice, but it's nothing special - any latching (i.e., non-momentary) single pole/single throw (SPST) switch will do. This site has some switches that look pretty good and could work:
https://www.sparkfun.com/categories/145?page=1
Momentary trigger switch base:
https://www.amazon.com/Self-Adhesive-Mounting-Organizer-Management-Fastener/dp/B074279VJG/ref=sr_1_16?ie=UTF8&qid=1527451422&sr=8-16&keywords=zip+tie+sticky+mount
Like the Portside's trigger, I used a 12mm x 12mm Arduino tactile (momentary) switch. Mine is hot-glued to a Zip tie "sticky base", which has the foam removed and is screwed to my board. I kept the stock Arduino switch button and trimmed its edge to fit inside the tube. There is a small segment of 7/16" wooden dowel inside the tube to achieve the correct height.
Pyrex tube:
Iwodevape Replacement Glass Tank for Cloupor Cloutank M3 Vaporizer authentic
https://www.fasttech.com/p/5236304
MOS FET trigger module:
15A 400W MOS FET Trigger Switch Drive Module PWM Regulator Control Panel
https://www.ebay.com/itm/MOS-FET-Trigger-Switch-Drive-Module-PWM-Regulator-Control-Panel-15A-400W-NEW/331961560311?hash=item4d4a736cf7:g:7IsAAOSwEzxYeEwQ or similar. Just search for the above part description, you'll find the right one. It's a popular Arduino circuit.
If you plan on using a momentary switch, this is the way to go. Don't make the momentary switch directly supply the heater current.
Heater:
Yosoo 5V-12V ZVS Low Voltage Induction Heating Power Supply Module With Coil
https://www.amazon.com/gp/product/B01C71XKZ6/ref=oh_aui_detailpage_o07_s00?ie=UTF8&psc=1
Power jack:
If you can solder:
https://www.amazon.com/2-1x5-5mm-Female-Barrel-Socket-Connector/dp/B01M3WBIA3/ref=sr_1_21?s=musical-instruments&ie=UTF8&qid=1527463812&sr=1-21&keywords=5.5+x+2.1+female
If you can't:
https://www.amazon.com/Sumaote-2-1x5-5mm-Connector-Terminal-Adapter/dp/B0761NL8V6/ref=sr_1_18?s=musical-instruments&ie=UTF8&qid=1527463812&sr=1-18&keywords=5.5+x+2.1+female . Although, seriously, this probably isn't a good project for you if you can't solder.
I know many of you have these for yourselves and don't need any help or parts lists, but this may help those who need a little more guidance.
Updated to add: the above links are intended to show the correct parts, but may not be the cheapest or fewest quantities available.
Cheers!
Parts List
Old telephone ringer box
RaspberryPi
Nixie tube vfdclock from ebay
or from these guys
Powered USB hub
Amazon USB speakers
PIR sensor (to turn on nixie tubes at night)
IR receiver/sender
GPIO buttons (they are pretty cheap, next time I'd use these. Thanks /u/John_Barlycorn for the link/idea!
old sony ps2 remote - I chose this remote because they are cheap, built solid and are in brand new shape (no one used them as a remote) and have easy LIRC support
USB mic
Edit:
forgot the pics!
Edit2: Linked everything
$38.37 (considering you have a soldering iron) and don't mind doing some coding, I'd estimate it would take 20 minutes at most if your not putting much detail into it.
Library: https://www.arduino.cc/reference/en/language/functions/usb/keyboard/
Here's a Youtube video as well, https://www.youtube.com/watch?v=SHIcliL4O14
I built an Arduino controlled Modulus with a solenoid dart pusher.
It has three different firing modes: semi-auto, 3-shot burst, and full-auto. The blaster cycles between these with a touch sensor switch mounted on the outside of the magwell. The video above shows the blaster firing in all three modes. It also has a close up shot of the solenoid pusher in action.
The blaster uses an Arduino and 60 amp MOSFET’s to control the Solenoid and two Neo Rhino motors with CC Cyclone flywheels. The onboard Arduino micro detects when the microswitches behind primary trigger and rev trigger are activated. It will then open the solenoid and flywheel MOSFET’s depending on what was pressed and what the current fire mode is.
Interestingly enough the Solenoid is able to cycle about 12-14 times per second but the 18 round magazine I was using could not feed more that 9 darts per second so that is the limiting factor on the fire rate of the blaster. I plan to try again with a worker magazine to see if this will increase maximum fire rate.
I am also currently working to add a dart detecting sensor so the solenoid only fires when the next dart has fully emerged from the magazine. This should eliminate misfires and reduce the risk of jams.
Blaster internals: https://imgur.com/a/03Fxutz
Feedback and advice are greatly appreciated!
edit: Had a request for the code that runs the blaster so I'm linking it through my Github repository.
https://github.com/Sandst0rmX/Nerf/blob/master/NerfModulus/NerfModulus.ino
edit 2: Solenoid link
https://www.amazon.com/Abletop-Solenoid-Electromagnetic-Electric-Automobiles/dp/B07G15X91N/ref=sr_1_1_sspa?ie=UTF8&qid=1538929128&sr=8-1-spons&keywords=35mm+12v+solenoid&psc=1
Battery, Voltmeter, Wire, Pusher, Motors, MotorCover, Micro Switch, Charging Stuff, Charging Stuff, You're idea is pretty good, no comments on improvement.
Edit: Formatting
Credit goes to /u/david4500
Pictures:
http://imgur.com/a/eOKIN
Parts:
https://www.amazon.com/gp/product/B011AQCDLG
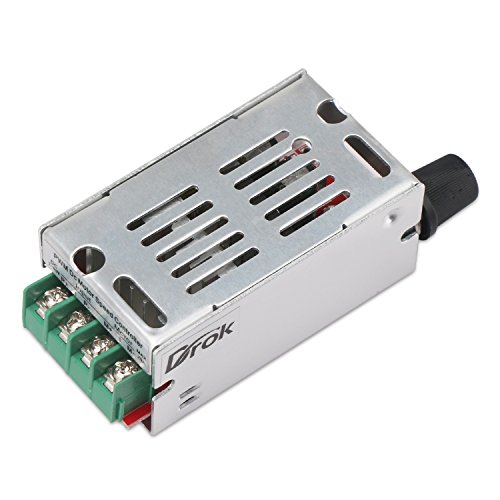
https://www.amazon.com/DROK-Controller-Regulator-Modulator-Indicator/dp/B00DVGGWC0
https://www.amazon.com/Minger-Supply-Adapter-Transformer-Flexible/dp/B01AJQ9G2C
I'm actually currently in the process of making power switches for all of my Pis right now! This is what I created. It just plugs into pins 5 and 6. I use RecalBox and have to edit a piece of coding in the config file. I saw online that you are able to do it via RetroPi as well. I went to my local electronic supply store to buy the buttons, wire, and wire connectors.
Here are the supplies I got:
Buttons
Jumper Connector Housing
Female Jumper Wire connectors
Rolls of wire (I got a roll of red and a roll of black)
The way it works, I have to hold the button down for about 3 seconds for the Pi to power off. To turn it back on, I just have to press the button once.
I added a relay to my doorbell to use as a simple contact. I'm connected to a mimolite, but should work similarly for an alarm contact.
Functional Devices Ribu1C - Rib Relay, Enclosed 10 Amp Spdt https://www.amazon.com/dp/B000LESCI2/ref=cm_sw_r_cp_api_aJ5Fxb515564X
It's just wired in parallel with the existing chime like a second chime. Much more affordable than the elk interface board.
My setup is a little more complex. I'm also using the mimolite to silence the upstairs chime while my wife is sleeping, but here's my setup for reference.
https://m.imgur.com/a/fzUE3
I’ve seen folks use these as well:
Cylewet 12Pcs 1A 250V AC 2 Pins SPST Momentary Mini Push Button Switch Normal Open (Pack of 12) CYT1078 https://www.amazon.com/dp/B0752RMB7Q/ref=cm_sw_r_cp_api_i_57G5CbPJ1XF53
Ahah! I knew there was some type of button/switch like that but I didn't know what it was called or where to look. It looks like I could get some limit switches like this: https://www.amazon.com/gp/aw/d/B06WRN7FQB/ref=mp_s_a_1_1?ie=UTF8&qid=1501434511&sr=8-1-spons&pi=AC_SX236_SY340_QL65&keywords=limit+switch&psc=1
Thanks for the idea. It will be much easier to add a switch than a photo resister the way I already have things wires.
You're looking for a normally open momentary push button switch.
If the circuit is fairly low power you can buy small ones like these in bulk from Amazon for like 6 cents apiece.
Forgive me if these are obvious suggestions but you can also check out digikey, mouser, banggood and sparkfun.
Search for pretty much any kind of switch on Amazon or google. Lots of them will say "DC 12V 20A Automotive/Marine Switch," etc. The ones that don't say AC or DC almost always list a voltage that's common for one or the other (12v, 24v, 125v, 250v). Typical marketing nonsense. Just like how 16 "gauge" wire isn't the same as 16AWG, etc.
https://www.amazon.com/Gardner-Bender-GSW-123-Electrical-OFF-Mom/dp/B0012ZE8IC/ref=sr_1_1_sspa?keywords=rocker+toggle+switch&qid=1571794115&sr=8-1-spons&psc=1&spLa=ZW5jcnlwdGVkUXVhbGlmaWVyPUE1MzJVN1hNVEI1NU0mZW5jcnlwdGVkSWQ9QTAzNzI2NjQyRzRNWUdVNEczU1BJJmVuY3J5cHRlZEFkSWQ9QTAyODI0NzExTDE4MVJBRk0yQVNMJndpZGdldE5hbWU9c3BfYXRmJmFjdGlvbj1jbGlja1JlZGlyZWN0JmRvTm90TG9nQ2xpY2s9dHJ1ZQ==
https://www.amazon.com/warranty-Latching-Stainless-Mounting-Self-locking/dp/B07932GYNH/ref=sr_1_2_sspa?keywords=dc+12v+switch&qid=1571794073&sr=8-2-spons&psc=1&spLa=ZW5jcnlwdGVkUXVhbGlmaWVyPUEzOFI0SDNVR1FKTUhLJmVuY3J5cHRlZElkPUEwMTc5MDk1M1NKOEhQUjJEMjhCOCZlbmNyeXB0ZWRBZElkPUEwNjQ4Mjc3TFRSNVRBOVpGTllMJndpZGdldE5hbWU9c3BfYXRmJmFjdGlvbj1jbGlja1JlZGlyZWN0JmRvTm90TG9nQ2xpY2s9dHJ1ZQ==
https://www.amazon.com/ZUPAYIPA-Solder-Rocker-Switch-Toggle/dp/B01N2U8PK0/ref=sr_1_6?crid=1SJOGUL3HGSAD&keywords=rocker+toggle+switch&qid=1571794160&s=industrial&sprefix=rocker+toggle+%2Cindustrial%2C197&sr=1-6
I built the same thing for my still. Except I used this instead of the voltage regulator, because you still want the constant voltage, but just less power:
https://www.amazon.com/gp/product/B00OZ5MBM6/ref=oh_aui_detailpage_o06_s00?ie=UTF8&psc=1
I also got a killawatt or whatever it's called so I can dial things in, wired the pulse width modulator in the middle of what is basically an extension cord. "works great!"
No problem. Most limit switches won't specify if they're normally open or closed, but if they have 3 contacts then 99% of the time you can configure them to be either. For example, these have both a normally open and a normally closed contact. However I wouldn't go for those ones specifically though because they're only 5A, I'd look for something closer to 10A.
What you are describing is using one heating system for stage 1 and second system as stage 2. You just need to connect an isolation relay for stage 2. Then configure it as 2 stage heating in ecobee and set the thresholds. An enclosed relay like this one is probably best. Functional Devices RIBU1C Enclosed Pilot Relay, 10 Amp Spdt with 10-30 Vac/Dc/120 Vac Coil https://www.amazon.com/dp/B000LESCI2/ref=cm_sw_r_cp_api_i_KRF2Db7WPP7H5
Not the person you replied to, but I will try to help.
Electrical switches are relatively simple devices but because there are so many styles of switches available, what you are asking for is really not that simple.
The first question is: What style of switch do you want? Toggle, momentary toggle, push button, momentary push button, rotary, magnetic, rocker? There are literally hundreds of thousands of different switches available.
The next question is how will you be making the connection? Solder, crimp, barrel connector, dupont, molex, scotchlok, screw terminal?
And finally, how and where will you mount the switch? Inline on the wiring harness? Do you need to drill a mounting hole? Are you looking for something that comes with mounting hardware? Is there clearance for your switch location?
I know this is all new to you and I am throwing out a bunch of terms you may have never even heard before. The simple solution for you, at least at first, might be to wire your LED strip right into the output screw terminals of your power supply. Then when the printer is on your light is on, and the light is off when the printer is off. Just be sure to mind the polarity (red to +, black to -) and wire into the 24v dc output side and not the 120v ac input side of the terminal block.
If it helps, here is a short list of switches I have purchased for different projects (all of these require soldering and some kind of mounting hole or hardware):
https://smile.amazon.com/gp/product/B00SUXW18S
https://smile.amazon.com/gp/product/B008DS1GY0
https://smile.amazon.com/ZUPAYIPA-Solder-Rocker-Switch-Toggle/dp/B01N2U8PK0
https://smile.amazon.com/Magic-shell-5-Pack-Rocker-Position/dp/B07D285PLL
https://smile.amazon.com/gp/product/B008ICKO30
I have build a C-Bot and am currently using a Fotek 40A SSR you can get off of amazon. This was the listing recommended by the creator of the C-bot in his rework design btw. I have it attached to the aluminum extrusions directly with some heatsink compound between them and it barely gets warm during operation.
You can hook it up as they recommend for the 24v configuration but that just provides the same amount of power at a different voltage so that doesn't help.
If you hook up 24v to the 12v terminals, you will quadruple the power and double the current.
Ohm's law, 12V=(1.2ohm)(10A) or 24v=(1.2ohm)(20A)
You would probably need a 600W 24v power supply and all of your wiring needs to be 10awg at least.
Hook it up like this diagram shows, except your bed power will connect to the 24v psu instead of the 12v.
https://thingiverse-production-new.s3.amazonaws.com/assets/25/7d/4a/1d/63/D-Bot_Electrical_Diagram.pdf
Here's the relay used, be sure to heatsink it
http://www.amazon.com/Single-Phase-SSR-40DD-DC3-32V-DC5-60V/dp/B012SW6TB6/ref=sr_1_6?s=hi&ie=UTF8&qid=1444750548&sr=1-6&keywords=solid+state+relay+dc+-ac
You can use Packard C140A 1 Pole 40 Amp Contactor 24 Volt Coil Contactor https://www.amazon.com/dp/B003U81D2I/ref=cm_sw_r_other_awd_Z2XFwb682SXHW
It will work just fine.
Edit: the brown wire goes on one side of the 24v coil, the yellows go on the other side of the 24v coil. The only difference is that instead of having both low voltage terminals on one side, they are on opposite sides.
Yes, this shield supports up to 4 DC motors. What type of DC motors do you have? Specs?
They should ship to Australia.
Amazon also sells a similar shield made by SainSmart (http://www.amazon.com/SainSmart-L293D-Shield-Arduino-Duemilanove/dp/B00813HBBO/ref=sr_1_2?ie=UTF8&qid=1369849137&sr=8-2&keywords=motor+shield). It's essentially the same design (since Adafruit's design is open source), just cheaper. I have one, but I have yet to test it to see if it is any different than Adafruit's. I'll report back later those results. If there is no difference, then you can save $8 on Amazon!
This is the relay I bought when I setup my doorbell sensor last month. It's worked great so far.
https://www.amazon.com/gp/aw/d/B000LESCI2/ref=ya_aw_od_pi?ie=UTF8&psc=1
What you listed is 5630 SMD LED's. Go to AliExpress or EBay and "5630 SMD Aluminum" will pull up equivalent options. I use Ali and saw one lot of 5 x 50cm going for $12, or about $5 a meter delivered.
Pick up one order of these limit switches-I use them for the very purpose you describe.
https://www.amazon.com/dp/B00H8TJOU8/ref=cm_sw_r_other_awd_Y434wbWQEW96P
I suggest a dimmer of some sort. Decent ones are $4-6 and can be had in aluminum.
Hey! I just looked at your solenoid pusher tutorial from 3 months ago. I watched the video on thingiverse too and the youtube guide too.
First of all, amazing work. And really good instructions too!
Since the solenoid is basically going to fire based on if there is input current, it should be possible to make this easily semi-automatic by cutting off the signal from the microcontroller, right?
Third, I think you've sold me on using a solenoid! I already am ordering this one:
https://www.amazon.com/Abletop-Solenoid-Electromagnetic-Electric-Automobiles/dp/B07G15X91N/ref=sr_1_fkmr1_1?keywords=generic+35mm+solenoid&qid=1569472290&sr=8-1-fkmr1
Thank you for giving me some sort of direction!
Thanks for the approval, mod bot. These switches are bog standard, here's an amazon link: https://smile.amazon.com/gp/product/B076GM7JQP/ref=ppx_yo_dt_b_asin_title_o00_s01?ie=UTF8&psc=1
There's a schematic diagram on this picture on the Amazon link: https://images-na.ssl-images-amazon.com/images/I/41hJy3AQHwL.jpg
Leg sizes are in the title.
Remember you get what you pay for, but since you're just trying this out I found some cheap options on amazon:
Volt meter
3 position switch Keep in mind you need to make sure you match your inputs and outputs to the voltage the PLC I/O wants (120v AV or 24v DC)
Indicator light you can use as an output to turn on/off
Looks like the PLC wants 24vDC power so you'll need something like this to switch your 120 power from the wall.
LED strip (12V, 60 LEDs/m, 5050 LEDs) is darn cheap, fairly bright, and all over the internet. Here's 5m of white on Amazon. If that's not bright enough, you can get higher lumen LED arrays that run on 12V.
You could use some little toggle switches or maybe rocker switches.
I use this to control the heating coils:
https://www.amazon.com/gp/aw/d/B00OZ5MBM6?psc=1&ref=yo_pop_mb_pd_title
I have a HF router control on a shop vac as a blower, I can roast 250 grams at a time, and could probably do more if I built a larger chamber. My roast this afternoon hit first crack at 8:07 and ended at 12 minutes.
If you're interested in the Raspberry Pi route, look up the ELF roaster. It uses a breakout board for the thermocouple and an SSR to cycle the coil on and off. You can download the software from the developers blog.
Packard C140A 1 Pole Contactor Coil Contactor, 40 Amp, 24V https://www.amazon.com/dp/B003U81D2I/ref=cm_sw_r_cp_api_i_pgwLDb7H92ECW
This is what cooked on me during my freak stall.
It should hold, but shit happens. I don't understand why people are so averse to observing proper practice when it's literally a matter of adding a couple of simple, cheap components.
The switch I'm using is this one: http://www.amazon.com/gp/product/B008DFYDNE?keywords=toggle%20switch&qid=1449860351&ref_=sr_1_15&sr=8-15
It has 3 positions (ON on each side, OFF in the middle I believe) and 3 places to connect
sounds like you're describing these. probably not quite right, but similar.
I'm not sure about #1, but for #2, you're looking for jumper cables. These let you plug in components to the arduio/breadboard without having to solder. The eBay listing is a great deal, but you can buy them at Fry's Electronics if you have one local to you(also, the eBay link is from a Chinese seller, which could take a long time to get to you).
EDIT: I just took a look at the link you posted, and in the questions section there are people asking about how to power the shield and what kind of solutions they used.
You can undervolt a fan, but most stutter and stall out at around 50%, without enough power to keep the blades moving. With something this loud, I'd guess that's still not going to be enough.
I'd actually recommend making or buying a PWM controller. They work by rapidly turning the fan on and off, changing the ratio to adjust the speed. Because it's always at full voltage, you never get the stalling issue at low speeds. They're also pretty efficient.
No problem! I just got mine wired up and used one of these to control the speed and it worked fantastically! I recommend them highly!
https://www.amazon.com/gp/product/B076GM7JQP/ref=oh_aui_detailpage_o00_s00?ie=UTF8&psc=1
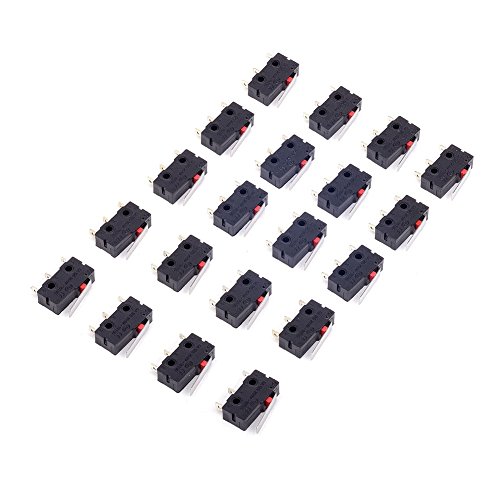
electrical tape bro. or solder and tape. but hey, you can get all new endstops in sets of 3 for like 10 bucks
​
here
https://www.amazon.com/gp/product/B07DWQZCBY/ref=as_li_tl?ie=UTF8&tag=technivorous-20&camp=1789&creative=9325&linkCode=as2&creativeASIN=B07DWQZCBY&linkId=191fc8eec04a468c80bc5ace44ff9427
Thank you so much. I was on and off the phone with ecobee earlier and they couldn't give me a straight answer.
I had already purchased this relay and have it ready to install.
https://www.amazon.com/gp/aw/d/B000LESCI2?psc=1&ref=yo_pop_mb_pd_title
I will give it a shot later this evening. Thanks again.
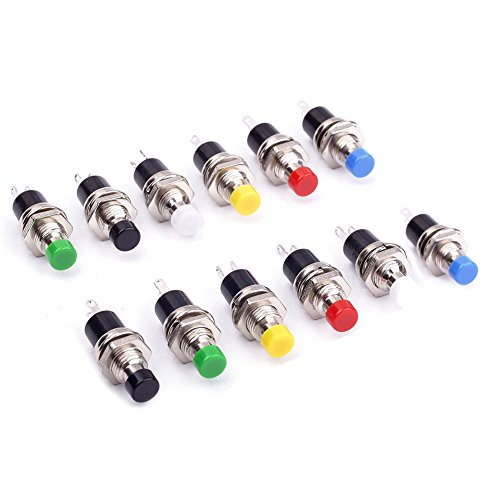
momentary switch $8.79 (for 25, you need only 1)
https://www.amazon.com/gp/product/B01NCQVGLC/
induction heater $12.99
https://www.amazon.com/gp/product/B01GDVVANA/
project case: $12.98
https://www.amazon.com/gp/product/B0107WU67M/
mosfet: $7.99
https://www.amazon.com/gp/product/B01J78FX9S/
power plugs $9.99 (you need only 1 pair)
https://www.amazon.com/gp/product/B078YP4CP6/
test tubes $6.02 (cut in half, you'll break a couple until you get one you like)
https://www.amazon.com/gp/product/B00RKMWZOA/
on/off switch $6.50 (for 15, you need only 1)
https://www.amazon.com/gp/product/B01N2U8PK0/
​
in addition, you'll need some 18-20ga wire & solder, and a 12v/6a to 10a power supply
You need to bend the spring in to it or get some new end stops really cheep 3D Printer Parts and Accessories, FYSETC 3D Printer Limit Switch Mechanical Switch Module Endstops Switch with 3 Pins 39.4 inch Cable for Ramps RepRap Tevo Tornado- 3 Pcs https://www.amazon.com/dp/B07DWQZCBY/ref=cm_sw_r_cp_api_i_YlwjDbSZQQYVW
Would these work?
Thank you for your reply!
Since its pretty much a gutted shell and nothing OEM remains inside the air handler except the A/C coils perhaps you may be able to help me.
I have this
Endurance Pro Control Transformer 40VA, Primary 120, 208, 240V Secondary 24V, HVAC Furnace Multi Tap, Jard 4031F, Packard 42440 https://www.amazon.com/dp/B07PPK4Y9Z/ref=cm_sw_r_cp_taa_8Y8uDbT9915DS
And this
Emerson 90 380 Fan Relay 24 Volt Coil, 1 https://www.amazon.com/dp/B000LDCPQS/ref=cm_sw_r_cp_taa_h38uDbRWDC8PW
Installed.
Still waiting on this (to go outside) to replace what is there. It's a replacement of what the HVAC fella put on there (and charged me $90 for!). I'm just covering all bases here.
Packard C140A 1 Pole Contactor Coil Contactor, 40 Amp, 24V https://www.amazon.com/dp/B003U81D2I/ref=cm_sw_r_cp_taa_D48uDbAQ9XXN2
Now, I'm confused as to how I would control the fan on/off. I assume some sort of relay, presently the fan bypasses the transformer and relay coil. I don't see a 24v wire on the fan itself and it is working but not turning off. (I have the outside compressor powered off at the box waiting for the coil for that)
Do I need to connect it to another transformer and relay and connect my thermostat to both relays?
If your kids are old enough to talk and handle the blasters, IMO they're mature enough to learn proper blaster/gun safety. Which is up to you, but I'd recommend things like not looking down the barrel, not pointing it at faces/anything you don't intend to shoot, and always assuming it's loaded.
If you don't trust them with the blasters, put them somewhere safe and have them ask you if they want to play with them. They'll probably end up jamming the blaster somehow and shredding darts, because I've seen college students do the same.
For the trigger switch, something like this would be a good switch, and you can watch the Make Test Battle Super Stryfe video for a guide on how to do the switch and some rewiring demos.
http://www.amazon.com/Momentary-Tact-Tactile-Switch-12mm/dp/B008DGB71Y/ref=sr_1_1?ie=UTF8&qid=1398100505&sr=8-1&keywords=tact+switch+caps
These are an add on item though, so you need like a $25 order to add them on for that price.
If you dont mind getting different caps (I wanted the rounded for more comfort) you can always turn to ebay: http://www.ebay.com/itm/20pcs-Momentary-Tact-Tactile-Push-Button-Switch-12x12x11mm-DIP-Black-Round-Cap-/310569400583?pt=LH_DefaultDomain_0&hash=item484f60f907
Warning though, they come from china and usually take 2+ weeks.
I suggest getting a Motor Shield. AdaFruit has a good one, and so does the arduino store. I picked up a very good one for cheap on amazon. SainSmart L293D Motor Drive Shield Motor shields do require a second power supply though.
Awesome dude. I was in the same spot as you. Ended up using some of these, but I have an LED fixture, so it's not drawing as much power at T5s. It works really great with the pi, and now I don't have to fuck with having 3 or 4 timers, and can change or control it all from my phone or computer without the pain in the ass of stooping under the tank.
This might work to control the speed on an ac motor. It claims to be able to provide 4000 watts max.
This is the spare relay i have laying around. I believe it's DC to DC, right?
I was watching a tutorial on modding a controller and for the back buttons the guy recommended using these
http://www.amazon.com/Momentary-Tact-Tactile-Switch-12mm/dp/B008DGB71Y/ref=sr_1_1?ie=UTF8&qid=1404049555&sr=8-1&keywords=tactile+switch+cap
Hope this helps!
https://www.amazon.com/dp/B01K0ZLMYM?ref=ppx_pop_mob_ap_share
I'm resurrecting this thread to warn anyone not to buy those switches I just took apart my friend's G903 because he had double clicking issues after two warranty replacements from Micro Center (he got the protection plan.) Those were the exact switches in the G903. I replaced them with Japanese D2F-F and so far so good. My old G900 had double click issue after two years and I installed Chinese D2FC-F7-N. We'll see how long those last. It's been 9 months since I did those mods.
4 Pack OMRON Ultra Subminiature Basic Micro Switches D2FC-F-K(50M) Pin Plunger PCB Terminals Mouse https://www.amazon.com/dp/B01K0ZLMYM/ref=cm_sw_r_cp_api_i_KwE5AbN44RJVJ
Here... right plunger height for like 75% of synths
https://www.amazon.com/CO-RODE-Tact-Button-Switch-6x6x5mm/dp/B00W0YUV1W/ref=sr_1_5?ie=UTF8&qid=1540867464&sr=8-5&keywords=tact+switch
Here's the link the OP provided elsewhere...
> https://www.amazon.com/Abletop-Solenoid-Electromagnetic-Electric-Automobiles/dp/B07G15X91N/ref=sr_1_1_sspa?ie=UTF8&qid=1538929128&sr=8-1-spons&keywords=35mm+12v+solenoid&psc=1
My own Modulus is most curious about this development...
this http://www.amazon.com/Tamiya-70108-Tracked-Vehicle-Chassis/dp/B00061HHTK/ref=sr_1_1?ie=UTF8&qid=1367962437&sr=8-1&keywords=arduino+tank
this http://www.amazon.com/Tamiya-Double-Gearbox-Independ-4-Speed/dp/B000C8F802/ref=sr_1_2?ie=UTF8&qid=1367962437&sr=8-2&keywords=arduino+tank
and thishttp://www.amazon.com/SainSmart-L293D-Shield-Arduino-Duemilanove/dp/B00813HBBO/ref=sr_1_1?ie=UTF8&qid=1367962500&sr=8-1&keywords=adafruit+motor+shield
Awesome man. I cannot tell you how cool I find all this. Science!
Here is what I have purchased so far.
12v 6a 72w power supply
ZVS Heater and Coil Combo
Switch. Can hold up to 20amps not sure that mattters whatever, room for extra isn't bad.
[Glass Tube]I DELETED THIS AS WHAT I HAD HERE IS TOO BIG! DO NOT BUY THE GUITAR SLIDE I HAD LISTED! NEW TUBE. I ordered this from China on a Thursday, let's see how long it takes to get here.
So, I would just be missing the mosfet and momentary switches that you have. Do you find them necessary? I might just buy the mosfet and momentary for peace of mind, but I did see a couple build that avoided the mosfet for simplicity's sake. This build seems to have avoided one.
Any further advice (wire gauge, soldering tips, etc)? I am currently looking for a good box to put it all in. Thanks again for the reply.
EDIT - MOSFET
Momentary Buttons
Mounting things for the momentary buttons
IF ANYONE IS READING THIS IN THE FUTURE, CONSIDER USING A 120W POWER SUPPLY. I DO NOT REALLY UNDERSTAND BUT SUPPOSEDLY IT MATTERS.
Is amazon an option for you? I have not used these but I found https://www.amazon.com/dp/B07DWQZCBY/ref=cm_sw_r_cp_api_i_uVd4Cb8VNZKM6
Just test it with the power supply before hooking it up to batteries? Still a good idea to have a fuse and some kind of current limiter, either resistive or one of those Drok board you can get on Amazon for $10.
If you want something a bit more straight forward Hobbyking has a packaged device that does the same and more... can’t find a link, I’ll post one when I find it.
Just to throw another option out there - I use 12v bilge blower fans (similar to: SEAFLO 4" In-Line Marine Bilge Air Blower 12V 270 CFM Quiet Boat White https://www.amazon.com/dp/B0166S2PA2/ref=cm_sw_r_cp_apa_i_SscDCbTQMY3Y9). If you go with a 4" you can just use dryer vent to get it outside. You can also put a motor adjustment switch on it (12V Motor Speed Controller, DROK DC Motor Driver Board for Brush Motor 7V-60V 20A 420W PWM Control 12V 24V 36V 48V Regulator Cooling Fans Dimmer Governor Pulse Width Modulator with Adjust Knob https://www.amazon.com/dp/B00DVGGWC0/ref=cm_sw_r_cp_apa_i_vvcDCbXK0FE4Z). These move a lot of air, which could help depending on the size of your run, etc.
Something like this?
https://www.amazon.com/Subminiature-Switches-D2FC-F-K-Plunger-Terminals/dp/B01K0ZLMYM/
Hopefully I'm not too late posting this. I need to install turn signals on my bike. The previous owner removed everything, the lights, controls, relay.
My question pertains to the controls. I originally was going to pick up a factory turn signal switch, but I sort of like the naked look. So instead I plan on using a micro SPDT toggle. I really want to install it into the bar itself, and not some type of holder.
My bars are 1.25", and taper to 1" OD at the ends. This means the ID is somewhere around 7/8" to 15/16". The problem is the smallest switch I've found has a total depth of 1.4", and has to be installed from the inside of the bar.
This is the switch.
I can't seem to find or think of a clean way to install them. The hole for the switch only needs to be 0.25". I haven't drilled yet, because I don't want to ruin the bars. The only way I've thought of is to drill an elongated hole, bend the terminals, and squeeze the switch through. But I'm pretty sure the nut for the switch won't conceal the hole.
Has anyone done this before? Or have any suggestions on how to accomplish this? Once I can figure this out, I also plan on adding micro push buttons for the horn and starter.
Thanks in advance, and sorry about the lack of metric measurements. :P
How much did you pay for it and how much are you willing to put into it to get it going? Your best bet, if you REALLY want to use it, is to get a cheap VFD ($75~$100 on Amazon) so that you can run the impact at the correct frequency which it is intended to run on.
You can put a standard 220V plug on the input side of VFD and then have a set of locking Hubbell plugs between the output side of the VFD and the tool.
With that said, when you are all said and done, you would probably be AT LEAST $150~$175 into getting it to run, not including what you already have into the impact itself.
Just my two cents.
No need to paypal, please just post your results! Success or failure, we want to see, learn and maybe help! Going straight from one battery to another poses the same problem as going from solar to battery directly. Little or no control. You can get basic buck down constant current constant voltage power supplies that would work with these. Again, they won't be smart and may have some ripple in their voltage, but they should work as long as you input the right stuff. https://www.amazon.com/dp/B01CE5P33M/ref=cm_sw_r_sms_apa_G9NHzbZ3YAENK. Be super careful, watch and measure voltage regularly, and set the voltage conservatively low to start. I'd start at 3.7 volts per cell. Best of luck!
I would highly reccomend getting VDF and a three phase motor. Why? Because with a VFD and a three phase motor you can vary the speed electronically, and you can find VFD's that take 110v or 220v, and they arent very expensive.
Heres a decent motor and VFD, Im going to be ordering this stuff for myself in the next month or two.
http://dealerselectric.com/33NCM-3-1-5-36.asp
https://www.amazon.com/LAPOND-Inverter-Professional-Frequency-VFD-1-5KW/dp/B01DKJWM62/ref=sr_1_3?ie=UTF8&qid=1482190507&sr=8-3&keywords=vfd
This guy explains it pretty well in this unboxing video. This video made me decide to get this setup. (skip to 7:00 where he talks about the motor and VFD)
https://www.youtube.com/watch?v=jaBZpKJ7H7U&t=1527s
I'm looking to modify the switches in my ThrustMaster T-1600M.
Previously I was using a Saitek Cyborg, which has a very mechanical feeling trigger and buttons that click. The TM I replaced it with has amazing movement and no slop, and no deadzone. Unfortunately it has a much more plastic feeling trigger with a large deadzone before it hits the contact, and the other buttons are just mushy.
I was thinking of using these for the trigger, and these for the buttons, but being a little new to electronics I am not sure if that is exactly what I am looking for.
Are there any recommendations that anyone has for joystick mods?
Packard C140A 1 Pole Contactor Coil Contactor, 40 Amp, 24V https://www.amazon.com/dp/B003U81D2I/ref=cm_sw_r_cp_apa_TVuLBbH855VTX
LAPOND SVD-ES Series Single Phase VFD Drive VFD Inverter Professional Variable Frequency Drive 1.5KW 2HP 220V 7A for Spindle Motor Speed Control(VFD-1.5KW) https://www.amazon.com/dp/B01DKJWM62/ref=cm_sw_r_cp_api_i_LukTCb6EFS90H
Might not be compatible to your voltage etc but a quick check on amazon has lots of these for short money. This is one of many.... good luck