(Part 2) Best hand tool cutters according to redditors
We found 950 Reddit comments discussing the best hand tool cutters. We ranked the 271 resulting products by number of redditors who mentioned them. Here are the products ranked 21-40. You can also go back to the previous section.


![Scientific Glass Tubing Cutter [ 1 Ea.]](https://m.media-amazon.com/images/I/317aUJgXgTL.jpg)


Glass tubing cutter.
It is a scientific glass tube cutter.
https://www.amazon.com/Scientific-Glass-Tubing-Cutter-Ea/dp/B004LPJEZW
Make a small scratch and pull/snap is the trick.
Here's one that fits on a key chain. Here is the one I use.
Some type of pipe cutter, they use for cutting steering column I would bet.
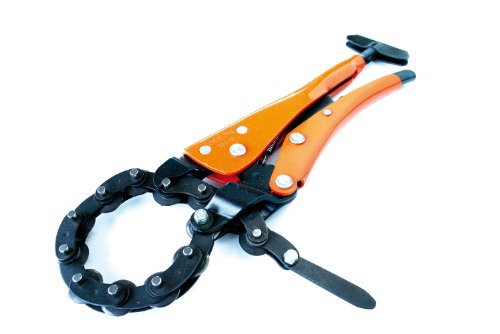
edit: https://www.amazon.com/186-12-12-Inch-Cutter-Locking-Epoxy-Coated/dp/B000SOVR3W
edit again: or cutting catlytic converters off if people still do that.
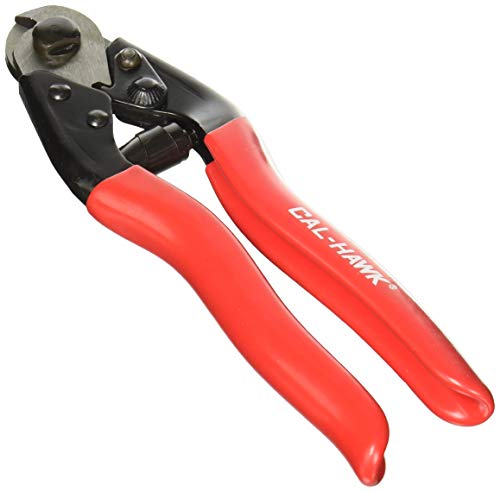
Always use the U-Lock to secure the bike to the stationary object (rack, sign post, fence, whatever). Use the cable lock to secure your wheels to the frame. That cable can be easily cut in under 30 seconds using a pair of these
Here's a video for the visual:
http://www.youtube.com/watch?v=P32x3RqsNmY
U-Locks can be cut in about a minute with an angle grinder, but angle grinders are louder and throw sparks which raises suspicion. Non-brazen thieves stick to the bolt cutters.
At the end of the day, the best security method is to keep the bike in your sight. Keep it in your house/apartment. If you leave it in a garage, keep it locked to something in the garage. When you do lock up outside, lock next to a bike that has worse locks than you. Thieves are lazy (granted, this doesn't apply if you're locking a top of the line, all carbon bike next to a rusted huffy. It's all effort and risk vs reward). Make sure the racks you lock to are secured. I've heard of thieves loading an entire bike rack into the back of a truck and driving off.
I'm in the process of building my first FPV drone with my 11 year old son. Tools I owned or have purchased for this are:
A set of small screw drivers. I found a set in the bargain bin at NAPA Auto that had straight, philips, a few hex, a few sockets.
A decent electronics soldering station. Not the gun. I have a digital Weller that is easy to control, but the analog is just as good for these purposes.
A third hand. There are many different kinds. I got a cheap $5 one at Harbor Freight. Not great, but does the job.
Solder, de-soldering wick, flux (maybe)
Depending on where you're doing your work, might want an air-filter or fan.
A magnifying lamp is helpful but not necessary.
An assortment of board stand-offs/spacers is handy.
A good small pair of wire snips.
Wire stripper
A digital multimeter is not a bad idea.
Those are all the major tools you might need. Plus all the drone parts. batteries/charger. Radio/receiver. Camera/receiver(goggles or screen).
In short, it's a lot of stuff. The drone parts end up being the least expensive part, honestly.
Above links are just examples, not necessarily endorsements.
You mentioned you're on a budget, which I totally understand. Building is not the cheapest route, but it's been a lot of fun so far. People who've done it for a while tend to forget the cost of tools. Once you've built one, subsequent drones are relatively cheap. You can re-use batteries, the charger, most decent radios, even the receiver.
If you're not in a hurry, Bangood is a good source for cheap(er) parts. You're on your own for support, usually, but there's lots of help out there.
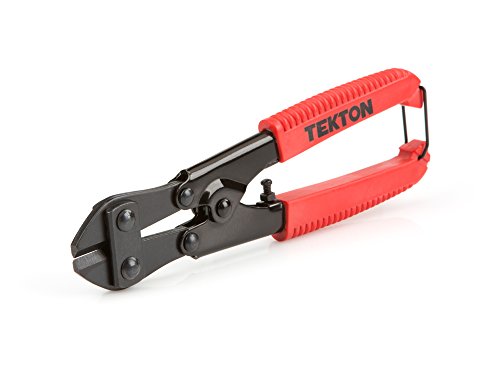
Get a pair of these.
http://www.amazon.com/TEKTON-3386-8-Inch-Bolt-Cutter/dp/B000NQ4OYO
Those cables are braided wire. You can snip through the rubber coating and then cut each mini-braid. There's usually some kind of nylon rope or something in the middle, it's not even wire all the way through. You can get through the thing in about 30 seconds with a mini bolt-cutters like the one I linked you to.
This happened to me more than once. That was my solution.
I have this little electrician shears and it came with its own sheath.
Sharp strong and will cut through a magazine.
http://www.amazon.com/Clauss-18087-Stainless-Electrical-Cutting/dp/B000XBBKK0
First off, the brake levers you have are probably not compatible with V-brakes. V-brakes need special long pull levers. Try looking for cantilever brakes instead. They'll look sort of like the ones you already have.
Besides that, to install brakes, you'll need some hex keys, a cable cutter, and some new cables. Park tool's website should have a guide, or search youtube for installing cantilever brakes.
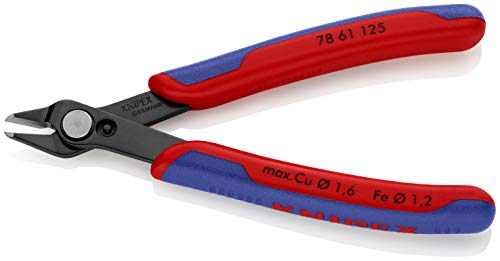
https://www.amazon.com/KNIPEX-78-61-125-Electronics-x/dp/B0048F601Q/ref=sr_1_6?s=power-hand-tools&ie=UTF8&qid=1541786543&sr=1-6&keywords=flush+cutter
Those are great
For me the top 2 things i can think of are
for PETG And Acrylic tubing a Primoshill RFB you can get it in multiple sizes for what ever tubing your using. I use mine exactly how it says to.
https://www.primochill.com/products/primochill-rfb-rigid-tubing-finishing-bit
Tube cutter you can cut PETG and soft tubing with ease.
https://www.amazon.com/XSPC-Heavy-Duty-Cutter-0-25mm/dp/B00ZQLKP0I
these are the only 2 things i use every time. i would say some kind of jog to help with bending can be handy but it all depends on the type of bends your doing. I have one but only use it when doing runs with double bends.
Nice tut! Another little tip (picked up from tokecity) to add for those with SSTBs is that if you want to cut it down to size for smaller runs, get a pipe cutter like so.
They are generally made to cut softer metal like brass so go slow and take a bunch of passes or you'll end up bending the tube in a little, but they will cut a tube down to size no problem.
I have never seen one myself. I’ve met a couple of people who have lost dogs to wire snares on USFS land around Gardiner. Some people carry these as a precaution.
Personally, I’ve seen hundreds of dogs out and don’t think it’s an issue to take mine at all.
I have one of these. works fine, wouldn't want to use it all day, but for how much I need to cut pipe, it's fine.
edit: fix link
This should do the trick
http://www.amazon.com/TEKTON-3386-8-Inch-Heavy-Duty-Cutter/dp/B000NQ4OYO/ref=sr_1_1?s=hi&ie=UTF8&qid=1453697895&sr=1-1&keywords=tekton+bolt+cutter
Just got a new pair of Knipex cutters today. Probably the single best tool I own now, aside from the Metcal.
This site has a few suggestions. I'm planning to mix and match pieces of a few of the designs to make a free-standing PVC stand with a downtube clamp. I made a 6-guitar stand out of PVC previously, so it'd be a similar project.
PVC's quite cheap and easy to work. You can just cut it with a hack saw, or pick up a tubing cutter, which will make things go a lot faster and easier. I bought the fittings here and the pipe at Home Depot for the best price. Then, for the clamp, you just need a hinge or two and a latch. A bit of foam tubing insulation can be put inside to make a tight fit and protect the tube.
Just remember: Sketch out a detailed plan, measure twice, cut once. Then it's just like building legos.
I use kegs with short dip tubes for lagering. I cut them with a mini pipe cutter.
> Splice them into your trailer wiring
That's what I did. I went up about 4" from the 7-pin plug, cut the necessary wires, used uninsulated butt connectors with a closed-barrel crimper and adhesive-lined heat shrink to splice in a 6-pin Deutsch DT connector pigtail, then built my own wiring harness that plugs into the Deutsch connector and ran it up to the headache rack.
Went with the 6-pin Deutsch connector since I only needed 5 of the 7 wires (LT, RT, Tail, Backup, and Ground) and 5-pin Deutsch connectors aren't available. Deutsch DT connectors are frequently used in the automotive aftermarket (probably more so than Delphi Weatherpack connectors). I know Rigid Industries uses them for their LED lights, and Smith Race Wire uses them for parts of their custom wiring harnesses.
Also, since you can only close-barrel crimp one end of the uninsulated butt connectors, I chose to close-barrel crimp the side that had only one wire (since closed-barrel crimping is more secure, and the one wire was looser in the connector) and used Channel Lock 909 Pliers to crimp the end with two wires.
Once you made your harness, make sure you slip it into some split wiring loom. Using a loom insertion tool makes quick work of that. Wrap the wiring loom with non-adhesive dry vinyl tape for a factory-finished look and to avoid a gooey, sticky mess in case you need to unwrap the wiring harness in the future.
Finally, a good wire stripper will save your hands a lot of fatigue compared to using a standard wire stripper that you have to always pull the wire through.
I transitioned into working on my bikes almost entirely by myself (Wheel building/suspension service/bearings excluded) and this is the exact path I went down as well. Here is everything I bought from Amazon:
The same $50 tool kit
Torque wrench
Cable/housing/wire cutter
Chain/quick link pliers
Wet/Dry Chain lubes
Park Tool grease
Degreaser
Blue Loctite
Carbon grip paste
And some additional small things like cables, cable end caps, ferrules, zip ties, etc. A set of needle nose pliers can be handy to help push/pull stubborn cables/housings as well.
Also, to make working on the bike 10x easier, I recommend getting a stand. I use this one because I am space constrained and it folds up nice and small, but there are probably better ones out there.
It seems like a lot of $$ to lay out at first, but it pays for itself pretty quickly compared to taking the bike to a shop every time you need to do something to it. Basically everything you need to do can be found on YouTube as well.
Trust me, you want some knipex flush cuts. Now, you may be saying "$30 for some flush cuts?!" but take that Knipex and your cheapo fast tech flush cuts or cutco scissors and go ahead and cut some 24 awg titanium about 50 times. See which one stays sharp. This isn't the exact model I use (I have them at home), mine are actually these ones I think, I'll edit when I get home.
I fucking love my knipex flush cuts. I've done hundreds of builds with all sorts of wire (Ti, SS, Ka1, Ni80) and have had 0 issues with them dulling like every other pair of nail clippers and flush cuts.
You're right, of course, and I wish you well with your marriage.
But you forgot the other option: A finger tattoo is as simple to remove as the finger itself is. It's cheap, too: one of these will get the job done neatly.
(And then you can mail it back to them!)
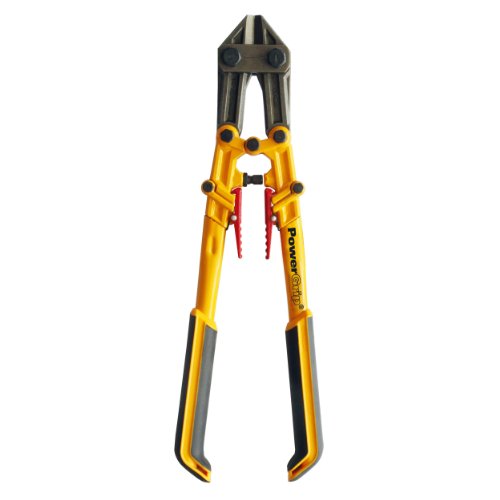
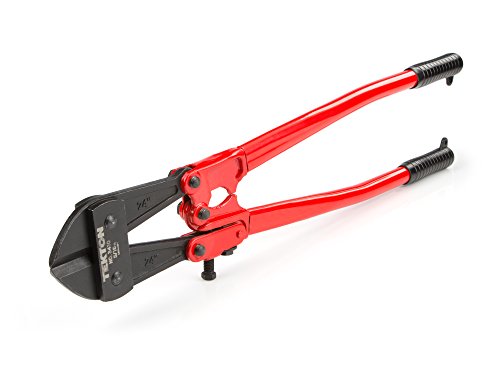
Go around the gate? No. The solution to this issue is $24. http://www.amazon.com/TEKTON-3410-24-Inch-Bolt-Cutter/dp/B000NPT5RG/ref=sr_1_1?s=hi&ie=UTF8&qid=1381178032&sr=1-1&keywords=bolt+cutters
something like this? http://www.amazon.com/Grip-On-186-12-12-Inch-Locking-Epoxy-Coated/dp/B000SOVR3W
maybe you could rent one?
Like others have said, hacksaw is what worked for me. I also use a tube cutter to make a small groove as a path for the hacksaw.
Sawzall is noisy. They use pipe cutters:
http://www.amazon.com/Grip-On-186-12-12-Inch-Locking-Epoxy-Coated/dp/B000SOVR3W
You would definitely need speaker wire (and wire stripper tool) to connect the Miccas to the amp, and then either an aux cable or an aux-to-rca Y-cable to connect the amp to your source (laptop, phone, etc.)
Hope this helps
Also, get yourself one of these. Once you dial it in for your wire thickness it makes stripping the wires easy without knicking the underlying conductors. Will save you tons of frustration!
http://www.amazon.com/DataShark-70029-Universal-Cutter-Stripper/dp/B000HRWOTQ/ref=sr_1_1?s=hi&ie=UTF8&qid=1459348600&sr=1-1&keywords=datashark
Other useful things:
Center punch, small crowbar, feeler gauges, screwdriver set, socket wrench set, warded lock set, jiggler set, lifter set, modified extractor bypass tool for Master 175 / Sesame cobo locks, paint scraper, and a pair of folding bolt cutters on special occasions.
Should I let you know when I do a post for r/edc?
I would build the arms out of electrical conduit. It's cheap, easy to cut and much stronger than wood or plastic.
You would need a drill, a conduit cutter, a clamp, some wing nuts, washers bolts and bushings.
Cut the conduit to the length you want, clamp the ends flat and drill a hole through them. then connect the ends with the bolts and bushings using the wing nuts to hold it together. Wing nuts are nice because they let you easily adjust the torque.
After that, you could attach a piece of wood to end to place the keyboard on.
Thanks!
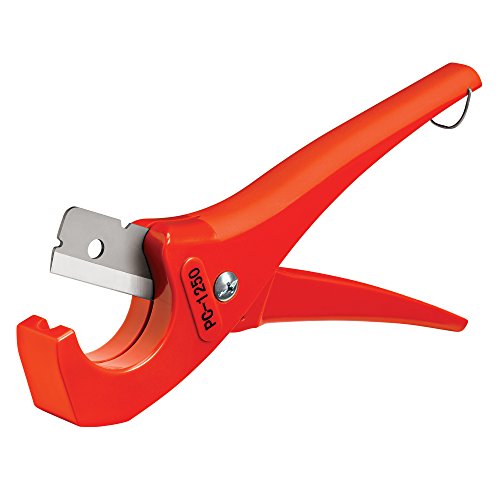
Here's my secret "weapon": https://www.amazon.com/TEKTON-6466-PVC-Pipe-Cutter/dp/B000NY4THS
It's made for cutting pvc pipe, but works great on vines. It's about the size of a pair of pliers.
A couple of suggestions (not a comprehensive list).
exactly
We use this bad boy.
But if that's not in the budget, a sharp razor blade.
Just get a short spool of some 16 gauge wire from Home Depot or whatever the budget brands are at your local electronics store. Cheapest brand will do, especially if you're just testing. I think Amazon makes their own speaker wire as well.
You'll need a wire stripper like this.
Just strip off 1/4" of the insulation from each side using the "AWG" number of your wire (16 if you bought 16 gauge). Twist the coper and put them in the binding post of your receiver and speakers. Connect black to black, red to red... etc. And you're all good.
You can get bolt cutters that fold and easily fit into a gym bag or back pack for a measly $20.
https://www.amazon.com/gp/product/B00GABUX9G
That deburring tool isn't very good for deburring.
If you're doing petg, you'll be very unhappy with its outer edge deburring performance.
This is the same tool that is much better made: https://www.amazon.com/dp/B0002YVLHA/
It still will NOT do external edge deburring well on petg. But it is made better :)
I recommend a circular pipe cutter over a hacksaw. They will leave much cleaner cuts.
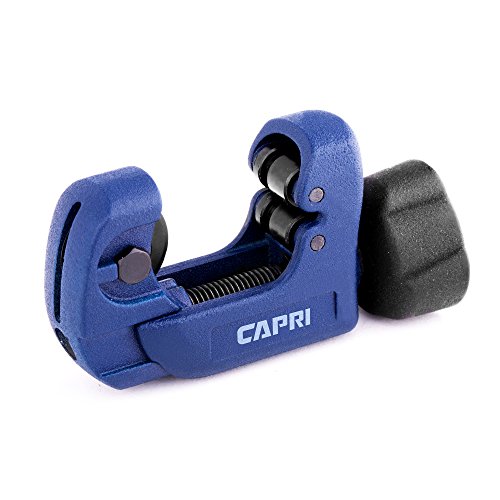
Capri Tools MiniKlinge Mini Tube Cutter, Klinge Close Quarters with 1/8" to 1-1/8" OD, Blue https://www.amazon.com/dp/B01DCHA3RC/
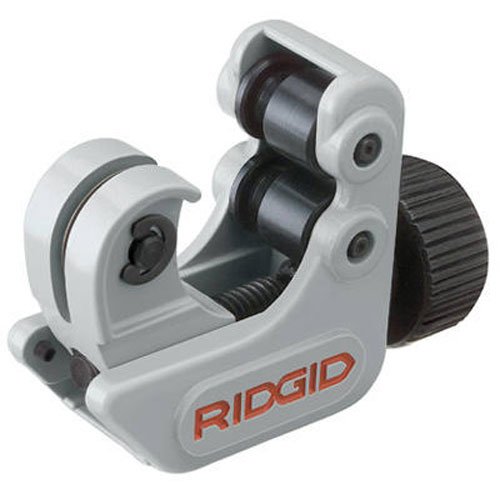
http://www.amazon.com/Ridgid-23488-Scissor-Style-Plastic-Tubing/dp/B0019MLSLS
How do I know what gauge to get? I this sufficient Wire, Bananas and Wire Cutters. I think I will skip the DAC for now and see how everything sounds? As I can always buy one later and add it in but how do I know if I need one?
Edit: Thank you for the help!
Sorry for the late reply. First of all, take all of this with a grain of salt. This is my first build, so I am by no means an expert. You should definitely look in to all this on your own rather than blindly trust my purchases.
Here are the tools I got in my Amazon order:
I hope this helps.
You're welcome. Paladin (and their cheaper entry-level Datashark brand) also has some decent offerings if you want something more "name brand" but still inexpensive.
Paladin:
Crimpers
Stripper
Tester
The Paladin stripper works really well; I think I prefer that one to the cheap Monoprice one I purchased (though it gets the job done). Both are adjustable for different thickness wire / sheathing.
Datashark:
Crimpers
Striper
Tester
The Datashark crimpers lack a ratcheting mechanism, so I'm not a huge fan of them, but a coworker owns a pair and they work fine. The testers from both are nearly identical, and don't really offer any more functions than the cheap no-name import ones do (except perhaps a better warranty).
I've made several perches out of PVC (like your design but only one perch).
I got the PVC pipe and fittings for cheap at home depot. Probably cost $5. I bought maybe 2 long pieces of pvc pipe, and a bunch of elbows and a few Ts. I also bought a cutter like this for maybe $12, and it makes everything really really easy. I used 1/2" pvc for everything.
I've gone through several revisions, and my final design ended up looking like this
At the bottom, I put a tray like one of these. I basically built the bottom of the perch around the dimensions of the tray so it pops in and is supported.
The idea was to put absorbent stuff on the tray. I found dog training pads like this at costco for $16 for 100 and now wrap the tray and put it at the bottom of the perch. I can't stress enough how great this is.
I assembled the perch without using any pvc adhesive. This works fine and you can take it down any time you want. It's also let me tweak and adapt the perch over time. No fumes either.
I wrapped the cross bar of the perch with self-adhesive bandage like this. It's the kind of bandage that's not sticky, but sticks to itself. Goes for maybe $5 at target. My green cheek never falls off. She can fly to it and always gets hold of it. She can hold on so well, she can avoid stepping up at bedtime by backing up upside down and continue around until she's done a full loop.
At first I had a perch only, but later I replaced the elbow with a T, maybe 6" of pvc and another elbow. (hard to explain, look at the design). I drilled a hole in the elbow and hang toys on it of all types.
It comes up just about shoulder level. That way I can walk over to the perch and lean over so she can jump off and later walk by and have her jump back onto my shoulder. It's great for potty training. I put her on the perch, say "poop!" and when she finally does it, we whoop and holler and I lean close so she can be rewarded by stepping on my shoulder.
Wow, wall of text. Hope it encourages you to experiment. It's a cheap and forgiving project.
Thanks! In order to bend the tubes you need a heat gun, something like this. https://www.amazon.com/Wagner-0503008-HT1000-200-watt-Heat/dp/B00004TUCV/ref=sr_1_6?s=apparel&ie=UTF8&qid=1497451741&sr=8-6&keywords=dewalt+heat+gun
I would just get the cheapest one that you can find. You will also need a silicon insert to place inside the tubing to keep the shape while you make your bends. I used the one that came in this kit https://www.ekwb.com/shop/ek-hd-tube-d-i-y-kit-10and12mm
but you can probably find the insert alone for cheaper since I didn't end up using the saw included in that kit.
I ended up using one of these https://www.amazon.com/Capri-Tools-MiniKlinge-Cutter-Quarters/dp/B01DCHA3RC/ref=sr_1_cc_7?s=aps&ie=UTF8&qid=1497452239&sr=1-7-catcorr&keywords=tubing+cutter
In order to get cleaner cuts. If you don't get the bend perfect the first time you can always take it back over to the heat gun and make any minor adjustments that are needed. The fans that I purchased came in a three pack that included a fan controller that supports up to six fans. I mounted the controller on the inside of the case because I didn't like how it looked anywhere else, but you can stick it on the case anywhere you want.
Like /u/jrm2191 said, Park Tool make some... comprehensive tool sets. Those prices are enough to make me choke, though. Your son's riding a ~$400 bike - I don't know how I would wrap my head around buying an $800 tool set, or even a $300 one.
But the tool sets are a good way to think about what tools you should buy. I'd get a basic tool set, fill in gaps, and upgrade selectively. What I'd do, in no particular order, would look like...
At this point I would start thinking about upgrading the tools that your son will use all the time. The thing that stands out for me is hex tools. He might use Torx screws, but he'll definitely use metric hex tools
Then probably nice meaty tire levers to make replacing tires and tubes easier
If you were looking to spend $300 or that range, then you'll notice you're way under that target. Feel free to start adding on some random nice things, like a portable multi-tool, which will pay off if he has an issue while out on a ride.
I'm running out of things that aren't "consumable" (like brake cables, housing, etc...), so for my last recommendation, nitrile work gloves! (they'll make cleanup a breeze)
There are tons of other things you could get (a bike stand, for instance) but at this point I'm getting a bit out of control. and there are tools I assume you have (e.g. a good screwdriver), but at some point I need to stop.
And obviously feel free to mix and match whatever components you can afford/feel comfortable spending that much money on. One thing that might help would be to talk with him about what kind of work he does on his bike. He might be in desperate need of hex tools, but not treating himself to nice hex wrenches. That could be your quick, easy, cheap answer. Or similarly he might be nervously tightening bolts without a torque wrench, even in places that call for very precise amounts of torque. Again, easy answer regarding what to prioritize.
Best of luck
edit: totals didn't add up right, sorry!
A reciprocating saw is probably best, but an oscillating tool could also do it.
If you don't have the power tools handy just buy a small bolt cutter. You should be able to find them in the electrical isle of any hardware store.
For future reference, bolt cutters have a hinge system that allows them to through thick metal quite easily. These 12-inch bolt cutters would snap through your padlock effortlessly. I've seen what you're wearing before and I'm sure of it.
http://www.amazon.com/TEKTON-3388-12-Inch-Bolt-Cutter/dp/B000NPXHXE/ref=lp_553176_1_3?ie=UTF8&qid=1370140725&sr=1-3
I imagine that their warehouses will get some in up to two weeks before they ship. There are a few ways to score one early. My favorite method for getting early deliveries from Amazon requires you to spend a little bit more money. Add this, this, this and this to your cart and use your Amazon prime to get overnight shipping.
Now you've got a little reading to do (no big deal for us Kindle lovers though, right? LOL!) Give this a read. On your PC, I guess since you don't have a kindle right now :(. Maybe print it out.
You've still got a few weeks before they hit the warehouses. Give this page a once over. Which one of those is nearby you? Take a drive down to the airport and do a little Kindle-lover pilgrimage! Make some notes about what people are wearing. You'll want to get an outfit like that.
Go back a few more times at different times of day. Get a feel for the flow of the place.
Now we have some more reading to do! Pick up the Kindle edition of this and read it on your PC (you'll get to put it on your new Kindle soon!). (I <3 Calibre's reader for this sort of thing.)
Hold on, someone's at my door. Probably about that slick "free TV from Best Buy" deal I posted a while ago! BRB!
How about this? http://www.amazon.com/TEKTON-6463-Pipe-Cutter-O/dp/B000NY8PGY/ref=lp_553180_1_6?s=power-hand-tools&amp;ie=UTF8&amp;qid=1409544418&amp;sr=1-6
You can't go wrong with the Park CN-10.
For years I just used a pair of linesman pliers, hitting it with a mallet would usually get me a good clean cut. Housings I'd just hacksaw or Dremel.
Once I picked up the Park, it was like "Holy shit".
http://www.amazon.com/TEKTON-6463-Pipe-Cutter/dp/B000NY8PGY/ref=sr_1_9?s=power-hand-tools&amp;ie=UTF8&amp;qid=1332642122&amp;sr=1-9
Try something like that. Any hardware store will have one and it will most likely do the trick. And if it doesn't work as you would like, just return it!
Cutters
Edit:
for the plastic not the wire
These little pipe tools come in handy for all sorts of stuff, definitely recommend.
Does it have to be from Aliexpress? I have these for round and flat CAT cable. I don't really use the coax stripper part of it, I have better strippers for that..
It's a belt shaped cable. LiteLok had people cut it down from the top (the hardest way) that makes the cables mangle and prevent cutting. LPL cut it from the side, one side then the other.
it has nothing to do with quality japanese tools, I bet this could be easily cut with hand snips like these if you just cut one of those 6 strands at a time.
Who wants to buy me a $130 dollar lock so I can prove it?
You score it with a scoring tool and then you snap it with your hands.
https://www.amazon.ca/Scientific-97-1601-Glass-Tubing-Cutter/dp/B004LPJEZW
You can also use a file if you have one.
(This should be a given, but wear gloves and safety squints)
Yeah, I do have one quick question. I see 9u, 6u, and maybe even a couple others. What does this mean and how can I make sure I'm getting the right sizes so everything fits? At first I thought these were model numbers. That Tripp Lite model is one I had found on Amazon with casual searching.
Okay, 2 questions. I looked up datashark cable stripper on amazon and see several different results. Is it this one?
Hah.. 3 questions. What do you mean by "provide it with an earth ground"? How do I do that?
I've been using this
http://www.amazon.com/TEKTON-3388-12-Inch-Bolt-Cutter/dp/B000NPXHXE%3FSubscriptionId%3DAKIAILSHYYTFIVPWUY6Q%26tag%3Dduckduckgo-d-20%26linkCode%3Dxm2%26camp%3D2025%26creative%3D165953%26creativeASIN%3DB000NPXHXE
put nail in jaws and toss a small piece of cloth over the top to catch flying pieces.
http://www.amazon.com/TEKTON-3410-24-Inch-Bolt-Cutter/dp/B000NPT5RG/ref=sr_1_2?ie=UTF8&amp;qid=1419883117&amp;sr=8-2&amp;keywords=bolt+cutter
Do I really need a deburrer for petg? I bought the drill bit from primo chill because I thought it would be handy.. not sure if I need to deburr on top of that?
You don’t need a deburrer. This is just to make the hard tubes not sharp on the ends so it won’t cut the o-rings in the fittings.
Should I buy gloves for when bending the tube?
You don’t have to. I don’t use gloves but if you want to play it safe and not get burnt then yea, get gloves.
Do you find it easier to hand-bend vs using some sort of mandrels?
Hand bending can be hard for a first timer but they do come out a lot nicer when hand bent. I would recommend getting a bending kit because the 90 degree angle bend is going to be your friend.
Trying to get any ideas of stuff that might be a good idea to have that might not be as obvious as the parts needed for the build..
You might need a drill.
Bending kit: http://www.frozencpu.com/products/22341/too-134/Monsoon_Hardline_Pro_Mandrel_Kit_-_12_x_58_16mm.html?tl=g12c133s2087&amp;id=nC9C9JEQ
XSPC Heavy Duty Hose Cutters: https://www.amazon.com/XSPC-Heavy-Duty-Cutter-0-25mm/dp/B00ZQLKP0I
Heat gun: http://www.frozencpu.com/products/22339/too-136/Monsoon_Hardline_Pro_Heatgun_w_Adapter.html?tl=g12c133s2087&amp;id=nC9C9JEQ
Edit: what do you use to cut your petg? Hand saw? the XSPC cutter? a pipe cutter from local hardware store?
The parts you need for your custom loop check out our CLC: https://www.ekwb.com/custom-loop-configurator/
It's a tobacco tool. http://www.amazon.com/Keaychain-Spike-Tamper-Reamer-Tobacco-Pipe-Tool/dp/B005OKG6V8
"USAGES: Tamper (Stubber): Allows you to pack the pipe bowl chamber. Reamer: Helps clean out the dottle & ash from the bowl chamber. Spike (Pick) is great for cleaning & removing ash & other residue in the stem and shank as well as the bowl chamber."
This kit? it doesn't seem any of the extra tools beyond the screwdriver and bits would be useful for setting up a custom loop.
For loop installation, I'd recommend getting a tube cutter for soft tubing or PETG hard tubing. You'll need a saw if you you want acrylic hard tubing. A tube reamer for PETG hard tubing. I haven't done an acrylic loop, so I'm not sure if a reamer like that is good for acrylic as well. maybe need sandpaper instead. All that you can buy at Home Depot, or whatever hardware store. You'll want a tube insert and heatgun if you want to bend hard tubing, but other than that, just need a screwdriver.
If you can afford that S3, you can afford some decent tools:
cable stretcher
cable cutter
If you shop around, both can be had for about $25 each during sales. Well worth it considering an LBS visit is usually more than $50.
And just to double-check because the pads aren't of the vibrant color variety, but be sure that the pads used on the Zipps are not the pads from use with alloy braking surfaces. Carbon requires a special brake pad.