(Part 3) Best power tool parts & accessories according to redditors
We found 5,665 Reddit comments discussing the best power tool parts & accessories. We ranked the 2,619 resulting products by number of redditors who mentioned them. Here are the products ranked 41-60. You can also go back to the previous section.


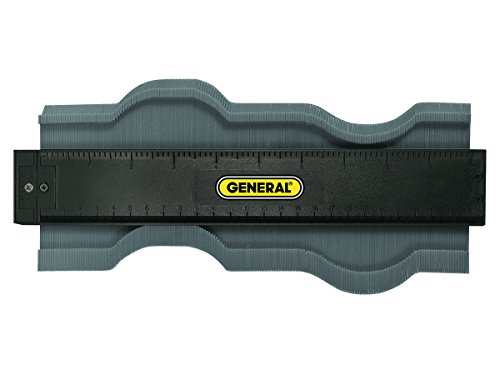


Countour Gage - $18.
Or what looks like this exact one, $9.
This is a pretty good deal. but don't let Amazons "MSRP" bullshit fool you into thinking it's the deal of a lifetime .
Hopefully price zombie will back me up here but no store has ever actually sold one of these for $358.00
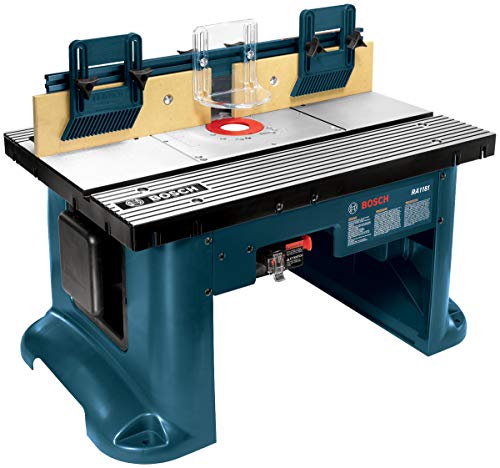
Not on sale It's a 175.00 router table.
As I said it's an OK deal if you need a tiny router table, but you could build a larger table for about the same price, even if you include a halfway decent router plate
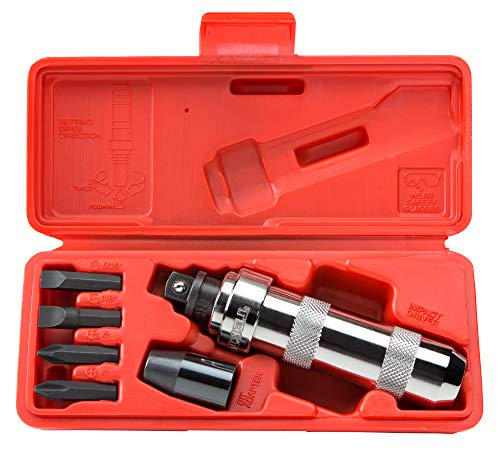
Or you could use an impact screwdriver https://www.amazon.com/TEKTON-2910-2-Inch-Manual-7-Piece/dp/B000NPUJYE
https://smile.amazon.com/TEKTON-2910-2-Inch-Manual-7-Piece/dp/B000NPUJYE
https://www.reddit.com/r/lifehacks/comments/6dj2bk/comment/di391qx?st=J7OPYW4W&sh=7f63b3f6
This response is pretty great although not exactly addressing the penny hack.
Edit: apparently you can get spacers to utilize smaller batteries in larger configurations. https://www.amazon.com/gp/product/B00JHKSLSW/ref=oh_aui_search_detailpage?ie=UTF8&psc=1&pldnSite=1
Because whatever oil you're using is a wet lubricant so all of the dust and dirt and shit from the road sticks to it.
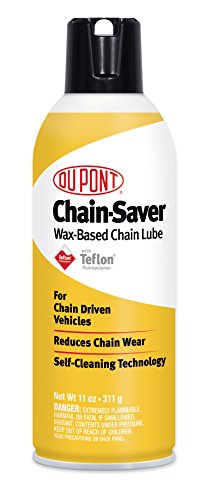
Use this https://www.amazon.com/DuPont-Teflon-Chain-Saver-Self-Cleaning-Lubricant/dp/B00KMMFE8Y
I've only done them for 2 or 3 pieces so far, but you can do a good shaker with cope and stick style. This video from saw stop does a decent job of summarizing things, but do additional googleing to get all the details.
https://youtu.be/d-fCL-ZAVWs
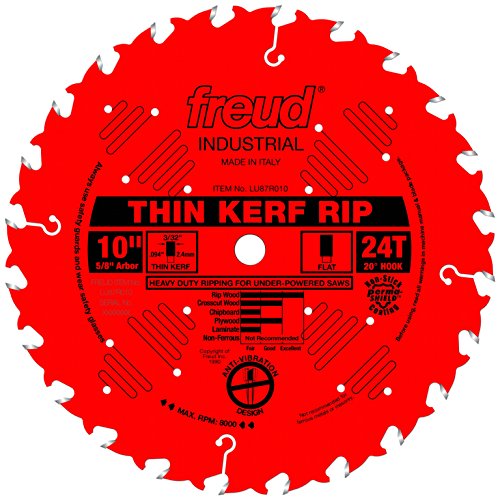
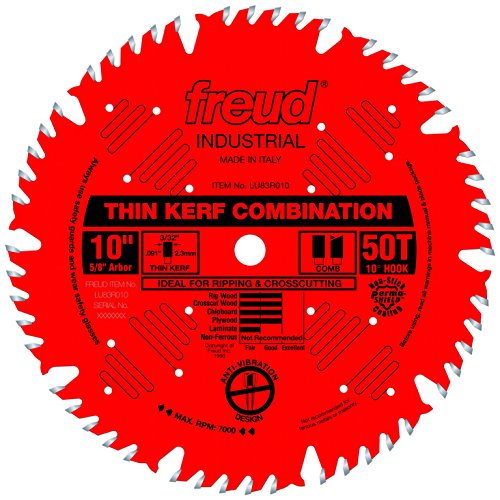
Also, get a ftg rip blade for cutting the groove, any bevel will make it impossible to get a good tight fit. Here is the one I use with good success (then you have a real rip blade too!) I'd totally recommend the thin kerf if you have a 1.5hp or less saw.
https://www.amazon.com/gp/aw/d/B0000225UH/ref=mp_s_a_1_1?ie=UTF8&qid=1468094452&sr=8-1&pi=AC_SX236_SY340_FMwebp_QL65&keywords=Freud+thin+kerf+ftg+rip
Get this set: http://www.amazon.com/Wiha-79242-Selector-Torx-Piece/dp/B001US4RMI
It was recommended to me by /u/uberfastman and it's truly wonderful. It's the last torx set you'll ever need.
Do not get cheapo torx screws, they will screw everything up and cause you endless grief. Wiha or bust!
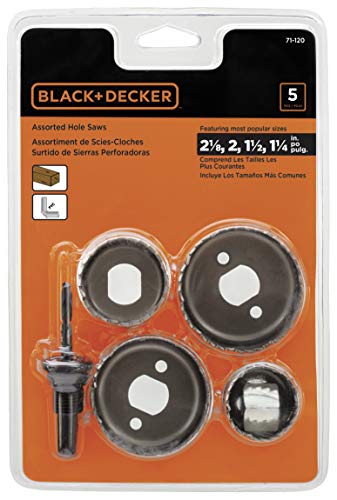
You have a welder, a digital level and a Dremel.....but not a $10 set of hole saws?
As a toolmaker/CNC programmer, your methodology made me twitch, but I can't argue with your results!
I think the tool you are looking for is a contour gauge like this https://www.amazon.com/General-Tools-833-10-Inch-Contour/dp/B000E36098
A more expensive lock might be cheaper for you, at this point.
Also, locks need maintenance too. Doubly so where you live. Let me just copy and paste Kryptonite's directions here:
>We recommend you clean & lubricate your lock(s) using these guidelines: If you are in an area that tends to have harsh climate changes with snow, rain or you're near the ocean, we recommend a monthly clean & lube. Otherwise, perform this maintenance on a bi-monthly basis. The areas of the lock you should focus on maintaining include the cylinder, deadbolts, u-shackle ends, or the lock-pin attached to cables.
>Step #1- Clean the above listed parts with a rag first (Note: If extra grime or corrosion is present, clean first with a degreaser spray or a WD40 type product. WD40 is not a lube, it is for cleaning.)
>Step #2- The lube type we recommend for all our locks is a "wax base" lubricant with added TEFLON. WAX helps as a carrier for the lubricant to coat and cling to the internal metal parts while TEFLON is a good slippery additive that gets in between the moving parts and reduces friction. Add a few drops on the above listed parts, then insert the keys. Turn the keys 5-10 times. This will keep the lock working great. Examples of this lubricant can be found in many local Bicycle or PowerSports shops, and Hardware stores.
https://www.amazon.com/DuPont-Teflon-Chain-Saver-Self-Cleaning-Lubricant/dp/B00KMMFE8Y
That's one such lubricant, if you're wondering.
Best shit ever: DuPont Teflon Chain Saver- http://www.amazon.com/DuPont-Teflon-Chain-Saver-Self-Cleaning-Lubricant/dp/B00KMMFE8Y
You have 2 options.
Lastly invest in flatlands bash guard. Google it. Its cheap and will protect the tip(s). No one likes a bent tip(s).
https://www.amazon.ca/gp/product/B0000DD0L1/ref=oh_aui_detailpage_o03_s00?ie=UTF8&psc=1
Protip: use a 2" hole saw on your drill. Makes nice big holes. Make your tools do the work for you. You can find a hole saw with a mandrel (the center thingie) at any hardware store. Or order a kit on the cheap: http://www.amazon.com/gp/aw/d/B0009ZAEY8
Something like this would work:
https://www.amazon.com/General-Tools-833-10-Inch-Contour/dp/B000E36098
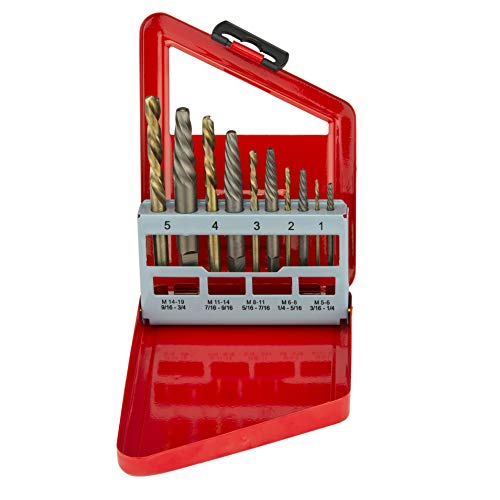
Neiko 01925A Alloy Screw Extractor Solid Cobalt Left Hand Drill Bits Set, 10-Piece https://www.amazon.ca/dp/B000F9ANQW/ref=cm_sw_r_cp_api_Ac3xzbK2JWX51
$23.93 CAD (pesos).
I've had them for a year and they have held up just as good as my old set of snap-on ones.
Amazon Prime > sex:
Seriously. After breaking a bolt or two on my Subaru I got fed up and bought a Makita metric bit kit. Where'd ya think I found it to get it to my house in < 3 days?
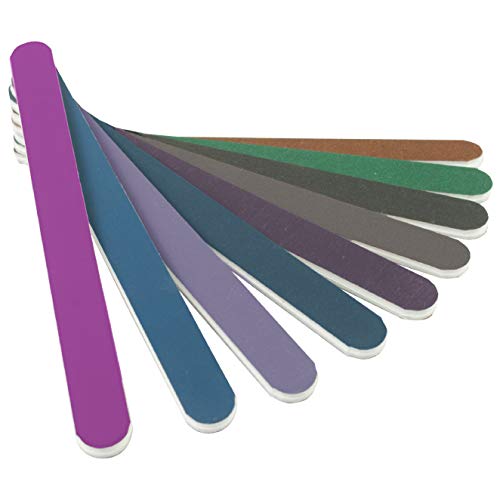
personally i think the best course of actions is to just buy new keycaps, unless you really want to keep them. light sanding should work best, sanding stick
i only have to pay double at amazon.ca
http://www.amazon.ca/Bosch-RA1181-Benchtop-Router-Table/dp/B000H12DQ6
i hate amazon, they always lie about their prices. this same table is 174 regular price at homedepot
How the fuck does hitting it turn it into rotation?
https://www.amazon.com/Micro-Mesh-MICRO-4N0000V-Colored-Sanding/dp/B003ELIO0A/ref=sr_1_1?s=hi&amp;ie=UTF8&amp;qid=1496455551&amp;sr=1-1&amp;keywords=Micro-Mesh+MICRO+-+4N0000V+Colored+Sanding+Sticks
Depending on how poor you are and how perfect of a job you want done, you might want to consider some DIY body work. Depending on the depth of the scratch, you might be able to fix it with just some automotive sandpaper (NOT hardware store sandpaper), some polishing compound, and a microfiber cloth.
If the scratches are deep enough that they've gouged out the paint, you'd need to sand, prime, and paint. I'd suggest talking to the good folks over at Bloomington Autocolor - they can fill a spray can with a custom matched color for your car. They can tell you what you need to do, and there are plenty of good Youtube videos as well.
For the dents, sometimes you can pop them out if they're rounded, otherwise you might have to replace the part. You can try a junkyard, or just order online. Depending on how the mirror broke you might be able to do a temp fix with some 2-stage epoxy, otherwise you'll probably want to order a replacement part for that as well.
Also, just because I'm a tutor, the word is "exorbitant", not "absorbent" ;-)
Wera 056490 Tool-Check Plus Metric https://www.amazon.com/dp/B00I8MYMT2/ref=cm_sw_r_cp_apa_i_T93YDbVKFCZCQ
Wera 05056491001 Tool-Check Plus Imperial https://www.amazon.com/dp/B016NC7NN0/ref=cm_sw_r_cp_apa_i_x-3YDbQZA02MD
https://smile.amazon.com/gp/product/B00JHKSLSW/ref=oh_aui_search_detailpage?ie=UTF8&amp;psc=1
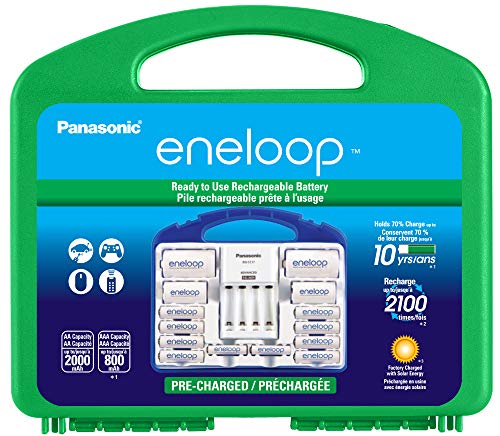
I have this set of rechargeable batteries that came with some C and D spacers. They work great.
That stuff is ok, but it doesn't last long. I'd go with DuPont Teflon Chain Wax. https://www.amazon.com/DuPont-Teflon-Chain-Saver-Self-Cleaning-Lubricant/dp/B00KMMFE8Y
It's available in a small aerosol to throw in a saddlebag on take on the road. I've been using it for about 35k miles on my streetbike and the chain still looks new.
I've been using it on my dirtbikes for over 10 years, and it is simply the best. My chain is cleaner and quieter than all my riding bros that like to use Maxima or Silkolene or any of that goopy messy stuff.
That's pretty normal for many lubes. They're sticky so that they won't fly off when the bike is at speed, but that means they'll gather dirt and fly off anyway.
You could try changing to a dry, wax-based lube like DuPont Chain Saver. I use that stuff and don't get the greasy build up as bad.
Nice work OP! Any reason you didn't choose an under-mount sink? Also for future weird tile cuts get a profile gauge: https://www.amazon.com/General-Tools-833-10-Inch-Contour/dp/B000E36098
Exactly right but I think it’s too late for this screw. The left-handed drill bit idea is the best choice IMO.
Neiko 01925A Screw Extractor and Left Hand Drill Bit Set, 10 Piece | Alloy Extractors | Cobalt HSS Drill Bits | https://www.amazon.com/dp/B000F9ANQW/ref=cm_sw_r_cp_api_48c-BbVJE5B8K
Hozan JIS-4 JIS Screwdriver Set (NEW 3rd. Gen) https://www.amazon.com/dp/B00A7WAHTU/ref=cm_sw_r_cp_api_09c-BbD50WFW8
It really depends on what you planning on sharpening. The stone you listed is a 5 in. medium and a 4 in. fine which you will come to find out if you buy it just isn't big enough. Also it really depends on how sharp you want your knives to be. The system you listed has a 400 grit medium and a approximately 1,000 - 1,200 grit fine. However if you don't mind not using a stone you could also use higher grit sandpaper or Polishing Paper but don't just cut into it like the guy did in the video. I like you experiment with different ways of sharpening my knives, my system is as follows; 800 sandpaper, 1,200 stone, 4,000 polishing paper, 6,000 stone, and finish with 2 different leather strop with compound approx. 8,000 - 12,000 grit. Find out what works best for you, Hoped this helped!
Get rechargeable batteries instead. This is a great brand that a lot of gamers use and recommend and that I own as well. They will last longer than the battery packs and it's cheaper and you can use them in other things other than your controller.
http://www.amazon.com/Panasonic-K-KJ17MCC82A-eneloop-Advanced-Individual/dp/B00JHKSLSW/ref=sr_1_2?s=electronics&amp;ie=UTF8&amp;qid=1421184411&amp;sr=1-2&amp;keywords=eneloop+power+pack
Hard to tell from the photo but I have a similar one I picked up from ifixit years ago. They've altered their design since, but this one also looks similar https://www.amazon.com/gp/aw/d/B071PB4RPV
A high quality blade will make a big difference. I use freud blades and love them. You could use a general purpose blade if you make both rip and cross cuts. https://www.amazon.com/Freud-LU83R010-10-Inch-Combination-PermaShield/dp/B00020JOAA/ref=sr_1_6?ie=UTF8&amp;qid=1466877982&amp;sr=8-6&amp;keywords=freud+10+inch+saw+blade
If you make a lot of rip cuts https://www.amazon.com/Freud-LM75R010-10-Inch-8-Inch-Arbor/dp/B001V5J4QY/ref=sr_1_1?ie=UTF8&amp;qid=1466878111&amp;sr=8-1&amp;keywords=freud+10+inch+saw+blade+glue+line+rip is amazing.
I use thin kerf as i had a crappy table saw in the past and its easier on the saw.
For the cables below the desk, I would suggest adding these things to the bottom of the desktop or on the wall behind the desk just below the desktop to clean up cables:
Above the desk, some velcro ties and maybe some braided cable sleeving should help clean up.
I think the best look is to have every wire coming out of the back of the PC geting wrapped up in 1 sleeve, then dropping below the desk (via a grommet) into the J cable raceway into the mounted cable management box, then 1 power cable comes off of there to the outlet.
Lastly, here are some grommet drills, grommets and some monitor mounts with cable management built in. The mounts will help clear up some deskspace (I have LG ultrawides and that half circle stand base eats up some space) as well as provide some ports for keyboard and mouse.
A profile tool like this https://www.amazon.com/General-Tools-833-10-Inch-Contour/dp/B000E36098 makes quick work of it. I use 1 for auto body work to match 1 side to the other perfectly. Also great for laying wood floor and matching the molding.
A contour gauge?
Here is a link to an Amazon listing. But there were a lot of various brands and options when I searched “left hand drill bit” so you can browse and make a choice of your favorite.
You might get lucky and have it just come off with a little prying, try that first. I've had some pop right off.
I highly recommend these Dremel EZ Locks over the older style cutting wheels that screw into the bit. They're much faster to change, because these wheels get eaten through and torn up pretty easily and quickly. Just get the metal cutting ones, and you should be good to go.
Edit: I also remembered the other reason i like the EZ lock's a lot more. The discs typically die in 3 ways 1) They just get worn all the way down (rare) 2) The outside breaks off 3) (On the old style) They break at the center mounting point. The EZ lock has a wider diameter at the mounting point for the EZ mount and its more reinforced, making it much rarer that they break the 3rd way.
You can use this to clean out the chip.
Try a [fiberglass pen](KTI (KTI-70550) Sanding Pen https://www.amazon.com/dp/B000FN8H52/ref=cm_sw_r_cp_api_0-fNAbT6MCGJ4) go really easy as you can easily go too far. Tape off around the switches to keep the broken bits of fiberglass and dust from getting in your keyboard.
If that is all the actual rust, I dealt with rust spots about that size on my NB. I first used a sanding pen to sand the rust down. Then I applied some OEM Touchup paint. Last thing, I used Langka blob eliminator to form it to the rest of the paint. You can't tell its been touched up from about 10 feet away, any closer than that and you can tell. Better than leaving rust to sit. Here are links for all of those things.
Sanding Pen
https://www.amazon.com/gp/product/B000FN8H52/ref=oh_aui_detailpage_o08_s00?ie=UTF8&amp;psc=1
Blob Eliminator
https://www.amazon.com/gp/product/B0074BMB0U/ref=oh_aui_detailpage_o09_s00?ie=UTF8&amp;psc=1
Micro Brush (Helps with touchup, sometimes)
https://www.amazon.com/gp/product/B01N6D0207/ref=oh_aui_detailpage_o07_s00?ie=UTF8&amp;psc=1
The best part about the blob eliminator, if you mess it up you can use it to completely remove any touchup paint, and not damage the OEM Paint. The stuff is magical for small touchup spots, work on it until you are happy with the results. Will be much cheaper than 450$
The router is one of those things that initially I was not interested in. But I was working on a project and realized a router would be the best way to proceed. So I got one and started playing with it. And now I am in love with it.
> dangerous
Sure, at first it seems so, but I got a pair of these push blocks and now I feel a lot safer. In general, I love the push blocks; they even make me feel a bit safer around the table saw. Now that is a power tool that scares!
> time consuming to set up
This is one area where the INCRA router set up really shines! Started off with a cheap Benchtop Router Table and it took forever to set up a new cut. And god forbid I should need to go back and re-do a cut. One of the first things I noticed with the new router set up is how quickly I can go from planned cut to the next one. I feel so much more freedom to change router bits and experiment with different ways to get the effect I'm after. Really can just dial in distances to within 0.0004". And return to the same dimension days later.
TEKTON 2910 1/2-Inch Drive Manual Hand Impact Driver Set, 7-Piece https://www.amazon.ca/dp/B000NPUJYE/ref=cm_sw_r_cp_apa_atUTBbTMV4HHR
Honestly, it looks like you just need to find a better flathead and then give'er. That's barely stripped at all.
If you have an impact driver, chuck up a flathead bit and bear down on it to prevent the bit from jumping out and stripping.
Something like this is the nuclear option. It's a hand impact, you strike it downwards with a hammer and that applies a twisting motion. Works great because of the combination of impact and that the same strike is driving the bit down to make sure it doesn't strip out.
it really depends on your budget. One of my favorite brushes is a badger 105 patriot found here
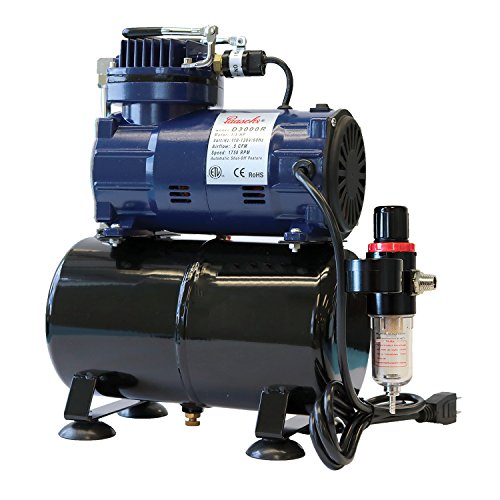
This brush will last you a long time with proper care. It's also reasonably priced and has a great spray pattern (pencil line to almost three inches). As for a compressor I personally use a California air tool - quite air model found here
I use this guy because of the large tank and because it has a rust free tank. Most model or little compressors have tanks that are made out of iron which will rust after some time. But depending on how much you wanna spend here are ones I would recommend because they come with a tank and an adjustable regulator/water trap (but as you can see they are not to far off from the California one)
Paache
PointZero
I have the second one in that list, however after a year the tank rusted even with proper care :(
They're considered by a lot of people to be the best out there. I have not used better ones and have not heard about better ones (but if there are I would love to know!).
Plus, they make a cool little kit version containig everything you'd need for knives. You can get away with a T6 and T8 for a while, but eventually you're going to start running into T5s, T7s, T9s, etc.
[Wiha Torx Set] (https://www.amazon.com/dp/B001US4RMI/ref=cm_sw_r_cp_apa_XEB7yb4EMKWCZ)
Felo Bit Driver
I can't recommend both of these enough. For strictly knife related purposes, a stubby bit driver might be a little easier to use but the Felo is great all around.
I think I found it on Amazon. Looks the same.
I went with this one to fit under the seat of my bike. The main missing tool that I had to add was this.
The 2500+mAh are Eneloop Pro's and cost more. I recommend just regular Eneloops in a kit (it's cheaper), and is 2100mAh. More than the Play'n Charge Kit and more than enough:
https://www.amazon.com/Panasonic-KJ17MCC82A-Eneloop-Advanced-Individual/dp/B00JHKSLSW/ref=sr_1_4
Alternatively: https://www.amazon.com/Panasonic-KJ17MCC82A-eneloop-Adapters-Individual/dp/B00JHKSLSW/ref=mp_s_a_1_4?ie=UTF8&amp;qid=1542678425&amp;sr=8-4&amp;pi=AC_SX236_SY340_QL65&amp;keywords=rechargeable+battery+set&amp;dpPl=1&amp;dpID=51qPqRlNGpL&amp;ref=plSrch
I wish I was aware of Dupont Chain Saver with Teflon when I started riding. It is pretty amazing stuff.
Of course. Glad to do it. If you follow some basic instructions it can be VERY VERY easy. The big stuff you will need:
most of the time HDD replacement is fairly easy. you usually just open a compartment, unplug some wires, unscrew some screws and then do the same steps in reverse order to complete the upgrade.
The parts AND tools listed above come to about $70 plus tax for a brand new SUPERFAST hard drive. If you wanted to do a RAM upgrade at the same time, I would estimate that to be around a $60 cost, putting your TOTAL ALL IN COST at $130, down from $400 lol.
You can do it!!
and feel free to ask any questions you like.
No downsides. I followed this guide. Just be careful and take your time. There are lots of small parts and it can get frustrating. I suggest taking plastic cups and keeping the screws from each step separate and labeled. Here are the tools I used.
https://www.amazon.com/gp/product/B071PB4RPV/ref=oh_aui_detailpage_o06_s00?ie=UTF8&amp;psc=1
https://www.amazon.com/gp/product/B06XXXQHS8/ref=od_aui_detailpages00?ie=UTF8&amp;psc=1
I've liked the rip cuts I get from my Freud thin kerf rip blades.
http://www.amazon.com/Freud-LM75R010-10-Inch-8-Inch-Arbor/dp/B001V5J4QY/ref=sr_1_2?s=hi&amp;ie=UTF8&amp;qid=1421010296&amp;sr=1-2&amp;keywords=freud+thin+rip+blade
http://www.amazon.com/Freud-LU87R010-10-Inch-24-Tooth-PermaShield/dp/B0000225UH/ref=sr_1_1?s=hi&amp;ie=UTF8&amp;qid=1421010296&amp;sr=1-1&amp;keywords=freud+thin+rip+blade
The thin blade eats less wood and for underpowered saws like mine works well.
I prefer the FTG blade because it's a little more aggressive and doesn't leave the tiny triangle of wood in the corners if you use it for a non through cut. Not an issue for re saws though.
A general purpose blade (even the fancy Forrest) won't solve your problem--it still has too many teeth for ripping thick hardwoods efficiently on a <3HP saw. I lost count of how many times I stopped the blade when ripping moderate-hardness woods like Walnut and Soft Maple on my last table saw, which was comparable to yours.
The glue-line-rip is a one trick pony. You're looking for a general use rip blade.
I would recommend the 24T Freud Industrial Thin Kerf Rip (not diablo).
BTW, the "3HP" on your saw is marketing nonsense--you can't get more than about 1.75HP out of a 120V/15A circuit.
I'd recommend a combination blade. Works great for someone getting started. Changing blades is a hassle https://www.amazon.com/D1050X-Diablo-50-tooth-Combination-PermaShield/dp/B00008WQ2Z/ref=pd_sim_469_2?_encoding=UTF8&amp;psc=1&amp;refRID=FS75W1HYKCW1CS1P4VTB
If you don't want to change your blade for crosscuts or rip cuts get a combo. I use the Diablo D1050X the price is right and let's be honest, your gonna sand anyway I don't care how good the cut is, it ain't gonna be no 220 grit finish.
https://www.amazon.com/gp/product/B00008WQ2Z/ref=s9_dcacsd_dcoop_bw_c_x_1_w
So I just bought a new table saw recently. I'm kind of following a similar track of 'upgrading' it with goodies.
Here's what I have to go along with my TS:
Next thing I'm going to make is a bunch of ZCIs, I figure this will come in handy for my next set of projects that will require the dado stack. I don't yet have an outfeed table (limited space), but my latest issue of WOOD has a cool mobile folding one that doubles as a scrap storage cart.
If you don't have a crosscut sled yet, I would make that first. They are made from inexpensive materials, and can be as simple or complex as you like them to be. My first crosscut sled for my old POS tablesaw was made from scrap ply and a chunk of scrap 2x4; it was ugly and kind of crummy, but it did the job. My second version is much nicer, with contoured and shaped fences and much more accurate using the 5 cut method. More sophisticated versions have built in stop blocks, tape measures, or T-tracks for adjustable inserts. I use my sled on just about every single project, as both my miter and circular saw are kind of inaccurate, and not great at making super accurate crosscuts. Plus, if you don't have a dado stack, you can use a crosscut sled to make rabbets and dados across the grain by making repeated cuts. It will take longer, but gets the job done.
Good luck!
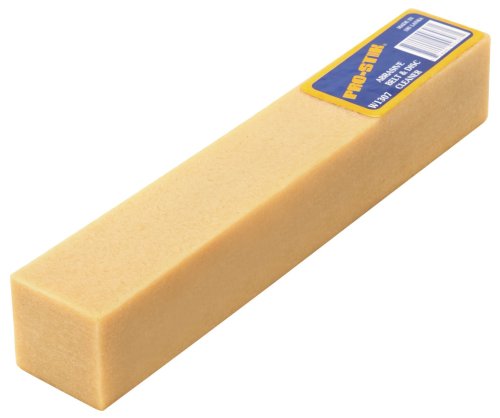
I recommend this: https://www.amazon.com/Prostik-W1307-12-Inch-Abrasive-Cleaner/dp/B0000DD0L1/ref=sr_1_1?s=hi&amp;ie=UTF8&amp;qid=1484675062&amp;sr=1-1&amp;keywords=belt+sander+cleaner
It functions like an eraser, and works pretty well.
Get a decent sized brass brush, pop the grip deck off, squirt bottle of soapy water, squirt it down, brushy brushy, spray nozzle it off, let dry, then shred it with your prostik
You can buy a latex rubber stick that's like a giant eraser. That works well to clean sandpaper on power sanders, but it would probably work on regular sandpaper with a bit more effort.
For example https://www.amazon.com/Prostik-W1307-12-Inch-Abrasive-Cleaner/dp/B0000DD0L1/
Hey, guys!
I thought you would all enjoy seeing my shrine to my Boosted. The only thing missing from it is the Boosted itself, and that should hopefully be arriving in the next few weeks. If everything is as planned, I should be able to hang it by the front trucks on the hook below the cabinet, and charge the board, the remote, my flashlight, and my taillight, as well as hang my gloves/wristguards, and helmet all from one spot, as well as keep my deck tape cleaner, skate tool, and any other random stuff I use with the board.
The taillight charges inside the small box on the bottom left. This is in my bedroom and the light glows red while it is charging, so I keep it in there so my room stays dark and I can sleep at night.
Cabinet: http://www.target.com/p/wood-wall-cabinet-threshold/-/A-50373639
Hook: https://www.containerstore.com/s/hooks/wall-hooks/satin-nickel-savoy-double-wall-hook-by-umbra/12d?productId=11004657
Cable box (holds all the plugs and extra cable in the cabinet): https://www.containerstore.com/s/office/tech-accessories/bluelounge-mini-cablebox-with-power-strip/12d?productId=10029358
Flashlight: https://www.rei.com/product/895484/fenix-uc35-rechargeable-flashlight
Tail light: https://www.rei.com/product/109689/niterider-sentinel-150-rear-bike-light
Light charging cables: https://www.amazon.com/gp/product/B01CRIPY6M/ref=oh_aui_detailpage_o03_s00?ie=UTF8&amp;psc=1
Remote charging cable: https://www.amazon.com/gp/product/B007NLW3C2/ref=oh_aui_detailpage_o03_s00?ie=UTF8&amp;psc=1
Cable hole covers: http://www.homedepot.com/p/CE-TECH-1-1-2-in-Furniture-Hole-Cover-Black-COVER-BK-1-5/203717844
Cable clips: https://www.containerstore.com/s/office/cable-management/bluelounge-mini-cabledrop-adhesive-cable-clips/12d?productId=10037207&amp;country=US&amp;currency=USD&amp;utm_source=tcscompshop&amp;utm_medium=feed&amp;utm_campaign=google&amp;cid=cse:PLA
Helmet hook: https://www.amazon.com/gp/product/B00VAMQR3G/ref=oh_aui_detailpage_o02_s00?ie=UTF8&amp;psc=1
Deck tape cleaner: https://www.amazon.com/gp/product/B0000DD0L1/ref=oh_aui_detailpage_o03_s00?ie=UTF8&amp;psc=1
Helmet: http://shop.s1helmets.com/s1-lifer-helmet-orange-matte/
Wrist guards: https://triple8.com/product/hired-hands/
Depending on how old you are this could last you the rest of your life. Cut it off in about 1 1/2 inch lengths. https://www.amazon.com/gp/product/B0000DD0L1/ref=oh_aui_search_detailpage?ie=UTF8&amp;psc=1
Bummer. Seems like a pretty good price though, especially for canuckistan.
This got me looking at Freud industrial blades in the US with a flat cut and led me to this.. https://www.amazon.com/Freud-Tooth-Combination-Blade-LU84R011/dp/B0000225V8
Thin kerf version here: https://www.amazon.com/Freud-Tooth-Combination-Blade-LU83R010/dp/B00020JOAA
You’ve got a fence, right? If so, buy a decent blade, watch a few safety vids and go for it.
You’ll figure out what needs to be fixed as you go along.
Try to spend more time working wood than getting your tools perfect.
Here’s a good blade to start: https://www.amazon.com/dp/B00020JOAA/ref=cm_sw_em_r_mt_dp_U_CcqyCbGEFW31T
What kind of table saw are you using, it's important for kerf sizing
If you're using a saw that can handle full kerf blades:
https://www.amazon.com/Freud-Tooth-Combination-Blade-LU84R011/dp/B00004T7A4/ref=sr_1_2?ie=UTF8&amp;qid=1478446733&amp;sr=8-2&amp;keywords=freud%2Bcombo%2Bblade&amp;th=1
Otherwise, thin a quality thin kerf blade:
https://www.amazon.com/dp/B00020JOAA/ref=psdc_552342_t1_B0000225V8
What are people's thoughts on this dado set and this thin kerf blade? I just got both for early Christmas gifts, but it's not too late to return them to Amazon for other options if these won't be great.
For nearly the same price as the big box Diablo's, the Freud branded Industrial line is supposed to be longer lasting. I just ordered the 50 tooth from Amazon Link
Here is the HD Diablo equivalent Link
Typically, a drill and the appropriately sized hole saw bit are what you would use.
Is that flange metal or plastic?
I'd drip a little oil down there. PB blaster if you have it. WD-40 or light machine oil if you don't.
Then get a set of left-hand drill bits and pick a small one. Go slowly with the drill in reverse and try to get it to bite. If the hole gets ~1/4" down and it hasn't bit in yet, try the matching extractor. If that doesn't work, move up a drill bit size and extractor size.
Eventually it'll get to the point where you've just drilled out the whole screw--destroying the threads in the flange in the process. This is okay. If it gets that far, get a tap in the next larger size and replace the screw with that larger size. And get a stainless screw for sure. And wax or copper grease it to help keep it from freezing to the flange in the future.
You need to either use a lot less pressure while cutting with the disc, or get some better discs. I use my dremel a ton and definitely get longer life out of a disc than that.
I recently picked up some of these and I'm liking them so far. They seem to last longer than others I've tried, and the "EZ Lock" is totally awesome.
https://www.amazon.com/Dremel-EZ406-02-Cut-Off-Mandrel-Cutting/dp/B000FBLRVA/ie=UTF8&amp;qid=1495130513&amp;sr=8-2&amp;keywords=dremel+quick+connect
I always recommend people upgrade to these cuttof wheels instead:
https://www.amazon.com/Dremel-EZ406-02-Cut-Off-Mandrel-Cutting/dp/B000FBLRVA
They are way easier to use.
Got this kit works great so far. The keyless chuck works fine too I got.
Which piece are you talking about to sand down the MVP?
Got this too
Ah, an egg strike. I hate people. Anywho, you can use one of these fiberglass prep pens. They are made to get into tight spots that you can't with sandpaper and are often used for touch up prep. They are sometimes called "scratch pens" as well. That said, with that much rust and damage, you are better off having a body shop respray the panel or at least do a spot prep and respray.
yes but i would use a sanding pen if you are trying to do small spots.
I like it! Good use of the small space. I'm stealing a couple ideas from you.
Also, how the eff did I not realize that there are router table inserts for my table saw?
I have this one: http://www.amazon.com/Bosch-RA1181-Benchtop-Router-Table/dp/B000H12DQ6
Is there benefit to having the one built into the table saw? Apart from having one less piece of equipment to worry about?
I have this saw. It’s not bad. One cool thing about it is that this Bosch router table top fits perfectly between the rails as a wing. You have to remove the stretcher and tap a few holes in the router table edge, though:
https://www.amazon.com/Bosch-Benchtop-Router-Table-RA1181/dp/B000H12DQ6
I have one mounted in mine. It works great.
Sure, http://www.amazon.com/Bosch-RA1181-Benchtop-Router-Table/dp/B000H12DQ6/ref=sr_1_1?ie=UTF8&amp;qid=1426809525&amp;sr=8-1&amp;keywords=ra1811
I am not entirely sure what is going on with amazon. They appear to be doing 50% Bosch accessories at the moment. However, that includes a good range of things. It appears there are some good deals out there...
Tekton makes a set for about $15, the are worth every penny.
Amazon link
I don't know how the rotors are attached to the bearing/hubs in your car, but if they happen to be held in with screws like my car (Honda Fit), get yourself one of these. It'll rotate and push the screw at the same time, limiting the chances of stripping the screw. As for the actual replacement, look up Youtube videos specifically about your car, and pay attention to what the dude says. Try to get atleast two supports when your car is jacked up, as a safety measure. When you've installed your new brakes, look up how to break in your brakes. Oh and one more thing, make sure to mount your brake pads on the right side :)
But most importantly, enjoy it!
Wanting to get a decent airbrush compressor with tank. Amazon recommends this unit and I'm not sure if that'll work or not. Reviews are good and its in my price range. Would be open to suggestions if that's not a great idea or whatnot.
Thanks for the help!
Here is a decent one
http://www.amazon.com/Paasche-D3000R-Compressor-Regulator-Moisture/dp/B001CJPWYM?ie=UTF8&amp;psc=1&amp;redirect=true&amp;ref_=oh_aui_detailpage_o00_s00
You'll probably get a better response over at /r/modelmakers or /r/modelcars.
A 30+ year-old airbrush probably isn't too good for a beginner to start with. Depending on your budget, you can get airbrush kits from Amazon for under $100, or go all out for a Paasche, Badger, or Iwata setup for $200 and up.
This is the kit I started with. The brushes are surprisngly well-made, and I haven't had any problems with them, except the big one's plastic handle broke. The compressor isn't that good, but it's good enough to get some experience. Mine won't hold pressure after 2 years, and the regulator sucks, but I've painted some pretty cool models with it.
Again, it all depends on your budget. If you're under $100, check out the Master Airbrush stuff on Amazon - if you have more to spend, look for a compressor with a storage tank like this.
I’ve been using this Paasche compressor and it’s been excellent so far. Precise control of pressure with a gauge and a moisture trap built in. It’s decently quiet too. I’ve heard tankless compressors can cause issues with sputtering paint due to potentially inconsistent airflow so a compressor with a tank could likely resolve those issues. I’m also using an Iwata eclipse.
This. Here's a link to the set.
I have THIS torx set. I like it. I have been thinking about getting a 2nd one. You would also need a bit holder with this.
I free hand sharpen with dmt stones, but I hear good things about the Spyderco sharpmaker (be sure to get the diamond rods). I use a Flexxx strop (USA Made blades) and Bark River compound. There are a few good strop makers here on reddit too. A lot of people use nano-oil as lube. I use flouro grease and militec oil.
I forgot one more method that I used before. It is a little more aggressive than an eraser but it works if you take your time. Wet sand using a high grit sanding stick. A drop of dawn in your water helps. These aren't the exact ones that I used but it is close. It will leave a little haze on the area you sanded but your clearcoat will make it disappear.
https://www.amazon.com/dp/B003ELIO0A/ref=asc_df_B003ELIO0A5426676/?tag=hyprod-20&amp;creative=395033&amp;creativeASIN=B003ELIO0A&amp;linkCode=df0&amp;hvadid=167153283791&amp;hvpos=1o6&amp;hvnetw=g&amp;hvrand=5050060401267926860&amp;hvpone=&amp;hvptwo=&amp;hvqmt=&amp;hvdev=m&amp;hvdvcmdl=&amp;hvlocint=&amp;hvlocphy=9033497&amp;hvtargid=pla-309730325436
I find the Olfa stays sharper longer than the current #11 Xacto blades. I also like that the tip is a bit shorter.
As far as sanding sticks, I use These, which are probably overkill. I get good results even using only half the set (progressing through every-other stick). Haven't tried any other sets, so can't compare.
As mentioned by another modeler you can use polishing pads.
Micro Mesh are good. These pads are also useful, I use them wet and in order. I also cut them into smaller pieces to make polishing easier.
As for a polishing compound, I found this one to be good. It also works well on the lenses of modern 1:1 size cars if you need them to be as bright as new. ;^)
Well, if you're thinking about doing it get some mylar paper from goulet and go slow and use super cheap nibs. You will break your first 4-16 nibs.
I personally like to do it on my dremel at low speeds using a finer grit spinny thing :) The way you do it is keep a vision of what the nib should look like at a very detailed level and just go slow and light with the grinding and check it with a loupe often. I use a 60x loupe (this one, it's amazing) and check the shape of the nib OFTEN. After every few seconds of work I'll check it till it's in the shape I want, then I'll take some fine files and smooth it out a bit with different sticks between 3200 and 12000 grit. I'll usually move up from 3200 and just keep going until I'm on the 12000 grit stick. I usually have the nib I'm working on in the pen by the stick tuning part but I do take out the nib when I'm using the dremel.
Now that I've gotten pretty proficient at it, it usually only takes about 5 minutes to do a nib unless it's below a F, in which case it'll take up to 10 since you really have to go slow with those because you want to keep as much material on the nib as possible, but just shape it into a finer point where the paper touches it.
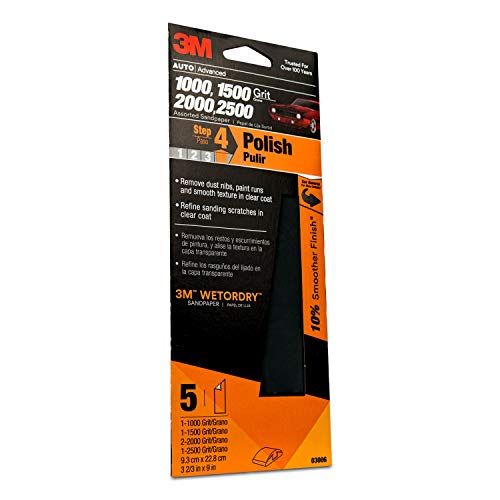
3M Assorted.
1000-2500 grit.
Thing is its usually an Add-on item on Amazon
https://www.amazon.com/gp/aw/d/B005JPGTNI/ref=pd_aw_fbt_263_img_2?ie=UTF8&amp;refRID=ANS6PKY1W1HB0F7SC93A
here you go
https://www.amazon.com/dp/B00I8MYMT2/ref=cm_sw_r_cp_api_i_yWIoDbFQDM4JB
edit, they also have imperial, if youre into that
I would return if it is not the quality you expected. Wiha is supposed to be a premium brand. None of the pictures look like major issues, but you are paying for something that is supposed to be nice. You could even save a few dollars and buy this https://www.amazon.com/Wera-056490-Tool-Check-Ratchet-Sockets/dp/B00I8MYMT2/ref=sr_1_1?s=hi&amp;ie=UTF8&amp;qid=1493311078&amp;sr=1-1&amp;keywords=wera+set
I got mine from Amazon. I got this exact package went it was on sale for $17. It goes on sale a few times a year. I'd keep an eye out on slick deals for it, they sell out pretty quickly. I wouldn't buy it for $33, but at $25 or lower sure.
https://www.amazon.com/DuPont-Teflon-Chain-Saver-Self-Cleaning-Lubricant/dp/B00KMMFE8Y
The only way to fly.
Pick up some chain lube, a can of plexus, and a microfiber towel. These are really simple things that are easy to overlook, but make a difference.
It's pretty easy to roll the bike a couple feet and spray the chain in sections every few hundred miles even without a stand.
I'm always surprised at how much less fatiguing a long ride is with a clean visor. Just less things for your brain to process if there aren't as many bugs in your vision.
http://www.amazon.com/DuPont-Teflon-Chain-Saver-Self-Cleaning-Lubricant/dp/B00KMMFE8Y
http://www.amazon.com/Plexus-Plastic-Cleaner-Protectant-13-Ounce/dp/B00092CKN4/
I have been using this for chain lube:
http://www.lowes.com/pd_213197-39963-D00110101_0__?productId=1059839
It is, frankly, amazing. It goes on like WD40. What I like about it is that it dries to a waxy like consistency so that it doesn't fling off all over the place and it isn't tacky and doesn't attract dirt like more liquid libricants.
I actually use it on a street motorcycle chain as well and have been very satisfied with that application as well.
EDIT: It looks like they changed the formulation of the multi-purpose lube. It is no longer a dry wax lube and is therefore not suitable for chain use anymore. :-(
They say that this is similar to the old formula, but I haven't tried it yet. I will soon since I am almost out of the old stuff. :-(
http://www.amazon.com/DuPont-Teflon-Chain-Saver-Self-Cleaning-Lubricant/dp/B00KMMFE8Y
If it won't lock in again then replace it. Someone on here suggested these to me: JIUWU Pneumatic Air Straight Fitting 4mm thread M6 One touch hose Connector Pack of 10 https://www.amazon.com/dp/B00WE1A3D2
They work and don't require any new printed parts, and prime shipping means they show up fast.
A few things typically break shortly after you start using one of these.. the biggest pain, and it's not even a printed part, is rewiring the bed so they don't rub on the hole going into the base.
Printed parts, I print an extra extruder arm and baseplate (part on top of the tower that feeds filament. This breaks second. I'll find the file I like to use, it's hard to find on thingiverse for some reason. WK7 has one, but it's not as tight and gives space for flexible filament to bend. Further you'll need, at least one https://www.amazon.com/gp/product/B00WE1A3D2/ref=ppx_yo_dt_b_asin_title_o01_s00?ie=UTF8&psc=1 and send me a self addressed stamped envelope and 1 dollar and i'll send you one. IM for an address.
Height spacer for when you get fed up with a warped print bed and move to glass.
There are a few options for each one, if you want links I can provide you the ones I like. It's sometimes funner to see what's available and play with the options yourself.
I had this happen to me too and these worked out beautifully. https://www.amazon.com/gp/aw/d/B00WE1A3D2/ref=gp_aw_ybh_a_46?ie=UTF8&amp;psc=1&amp;refRID=KZ034DRXZ93250TN11CA comes in a ten pack too which is great
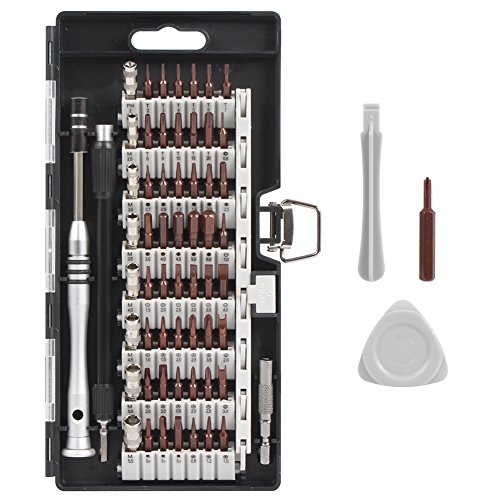
It depends...Due to a medical issue my hands shake a fair bit so I used one of these: https://amazon.com/General-Tools-500-Precision-Screwdriver/dp/B002XZLTQO and drove the screws all the way but stopped just short of tightening then did the final tightening by hand with a hex key or the hand driver in the kit linked below. It beat dropping the allen key on the floor every 4 minutes! Now this power driver uses 4mm shank "micro bits" and the German tool makers Wiha and Wera, which are seriously pro grade and expensive as all hell, market these bits but this kit I linked to will supply you with all the bits you need and then some.
https://amazon.com/Syntus-Precision-Screwdriver-Electronics-Cellphone/dp/B071PB4RPV
Oh, and use lithium AAA batteries in your driver as it'll kill regular batteries in just a few hours.
Full disclosure I have zero, nill, null, nadda financial interest in the above linked items.
I've used this cheap kit from amazon to put together a few PCs, do some laptop repair, and pretty much any thing else that didn't require insulated tools or a drill. The bits didn't snap the moment I misused them, so the quality is decent. The included hex/socket(?) is also great for putting in standoffs. The handle leaves a bit to be desired in ergonomics, but you could always buy a more comfortable handle - these bits are a standard size.
edit: fixed link to make automod happy
I'm not sure of a specific brand, just try to find something like this
If you do attempt this on your machine, you will want a thin-kerf rip blade, 20-30 teeth. The thin kerf will reduce the load on your machine.
Heres a decent Freud one for under 40 bucks from Amazon.
Never mind my suggestion, it'll probably ruin your veneer.
Depending on the finish needed, you might want to switch to using a blade with less teeth - something made more for ripping.
A smaller blade, with just as many teeth won't be any cheaper to resharpen.
I just got the following blade (Freud LU87R010 10-Inch 24-Tooth - http://www.amazon.com/Freud-LU87R010-10-Inch-24-Tooth-PermaShield/dp/B0000225UH/ref=sr_1_1?s=hi&amp;ie=UTF8&amp;qid=1381425527&amp;sr=1-1&amp;keywords=freud+lu87), so I can't commend on its longevity, but it seems more suited to your needs.
Should be at least half as expensive to resharpen.
I have the same saw and I bought this for it -- https://www.amazon.com/Freud-Tooth-Ripping-Blade-LU87R010/dp/B0000225UH/ref=sr_1_1?ie=UTF8&amp;qid=1506016279&amp;sr=8-1&amp;keywords=thin+kerf+saw+blades+10-inch
I like the thin kerf as you don't have to worry about it bogging down if you cut anything thick, and I do mostly rip cuts. I've ripped and cross cut plywood with a thin maple veneer and haven't had any issues with tear out either.
I had some issues with my 4512 also bogging down. I bought a Freud 24 tooth thin rip blade and it works great. I haven't had any problems since. The thinner the kerf the easier it is for the saw to cut.
http://www.amazon.com/Freud-LU87R010-10-Inch-24-Tooth-PermaShield/dp/B0000225UH
For the cost of a blade just to save an extra ~0.025 inches or whatever or wood you can just buy a LOT more board feet of lumber instead. Or resaw on a bandsaw.
I think the blade that dewalt comes with is technically close to thin kerf (3/32 ~= 0.095 I think I have the same blade that came with my Dewalt..24 tooth 0.095 kerf).
A normal kerf is 1/8 or 0.125, to go even thinner you are talking like 1/32 of an inch less per cut I don't think you'll find a 1/16 blade for a TS and if you do it will cost a lot.
A 56.00 Freud thin kerf blade is also basically the same as what's in your saw https://www.amazon.ca/Freud-LU87R010-10-Inch-Ripping-Perma-Shield/dp/B0000225UH/ref=sr_1_3?ie=UTF8&amp;qid=1526935425&amp;sr=8-3&amp;keywords=freud+thin+kerf
So just save your money on a new blade and buy more lumber
The contractor comes with their rather shitty 40t, full kerf combo blade. Its not a great blade, and its full kerf. Lots of full kerf blades will perform better, let alone a thin kerf. Its also a relatively loud blade compared to many on the market.
If you haven't bought blades already and are still researching, I use a Freud 24t thin kerf rip blade and 50t combo blade and I've been very happy with them.
The rip blade can easily handle ripping 45mm redgum (12kN on the janka scale) without bogging down.
Any contractor saw would be excellent. You should look for saws with the motor hanging out the back, they're better than the direct drives. Everyone here loves the delta -I cant remember the number- or the Rigid, but I've got a mid 90s craftsman with new freud blades and it cuts very smoothly. I tuned it up following youtube's guides and then every time i adjust the fence have to square it up for 2 minutes cause I havent had time to build a biesemeyer fence yet. I got these two saw blades 24 tooth FTB and 60 tooth ATB
Build yourself a crosscut sled for 10$ worth of wood and I used it for rabbets and Miter-ing. This table saw is a pretty decent deal. Bet he'd take 300 for it
Dont be afraid of used things, youtube will tell you how to make it pretty decent.
Ya, the table saw guard is a combination splitter, blade guard as well as pawls on either side to prevent the workpiece from reversing direction. When I was first starting to use it I made some dumb mistakes and shot some small boards right past me because I got mine used and it didn't come with part of the guard assembly. Fortunately I had watched enough safety videos and things to know to stay out of the way of the blade so it did not hit me, but still was not a pleasant experience. I have since bought the missing piece and use the splitter and guard whenever I can.
As far as a multipurpose blade, I went with a combination blade so I don't have to change blades when doing rips vs. cross cuts. This is the one I got:
http://www.amazon.com/D1050X-Diablo-50-tooth-Combination-PermaShield/dp/B00008WQ2Z/ref=sr_1_4?ie=UTF8&amp;qid=1407533481&amp;sr=8-4&amp;keywords=diablo+10%22+blade
I have found it to cut plenty clean for my needs.
Agreed on the tooth count. I've had decent luck crosscutting hardwood with this blade and a slow feed rate. It isn't perfect, and I have an 80 tooth blade on my wish list for that reason.
I have a Freud D1050X Diablo 10-Inch 50-tooth ATB Combination Saw Blade in my amazon wish list (for my table saw). Everyone seems to love them...
https://www.amazon.com/dp/B00008WQ2Z
For a general purpose blade I would recommend one. They are cheap but still decent quality and good for 90% of your cuts. I have this one and have no complaints as a hobbyist
https://www.amazon.com/dp/B00008WQ2Z/ref=cm_sw_r_cp_taa_HFBSzbCZA2EXX
I use the diablo blade you linked to; it's great. Slightly cheaper on amazon.
Before those, I used these blades, and for $20, they're hard to beat.
Yes, combo blades are a fine alternative to high or low tpi blades. The only time I've ever used a 24tooth ripping blade is when I need the flat top grind for flat bottomed grooves for splines.
http://www.amazon.com/Prostik-W1307-12-Inch-Abrasive-Cleaner/dp/B0000DD0L1/ref=sr_1_1?s=hi&amp;ie=UTF8&amp;qid=1464233002&amp;sr=1-1&amp;keywords=sanding+belt+pad+cleaner
I usually don't bother but here in NC there can be a lot of mud, and I've had it build up enough to make the grip less grippy. I use this: https://amzn.com/B0000DD0L1
It kind of depends on the saw you have. If it is a portable saw buy the .091 kerf here:https: //smile.amazon.com/Freud-Tooth-Combination-Blade-LU83R010/dp/B00020JOAA/ref=pd_sim_469_13?_encoding=UTF8&psc=1&refRID=YMMS6DY84H49CKS4C9GW
If it is a bigger saw that can handle the load buy this one:
https://smile.amazon.com/dp/B0000225V8/ref=psdc_552342_t1_B00020JOAA
Both are great blades and the full kerf gives a much better cut on a full size saw but the smaller saws can't handle removing that much material. I use the thin kerf in my "jobsite" saw. I use Freud's 1/8" kerf line of blades in my cabinet saw. You can have them sharpened 3-4 times for about $12 each time.
If you only paid $30 bucks for the saw and the motor is good sink some money into a good blade, possible thin kerf. That dewalt blade that is in there is a piece of shit.
This should do quite nicely.
2" sspade bit with a hand drill is still pretty sketchy. You can get something like this instead.
drill and a 2in hole saw.
https://www.amazon.com/Black-Decker-71-120-Assortment-5-Piece/dp/B0009ZAEY8/ref=sr_1_1?ie=UTF8&amp;qid=1497455790&amp;sr=8-1&amp;keywords=2in+hole+saw
Okay, so this is the mandrel I want to get and the hole saw I want to use. This would be fine you say?
Hole saw sizes: 1 1/2" for the smaller/lower hole, and a 2" for the larger/upper hole. These sizes typically come standard with a hole saw kit ($14.02): https://www.amazon.com/Black-Decker-71-120-Assortment-5-Piece/dp/B0009ZAEY8/
NOTE! The official IKEA FIXA hole saw kit does not come with the correct corresponding sizes!
My specific hack requires a grommet to achieve a tight yet adjustable fit while utilizing standard hole saw sizes ($7.49): https://www.amazon.com/HYCC-Flexible-Desk-Grommet-Color/dp/B01KNXAPK8
Any particular advantage of a forstner bit over a hole saw?
E.g.
https://www.amazon.com/gp/aw/d/B0009ZAEY8/ref=mp_s_a_1_1?ie=UTF8&amp;qid=1484366877&amp;sr=8-1&amp;pi=AC_SX236_SY340_FMwebp_QL65&amp;keywords=2%22+hole+saw&amp;dpPl=1&amp;dpID=51ypuzQ689L&amp;ref=plSrch
I think for that application, I'd rather use a contour gauge - this plastic holds it shape generally, but does have some springback after released, so it wouldn't be exactly the contour you were trying to bend it to.
https://www.amazon.com/General-Tools-833-10-Inch-Contour/dp/B000E36098
About 19 bucks and solid measuring.
Depending on the object size, a contour gauge like this will help you transfer the design accurately to paper.
The cooling system seems like a leaky mess, but I got it cleared up (for now). I'm not sure which part of the process fixed the problem, but I removed the IACV and replaced the two coolant hoses then reinstalled the IACV. After clearing the fault codes and running the engine again, I haven't had any codes pop up since. Even managed to pass a smog check. A few other coolant leaks came up after that, but I've fixed those as well. Basically every coolant hose in the car is new now, so I hope it'll stop leaking.
As for the power steering pump bolt, there is still half of the old bolt stuck inside. Is the best way to remove it using a screw extractor thing like this: https://www.amazon.com/Neiko-01925A-Extractor-Extractors-Cobalt/dp/B000F9ANQW/ ?
For the exhaust manifold leak, it seems like one of the bolts I broke is a stud bolt installed on the exhaust manifold. Would it be possible to remove the stud bolt and replace it? It is #12 in this diagram: http://hondapartsnetwork.com/assembly/images/detail/3309514.png
I'm happy the car finally runs well enough for me to worry about things like a leaky exhaust now.
Thanks for the help.
I like extractor sets with reverse drill bits. Often they'll come out before you have a chance to use the extractor.
http://www.amazon.com/Neiko-01925A-Alloy-Extractor-Cobalt/dp/B000F9ANQW/ref=sr_1_1?ie=UTF8&amp;qid=1450035946&amp;sr=8-1&amp;keywords=extractor+set+with+reverse+bits
OK, so what I purchased from Harbor Freight was somthing similar to this:
* https://www.amazon.com/Neiko-01925A-Extractor-Extractors-Cobalt/dp/B000F9ANQW/ref=sr_1_12?keywords=screw+extractor+kit&qid=1554384193&s=gateway&sr=8-12
&#x200B;
However if you already have drill bits, including a small enough one for that buffer, then you'll just want one of these.
* https://www.amazon.com/Extractor-TIAMAT-Hardness-Extractors-Stripped/dp/B07GLPLV78/ref=sr_1_11?keywords=screw+extractor+kit&qid=1554384193&s=gateway&sr=8-11
* https://www.amazon.com/Damaged-Extractor-Stripped-Remover-Queenti/dp/B07P668VWV/ref=sr_1_1_sspa?keywords=screw+extractor+kit&qid=1554384193&s=gateway&sr=8-1-spons&psc=1
&#x200B;
{edit}
Forgot to say, if you already do have the drill bits, I would recommend #2 of the other 2 options, as those bits are double sided for more dual purpose work.
Get an EZ-Lock for cut-off wheels: EZ-Lock Metal Cut-off Kit at Amazon
this is what I've used in the past - probably what you got. That said, I did have to dremel a notch to get them to fit just right. I recommend aquick change disc for that.
Engraving bits
Flex Shaft attachment
EZ Lock cutinng wheel kit
Haha, when it comes to building my own computers, I have raging OCD; so when it came to modding it and putting a dremel to the nice brushed aluminum case, it was extremely nerve racking. I used a pretty cheap single speed Dremel from Walmart with these metal cutting wheels.
The acrylic sheet that I used was precut and sold off the shelf at Home Depot, it's 8"x10" clear acrylic (.9mm thick)
Some cuts I couldn't get with a Dremel. I used the quick detach metal disks http://www.amazon.com/Dremel-EZ406-Cut-Off-Mandrel-Cutting/dp/B000FBLRVA
The paint is not adhering to the bumper. Please keep in mind that I'm not an expert, but I've got some experience with putting paint on plastic surfaces (aka scale model nerd, lol).
Here's what I would do: lightly rough up the bumper's surface with a spot sanding pen (LINK) and clean the surface with some isopropyl alcohol. Usually there's specialized prep involved with painting plastic on cars, but those two steps should help your touch up paint "grab on" to the bumper.
As with all painting, most of the work is in the prep. Good luck!
Hi all,
So I have a few small paint chips on the roof of my truck that have rusted over time. I bought a kit from Dr. ColorChip after hearing such good things about them and thought I would give it a shot.
I purchased this sanding pen from Amazon, because from my understanding you need to sand off the rust first before applying the paint. The rust was much harder to get off than I thought, and since the sanding pen was a little wider than the chip I think I took off too much paint.
I cleaned everything up and continued on with the Dr. ColorChip kit. After following the instructions and applying two coats this is what I ended up with.
Where did I go wrong here? Did I wipe on the blending solution too early? I waited at least five minutes after I applied the paint before using it. Also, it looks like the rust is still there underneath even though I sanded a majority it off before painting?
Pretty disappointed with how it came out, looks worse than before I started. Any help here is appreciated.
Thanks.
Just spots but there are a lot of them. I got the squeegee version because I have so many. I have never done any chip repair on my car before. I got a sanding pen (https://www.amazon.com/gp/aw/d/B000FN8H52) to try to clean out any rust and I suppose rough them up.
Do you know if there is a kernel for this router?
https://www.amazon.com/Bosch-Benchtop-Router-Table-RA1181/dp/B000H12DQ6
Link to it not going through twitter and removed the ref ID
I have recently purchased my first home with my fiancée, and like all of you, have an enormous list of projects we'd like to do. I am fairly handy and am prepared to tackle any project (with supervision on electrical). All that being said, I have always used other people's tools when working on projects, so I don't have many of my own. I have a budget and would like to purchase all of my tools on Black Friday/Cyber Monday to get the best bang for my buck. I'd like your advice on which tools are the best for my budget.
We are planning on renovating the master bed, bath, and closet, kitchen, mudroom, and the laundry room. I also plan on making a kitchen table, coffee table, cabinets, dresser, etc. The first project is the laundry room and mudroom, which will require tile, built-ins, cabinets, and replacing washer/dryer. I have a tool budget of $5k-7.5k (ideally staying on the lower end) and would like your thoughts on my equipment list.
If you've used any of this below, what did you think? Are there any cheaper or better alternatives I should consider?
Last question: does anyone know where I can find plastic sawhorses that allow me to put a 2x4 across the top, but also allow the legs rotate for easy storage? My dad had these growing up and I cant find them anywhere. I have found all plastic ones, but I'd like to have the wood so I can saw through it and replace it as needed.
Thank you for your help! I look forward to keeping you updated with our projects.
this bosch table will work as a table saw wing if you remove the base. There is also the bench dog promax to consider. good luck in your search - we all expect to hear about whichever you choose :)
You could always pick up a hand impact driver like this.
Also you could try trying to turn both directions. Sometimes all you need to do is get it moving.
Also you could use a propane torch to heat the bolt, and give it a few heat cycles.
never heard of point zero, looks like they are rebranded masters stuff. The paasche is known brand, quieter, but less powerful. If you plan on using the compressor for airbrushing you won't need it more powerful though.
Man there is a lot to cover.
But to start, get a compressor with a reservoir so you can have extended paint sessions without overheating the pump. Something like this, Also some Dentist supply depot have oilless compressors with reservior ( the oiless part is very important for painting) that are really quiet but can get a bit expensive.
Get a good airbrush, you can find good quality airbrush in amazon but skip ANY of this type you won't get much out of those. This is a very good gravity fed airbrush.
Thank you for the response. How much time do you usually airbrush for? Do you do a lot of detail work with it? I was thinking I would just be doing base coats and the initial highlights, then finishing with a brush.
These Master or Paasche tanks seem good. I am concerned about the 1 star reviews though, seems like they can break.
For now I think I am going to try my Hitachi and see how it goes. I can always get an airbrush compressor later.
Long post incoming....
So, I don't think I've seen many airbrush discounts. Badger did a nice promotion where you could buy any airbrush for $55 for their 55 year anniversary this summer, but other than that it's kind of hard to find discounts. As far as Prime Day, I doubt they're going to have discounts on airbrushes, that's a pretty niche product they don't really get into. If you want to get started with that, I'd do something like this:
You then need a cleaning pot, some cleaning fluid, and an airbrush hose All told, that's like $300.
Then you need paint, paint brushes, a hobby knife, super glue, a mini hand drill, some small drill bits, sprue cutters, basing materials (cork board, model railroad ballast, etc) and I find a pair of tweezers helpful. That could add up to another $200 in materials (and obviously can cost way more, paint is expensive). So of your $550 budget, you would then have $50 remaining for models... which will buy you one model kit. So if you're looking to get started for $550, I'd probably forget the airbrush for now, and just get paints that can be used with one later. I recommend Vallejo paints. The eyedropper bottles work great for airbrushing, and you can just thin them with water. I haven't met one yet that doesn't work. A paint set like this would set you up nicely for doing an Imperial Guard army.
As far as what army to play... Guard is fun, but if you like the modern military aesthetic, Space Marines might be more what you're after. The new Repulsor Executioner tanks look awesome, and the new Primaris marines are great looking models... some of the best GW has produced. The Guard kits are looking kinda... dated IMO.
Don't do compressed air. Either a CO2 tank with a good regulator, or a comressor. I have this one, I think, got it for something like $120. Very quiet, about the size of a laptop, you can use the plug in the picture for scale.
Not necessarily
Get this and you should be able to do some basic maintenance. Also check our wiki page listed in the sidebar for the "Basic Maintenance" page on how to do certain things. Not listed in there is /u/crazymutherfucker 's video on how to apply loctite.
Wiha 79242 Bit Selector with Torx Bits, 10 Piece https://www.amazon.com/dp/B001US4RMI/ref=cm_sw_r_cp_api_r2-mxb25PS75N
Looked into the brand. Think this set might do?
https://www.amazon.com/Wiha-79242-Selector-Torx-Piece/dp/B001US4RMI/ref=sr_1_1
i use this one
I have a Wiha torx bit set from Amazon. It works perfectly well, but be aware that their torx bits don't carry a warranty, while their torx drivers do. I had one bit deform on a loctite-ed screw, but it takes some mighty force to break them like that.
https://www.amazon.com/gp/product/B001US4RMI/ref=oh_aui_detailpage_o02_s00?ie=UTF8&amp;psc=1
It's the Wiha torx set, recommended by someone on here. So yeah, one of the screws are stripped, and I can't put tighten the other ones back now, as it seems to just keep spinning.
Nemosine has a nib that will fit in EF (and other sizes) for about $7, then there is the Goulet nibs, #6 will fit.
On to your question, search for micro mesh and you should be on the right path to re-shape and clean up a nib. For heavy profiling, you will want to start with a lower grit (800-1500), then work up to 12,000 or beyond for finishing. Be careful, it is easy to go to far, and ruin the nib. This will not be any cheaper than picking up a new nib, and probably more expensive, but it can be fun.
thanks, is it possible to only use one type of sand paper if i am using the god hands and no hobby knife? would i only need 1000 or 1500 then? to avoid the discoloration?
&#x200B;
something like this?
&#x200B;
https://www.amazon.com/Micro-Mesh-MICRO-4N0000V-Colored-Sanding/dp/B003ELIO0A/ref=sr_1_3?keywords=1500+sandpaper+stick&qid=1563999174&s=gateway&sr=8-3
https://www.amazon.com/dp/B003ELIO0A/ref=cm_sw_r_cp_ep_dp_NTi9BbYRY0FM5
Amazon sells these, they work extremely well.
Micro-Mesh MICRO - 4N0000V Colored Sanding Sticks https://www.amazon.com/dp/B003ELIO0A?ref=yo_pop_ma_swf
I had a tiny spot on my hood that I left about 5 years ago thats slowly progressed from a dot to circle about an inch wide. I kept saying I was going to find a new hood from the junk yard, but I have yet to find one in good condition & the right color. I should've taken care of it before it grew.
Touch up paint is what you want, I've used that in other areas in the past. Focus your sanding right where its rusted only, try not to sand past it thinking you can blend the paint in. That's only possible if you use a full spray setup and respray the entire area over.
The trouble with touch up is it will never match or look original. So do it while its small to minimize the impact. Check with your dealer to see if they sell a small jar or pen of original factory paint in your color -- if not many places sell it online (color matched / mixed). They should give you a jar of color plus a jar of clear, and you may need to buy your own sandpaper and polish. 3M sells a small sandpaper kit like this: link. Heres the polish I have: link. That will take out any sanding marks after.
More like this pack:
https://www.amazon.com/3M-Wetordry-Sandpaper-03006-Assorted/dp/B005JPGTNI
If you don't go too far and cut into the actual part with the file, then not really. It will leave some small scratches, because that's basically how the file removes the nubs, but you can clear those up with a few passes of some really fine grit sandpaper. Something in the 1000+ grit range should do, because it's fine enough that it's basically polishing the piece. Automotive sandpaper usually ranges from 1000-3000 grit, and you can find it at any auto parts store in small multi-grit packages that sell for like $5. Something like this.
Cut with these
Sand with this
Fill in stressed plastic with these
I use hard Wave sticks too and love them. They sand very flat (something I liked files for) but are quite gentle on the plastic in terms of deap scratches. BUT for some reason the 800 grit is disconnected like in your link. Anyone know where else you can get it?
In terms of files I have the Tamiya basic , Tamiya fine basic , and a (hopefully) nicer plastic hobby file on order just to try. Files are nice for larger jobs like serious molding flaws (not common in Bandai kits) and the fine ones are OK for nubs but still quite rough compared to any sanding stick. Although, as you know I'm sure, files last forever and require much less effort and time to chew through plastic. I'm hoping the plastic file is the Holy grail and is a good balance. I bought a set of needle files and diamond files from harbor freight and they blow. The trash just don't grip or cut don't waste your $3.
And as a reference I own Revell, squadron , nail buff sticks, and have made my own sticks from automotive sand paper. The nail files are way too rough imo, making my own is a pain, and while the squadron sticks are nice I mainly only used the tri-grit while I used all the Revell except the roughest and are probably the best value imo. I still use the other more flexible kinds but dramatically prefer wave. Wish the 800 grit still were available.
Long post sorry. Hope it helps
Edits: spelling, phrasing, and lots of links
Let me start by saying that this would be the bare minimum. This is assuming that you have all the experience to use these tools effectively as someone who has the appropriate skill and knows to do things like not bear down on a saw when cutting, keeping everything square, how to mill boards by hand, how to not kill sandpaper in a few strokes, how to tune and sharpen a hand plane, ETC.
2x$8.69Vise grips Two vise grip clamps. Clamps can be universally adjusted and clamped in almost any direction with some quick thinking. One is never enough.
$9.99Cheap set of chisels Everyone needs a chisel. These will be made from a milder steel, but it's better than nothing.
$22.00Generic ryoba saw A ryoba saw will double for crosscuts and ripcuts. They go as far as you can take them provided you treat them right.
$18.62Bench Plane You need to be able to take down material in terms of thickness. A simple bench plane will due for now.
$20.61Block Plane A block plane will help slightly with end grain smoothing where the bench plane cannot.
$3.47Bundled Sandpaper You need to finish your products somehow. I would get a generic bundle of sandpaper and use it sparingly and tenderly.
$12.85Square Keeping things square is vital.
$6.79Mallet Hammering your chisels is going to be very important since you cannot use a 2x4 reliably.
$3.47Wood Glue Need to be able to glue things together.
$11.80A set of card scrapers Remove material smoother and faster. You don't want to waste sandpaper if you don't have to, and these are quite versatile.
$8.06A bastard file A bastard file will do for now when it comes to heavier shaping and sharpening your card scrapers.
$15.92A small drill viseKeeping something secure in place is very important. A small vise will accommodate small and narrow pieces of lumber and can be bolted to a bench.
$3.97Assorted finer sandpapers You need something to keep your chisels constantly sharp, especially when it is such a mild steel as a set of 9.99 chisels.
$15.59Wipe on polyurethane You need to be able to finish your products somehow.
Comes to $170.52 I would use the rest to make a bench and two sawhorses out of some 2x4's.
I like Wera tools. They aren't power driven, but they are really high quality and TOUGH.
I have one of these and it's my favorite thing EVER.
I got this set it was expensive but comes in handy all the time. amazon
Currently in my bag by default -
Leatherman Wave
Wera Tool Check+
Everything else travels in my work box, unless its a gig I cant get my box to then I pull out the essential bits for that job
Amazed people still use non recharable batteries. My suggestion would be to invest in 8 good quality recharable batteries like Eneloops and just swap them from the charger to controller when required.
I personally bought this package maybe 5 years ago and the batteries are still going strong in my xbox controllers and other devices.
https://www.amazon.com/Panasonic-KJ17MCC82A-Eneloop-Advanced-Individual/dp/B00JHKSLSW/ref=sr_1_14?ie=UTF8&amp;qid=1510351864&amp;sr=8-14&amp;keywords=eneloop+aa
Make sure you get similar batteries if you choose another brand that hold a charge for a long time. The cheaper rechargables go flat very quickly even without use. I think eneloops and similar ones can hold charge for 10 years even if just sitting there.
Panasonic KJ17MCC82A eneloop Power Pack, 8AA, 2AAA, 2 C Adapters, 2 D Adapters, Advanced Individual Battery Charger and Plastic Storage Case (case color may vary) https://www.amazon.com/dp/B00JHKSLSW/ref=cm_sw_r_cp_apa_i_qTdEDbHAKNZ3H
One of the best purchases I've ever made for around the house and for years now I've just kept recharging the supplied AAs
I am nit sure if this charger does Aa and aaa, but bunch of eneloop batteries (best batteries you can get) and a charger is one of best investments I made, and I got it as my first purchase trough prime now app same day delivery to get $20 off first purchase of $50 bucks, so I got 16 Aa 14 aaa couple of converters and a smart charger for like 30 bucks.these and couple extra packs of batteries
Edit it does charge both aaa and aa and it's 2 individual chanels which is great for this price, as far as getting more batteries eneloop are best and Amazon branded ones are basically eneloop last gen rebranded which you can find on sale.
That stuff looks good
This is a terrible price BTW, should be at walmart--
http://www.amazon.com/DuPont-Teflon-Chain-Saver-Self-Cleaning-Lubricant/dp/B00KMMFE8Y
i think most revisions use an M6 coupler
useful to keep around, I used some to make dryboxes.
That would work, you'll just have to be careful that you've still got enough length on the tube that you don't choke up the filament path when the X axis is all the way out.
Here's a link for replacement fittings.
https://www.amazon.com/gp/product/B00WE1A3D2
This is for extra PFTE tubing
https://www.amazon.com/Meters-Filament-3D-printer-Rostock/dp/B00THZKC8Y
JIUWU Pneumatic Air Straight Fitting 4mm thread M6 One touch hose Connector Pack of 10 https://www.amazon.com/dp/B00WE1A3D2/ref=cm_sw_r_cp_apa_i_gBlACbGT9J0X4
I bought 10 for ~$7 on amazon JIUWU Pneumatic Air Straight Fitting 4mm thread M6 One touch hose Connector Pack of 10 https://www.amazon.com/dp/B00WE1A3D2/ref=cm_sw_r_cp_apip_Ex8VNlMxPNHxG
The blue-topped connector is a fitting that connects to a lock-washer-looking piece of garbage that sits just inside the extruder case. If you unscrew the top of the extruder case, you should see that the lock-washer-thing has shattered, which means the connector can't keep the tube held in place. On another extruder, you'd be able to swap out this shit plastic fastener with something like this: https://www.amazon.com/gp/product/B00WE1A3D2/ref=oh_aui_detailpage_o01_s00?ie=UTF8&amp;psc=1
But this won't work with the stock extruder casing because there's no threading to screw it into. If you were able to drill your own threading or swap out the plastic bit that broke, you'd be all set. Otherwise, you need a new extruder case and you might as well swap out all the parts with cheap metal versions that won't break down.
Wiki is: http://mpselectmini.com/
Some items I bought from Amazon (don't buy the hot end pieces if you have a V2. They changed the hot end to an all metal one):
https://www.amazon.com/gp/product/B00WE1A3D2/ref=oh_aui_detailpage_o00_s00?ie=UTF8&amp;psc=1
https://www.amazon.com/gp/product/B00T2DNKJY/ref=oh_aui_detailpage_o01_s00?ie=UTF8&amp;psc=1
https://smile.amazon.com/gp/product/B01LAYCRAA/ref=oh_aui_detailpage_o07_s00?ie=UTF8&amp;psc=1
https://smile.amazon.com/gp/product/B00L4UXQ42/ref=oh_aui_detailpage_o08_s00?ie=UTF8&amp;psc=1
V
https://smile.amazon.com/gp/product/B00MQKW230/ref=oh_aui_detailpage_o09_s01?ie=UTF8&amp;psc=1
https://smile.amazon.com/gp/product/B01A81FXMK/ref=oh_aui_detailpage_o05_s00?ie=UTF8&amp;psc=1
https://smile.amazon.com/gp/product/B01ACIFPYA/ref=oh_aui_detailpage_o00_s00?ie=UTF8&amp;psc=1
OP, if you are in the market for a precision set, these $15 sets are pretty nice. On par with the older iFixit kit sets, way better than their current stuff. Buddy and I have the same set, seem to be hard-wearing tips and includes your #2 Phillips.
Syntus 63 in 1 Precision Screwdriver Set with 57 Bit Magnetic Screwdriver Kit Electronics Repair Tool Kit for iPhone, Tablet, Macbook, Xbox, Cellphone, PC, Game Console, Black https://www.amazon.com/dp/B071PB4RPV/ref=cm_sw_r_cp_apa_i_nfujDbR06HW0P
The cheap options, should be good enough for a Pro Controller.
The good option. Probably overkill for just the controller, but this thing is amazing for general use. It has bits very few kits do. The screwdriver is fantastic.
If you do other sorts of electronics stuff I highly recommend this kit.
I found this one on amazon if youre looking for a multi bit set. Seems to have pretty good reviews but take a look at the videos. I would buy it myself but i already have a similar set that doesnt see much use. I dont know if my harbor freight one is s2 tool steel though, i know ive bent a couple of the flathead tips. Who knows maybe ill get it.
Solved it myself. For any of you spacemen of the future that might be trying to do the same thing to this kind of laptop, here's a little help:
https://www.amazon.com/gp/product/B0000DD0L1/ref=ox_sc_mini_detail?ie=UTF8&amp;psc=1&amp;smid=ATVPDKIKX0DER
https://www.amazon.com/Neiko-01925A-Extractor-Extractors-Cobalt/dp/B000F9ANQW/ref=sr_1_8?keywords=easy+out&amp;qid=1557903137&amp;s=gateway&amp;sr=8-8
I'm about to buy a Color N Drive touch up paint set so I could touch up all the paint chips before I give my new-to-me vehicle a wash/clay/wax. Now, the vehicle is about 10 years old, so I don't expect the paint to match exactly, but I think it'll be close enough. I have a couple questions about repairing paint chips that go down to the metal.
Thanks for reading.
You're garage!
Seriously, this is one of the of the higher value maintenance tasks most people can do at home. It can easily save you $200 and much more if you're also changing rotors. Just use the jack from the car if you don't have a floor jack. The only thing you might need that most people don't have are jack stands (safety first). You might also need some grease for the pins and the back of the pads, but otherwise it's pretty simple tools. You might also need an impact driver if you need to replace the rotors as well (I'm not sure if Yukon rotors are bolted on at OEM). Like this: http://www.amazon.com/dp/B000NPUJYE
Here is a decent guide:
http://www.paulstravelpictures.com/GM-Chevrolet-Tahoe-Front-Brake-Pads-Replacement-Guide/
I haven't had experience with the set you listed but I bought the Wera Tool check set about a year ago and it's great. Doesn't have the ability to spill, has all of the bits you would need for the most stuff and has some smaller sockets. I would highly recommend. It's 10 bucks more I think but that's not much over the years you'll have it.
Wera 056490 Tool-Check Plus Bit Ratchet Set with Sockets - Metric https://www.amazon.com/dp/B00I8MYMT2/ref=cm_sw_r_cp_apa_i_Naq4BbV4832TP
Edit: I will warn you that the screwdriver handle is very small. But if you need the extra torque to break the screw loose you can use the ratchet.