(Part 3) Best automotive lighting parts & accessories according to redditors
We found 1,625 Reddit comments discussing the best automotive lighting parts & accessories. We ranked the 800 resulting products by number of redditors who mentioned them. Here are the products ranked 41-60. You can also go back to the previous section.


Upgraded might be an overstatement but you'd understand if you had a Nissan leaf
FIAMM 74100 El Grande - Twin Horns - Red https://www.amazon.com/dp/B000DLBIGG/ref=cm_sw_r_cp_apip_MtbTmDGZplGLH
The $19.95 one from Amazon that is currently out of stock
Amazon $19.95 prime shipped
http://www.amazon.com/Accu-Gage-H100X-Professional-Pressure-Protective/dp/B00HESFIJ4
For in the car I like the form factor of this one better
http://www.amazon.com/Accu-Gage-RS60XA-Professional-Pressure-Protective/dp/B00VS0T7IC
and down below you can get the rubber guard for it for $5 so $15 total and much more compact and handy for in car usage although only goes to 60psi.
you can get the ribbed sheath for $7.49 and its also prime shipped. (the regular rubber sheath is not prime found it also for $5.07 prime shipped just search accu-gage and you will find it (second page)
and I will be buying a couple of these shortly. did not even know this existed.
http://www.amazon.com/Accu-gage-Chek-Spare-Valve-Extender/dp/B0006O2S8M
you screw onto your spare and then run the other end somewhere convenient so you can both check and fill as needed your spare without digging it out!
I think my favorite is this one
http://www.amazon.com/G-H-Meiser-EZ02-EZ-Gauge/dp/B001CJHU9W
clamps onto your tire chuck AND has a pass through for the compressor. so you can fill at a gas station for example but also use your gauge to know when to stop since many do not have a gauge or its hard to read or inaccurate/broken.
$17
---
Write down your values right now.
0 being the lowest, 10 being the highest.
A129 isn't a bad dash cam, but be prepared for your values to shift after ownership after a while. If you did your research, you know what you are purchasing. A129 2CH is what it is, as advertised.
---
Micro SD cards last about a year or 2, maybe 3, then die. They have a limited number of read/write/rewrite cycles. Some are not Dashcam rated (will say in the warranty use in a dash cam will void warranty.) Some dash cams are picky with Micro SD cards and reject them on an unknown criteria. Some dash cams have recommended brands of Micro SD cards.
So I don't know how Viofo parking mode activates under different situations.
1st wire (Postitive) -> Always on fuse = Parking mode; 2nd wire -> Ground wire (Negative) to unpainted bolt (completes circuit).
Or
1st wire (Positive) -> Ignition only fuse = No parking mode; 2nd wire -> Ground wire (Negative) to unpainted bolt (completes circuit).
1st wire (Bat) -> Always on fuse = Powers dash cam; 2nd wire (ACC) -> Ignition only fuse = Detects if parked or driving; 3rd wire -> Ground wire (Negative) to unpainted bolt (completes circuit).
I don't know how/if A129 changes from 2 -> 3 wire, or from 3 wire viofo -> 3 wire Power Magic Pro.
All Fuses, including Tap a fuse should match your vehicle's type. Mini/Mini low profile are the most common. There are also ATO, Micro 2, Micro 3, and Maxi type fuses.
Read your owner's manual for fuse box location(s) typically 2-3 in every vehicle - in/under dashboard (use this one), Under hood (avoid at all costs), In door (use able but not favored), and Trunk (Use able but not favored.)
Here's a list and example found on amazon for all the major parts. I'll also include a wiring diagram at the end.
Solar Panel $169.99 - 100W Flexible & Thin
Solar Cable $18.99 - 20ft with male and female heads (cut in half for + & -)
[Charge Controller]
(https://smile.amazon.com/gp/product/B019QSX0CG/ref=oh_aui_detailpage_o09_s00?ie=UTF8&psc=1) $34.99 - 30A gives you room to add more panels
Battery $160 - 100Ah AGM will provide enough power depending on fridge but requires no maintenance
Fuse Panel $35 - 6 circuits with negative and cover
12V Sockets $6 - Get some of these for plugging in appliances and phones. You can buy 12V adapters for almost any electronic besides most kitchen appliances.
Pick up some 10 gauge stranded wire from your local hardware store (home depot) to wire the battery and fuse panel to the charge controller. You shouldn't need much since you want the battery as close as possible to the controller. You can buy smaller wire (16 or 18 guage) for wiring outlets/appliances to the fuse panel. 50ft of that should be fine unless you want multiple outlets on the other side of the van.
You'll also need some ATC blade fuses for your fuse panel. You can buy these at a local auto parts store pretty cheap. 15 amps should be enough than anything you'll be pulling.
To connect the wire ends to the battery and fuse panel you will need these wire terminals for the corresponding wire guages you are using. Along with these female terminals to connect to the 12V sockets. All of these can be found at your local auto parts store for cheap sometimes all together in a kit.
You'll also want a pair of wire strippers/crimper for wiring.
This is the best wiring diagram I can find. Most are so overcomplicated. This diagram does not show the fuse panel but you can see the empty slots on the far right of the charge controller where you insert the wiring for that, it's called the "load." This diagram also shows an inverter which is something I didn't go into because you will only need that if you HAVE to run a 110V appliance. I know you mentioned a kettle but maybe you could just install a gas stove in your van and use that to heat water? That's what we use :) Installing the inverter should be pretty straight forward though if you need it but remember you will waste energy going from 12v to 110v so 12v is more efficient.
Hope this can help you (and maybe others) in some way. I plan on making a more in depth version of this guide in the near future along with a video but finding the time has been difficult! Let me know any more questions you have :D
You should definitely be able to wire it to the fuse block if you really want to go that route.
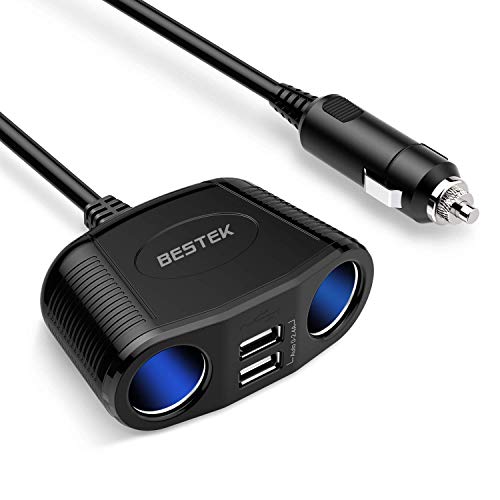
But if you would prefer to go the cigarette lighter route I would recommend something like this.
It has a convenient on/off switch too so you can leave it plugged in.
If you really want to rig one yourself the center springy metal piece should be 12v positive, you would probably need to run the red and white wires to that. The side springy piece will be "ground", black wire will go to that.
This pryometer is single best investment I've made. Testing pressures like you did is basically trying to subjectively measure what this can directly measure. What's the best pressure to run? The one that get's the most work out of the tire. That shows up as relatively consistent temperature distribution across the surface. All changes I've made to the kart correlates in some way to tire temp.
http://www.amazon.com/Joes-Racing-54005-Pyrometer-Adjustable/dp/B005JVFTTM/ref=pd_sim_263_4?ie=UTF8&dpID=414eFGN%2BEtL&dpSrc=sims&preST=_AC_UL160_SR144%2C160_&refRID=0CS2WBZGAA1RVH0YHQQ2
I believe it is this one. I actually just installed a second 12v car socket and then just plugged this adapter into it. The bummer was that i found it used power even when there was not a USB device plugged into it. That's why i added the red switch on the back. That switch shuts off power to that socket when it's not in use.
I got the Fiamm 'El Grande' Horns for my motorcycle - they work great, and they're plenty loud, too.
Here is a good 'before' example for the Fiamm
And here is after the Fiamm install
They make these small stepper motors just for this type of application. No specialized driver needed, hook up directly up the Arduino ttl output pins. I bought one years ago on eBay for a couple dollars to play around with. This Amazon link are similar but different color. They are useful to make all sorts of analog instrumentation displays.
http://www.amazon.com/Instrument-Dashboard-Silverado-Cavalier-Avalanche/dp/B004PXAUGC
I run these Trucklite LED lights on my 05 LJ and I love them. No conversion needed, they plug right into your stock harness.
http://www.amazon.com/Wrangler-Headlamp-Conversion-Truck-Lite-27270C/dp/B00B5WJHSI
Links to al the stuff I purchased listed below:
Headlights:
http://www.wpdrl.com/Showprot.aspx?id=658
Tail lights:
RCP - RFT01 - Aftermarket Upgrade LED Taillight for 2012-2015 Ford Fusion, Clear Red Rear lamps Lens with Loop Ring Driving light https://www.amazon.com/dp/B01FU39X9K/ref=cm_sw_r_cp_api_i_CFjoDbY02WJRE
Spoiler:
Painted Factory Style Spoiler fits the Ford Fusion 525 G1 https://www.amazon.com/dp/B0104J33ZK/ref=cm_sw_r_cp_api_i_HGjoDb26XJDHF
Antenna:
CravenSpeed Stubby Antenna Replacement for the Ford Fusion 2005-2019 | 4 Inches https://www.amazon.com/dp/B0073X74X8/ref=cm_sw_r_cp_api_i_0GjoDbK3DM47X
Grill:
https://rover.ebay.com/rover/0/0/0?mpre=https%3A%2F%2Fwww.ebay.com%2Fulk%2Fitm%2F162601654749
Sway bar stiffener:
https://www.steeda.com/steeda-ford-fusion-rear-swaybar-13-14
K&N intake:
K&N 69-3533TTK Air Intake System https://www.amazon.com/dp/B00FU9B9HE/ref=cm_sw_r_cp_api_i_WJjoDbXCE1G1Z
I put a pair of Fiamm Hi/Lo car horns on my SV650 and they were damned loud (and cheap). You'll need to use a relay (any garden variety $5 car horn relay will work). Cost about $25 for everything.
Mounting out of sight may be difficult, I didn't even try to conceal them.
https://www.amazon.com/JW-Speaker-554543-Black-Light/dp/B072866KS2#customerReviews
https://www.amazon.com/Wrangler-Headlamp-Conversion-Truck-Lite-27270C/dp/B00B5WJHSI
Probe all day . More accurate and more precise
the loop of wire creates a magnetic field which heats the cap
There are guys on fc that have made these into vapcap heaters ( I think a guy by the name of Pipes even sells some)
You can get the heater for cheaper from ebay/china, but amazon has faster shipping on that link. I also am lazy so
https://www.amazon.com/gp/product/B06XBY66R5/ref=oh_aui_detailpage_o09_s02?ie=UTF8&psc=1
and
https://www.amazon.com/gp/product/B00LCQZEK2/ref=oh_aui_detailpage_o09_s00?ie=UTF8&psc=1
can be put together with no solder necessary to make an at home and in the car setup. I wrapped the coil around a 14mm/18mm glass bushing I had sitting around. I think you can get those on amazon too for ~5$
Yeah, you obviously need to replace the mount base assembly. I would keep it taped up to seal out moisture until that day, though.
However, once you do that, I would get the low-profile antenna. Here's what I got and it's great - no loss of signal that I can tell :
https://www.amazon.com/gp/product/B0073X74X8/ref=ppx_yo_dt_b_search_asin_title?ie=UTF8&psc=1
>With that said, is there a preference of one over the other?
The A119 has a better camera vs the Mobius and has a screen which the latter doesnt. Personally, I would go with the A119
>my commute is generally 2 hours each way. When I get into the car the first thing I do is plug in my phone. Is there a cord I can purchase allowing the charge of the phone and cam simultaneously?
You can get something like this
>I live in NY. The summers get extremely hot, with ice cold winters. Is storage inside the car out of the question?
It isn't, but you would want one that doesn't have a bettery but instead has a capacitor which just means it'll only work when plugged in.
>I will not be able to keep the camera on the dashboard when the vehicle is unoccupied during the day, as I work in a highly populated area with a decent amount of crime (my car has been broken into in broad daylight while I was at the office)- so the ease in removing and reattaching the camera from its working position is VERY important to me.
Both are fairly easy to remove from the windshield to store away somewhere else.
It is easily twice as bright as the factory setup. far better pattern too.
https://www.amazon.com/Headlight-Relay-Wiring-Harness-Ceramic/dp/B00H5JFHR0/ref=sr_1_9?ie=UTF8&qid=1464810131&sr=8-9&keywords=h4+harness
https://www.amazon.com/HELLA-HLA-H83140171-H4-100-80W/dp/B000COBLKW/ref=sr_1_1?ie=UTF8&qid=1464810209&sr=8-1&keywords=h4+100w
https://www.amazon.com/HELLA-003427811-132mm-High-Headlamp/dp/B001G72VIK/ref=sr_1_4?ie=UTF8&qid=1464810364&sr=8-4&keywords=hella+h4
Order one of each and a second bulb. plug it all in and have awesome light.
If your cig lighter is hot when the car is off then you can use that. You can also use a fuse split-er to hardware it without cutting any factory wires.
Like this...
https://smile.amazon.com/Mini-Fuse-Circuit-Adapter-Terminals/dp/B00AK0TGRS
If you use one of those make sure to get the right fuse type that matches your car and extra low amp fuses for the camera power line.
Could be a relay to make the 3rd brake light flash a few times and then hold steady when you apply the brakes. Some automakers are testing systems like this in the US. They're already pretty popular in Europe
Something like this: http://www.amazon.com/Vehicle-Flasher-Module-Universal-Motorcycles/dp/B00FADDOL4
Here's one in action: https://www.youtube.com/watch?v=P_ORq2XyfMQ
This is the one I have, although it might be a little bigger than you want. I picked it up at a local Advanced Auto, but the one on Amazon that I link to seem identical. I like it, but it might be more than you're looking for.
my gauge
Hold on there.
ANY changes you make to the pipes need matching changes at the carbs. The ones you've got on there are junk (factory CV carbs) and there's no guarantee they're tuned correctly to the pipes NOW. In fact, getting CV carbs to work right with pod filters like you've got is a tricky proposition. Who tuned those carbs? If it was you, and you're asking the questions you're asking now...um...odds are it's not in a great state as is.
If you're willing to swap carbs, any of the Mikuni VM34 kits will kick major ass over what you've got. Faster overall, faster throttle response, easier to tune to match pipes and genuinely likes pod filters like you have here. Don't go with a VM36 kit unless you're doing big motor mods (cam, big-bore kit, head porting).
Next issue. That pipe isn't the best in terms of cornering clearance. If you want max handling out of this beast you might want to consider cutting those pipes in front of the motor, extending them under the frame, merging them the same distance down as the merge point you have, and then bring the pipe out from under the bike not that far from the rear tire.
I wrote a bit about pipes (and carbs) here:
http://www.motorbikemondays.com/wp-content/uploads/2014/03/CafeRacerGuide-1.pdf
So with all that said, now I can answer your question!
I like SuperTrapp generic mufflers. Measure the diameter of whatever pipe you end up with where the muffler is going to go and order from Summit. This is one batch:
https://www.summitracing.com/search/brand/supertrapp/product-line/supertrapp-s-c-standard-mufflers?autoview=SKU
They also come in chrome and different lengths. Note the differences in inlet diameter.
SuperTrapp mufflers can be tuned as to the back-pressure by removing or adding disks. This also changes the sound. It also changes how the carb needs to be tuned to match the muffler, or if you get it close you can fine-tune the muffler to the carb instead of the more common method of only tuning the carb.
With me so far?
OK. One last thing. When I wrote that guide I didn't know about these:
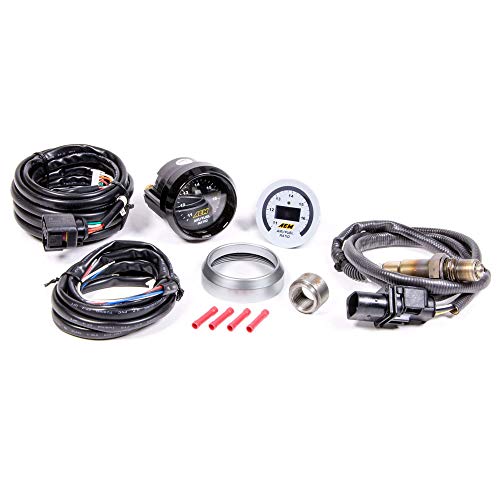
https://www.amazon.com/AEM-30-4110-UEGO-Ratio-Gauge/dp/B00N3VGPYS
For about $200 (plus you need to weld a nut-thing on the pipe or muffler) you get total knowledge of what the fuel/air ratio REALLY is. You only need this gauge while tuning it (with an exception I'll mention in a sec). It's annoying to try and permanently mount because the cable it comes with from the sensor to the gauge is too damn long and you can't cut it (if you do the calibration will be fucked). But with this, you can absolutely fine-tune the carb's settings to the pipe and get the mixture dead-nuts accurate even if this is your first time tuning this shit :).
---
Now I'll add one more oddity...and this is a setup I'm considering.
These crazy fuckers have a BUNCH of modifications available for Mikuni VM series carbs:
http://thunderproducts.com/
They've got dial-adjustable jetting. You can adjust jetting WHILE RIDING. No shit. You can also add more jets, like the Thunderjet for top-end power.
So. What does this mean?
For one, you can alter the settings for different altitudes, using the Thunder Products Intellajet and Thunderjet stuff to fine-tune the carbs and use the fuel/air gauge to know that your on-the-seat re-tuning is accurate.
That, in theory, would give you the most advanced carb (and pipe!) setup on the goddamn planet.
Pair Square 5''x 7'' Led Headlight High Low Beam Headlamp for Jeep Wrangler YJ Cherokee XJ Trucks 4X4 Offroad https://www.amazon.com/dp/B0733G5QLC/ref=cm_sw_r_cp_apap_kBVCHVpJQCQgW
Dual High Low Beam Headlight... https://www.amazon.com/dp/B00H5JFHR0?ref=ppx_pop_mob_ap_share
I'm running these two and it's amazing
ADVMonster has some good controllers for auxiliary lights.
I made my auxiliary light circuit using instructions from post #2 here: http://www.klrforum.com/2008-klr650-wrenching-mod-questions/10863-power-source-aux-lights.html
My bike has a free 12v port that's only on when the key is in the on position which I used for the relay switch. I don't know what your bike has that's similar to it though.
I bought these:
DIGITEN 5x20mm GDC Fuse Holder Inline screw type with 16 AWG wire (Pack of 10)
Foxnovo Fast-blow Glass Fuses Quick Blow Car Glass Tube Fuses Assorted Kit Amp
HELLA 965400001 12V 30A SPST Relay with Bracket
I designed and 3D printed a waterproof holder for the relay and switch that I used. I can send them your way if you want.
Mercedes Benz started it for emergency braking on european vehicles in 2006. It took a few years before it was even legal in the US, due to the flashing light restriction on non-emergency response vehicles.
Today, many vehicles have it with several different types of triggers. For Fiat/Chrysler, only the CHMSL light flashes, but it's whenever the brakes are applied. For others, including Mercedes, it's when ABS/Stability control is activated such as during panic braking.
It is also easily available as an aftermarket part (Amazon link) and are frequently used on motorcycles for increased visibility, similar to strobing headlights.
Just add an outlet by tapping into your fuse panel!!
https://www.amazon.com/gp/product/B013JXVG2U
https://www.amazon.com/gp/product/B0002KRC5Y/
If you want to spend a bit more money, tire pyrometer. Something like this one that actually penetrates the rubber. The laser ones are useless for tires: https://www.amazon.com/dp/B005JVFTTM/ref=cm_sw_r_cp_api_i_wQD2Db3KQ5FAG
Also, biggest tote he can fit in his car/trunk with tires and other gear. Makes it nice and easy to have an autox pack to just toss in the car and go and easy to store stuff in at the events.
I bought one off Amazon for 20 bucks. Here it is:
https://www.amazon.com/gp/aw/d/B00062YWNI/ref=ya_aw_od_pi?ie=UTF8&psc=1
If you have an OEM gauge, it'll fit in there. Don't second guess it, just do it.
Air/Fuel gauge $170
http://www.amazon.com/AEM-30-4110-UEGO-Ratio-Gauge/dp/B00N3VGPYS
__
12V Impact wrench $25
http://www.harborfreight.com/12-volt-1-2-half-inch-emergency-impact-wrench-92349.html
__
Cylinder head temperature gauge, $39
http://www.amazon.com/Trail-Tech-Temperature-Meter-72-ET3/dp/B0031BIWX2
__
Roller weight tuning kit $33 (there are different weight sizes, what scooter?)
http://www.amazon.com/Prima-Roller-Weight-Tuning-16x13/dp/B00LESCZHS
__
Or a set of a range of carb jets. Again, need to know the scooter type.
__
Scooter Dyno $12,000 hahaha
http://www.dynojet.com/products/dynamometers/dynomodelsd12/dynojet-dynamometer-sd12.aspx
I've never used most of these, so I can't review them. They look interesting to me though.
You could try:
AEM (30-4110) UEGO Air/Fuel Ratio Gauge https://www.amazon.com/dp/B00N3VGPYS/ref=cm_sw_r_cp_apa_i_a2CPCbXQA9308
Pyrometer
Low profile jack stands (flat feet, safe for tarmac)
Racing gloves
RaceQuip Helmet Support
A GoPro off-brand accessory kit To help mounting that GoPro to whatever you want to mount it to.
Some Mechanix gloves lots of options
Paint markers various colors.
F4 self-sealing silicone tape
Going Faster
Speed Secrets
High-Performance Handling for Street or Track
Another few things would be to find out what the driver uses for brake pads, brake fluid, rotors, oil filter, etc., as those can be pricey and nice gifts. (I use Hawk DTC-60 front, HP+ rear pads, Motul RBF-600 fluid)
Portable battery powered air pump for tires I have one very similar to this. It's cheap and great to use for adjusting pressures before sessions.
A decent tire pressure gauge This is the one I have and have used for several years and I have been very happy with it.
A subscription to Grassroots Motorsports
Torque wrench, +200 ft/lbs This is the one I have been using for a few years and it works well.
I've got lots of other ideas for tools and such; specific socket sets, impact gun & sockets, special bits for your car, magnet, flash lights/head lamp/stick light, channel locks, stubby sockets, various wrenches, extensions, breaker bar, bits, allen wrenches, vice grips, pry bars, adapters, pliers, cutters, etc that would be good to put on your list if you don't have them in your kit.
Happy holidays!
I do find that the lack of a gauge is a big downside to the device but I use Fobo bluetooth sensors that give an instant readout when I put the cap back on... does take some back and forth but you get used to the time required per psi rather quickly. Otherwise, I also add a passthrough type gauge for a readout: http://www.amazon.com/G-H-Meiser-EZ02-EZ-Gauge/dp/B001CJHU9W
I don't think any of them actually come with it like that. I did the mod myself.
Here is the tach mount I used to hold my speedo in place. All it took was drilling an extra hole in the plate to mount it.
Then you get something like this
to mount the indicator lights on the bar clamp.
Quite simple but makes it look much better in my opinion!
Good luck!
3V converter:
https://www.amazon.com/SMAKN-Converter-Power-Supply-Module/dp/B00ODL140M/ref=sr_1_1?ie=UTF8&qid=1493223709&sr=8-1&keywords=12v+to+3v
AC to DC car converter:
https://www.amazon.com/AOKII-Converter-110-220V-Cigarette-Household/dp/B01H4UZQRA/ref=sr_1_4?s=electronics&ie=UTF8&qid=1493223837&sr=1-4&keywords=ac+to+12v+dc+power+adapter
and 12V plug + wires:
https://www.amazon.com/uxcell-Button-Cigarette-Lighter-Black/dp/B0090149R0/ref=sr_1_4?s=automotive&ie=UTF8&qid=1493223892&sr=1-4&keywords=12v+plug
of course you can combine all 3 into one with something like this but that's what I had around the house
https://www.amazon.com/SoulBay-Universal-Switching-Selectable-Suitable/dp/B01ISM267G/ref=sr_1_3?ie=UTF8&qid=1493223964&sr=8-3&keywords=ac+to+3v+dc
You can use these and mount under your tank https://www.amazon.com/Auto-Meter-3209-Tachometer-Mounting/dp/B00062YWNI/ref=sr_1_9?ie=UTF8&qid=1519655184&sr=8-9&keywords=autometer+tachometer
I used this although it mounted to the fork and it is works so good and is super tucked in https://www.amazon.com/WinllyAT-Relocation-Bracket-Sportster-1995-2016/dp/B074H7LLNX/ref=sr_1_8?s=automotive&ie=UTF8&qid=1519655244&sr=1-8&keywords=sportster+speedometer+relocation
https://www.amazon.com/Vehicle-Flasher-Module-Universal-Motorcycles/dp/B00FADDOL4
X2,
My camera didn't come equipped for hard-wiring so I had to clip the cigarette lighter plug off. I bought an add a fuse adapter, and spliced the positive into it, and ran the negative to a ground terminal by the fuse box. The wires are totally concealed, and I still have my lighter outlet for charging my phone. I didn't have to remove any panels. I was able to tuck the wires inside from the edge.
Wire this to the fan plug in the the charged yeti. uxcell® DC 12V Car Auto Push Button Cigarette Lighter Black https://www.amazon.com/dp/B0090149R0/ref=cm_sw_r_other_apa_PnOHxb48549QP
Hey, scrotch!
I only now remembered, "Wait, I was supposed to respond to that Redditr's comment!" I am 26 years old with the memory of a perpetually stoned grandpa'.
Onto the nitty-gritty:
IIRC, I purchased an AEM (30-4110) UEGO. It came with the Lambda Sensor Unit 4.9. All that was required was having a bung welded into the header and a way to mount the gauge.
For us carb'y owners, especially those with split FCRs, this makes tuning our carbs more exact than our butt-dyno, and less costly than hours on the dyno. It's a wide-band, so it gives accurate readings between 10:1 and 20:1.
These are the ones i picked up
5x20mm AGC Fuse Holder Inline , something like this. Maybe not such heavy leads.
To wire in, one side would connect; Power in, and pin 2 of both SSR's.
The other side; Controller pins 1, 5, and 7.
Do you have amazon prime? http://www.amazon.com/G-H-Meiser-EZ-Tire-Gauge/dp/B001CJHU9W/ref=sr_1_1?ie=UTF8&qid=1323050127&sr=8-1
Stubby Antennae for $25
Or you can buy the new stepper motors, tear down the instrument cluster, desolder the old ones and solder the new ones in their places. Costs about $15 for parts and isn't too hard if you've got mechanical experience. You do need a soldering iron though.
I got these as well and they're great. Definitely an upgrade over stock. I would highly recommend a relay upgrade. I had a random power draw issue that killed my battery after installed the lights. This kit (https://www.amazon.com/gp/aw/d/B00H5JFHR0?psc=1&ref=ppx_pop_mob_b_asin_title) fixed the issue and made the lights brighter. Just had to wire power and ground to the battery.
It plugged straight in to the stock headlight plugs. Definitely recommend.
Dead thread, but just for posterity's sake: I've started experimenting with these.
I think these can be utilized safely. I'm basing a build around a RapidLED aluminum enclosure. This allows me to earth ground anything I may bump in the tent. I've also bought inline fuse holders to limit the current on both legs (independently) of the AC (positioned as close to the main power cord as feasible.) Finally, a little kapton tape to cover the solder joints that can't be heat-shrinked (eg., right on the boards themselves, which are behind a the enclosure's plastic splash-shield to begin with.)
Just a little taste from today's initial testing, I think the 50 watt ICs may be a bit ambitious. I wired up three of them on my 20" enclosure, and even with the 92mm fan going (though in fairness, without thermal compound behind the boards) they were putting off a bit of smoke. Upon shutdown, none of the wires look melted, so I think the smoke must have been from the boards themselves. I'm not sure if this is some initial out-gassing, but I'm uncomfortable with it. I'm going to try again with some 20w & 30w ICs. The flicker that Big Clive talks about on his youtube channel wasn't very noticeable to my naked eye.
https://www.amazon.com/gp/product/B00B5WJHSI/ref=oh_aui_search_asin_title?ie=UTF8&psc=1
I went with these Truck-Lite and I love them, they do have their flaws like every other ones, but I love them.
Overview
Not wanting to spend hundreds on the RIGrunner series of distribution boards and being limited by their options, I decided to make my own versions.
I am new to electronics and I had no idea how to make PCBs a couple of days ago, so I need some help here. I will give some for free if someone help me with the technical problems or verify the files (more in the end), and of course I will make everything public for everyone to use personally.
About this board
This is the most simple and my first version. UNTESTED AT ALL at this point. It uses soldered/crimped 12ga wires, and [Keystone 3557-2] (http://www.mouser.com/ProductDetail/Keystone-Electronics/3557-2/?qs=cxy41lVAGV%2FfbyASjpXK1g%3D%3D) Fuse Holders. Fuse holder is rated for 30A, so is the contact. The fuse holders accepts both ATC/ATO and mini size fuses, and looks nice. The mounting holes are for 6-32 or 3mm size screws (0.142''/3.6mm ID)
Any problems you see with the design? Connectors placed too close/too far?
Component Cost
At the highest retail price (lowest volume), 7 holders and 7 connectors cost about $15, plus the cost of some 12ga wires (building wire). 7 good quality [Eaton fuses] (http://www.mouser.com/Circuit-Protection/Fuses/Automotive-Fuses/_/N-ba8b5?P=1yocc0hZ1z0s1g2) adds another 7 dollars, or you can get [120 pcs of cheap stuff] (https://www.amazon.com/Cal-Hawk-CAPCFM-Assorted-Truck-Mini/dp/B0045K2Q9Y/ref=pd_bxgy_263_2?_encoding=UTF8&pd_rd_i=B0045K2Q9Y&pd_rd_r=65EQMQKVBF7B5AFRSBNF&pd_rd_w=dzzaU&pd_rd_wg=pK73O&psc=1&refRID=65EQMQKVBF7B5AFRSBNF) on Amazon for the same price. In the end it should be less than $20 w/o the PCB.
Depending on where you get the PCBs made, it can be cheaper, or a lot cheaper than the commercial options.
Future designs
For future versions - what functions would you like to have on your power distribution board?
Case
I have some experience in CAD and CAM, so I should also be able to make some enclosures for whatever board I come up with. It should be pretty cheap for a simple folded sheet metal case or some machined plastic cover and mount them with standoffs.
Software problems / design checking
I'm using KiCAD - free, no licensing needed whatsoever. The files, both KiCAD files and Gerber files can be found [here] (https://github.com/cjm27/Powerpole-Distribution-Boards) on GitHub. I have two problems now:
If someone is experience with PCB manufacturing, I will really appreciate some verification before I send the files to production.
Thanks everyone for reading. 73
You car has "mini fuses" and I get an assortment from Amazon. The ratings range from 5 amps to 40 amps.
This is the set that I have: https://www.amazon.com/dp/B0045K2Q9Y/ref=cm_sw_r_cp_api_ERyszbQ91N786
Yea. That's what I'm saying. There isn't enough resistance when the fogs and lows beams are on, so they freak out and flicker. Here is a flasher that will stop the hyper flashing for your turn signals.
sorry i confused you I mean't pay close attention to the amount of digits. It actually is doing something. Its just doing it at very fine increments(thats why you got 3 numbers instead of 2). I.e. So like right now im printing abs, mashing the first layer and i've been lazy about calibrating my gcode offset with my probe. I first watch how the initial lines are laying down. Then i poke my head down and if i can see the stream of plastic laying down out of my nozzle, i keep going down until just after i can't see that stream, then check the layers and stop. A flashlight is handy. All off the filaments have a different feel. PETG being the absolute worse. I imagine your first layer looks incredible right now because its kind of mashed. And that it is beautifully mirrored like on the underside where it meets the glass if you haven't used a glue stick. Which is a look i like personally a lot. Looks like fine circuit board traces with the lines right?. But after that first layer keep jacking it up until the stringing stops. Just keep going up man. You may be twisting that knob a lot and thats okay. And when you get where it stops stringing, just add that number to your g code offset in your slicer. Baby stepping is a killer feature to utilize, its not hard at all you just have to get a feel for it. You will notice differences in how the lines lay down vs how much of a filament stream you can see. Im telling you this because I think finding your number babystepping with one print is less frustrating than start prints over and over punching in numbers inside your slicer. Its great to learn babystepping.
I was printing ABS tonight and i went to -150, i was printing PETG the other day and went all the way up to 500-600. If its way off you could be going way up. You will see it in your print, just be patient. I would actually encourage you to keep your first layers as your doing now for better adhesion and make your slicer correct the offset after the first layers. Thats what I do. But do that after you get this figured out.
These help a lot
https://www.amazon.com/gp/product/B00T85ANNW/ref=oh_aui_search_detailpage?ie=UTF8&psc=1
Well, I don't know how many DC outlets you have or need, but this was AWESOME for us:
http://www.amazon.com/gp/product/B003RQBKLC/
We were able to plug in the GPS, DVD player, Ipad and Iphone
I got one of these Grom Audio units for my 2007.5 A4. It plugs in to the external CD changer port of the stock head unit. I didn't have an external CD changer, so no big deal for me. I'd you do have one you'll have to decide if it's worth losing it, or if you want to go with something else.
As for the unit itself, it mimics a CD and doesn't provide track or artist info on the display, but it does work with the steering wheel controls.
Installation is very easy. Order yourself a set of these stereo keys and you can have the unit installed in 15 minutes. No tools required.
/u/VeryCleverMoose okay, so this is the aux/30-pin cord that I bought and this is the adapter you need to go with it. There are dozens of things on amazon that are virtually the same, you just have to look through the reviews and questions and usually people say what it fits. Also, you will need a set of radio removal keys, I paid a few extra for ones that don't bend so easily here.
Tutorial:
You might want to snag some feeler gauges to actually measure your neck relief.
Cheap Amazon option
Once you've set the neck relief, then adjust the action by changing your bridge height.
>To my understanding, the relay is connected to the ignition so when the vehicle is started
Yes that's a way you can do it, but imagine that you're camping and you totally depleted your deep cycle battery, and now you have an empty battery and a good battery, as soon as you turn your key (even before the engine is running) both batteries will be connected in parallel. If you try to start your car you'll find that you cant since the good battery is essentially charging the bad battery, if you keep trying start your car you'll soon find the the voltage of both batteries is 6v. If you find yourself in this situation you will have to manually unplug the depleted battery to be able to start the car. This scenario is exactly what the power stream is meant to prevent since it will not connect both batteries unless the alternator is outputting 13.4v.
Yeah I guess for your application the Goal Zero is the way to go. That's why I Initially just mentioned an extra battery with a cheap inverter hooked to it, and charge it whenever you come home. If you want to charge it while on the road just take the leads of a cigarette lighter plug and connect them directly to the extra battery to charge it, it'll be a slow charge (5~10Amps) but that's exactly how the Yeti Goal Zero does it. But if you have the $600 to spend on the yeti, go ahead.
Was gonna buy that, ended up with this instead. Perfect if you don't care about relocating the dummy lights.
https://www.amazon.com/gp/aw/d/B00T85ANNW/ref=mp_s_a_1_5/135-7703905-1072318?ie=UTF8&qid=1505860478&sr=8-5&pi=AC_SX236_SY340_QL65&keywords=feeler+gauges&dpPl=1&dpID=41hU5y4B3OL&ref=plSrch
I agree with @failinglikefalling your talking about a generic 12V cigarrete device (like such https://www.amazon.com/Ketofa-Cigarette-Lighter-Socket-Connector/dp/B00LCQZEK2) commonly used to power an electrical device when the car is running. This could have been used to wire a dash cam, CD player, radar detector, etc. If the device was "hard wired" there would be a fuse-wire attached to the fuse box and no need for the 12 V socket.
​
I ran into this problem and fixed them myself. I have a 2004 Chevy Silverado with this issue. It's a known issue with the GM vehicles in a certain range. They sent a recall out for it but my mileage was too high to have it done for free. It was pretty simple with minimal soldering skills.
If your car is a GM car (which it looks like a GM dash), here are some links. I used these exact stepper motors and instructions similar to this and it took me approximately 30min to complete. It was much easier than I expected.
Good Luck!
feeler gauges are like 10 bucks, stop being a brokeback bitch and man up
I lied, theyre $6:
https://www.amazon.com/ABN-Piece-Master-Feeler-Measuring/dp/B00T85ANNW/ref=sr_1_2?ie=UTF8&qid=1494961039&sr=8-2-spons&keywords=feeler+gauge&psc=1
The first thing that I got was a cell phone holder and a USB splitter. Makes the daily driving much better.
http://www.amazon.com/adapter-cigarette-lighter-splitter-MRS152UV/dp/B003RQBKLC/ref=sr_1_3?ie=UTF8&qid=1416346705&sr=8-3&keywords=cigarette+lighter+splitter
Cut, splice, insulate, play.
Try this!
I would use one of these to tap into a fuse that only comes on when the key is on, rather than tapping directly into the lines. You should be able to find them at any local auto parts store, walmart should carry them too.
I wouldn't run the LED's in parallel, especially with strip lighting, you'll have inconsistent brightness across the strip, and may well cause the whole thing to burn out. Always do it in series.
https://www.amazon.com/Marine-Grade-Cigarette-Lighter-Socket/dp/B0002KRC5Y/ref=sr_1_5?ie=UTF8&qid=1496619302&sr=8-5&keywords=waterproof+12v+socket
Stubby
I got my Helix sub installed close to 2 months ago, here's where I got everything (tax and shipping excluded):
That was my best attempt at saving money when I did it. The sites that claim $300 or so where when they cleared inventory of the previous revision and then released B. Couldn't find a better combination of discounts and rebates.
These 4 videos were all I needed to install it, there's overlap between them. Video 1, video 2, video 3, video 4.
I had a MK7 with the Fender system but totaled it, replaced with a MK7.5 without Fender (SE). Helix is better (a little more powerful), so nothing to envy on Fender, although Fender has the advantages of not having to deal with any of the installation and retaining the lower floor with a spare.
https://www.amazon.com/3-Pin-CF-13-Electronic-Flasher-Signal/dp/B008C9YJ6C
https://www.autozone.com/electrical-and-lighting/turn-signal-flasher
I didn't narrow down by what your truck is but those searches should get you in the neighborhood. For mine it was just one of the relays near the fuse box, popped the one that was turn signal, bought the electronic one with same outputs and there you go. No mini super-heaters (those resistors get hot!) needing to mount somewhere they can dissipate that heat without burning the vehicle down.
I've been thinking about buying one for a while. This one in particular:
http://smile.amazon.com/adapter-cigarette-lighter-splitter-MRS152UV/dp/B003RQBKLC/ref=cm_srch_res_rtr_2
But I'm not sure if it will be able to fit into the ashtray next to the cig lighter...really want it to feel like an integrated part of the car, not hanging out.
Would one of these be better than the other?
http://smile.amazon.com/Roadpro-Fused-Replacement-Cigarette-Lighter/dp/B0016LG0CY?sa-no-redirect=1
http://smile.amazon.com/Auto-Button-Cigarette-Lighter-Black/dp/B0090149R0/ref=sr_1_2?s=automotive&ie=UTF8&qid=1420742893&sr=1-2&keywords=cigarette+lighter+plug
http://smile.amazon.com/K40-K403CBPP-2-Wire-Cigarette-Lighter/dp/B001JT98S6/ref=pd_sbs_auto_5?ie=UTF8&refRID=06E9J8F93C84MQ2G79PE
TIA
[this guy] (https://www.amazon.com/3-Pin-CF-13-Electronic-Flasher-Signal/dp/B008C9YJ6C). You can get them in 2 prong round ones too.
AH sorry missed that. May have to make up your own for that. Not a big following on those. You can buy general kits taht you can modify as you need to. Just make sure and get one that has the correct plugs for your bulbs.
Somethign like:
https://www.amazon.com/Headlight-Relay-Wiring-Harness-Ceramic/dp/B00H5JFHR0
I had no idea there was a specific tool for this! Does this look right?
Thanks for the help!
I put in these as drop-in replacements for my Subaru OEM horns:
https://www.amazon.com/Fiamm-74100-FIAMM-El-Grande/dp/B000DLBIGG
They aren't necessarily louder, but they have a different range of sounds (sort of like an 80s Buick) and have gotten more attention than my stock horns used to, I've found.
I think you and I use very different devices then. I've seen plenty of glass fuses on circuit boards and thermal fuses that self-reset.
Anyways, to OP's question, I do not believe you should install a switch like that without a 3 amp or less fuse inline, even if it's one of those glass fuses in a "container" it'll make sure your switch doesn't get overloaded.
https://www.amazon.com/DIGITEN-5x20mm-Holder-Inline-screw/dp/B00VLBAF84/
Fuses are a fail safe in case there is a surge, they don't control how much current goes through the outlet. But even if there is a surge you still have the charger as a secondary fail safe. If the bigger fuse still blows, then it's the charger. Car fuses are dirt cheap at a few cents a pop, and you should have them in glove box anyways.
http://www.amazon.com/120-Assorted-Truck-Mini-Fuse/dp/B0045K2Q9Y