(Part 2) Best computer cleaning & repair products according to redditors
We found 1,770 Reddit comments discussing the best computer cleaning & repair products. We ranked the 224 resulting products by number of redditors who mentioned them. Here are the products ranked 21-40. You can also go back to the previous section.


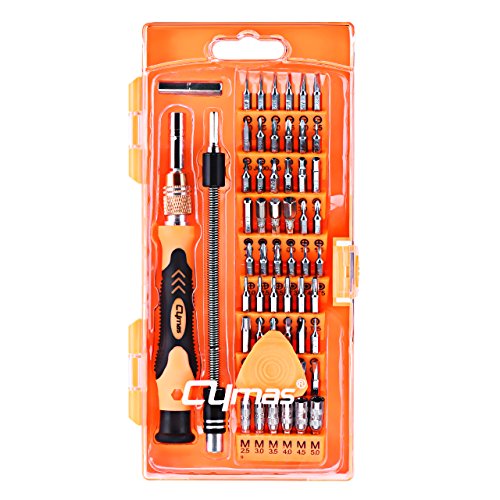


This is the kit I use. Has every tiny bit you need for electronics and such. Cleaned my PS4 recently and it made a world of difference sound wise. Almost thought the fan was broke.
>electronics so forgive the basic question
don't be bashful! This is a great kit for little electronic repair and contains lots of special bits. Here's a list of what it contains from the site:
64 Bit Driver
150 mm Flex Extension
4 mm Screwdriver Bits
Phillips - 000, 00, 0, 1, 2
Flathead - 1, 1.5, 2, 2.5, 3, 4 mm
Torx - T2, T3, T4, T5
Torx Security - TR6, TR7, TR8, TR9, TR10, TR15, TR20, TR25
Pentalobe - P2, P5, P6
JIS - J000, J00, J0, J1
Hex - 0.7, 0.9, 1.3, 1.5, 2, 2.5, 3, 3.5, 4, 4.5, 5 mm
Tri-point - Y000, Y00, Y0, Y1
Nut Driver - 2.5, 3, 3.5, 4, 4.5, 5, 5.5 mm
Square - 0, 1, 2
Gamebit - 3.8, 4.5 mm
Spanner - 4, 6, 8
Triangle - 2, 3 mm
SIM Eject Bit
1/4" to 4 mm Driver Adapter
Just remember, that with any repair/hobby, you're gonna need more than this. Before you buy this, check to see if ifixit has larger bundles that come with more stuff and fits your budget.
With this kit, you will have to buy other tools, like tweezers, spatulas, and what not. The bundles will have them, but will obviously more expensive.
Is the price difference worth the tools and time to buy them as you need them? If so, buy a bundle. If you are just taking it slow, go with this.
One more thing, do NOT buy any of the cheaper Chinese versions you see on Amazon/ebay. I've dealt with those, ifix, wera, wiha, snapon, and other kinds. ifixit is not bad, snap-on is too pricey, wera and wiha, imo, are better than snap-on and might be cheaper if you can source them right. The cheap versions often use Chinesium metals to make them, so they bend, break, and wear fast.
I had to fix my Ring doorbell and used a torx from the cheap kit, unused, and it twisted the head, so yea..
ifixit is good and for this kit at that price is great`
My allergies called. They wanted me to send you this link
Save the cans of air, get one of these
Yesterday I took some time and blacked out the chrome on my headlights and installed Diode Dynamics Switchback C-Lights on my 2015 Premium. I think it turned out pretty well, as you can see from the before / after photos above.
It was pretty warm out and - while I left the headlights in the sun for a while before opening them - I didn't bake them and thought they came apart fairly (10 minutes / side) easily. Overall, the job took about 5 hours and I'd rate it a 6/10 for difficulty.
Total cost came out to be about $155, Rallysport Direct had a 10% sale so I got the boards and retro-rubber for $150, and got a $5 can of matte black Krylon paint + primer at Lowes. I also purchased some Frog Tape but didn't end up using it.
Some thoughts...
I'm not a huge fan of the turn signal connectors on the LED boards. I would have preferred the wires to be about 12" longer, and I ended up stripping a section of my (blue) turn signal wire, soldering, and then taping them (would prefer heat shrink tubing, but it worked) instead of using the vampire taps.
I also didn't use the (i think) T-10 connector. I couldn't find anywhere in the headlights that I liked to mount the drivers, and there wasn't a good place to run the wires out, so instead I removed the socket from the light, cut / stripped / soldered the white and black wires to the driver to the red and black C-light wires. Then, I used VHB tape to stick the driver boxes to the back of the headlights, and sealed the holes with some extra retro-rubber.
I should have bought the DRL harness, because even though I disconnected my DRL resistor I couldn't confidently find the place to connect it to the new C-boards for DRLs. I'm not sure if I got a different / newer model of C lights than most sites describe, because the red wire went from the driver board to the LED board. I may buy that and connect it in the future.
It was a bit tricky putting the C-light diffuser back in over the LED boards. The little clips wanted to scratch the newly painted surface, and the LED boards didn't fit as nicely as I thought they would. I eventually got them together, but I had to take them apart and touch up once.
Fingers crossed on fogging. If I do get fogging, I have a few silica gel packets that I'm going to stuff in there for a day or two to see if that knocks down the moisture.
The stock silicon sealant is pretty gross, but cleans up easier than I expected. Regular soap washes it off, but Goo-Gone might not be a bad idea.
Pulling the bumper was pretty easy. About a dozen clips / screws, and it popped right off without too much trouble. I put a mover's blanked down (which really wasn't necessary - you aren't going to mess anything up on the bottom of the bumper) and had enough play that I didn't bother disconnecting the fog lights and turn signals.
Either have a helper, or something reflective enough that you can see the lights sitting in the car. You'll want to test all the light settings, turn signals / hazards, and test with the handbrake on and off.
I did everything myself and didn't feel like a helper would have made things any easier.
Having a set of body panel tools and spudger kit is invaluable, both for this job and in general. Just spend the $20, it'll pay for itself.
I did scare myself taking apart the headlights - I hadn't removed the stock bulbs in my c-lights, and one of them broke on me. Fortunately it didn't damage anything. Make sure you remove those c-light bulbs first if you want to avoid a sphincter tightening surprise.
If I were to do it again, I would probably get some frosting paint and paint the c-light diffusers. It looks good, but I think I would prefer the full C-light diffuser to appear a bit whiter and even out the light from the LED boards. If I end up taking them apart again I will probably do this.
I didn't replace my halogen bulbs - the extra $100 or so it would cost to switch to LEDs wasn't in my budget. I'll probably do that not too far down the line, but for now it looks fine with the orange halogens. Since I disconnected the high beam DRL resistor, it'll only matter at night anyways. I thought about doing an HID retrofit, but again - budget.
I didn't replace the amber side-marker covers with tinted ones. They darken up a bit when you paint the chrome under them, but I wouldn't mind having them a shade or two darker.
It looks pretty good, a very worthwhile mod for one person to do in 5 hours for ~$150.
​
​
Clean their keyboard? Yeah, they should. I prefer Cyber Clean though
I used Cyber Clean! It's like putty that gets the grease off and the dust out of the crevices and don't leave behind any residue or get stuck in the buttons. It has worked better than any cloth or chamois I have tried.
Here it is on Amazon
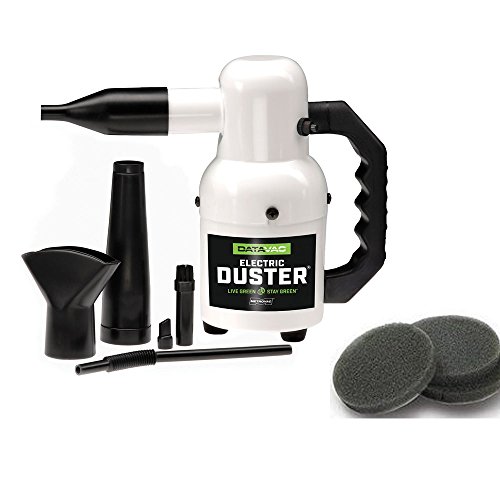
buy a datavac.
expensive but worth it.
as others said hold the fans when blowing air on it.
https://www.amazon.com/Bonus-Electric-500-Watt-Computer-Electronics/dp/B071LQSXGD/ref=sr_1_1?s=electronics&ie=UTF8&qid=1527177507&sr=1-1&keywords=datavac
(Ive had other cheaper ones similar to this and this easily takes he cake. Solid built and 5 year warranty on the motor)
They sell laptop screw kits for 10 bucks, if all you're missing is screws.
They'll come in various sizes, M2x2, M2.5x2, M3x2, etc.
The first number, is the the diameter of screw in metric (millimeters, M2 is the super tiny "lost forever in carpet" screw size, and M2.5 is the slightly bigger), and the second is length of screw.
Use the 2mm length screws to identify the screw size (diameter), then jump up in length on the hole until you actually hit the threads to secure it.
It'll likely be M2 and M2.5 holding it together.
Sounds like you need some assistance from a trainer so that you can work on obedience. They can be expensive though so a couple simple tips that may help:
I use all of these strategies with my dogs and they’ve worked very well. Be patient, keep at it, and your dog will learn. If he’s extremely willful though I highly recommend hiring a professional trainer or attending obedience classes.
No matter what, you're going to make a mess. Might as well take a load of PCs outside. Get the client to let you shut them down to do this properly. Use the blower below. That little guy is wicked good.
https://smile.amazon.com/Bonus-Electric-500-Watt-Computer-Electronics/dp/B071LQSXGD?ref_=ast_bbp_dp
My sons ASUS keyboard was also lacking the proper screw. They seem to not include them. Ended up this box: https://www.amazon.com/dp/B011EFAB8K/
It's quite excessive but I've used it for other things too. It actually was the cheaper option due to Amazon Prime membership. Every other option had $10-20 shipping fee for just a few screws.
When an anti-static bag is closed, electricity flows on the outside of the bag, not touching whats inside. When you put something like a video card on the outside of the bag, the video card becomes part of the circuit, and electricity can freely pass through it. You can read more about Faraday cages here http://science.howstuffworks.com/faraday-cage.htm
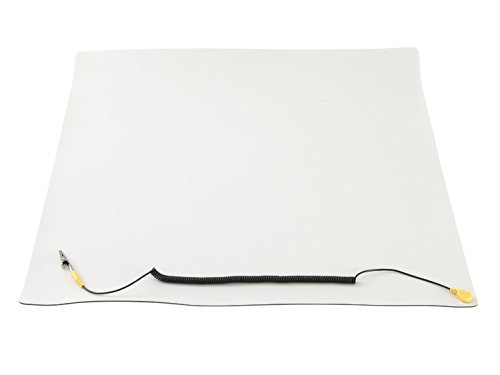
What you want is an anti-static rubber mat like this, with a connected wrist strap. The rubber is not conductive, and the wrist strap gives a path of least resistance for any static to flow away from the mat.
Turning the anti-static bag inside out nullifies the Faraday cage, because only 1 side of the bag (the outside) has the actual cage. Don't throw away the bags either, if they are in good condition they can be used again to store different PC parts or electronics. The bags aren't ruined when they are opened, but in order for them to work properly, the PC part needs to be inside of it, and the bag needs to be closed.
Unless you have a Microcenter or larger computer store nearby I don't think you'll have much luck finding it in a store - Best Buy doesn't carry it as far as I can tell.
Here's the brand I use: https://www.amazon.com/HomeDoReMi-Keyboard-Cleaner-4PCS-Electronics/dp/B00ITEDDQW
Compressed Air.
But I think in this case you should get the serious stuff.
http://www.amazon.com/Cyber-Clean-25054-Home-Office/dp/B002C03AIA/ref=sr_1_1?ie=UTF8&qid=1396666679&sr
Used some stuff like this on some older phones for random junk and lint - it worked. Luckily I haven't had to use it for my M8 yet.
Best of luck.
I have always gone with Ultra Duster...but compressed air is compressed air AFAIK. I think you would be fine going with anything off the shelf
Biggest solution is to eliminate their food supply. diatomaceous earth anywhere you see a potential entry point. Get a few tubes of paintable caulking and some steel wool. Shove the steel wool into any crevices then caulk over it, cracks and gaps in the eaves, gaps around windows, etc. You can get little duster cans like https://www.amazon.com/dp/B004FBKLZE/ref=cm_sw_r_sms_apa_i_9eroDbMYCZ6RQ
You don't need a pile of diatomaceous earth, just a light dusting will do. Getting it in the back of cabinets, behind furniture, under baseboards, etc will do tons towards prevention
To treat for scorpions (as well as many other insects) you want "Demand CS" (or one of the generics) this is what most pest control companies will actually use in Tucson. I recommend a pump sprayer and at minimum a dust mask while spraying it. Read the instructions carefully, and be smart while applying it. Spray 4-6 times a year, full perimeter and around all openings, and you should be pretty good
Check out https://www.doyourownpestcontrol.com/scorpions.htm
El que yo tengo se llama EasyGo CompuCleaner . No se que tan fuerte sea el chorro de aire de las latas, pero este aparato dispara el aire bastante fuerte y todavía puedes aumentar mas la presión ya que tiene dos velocidades.
those flat plastic 'spudger' tools may come in handy. like a thin plastic screwdriver.
https://www.amazon.com/Zacro-Professional-Non-Abrasive-Spudgers-Anti-Static/dp/B01F52ZPBQ
Here's the item:
https://www.amazon.com/dp/B01I4SOVDG/ref=cm_sw_r_cp_apa_1IXZBb6GQDJWF
Electronics blowers are definitely a thing but they're pretty damned pricey. I used them all the time when I did production tech work.
There are electronics dusters that don't create static. There are cheaper ones too, this is just the one I have.
I use a cleaning putty like this and it works great. I usually get mine in the checkout line at Microcenter if you have one of those nearby. Alternatively you can use scotch tape and it will help get out much of the crud that gets stuck in there.
https://www.amazon.com/Bonus-Electric-500-Watt-Computer-Electronics/dp/B071LQSXGD/ref=sr_1_1?keywords=datavac&qid=1570030380&s=gateway&sr=8-1
No need for an air compressor. Just buy a data vac (which does not vac but blows). If you do get a compressor get a good quality water trap for it. That's really too much pressure though IMO and the data vac is the best one time purchase.
I bought a set of these, can't really fault it for the money, and most importantly it has the T2 bit you need:
https://www.amazon.co.uk/gp/product/B00DXZ5PE0/ref=oh_aui_detailpage_o01_s00?ie=UTF8&psc=1
+1 on cleaning the earpiece, I did it to mine and it made a huge difference.
A quick tip: when you remove the earpiece, it may look like there is no dirt in there, but there is another piece of cloth/gauze you need to peel back to get to it. Good luck!
I used this set
https://www.amazon.co.uk/gp/product/B00DXZ5PE0/ref=oh_aui_detailpage_o08_s00?ie=UTF8&psc=1
Worked perfectly.
use and clean dust filters at least twice a month.
get something like this so you arent always having to buy compressed air.
try to create positive air pressure inside the case by having more intake that output fans. if you're like me and have 2 in 2 out you can tune the intake fans to run 15-35% faster than the output fans. this helps keep dust out of the case
the higher up it is the better, on a table or desk works but if its on the floor get a hard flat surface like a slat shelf or something to set it on
if all else fails spray it down with fabuloso and hit it with the garden hose.
Repairing the old kindle is an option, if you are so inclined. A replacement screen, a simple tool kit, and about 30 min of your time is all it takes.
Depends how long you're willing to wait or how much you want to spend. NZXT might be willing to hook you up with a screw set but you'll have to submit a ticket and see. You could buy just the specific size screws you're missing for cheap off Amazon or even a local hardware store. Personally, I'd just buy a kit like this, that way you'll have plenty of extra for future builds or if anything goes missing again.
https://www.amazon.com/Office-Depot-Cleaning-Duster-OD101523/dp/B00DB8NSG6/ref=mp_s_a_1_5?ie=UTF8&qid=1524841276&sr=8-5&pi=AC_SX236_SY340_FMwebp_QL65&keywords=compressed+air
would an anti-static mat be acceptable?
https://www.amazon.com/Michaelia-Standoff-Drives-motherboard-screwdriver/dp/B07D6G9XXL
Not a bad idea, they even have specialized cleaning putty now just like silly putty with the added benefit of having a higher chance of not leaving residue behind.
2.0 x 3mm (CM2x3-3.3).
https://www.amazon.com/Phillips-Alienware-keyboards-components-base-plastic/dp/B00BW3QQRA
The cooling solution is more than adequate... when it works. The problem is the quality control stinks. So, if you have a problem, deal with it. If you don't, be happy that you don't.
Now, if you do have heat issues, and need to resolve it, Alienware provides you with all the documentation you need to do the job correctly. Go to the dell support site, look up your machine, and download the full users manual. It will tell you how to take that machine apart step by step. Read the manual, go to Amazon to get a couple plastic tools to help open the machine up. A kit like this is amazing for opening up electronics. That allows you to get between the plastic pieces without damaging them. Also get some new thermal paste, appropriate pads, and decent alcohol. I use this stuff here because it is a cheap, big ass bottle of 99.9% pure alcohol.
Some people are overly religious when it comes to properly cleaning a pc.
I on the other hand am a little more realistic.
First, if at all possible i would get a can of compressed air, (you can buy a 6 pack for $15 and it should last well over a year)
https://www.amazon.com/Ultra-Duster-Canned-Air-6-Pack/dp/B00FM58A7I
Secondly, make sure when you do decide to clean your pc that you hold the fans with your finger so they do not spin. Allowing the fans to spin as you blow/suck air onto them can easily damage their internal motor.
Secondly, just use common sense, the pc does not need to be perfect, don't try to overdo it when cleaning out every tiny piece of dust.
Oriental roaches are all about moisture control. Moisture, moisture, moisture. A combination of a pyrethroid liquid barrier around all rooms, along with a "dust" (Delta dust should work just fine) injected into wall voids, esp. around pipe chases and down rarely used drains (esp. floor drains in unfinished basements). Buy yourself a hand duster to inject the dust. Oriental roaches are not that difficult to control. Again, IT'S ALL ABOUT MOISTURE CONTROL.
The old man is snoring
this air duster would be perfect because working on things you wouldnt have time for is great to do when its a rainy day
Sure, they usually just run on wall outlets.
I was thinking something like this. Don't know what your search brought up.
If you're going to be prying open plastic electronics parts, please consider getting some plastic prying tools. Or at least improvising with something similar.
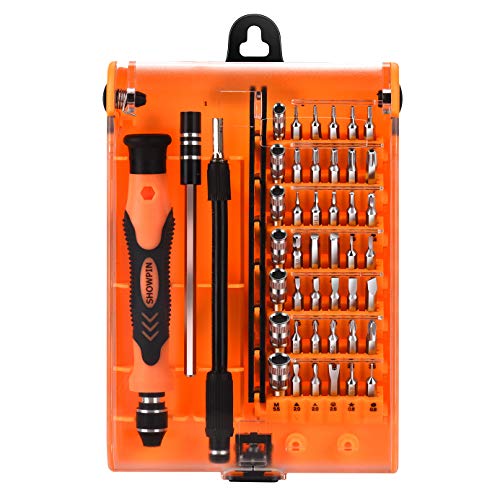
Just get a scredriver set like this https://www.amazon.com/Showpin-Precision-Screwdriver-Professional-Magnetic/dp/B00RCXE5EU/ref=sr_1_1_sspa?ie=UTF8&qid=1524551656&sr=8-1-spons&keywords=hex+screwdriver+set&psc=1
Thats what i use :-)
A single can of air isn't going to cut it for this mess. What he needs is this. I have one of these. Never have to spend money on a can of air again. One of the best purchases I ever made.
>It's a bitch to remove though.
I found one of the tools in this kit to be super helpful when it came to removing the rubber plug for the fire selector detent/spring.
Blow out the fan with some canned air (you have access to the vents on the left side of the case) and see if that makes an improvement. If you're absolutely dead set on having the thermal paste replaced, take a stab at it. As long as you pay attention to which screws went where, you'll be fine. Take pics as you disassemble it so you have a record of what goes where.
You may need a spudger or guitar pick tool to help ease the case open. I have this set of tools (non-referral link), they're thoroughly useful for taking things apart.
You'll need to clean off the old thermal paste - 90% rubbing alcohol and a q-tip will do this nicely assuming it's actually thermal paste on there and not that grey rubbery crap, in which case you'll need a razor blade and patience.
Thermal paste is cheap to acquire, either the Cooler Master or Arctic Silver should do fine.
I doubt Home Depot or Lowe's carry that type of screw.
You can [get](https://www.moddiy.com/categories/Screws-&-Bits/M2-%7c-2mm-Screws-(Notebook-Screws) them online though.
Had the same issue, bought this ones and they worked perfect,
VMPVT-001-5 Mini - 5" Screw Extraction Pliers https://www.amazon.com/dp/B00LMMU2HG/ref=cm_sw_r_cp_apa_i_9CZzCb58VBQWC
Also, I bought this screws to replace the damaged and have spare ones.
Mcsher 300pcs Laptop Notebook Screws Kit Set For IBM HP Dell Lenovo SAMSUNG Sony Toshiba Gateway https://www.amazon.com/dp/B011EFAB8K/ref=cm_sw_r_cp_apa_i_VFZzCbNEBKWT6
Got the mat and wristband on Amazon, both made by Rosewill:
Rosewill Anti-Static Mat Components Other RTK-ASM Black, Ivory
https://www.amazon.com/dp/B004N96WQ0/ref=cm_sw_r_cp_awd_nMa.wbKGH1TGY
Rosewill ESD Anti-Static Wrist Strap Components RTK-002, Black/Yellow
https://www.amazon.com/dp/B004N8ZQKY/ref=cm_sw_r_cp_awd_ZMa.wbPZ78YZA
If you plan to disassemble it completely (to upgrade the cpu for example), I would recommend one of these kit : https://www.amazon.com/Zacro-Professional-Non-Abrasive-Spudgers-Anti-Static/dp/B01F52ZPBQ/ref=sr_1_1?ie=UTF8&qid=1487607985&sr=8-1&keywords=laptop+opening+kit
I don't want you to harm your PC, cuz one wrong move and you could damage something which could cost you a lot of money. I've never used that product but this is what I use and it kicks ass. I know that you were looking at that one for $20 but if you have the money I highly recommend the datavac. It's corded so you don't have to worry about refill or some kind of battery and it comes with attachments hope this helps
It is $75 bucks but i think its a pretty good deal. Most value packs for canned air is about 20 bucks so after a while are we spending that money anyways
Hope this helps
https://www.amazon.com/Bonus-Electric-500-Watt-Computer-Electronics/dp/B071LQSXGD/ref=mp_s_a_1_2?ie=UTF8&qid=1539072665&sr=8-2&pi=AC_SX236_SY340_FMwebp_QL65&keywords=data+vac+computer+duster&dpPl=1&dpID=414T74fJIRL&ref=plSrch
Here’s what I bought: https://www.amazon.com/dp/B01FTI8TM8/ref=cm_sw_r_cp_api_hFl.BbZ6CDKGN
The top left slot (2x3) are the screws you’re after.
Get a mat too
Rosewill Anti-Static Mat with Grounding Wire. ESD Mat Size 23.6 x 23.6 Inch. 10 Feet Coiled Grounding Cable with Alligator Clip ESD Desktop Mat RTK-ASM https://www.amazon.com/dp/B004N96WQ0/ref=cm_sw_r_cp_api_kodaCb2EHMA2A
https://www.amazon.com/Phillips-Alienware-keyboards-components-base-plastic/dp/B00BW3QQRA/
Don’t spend money on air cans. Get a DataVac blower. I love mine and haven’t had to buy compressed air since.
Non-affiliate Amazon link:
Bonus - Includes 3 Extra Filters - Metro DataVac Electric Duster - 500-Watt Motor - Model ED500P Computer - Electronics Duster- Made In The USA https://www.amazon.com/dp/B071LQSXGD/ref=cm_sw_r_cp_api_i_H-a6Cb31MZB5X
Screw - https://smile.amazon.com/Phillips-Alienware-keyboards-components-base-plastic/dp/B00BW3QQRA
No idea on the heat shield though outside of going direct to dell.
edit - the screw is just a M2 x 3mm the fact that the link above mentions alienware is coincidence it was just the first link that came up
your motherboard will probably not come with any mounting hardware. The case might have built in standoffs. Just if the case bubbles up where the screw holes are. the actual standoffs probably aren't required.
But you can find pc screw kits pretty easily. https://www.amazon.com/228pcs-Personal-Computer-Standoffs-Assortment/dp/B01I4SOVDG/
I was able to pick up a nice pack of M screws in varying sizes on amazon.
Had to buy some a few months back myself. These worked for me. I think the size and thread count is standard.
Michaelia M.2 Standoff and Screw... https://www.amazon.com/dp/B07D6G9XXL?ref=ppx_pop_mob_ap_share
Mid 2011? If you don't have a warranty, I'd go ahead and open it up, take some cotton swabs and compressed air to the internal fans/heatsinks. You won't break anything, so long as you do not force anything but don't be afraid to use SOME force though, some of those plastics will need a little bit of leverage. Follow this guide as far as you need to, to remove the covers.
Then once you've uncovered the fans, just get all that dust and stuff out, and you're good! I would recommend you do this on an open table/working area without synthetic fiber clothing on, preferably in a non-carpeted area. If you have an anti-static wristband, yay for you. Do it on a garage workbench if you've got one, or something of that nature. Just don't build up static electricity. If you can see or hear the arc from built up static electricity, it's far beyond enough to fry things. No pressure!
http://blog.parts-people.com/2012/08/01/dell-xps-15z-l511z-heatsink-removal-and-installation/
You'll definitely need a small screwdriver, but these I'd also recommend on principle:
http://www.amazon.com/Rosewill-Anti-Static-Components-Other-RTK-ASM/dp/B004N96WQ0/
http://www.amazon.com/Rosewill-RTK-002-Anti-Static-Components-Yellow/dp/B004N8ZQKY/
If you're feeling up to the task and want to reseat your CPU heatsink:
http://www.amazon.com/Arctic-Silver-Thermal-Compound-Grams/dp/B000OGX5AM/
Good luck and have fun! :)
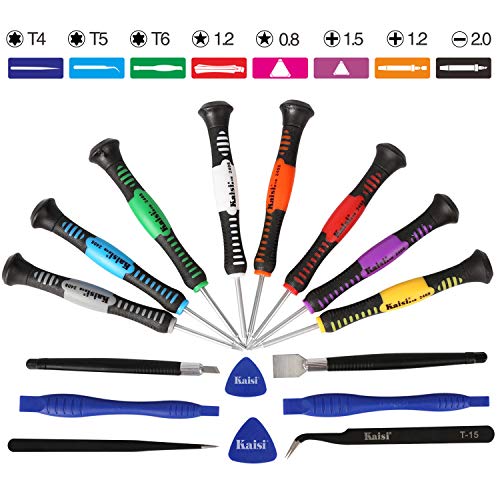
https://www.amazon.com/Kaisi-Precision-Screwdriver-16-Piece/dp/B00E3CHLLC/ref=sr_1_15?ie=UTF8&qid=1505171804&sr=8-15&keywords=precision+tool+kit
I would get this better than a compressed air can with unlimited use pretty much
Those don't look right. Buy a kit like this. The one you are looking for has a rounded, circular head with a flange. Buying the kit will help in the future with other parts.
Computer maintenance outside of hardware/physical stuff. There's free anti-virus and other programs like that. Windows 10 comes with Microsoft Defender.
PCPartPicker part list / Price breakdown by merchant
Type|Item|Price
:----|:----|:----
CPU | Intel Core i5-6500 3.2GHz Quad-Core Processor | $199.00 @ Amazon
Motherboard | MSI H110M Pro-VD Micro ATX LGA1151 Motherboard | $52.95 @ Amazon
Memory | Corsair Vengeance LPX 8GB (2 x 4GB) DDR4-2133 Memory | $49.99 @ Amazon
Storage | Seagate Barracuda 1TB 3.5" 7200RPM Internal Hard Drive | $49.00 @ Amazon
Video Card | MSI GeForce GTX 1060 6GB 6GB GT OCV1 Video Card | $249.99 @ Amazon
Case | Corsair 100R ATX Mid Tower Case | $39.99 @ Amazon
Power Supply | EVGA SuperNOVA G2 550W 80+ Gold Certified Fully-Modular ATX Power Supply | $79.99 @ Amazon
Monitor | Asus VX228H 21.5" 1920x1080 60Hz Monitor | $119.99 @ Amazon
Keyboard | AmazonBasics KU-0833 Wired Standard Keyboard | $11.32 @ Amazon
Mouse | Logitech SBF-96 Wired Optical Mouse | $8.70 @ Amazon
| Prices include shipping, taxes, rebates, and discounts |
| Total | $860.92
| Generated by PCPartPicker 2016-12-14 18:14 EST-0500 |
A little overbudget lol :)
http://www.tomshardware.com/answers/id-2930387/ssd-screw.html
https://www.amazon.com/Phillips-Alienware-keyboards-components-base-plastic/dp/B00BW3QQRA
http://www.overclock.net/t/1512964/m-2-ssd-screw-size
http://www.amazon.com/Mcsher-Notebook-SAMSUNG-Toshiba-Gateway/dp/B011EFAB8K/ref=sr_1_1?ie=UTF8&qid=1449240327&sr=8-1&keywords=dell+computer+screws
That kit includes m2 screws in various sizes and is available with Prime shipping (at least in USA), I bought one a few weeks ago and it's been very helpful on micro builds.
You can try Cyberclean. I've been using it for my Nexus 5, 6P, and 9.
If by electric dusters you mean something like this, it's really not worth it.
I'd recommend just buying canned air in bulkish amounts like this.
>If I place the dust everywhere, should I try to refrain from vacuuming? Or just reapply after vacuuming?
I'd vacuum, then apply, then re-apply after any future vacuuming.
>Can you possibly link me to the pump/sprayer?
Here's 2 options, we used this one ourselves, but this one seems to be promoted by Amazon right now. Looking at that yellow one... eh, I'd personally recommend going with the first one. THe extra $6 is worth it for higher quality.
>How much is needed for a ~800 sq. Ft. Apartment?
Per their Amazon link, 2 ounces covers 100 ft^2, large bottles are 4 ounce, so you'd want 4 large bottles
Oh, and as a safety given the high chance other apartments are infested, you probably want this XFasten double sided tape, you will want to make squares around every power/cable/telephone/airvent/etc. outlet, and a large square above your bed, slightly larger than your bed. Yes, they are known to crawl along the ceiling then drop down onto beds.
Pro trip - Canned compressed air for computers will work, you just have to pop the cap off: https://www.amazon.com/Ultra-Duster-Canned-Air-6-Pack/dp/B00FM58A7I/ref=sr_1_1?ie=UTF8&qid=1505840707&sr=8-1&keywords=canned+air
I have the same one.
Michaelia M.2 Standoff and Screw for M.2 Drives,Asus motherboard M.2 Screw + Hex Nut Stand Off Spacer(3 sets)+1 pcs screwdriver https://www.amazon.com/dp/B07D6G9XXL/ref=cm_sw_r_cp_api_i_s8KRCbMKQFQNY
Like this?
http://www.amazon.com/Rosewill-RTK-ASM-Anti-Static-Mat/dp/B004N96WQ0
Open and place all components on here before building. Touch mat before building.
After my own extensive R&D, I've come up with this. Give me a dollar.
Edit: Or try this. It's less than $7 and even comes with a Torx screwdriver if you need to take your Pax apart.
Oh, and this is by no means necessary because most cases and parts come with plenty of extra scews and stuff, but you can get a set of standard PC screws of different sizes for like ten bucks. Something like this. If you only build the PC and don't upgrade often or like to obsessively mess around with stuff like me, probably unnecessary, but it's come in useful occasionally.
You'll probably also want a small tube of high quality thermal past like Arctic Silver MX-4 or IC diamond. It will usually lower your CPU temperature a few degrees over what most coolers come with.
A wrist strap makes damage from static discharge highly unlikely but its not required. I have built about 20+ pcs and most of which was on office carpet at a conference table and all i did was touch the metal of the case to ground myself.
Here’s another option: Rosewill Anti-Static Mat with Grounding Wire. ESD Mat Size 23.6 x 23.6 Inch. 10 Feet Coiled Grounding Cable with Alligator Clip. Rosewill ESD Desktop Mat RTK-ASM https://www.amazon.com/dp/B004N96WQ0/ref=cm_sw_r_cp_api_i_xxmaBbFVK6G25
If you aren’t break dancing in socks on a carpet with a wood stove on full blast while building a pc you can get away with just touching the metal of the case. If you find that every time you do touch the metal of the case you get a noticeable shock, an ESD device may not be a bad idea.
I clean my pc with compressed air every 3 to 4 months and the filters every 1 to 2 months.
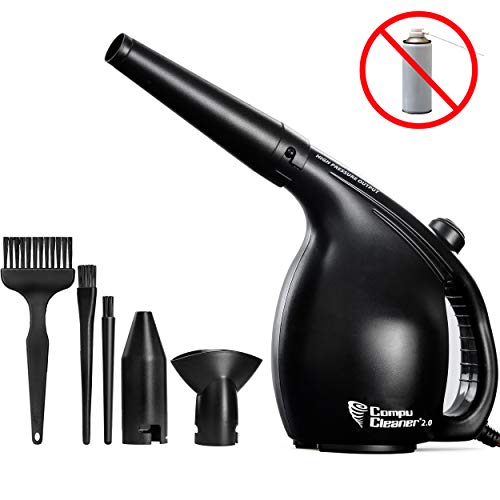
I bought this couple months ago for longer term investment EasyGo CompuCleaner 2.0 – Electric High Pressure Air Duster – Computer Cleaner Blower - Keyboard Cleaner – Electronic Devices and Laptop Cleaner - Replaces Compressed Air Cans (Black) https://www.amazon.com/dp/B0787KXTFW/ref=cm_sw_r_cp_apa_i_yoI.Ab5GQVQ77 and it works pretty well for me. 2 of my brothers just got a pc too so it'll be more cost efficient for us to use this now.
https://www.amazon.com/gp/product/B01A0EXE44/ref=oh_aui_detailpage_o05_s00?ie=UTF8&psc=1
This will help with opening it up.
https://www.amazon.com/Kaisi-Precision-Screwdriver-16-Piece/dp/B00E3CHLLC/ref=pd_bxgy_147_2?_encoding=UTF8&pd_rd_i=B00E3CHLLC&pd_rd_r=5HGZ0SEW8RGY75FNQXVF&pd_rd_w=hSlxs&pd_rd_wg=aj4MU&psc=1&refRID=5HGZ0SEW8RGY75FNQXVF
extractors: https://www.amazon.com/Alden-4507P-Grabit-Broken-Extractor/dp/B000Q60UOO
you can also do your best to cover the board and cut a flathead line as well.
generic laptop screw set: https://www.amazon.com/Notebook-Computer-Samsung-Toshiba-Gateway/dp/B01FTI8TM8/ref=pd_lpo_vtph_147_bs_t_1?_encoding=UTF8&psc=1&refRID=QCJ4MGDE9ZZQKS5CPM84
Achoo
It was just like this sale back then https://www.amazon.com/gp/product/B01IBHE0MC/ref=oh_aui_detailpage_o00_s00?ie=UTF8&psc=1 (price at 10).
Regardless, this is still a good deal for all those tool bits that would last for a while all for 10.
I got mine from here http://www.fixez.com/store/lg/lg-nexus-4/lg-nexus-4-e960-battery-replacement. They were a little bit pricier then some of the guys on ebay, but the battery that I got from them seems to be the same one that was originally in my phone. If you don't have the tools need to remove the torx screws and such I bought this pretty cheap set of them of Amazon that worked http://www.amazon.com/gp/product/B00E3CHLLC/ref=oh_aui_detailpage_o00_s00?ie=UTF8&psc=1.
Get this https://smile.amazon.com/gp/product/B01FTI8TM8/
It's $11, Prime eligible, and you'll have screws for most laptops in the house. You can check the HMM (here to figure out what size screw goes where. Says you need 2x5mm/M2X5 screws, which there are 50 of in the kit and they're extremely common among most non-Apple laptop brands.
This jelly-putty stuff is excellent for cleaning all keyboards and inside nooks and crannies, including the MBP. I recently got a used MBP that had all kinds of icky gunk around the keys and such and it all came right of.
With all other areas of the laptop, a microfiber cloth and water does the trick. I use this electronics cleaner but I'm not sure if it's any better than water. I suppose it is.
The screws are "standard sizes" and this kit worked great for me for replacing any screws on my 17R4, even the ones that hold the main bottom plate on.
https://smile.amazon.com/gp/product/B01FTI8TM8/ref=oh_aui_search_detailpage?ie=UTF8&psc=1
this is the one https://www.amazon.co.uk/gp/product/B00DXZ5PE0/ref=ppx_yo_dt_b_search_asin_title?ie=UTF8&psc=1
I use these and they work just fine and the black tops look nice as well. Also these are definitely better than the Dell versions and Dell themselves stripped out my screws during a repair. So after I got those out and replaced them with these no problems at all.
​
https://www.amazon.com/gp/product/B01FTI8TM8/ref=oh_aui_detailpage_o06_s00?ie=UTF8&psc=1
Not ideal if you need it sharpish, but I just bought this big set of screwdrivers for electronics off Amazon for fixing my phone, they do the job and not really bank breaking at 11 quid. Good to have them around if you need to call on them in the future as well.
https://www.amazon.com/gp/product/B011EFAB8K/ref=oh_aui_detailpage_o02_s00?ie=UTF8&psc=1
Here you go. This thing contains every screw you could possibly need and more. Also I wouldn't recommend using Conductonaut. Liquid metal is extremely finicky and one mistake can mean a dead computer. If Kryonaut isn't doing a good enough job, most likely you didn't do a good job repasting or you didn't screw on the heatsink back on tight enough.
On the subject of stripped screws, if you are working on a screw and feel that the screw might start to strip, use AS MUCH DOWNWARD FORCE as you can to get it to turn in one try. If you keep twisting it over and over with moderate force, that'll just ruin the screw.
Fast Blast Duster 10 oz. Can Air Removes Dust and Debris
http://amzn.com/B005FMX712
Tip: Fixate the fans before blowing the dust out, otherwise they can induce current and kill your board.
According to camelcamelcamel it hasn't gotten lower by much. 3rd party, yes, but not through Amazon. I mean, you save a couple of bucks and if you were in the market for a new screw then it's not bad.
Edit: https://camelcamelcamel.com/Cymas-Screwdriver-Magnetic-Driver-Electronic/product/B01IBHE0MC
You probably don't need 24 of them but this seems to be the screw you need, M2x3mm
https://www.amazon.com/dp/B00BW3QQRA/ref=wl_it_dp_o_pC_nS_ttl?_encoding=UTF8&colid=1KJUPQWUDCI3N&coliid=I25EX5L0KZXUX1
Could worth contacting ASRock and seeing if they will take pity on you and send you replacements, might get lucky.
Edit: and this might be the standoff
https://www.digikey.com/product-detail/en/wurth-electronics-inc/9774040243R/732-7090-1-ND/5320695
There are too many 'bad' ideas. Compressed air could spray moisture, the vacuum cleaner could create static.
I use a small paint brush with natural hair and a vacuum cleaner. So far nothing bad happened. There are also air-blowers. This hand blower might be an option. This electrical blower too.
I would use those air spray cans that are used for computers and such.
https://www.amazon.com/Office-Depot-Cleaning-Duster-OD101523/dp/B00DB8NSG6/ref=sr_1_1?ie=UTF8&qid=1524285687&sr=8-1&keywords=air+spray+for+cleaning+computers
Cheap: Fast Blast Duster
Frugal: Metro Vacuum ED500
Your CapsLock is stuck bro. Try some of this.
http://www.amazon.com/Fast-Blast-Duster-Removes-Debris/dp/B005FMX712/ref=lp_3012916011_1_3?s=pc&ie=UTF8&qid=1408302384&sr=1-3
https://www.amazon.com/Kaisi-Precision-Screwdriver-16-Piece/dp/B00E3CHLLC
I bought something like this to take the phone apart. It is a very easy process to get to the camera module. I'm not sure how you would go about cleaning it. I'd assume you just have some dust on the inside part of the phone (not inside the module?). Google an ifixit article and give it a shot! The Nexus 5 was the first phone I ever took apart and it was very simple.
(I had to remove my camera modules - front and back - due to security at my job). Good luck!
Some "canned air" is better than others. Specifically, the ones with bigger straws/valves, like this. Bigger holes == more volume == blowing more stuff out of the PS3/whatever than regular ones.
But it's not really worth much more money. All of these products are just a refrigerant not too unlike that used in an air conditioner. The can I linked uses HFC-152a.
Do you think something like this would work?
https://www.amazon.co.uk/Deyard-Precision-Screwdriver-Smartphone-MacBook/dp/B00DXZ5PE0/ref=sr_1_4_sspa?crid=3FVNIYRZK7YMF&keywords=precision+screwdriver+set&qid=1565012706&s=gateway&sprefix=precision+%2Caps%2C150&sr=8-4-spons&psc=1
I guess it's moot if you already bought that set, but I like this spudger kit since it has variety of devices instead of a bunch of the same ones.
For the one you got, you'll probably want to use the flat end. Push it into the gap just a little and then twist it to pry the case apart. The exact technique will depend on exactly which ThinkPad you are opening.
https://www.amazon.com/Bonus-Electric-500-Watt-Computer-Electronics/dp/B071LQSXGD/
Link for the uninformed.
How's this?
https://www.amazon.com/Kaisi-Precision-Screwdriver-16-Piece/dp/B00E3CHLLC/ref=pd_bxgy_469_3?ie=UTF8&psc=1&refRID=DHE8F8X8BZR4P9JF20P9
Not necessarily a cloth. You won't want to risk any form of static building up. You'll need some canned air. You can usually pick up a can in your local BestBuy, Walmart, etc., for a few dollars. Take that and blow out any dust that may be stuffing up your GPU's cooler.
It's also very good practice that whenever you touch any computer components with your bare hands to have an ESD on your wrist at all times. Static buildup from you can discharge onto the very tiny electronic components and fuse the nano circuits of a computer. You would never feel or see it either as it takes fractions of what it would take for you to feel. It may not destroy your computer, but it'll rob you of a lot of performance that you just paid top dollar for. That's just my $.02. I work in IT and have A+ certification.
ESD mat for your work top
ESD wrist strap to be clipped to the case to ground you
edit- I forgot to say how fucking cool your setup looks btw. I love the ingenuity.
Pretty sure it's a M2X3 size. I would check local hardware stores first if not https://smile.amazon.com/Mcsher-Notebook-SAMSUNG-Toshiba-Gateway/dp/B011EFAB8K/ref=sr_1_1?ie=UTF8&qid=1466024440&sr=8-1&keywords=M2X3 may be your best bet.
I would research more on the exact size first. Best of luck to you
2.0 x 3mm (CM2x3-3.3)
https://www.amazon.com/Phillips-Alienware-keyboards-components-base-plastic/dp/B00BW3QQRA/ref=sr_1_2?ie=UTF8&qid=1473791117&sr=8-2&keywords=m.2+screw
I'd recommend getting a bellows duster for diatomaceous earth. You don't want to breath it in and it is very hard to clean up off of rough surfaces like brick.
Regular or XL? They're pretty easy to change. The XL ones are $7 each on ifixit and you might have the right screwdrivers for the job. If you don't, they cost very little, a $10 screwdriver Screwdrivkit would do great. It might just have been a connection that came unseated.
But if it's your motherboard that's bad, I'd just get a new 3DS. That thing is terrible to change, imo.
I would invest in something like this
EasyGo Compucleaner 2.0 - Electric High Pressure Air Duster - Computer Cleaner Blower - Keyboard Cleaner - Electronic Devices and Laptop Cleaner - Replaces Compressed Air Cans (Black) https://www.amazon.com/dp/B0787KXTFW/ref=cm_sw_r_cp_apa_i_7NTGDb3SQ3FX7
Here's a 24 pack on Amazon for $6
Just search around for "M2 x 3mm," that's the size you need.
Canned air? Pretty much everywhere. Amazon, newegg, Best Buy, most grocery stores even.
http://www.amazon.com/Ultra-Duster-Canned-Air-6-Pack/dp/B00FM58A7I/ref=sr_1_4?ie=UTF8&qid=1456880936&sr=8-4&keywords=canned+air
I just use windows disk clean up, I find most other programs tend to want to delete what I want to keep.
Here is an image of what I mean by air compressor walmart air compressor Note I am not recommending that one I just found that one with a quick search. You can find them cheaper, smaller, or even bigger. They can be used to blow air on things, air up car tires, or even for air tools such as an impact wrench.
Here is a image of canned air Amazon Canned Air It does show its great for computers and such but when held at angles you will get liquid out of them, especially when they start to get cold. Which happens pretty fast.
Not sure specifically. I’d recommend getting one of these and keep it. Will have every laptop screw you’ll need for future. I have this kit and like it.
Mcsher 300pcs Laptop Notebook Screws Kit Set For IBM HP Dell Lenovo SAMSUNG Sony Toshiba Gateway https://www.amazon.com/dp/B011EFAB8K/ref=cm_sw_r_cp_api_IqE8Bb3N28FE7
Any place that sells computer stuff should have it. Amazon has it.
I found this according to your description: https://www.amazon.ca/dp/B00BW3QQRA/ref=cm_sw_r_cp_awdb_t1_4RSyCbC2GH5BQ
I would ask Razer Support first if they will fit before ordering
More than you'll need, but you should be able to find this at any office supply store or computer electronics store.
Its tough but you need to convince your customers first. I ran routes that included small restaurants and larger food processing plants. Outside of our three warmest months, I rarely touched a B&G. I used monitors and baits. I carried a tool bag instead of a B&G. In the bag was ant, cockroach and rodent baits along with snap traps, insect monitors as well as putty knives for inspecting. I also had a brush or two for some light cleaning. ect. IPM is not the elimination of pesticides but rather the selection of low impact products and techniques. The most striking examples of IPM appear in cases where you do Monthly Services or "maintenance treatments. A good example is when you run into cove base. You COULD spay the surface of that cove base with a given residual. How long do you think that residual will las in a typical office setting? The reality is that you MAY get 15 -21 days of detectable amounts from the cove base. Conditions vary. But look at that cove base pic again. Do you see how the bottom of the cove base forms a small half tunnel as it meets the floor? That is an EXCELLENT highway for most pests. Remember that the mass of a pest's time is spent hidden as much as they can. This tunnel is like a hidden highway.That is a BETTER place for your insecticide. So in this scenario, let's say there are pavement ant under the slab of this office. They keep pushing out their little grains of sand. Consider this alternative treatment. In my tool bag I kept a pack of post it notes and an old letter opener.I would walk through the office checking my monitors and speaking with people about their pest sitings In this example, we have a large office on a slab and pavements ants are the main pest. As I go, I place a post it on or near the "hot spots" of the pavement ant activity. I go back out,and get my Getts duster ( or have it with me in a ziplock freezer bag with me.) From my tool bag I pull out an old letter opener. I go to these "hot spots" and sit down right on the floor next to the "hot spot." I take my old letter opener and slip it under the "lip" in the cove base where it meets the floor.I pry up that lip and slip the stem of the duster in where I pried it up (kind of like a shoe horn.) I pivot the duster so the stem is parallel with the wall (as much as possible) and give the duster a gentle squeeze. If you watch you will see a small amount of dust puff at seams ext in the cove base about 6 or 8 feet to the right. You now have covered 6 or 8 feet to your right. Pivot the duster to the left and repeat. You have covered the cove base for about 16 feet. 16 feet will cover most any "hot spot." Mind you, I only do this at hot spots, not the entire building. Its a bit more work but in a few monthly visits, you will cover the mass of the issue. I assure you this is far more effective, especially if you return to those hot spots next month with a boric acid or DE kind of product. You can just do a couple of these old hot spots on each visit while knocking down new ones. I assure you...treating cove base in this manner is far more effective, lasts far longer and your customer isn't exposed to your insecticide like they would be if you were spraying the surface of the cove base. This seems like a lot of work but it WILL pay dividends in the long run in fewer call backs and reduced liability.
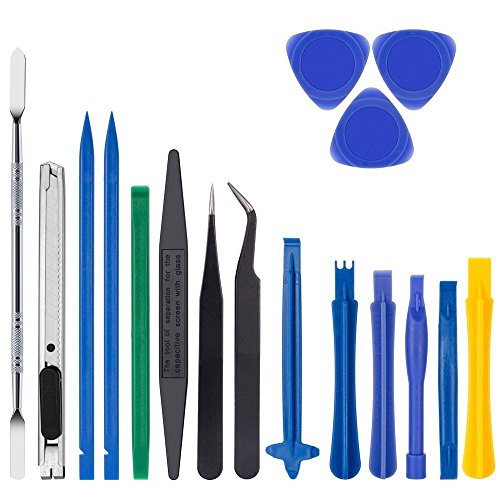
This kit is the one I use, the metal tool all the way to they left has been perfect for prying prints off of any surface.
Ever since i switched to glass, all I have to do his hit the print with a hammer and it pops right off. By the way I'm using a watch makers hammer, not a 5lb maul. Also the 5x7 glass will cover your leveling screws, you can get a cheap set of glass cutters from lowes for $4. I used them to change the ends of the glass to leave the leaving screws exposed. Its not necessary but makes life easier. I've also found these clips to be a perfect fit for picture frame glass. Hope this helps you in some way.
Look for something like this, for electronic repair. Not a big magnetic tip screwdriver from home depot.
Can you remove the motherboard and turn it upside down to get the screw out?
228pcs Personal Computer Screws & Standoffs Set Assortment Kit for Mother Board https://www.amazon.com/dp/B01I4SOVDG/ref=cm_sw_r_cp_apa_i_NxbPDbVVJHCNJ
More than you need for this but definitely would help in the future too
https://www.amazon.com/CO-RODE-Notebook-Computer-Samsung/dp/B01FTI8TM8
have you ever tried google? cool thing you can look up things.
[something like this](Falcon Compressed Gas (152a) Disposable Cleaning Duster 4 Count, 10 oz. Can (DPSXL4T) https://www.amazon.com/dp/B002ZB6LZA/ref=cm_sw_r_cp_api_i_q8ZLDbNK19MFV)
If you're afraid of taking the components apart, buy a can of compressed air to clean out as much dust as you can. Office Depot Cleaning Duster https://www.amazon.com/dp/B00DB8NSG6/ref=cm_sw_r_cp_apa_i_Wqo3Db66MX0MZ
There's a green slime stuff. One of those "as seen on tv" items advertised to clean out keyboards, etc....that shit works great to clean all the dust and lint accumulation in all the little trouble spots
Found it https://www.amazon.com/HomeDoReMi-Keyboard-Cleaner-4PCS-Electronics/dp/B00ITEDDQW
Thanks for the advice.
Would you say the one I linked on Amazon would be fine?
I use rubbing alcohol for keyboard cleanup if I just need something easy, but this stuff is one of the better keyboard cleaners I've used.
These cans ok?
Office Depot Cleaning Duster, 10 Oz., Pack Of 3, OD101523 https://www.amazon.com/dp/B00DB8NSG6/ref=cm_sw_r_cp_api_gsHNAb7A4ZCNX
https://www.amazon.com/Cymas-Screwdriver-Magnetic-Driver-Electronic/dp/B01IBHE0MC/ref=sr_1_15?ie=UTF8&qid=1482435539&sr=8-15&keywords=hex+screw+set
you could get this set and it'd would helpful for many things vaping and non vaping related in the future aside from just tightening your coils.
Sorry for the late reply, an M2 3mm screw should work I think.
There's a 24 pack on amazon that worked for for some guy with a samsung ssd but 24 screws seems like a little too much
Are you talking about this?
I'd like to know too. Any updates on this?
Just got the right ones in. You need M2X3L screws, specifically. If you just get the M2X3 screws, the head of the screw is too small to hold down the SSD in the bay.
Here's a link that is on my bag, though I ordered them through Amazon: www.laptopscrewsdirect.com
Here's the link I ordered from specifically: http://www.amazon.com/Phillips-Alienware-keyboards-components-base-plastic/dp/B00BW3QQRA/ref=sr_1_1?s=electronics&ie=UTF8&qid=1452962402&sr=1-1&keywords=m2x3l
They come from the UK, so if you're in the US like me, it took them 10 days to get here.
Because I like to over-do everything I use one of these:
But really that's unnecessary. You'll find that you can do everything with just the case and the motherboard box.
Typically you fit the CPU and cooler to the motherboard while it's still in the box, transfer that directly into the case, and every other component goes directly into the case. Nothing needs to be sitting around on the table.
Tip: if possible ground the case before you begin. If you're in a country where wall plugs have a ground pin (e.g. the UK) then install the PSU in the case and plug it into the wall socket (socket switched off) - this will ground the case for you.
Then you make sure to touch the case frequently during the build to discharge yourself (extra important if you're standing on carpet).
https://www.amazon.com/EasyGoProducts-EasyGo-CompuCleaner-2-0-Electronic/dp/B0787KXTFW/ref=sr_1_1?s=office-products&ie=UTF8&qid=1522524290&sr=1-1&keywords=it+duster
This is the one I have.
[Better yet, buy putty that's designed to clean gunk out of tight spaces!] (https://www.amazon.com/dp/B00ITEDDQW/ref=cm_sw_r_other_awd_YXgAwbPH7KNK6)
I don't think you can remove the built in one, if your motherboard box doesn't have the little screw you can buy one from amazon https://www.amazon.com/Michaelia-Standoff-Drives-motherboard-screwdriver/dp/B07D6G9XXL/ref=mp_s_a_1_4?keywords=M.2+screw&qid=1575029399&sr=8-4
The first result on google was actually the exact brand that worked for me. I found this brand in a store locally, you can probably find a better deal than my quick search. https://www.amazon.com/Ultra-Duster-Canned-Air-6-Pack/dp/B00FM58A7I/
The large capacitors in a PSU can hold a charge for days, so after you open it, wear rubber gloves, and do not touch ANYTHING metal inside the PSU. Here is some safety equipment to consider:
https://www.amazon.com/Electrical-Insulated-Electrician-Protective-Insulating/dp/B07S878KNX/
https://www.amazon.com/Magid-Glove-Safety-M011B12-Electrical/dp/B078GLBCLD/
This kit has several plastic tools with it that would be safe, just don't use the metal or metal-tipped ones:
https://www.amazon.com/Zacro-Professional-Non-Abrasive-Spudgers-Anti-Static/dp/B01F52ZPBQ/
if you want to stick with wiha and get a bit of other bits
cheapest wiha set
[this is what I used a for along time, the other bits come in handy for random jobs but it's a cheap metal that will warp sometimes. I mainly use the micro bit holder for my wiha bits now]
(https://www.amazon.com/dp/B07GYM7W6L/ref=cm_sw_r_cp_apa_i_UcmTCbSMSF3KB)
the cheapest micro bit holder, they other bits probably suck but the holders are usually fine, I mean, how can you really screw that up
Use canned air made for electronics to shoot out the loose dust, then cyberputty.
Use a cyberputty from a reliable supplier to clean in crevices. I don't know what is in the no-name or counterfeit stuff.
90%+ isopropyl alcohol on a microfiber cloth will clean most fingerprints off the case and screen. If you have a touch screen, check your manufacturer's recommendations. I'm not family with some of the newer ones. Use the lightest touch necessary to accomplish the cleaning.
Source: my 20+ years maintaining computer equipment used by some of the grimiest hands.
I have used a green slimy gel product called Cyber Clean that works wonders on your keyboard and other such hard to reach places. Has a chemical smell but other than is pretty handy.
Amazon has a lot. You can get a 6 pack for $15.59.
That comes to about $2.60/can.
Does anyone have experience with this product for cleaning the dust inside of a PC?
Save yourself a lot of headaches now and in the future by buying this
228pcs Personal Computer Screws & Standoffs Set Assortment Kit for Mother Board https://www.amazon.com/dp/B01I4SOVDG/ref=cm_sw_r_cp_api_i_5niaBbVQ3NK0P
It will have everything you may ever need for $10
Forget that. Get one of these instead and never look back. They're amazing.
EDIT: the other problem with air compressors is that they can get moisture in them, and unintentionally blowing a fine mist all over the inside of your PC generally is a bad idea.
The wifi antenna wires are part of the LCD panel assembly.
You'd have to buy new antennae wires and then route them up through the hinge and back up in the panel display. So, you'd need some pry tools to separate the bezel of the panel display. Which could be dicey as there is a risk to cracking the display panel when removing the bezel.Buy a new antenna assembly
Edit: Shoulda check manual this model has a removable antennae assembly.
Check this out and you can see what the standoff in screws look like https://www.amazon.com/gp/aw/d/B07D6G9XXL/
Amazon has some pretty cheap, lemme get a link real quick
Edit: here's the link; http://www.amazon.com/gp/aw/d/B005FMX712/ref=mp_s_a_1_4?qid=1409365571&sr=1-4&pi=AC_SX110_SY165_QL70
I don't know if the price would be the same or not though...
Totally feel ya, these are some very soft screws. It sucks to have to do this but if you've exhausted the top three tricks for getting screws out you might have to dremel them out with a cutting disk.
​
I bought $30 worth of tools and screws to do this and it's easy if you have steady hands, like the kind you get from handling tiny screws for a day ;) . Just cut a slot straight across the screw and then use a slotted (flat) screwdriver to take it out. I had to do a little damage to get a deep enough cut on the screw - here's the result with new screw - https://imgur.com/pqDU519
​
This is all I used
Rotary Tool - This came with cut-off disks that worked on the stripped soft screws.
Screws - These replacement screws had all 3 of the right sizes for my XPS 15 9570, I suspect they will fit the XPS 13 but please check first. These screws are Phillips head and none have stripped on me in the last year.
The best solution would be to open the console up and clean it with rubbing alcohol. If you don't want to explore that route, you can try using cyber clean
Gotcha. Felt like I was readying arabic there trying to figure out what the 19DY9 Torx SCREW,M2x3L,3.6D,0.4T,Black, Base -> Palmrest meant.
thanks man, I ordered one of these to have some spares https://www.amazon.com/gp/product/B01FTI8TM8/ref=oh_aui_detailpage_o00_s00?ie=UTF8&psc=1
You can find some spare standoffs from sites like eBay and Amazon. I bought a screw set that included plenty of motherboard standoffs when I upgraded a prebuilt from mATX to full ATX (ASUS Prime B350-M CSM to MSI X470 Gaming Pro Carbon). I have the set I bought from Amazon a while back in 2017 listed below. It doesn't come with colored motherboard screws, but it gets the job done.
Site
It should come with everything you need. The screws are included with the case. You can buy kits on amazon though that have a bunch of extra.
https://www.amazon.com/gp/product/B01I4SOVDG/ref=oh_aui_detailpage_o05_s00?ie=UTF8&psc=1
Bought one of those recently, worked pretty well, but you should get everything you need.
On your build it looks pretty good, might consider getting the i5-7500 instead, it is a tad bit faster and $15 more.
Also if you aren't purchasing this thing literally right away you might be best waiting for Ryzen in 2 weeks. They will be selling i7 class processors at i5 prices if all the leaks are true. Intel will likely need to adjust and even if you go with that build it will be cheaper in 2-3 weeks. Up to you. I wouldn't expect any major changes in speed from AMD, but most likely a big shake up in cost that will beneficial.
Not sure about cheap knockoff, but https://www.amazon.com/gp/product/B01IBHE0MC/ref=oh_aui_search_detailpage?ie=UTF8&psc=1 goes on sale for like 8 bucks from time to time, and I have it and it's fantastic. There's also another one that's identical from like Oria or premium or something, not sure on those but it looks like the same kit.
Anyway, great for the price.
Do you have any tips for applying the flour?
​
The best method I've come up with so far is a powder sprayer used for pest control:
​
https://www.amazon.com/gp/product/B004FBKLZE/ref=ppx_yo_dt_b_search_asin_title?ie=UTF8&psc=1
I bought https://www.amazon.com/gp/product/B01FTI8TM8 thinking it would work but 2mm seems too small, they slip right in and 2.5mm are too large to fit
Just wipe it, like with a cloth. /s
Serious reply: how often you clean your computer depends heavily on the environment it's in, such as if you have pets or live in an older, dustier, house. The fans also pull in dust, which can be pulled in from both the bottom and front of your computer (even with filters, some particles will get in).
Personally I just power-dust my computer every 1-2 months (with a can of compressed air) and clean out my fan filters. If you have a pet you might want to clean it out more often (I've heard of people that do so every two weeks because they have cats). Not cleaning your computer often could lead to slightly higher temperatures for all your components, so it's better for your system if you keep it free of dust. The compressed air should be fine, and I think it's what most people use. If you want to wipe anything with a cloth make sure it's non-static, since you could accidentally damage some components.
The pry tools are kind of difficult to wedge in there, so you have to be careful to not damage the plastic ring that acts as a buffer between the display and the back case. It takes about 30-60 minutes start to finish depending on how comfortable you get with it.
Links:
Video Guide: https://www.ifixit.com/Guide/Oneplus+3+Rear+Facing+Camera+Replacement/72752
Ebay kit:
https://www.ebay.com/itm/For-OnePlus-3-OnePlus-3T-Rear-Back-Camera-Replacement-Part-16MP/173364683506?hash=item285d5722f2:g:U1gAAOSwFFZbIjnV
Extra pry tool kit:
https://www.amazon.com/gp/product/B01F52ZPBQ/ref=oh_aui_detailpage_o01_s00?ie=UTF8&psc=1
Replacing the screen assembly is fairly easy and not horribly expensive if you're any good with a spudger and a screwdriver.
I bought [this] (http://www.amazon.com/gp/product/B00HKL3DEM/ref=oh_aui_detailpage_o07_s00?ie=UTF8&psc=1) from Amazon and used [these] (http://www.amazon.com/gp/product/B00E3CHLLC/ref=oh_aui_detailpage_o07_s00?ie=UTF8&psc=1) tools to install it following [this] (https://www.ifixit.com/Teardown/Nexus+5+Teardown/19016) iFixit teardown. Took about 20 minutes.
Screwdriver Kit
Get this and use the Torque 5 screw to open the laptop and I can't remember the screw to get the SSD out but it's in the kit. This is super high quality (own one) and will ensure you have all screws needed for future projects as well.
It was not hard to build the mobo into the case, just keep on top of your cable management. If you can, remove the HD sled first (unless of course you need it). All the screws come with the products that I purchased, yes. Be careful about stripping screws, just use the proper driver (no power!). I believe I have 8 standoffs mounted + 1 nub that comes pre-attached to the case. I probably watched ALL the youtube videos, lol. https://www.youtube.com/results?search_query=fractal+meshify+c+build
Things I made sure I had for my build before all my parts showed up.
I got most of these items as a tip from a youtube video but I can not find it at the moment. Yeah, definitely let me know if you need help with anything or just want me to show you "how I did it". The manual for the mother board has the header LEDs defined on there, there is one dead spot (no pin) in the top right, obviously dont use that one but also don't use the one below it even though its labeled ground for the reset button (thats the only issue I had).
I mentioned it as a possible solution on the onset, and he offered it up as a solution as soon as he saw the issue. It's cheaper for Dell to ship a card vs getting a whole computer back and replacing it themselves.
And no, you need to buy the screwdriver (I bought this on Amazon).
This stuff hands down is the best to clean a keyboard: http://www.amazon.com/gp/product/B00ITEDDQW?psc=1&redirect=true&ref_=oh_aui_detailpage_o09_s00
https://www.amazon.com/gp/aw/d/B00G8MMQI8/ref=mp_s_a_1_8?ie=UTF8&qid=1504104108&sr=8-8&pi=AC_SX236_SY340_FMwebp_QL65&keywords=compressed+air
https://www.amazon.com/gp/aw/d/B00DB8NSG6/ref=mp_s_a_1_7?ie=UTF8&qid=1504104108&sr=8-7&pi=AC_SX236_SY340_FMwebp_QL65&keywords=compressed+air
https://www.amazon.com/gp/aw/d/B00FM58A7I/ref=mp_s_a_1_10?ie=UTF8&qid=1504104108&sr=8-10&pi=AC_SX236_SY340_FMwebp_QL65&keywords=compressed+air&dpPl=1&dpID=51csK8MuBVL&ref=plSrch
https://www.amazon.com/gp/product/B00RCXE5EU/ref=oh_aui_detailpage_o00_s00?ie=UTF8&th=1
Note: You'll probably want to go to a hardware store and get a 1.3 and 1.4mm allen/hex bit for the set. Some of my RDAs use 1.4mm screws, but the kit covers most everything else. And it's cheap.
same way as fc660c
I personally use those triangle pry tools (similar to one in this kit), which works pretty well for this
I usually just buy these
https://www.amazon.com/gp/aw/d/B002ZB6LZA/ref=mp_s_a_1_1?ie=UTF8&qid=1571670862&sr=1-1&pi=AC_SX236_SY340_QL65&dpPl=1&dpID=51Wg9XqGvIL&ref=plSrch
Can you post a link to the attachment you use?
2017 keyboards are better than 2016.
General rule of thumb: Don't eat (things that has crumbles like pizza etc.) on the laptop and keep a can of compressed air handy
https://www.amazon.com/gp/product/B00DB8NSG6/ref=oh_aui_detailpage_o03_s00?ie=UTF8&psc=1
Just blow it with some canned air It's like $4 at Walmart. Blow some air through it and you're done.
Go in Amazon and search for a keyboard cleaner that is like a jelly ball... I'll try to find if and edit this post but it's an amazing cleaner
Edit:
HomeDoReMi Keyboard Cleaner (4PCS) - Remove Dust, Hair, Crumbs from Keyboard, Keypad, Air Vent - Rid Your Electronics of Germs - Best Keyboard Instrument Cleaning Care Product, Effective and Efficient
https://www.amazon.com/dp/B00ITEDDQW/ref=cm_sw_r_cp_apa_o9VXAbCDRC579
These things, $12 for 4 packs and you can just rub it on the entire board and it cleans every little gap perfectly. Lifts high majority of dust off of grip tape too!
Don’t vacuum your computer. Compressed air or a plug in air blower.
EasyGo CompuCleaner 2.0 – Electric High Pressure Air Duster – Computer Cleaner Blower - Keyboard Cleaner – Electronic Devices and Laptop Cleaner - Replaces Compressed Air Cans (Black) https://www.amazon.com/dp/B0787KXTFW/ref=cm_sw_r_cp_api_i_Dhv4Cb29RTVXW
I use the white version of this(out of stock) and it’s really great and affordable. Since I got it, I’ve used it to clean much more than my pc.
Compressed air
Cough