(Part 2) Best single board computers according to redditors
We found 2,398 Reddit comments discussing the best single board computers. We ranked the 551 resulting products by number of redditors who mentioned them. Here are the products ranked 21-40. You can also go back to the previous section.


![Adafruit USB Micro-B Breakout Board [ADA1833]](https://m.media-amazon.com/images/I/61bXItl3XOL.jpg)


I made this Pi controlled irrigation system. The goal was to make it as user friendly as possible. It is not finished yet. I had to get a working proto going as soon as possible because I moved to a different state and my parents are selling this house. Not to mention fall semester starts on Monday. I plan on working on this as much as possible on my free time and then make a guide and share my code with everyone so others can benefit from my work. If you want my current code and want to improve on it please PM me. Also, I would love it if you shared your version with me as I will implement it into my code. I want to share my best with everyone.
P.S. I did not document my code at all. I mainly hard coded all of this in the past few days since I was limited on time. I am also a noob on Kivy and this is my first big Pi project.
Edit: Below are the hardware
Landzo 7 inch touch panel - 40.88
Raspberry Pi 3 Model B - 39.99
32 GB flash - 15.69
DS3231 RTC Clock Module - 5.99
4 channel relay - 6.99
Uxcell enclosure - 9.99
M2.5 hex spacer screws - 9.98
Modified internal panel - 8.30
Total: 137.81
PS. Definitely could be cheaper. For me it sure was because I had some of the parts already available that came in a some sort of kit.
The 3b+ is POE ready. Which means it requires a POE hat. That’s the one I use on 3 of my Pi’s. Though I got them when the 3b+ was released and they were a lot cheaper at the time.
There is the Retroflag NESPi Plus case, which now has a safe shutdown option through an additional switch on the PCB. https://www.amazon.com/dp/B07BRHDVTN
I have their SuperPi case that uses the same circuitry with a B+ and the official 2.5A/5V PSU and didn't have any problems yet.
The RetroFlag NESPI+, Super Pi, and Mega Pi cases have safe shutdown circuitry and scripts, and are pretty popular here.
Or don't and get a raspberry pi and put Kodi on it.
Here^1 is^2 everything^3 you^4 need to make a KodiPi with enough space to put a bunch of movies on (if you wish, otherise just get a smaller mSD). About the same price as a brand new roku, but you can do a lot more with it, and it's open source so you could do whatever you wanted with the device.
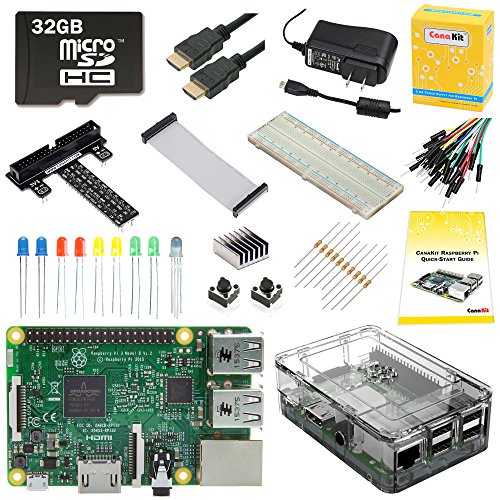
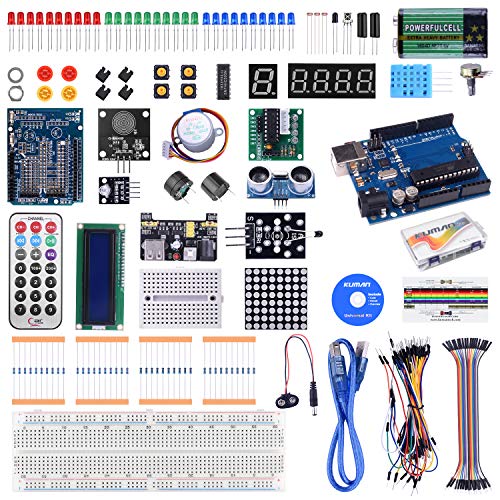
A package like this should contain almost anything he might need to prototype something. The only thing he could need later on if he wants to finalize a project would be a soldering iron, but that could be added later on.
https://www.amazon.com/CanaKit-Raspberry-Ultimate-Starter-Kit/dp/B01C6Q4GLE/
Inventory:
pfSense:
Snort, pfBlockerNG, OpenVPN, Squid, ClamAV, Default deny ingress/egress FW, etc.
ZOTAC ZBOX NUC
Kingston 120GB SSD
Crucial 8GB DDR3L RAM
ESXi Hypervisor:
Skull Canyon NUC
32GB DDR4 RAM
Samsung 950 Pro 512GB M.2 SSD
Virtual Machines I'm currently running.
Splunk - Receives my FW, DNS, Snort, and OSSEC logs. I have dashboards to filter this data.
Snorby - Also receives my Snort logs. I like this a little better than Splunk as I can view packet contents.
OSSEC - I used this for file integrity and endpoint monitoring on my servers and desktop. Functions as a host based IDS.
Nessus - I use this every once in a while to see if there are any open holes. Otherwise, I just use nmap and iptables to close everything off.
Unifi Controller - for managing my AP.
Wireless:
Ubiquiti Unifi AP-AC Lite
Switch:
TP-LINK 8-Port Gigabit L2 Switch
RetroPi + Monitor:
RPi3
10.1 Inch IPS HDMI Monitor
My VMs, configs, and files are backed up to a HDD I keep offline. I'm thinking about adding a NAS into the mix for somewhere around 200-400 dollars. Low energy consumption preferably if anyone had any recommendations. :)
Retroflag is a company that sells injection molded plastic versions on amazon, and they even have usb headers to move 2 of the usb ports to where the controller ports would be. They also have functioning power and reset buttons. I built one for my brother and myself a year and a half ago. Here's a non-affiliate link to the new Rpie 3 B+ version although I used the regular B version:
https://www.amazon.com/Retroflag-Functional-button-Shutdown-Raspberry/dp/B07BRHDVTN
With the P 3 B, I was able to get all US released NES and SNES roms to work flawlessly, and about 60% N64 roms to work with a cpu and gpu OC. The B+ should do better as it's stock clocks is at my OC so it should OC higher.
Btw I own all of the Nintendo classic consoles(the small reproductions that Nintendo released over the last two years: NES, SNES, Famicom and Super Famicom) and that nespie case is about the same size as the NES classic.
You could save money, and buy more, if you didn't go with the CanaKit and built your own. Using a mix of ebay and amazon you can get a complete RPI3 Kit for <$60
[Cana Kit]
Raspberry Pi 3
32gb Micro SD (Class 10)
CanaKit 2.5A Power Supply
Case
MicroSD To USB Reader
HDMI Cable
Heat Sinks
Total: $74.99
[Self Built kit]
Raspberry Pi 3 $37.85
32gb Micro SD (UHC 1) $9.99
Power Supply $5.59
HDMI Cable $0.99
Cheap Case $3.79
CanaKit Case $7.99
MicroSD To USB Reader $0.99
Heat Sinks $0.23
Total (Cheap case): $59.43
Total (CanaKit Case): $63.63
Your Camera from Amazon: $19.99
Same camera on Ebay: $9.99
(Before anyone says anything about some off brand power supply, that you need one of those high quality power supplys yada yada, I have that exact power supply and it works great. I'm pretty sure they all use the exact same ac-dc converter, just different housing and cable design. Currently doing some more tests on my pi3 overclocked to 1.35ghz and stress testing it to see the temps. Just finished another test, 22x22mm heat sink + 10mm fan + arctic silver and the avg temp over 5mins was 41C and I never got the undervolt warning)
There are a few that come to mind when it comes to soft shutdown cases. Most, if not all, cases in this list require the installation of a script, which can be done through the Raspbian terminal (accessed by quitting EmulationStation, either by pressing F4 or by pressing START while in ES and selecting the bottom menu item, then Quit EmulationStation). You could also access the terminal through SSH using PuTTY.
Honestly, it fucking sucks trying to solder to that connector. I got it right eventually, but the connection to those tiny pins is so weak that it causes a ton of problems. Get something like this
It really depends on the level of complexity you want to get into.
Want something that will take you 4 minutes to put together? Here's what you need:
Again, this is hassle-free and the quickest route to go. What you'll still need:
I can go into more detail if you're interested in something like this.
----------------------------------------
EDIT: Sounds like there's some interest, so here's my additional notes.
First off, let me say that I do not take any credit for this idea. I was pushed-over-the-top by this Reddit post. With that said, I can add my personal experience onto things.
----------------------------------------
About the case - Like I mentioned earlier, there's 2 major options for the case, both with pros and cons. In no particular order ...
Option 1: LoveRPi Premium Black Case for Official Raspberry Pi 7" Touch Screen Display and Camera
Option 2: Case for the Official Raspberry Pi 7" Touchscreen Display - Adjustable angle
----------------------------------------
About the audio output - The 3.5mm headphone jack becomes your primary audio output. There's a way to control the volume output on the RetroPie's menu screens. Unless you have in-line volume controls on your headphones, you may need something like this..
----------------------------------------
Personally, I went with the LoveRPi Premium Black Case, Aukey battery, a shortened power cable, and the Koss VC20 Volume control.
I don't have pictures with me, but the setup is pretty efficient. I didn't have to solder, cut any cables, or anything crazy. Connect the bits, tuck the cables, and go.
Yep, that's the jist of it.
(And you'd have to cut off the connectors since the board has screw terminals)
Honestly, the hardest part is calibrating the transformers with the board. You need something to measure against, like a hair dryer and a kill-a-watt. Then there's some math and changing some values in the main program. After some time I will probably have some baseline calibrations for various CTs.
Yeah, sure. The hardware isn't too difficult to set up, here's the part list I used:
For wiring any mains power yourself, make sure you know what you're doing. Messing with Arduino/RPi-style hobby electronics is one thing, but making a mistake with wiring mains power can cause property damage, injury, or death. Here's what I did:
AC neutral connects directly to outlets, and one prong of the 5V power supply. AC line connects to switch, and switch connects to 5V power supply, and normally open of relays. Common of relays connects to outlets. Make sure that you don't switch line and neutral. Some people who don't know better will claim that both leads are the same in AC mains, since it's AC, but that's FALSE. Neutral normally connects to earth ground at your main electrical panel, but line obviously does not, as that would be insane. Line is the smaller prong in US-style plugs, and neutral is the larger one. Also, make sure you connect earth ground to everything appropriate (the switches, outlets). All of this applies to the standard 120V, single-phase AC as used in North America.
As for connecting to the PI, each of these relay boxes needs a ground connection, 4 gpios, and a 5V if you're not using a separate power supply for the relays. Then, some software to drive them. My code is at here, where I have a command-line utility called "relays" that I used for scripting and such, and a web interface for controlling them from my phone, tablet, etc.
There's probably better and easier to follow guides out there, just google "rasbperry pi relays' and you should find some stuff. Here's one of the guides that I used as a reference when I was building mine.
I use these for all my builds that I've made people.
http://www.amazon.com/Eleduino-Raspberry-Metal-Cooling-Black/dp/B012GPCLR6/ref=sr_1_2?ie=UTF8&amp;qid=1463522653&amp;sr=8-2&amp;keywords=raspberry+pi+fan+case
For kids that age, I would start with blinking LEDs, or maybe reading in from simple sensors, like photoresistors or thermometers. I had gotten a friend a beginner's arduino kit for about $30 and it came with a bunch of neat little pieces and enough to get started
Edit: Here's the kit: https://www.amazon.com/gp/aw/d/B016D5KUHS/
It does come with the Arduino also
Because basically a raspberry pi will do all of that at this point....
If you need a pc.
Get him 4/8gb of ram with a g4400 and any mobo that supports it,500gb hdd and 300w psu and call it a day.
Edit:https://www.amazon.ca/gp/aw/d/B01CCF6V3A/ref=mp_s_a_1_7?ie=UTF8&amp;qid=1520982893&amp;sr=8-7&amp;pi=AC_SX236_SY340_FMwebp_QL65&amp;keywords=lattepanda&amp;dpPl=1&amp;dpID=61dV9TG0ViL&amp;ref=plSrch
This might do the trick. Get him a wireless keyboard and mouse to go with it.
Make an all purpose travelpi.
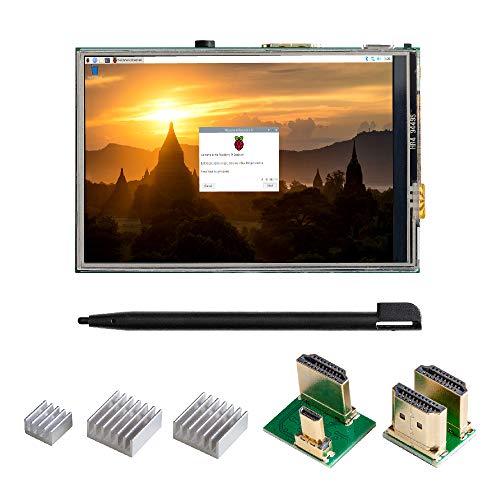
Get a PI3, load it up with raspbian or your preferred OS and throw it together with this Screen and case combo. Add some heatsinks to keep it cool, put emulation station on there for all the downtime gaming action you could ask for. Then have some fun playing with accessories. Here's a bluetooth vehicle diagnostics monitor you can use with pyOBD to monitor any 96 and up vehicle to check gas mileage and check error codes. Here's a GPS module for logging miles and checking locations and for the times you just absolutely must get wifi no matter what heres an adapter and antenna that will reach out and touch someone in the next country.
Edit: game pads
Hey,
your lab looks pretty good. Can you tell me where you got the two cases at the bottom from?
Btw instead of the hue bridge i would highly recommend this Raspberry Pi module.
Also I recommend looking into OpenHAB/ Home Assistant as instead or in combination with Smartthings.
Raspberry Pi 2: $35
SNES controller adapter: $11
32 GB MicroSD card: $10
Power Supply: $10
Case: $7
RetroPie: $0
The ability to play your favorite games forever: Priceless
This is fine; it works. For a high-school project, this is really cool (my HS robotics team never did PCB design; we were scrubs). They're just saying this because there are some other options you may want to look into. This is one of my own favorites. It has a lot more memory and a faster CPU than the Arduino boards. It has built-in wi-fi and bluetooth. It's cheap. It's small. It can even be programmed in the arduino IDE. It's a pain to solder, but you can find cheap boards that already have that done quite easily.
Not taking away from Adafruit, I love that store, but I bought this on Amazon , and it had everything I needed.
Setup was a snap, I did headless, and only use WiFi, so you’ll need to enable ssh and add your WiFi details as a text file, steps 3 and 4 here. After that I set my zero static using the dhcp server on my router assigning it via MAC address.
Ran the pihole install script, and changed my wan DNS to the op of the pi.
Edit - that Ethernet adapter is genius
Those screens are low resolution anyway. They're fine if you're just playing videogames, but even then they're just really low quality. There are good $25 5V screens with double that resolution that I'd highly recommend you use instead.
You can get them even cheaper on Aliexpress. I paid $20 for one, shipped.
Retroflag NES Pi Case Plus
My household has had monthly parties for years and on a side porch one of our largest old tube tv's got put on a small table in a corner. We had the attitude that if it ever got stolen either the thief now has a hernia and he probably did us a favor.
During the parties I've been hooking up a raspberry PI to play a playlist of 4:3 vhs style style content and we been referring to it as the ghost tv. So it's lots of random music videos, commercials and shorts. I've gotten into digitizing Disney vhs tapes to collect the entire experience of stuff on those and I've been tempted to put those on during parties. So it's actually already not THAT far off from this.
Currently I've been using this nintendo case but now I gotta find a VHS style case and it would nearly be this thing pictured.
Full parts list with links to each product:
Camera:
$36 - Raspberry Pi 3
$30 - Raspberry Pi Cam v2
$9 - 8GB SD card (class 4 or higher)
$3 - M3 hex nuts
$8 - M3 screws 16 mm
Iphone Lens x0.67
$20 - Male/Female Header Pins
$12 - Resistors 10k x 2 + 220 O x 2
$7 - Jumper Wires
$7 - LED Buttons x 2
$35 - Adafruit 2.8" PiTFT x 1
$8 - Pogo Pins
$7 - Clear Red 3mm LEDs x 3
$20 - PowerBank
$6 - Resistors - 2x 10k (included in price before) & 2x 100k
$30 - TowerPro MG92B Servo x 1
$8 - Neodynium Magnets 6X2 mm (8 pieces)
$10 - Micro USB Breakout x 2
$7 - Micro USB Cables x 2
Gif Cartridge:
$26 - Raspberry Pi Zero W x 1
$9 - 8GB SD card (class 4 or higher) x 1
Resistors 10k x 1 + 100k x 1 (included in price from camera parts multi pack)
$3 - Momentary Switch x 1
$35 - Adafruit 2.8" PiTFT x 1
$13 - 3.7 v LiPo 400mAH Battery x 1
$20 - Power Boost 1000C x 1
Tools you may need:
Soldering Iron, Desoldering Gun/Solder Sucker, Screwdriver set, Crimping tool, Pliers, Exacto Knives, Sand Paper(400-1200 grit), Tweezers, Acrylic Spray Paints (Black and White) Krylon or Montana Gold
Github Repo for the code: https://github.com/shekit/instagif
Github Repo for the eagle files, STL files: https://github.com/shekit/instagif-hardware
Total Cost: $369
+ iPhone Lens which varies greatly
If you're just looking for ideas, the MagPi back issues are a good place to start.
You can find quality starter kits with hardware prototyping goodies including breadboards, LEDs, resistors and capacitors and other electronic components from Adafruit and Canakit, but I haven't seen any that ship with a soldering iron. The starter kits are usually meant for the solderless breadboard. Beware cheap kits with crappy power adapters and microSD cards, as they'll cause a lot of frustration.
Adafruit is a great resource for getting started. I'd recommend a good iron and soldering setup separately. Don't skimp on the iron, as the quality of your projects will depend on a good soldering job. By the same token, you don't need anything overly elaborate.
You've chosen a great DIY hobby. You can built a wide range of hardware and software projects, and the price of components are dropping every day. Once you get familiar with the basics, you can pick up additional components cheaply online. A $20 shopping spree on some of the cheap Chinese online shops will keep your mailbox loaded up with goodies for weeks.
This thread on the Adafruit forums has a good discussion of this very topic.
I ordered this Raspberry Pi 3 kit on Amazon and had it up and running with NES, SNES, Genesis, Atari 2600 and some MAME games in about an hour. I am decently savvy with PCs, so I had an edge, but I followed these instructions to help me out.
Looks like this UCTRONICS 3.5 Inch HDMI TFT LCD Display - I've purchased a couple - work pretty nice. The pass-thru HDMI connection means it doesn't quite fit the "average" case design.
NEspi just released an updated version of the NESPI case that has safe shutdown setup for the buttons on the case - https://www.amazon.com/Retroflag-Functional-button-Shutdown-Raspberry/dp/B07BRHDVTN/ref=sr_1_1?ie=UTF8&amp;qid=1523908652&amp;sr=8-1&amp;keywords=nespi+plus
THey added a switch inside to turn on or off the safe shutdown mode and you just download the scripts and add to the pi then put the switch to on and it now safely shuts down when pressed instead of turning off immediately - No modification needed so no more soldering !
Looks like nespi by retroflag. Just got mine in yesterday. The power and reset button functionality is awesome. Though I’ve been reading I may need to link a python script to the reset button to be safer.
Retroflag NESPi Case+ Plus Functional POWER button with Safe Shutdown for Raspberry Pi 3 B+ (B Plus) https://www.amazon.com/dp/B07BRHDVTN/ref=cm_sw_r_cp_api_i_-ZD-AbM4V7RMH
I came here to say this and just in case OP didnt know there are POe hats like this one and the raspberry pi foundation is comming out with one of their own.
Yep, it's this one to be exact. I needed something to ship out to reconfigure devices is something went tits up. All my locations have PoE switch stacks, so the power is there. I could have just used the power plug that comes with it, but for simplicity purposes I needed something that was just easy to use. Meaning, you only plug in two cables - kind of hard to mess that up. That and finding power in our racks isn't always the easiest of tasks.
Does anyone have experience with the Raspbee from Dresden? I wonder how hard it would be to create a Hue-compatible API allowing other apps (and the official one) to continue working, while keeping an open platform.
When combined with homebridge, it even could offer HomeKit support for non-Hue bulbs.
Hey, I was a complete noob in electronics and a beginner just a few months ago, so I think I can help:
Firstly, who was unable to recommend a starter kit? I was lost when I wanted to start, and there was really no way for me to go about it except to buy the starter kit. Many people say that starter kits are not cool because "you can just buy all the components separate and according to your project, and will come out to be much cheaper." My problem with this advice was: I have no idea what a resistor or Ohm is. I have no idea what a capicitor, and I have never even touched electrical wire before; how am I supposed to find all the components by myself? there is ton of different components online! SO: I bought a starter kit from amazon
(EDIT: as pointed below, it is not hard to google all that stuff, and learn what you need, but I was simply lazy :end Edit)
I don't know if you already have an arduino board, but if you do not, I highly recommend this kit, with the LCD display. It also comes with a booklet and the tutorials are A-M-Azing (I learned a lot from them).
Arduino's are capable of MANY different things: and I am still discovering new things that it can do to this day. I see projects on this subreddit and learn from them, and previously never had known that That project could have been done. Some pretty unique stuff.
Personally: I did the tutorials from the booklet, and then I started to build on the tutorials, and started to combine multiple tutorial objectives together. For example: A tutorial on a push button turning on and off a light. Another tutorial on using the Speaker and making music. I took those two and programmed: whenever the push button was pressed, a light would turn on, and music will start playing. another push, and music off. This is just one example, and you can combine many different tutorials and make something unique and really cool (Be Aware: you WILL impress your friends and they will be jealous :))
In addition, I am very interested in Bitcoin prices: so I decided to make a bitcoin price display that updates the price automatically from an API. This requires a wifi-breakout board or shield, but basically, I am trying to learn how to do Requests and try to get the bitcoin price.
Projects like these are really cool and interesting to me. Will I keep this bitcoin display on my table for ever? probably not, but it is really cool to accomplish it and have it made. If I really do want it on my desk, I could make a nice display for it, and waalaa! My very own personal Bitcoin price display!
This is my two cents. I am still a noob, but I have learned a lot this summer. Maybe more expert people can give their opinions on the topic, but I felt that I could relate because I felt the same exact way just three months ago
You are really overestimating prices for most of that.
The controllers even appear to be the same ones from the photo in the OP.
All from Amazon and qualify for Prime. Just saved you $55.
You could get a kit like this-http://www.amazon.com/CanaKit-Raspberry-Ultimate-Starter-Kit/dp/B01C6Q4GLE/ref=sr_1_5?s=pc&amp;ie=UTF8&amp;qid=1457338493&amp;sr=1-5&amp;keywords=raspberry+pi+3
Hello,
I have been wanting to start playing around with a raspberry Pi 3. So I was shopping around and found some kits for sale that were interesting.
I was wondering if someone with more knowledge could help. Would buying the board at this price be better than buying one of these kits from amazon with prime?
https://www.amazon.com/CanaKit-Raspberry-Complete-Starter-Kit/dp/B01C6Q2GSY/ref=sr_1_3?s=electronics&amp;ie=UTF8&amp;qid=1504673256&amp;sr=1-3&amp;keywords=raspberry+pi3
https://www.amazon.com/CanaKit-Raspberry-Ultimate-Starter-Kit/dp/B01C6Q4GLE/ref=sr_1_11?s=electronics&amp;ie=UTF8&amp;qid=1504673256&amp;sr=1-11&amp;keywords=raspberry+pi3
https://www.amazon.com/Vilros-Raspberry-Basic-Starter-Black/dp/B01DMFQZXK/ref=sr_1_9?s=electronics&amp;ie=UTF8&amp;qid=1504673256&amp;sr=1-9&amp;keywords=raspberry+pi3
https://www.amazon.com/Raspberry-Essentials-Kit-board-Connectivity/dp/B01LWVVMUI/ref=sr_1_10?s=electronics&amp;ie=UTF8&amp;qid=1504673256&amp;sr=1-10&amp;keywords=raspberry+pi3
If I just bought the board now, I would need to buy:
Edit: Formatting
For that budget, get a Raspberry Pi 3 with a My Passport 2TB drive.
Canakit is actually Canadian, from BC I think? You can find the exact same thing on amazon.ca.
https://www.amazon.ca/CanaKit-Raspberry-Complete-Starter-Kit/dp/B01CCF6V3A/
I'm literally buying a Pi tomorrow for a school project. Need a small screen to display some shell scripts. Can anyone tell me what makes this screen better than one like this $22 one?
Hey! I have that exact same router and just set up my pihole this week! I used this one based off some research, also you'll need the right size sdcard and adaptor to fit it from your computer and back into the raspberry pi. If your computer doesnt have a way to plug the sdcard in youll need an adaptor for that aswell!
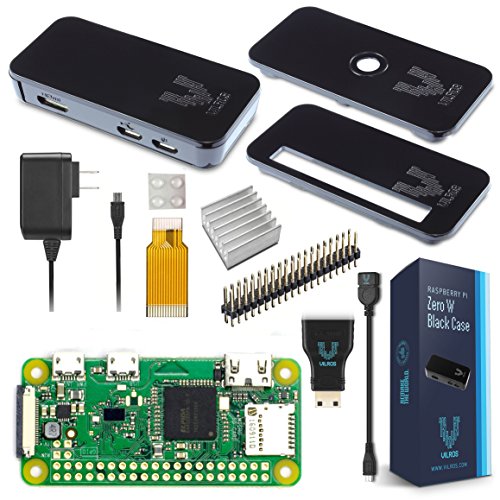
https://www.amazon.com/Vilros-Raspberry-Starter-Power-Premium/dp/B0748MPQT4/ref=mp_s_a_1_3?ie=UTF8&amp;qid=1540185933&amp;sr=8-3&amp;pi=AC_SX236_SY340_FMwebp_QL65&amp;keywords=pi+zero+w&amp;dpPl=1&amp;dpID=51pHy84c30L&amp;ref=plSrch
The wireless doesnt affect speed at all due to the nature of it being just a dns.
Also here's the guide i used to set it up without plugging a monitor and keyboard to it. All you have to do after that guide is run the command to download and install the pihole!
https://desertbot.io/blog/headless-pi-zero-w-wifi-setup-windows
After you install and setup the ssh heres the command to run in it to install pihole
curl -sSL https://install.pi-hole.net | bash
In the netgear router settings youll want to change both DNS options, make one the pihole and the other some fake IP on the network so the router is forced to use the pihole.
I dont use the piholes DHCP and neither will you :)
Pro tip, look up guides and info on adding more domains.
Take a look at this version: Retroflag NESPi Case Plus Functional Power Button with Safe Shutdown for Raspberry Pi 3 B+ (B Plus) https://www.amazon.com/dp/B07BRHDVTN/ref=cm_sw_r_cp_api_i_fRk6Cb0MSVTD6
That is exactly what I am saying.
PoE Hat:
https://www.amazon.com/gp/product/B07CLCFLH8/ref=oh_aui_detailpage_o02_s00?ie=UTF8&amp;psc=1
Case With Fan that Allows PoE Hat:
https://www.amazon.com/gp/product/B07G4RZWSZ/ref=oh_aui_detailpage_o00_s00?ie=UTF8&amp;psc=1
The case is not a "layered" case.
pi ($38/)
pi camera ($24/)
ReSpeaker ($15/)
so $77 per unit/room or 6 rooms for under $500
See second answer here to stream via RSTP to pull in to HA via streams or capturing via zoneminder
That's pretty close. I just did a build, so here's some recent prices:
Pi 3 with 5v 2.5A power supply and heat sinks - Was $49.99, now $46.99
32GB MicroSD - Was $9.99, now $11.99
This plain case, which I put custom stickers on - $6.99
Two SNES-style USB gamepads - $12.20 each
I didn't include an HDMI cable because I had several laying around, so your minimum cost is about accurate.
Edit: Oh, and this case to keep it organized while traveling.
I got this kit about 2 months ago and it's great. The card has NOOBS on it and everything came that was needed to get going. I thought I would use it for RetroPi and other pre-built things, but then really starting learning a lot and having more fun than if I were playing games on it.
In retrospect, I wish I had upgraded a little at the time and got the Cana "Ultimate" Kit - with the breadboard, ribbon, and GPIO interface, as well as some little bits and pieces to fiddle with. I've since acquired those other pieces so I can play with LEDs, sensors, and other things. Had I had all that to start with, I would have been even happier.
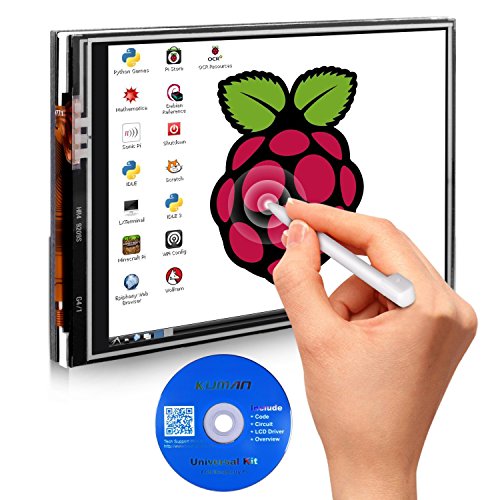
https://www.amazon.com/Raspberry-Display-kuman-480x320-Interface/dp/B01CNJVG8K/ref=sr_1_2?ie=UTF8&amp;qid=1505148397&amp;sr=8-2&amp;keywords=kuman+3.5
Brand is 'Kuman' but it's really a 'waveshare' clone. So unless you are using the image they provide with it, you'll need to follow the instructions to configure the waveshare display.
Also, it is a 'touch screen' if you can call it that, it really sucks on the 'touch' functionality - don't use it for that
I have had a lot of fun with this set for the Arduino for $30.
I play around with both the Arduino and ESP8266 as well as the Pi. I think they all use 3.3 volts, same as the Pi, so there shouldn't be any voltage shifting needed. The only problem is you won't have the Pi tutorial, which can be found elsewhere.
Edit: A quick search found these two kits with Pi tutorials.
https://www.amazon.com/kuman-Arduino-Raspberry-Projects-Tutorials/dp/B016D5L5KE/ref=sr_1_1_sspa
https://www.amazon.com/kuman-modules-Sensor-Raspberry-components/dp/B01EURJ7XY/ref=sr_1_2_sspa
That has proven to be less than intuitive. Which manual should I be consulting? I've got a "HiLetGo" ESP32S. Nothing came with it pointing to documentation. So I can find scads of docs for the ESP-WROOM-32 chip, but that doesn't tell me anything about the design choices made for the board itself (like which header pins connect to the GPIO pins). The way I eventually figured it out was flipping it over and realizing that they had printed (in very tiny text) the pin assignments on the back of the board. Programming the thing was also a bit confusing, because you have to push a switch labeled "IO0" down when the upload says "Connecting...___..." otherwise it times out. I've got another one that times out, even when you do that.
So, it's not like these little boards are without quirks, especially if you're used to a traditional Arduino. I agree with /u/holytoledo760. It appears the most sensible approach is to figure the thing out on a breadboard. I made the mistake of building a PCB with a bunch of connections before I really understood the thing's quirks. Now I'll have to design a new PCB most likely (unless I get really lucky).
The monitoring app was inspired by this excellent post by /u/MaryJannieSmith
I am a rails guy so I decided to go against the python grain for raspberry pi and build the app on rails, and I'm very happy with the result.
You can find the code here:
https://bitbucket.org/tinyplantas/growtent
I'll do my best to help anyone get this setup locally, but be warned that it took me a lot of trial and error. Setup instructions can be found in the readme.
As for parts, I went with the raspberry pi 3 canakit, standard raspberry pi 5mp camera board, and the uxcell temperature and humidity monitor.
To be honest the DIY route is not much cheaper but here is my thinking to do what you are thinking about:
You could then hook up your pi and Zigbee controller, write some code that has some controls that work for your Zigbee receiver and lights. Then write an Alexa skill that communicates with the Pi either through a Message Queue like SQS (see my skill that does this -https://www.youtube.com/watch?v=KAtZzVJb898). Your code would poll the queue and react based on what the queue has in it which would be populated by Alexa running in AWS Lambda. If you are interested in this method, I recommend looking at my Alexa Python module (see http://reddit6.com/r/amazonecho/comments/5ef1m1/pythonalexa_alexa_skill_module/)
You can do it, it would take a lot of time to get it working nicely and would be damn satisfying if it worked but from a cost PoV you would need a new RGB driver per seperate strip you wanted to control plus a new strip so your looking at ~$70 per light, still a $20 saving and you will be able to get longer strips but a lot of work to get there
I have Hue and although it can get annoyingly expensive, once you have the initial setup its much easier on the wallet as you can just add in new lights when you want
I have the same board. It's pretty decent! If you're itching to upgrade some things, I recommend these purchases:
I also hacked in a USB port to make transporting the keyboard a bit easier (I travel quite a bit for work). Pics here: http://imgur.com/a/hXi6p The only part you have to buy is https://www.amazon.com/gp/product/B00KLDPZVU and you'll likely need the ability to 3d print some standoffs (or find some other kind of non-conductive spacers to hold up the breakout board).
https://www.amazon.com/gp/product/B00KTEN3TM/ref=oh_aui_detailpage_o01_s00?ie=UTF8&amp;psc=1
The heatsinks came with the case:
https://amazon.com/dp/B011RBJUOC
They come with thermal tape on them. Thermal paste isn't needed.
https://www.amazon.com/Enokay-Case-Raspberry-Model-Black/dp/B011RBJUOC/ref=sr_1_3?keywords=Raspberry+pi+2+case&qid=1554210433&s=electronics&sr=1-3
They come with heat sinks now but there are much better cases out there though. I personally love the FLIRC case
https://www.amazon.com/Flirc-Raspberry-Case-Gen2-Model/dp/B07349HT26/ref=sr_1_3?keywords=FLIRC+case&qid=1554210531&s=gateway&sr=8-3
&#x200B;
You could get them one of the cana kits which has the pi and a bunch of other stuff depending on the level. You could also find a small pi project kit for something beginner level.
edit: Here is the ultimate kit. They do have cheaper kits available.
I actually didn't tally up the cost as that wasn't really of a concern to me, but I'll try my best to provide links to the things I bought for this. Feel free to add it up for me!
I also bought various tools, like crimpers, Dremel kit, drill, etc, but I don't consider those to be project-specific as I'll have them for the foreseeable future. Let me know if there's anything you see that you think I missed!
https://www.amazon.ca/CanaKit-Raspberry-Complete-Starter-Kit/dp/B01CCF6V3A/ref=sr_1_1?ie=UTF8&amp;qid=1503536754&amp;sr=8-1&amp;keywords=raspberry+pi+3
Amazon - Sticks and Pi
The box i'm just going to build out of MDF. 24"x10" with 3" sides.
Yes they are! You can also get them on Amazon! They usually include a microusb power supply, HDMI cord, microSD card, Pi, heatsinks, and case for your Pi! If you would like to tinker around this summer you could definitely get a kit, but you don't have to by any means. Here's's a link to one on Amazon!
It's a cheap Kuman screen from Amazon. Similar to the adafruit one.
For Raspberry Pi 3 2 TFT LCD Display, Kuman 3.5 Inch 480x320 TFT Touch Screen Monitor for Raspberry Pi Model B B+ A+ A Module SPI Interface with Touch Pen SC06 https://www.amazon.com/dp/B01CNJVG8K/ref=cm_sw_r_cp_api_J0gfzb0DCH464
Instructions for getting it working are in the comments section. Just beware that the waveshare35a.dtbo will come off of github as waveshare35a-overlay.dtb . You'll either need to rename it or make sure your config.txt points to the -overlay one. Also have to rename the extension to dtbo.
Hahahaha!!!!.... Fake Satoshi... He's so funny.
I'm running a Full Validating Node on a $70 computer. With the new "prune" setting, you don't even need an external hard drive. It will all run (the OS, and the node software and data) on a 32GB microSD card.
You can buy one here.
You can see it running here, pulling 1 watt which costs me about 15 cents worth of electricity a month.
It currently has connections to 17 nodes.
I highly highly recommend the Elegoo super starter kit
It has everything you need. And it's cheap. It's a great knockoff of the Arduino. It's EXACTLY the same. Same parts and same layout. When I say exactly I mean exactly. Works with the same software. It's cheaper than Arduino kits and comes with more things. They also sell a kit with just add-ons for a good price too. They even sell a kit for making a car.
Get the super starter kit. It's amazing. It comes with a PDF that teaches you everything through small projects. It's one of the best things I ever got. It got it as a Reddit secret santa gift.
The auto mod keeps remeoving my post for some reason
Here's a link
https://www.amazon.com/Elegoo-EL-KIT-003-Project-Starter-Tutorial/dp/B01D8KOZF4
Also here is 37 add-ons for $30. Pretty good deal
https://www.amazon.com/gp/aw/d/B01MG49ZQ5/ref=pd_aw_fbt_328_img_3?ie=UTF8&amp;psc=1&amp;refRID=4G6RRSZJX21NP8AQTGC8
Here is a link to their car project. But I highly recommend you finish doing the starter kit first
You need to build up your knowledge first. The cool thing about the car is that when you're done you can still work on it. Maybe learn how to make it do a maze.
https://www.amazon.com/gp/aw/d/B0746DVP1J/ref=mp_s_a_1_1?ie=UTF8&amp;qid=1523573722&amp;sr=8-1&amp;pi=AC_SX236_SY340_FMwebp_QL65&amp;keywords=elegoo+car
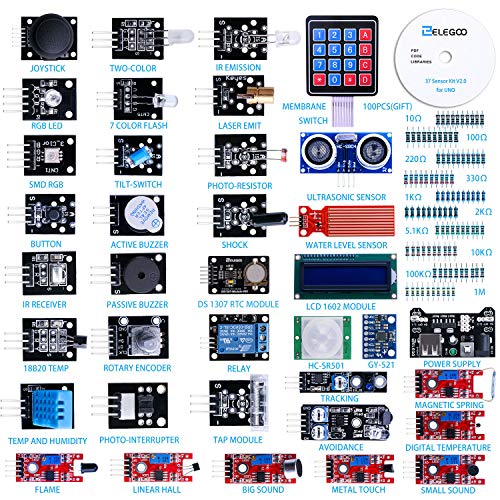
I'm going to second the Elegoo Sensor Kit that another user mentioned.
While I haven't used this specific kit, I've had success with other Elegoo products and have come to recommend them in general. I can't say sensor-for-sensor how the two products compare, but the Elegoo kit is $50 cheaper. I see the kit you linked to includes a T-Cobbler, but you can get one of those from Amazon for around $10-$15 extra. You'd still save good money.
I think you may want to look at a sensor kit like this: https://www.amazon.com/d/Computer-Motherboards/ELEGOO-Upgraded-Modules-Tutorial-Arduino/B01MG49ZQ5/
It sounds like he has an interest in sensors and this kit, or one like it, gives a good crash course with them.
Cool! Here is what I bought.. ( you can probably find just the RPi0 board and heatsink for cheaper )
Vilros Raspberry Pi Zero W Basic Starter Kit- Black Case Edition-Includes Pi Zero W -Power Supply & Premium Black Case
&#x200B;
This set up fits well in the Jeda USB Hub
Edit: When you edit the config file, you can turn on the Wireless Access Point (WAP), enable the Samba guest share, then you can connect to the RPi0 via wifi and view the videos with an iOS app like FileBrowser without having to disconnect the drive.
Thanks! I'm using this display: https://www.amazon.com/gp/product/B076M399XX/ref=ppx_yo_dt_b_asin_title_o05_s00?ie=UTF8&psc=1
And a Raspberry Pi 3 B+, there are many bundles, I'm using a 32GB micro SD Card but a 16GB should be fine
To setup your Raspberry Pi I recommend this tutorial https://thisdavej.com/beginners-guide-to-installing-node-js-on-a-raspberry-pi/ (setting it up is really simple, but this link goes through a lot, like remote access and installing Node.js)
&#x200B;
The Magic Mirror is also really simple, their official website is https://magicmirror.builders/, but this tutorial is really great, he shows how to setup your Calendar, Spotify, turn the screen, etc https://www.youtube.com/watch?v=HO326ptdlco
&#x200B;
&#x200B;
It depends. If it was left on the sink in plain view it could have just been left there with no intent to record. Or it could have been laid just right hoping to get some pictures.
I once was building a timelapse camera with a raspberry pi and left the camera in our bathroom. Nevermind that it was only the camera and nothing else -- the Raspberry Pi wasn't attached. I had the camera in my hand when nature called, I set it on the sink (with the lens facing the ceiling), and then I forgot it for a couple of hours because I became distracted afterwards.
Anyhow, from that point forward our foster son was convinced that we were secretly videotaping him everywhere. Nothing I said could convince him otherwise, even after I showed him that the camera needed a lot more parts to work.
The caseworker understood, thankfully.
I'm not saying that happened here. But I'd like to know if it was set up in a way that it could record private activities or if it was just laying on the floor facing the wall because it fell out of a pocket.
I know a lot of foster parents (and agencies) that have recommended hidden cameras in their homes because they have problematic foster kids. Sometimes things are being stolen, sometimes the kids sneak out, and sometimes the kids are hurting pets or something. A camera should never be anywhere that isn't public, though. But that could explain why it was in the house in the first place.
We've never installed a camera, although we did think about it with a child once. She did a lot of things that nobody believed us about, so they wouldn't offer treatment since she acted so sweet and charming around caseworkers and therapists. It probably took an extra six months to get her the right kind of therapy because the agency didn't believe her behaviors until the police became involved.
tl;dr: Sometimes a cigar is just a cigar. And sometimes it's not.
one of these http://www.amazon.com/Raspberry-5MP-Camera-Board-Module/dp/B00E1GGE40
I don't know what Pi kit you're getting, but make sure that the charger is giving it the proper juice. You may also want a powered USB hub for peripherals such as a mouse, keyboard, etc. A small WiFi adapter and camera module can also come in handy.
I really like my Leatherman Squirt. It fits on the keychain that I carry every day. I also want to add this small flashlight. If you're into DIY, you might find Instamorph useful.
This is really the best/easiest option.
RaspberryPi 3 ($43) + Raspberry Pi Camera (~$20) + 2ft ribbon cable ($7) = $70
OctoPi (Free)
One writeup: http://3dprinterwiki.info/wiki/wanhao-duplicator-i3/computer-software/octoprint-on-raspberry-pi/
A cheaper option is to buy a cheapo wifi camera that works with iPhone. (~$20) Connect your printer to your PC and use something like TeamViewer to remote from your phone to your PC to control the printer. It's a multi-step solution but cheaper than RaspberryPi.
Love this project, just started setting up something similar for my Sonos but a very different (Less DYI) approach and definitely not as cool. I am using the Aqara Cube and plan to print removable stickers to add the pictures to each side. I am only using one cube for now, adding additional cubes would cost about $15-$20 a piece. You can handle shake, rotate and flip events as well as sliding along the table and double tapping it on the table. The flipping and double taping report what side is flipped to or is up when double tapped so you can use double tap to start playing the station on the top face, then flipping to another face will switch channels, rotating (like a knob) can adjust volume. Sliding could be next track.
The Cube uses Zigbee wireless protocol which means that in order to handle the events you need a Zigbee hub that exposes events easily. You can build this hub yourself with a Raspbee which is the Zigbee radio and a Raspberry Pi computer plus a power supply and an SD card for the pi. Now you can handle cube events in code on the same Raspberry Pi that is acting as the Zigbee hub. You could use the same http Sonos api as OP's project or if coding in Python just use this Python library.
&#x200B;
All told probably come in at about $75 so not cheap but, in addition, the hub you have built can be used to control Philips Hue light bulbs (without having to buy the Hue hub) and most other Zigbee devices so you have a cube that can change your light bulbs colors and adjust brightness and turn on and off. Maybe a heart on one side that turns the bedroom lights to a dim red and starts the Sonos playing your favorite sexy playlist ; )
&#x200B;
I already have the Raspbee/Pi setup as a Zigbee hub for my home automation system controlled by Home Assistant so I only needed the Cube.
&#x200B;
&#x200B;
&#x200B;
&#x200B;
Off the shelf xbee module or such no.
Dresden sales a ZigBee module with firmware and software here but I wouldn't recommend it. Their support is awful, software is sketchy, and they've been promising updates forever with no delivery.
Honestly I've tried a bunch of stuff trying to simplify or save money and still have local control. Eventually just bought a Hue kit and wish I did that from the start. If nothing else get just a Hue hub and you'll be able to pair up your GE link bulbs and be running in minutes (especially with HASS's auto discovery).
P.S. I've got an extra I'll sale you if you're in the US ;)
An arduino starter kit is a great introduction into microcontrollers. I got one for my brother who is just starting university and he loved it. Here's a link to a pretty decent one
Starter Kit
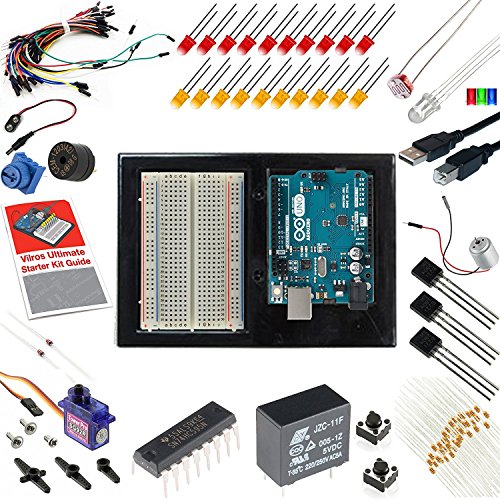
When first starting out, go with a kit that includes a manual on how to use all the parts included. I went with Arduino Ultimate Starter Kit from amazon. However, the kit you linked does have a lot of very cool components that the one above does not.
However, I really appreciated the manual of the Ultimate starter kit, because I had ZERO electronics or programming knowledge.
Interestingly, the Vilros manual looks very similar to the Sparkfun one. Check out a review of Arduino starter kits HERE. It shows off the manuals and reviews the components.
That said, if you are already have a bit of background in this area, and you don't mind some google research to get things working, then go with the one that has the most diversity of components, although try to stick with an Arduino Uno (or Uno clone) while you are learning.
GL!
Sure.
Here's one, and here's another.
The instructions you can find online for free. The internet is packed full of Arduino tutorials, Arduino projects, and so on.
To be honest, if you want cheaper stuff, it's best to buy separately from Tayda, eBay, etc. But as a beginner it is nice to have everything in a single kit.
Depending on your case, getting the Teensy lined up just right to enable you to plug directly into it can be either impossible or merely difficult. So a good option is to buy a breakout board like this one for a Mini USB jack and then wire it up to something like one of these Mini USB male connectors. You then plug your male connector into the Teensy 2 and then you can place the female jack wherever you want on your board - using super glue or epoxy or whatever else you can find that makes it stick in place.
The connector I used on this board is this one right here because the case has a cutout that is only large enough for a Micro jack, not a Mini.
But yeah, I highly recommend getting some of these. They give you a lot more options on placing your controller.
So you're thinking of something like this?
Use the relays to electronically close the circuit?
By relay boards, I'm assuming you're talking about a relay board off of Amazon like this one? I'd actually recommend that relay over a 12V relay simply because this will save you from having to do voltage conversions. Keep in mind that the relay board and your controlled device can operate on different voltages. I have a Raspberry Pi with this board that controlls various aspects of a 12V 3D printer. This board is especially advantageous as it is already wired to interface with the Arduino directly, just give the board GND, +5V, and a digital signal pin. Be aware that this board uses inverted signalling, which means that the relays are "ON" by default, or when the I/O pin is 0(low), and turn "OFF" when the I/O pin is 1(high).
A relay consists of two parts: A coil that is energized or de-energized according to the input power on the I/O pin, and a switch of some sort. These particular relays have single pole double throw switches which means this will allow you to switch one flow of power (single pole) to one of two states (position 1, or position 2).
Relay pins are usually designated with three values "NC" (for Normally Closed), "NO" (for Normally Open), and "C" (for Common) and are determined by the switch's contacts at rest (the relay is not energized). If you put power to the C pin and put your load on NC, when the relay is energized, that connection will be opened and will turn your load off. The inverse is true if you put your power on the C pin and you put your load on the NO pin, the relay will energize and the connection will be closed, turning your load on.
In your application, I would imagine that using the relays to control +12V to your solenoid valves would be a good use of the board because it's already wired up with the correct I/O protection and isolation that you'd have to be worried about if you attempted to drive the solenoid valves directly from the Arduino.
Remember the inverted thing? Well, you could do one of two things with your code. Either write 1's to each of the I/O pins you're using on the relay board to turn off the relays, or you could use the NC pins to wire to your solenoids. Each has their pros and cons:
If you write 1's to the relay board as one of the first steps in your program, there's a chance a little bit of whatever you're controlling with the valves would drip out when the arduino is restarted/reset. If you use the NC pins to your relay board, your relays would always be engaged until they are needed which might cause extra wear. If the relay were to fail and the switch goes to "rest", the relay would direct your solenoid valves to open causing a significant spill. You're going to have to figure out which is right for you.
It depends on what the wire connects. If it's low voltage, like a 3v audio signal, you can use a small relay which can be controlled with a switch or raspberry pi. https://www.amazon.com/JBtek-Channel-Module-Arduino-Raspberry/dp/B00KTEN3TM
They make relays like this for lots of applications. Just make sure you're not sending too much voltage.
I can only help with first point. A relay like this will work: https://www.amazon.com/gp/aw/d/B00KTEN3TM/ref=mp_s_a_1_7?ie=UTF8&amp;qid=1523803746&amp;sr=8-7&amp;pi=AC_SX236_SY340_FMwebp_QL65&amp;keywords=Relay
The thought of leaving my homebrew printer running while away frightens me, this is a setup to ease my fears of burning the house down.
There are multiple redundancies built in but the basic idea is simple:
Yesterday I came up with an easy way to reboot or turn off the Pi using the relay, basically have the Pi ground hooked up to the 4 channel relay using the normally closed side of a channel, then to reset/shutdown simply switch the relay so the ground is no longer connected.
Note: The fans and lights are controlled via SPST switch not SPDT.
Raspberry Pi is a series of small cheap basic computers. The latest is the Raspberry Pi 3.
One Retropie distrubution that I've found easy to setup is to use Recallbox. You will need a PC to set it up.
https://www.recalbox.com/diyrecalbox
You should probably get a Raspberry Pi 3.
https://www.amazon.com/Raspberry-Model-A1-2GHz-64-bit-quad-core/dp/B01CD5VC92
A Case (I just picked the first one that was cheap):
https://www.amazon.com/Enokay-Black-Case-Raspberry-Model/dp/B011RBJUOC/ref=sr_1_1?s=electronics&amp;ie=UTF8&amp;qid=1496809005&amp;sr=1-1-spons&amp;keywords=pi+3+case&amp;psc=1
A micro SD card:
https://www.amazon.com/Samsung-MicroSD-Adapter-MB-ME32GA-AM/dp/B06XWN9Q99/ref=sr_1_1?s=electronics&amp;ie=UTF8&amp;qid=1496809133&amp;sr=1-1&amp;keywords=micro+sd+card+32+gb
One or two USB SNES Controllers. This should cover most 16bit systems and down.
https://www.amazon.com/Buffalo-iBuffalo-Classic-Gamepad-BSGP801GY/dp/B002B9XB0E/ref=sr_1_5?s=electronics&amp;ie=UTF8&amp;qid=1496809064&amp;sr=1-5&amp;keywords=snes+usb+controller
You might need some other things like an HDMI cable and a micro usb charger for the power cord if you don't already have those. You possibly might need a usb keyboard laying around for setup. You are going to have to find your own roms (game images)
Ah, that's interesting. That might work well with cases like this that have a more subtle and less accessible SD slot. I wonder about the long term stability of Sugru though, which is important for many of my applications.
The glue I typically use is a PVA called Jade 403 that's stable for long term use.
ordered a case+fan from amazon will get here tonight. will comment how it fits tomorrow. EleDuino Raspberry Pi 3 and Raspberry Pi 2 Metal Case with Cooling Fan Black
https://www.amazon.com/Eleduino-Raspberry-Metal-Cooling-Black/dp/B012GPCLR6
Fits a little tight. Made from bent metal (steel) Fit could have been a little better. Putting in the 4 screws to hold the board down was a bit of a pain. Might try to use some set-screws and nuts if i use this case on another project.
I can see the sd card via a large notch on the bottom, and i think i can remove it without taking the case apart, but it may take some tiny fingers. There is a slot for wires from the gpio pins. A tiny screwdriver and some extra screws were included.
I had to use just 2 of the long screws to hold the fan in, the screws were just a bit too long and would not let the tinkerboard fit correctly.
The airflow seems to be in one side, around the board, then back out the back in a loop.
The fan is tiny, and quiet. No filter on the fan.
For the cost - it seems to be a solid case that can take a beating. About the only extra feature i would like, would be a led, or opening where you can see the lights on the tinkerboard to be sure its on.
I am not using wireless on my tinkerboard so no idea how this metal case affects it. The slot is near the wifi end of the board.
I am not sure how to measure temps on the tinkerboard, so cant really give any numbers for the temps. My tinkerboard just sitting bare on the desk was VERY warm today, (i was imaging 2 hard drives for several hours) So i will see if it feels any warmer later after doing some more work.
I have this case and it works great for the retropie. You can't pull the sd out without completely taking the case apart. It has a fan though which is great and it's sturdy.
https://www.amazon.com/gp/product/B012GPCLR6
Hmm... I see that now. But I think you're right. Even at $90 now, I cannot imagine them lowering it much
https://www.amazon.com/dp/B01C6Q4GLE/
I saw this as a non-prime day lightning deal yesterday for $62, down from $70. Was tempting, but I didn't need most of the crap in it.
https://www.amazon.com/CanaKit-Raspberry-Complete-Starter-Kit/dp/B01C6Q2GSY/
I ended up buying this one that seemed cheaper than buying the RP3 and power supply separately. $43 total.
https://www.amazon.com/gp/product/B01C6FFNY4
If you search on Amazon for the raspberry pi there are a ton of kits that come with the OS on a microSD, a little getting started manual, and a bunch of random little parts to do some small projects with.
If you don't get a kit, I'd recommend getting the Pi 3 Model B (even if you do get a kit, get one with the rPi 3 B) and getting a blank 16gb microSD card that you can load the OS onto. Just search "raspberry pi os download" and the first result should be their official website where a bunch of different OS's are listed for free!
Here's a kit that I found that is a tad pricey but looks fairly comprehensive!
https://www.amazon.com/CanaKit-Raspberry-Ultimate-Starter-Kit/dp/B01C6Q4GLE/ref=sr_1_13?s=pc&amp;ie=UTF8&amp;qid=1505931653&amp;sr=1-13&amp;keywords=raspberry+pi+3
A lot of the "value" they tack on is stuff you could do for free, they're just offering it up with their own tutorial videos. The complete Pi 3 Canakit is $75 on Amazon. If you want some extra stuff to play with they have an ultimate edition for $90. I got my complete canakit pi 2 for $65 on sale before the pi 3 was out.
Edit: to be fair it's not a terrible price considering they spent the time and money making the videos. The "lol" was more about their original price.
I agree with intrglctcrevnfk - the Canakits are great.
I bought the Ultimate, since I needed the GPIO breadboard and other electronics for my project.
https://www.amazon.com/gp/product/B01C6Q4GLE/ref=oh_aui_search_detailpage?ie=UTF8&amp;psc=1
I just purchased a CanaKit Raspberry Pi 3 Ultimate Starter Kit.
https://www.amazon.com/gp/product/B01C6Q4GLE/ref=oh_aui_detailpage_o00_s00?ie=UTF8&amp;psc=1
I am looking for a "getting started" book I can work together with my 14 year old daughter, but I don't see any book that make use of all the parts like GPIO, Ribbon Cable, Breadboard, Jumper Wires, LED, Resistors, Push Button Switches.
Can I get some recommendation on where to start?
It all depends on what your looking to do. If you just want to set up something like a media center, computer, or retro game station, all you need is a pi, a case, and some sort of input like a controller or Bluetooth keyboard. If this is your goal, then I'd buy separately. If you want to get into the fun stuff like home automation or wiring up all sorts of cool stuff, then I recommend spending an extra $30 and get a kit like https://www.amazon.com/gp/aw/d/B01C6Q4GLE/ref=mp_s_a_1_11?ie=UTF8&amp;qid=1482887908&amp;sr=8-11&amp;pi=AC_SX236_SY340_FMwebp_QL65&amp;keywords=raspberry+pi
Hope this helps!
Raspberry Pi + Case + HDMI Cable + Power Cord + Micro SD card $99.99
2 SNES Controllers $23.99
retropie is free and the roms (the games) you can get off pirate bay (free)
Soooo... maybe not cheaper with all the accessories but you can play games from a lot of different consoles.
Check out this tutorial before you buy anything to make sure this is something you're capable of.
oh ok. Like I said... complete noob.
Just when looking at amazon, I see these two items... thought they may be different as one said model b. the other did not.
https://www.amazon.ca/CanaKit-Raspberry-Complete-Starter-Kit/dp/B01CCF6V3A/ref=sr_1_1?ie=UTF8&amp;qid=1493822297&amp;sr=8-1&amp;keywords=raspberry+pi
https://www.amazon.ca/Raspberry-Pi-RASPBERRYPI3-MODB-1GB-Model-Board/dp/B01CD5VC92/ref=sr_1_2?ie=UTF8&amp;qid=1493822297&amp;sr=8-2&amp;keywords=raspberry+pi
I did this last week. I used this & it had all of that in one kit:
CanaKit Raspberry Pi 3 Complete Starter Kit - 32 GB Edition
[https://www.amazon.ca/gp/product/B01JYGYAX8/ref=oh_aui_detailpage_o00_s00?ie=UTF8&amp;psc=1](SNES Retro Classic USB Controller,kiwitatá Super Nintendo SNES Game Controller USB Gamepad for PC/Mac/Raspberry Pi (2 Pack))
I'm not a huge fan of these controllers but I don' tknow if it is them or the whole emulation things. Playing super mario 1, i found it harder to powerslide & stop/not fall down holes. I had this probem with a retroduo but the controlers were even worse
I also picked up this keyboard but haven't even bothered hooking it up:
(2017 Update )Rii® K12+ Mini Wireless Keyboard with Large Touchpad, Stainless steel Cover for Pad,Smart TV,Raspberry Pi2/3, MacOS,Android,XBMC,Windows 7/8/10(Black,US Layout)
I have this one hooked up to a zerow.
The touch feature is crap, though. You need to push really hard to get it to register.
5x pi owner here! I buy Vilros kits like this one:
https://www.amazon.com/Vilros-Raspberry-Complete-Starter-Clear/dp/B01CUMNIV8/ref=sr_1_1?ie=UTF8&amp;qid=1484015645&amp;sr=8-1&amp;keywords=vilros
Pi3, case, heatsink, power adapter, and hdmi cable for cheaper than all of those parts seperately. I don't usually need the hdmi cable but it's basically free at this point.
This is the kit I originally ordered. https://www.amazon.com/gp/product/B01CUMNIV8/ref=oh_aui_detailpage_o03_s00?ie=UTF8&amp;psc=1
There are other cheaper kits, and for NES emulation, the kit I bought is a bit overkill. But I sprang for a slightly more expensive kit because I'm also using the Raspberry Pi for other things besides just an emulation box.
Best thing to do is just shop around. At minimum, you want a kit that comes with heatsinks, power supply, and a sturdy case. If you don't already have spare HDMI cables and an SD card, you'll want those as well, of course.
You'll also want controllers like these for NES emulation: https://www.amazon.com/Controller-Laptop-approx-Windows-Kernel-Classic/dp/B01N2YT0QT/ref=sr_1_3?ie=UTF8&amp;qid=1492532678&amp;sr=8-3&amp;keywords=usb+nes+controller
If you search for "USB NES controllers" on Amazon, you'll find a good many of them available. Shop around and read the reviews, although I imagine most are similar to one another.
I'm currently using a LiFePO4wered/Pi+, specifically the model with the larger 18650 battery and stackable headers. It can be bought on Crowd Supply.
And according to the creator, it has been tested and is capable enough to work with a Pi4. I would probably be best to put a small heatsink on the unit for continuous high loads like with a Pi3B+ or Pi4.
This unit will not power a Pi3B+ or Pi4 for too long, maybe an hour at best at full load. I get around 2-3 hours of just general use on a Pi3B. However, it offers some huge advantages:
So what I recommend doing is combining a UPS unit of your choice (although the one I listed is highly recommended) with a separate power source such as any large USB battery or any USB phone charger. This will prevent interruptions in power when swapping batteries or plugging in power. It will also mean you have a power button with software assisted safe-shutdowns.
On my setup I am currently using a Pi3B (non+) with the LiFePo4wered Pi+ (with 18650 battery and stackable header option), and an Anker PowerCore Fusion 5000mAh battery with built-in charger. Since I have my Pi3B inside a SmartiPi case with the official 7" touchscreen (similar to the other Cyberdecks built here) and I put a large heatsink on the Pi, it isn't possible for me to mount the LiFePo4wered Pi+ directly on top of the Pi like other HAT's. I bought the LiFePo4wered Pi with the stackable header option and a 40pin GPIO cable to link the 2 units and mounted it down below the screen. For those of you that might attempt this same setup with an Offical 7" LCD, make sure you install software for the LiFePo4wered Pi unit BEFORE you plug-in the hardware. Having both the touchscreen and the LiFePo4wered Pi unit installed without the software will cause a hardware or software conflict and the Pi and screen will lockup at EXACTLY 600 seconds (10 minutes).
the arm is just a small tv mount from fry's. I designed a bracket to attach the arm to the printer. the keyboard is a generic bluetooth keyboard with a 3d printed bracket to attach to the screen.
Here's the one used.
https://www.amazon.com/Case-Official-Raspberry-Touchscreen-Display/dp/B01HV97F64/ref=sr_1_3?ie=UTF8&amp;qid=1539997299&amp;sr=8-3&amp;keywords=raspberry+pi+touchscreen+case&amp;dpID=41kEuUfLUKL&amp;preST=_SY300_QL70_&amp;dpSrc=srch
I built a similar project. I used this display and this case and have been thrilled with both.
Kerberos IO is optimized for Raspberry PI, so you can set up a cron script to run nightly and move or delete files older than a certain age.
I have not set that up myself yet, but so far that is my leading contender.
http://amzn.com/B06XTPY13N
http://amzn.com/B075HDVG28
http://amzn.com/B01HV97F64
http://amzn.com/B0153R2A9I
http://amzn.com/B00D0L5BH8
Yeah, either of those would be good, the second one has more memory than the Uno, but otherwise they're comparable. I wouldn't get too distracted by it, you'll probably buy more boards at a later date and they're like $4. I still use my Uno for prototyping then move it to the ESP8266 for an actual implementation.
You might do the cheaper one and then this, your first one has a stepper motor, servo, motor, etc so combined it'd be a little of everything.
Then you can always order individual pieces for a specific project, 10 pack of motors for $5, servos, buttons, gyrometers, etc, I'd still grab a couple of those little 1" oled screens, they support i2c protocol, which a lot of sensors support, and basically you take 2 pins from the arduino and daisy chain sensors to build a network of nodes, then can send commands to specific nodes with its address similar to an IP address. It's actually simpler than that rectangular screen you see in both kits, those take a bunch of pins. They also sell multiplexers so if you have like 8 i2c screens or gyros or whatever sharing the same address you use a chip like that to make them individually addressable, like a hub.
Another site is SparkFun, it's more expensive than china/amazon, but it's more of a guided experience, selling the parts and providing libraries to use them and lots of tutorials to implement them. I started with them then just order the stuff directly now.
Awesome! You could look into getting a kit that comes with several sensors/motors/ect, like this one. Most sensors that work with arduino should work with raspberry pi too. That way you could play around with different combinations.
I am aware that they share the bus and the question asked about gigbit internet but i added what i said in response to you about setting up a cheap VPN service since there are multiple ways of doing it.
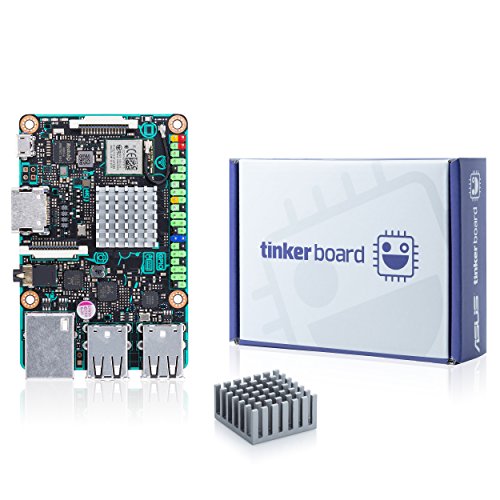
EDIT: Alternative to the raspberry would be ASUS SBC Tinker board since it does have a non-shared usb/ethernet bus.
Very interesting. Amazon.com seems to have them:
https://www.amazon.com/ASUS-Tinker-board-2GB-Motherboard/dp/B06VSBVQWS/ref=sr_1_1?ie=UTF8&amp;qid=1487536280&amp;sr=8-1&amp;keywords=tinker+board+computer
But you know what is? A Tinkerboard.
https://smile.amazon.com/ASUS-Tinker-board-2GB-Motherboard/dp/B06VSBVQWS
There's a whole world of stuff, it really depends on what kind of thing he finds exciting.
Here are two ideas of things I think are really cool and would make a fun birthday presents for an Arduino fan.
Little OLED display
https://www.amazon.com/Heltec-Automation-HTDS-WI96-0-96inch-comminication/dp/B0742BJPNF/ref=sr_1_29?ie=UTF8&qid=1543406669&sr=8-29&keywords=oled+display
Basically an Arduino with built in WiFi ( and a lot more features )
https://www.amazon.com/HiLetgo-ESP-WROOM-32-Development-Microcontroller-Integrated/dp/B0718T232Z/ref=sr_1_3?s=electronics&ie=UTF8&qid=1543406789&sr=1-3&keywords=esp32
Adafruit is always going to be overpriced. Their ESP32 board is about the same price as the Sparkfun board. Avoid adafruit whenever possible, you can usually get the exact same stuff on Amazon or Ebay for a far better price.
You can't really go wrong with a $10 ESP32 dev board from Amazon or wherever. Once you learn enough about your first dev board, and decided you need something else, you'll know better what to purchase for your specific needs. You can get quite a lot done with just the simple $10 dev board. I wouldn't go with a custom-made dev board with an exposed ESP32 chip on it (like the Sparkfun board) - you should definitely use a dev board with the ESP32-WROOM module on it, like most of them out there. You would most likely be using the ESP32-WROOM (or WROVER) modules in any project you'll do, and learning how the ESP32-WROOM module works and its pinouts is invaluable knowledge you won't get with the Sparkfun board.
We have the same problem at my office; 2 stalls shared with 30 people.
Since your goal is to get the "occupied" status to a web server, you'll need something that has network capability.
For ~$10, I recommend an ESP32-based solution. It'll allow you to send read your presence detection and send it via WiFi to a service like IFTTT.
If you don't want to use mechanical pressure sensors, a ToF distance sensor, like the STM VL53L0X can be bought already mounted to a breakout board, for around $10, and can be connected to the ESP32 over SPI. From there, poll the sensor (set "occupied" status whenever the distance reported is smaller than the distance between the door and the wall).
I would actually advise against a development board. The time spent getting up to speed on the MCU/SOC, tooling, datasheet style, etc, is huge. Usually for most designs the IC is chosen specifically to cater to the design. For example, one design needs very low power (like an MSP430), one needs many fast ADC's, one needs one or two high resolution but slow ADC's, one needs a very beefy CPU with tons of RAM, etc. It's unlikely that the knowledge gained from that development board will translate well to other designs.
Instead, consider getting them a tool. An oscilloscope is always a very safe bet, but they tend to be a few hundred dollars. The DS1054z is cream of the crop for hobbysts right now, and is $350 roughly.
If you need cheaper, then a nice proper soldering iron like the TS100 here for $80 with a few tips is a very, very, safe bet.
Those tools will stick with him/her for years and years and will be used often. The development board on the other hand likely won't.
If you must go for a development board, I would actually recommend a teensy for $30 instead of something like an Arduino. The teensy 3.6 is an awesome platform that is very arduino like but uses an actually modern beefy MCU on it. The library support for it is fantastic, and it has a decent bit of I/O for future designs. It also uses a Kinetis chip which is in my opinion very well documented, so once he has to go beyond the Arduino library he can easily do it himself.
Then on the side, get him an ESP32 which is very cheap. Sparkfun has their own ESP32 module for $20 but is very thoroughly documented. You can get them cheaper form Amazon for like $10 like this. The cool thing about the ESP32 is it's insanely cheap and very well documented in terms of API. If he wants to use an ESP32 in a design, you can get modules for $4 each. This thing is a very fast chip with Wifi built in and very easy to work with.
TLDR; Get him an ESP32 module for like $20 and a Teensy 3.6 for $30 and he should be set. Ideally get him a piece of equipment like a TS100 for $80 or a DS1054z for $350 if you are willing to spend that much money.
https://www.amazon.com/gp/product/B0718T232Z/ref=oh_aui_detailpage_o00_s00?ie=UTF8&psc=1
&#x200B;
it says Nodemcu on the back
Where did you get your pi zero w? Im in US and would like to get one but im not really sure exactly what I need since ive never done a pi. For example does this have everything I would need? https://www.amazon.com/Vilros-Raspberry-Starter-Power-Premium/dp/B0748MPQT4/ref=sr_1_3?keywords=Pi+Zero+W+starter+kit&qid=1567128742&s=gateway&sr=8-3
I built one with a dmg01 and used a screen similar to this one - https://www.amazon.com/dp/B076M399XX/ref=cm_sw_r_other_apa_RPrIAbQM3H4FX
The HDMI was a bit overkill but there is zero lag compaired to the ones that run over gpio.
Honestly, if you are not running n64 or ps games, use a pi zero. Pi3 is way too big. I had to desolder all usb ports and Ethernet jack, what a nightmare.
As for the battery, get as much capacity as you can fit. For charging, the powerboost 1000c ( I think?) From adafruit works well for pi zero, wont quite cut it for pi3 though.
Use one of these - https://www.amazon.com/Retroflag-Functional-button-Shutdown-Raspberry/dp/B07BRHDVTN
The lid flips open would be sweet... actually on 2nd thought I'm not sure if scale is right.
Or: https://www.amazon.com/dp/B07CLCFLH8/ref=cm_sw_em_r_mt_dp_U_z.kwDbX5X682B
Check amazon reviews :)
https://www.amazon.com/NavoLabs-Raspberry-Pi-POE-Hat/dp/B07CLCFLH8
&#x200B;
This one is awesome though: https://www.amazon.com/NavoLabs-Raspberry-Pi-POE-Hat/dp/B07CLCFLH8
I would recommend this http://www.raspberrypi.org/help/camera-module-setup/ http://www.amazon.com/Raspberry-5MP-Camera-Board-Module/dp/B00E1GGE40
I was looking at building one myself but dont have much time or EXP as you may have with this. Hope it works out. 5MP shouldn't be bad unless you are looking for something with a better camera. I think the fact that the board is controlled by linux this should make your process easier.
It's on sale for $27.50 on Amazon:
http://www.amazon.com/Raspberry-5MP-Camera-Board-Module/dp/B00E1GGE40/
I'm in the states as well, and Amazon is the place to go for me. They've got everything.
For cases, I really like C4 Labs' cases, especially the black-and-clear Zebra line.
For a power supply, you're probably going to want one that is 5V/2.1A -- any less and you might run into power issues, so it's better to be on the safe side. Some of my Pis (like my Pi Zeros) run well simply connected to a USB port on my computer, other Pis (like my Pi 2) do not. This is most likely due to those particular USB ports only putting out ~1 amp or so.
You'll also want an HDMI cable probably, and for this, I would recommend going away from Amazon and trying out monoprice.com -- they've got good, cheap cables galore, though you can probably also find a decently-priced HDMI cable on Amazon as well.
I use the Logitech K400 keyboard for my Pis and it works well, too. Good battery life. Some keys are laid out a little weird, so I find myself hitting "Backspace" when I want to type a backslash a lot of times -- it takes a bit of getting used to, but it's small enough to work on and doubles as a good media center remote as well.
For a camera, you're going to be limited to the "official" Raspberry Pi camera, but USB cameras work well with some programs too.
I like the jib crane idea.
I had not even considered that. I'm just a hobbyist, so I don't always think about that "hollywood" style gear.
For simultaneous camera triggering, I just happened to run across this link recently. I think someone from here linked me to it, but I haven't viewed it yet. I haven't tried it yet, but I like the concept of using infrared based triggering (if your cameras support it) because it doesn't require any fancy wiring. Is infrared reliable enough or consistent enough for this application? I'm not sure.
If you plan on using one of those standard hardwired 5MP Raspberry Pi cameras triggered by a Raspberry Pi, it should be trivial to design a shell script with modifiable camera delays for each module so they are each in sync.
Personally, I would use a camera array including the best camera lenses I could justify spending money on. I'm still learning about which lenses are best for my style of image captures, so I would be extremely hesitant to spend $4000+ on ten camera bodies (for example) and another $4000 on ten prime lenses out of fear that I'd select the wrong style or size. That's why for my novice experience level and budget, I prefer the single camera method with a variety of different optics so I can experiment without "trapping" myself into a particular setup.
Raspberry Pi 2 B+ (Older versions are barely powerful enough for streaming 1080p): http://www.amazon.com/Raspberry-Pi-Model-Project-Board/dp/B00T2U7R7I/ref=sr_1_3?ie=UTF8&amp;qid=1452140774&amp;sr=8-3&amp;keywords=raspberry+pi+2+b%2B
RaspiCam: http://www.amazon.com/Raspberry-5MP-Camera-Board-Module/dp/B00E1GGE40/ref=sr_1_1?ie=UTF8&amp;qid=1452140727&amp;sr=8-1&amp;keywords=raspicam
Extra cable for the camera: https://www.adafruit.com/products/2144
This camera holder: https://www.adafruit.com/products/1434
This flexible camera mount: http://www.amazon.com/gp/product/B00MWNYGUS?psc=1&amp;redirect=true&amp;ref_=oh_aui_search_detailpage
Follow the steps here: https://www.reddit.com/r/raspberry_pi/comments/2ahzp2/raspberry_pi_encoder_live_streaming_to_youtube/
The most important step is to download ffmpeg crosscompiled for arm from here: https://drive.google.com/file/d/0B0OC20ApqKZ_YVB3NHF6VU9XTUE/edit?usp=sharing
Then you can use my script:
./video.sh "Your custom message can go here"
!/bin/bash
SERVER="rtmp://a.rtmp.youtube.com/live2"
KEY="YOUR YOUTUBE KEY GOES HERE"
while true; do pkill -9 raspivid; pkill -9 ffmpeg; raspivid -o - -t 0 -ISO 100 -ev 0 -w 1920 -h 1080 -fps 25 -b 5500000 -g 50 -awb off -awbg 1.7,1.8 -st -ae 64,0xff,0x808000 -a "$1" -a 1025 | /home/pi/arm/bin/ffmpeg -re -ar 44100 -ac 2 -acodec pcm_s16le -f s16le -ac 2 -i /dev/zero -f h264 -i - -vcodec copy -acodec aac -ab 160k -g 50 -strict experimental -f flv $SERVER/$KEY; done
Raspberry Pi: http://www.amazon.com/CanaKit-Raspberry-Complete-Original-Preloaded/dp/B008XVAVAW/ref=sr_1_1?s=pc&amp;ie=UTF8&amp;qid=1449253554&amp;sr=1-1-spons&amp;keywords=raspberry+pi+kit&amp;psc=1
Camera: http://www.amazon.com/gp/product/B00E1GGE40/ref=as_li_tl?ie=UTF8&amp;camp=1789&amp;creative=9325&amp;creativeASIN=B00E1GGE40&amp;linkCode=as2&amp;tag=claystuto-20&amp;linkId=PXBBVBF6TDLU77XP
Script: (Not made by me) https://github.com/Claytonn/piPixelMotion
I was thinking more like these ones http://www.amazon.com/Raspberry-5MP-Camera-Board-Module/dp/B00E1GGE40
It seems like the ones that connect to the board are only capable of 5MP, these are the ones i am asking about.
A computer science student and an electronic enthusiast here
Saving up for a camera for my Raspberry Pi, The product costs 3640 INR my current savings are around 500 for this, i am a college student so its tough to save up.
just a note, UK voltage is 240v/50hz (230v + 10 for the UK/ -10 for the EU). The no neutral switches are 220v 50hz. They will burn out (I've had a bad experience) and the sellers use the voltage difference as a shield.
&#x200B;
do I still need to get a Xiaomi hub? No but it allows you to switch to "wireless switch" mode for 2 way switches if needed.
zigbee2mqtt - do I need that? Yes or Conbee II / Raspbee, they allow HA to replace the hub.
https://www.amazon.co.uk/dresden-elektronik-BN-600107-ConBee-II/dp/B07PZ7ZHG5/ref=sr_1_1?keywords=conbee&qid=1564768042&s=gateway&sr=8-1
https://www.amazon.co.uk/RaspBee-premium-ZigBee-Raspberry-Firmware/dp/B00E6300DO/ref=sr_1_2?keywords=conbee&qid=1564768042&s=gateway&sr=8-2
I used the Osram bridge for quite a while with mine - a little quirky, but it worked well enough for my needs. Then when I got into OpenHAB I moved to this instead: https://www.amazon.com/RaspBee-premium-ZigBee-Raspberry-Firmware/dp/B00E6300DO
It's more involved than just using an off the shelf hub, for sure, but if you want to roll your own solution and keep it completely off the Internet, this will work.
There's an Arduino to Pi connection bridge with a ZigBee adapter or a GPIO ZigBee board.
And of course USB Zigbee adapters a plenty.
Thx for the info! I think I am going to try that. However, I am not able to find conbee in the EU currently, do you thinkg raspbee will also work? Looks like this: https://www.amazon.de/RaspBee-Premium-Aufsatzmodul-Firmware-Raspberry/dp/B00E6300DO/ref=sr_1_1?__mk_de_DE=%C3%85M%C3%85%C5%BD%C3%95%C3%91&keywords=ZigBee+Aufsatzmodul&qid=1554796499&s=gateway&sr=8-1
&#x200B;
The point is to be able to run hass.io at the end right? So if they say this should work with hass.io, it shouldn't be a problem? Or should I rather look for an usb stick type instead?
>I've been searching around for the right radiator thermostats to use with hassio. My idea was to get the cheapest one, connect it via WiFi and configure it via hassio. I might also add a temperature sensor since my radiators are in the corners of the rooms, so the built-in sensor won't reflect the actual room temperature. Any sug
Are you referring to the Danfoss (Living) Eco? I read here that they do not report back the temperature, though this thread is from 2017: https://community.home-assistant.io/t/danfoss-living-eco-thermostat/34943
Just to make sure we're talking about the same devices, I found the Danfoss LC-13 Z-Wave. There is also a BlueTooth variant.
&#x200B;
I'm ordering the SPIRIT ZIGBEE now. 45€ is quite a lot I think, but I'll get one for now, and maybe a second one later. I'm also buying this Zigbee module for the RPI: https://www.amazon.de/gp/product/B00E6300DO/
https://www.amazon.com/gp/product/B00E6300DO
which starter kit did you get? I am currently deciding which one i am going to buy.
http://www.amazon.com/gp/product/B00HI0RYJK/ref=ask_ql_qh_dp_hza
There is this one, but I am unsure if I should pick the LCD / Ethernet option. Would the LCD screen / Ethernet shield even be useful for a beginner like me?
Or should I just get the Official kit by Adruino:
http://www.amazon.com/Arduino-Starter-Official-170-page-Projects/dp/B009UKZV0A/ref=cm_cr_arp_d_product_top?ie=UTF8
They honestly both seem about the same other than the 20$ price different between the official one and the vilros one.
I'd reccomend getting her an arduino starter kit. Something like this
http://www.amazon.com/gp/product/B00HI0RYJK/ref=ox_sc_act_title_1?ie=UTF8&amp;psc=1&amp;smid=AHALS71WJO58T
If he really enjoys tinkering and making things, consider looking into either Arduino ( http://www.amazon.com/gp/aw/d/B00HI0RYJK?cache=a7de99f3443d14ad7f4c88825a1e65af&amp;pi=SY200_QL40&amp;qid=1412170163&amp;sr=8-3#ref=mp_s_a_1_3 ) or Raspberry Pi kits.
This is a little Arduino kit that I just bought. It has a book (let), but so far it's been quite fun:
http://www.amazon.com/gp/product/B00HI0RYJK/ref=oh_aui_detailpage_o02_s00?ie=UTF8&amp;psc=1
I bought this kit from Amazon.
http://www.amazon.com/gp/product/B00HI0RYJK?psc=1&amp;redirect=true&amp;ref_=oh_aui_detailpage_o00_s00
I wonder if theres enough room in the case to just remove the whole connector and put one of these in its place after soldering the conections.
https://www.amazon.com/Adafruit-USB-Micro-B-Breakout-Board/dp/B00KLDPZVU
Yep, it's another 'on the way to work' pic. Eight year old Filco TKL's stock cable was on it's last legs. Decided to do the removable cable mod using a micro USB breakout board. Figured it would be a good time to paint so I used a couple coats of primer followed with six coats of glossy clear. Hope you guys like it!
Another pic showing the cable mod: http://i.imgur.com/7TEeWob.jpg?1
or if you are impatient like me or think you need something smaller then there is this from amazon
https://www.amazon.com/gp/product/B00KLDQ2SK/ref=ox_sc_act_title_1?ie=UTF8&amp;psc=1&amp;smid=A20H7HZMYKP2JK
or you can even use one these to convert it to the more common Micro USB (maybe more fragile though?)
https://www.amazon.com/Adafruit-USB-Micro-B-Breakout-Board/dp/B00KLDPZVU/ref=pd_sim_147_1?ie=UTF8&amp;dpID=61bXItl3XOL&amp;dpSrc=sims&amp;preST=_AC_UL160_SR160%2C160_&amp;psc=1&amp;refRID=9F444YBZAHPPBEP2ZYZ5
Unfortunatley no, its just a cheap soldering iron, heatgun is next on the list after a rotary tool!
So this would do the job? Solder headers to board, then wires to header? Would I lose use of LED indicator or could it connect to 5V as well? Or one of the other headers? It's separately ground on the current board, would that be the same if it I retained use of the LED? Thanks!!
&#x200B;
More info @ https://imgur.com/gallery/CG9w4
Everything you need
Sourcing parts is one of the most challenging aspects of these builds. It's a chicken and egg situation in which the parts are defining the design and dimensions and at the same time the design is attempting to define the parts you should look for.
Just as one example, I sifted through tons of portable powerbanks online. The reason I selected the one I used was because:
Similar back and forth's happened for every part that was purchased. I've listed all the parts and split them into those required for the camera and those needed for the cartridge
Raspberry Pi 3 x 1
Raspberry Pi Cam v2 x 1
8GB SD card (class 4 or higher) x 1
M3 hex nuts - McMaster Carr 90695A033
M3 screws 16 mm - Mcmaster Carr 95258A126
Iphone Lens x0 . 67
Male/Female Header Pins
Resistors 10k x 2 + 220 O x 2
Jumper Wires
LED Buttons x 2 https://www.amazon.com/gp/product/B0094GIKDK/ref=oh_aui_detailpage_o00_s01?ie=UTF8&amp;psc=1
Adafruit 2 . 8" PiTFT x 1 https://www.adafruit.com/product/2298
Pogo Pins https://www.amazon.com/gp/product/B008LTKMG4/ref=oh_aui_detailpage_o00_s00?ie=UTF8&amp;psc=1
Clear Red 3mm LEDs x 3 https://www.amazon.com/Transparent-Lighting-Electronics-Components-Emitting/dp/B01AUI4VX8/ref=sr_1_2?ie=UTF8&amp;qid=1503997638&amp;sr=8-2&amp;keywords=3mm+clear+led+red
PowerBank - https://www.amazon.com/gp/product/B01H85P0EK/ref=oh_aui_detailpage_o01_s01?ie=UTF8&amp;psc=1
Resistors - 2 x 10k & 2 x 100k
TowerPro MG92B Servo x 1 http://www.ebay.com/itm/like/182310479953?chn=ps&amp;dispItem=1
Neodynium Magnets 6X2 mm (8 pieces) https://www.apexmagnets.com/6mm-x-2mm-disc-neodymium-rare-earth-magnet
If you aren't making your own USB cables:
Micro USB Breakout x 2 https://www.amazon.com/gp/product/B00KLDPZVU/ref=oh_aui_detailpage_o01_s00?ie=UTF8&amp;psc=1
Micro USB Cables x 2 https://www.amazon.com/gp/product/B00S8GU03A/ref=oh_aui_detailpage_o01_s01?ie=UTF8&amp;psc=1
Raspberry Pi Zero W x 1
8GB SD card (class 4 or higher) x 1
Resistors 10k x 1 + 100k x 1
Momentary Switch x 1 https://www.adafruit.com/product/367
Adafruit 2 . 8" PiTFT x 1 https://www.adafruit.com/product/2298
3 . 7 v LiPo 400mAH Battery x 1 https://www.amazon.com/gp/product/B016ZU9C2K/ref=oh_aui_detailpage_o00_s00?ie=UTF8&amp;psc=1Adafruit
Power Boost 1000C x 1 https://www.adafruit.com/product/2465
Tools you may need:
Soldering Iron
Desoldering Gun/Solder Sucker
Screwdriver set
Crimping tool
Pliers
Exacto Knives
Sand Paper(400-1200 grit)
Tweezers
Acrylic Spray Paints (Black and White) Krylon or Montana Gold
Github Repo for the code: https://github.com/shekit/instagif
Github Repo for the eagle files, STL files: https://github.com/shekit/instagif-hardware
I finally got my board repaired with the help of my SO's dad. We tried to reattched the USB port but it was pretty fragile, so we ended up soldering a USB cable onto the PCB itself.
First we used a multi-meter to determine where each wire within a USB cord connects to the USB port. Then we did the same with where the USB port connects with the PCB. Here's a picture of the the end result.
The USB cord we attached is a bit short, so I'm planning on replacing it down the road with this or maybe a 6 ft cable with a para-cord wrap, but for now I'm just happy my favorite board is working.
Picture
I soldered one of [these] (https://www.amazon.com/gp/product/B00KLDPZVU) to the end of a USB cable that I cut down to go between the Teensy and the edge of my acrylic case.
As a bonus, I was able to drop from Mini to Micro USB.
Yep - for a "weight trigger" look into "Load Cells". For "sending a signal to a battery", you probably want a relay to switch the battery voltage to something else.
For the "magnetic lock", that depends on what you mean - maglocks are those big bars on commercial doors that hold doors closed (these have to be powered all the time to keep the door "locked"). If you want something simple like a physical lock that you can open with electricity, look into a "lock-style solenoid"
I've used a 12V power supply for a motorized curtain project. Something like this should suffice depending on your motor (though if you're using a motor that draws too much current for that power supply it's probably way overpowered). You can run the arduino off of it too, just run the 12V to Vin and ground to ground. You could also use something like this to control the motor, might be easier than making a circuit out of transistors.
I'm not technically "using" them yet, so I can't say whether they work, but here's what I bought:
position sensor
relay board
I can use this to control 4 power outlets correct?
https://www.amazon.com/gp/product/B00KTEN3TM/ref=oh_aui_detailpage_o00_s00?ie=UTF8&amp;psc=1
Following a guide like this:
https://www.sparkfun.com/tutorials/119
basically, the relay will act as a switch. You need to wire the phase and ground to the back of the receptacle and the neutral wire to the output side of the relay. The other end of the output from the relay should go to the neutral
Thanks!
I am using this relay which I believe will be able to handle the current, right?
Is there any extra precautions I can take to make sure I wont have any problem with arcing? Or are you saying that 110V shouldn't arc?
I think I'm getting what you're saying but if you have any kind of diagram so I could confirm that would help.
The PI isn't much cheaper than a retail-priced classic...
Total: $69.13
But there is the fact that the games wouldn't exactly be legal...
Of course, you could go all out and get a broken SNES for the case, wire up the actual controller ports, and even make it read genuine cartridges, that could end up costing quite a bit more though, although, making the pi dump real carts would make it more-less legal.
In the end, you're cutting corners or not giving users a non-techie-friendly experience...
Most people would expect a power switch and a reset button (to "reset" the pi to the main screen)...
When you start adding things like a shutdown circuit, the cost starts to exceed the classic...
Yes, I know there's a shutdown option in RetroPie, I know you don't need the circuit, but it makes it more user-friendly.
found the case lol:
https://www.amazon.com/gp/product/B011RBJUOC/ref=oh_aui_detailpage_o09_s00?ie=UTF8&amp;psc=1
It looks like this is the case.
Might have some luck with this:
https://www.amazon.com/Eleduino-Raspberry-Metal-Cooling-Black/dp/B012GPCLR6
I would consider putting a fan blowing on that as well from your kiosk case. Perhaps dual 50mm fans, one for redundancy ideally each from a different manufacturer. Decent discussion here, sounds like they're very sensitive to heat:
https://www.raspberrypi.org/forums/viewtopic.php?f=63&amp;t=138193
Tldr: 70-80c is your practical maximum before failure/damage, serious throttling/crashing, sd card corruption, etc. I would not go anywhere near that. Perhaps make sure you're always cooling to 50- 60c or below under all circumstances. High load, kiosk in the sun, no AC, etc.
I would also do redundant Pis so a field tech or onsite customer can just swap them out easily. Just have the primary replicate to the backup. The onsite can just open a panel and replace Ethernet, HDMI, and USB cables.
Also if this was me, id probably go with the odroid C2 which comes with a heatsink.
I've got the same one. It's the third case I've tried, I didn't like the other two very much.
First one was the same brand but no fan. Overclocked and it overheated.
Second one was a layer case with a fan. I didn't like the look of it and the fan started dying within a couple days.
Now, finally, i'm good.
Thanks. I just went with an Elduino Metal Case with Cooling Fan.
https://www.amazon.com/gp/product/B012GPCLR6/ref=oh_aui_detailpage_o00_s00?ie=UTF8&amp;psc=1
I didn't check on the volume of the fan. Hopefully it isn't too loud.
So if I went with the standard RPi3, any recommended cases?
https://www.amazon.com/gp/product/B012GPCLR6/ref=pd_sim_147_3?ie=UTF8&amp;psc=1&amp;refRID=KWM34Q7V3F47V71JRPQ5
This case seems cool
I bought one of these https://www.amazon.com/gp/aw/d/B012GPCLR6?psc=1&amp;ref=yo_pop_mb_pd_title about 6 months ago and I've never been able to get above 55c even running a 1350mhz overclock on a pi 3. Its a killer little case and I only replaced it after a friend of mine that runs a cnc shop milled me a case out of some billet aluminum he had laying around.
A couple more:
https://smile.amazon.com/Kuman-Project-Complete-Starter-breadboard/dp/B016D5KUHS/ref=sr_1_1 (contains UNO R3)
https://smile.amazon.com/SunFounder-Modules-Sensor-Raspberry-Extension/dp/B014PF05ZA/ref=sr_1_5
No opinion on their respective quality or value - just passing along the links.
I'm an EE and It sounds like you need arduino in your life. You can get a starter kit that comes with an Uno, wires, buttons, leds, pots, 7-seg displays and all kinds of other crap for $20-$30. From there just start googling projects with the parts you have. Here's the starter kit we had to buy for Embedded Systems II "Kuman Project Complete Starter Kit with Tutorial and Reliable Components for Arduino UNO R3 Mega 2560 Robot Nano breadboard Kits https://www.amazon.com/dp/B016D5KUHS/ref=cm_sw_r_cp_api_MYFizbGBA88CX "
Since I am also a begginner, what is the difference between this
aliexpress!
and this [kuman!] (https://www.amazon.com/Kuman-Complete-Tutorial-Components-breadboard/dp/B016D5KUHS/ref=sr_1_1?ie=UTF8&amp;qid=1486695798&amp;sr=8-1&amp;keywords=arduino+uno+starter+kit+kuman)
Then you probably do need the USB driver for the board. This Amazon listing for Kuman Uno has a video at the bottom from a buyer named Mikey who says, "Took me about 5 minutes to setup the drivers for the clone board." I would watch that video, and if it doesn't say where he got the drivers ask him on his YouTube page.
kuman for Arduino Project Complete Starter Kit with Detailed Tutorial and Reliable Components for UNO R3 Mega 2560 Robot Nano breadboard Kits https://www.amazon.com/dp/B016D5KUHS/ref=cm_sw_r_cp_apa_BWpHzbF060GVZ
Nah, this one looks fine, though. You just want one that comes with a board and some components to play with. Also the book a Beginners Guide to Arduino is nice.
I got this one and so far I love it.
I'm super inexperinced, but an arduino could do this easily. That might be too large for you application. You might need a micro controller component, but I've never used one.
I have an arduino uno (clone), beginners kit, that has been really educational. https://www.amazon.com/gp/product/B016D5KUHS/ref=oh_aui_detailpage_o05_s00?ie=UTF8&amp;psc=1
You can get an ultimate starter kit including pre installed sd card and a lot of additional hardware stuff for 80€ (90$) on Amazon - that's a really good deal
germany: https://www.amazon.de/Vilros-Raspberry-Pi-Ultimate-Kit/dp/B01CYQJP9O/ref=sr_1_1?ie=UTF8&amp;qid=1494926613&amp;sr=8-1&amp;keywords=raspberry+pi+3+ultimate
US: https://www.amazon.com/CanaKit-Raspberry-Ultimate-Starter-Kit/dp/B01C6Q4GLE/ref=sr_1_3?ie=UTF8&amp;qid=1494926649&amp;sr=8-3&amp;keywords=raspberry+pi+3+ultimate+starter+kit
> I don't want to drop 600 on a mini PC just for streaming
i'm in the same boat!
my thinking: why not save CA$40 and just get a raspberry_pi kit if you are going to install linux and only use it for HTPC? libreELEC+kodi (included) on a pi3.
https://www.amazon.ca/CanaKit-Raspberry-Complete-Starter-Kit/dp/B01CCF6V3A/ref=lp_7703362011_1_1?srs=7703362011&amp;ie=UTF8&amp;qid=1511289486&amp;sr=8-1
IDK why, but these canakits are like WAY cheaper in the US. USD 50 in US vs CND 100 (~ USD 78) in Canada. Sorry my moose bro!
> To check if your remote is working, point it at your camera phone
This https://www.amazon.ca/CanaKit-Raspberry-Complete-Starter-Kit/dp/B01CCF6V3A?ie=UTF8&amp;ref_=pe_386430_199462080_TE_item ? I ordered it yesterday :)
https://www.amazon.ca/CanaKit-Raspberry-Complete-Starter-Kit/dp/B01CCF6V3A/ref=sr_1_2?s=pc&amp;ie=UTF8&amp;qid=1495632072&amp;sr=1-2&amp;keywords=raspberry+pi
It's on Amazon as well but seems to be pretty overpriced https://www.amazon.ca/dp/B01CCF6V3A/ref=br_imp?pf_rd_m=A3DWYIK6Y9EEQB&amp;pf_rd_s=desktop-sidekick-3&amp;pf_rd_r=FVNRVWZ60X5MH413HVYH&amp;pf_rd_t=36701&amp;pf_rd_p=2422367542&amp;pf_rd_i=desktop
Buy a Raspberry Pi and set up PiHole:
https://www.amazon.ca/CanaKit-Raspberry-Complete-Starter-Kit/dp/B01CCF6V3A
https://pi-hole.net/
I'm looking for recommendations for a kit that would make sense for a non-beginner. This is the best looking one I've found so far:
https://www.amazon.ca/gp/aw/d/B01CCF6V3A/ref=mp_s_a_1_1?ie=UTF8&amp;qid=1481049272&amp;sr=8-1&amp;pi=SY200_QL40&amp;keywords=raspberry+pi+3&amp;dpPl=1&amp;dpID=61LxoDAa3PL&amp;ref=plSrch
But if you know of any others it'd be greatly appreciated! Thanks!
In that case you probably would find it pretty easy. The GPIO pins on the rpi are pretty easy to deal with. Since it's a full computer you can use full language interpreters easily and not have to worry about the usual embedded systems restrictions.
The only time where an MCU board like an Arduino starts to look better is when you need full real time guaranteed execution for bit banging purposes, but that's not often necessary since the BCM SoC provides i2c, SPI, and 1-Wire interfaces which I'm pretty sure have hardware interrupts and kernel drivers. (I'm not really sure because I usually just use the Python libraries and they seem to just work.)
Python is probably the easiest thing to use partly because most sensors have libraries already written. For embedded/custom GUI stuff check this out: https://kivy.org/ (someone also created a gauge widget for it).
There are some displays like this one that are pretty cheap: https://www.amazon.com/Raspberry-Display-Kuman-480x320-Interface/dp/B01CNJVG8K/ The only problem with that one is that I'm not sure how many GPIO pins it consumes, but since the Pi zero comes without pins soldered on you can get something like this: https://www.sparkfun.com/products/12693 and connect to the necessary pins on the other side of the board.
Connecting the phone seems more complicated if you ask me, but you'll probably want some sort of way to connect to it other than serial console.
(I think you're right that a hall sensor probably wouldn't work for detecting spark coil discharges. I'm not sure if there are any noise concerns with using an inductive coil. You might need an opto isolator.)
This project used the Kuman 3.5 LCD. It was pretty easy to install on the version of Raspian that I'm running.
The pi uses the microsd card as a hard drive, but to load operating systems onto the microsd you need a computer with a microsd slot. Since most computers don't have them built in, I suggested it. If you're already having him buy the microsd then he can get an adapter if he needs one for his computer.
For the touchscreen, I bought a couple off of eBay. I just searched 'raspi 3.5 tft' and chose a cheap one (around $15) that had a good seller rating. Im using one of the waveshare ones.
This is the one I have:
For Raspberry Pi 3 2 TFT LCD Display, Kuman 3.5 Inch 480x320 TFT Touch Screen Monitor for Raspberry Pi Model B B+ A+ A Module SPI Interface with Touch Pen SC06 https://www.amazon.com/dp/B01CNJVG8K/ref=cm_sw_r_cp_api_swKtybQ027XFP
https://www.amazon.com/dp/B01CNJVG8K/ref=cm_sw_r_cp_awdb_t1_LfWaBbWDKQS1P
Yeah, it's why I posted my unhappy review. Sorry. :7(
But I did eventually manage to make it work. Here, hang on a second... AH, OK. Here's my steps, in a copied-straight-from-the-Amazon-review stream-of-consciousness kind of flow:
A USEFUL AMAZON REVIEW:
Kumon 3.2":
Top customer reviews
Willie
Howto for the RPi3 and May 2016 Raspian release
May 15, 2016
Color: 3.5 inch screen|Verified Purchase
FURTHER UPDATE: this LCD display also works with the pi zero with no problem at all! (see pic)
UPDATE: this LCD display works just fine with the new Linux 4.4.9-v7+ kernel and May 10, 2016 Raspian release! here are the steps:
dwc_otg.lpm_enable=0 console=tty1 console=ttyAMA0,115200 root=/dev/mmcblk0p2 rootfstype=ext4 elevator=deadline rootwait fbcon=map:10 fbcon=font:ProFont6x11 logo.nologo
dtparam=audio=on
dtparam=spi=on
dtoverlay=ads7846,penirq=25,penirq_pull=2,xohms=150,swapxy=1,xmin=300,ymin=700,xmax=3800,ymax=3400,pmax=255
dtoverlay=waveshare35a
waveshare35a.dtbo
(note that the new kernel requires a '.dtbo' on overlays now!)
Section "Device"
Identifier "Allwinner A10/A13 FBDEV"
Driver "fbturbo"
Option "fbdev" "/dev/fb1"
Option "SwapbuffersWait" "true"
EndSection
Section "InputClass"
Identifier "calibration"
MatchProduct "ADS7846 Touchscreen"
Option "Calibration" "3932 300 294 3801"
Option "SwapAxes" "1"
EndSection
folks, there's no real magic here and no need to download a special 'image' of a Raspbian distro... i don't know why vendors make customers jump through insane hoops to get a product like this working... the screen is an XPT2046, aka 'ADS7846,' which is readily supported by the Linux kernel and Raspian releases
this display is a good deal and will provide a lot of fun - why vendors don't make things easier for their customers i'll never know... one of these days, Raspberry Pi users may benefit from vendors providing simple and easy instructions (Adafruit's waveshare approach is convoluted as well and didn't work for me)...
hope this helps someone
---
WAVSHARE:
Works well, no additional drivers needed with Jessie. Screen is clear.
Steps to enable:
Your screen will not be black. Next you need to get a terminal running on it.
This will map your terminal to the HDMI port and this screen.
restart.
you now have a working screen. see less
Customer Reviews
I like it except for...
By Mr.KnowItAll on May 9, 2017
-- FLASHING SCREEN SOLVED --
For what it's worth to anyone with a problematic Waveshare 7"-C HDMI 1024x600 LCD Rev 2.1, mine came in late last night and so, of course, I stayed up to configure and test it out. Life is never so simple. The editing of /boot/config went without a hitch and mine is set (having commented out any overscan and framebuffer entries that I use for other LCDs) with:
hdmi_group=2
hdmi_drive=1
hdmi_ignore_edid=0xa5000080
hdmi_mode=87
hdmi_cvt=1024 600 60 6 0 0 0
The screen booted up fine and displayed correctly, but the backlight kept cycling on and off. The cycles might change in duration and spacing depending on how I was fiddling with it and I soon discovered that if I held it with my finger in a certain place on the back that the screen would stay on indefinitely. Upon VERY close inspection with a loupe and strong light I realized that the 103 resister nearest the upper-right corner (when looking at the back of the LCD board) had a micro fracture in it. To be more clear, the resister that's at the far edge from the HDMI and USB connectors and at about the same level. It looks like a pull-down connected to the ground plane and was probably cracked as it was placed and soldered.
I couldn't quickly dredge up a 103 but I did find some 104's on a defunct CO2 detector/alarm, so I parallel soldered one of those to the 103. (If you can't solder micro parts then get some help.) Going on a day now and the screen has been working beautifully and consistently, and hopefully we will all live happily ever after.
The end
PS. I initially skyped Waveshare but they're on China time and I'm not, ... I honestly didn't have the time window to properly settle this problem with Waveshare or AMAZON and that's why I tried fixing it rather than return it. The display was obviously not QC'd before shipping, however I DO like it now that it's working despite my lost time and effort. In researching this problem I came across many other buyers on the RPi forums with the exact same symptoms so mine is not an isolated issue. I would have given it 5 stars if it had worked outright, and only 1 star if I hadn't fixed it, so be forewarned if you buy one. And Waveshare really needs to step up their QA game. There's no excuse for this.
Here's contact info if you need it:
(sales) [email protected]
(after-sales) [email protected]
(complaint) [email protected]
(apply for distributor) [email protected]
Skype: wvshare
Whatsapp: 86-18923750395
Tel: 86-755-82807524
Fax: 86-755-83042572
Address: Waveshare Electronics
Rm 813, Dynamic World Building, Zhenhua Rd, Futian District, Shenzhen, China see less
I have got this one for my graduation work. I work on it since one year. Never had any problems. Maybe its a bit expensive, but you have everything to start and a Case!
https://www.amazon.com/Vilros-Raspberry-Complete-Starter-Clear/dp/B01CUMNIV8/ref=sr_1_1?s=pc&amp;ie=UTF8&amp;qid=1484984202&amp;sr=1-1&amp;keywords=vilros+raspberry+pi+3
Vilros Raspberry Pi 3 Complete Starter Kit with Clear Case and 32GB SD Card https://www.amazon.com/dp/B01CUMNIV8/ref=cm_sw_r_cp_apa_0CD6xb9RDCS5Z
There was deal about a week ago to get $10 off of this kit.
I'm back guys how's this look for for 56 bucks? Do I have to add the heat sinks myself? https://www.amazon.com/gp/aw/d/B01CUMNIV8/ref=ox_sc_act_image_1?ie=UTF8&amp;psc=1&amp;smid=AHALS71WJO58T
I want to get a raspberry pi that I can use as a word processor while I'm laying in bed with my keyboard. So far I know I've got to get the pi 3 model b, the official 7 inch touch screen, and then this case.
Besides cables, a power supply, sd card, is there anything else I'll need to get?
Be careful - the Mega is not fully compatible with all shields made for the Uno. The SPI pins are not in the same place, which means that display shields don't always work as intended. The display that I have, for example, has a micro SD card slot on it but a pin mismatch means that the card slot doesn't work on the Mega. Everything else works, though.
You don't have to use shields/hats/whatever. You can just use sensors attached with wires - IMO it's actually easier this way. A normal Arduino resistive touchscreen only takes up like 6 pins, even though a hat could block all the pins on the Uno.
The only real problem is finding something to mount all the different parts to, but a piece of plastic and some double-sided foam tape is usually good enough. If you do it this way, the Pi is actually way easier to deal with, especially if you use something that can be attached using a ribbon cable.
Combine these items (below), for example, and you get a propped-up touchscreen display that still leaves the GPIO pins exposed on the back. There are like 17 pins available, not including I2C and SPI, which are what you'd use for your sensors.
Control of the pins on the Pi is pretty easy using wiringPi library; not a lot different from Arduino.
https://www.amazon.com/Case-Official-Raspberry-Touchscreen-Display/dp/B01HV97F64
https://www.amazon.com/Raspberry-Pi-7-Touchscreen-Display/dp/B0153R2A9I
It might be fun to have your Arduino attached to sensors and a radio transmitter that sends to a Pi, which has the touch screen and control software on it, and communicates with a different Arduino that controls valves/sunlight/whatever.
Looks promising, will try soon, do you know how I would fit it all in with this case? (https://www.amazon.com/dp/B01HV97F64/ref=cm_sw_r_cp_apa_jyJ6BbX8BJSFP) It is alot different and don't know if I can get to the GPIO pins with it.
Ah ok. The "magic mirror" thing was what got me. I might have to do this as well, though I have done mountable cases I got from a kickstarter. Idk if it's available over there. SmartiPi Touch case for The Official Raspberry Pi 7" Touchscreen Display - Adjustable Angle https://www.amazon.com/dp/B01HV97F64/ref=cm_sw_r_cp_api_i_MCf3Cb1HGK598
If you check they're website there you can find a 7" monitor I think it's a mini hdmi not sure though
you can buy this so it'll be like 7" thick tablet or something
I am using the Smartipi case which comes with the Y adapter. https://www.amazon.com/Case-Official-Raspberry-Touchscreen-Display/dp/B01HV97F64/ref=sr_1_1?ie=UTF8&amp;qid=1521139404&amp;sr=8-1&amp;keywords=smartipi
Boot up is 10 seconds max. Works great.
I have the official case from Raspberry Pi and its pretty good. It doesnt come with a way of mounting so I am currently working on mounting in my car but it won't benefit anyone else unless you have a 08' Hyundai Elantra...
There is the SmartPi Touch case that has two different kinds of mounting feet that might work for most people
Official: https://www.amazon.com/Raspberry-Pi-7-Inch-Touch-Screen/dp/B01GQFUWIC
SmartPi Touch: https://www.amazon.com/Case-Official-Raspberry-Touchscreen-Display/dp/B01HV97F64/ref=pd_lpo_vtph_147_tr_img_2?_encoding=UTF8&amp;psc=1&amp;refRID=VFWHH7QV2N9FSQ96NS6V
The screen draws its power from the Pi's 5v GPIO, so you should only have to plug the Pi into the battery. With this setup plus a USB/Bluetooth controller, you should have a fully-portable setup with no nasty wire mess!
Hope that helps!
I've really keep my self busy buying this sensor kit https://www.amazon.com/dp/B01MG49ZQ5?ref=yo_pop_ma_swf
Along with this basic starter set https://www.amazon.com/dp/B01N6BFGWA?ref=yo_pop_ma_swf
But it didn't include an arduino so I also bought one separately. However, you can easily buy a kit that includes one as they are a plenty, just make sure to get a very diverse one with resistors, wires, breadboard etc. That'll keep you busy for the next couple months going through all the different sensor functions.
this is the one i bought:
https://www.amazon.com/Elegoo-Upgraded-Modules-Tutorial-Arduino/dp/B01MG49ZQ5/ref=sr_1_3?ie=UTF8&amp;qid=1499097531&amp;sr=8-3&amp;keywords=elegoo+sensor+kit
also, let me know if yo uwant that. im selling an exact version of this on ebay for 38 with an arduino uno r3, case, breadboard, and cable all bundled together.
somehow i got 2 in the mail and decided to sell the second one. the only thing missing in my set is the LCD screen. it was borked but i cant return it because i didnt pay for it haha, they just sent me 2. i can give you a good deal if yo uwant to do it via /r/hardwareswap.
That should keep you entertained for quite a while.
As for suggestions.. I think it just depends on what direction you're wanting to go. If you want to go deeper on processing, I really have enjoyed ben eater's make a computer from scratch series (https://www.youtube.com/watch?v=HyznrdDSSGM), but it's about 100-200$ to get everything for that to get up to about video 24. I have enjoyed playing with the sensor kits (https://www.amazon.com/dp/B01MG49ZQ5/ref=twister_B07F65Y7PS?_encoding=UTF8&amp;th=1). I've enjoyed motors and automation.. We're currently building a copy of kosmo from look mum no computer (https://www.youtube.com/watch?v=U5qHMgZJ2w4).. This is surprisingly cheap.. A few sensors, a 10 pack of servos (https://www.amazon.com/gp/product/B00X7CJZWM/ref=ppx_yo_dt_b_asin_title_o03_s00?ie=UTF8&amp;psc=1) and a raspberry pi so it can be managed via wifi through python. It would work totally fine w/ arduino only, but they wanted to do a voice and it made more sense to use a google api on that so they didn't have to hand design audio circuitry..
Tools-wise. I'm loving the 100$ hakko soldering iron.. After almost 25 years with my weller wlc100, my life was turned upside down when I put a bit of cash into the hakko.. Soldering is actually enjoyable, now. Also, I treat prototype boards kind of like permanent project boards.. I rarely take them apart, so I tend to buy a 5 or 10 pack for super cheap on ebay.. Like 20$.
And don't feel bad on the hs comment.. Kids pick stuff up faster adults do and we all start at the same knowledge level on new things. I usually work w/ my students like a teammate and go in cold.. A lot of the time I'm right there with them unsure how to solve a problem.
Get the one that has the maximum number of sensors at the price you're still willing to pay. The one you've linked on Amazon has almost nothing, just a bunch of LED's and resistors (arranged so it looks like you're getting a lot when you're really not getting anything).
Or you could get that an a sensors pack like this.
I don't know where you live, but if you'll google around for kits, I'm sure you can find them cheaper than on Amazon. And of course there's always AliExpress if you're willing to wait a little.
I have no experience on any other board than the Raspberry Pi series, but these ones tend to come up in discussions about RasPi alternatives:
You got me interested. Here is what i was able to find.
Tinker Board by Asus offers 4k and available on Amazon for $59.
https://www.amazon.com/Tinker-board-RK3288-1-8GHz-Mali-T764/dp/B06VSBVQWS/ref=sr_1_1?ie=UTF8&amp;qid=1492744107&amp;sr=8-1&amp;keywords=tinker+board
For Computer Science I'd say math - hands down, without question.
But for IT, the answer is more complicated. There is no single academic subject that benefits the study of IT the most.
Some IT degrees might require calculus. I'm not sure why really, but mathematical logic does have benefits, I suppose.
But what you need to cultivate is a diagnostic or investigative mental approach to everything. Critical thinking is a difficult subject to teach. Debate Team might be a great environment to develop these skills. A Science Club, where you at least occasionally leverage the scientific process as part of a discussion could also be good. Electronics where you have to diagnose why something doesn't work could be equally good.
One of the reasons why so many IT professionals come across as grumpy and negative is we spend so much time searching for negatives. "How can this thing fail?" "If this thing breaks, what results or outcomes can we expect?"
We do that mental exercise over and over and over. And it bleeds out of our work-lives and into our social-lives sometimes.
More important that academics or formal extra-curriculars though: You need to start tinkering NOW.
Download a LiveCD or Bootable USB image of Ubuntu or Fedora or CentOS and start tinkering.
Buy a Raspberry Pi kit or one of those new Asus TinkerBoards and start poking at Linux and all the things it can do.
Explore the world of technology beyond Windows -- those efforts might pay off best of all.
A dedicated computer that you can experiment on, and not impact your ability to do homework might be the single best investment you can make in yourself at this phase of your life.
It doesn't have to be magnificent. It just has to be dedicated to experimentation.
Refurbished Lenovo ThinkPad T430 @ $185
I know, compared to a sexy MacBook Pro, Microsoft SurfaceBook or Samsung ChromeBook, that ThinkPad looks ugly and crude and clunky. But spare parts for ThinkPads are easy to find, and the support manual for how to take it apart is publicly available. And that hardware will run windows or Linux like a champ with no strange driver issues to deal with. There is great beauty in its simplicity.
Here you go!!
ASUS SBC Tinker board RK3288 SoC 1.8GHz Quad Core CPU, 600MHz Mali-T764 GPU, 2GB https://www.amazon.com/dp/B06VSBVQWS/ref=cm_sw_r_cp_api_Wey-yb8GR4N09
This is what I get for rock64
ESP32 I'm thinking?
https://www.amazon.com/HiLetgo-ESP-WROOM-32-Development-Microcontroller-Integrated/dp/B0718T232Z
Thank you and sorry for the late response.
Is this an example of what you mean?
https://www.amazon.com/HiLetgo-ESP-WROOM-32-Development-Microcontroller-Integrated/dp/B0718T232Z/ref=sr_1_6?keywords=esp32&amp;qid=1574788418&amp;sr=8-6
I read reviews that there are many issues getting it to work with the Arduino IDE (although I'd want to use Visual Studio or Visual Studio Code). Also, forgive me if this is a stupid question - I'm more of a server-side developer - but I would be able to program it with C++, right?
Thanks for your time.
Do you have a link? Lowest I found is this one for $11, which I may order one of just to confirm it will fit, but that’s still $4-$5 more than Ali.
Sorry I hadn’t provided that - here’s the amazon link, and yes, a different thread on reddit def led me to what’s probably the wrong hardware to buy for someone like me:
https://www.amazon.com/dp/B0748MPQT4/ref=cm_sw_r_cp_api_i_f1ohDbCB7CZN8
Mind you it’s $25 so not a big deal if I need to get something else. And thanks for the tip on Docker!
Yup. Do it.
You can find them cheaper all over, but here's a start:
https://www.amazon.com/dp/B0748MPQT4/ref=cm_sw_r_cp_apa_i_qnf6CbPH6Z764
Then follow their easy setup guide.
Join r/pihole
Enjoy. It's an amazing device and rather easy to use. Plus, you might learn a thing or two about Linux.
can i pm you? im new to this. I have both 2.4 and 5Ghz on my router. I need a fit case ,low consumption only used for blocking ads and nothing else. I plan to connect via ethernet.
I found zero w in amazon https://www.amazon.com/Vilros-Raspberry-Starter-Power-Premium/dp/B0748MPQT4/ref=sr_1_3?keywords=Pi+Zero+W&qid=1574873913&sr=8-3 is thisok ?
There are cases that combine the pi zero with the camera integrated into the lid. I've had success using Motion to run the camera, live streaming (viewing over VPN remotely) and auto loading into Google Drive and Photos (inotify, rsync) with email notifications. If you added a small battery from Adafruit and the UPS linked below, you could have a small package for some pretty good video.
You can assemble the hardware, and spray with electronics waterproofing to allow for rugged use. Probably best to silicone in micro USB power and USB cables to the pi first, then cap the ends when disconnected.
I havent used the UPS with the listed case, but some mods may work. The issue will be the cost, all said and done it will cost about 65 for a complete kit, and if you aren't familiar with the software process it will take the average non-initiated about 2 weeks of determined self teaching to make it all work
Raspberry Pi Zero: $14:
https://www.adafruit.com/product/3708
Zero2Go: $20 https://www.adafruit.com/product/4114
Battery: $15:
https://www.adafruit.com/product/328
Kit with preferred case: $26:
https://www.amazon.com/Vilros-Raspberry-Starter-Power-Premium/dp/B0748MPQT4/ref=mp_s_a_1_3?keywords=raspberry+pi+0+case&amp;qid=1554653377&amp;s=gateway&amp;sr=8-3
Camera: $13:
https://www.amazon.com/Raspberry-Camera-Module-Webcam-Support/dp/B0748FZXW3/ref=mp_s_a_1_3?crid=115XCG0UJFB2O&amp;keywords=raspberry+pi+0+camera&amp;qid=1554653486&amp;s=gateway&amp;sprefix=raspberry+pi+0+&amp;sr=8-3
Water Proof Spray: $14:
https://www.amazon.com/CRC-Urethane-Viscous-Coating-Temperature/dp/B000IC7ZQ2/ref=mp_s_a_1_2?crid=BJN7ZAM77XCW&amp;keywords=electronics+waterproofing+spray&amp;qid=1554653537&amp;s=gateway&amp;sprefix=electronics+water&amp;sr=8-2
Pi and a 3.5 inch screen for the chat https://www.amazon.com/dp/B076M399XX/ref=cm_sw_r_cp_apa_TmphAbF5M8J0F
This one from uctronics: https://www.amazon.com/dp/B076M399XX/ref=cm_sw_r_cp_awdb_t1_MMyDDb9Q129GZ
https://www.amazon.com/gp/product/B076M399XX
amzn.com/B0045IIZKU
amzn.com/B076M399XX
I did this exact mod. I just used plain black electrical tape. Glad I did too as I had to open and recheck everything a few times after doing this mod and running into a few issues. The big one was the lighting bolt error caused by the cheap power wire. (The wires you cut to install the Pololu board between the rear USB micro port and the power button board.) You might consider replacing that whole section of +/- wires while you are in there.
I don't know how good it is, but there's also a brand new Nespi Case+ that is supposed to integrate safe shutdown with a script. I don't know if it's any better but here's a link. Hopefully we get some reviews soon. https://www.amazon.com/gp/aw/d/B07BRHDVTN
Still need hat, I missed that. Would need to buy one:
You can use either official hat, which is ugly, and has fan which I do not like:
https://www.raspberrypi.org/products/poe-hat/
Or this hat:
https://www.amazon.com/NavoLabs-Raspberry-Pi-POE-Hat/dp/B07CLCFLH8
Or even this:
https://www.adafruit.com/product/3847
Update:
After thinking about this, I think I will just go with POE USB splitter, and forget about POE capability of Raspberry:
https://www.amazon.com/UCTRONICS-802-3af-Splitter-Ethernet-Raspberry/dp/B01MDLUSE7
why is that cheaper than this...which should be built in INMHO
https://www.amazon.com/NavoLabs-Raspberry-Pi-POE-Hat/dp/B07CLCFLH8
I'm running 7 Pi's for various functions from an Ubiquiti Unifi US-16-150W switch, and they are working perfectly. At first I was using Pi Supply POE hats but for the last few I've started using the Navolabs POE hat. Both have worked well, however the Navolabs hat is a much nicer physical footprint. It's hard to get however because when they are in stock they seem to go fast, and then take some time to replenish, at least on Amazon.
Yep that is totally a big piece of shit. With that gift card get yerself one of these. It'll play all games 1080p 60fps easily.